
Using iSpace to Store And Share Files
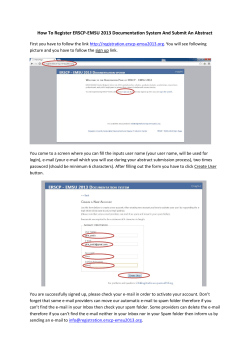
Using iSpace to Store And Share Files
What is iSpace
iSpace is a collaborative resource for file storage and sharing for students, faculty, and
staff at The University of Texas Medical Branch at Galveston (UTMB). You can use
iSpace to store copies of important documents such as notes, assignments, research
papers, e-learning materials, graphics, joint projects, etc. and have these files available
anywhere you have an Internet connection and a Web browser. This resource is offered
to help students, faculty, and staff conduct University-related business.
USING ISPACE TO STORE AND SHARE FILES
1
Using iSpace to Store And Share Files
Accessing iSpace
The first time you access iSpace, you must do so from a web browser connected to the
internet.
Visit http://ispace.utmb.edu
Or, you can get there from the iUTMB website
USING ISPACE TO STORE AND SHARE FILES
2
Using iSpace to Store And Share Files
Log in to iSpace
Log in to iSpace with your UTMB username and password. This is the same log in
information you use to access webmail, Blackboard, and other official UTMB resources.
Navigating iSpace
The first time you log in to iSpace, your user folder will be empty. You will use the
navigation icons on the iSpace website to upload, organize, share, and delete files and
folders as you need them.
1.
2.
3.
4.
You can select a file or folder by clicking in the checkbox to the left of the item to select.
You can copy the selected file or folder.
You can move the selected file or folder into another file or folder in your iSpace.
You can delete the selected file or folder.
USING ISPACE TO STORE AND SHARE FILES
3
Using iSpace to Store And Share Files
5. You can rename the selected file or folder.
6. You can upload a new file.
7. You can create a new folder.
USING ISPACE TO STORE AND SHARE FILES
4
Using iSpace to Store And Share Files
Uploading a File
1. To upload a file into your workspace, click the Upload button.
2. If your computer allows, you can use the drag-and-drop feature to drag the files onto your
iSpace.
3. Or, you can click the Browse button to upload single files onto your iSpace.
4. Click Submit to upload the files.
USING ISPACE TO STORE AND SHARE FILES
5
Using iSpace to Store And Share Files
Sharing a File
You can share a file or folder with other students, faculty, or staff.
1. Right-click on the file or folder you wish to share.
2. Choose Share from the drop-down menu.
3. In the Choose Users box, type the UTMB email address of the user you wish to share
the file or folder with.
4. As you start to type their username, the name will auto-populate. Select the user from
the drop-down list.
5. Click the Next button.
USING ISPACE TO STORE AND SHARE FILES
6
Using iSpace to Store And Share Files
Granting Permissions
You will need to select what permissions the user you wish to share your file or folder
with should have.
USING ISPACE TO STORE AND SHARE FILES
7
Using iSpace to Store And Share Files
1. Viewer means they can only read the file - they cannot make changes to it or delete it.
2. Contributor means they can read the file, write to the file, or delete the file if they choose
to do so.
3. Full Access means they can read, write to, delete, and share the file with other users.
4. Once you have selected the level of permissions the user should have to your file, click
the Next button.
5. Review and edit the email that will be sent to the user with the link to the file and a note
telling the user they have had the file or folder shared with them.
6. Click Finish when you are done.
USING ISPACE TO STORE AND SHARE FILES
8
Using iSpace to Store And Share Files
Revoking Permissions
You can revoke any permissions you have given a user to a file if you no longer wish
them to have access to the file.
1.
2.
3.
4.
Right click on the file or folder you wish to revoke permissions to.
Choose Manage from the drop down menu.
Choose Permissions from the next drop-down menu.
You can completely revoke permissions by checkmarking the box to the left of the user's
name.
5. Then clicking the Remove Access button.
6. Click OK in the pop-up box to confirm revoking permissions.
USING ISPACE TO STORE AND SHARE FILES
9
Using iSpace to Store And Share Files
USING ISPACE TO STORE AND SHARE FILES
10


© Copyright 2026