
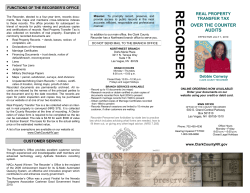
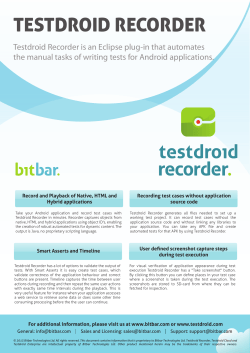
Recorder Database Management Guide Smarter Surveillance for a Safer World On-Net Surveillance Systems, Inc. One Blue Hill Plaza, 7th Floor, PO Box 1555 Pearl River, NY 10965 Phone: (845) 732-7900 | Fax: (845) 732-7999 Web: www.onssi.com Revision: 00003302015-1515-5.0.0.28 Legal Notice This product manual is intended for general information purposes only, and due care has been taken in its preparation. Any risk arising from the use of this information rests with the recipient, and nothing herein should be construed as constituting any kind of warranty. © 2002-2015 On-Net Surveillance Systems, Inc. All rights reserved. OnSSI and the ‘Eye’ logo are registered trademarks of On-Net Surveillance Systems, Inc. Ocularis, Ocularis Client, Ocularis Client Lite, Ocularis Video Synopsis, NetEVS, NetDVMS, NetDVR, ProSight, NetGuard, NetGuard-EVS, NetSwitcher, NetMatrix, NetCentral, NetTransact, NetPDA and NetCell are trademarks of On-Net Surveillance Systems, Inc. All other trademarks are property of their respective owners. On-Net Surveillance Systems, Inc. reserves the right to change product specifications without prior notice. US patent # 8,390.684 B2 for Ocularis Client Additional Patents Applied For in the U.S. and Abroad On-Net Surveillance Systems, Inc. 2 Ocularis Recorder Database Management Guide Contents Table of Contents INTRODUCTION........................................................................................................................................... 4 OVERVIEW ....................................................................................................................................................................4 TARGET AUDIENCE ........................................................................................................................................................4 CONFIGURATION DATABASE MANAGEMENT ....................................................................................... 5 BACKUP OF THE CONFIGURATION DATABASE.................................................................................... 5 Manual Backup ....................................................................................................................................... 6 RESTORE THE CONFIGURATION DATABASE ........................................................................................ 8 CONFIGURATION DATABASE STORAGE SPACE .................................................................................. 9 CONFIGURATION DATABASE CACHE..................................................................................................... 9 MULTIMEDIA DATABASE......................................................................................................................... 11 ABOUT ZONES .............................................................................................................................................................11 On-Net Surveillance Systems, Inc. 3 Ocularis Recorder Database Management Guide Introduction Introduction Overview The configuration settings used in the recorder for Ocularis Ultimate, Ocularis Enterprise or Ocularis Professional can and should be backed up regularly. Similarly, the location(s) for storing the video data may be modified This document identifies the process of how to manage the recorder databases. Target Audience The target audience for this document is surveillance system administrators and/or database administrators who are responsible for data integrity and system maintenance. On-Net Surveillance Systems, Inc. 4 Configuration Database Management Ocularis Recorder Database Management Guide Configuration Database Management All of the configuration for an Ultimate, Enterprise and Professional recorder is maintained in a configuration database (also known as the ‘Management Database’ or ‘MaxDB’). This database also stores alarm data for events that takes place through the recorder. Backup of the Configuration Database By default, the recorder included in Ocularis Ultimate, Ocularis Enterprise or Ocularis Professional is automatically set to back up its own configuration data. The backup default settings include: Use of automated backup Backup is performed daily The time for the backup is 1:01 a.m. (local time on the Master Core) The storage location for the backup file is: Old backups are automatically deleted …\Program Files\Ocularis Recorder\sapdb\backup You may modify these settings from the Master Core computer by using the Ocularis Recorder Manager. To View or Modify the Backup Settings 1. Open the Ocularis Recorder Manager application. 2. In the Control Bar summary section, select System (1). 3. In the Control Bar detail section, select Backup (2). Figure 1 System Configuration: Backup Detail On-Net Surveillance Systems, Inc. 5 Ocularis Recorder Database Management Guide Configuration Database Management 4. In the detail section of the backup screen (3), the checked box Use automatic backup will perform backups automatically based on the settings below this box. Uncheck if you want to disable the automatic backup (not recommended). 5. The Time drop-down list allows you to set the occurance of when to do the back up. Daily is the default but you can select a specific day of the week for the backup. 6. The Start time of the backup is defaulted to 1:01 a.m. If you wish, you may change this time. 7. Storage path on master server allows you to change the directory where the backup is saved. If the Ocularis Recorder Manager that you are using is installed on the Master Core server, you may click the Select button to modify this path. Otherwise, you will need to enter the path manually. 8. The Delete old data checkbox instructs the systme to delete existing backups before the data is backed up. This setting applies only to automated backups. There can be up to eight backup files. Note: The backup folder should be backed up to a tape drive or other backup medium at regular intervals to ensure that the data backups are still available in the event of a hard drive crash. 9. If you want to initiate a manual backup, click the OK button next to Perform backup. This will create a zip file in the designated location using the format: SeeTec_M_20yymmdd.hhmm.zip Where: - M stands for manual; A appears for automated backups - yy is the year - mm is the month - dd is the day of the month - hh is the hour - mm is the minute of the hour 10. Click Apply to save the settings and keep the System configuration: Backup screen displayed. 11. Click Save to save the settings and close the window. Manual Backup There are two ways to perform a manual backup. One is through the Ocularis Recorder Manager and the other is through the Ocularis Recorder Administration Tool. To Perform a Manual Backup with the Ocularis Recorder Manager 1. Open the Ocularis Recorder Manager application. 2. In the Control Bar summary section (see Figure 1), select System (1). 3. In the Control Bar detail section, select Backup (2). 4. To initiate a manual backup, click the OK button next to Perform backup. This will create a zip file in the designated location using the format: SeeTec_M_20yymmdd.hhmm.zip Where: On-Net Surveillance Systems, Inc. 6 Ocularis Recorder Database Management Guide Configuration Database Management - M stands for manual; A appears for automated backups - yy is the year - mm is the month - dd is the day of the month - hh is the hour - mm is the minute of the hour 5. Click Apply to save the settings and keep the System configuration: Backup screen displayed. 6. Click Save to save the settings and close the window. To Perform a Manual Backup with the Ocularis Recorder Administration Tool 1. On the Master Core computer, open the tool from the Windows Start menu: StartAll ProgramsOnSSIOcularis RecorderOcularis Recorder Administration Tool Figure 2 Ocularis Recorder Administration Tool-Database Configuration 2. Select the second item in the left panel: Management Database (MaxDB) (1) 3. Click the Backup button (2) to initiate a manual backup. 4. The first time you execute a backup from this screen you will be prompted for a user name and password. This is the administrator account on the Master Core. Enter the credentials and click OK. 5. An information message appears reminding you that the backup may take several minutes. Do not interrupt this process. Click OK. The backup file is saved to: On-Net Surveillance Systems, Inc. …\Program Files\Ocularis Recorder\sapdb\backup 7 Ocularis Recorder Database Management Guide Configuration Database Management Note: Even if the destination folder path for the backup was modified in the Ocularis Recorder Manager, the Ocularis Recorder Administration Tool will save the backup to the default directory: …\Program Files\Ocularis Recorder\sapdb\backup. Restore the Configuration Database In any event that may require you to restore a previously made backup, you must do so using the Ocularis Recorder Administration Tool. 1. On the Master Core computer, open the tool from the Windows Start menu: StartAll ProgramsOnSSIOcularis RecorderOcularis Recorder Administration Tool (See Figure 2) 2. Select the second item in the left panel: Management Database (MaxDB) (1) 3. Click the Restore button to initiate a manual restore. 4. Select the backup you wish to restore from the Windows Open dialog and click Open. 5. An information message appears reminding you that the restoration may take several minutes. Do not interrupt this process. Click OK. On-Net Surveillance Systems, Inc. 8 Ocularis Recorder Database Management Guide Configuration Database Management Configuration Database Storage Space If more storage space is needed for the recorder configuration database because, for example, the event data is to remain available for an extended period, an additional volume can be added to the configuration database. The default size for the database is 4 GB. A maximum of four volumes can be added to the configuration database. Note: This extension has no impact on the actual multimedia database. To Increase the Size of the Configuration Database 1. On the Master Core computer, open the tool from the Windows Start menu: StartAll ProgramsOnSSIOcularis RecorderOcularis Recorder Administration Tool (See Figure 2) 2. Select the second item in the left panel: Management Database (MaxDB) (1) 3. In the section Increase storage space (add volume) (3), enter the Size (in MB) of the additional storage space for the expansion of the configuration database. The minimum amount is 512 MB and maximum amount 4000 MB. 4. Click Add new volume. The additional storage space is available immediately under DISK0000X in the database installation folder. 5. for an estimate of how long (in days) the space in the configuration database Click the Refresh button will last at the current alarm/event rate. A reliable estimate can only be made if the system is running under normal load with reference to the alarm occurrence. Configuration Database Cache If a large number of events occur on the recorder with resulting high loading times, the configuration database cache size can be increased. However, this value should be selected carefully. Enlarging the cache is not useful if the computer does not actually have enough available free RAM. The current cache size of the RAM reserved for the configuration database is displayed. The actual size of the configuration database is shown under Current capacity utilization of the management database. Note: The cache size of the configuration database is an extremely system critical parameter that should not be changed unless there are good reasons to do so. The throughput is optimal if the complete database is kept in the cache. On-Net Surveillance Systems, Inc. 9 Ocularis Recorder Database Management Guide Configuration Database Management To Modify the Configuration Database Cache Size 1. On the Master Core computer, open the tool from the Windows Start menu: StartAll ProgramsOnSSIOcularis RecorderOcularis Recorder Administration Tool (See Figure 2) 2. Select the second item in the left panel: Management Database (MaxDB) (1) 3. In the section Cache (4), enter a value in MB for the desired size in the Size [MB] field. 4. Click Adjust cache size. On-Net Surveillance Systems, Inc. 10 Ocularis Recorder Database Management Guide Multimedia Database Management Multimedia database The multimedia database is where video is stored The multimedia database tab is used for maintenance and editing of zones of the multimedia database. The zones are paths in which the multimedia database stores its image data. Both local drives and network drives can be addressed. The specified zone size is not reserved immediately but only used as required. About zones Zones specify the maximum storage depth of the multimedia database and thus of the software. By default, the software does not set any limits on the zone of the multimedia database. The default zone is placed in the following folder in a new installation: c:\VideoDatabase. However, we recommend replacing it with a zone on a dedicated partition. If the volume of the existing zone is not sufficient, another zone can be added. A maximum of ten zones should be created. A larger number has a negative effect on the performance of the multimedia database. It is also better to have a few large zones than a larger number of small zones. If more storage space than is available on the zones or on the hard disk is assigned to the connected cameras, the database stops recording. Note: We strongly recommend against setting a hard disk that is connected by USB or FireWire as a multimedia database zone, because this will have a very negative effect on the performance. The multimedia database should be placed on another hard disk or a RAID system to ensure satisfactory performance. To Add a Zone (Local) 1. Create a folder on a dedicated partition as a zone to store image data. The cluster size should be 64 KB. 2. On the Master Core computer, open the tool from the Windows Start menu: StartAll ProgramsOnSSIOcularis RecorderOcularis Recorder Administration Tool On-Net Surveillance Systems, Inc. 11 Ocularis Recorder Database Management Guide Multimedia Database Management Figure 3 Ocularis Recorder Administration Tool - Configuring the Multimedia Database 3. Select the third item in the left panel: Multimedia Database (1) 4. In the Zones section (2), click Add Zone. 5. Enter the Path and the Maximum size (in GB). You can use the Browse button to select the path. 6. Click the Unlimited checkbox to use all the physical space in the partition. Note: We recommend using no more than 90% of the physical space on a partition. Any more will adversely affect the performance of the operating system. 7. Click OK. To Add a Zone (Network) 1. Create a folder on a server in the network to store image data. 2. On the Master Core computer, open the tool from the Windows Start menu: StartAll ProgramsOnSSIOcularis RecorderOcularis Recorder Administration Tool (See Figure 3) 3. Select the third item in the left panel: Multimedia Database (1) 4. In the Zones section (2), click Add Zone. 5. Enter the UNC Path and the Maximum size (in GB). On-Net Surveillance Systems, Inc. 12 Ocularis Recorder Database Management Guide For example: 6. Multimedia Database Management \\192.168.2.20\Path\To\Accept Click the Unlimited checkbox to use all the physical space in the partition. Note: We recommend using no more than 90% of the physical space on a partition. Any more will adversely affect the performance of the operating system. 7. Enter the user name and password. The user must also be available locally on the computer and the domain is also required. For example: 8. DOMAIN\firstname.lastname Click Test to check the availability and authorization on the network drive. To Edit a Zone 1. On the Master Core computer, open the tool from the Windows Start menu: StartAll ProgramsOnSSIOcularis RecorderOcularis Recorder Administration Tool (See Figure 3) 2. Select the third item in the left panel: Multimedia Database (1) 3. Select the desired multimedia database in the zones field. 4. Click Edit zone to change the path and/or size. Note: We recommend using no more than 90% of the physical space on a partition. Any more will adversely affect the performance of the operating system. 5. Click OK to confirm. To Remove a Zone 1. On the Master Core computer, open the tool from the Windows Start menu: StartAll ProgramsOnSSIOcularis RecorderOcularis Recorder Administration Tool (See Figure 3) 2. Select the third item in the left panel: Multimedia Database (1) 3. Select the desired multimedia database in the zones field. 4. Click Remove zone. The image data in the deleted zone is no longer available, but is not automatically deleted. On-Net Surveillance Systems, Inc. 13


© Copyright 2026