
Microsoft Publisher 2010 Chapter 12 Page 1
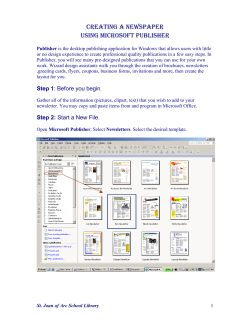
Chapter 12
Microsoft Publisher 2010
Page 1
Microsoft Publisher 2010
This tutorial and reference explains the basic features of MS Publisher which is a Microsoft Windows based
program. It is assumed that the user is familiar with the Windows environment and with the use of a mouse.
This tutorial is designed for MS Publisher 2010, but many of the features and keystrokes are used in other versions
of MS Publisher and you should be able to accommodate to the changes. Many of these features and keystrokes are
used in the current versions of the Microsoft Office Suite (Word, PowerPoint, Excel) so you should find there is an
easy transfer of learning between these applications. If you have any questions, email Derek Floyd at
[email protected]
Concepts
It is most important to understand the difference between a desk top publishing application (DTP) like MS Publisher
and a standard word processor.
Desk top publishing (DTP) programs are similar to word processing programs since you can enter and edit text and
images, as well as format text and spell check.
However, when you use a word processor, you enter text from the top of the first page and the text flows to
subsequent pages. If you insert text or an image on page one, the remainder of the text is pushed down the page or
may be pushed to the following page. Word Processing programs are best suited for essay and report documents.
With a desk top publishing program (DTP), text is entered into a Aframe@ and each frame can be moved anywhere
on the page, can be re-sized or placed on top of other frames. You create one page at a time and generally, there is
no flow of text between pages (although it can be done). Desk Top Publishing software is therefore ideal for
brochures, calendars, newsletters, posters, certificates, etc. and has excellent templates and wizards to create these.
When you create a text frame, you will see a faint outline. This is a guide and will not appear on a printed
document.
Each frame has a Acontext sensitive@ formatting bar. If you create or click on a text frame, you will see a formatting
toolbar with options to change the font or font size, or add bold, underline, shading, etc. A picture frame will
provide options to rotate, flip or add a border to your image. These may appear under the Standard toolbar or may
appear as a floating toolbar.
There are times when the formatting bar is not visible. This may be because you have not selected a frame in which
to work. Click on a frame and the appropriate property bar will be selected. Occasionally you will have to display a
toolbar using View < Toolbar and placing a checkmark beside the toolbar you need.
Starting MS PUBLISHER.
Locate the MS Publisher icon and double click on it or select
it from the Start < Programs < Microsoft Publisher option.
The following screen will appear.
There is a task pane (left panel) where you can:
Open a Publication
Start a “New” publication
Choose from the Templates
(Templates include newsletters, calendars, certificates,
brochures, greeting cards, etc.)
Chapter 12
Microsoft Publisher 2010
Page 2
Choose a Template provides the option of using pre-designed Wizards and Templates. We will use these wizards
and templates later.
It is important however, that you become familiar with the
basic concepts of MS Publisher before using these.
Click on Blank 8.5 x 11 in the left panel. The options will
disappear and you are presented with the worksheet. The main
outline is your 8.5 in x 11 in page.
The purple/blue dotted rectangle is a guide for your text and
border (0.5 inch margins) and will not be printed. The space at
the side is a work area and a temporary storage area.
You will see the Microsoft ribbon with tabs to display the
various features and tools of Publisher.
If you start to type, you will see a text box appear which is the
same size of the current page. However, we usually create the
text boxes as described below.
Text
To enter text, you create a text frame. Click on Home tab and select the Draw
Text Box tool from the Objects group (box with a letter A), move the pointer
to the top left corner of the page, press and hold down the left mouse button and
drag out a small (less than half the width of the page) rectangle. Let go of the mouse
button and a rectangle appears on the screen with a flashing cursor at the top and eight
"handles" (small circles) around it. This is called a text frame. Notice the formatting
toolbar appears giving you access to the bold button, alignment buttons, etc.
It is probably difficult to see the cursor and the prompt to enter text so press the F9
ZOOM key and you will then be able to see the letters. Type some information about
yourself, e.g. My name is John and I live in London.
Zoom F9
Press F9 Zoom to return to the full page. F9 toggles
between the Zoom view and the full page view. You can
also zoom in increments by using the zoom tools (View
< Zoom)
Click outside the text frame and the handles will
disappear. A grey outline surrounds the text box. This is
the text frame border. However, since it has no handles, you cannot edit the frame (and your property toolbar has
disappeared). You have now made a text frame, used the zoom feature and entered text. If you wish to edit the text
in the box, click inside the text box to display the handles, and edit the text.
Changing Effects
You can easily change the appearance of your text and MS Publisher has many ways to do this. These include the
use of the icons on the toolbar, pull down menus or keyboard combinations. The text formatting toolbar is accessed
from the Home tab and is shown below. It is assumed you are familiar with the basic buttons.
Chapter 12
Microsoft Publisher 2010
Page 3
You will find a summary of these basic formatting commands below.
Create a text frame, zoom in (F9), and type your name using the default font and default size. Press Enter twice to
go to a new line and also skip a line.
Click on the B for Bold on the toolbar. Type your name. To remove the bold for future typing, click on the letter B
to turn it Aoff@. Press the enter key twice. Your name should be in Bold letters.
Repeat using the I for Italic and the U for Underline, making sure you turn off the effect when complete. Your
name should be Italicized and Underlined.
You can also use the following keystrokes - Ctrl < B (bold), Ctrl < I (Italic), or Ctrl < U (underline) to turn the
effects off and on.
Changing Fonts and Font Size
Click on the arrow beside the selected font on the toolbar. Several new fonts appear. Scroll to select Arial or
another of your choice. The new font is selected. Type your name using the new font and press the enter key twice.
Click on font size drop down arrow on the toolbar and choose size 16. Type your name. Press the enter key twice.
Change the font size back to 10.
Changing Alignment
The default alignment is Left alignment. Press the enter key for a new line. Click on the Centre Alignment button.
The cursor moves to the centre of the line (within the text box). Type your name. Press the enter key. The cursor
remains in the centre of the line. To remove the centre function, click on another alignment.
Click on the right Alignment button. The cursor moves to the right of the line. Type your name. Press the enter
key twice. To remove the right alignment, click on another alignment.
To see the Justify alignment, you need a paragraph of text. When you justify text, both the left and the right side of
the text are aligned. For this document, the text is left aligned. However, I have justified this paragraph and you
will notice that the text on the right side (as well as the left) of the page is perfectly straight.
Your text should now be similar to the text shown below.
John Smith
John Smith
John Smith
John Smith
John Smith
(size 10 Times New Roman)
(bold)
(italic)
(underline)
(Arial font)
John Smith
(size 16)
John Smith (centred)
John Smith
Changing Typed Text
You can also change the appearance of text after you have typed it. Go to Full Page view (F9) or select Page from
the menu bar and select Full Page from the menu. Make another text box. Press F9 to ensure you are in the zoom
mode to make it easier to view.
Type your name six times, each on a different line, leaving a blank line between each one.
Chapter 12
Microsoft Publisher 2010
Page 4
Selecting (Highlighting) Text
Move the mouse cursor to the first letter of your name. Click the left button and drag the cursor to the last letter of
your name to highlight your name. To remove the highlight, click outside the highlighted text.
You can also use the Aclick@ method to highlight text.
Single click
Double click
Three clicks
- insertion point is placed in the word
- word is selected
- sentence or paragraph is selected
Changing Size
Select your name. Click on Size, select 20 and your name appears larger. Click outside your name to remove the
highlighting.
Changing Text
Select your name on the next line. Click on the Bold button. Click outside your name to remove the highlighting
and the text is bold. Repeat on the next two lines, making you name Italicized and Underlined
Changing Alignment
Select your name on the next line or place the cursor on the line. Click on the Centre alignment button. The text is
centered. Click outside your name if you need to remove the highlighting. Click on the Right Align button and the
text is aligned on the right of the page.
Changing Font
Select your name on the next line. Change the font by selecting a font from the toolbar and scrolling until you find
the font you want. Select a new font and the font changes. Select your name and change the font size.
You should now be familiar with the basic effects and alignment options.
Moving Text Frames (and Images)
Click on a text frame to show the "handles". Move the cursor over part of the frame between two handles
until you see a "moving truck with a four arrows". Hold down the left button and then move the mouse and
the text frame to another location. Practise with other text frames.
Changing the Size of Text Frames
Click on the text frame. Move the cursor over a handle and one of the re-size pointers
appears (two headed arrow). Click and hold the left mouse button, drag the mouse and
the size of the frame will change. Try other handles, including a corner one.
Removing a Text Frame (box)
Click on the text frame that you want to remove to display the handles. Hold down the Ctrl key and press letter X
(Ctrl < X) and the picture disappears.
Undeleting a Text or Image Box
You may accidentally delete text or a picture. If you do, immediately select Edit < Undo Cut or Undo Delete
Object(s) from the top menu or click on the Undo button on the toolbar. MS Publisher 2010 gives you multiple
AUndos@ so you can go back several steps.
Chapter 12
Microsoft Publisher 2010
Page 5
Text Symbols
Occasionally you will notice symbols appear at the top or bottom of the text box when it is selected. These will vary
according to the task you are performing. The first one you may have observed already. More detailed explanations
of the other two will be given later.
This symbol appears in the bottom right side of the text frame and indicates that there is too much text to fit in
the frame. The text is still available as part of your document but it is not visible. You can enlarge the text frame to
see the text or you can connect it to another text frame and flow the text into the new frame.
Images (Clip Art - Photographs)
Inserting Clip Art
To insert an image, select Insert < Illustrations < Clip Art and the Insert
Clip Art task pane will appear.
In the search field, enter: car (or the word for which you want to search)
A selection of car images appear similar to the selection on the far right. Move
your mouse over (mouse over) the green car (or any other) and a gray bar
appears on the right. Click on the bar and a menu appears. Select Insert and
the image is inserted onto your page and will appear in its default size with
eight small circles or handles.
You can also right mouse click on the image in the Insert Clip Art task pane
and select Insert from the menu, drag the image onto your page or double click
on the clip art image and it will be inserted.
The first time the clip art gallery is accessed on the computer, there may be an
install procedure. This may take a few minutes. You may also find this gallery
is not installed on some networked computers.
Click on a blank part of the screen to remove the handles and de-select the image.
Repeat the procedure to import another picture. If you do not de-select the image by removing the handles, the new
image will replace the previously selected image.
Inserting images from folders
Select Insert <Picture < From File and the Insert Pictures dialogue box appears (The default folder will probably
be My Pictures). You can navigate to one of your folders and select an image.
Moving Images (and Text)
This is similar to moving a text frame. Click on a picture frame to display the "handles". Move the cursor over the
picture until you see the move symbol (a four pointed cross). You may have to place the pointer on the frame
between two handles. Hold down the left button and then move the mouse and the picture to another location.
Practice with other pictures.
Changing the Size of Images
This is similar to changing the size of a text frame. Click on the picture. Move the cursor over a corner handle and
the re-size cursor appears (two headed arrow). Click and hold the left mouse button, drag the mouse and the size
will change. Always select a corner handle.
If you used the Insert < Picture < From File option and select a corner handle, you will notice the ratio of height
to width is maintained when you move the handle. You are maintaining the aspect ratio of the width to the height.
If you use a centre handle, you can distort the image.
Chapter 12
Microsoft Publisher 2010
Page 6
Removing an Image
Click on the picture that you want to remove so the handles are displayed. Press the Delete key and the picture
disappears.
File Handling
Saving Documents
To save your document, select File < Save As. The Save As dialogue box will appear.
The program will probably default to the My Documents folder. Select the folder in which you wish to save the
document, enter the name of your project, e.g. mynames or test and press Save. You do not need to put an
extension on the filename, the program will put a .pub extension on the file.
Note:
When you select Save or Save As, the program may select a default filename with a .pub extension.
Printing Documents
To print your document, select File < Print menu,
and the following dialogue box appears.
Change any parameters and then click on the
Print button.
Closing a Document
When you have saved a publication, you can
continue to work on it or you can close it and
return to the initial screen to start a new
publication. To close a publication, select File <
Close. If the publication has not been saved, you
will see the prompt Do you want to save the
changes you made to this publication? This is
to prevent you accidentally closing a publication
and losing all your work. If it is a practice
exercise, select No and a blank Publisher screen appears. If you need to save your work, select Yes and the Save
As dialogue box appears.
New Document
To start a new document, select File < New and the New Publication pane will appear as described previously. You
can also click on the New Document button on the toolbar (usually the first button on the toolbar which appears as a
white sheet of paper with a fold) and a blank page appears with no panes.
Exit Publisher
To exit Publisher, select File < Exit.
Portrait/Landscape Mode
The Publisher default page is portrait mode which is 8.5 inches wide by 11 inches long. This is called Portrait
mode.
To change the orientation of the paper, select Page Design < Page Setup < Orientation and select the Landscape
or Portrait option
You can also select the publication type, e.g. Full Page, Business Card, Booklet, etc. on the Page Setup screen.
Chapter 12
Microsoft Publisher 2010
Page 7
Copying Text and Images
You can copy text using the standard Windows methods. Highlight the text, click on the
Copy button on the Home < Clipboard tab and the text is copied to the clipboard. Place
the cursor in the desired location and select the Paste. Button on the Home < Clipboard
tab. You can cut text in a similar way using the Cut button.
To copy images or clip art, select the image and again, click on the Copy button on the
Home < Clipboard tab. The image is copied to the clipboard and can be pasted into the
document as required. If you paste the image several times, you may find each image is
superimposed on the previous one. These can easily be moved to the required position.
You can also use the cut, copy and paste keystroke commands - Ctrl <X (Cut), Ctrl < C (Copy), or Ctrl < V (Paste).
Borders, Shading, Shadows - (Text, Clip Art & Page)
Placing a border around a text or graphic frame
You can add borders, shading and shadows to clip art, text frames or pages.
Select the text frame to display the handles.
Select Format < Shape Styles and click on the Shape Outline tool.
Click on the weight option and select the line thickness you require. You
can now select the line style you want.
Click on More Lines and the Format Text Box dialogue box will appear.
Thisa will give you greater control over the colours and line thickness.
You can click on the Line < Colour and select a Colour and a Style.
To place a border on an image, follow the above commands but select
Format < Picture Styles instead of Format < Shape Styles.
Remove a Border
To remove a border, select the object, select Format < Picture Styles or Format < Shape
Styles and select No Outline from the drop down menu.
Drop Shadows on a Frame
Drop shadows can look quite effective. To drop a shadow on
a text frame, select the frame and create a border and then
click on the Shadow button on the toolbar.
You can also drop a shadow on an image or photograph.
To remove the shadow, select the frame, click on the shadow button and select No Shadow.
Shadows are more effective if the text frame is shaded.
Shading inside a frame
Select the text or picture frame and select Format < Shape Styles. Select the Fill Colour
button and the
frame will be filled with the selected colour. To change the colour, click on the drop down arrow beside the Fill
Colour button and select More Fill Colours.
Chapter 12
Microsoft Publisher 2010
Page 8
The dialogue box shown on the right appears with either the
Standard or the Custom colours displayed. Select a colour.
When you click on the Colour drop down arrow, you can also select
Fill Effects. A dialogue box will appear that will give you options
to select Gradient, Texture, Pattern, Picture or Tints by selecting the
appropriate tab. Click OK to apply the selection.
Below is an example of a text box with a thin border, a drop shadow
and a light grey shading. When selecting shading for a black/white
document, choose a light shading.
We can put state of the art technology on the desk of every
student, but without the vision of an inspired educator,
nothing of value will happen.
Placing a border on a page
To put a border on the page, select the Text button and draw a rectangle to match the purple page guidelines on the
single page layout. The rectangle should ASnap to Grid@ and lock onto the guides. Click on the Lines button as
described previously and select a line size/style.
You may find the text or other objects disappear. This is because the page border layer is on top of the other layers.
Select the page border and select Format (Drawing Tools) < Arrange < Order < Send Backward. This will place
the outside page border as the bottom or back layer and the other layers are now on top of it and are visible.
Rotate and Flip
It is possible to rotate or flip an image (or text box) using the rotate button on the toolbar. Select the object, select
the drop down arrow beside the button and choose the rotation you require. You can choose Free Rotate and place
the mouse pointer on the coloured (green) handle and the twist the mouse.
You can also select Home < Format < Arrange and select Rotate. You can then rotate right or left, or flip vertical
or horizontal.
Word Art
Word art allows you to add special effects such as curves and shadows to text boxes or make words appear in certain
shapes, e.g. triangle.
Select Insert < Text < WordArt. Choose a Plain Word Art Style or a WordArt Transform Style and you are
prompted to type Your Text Here.
Type your first and last name. Click OK and your name appears. You will also see the Format WordArt Tools
You can edit your text using the WordArt Tools.
Chapter 12
Microsoft Publisher 2010
Page 9
To change the shape of the text, click on the Change Shape tool and the fly out will appear. Choose a shape, e.g.
waves, and the shape of the text will change.
You can change the spacing of the text from very tight to very loose using the
button on the WordArt toolbar.
You can use the Format WordArt button to format the text, e.g. shade the letters, make a heavier outline on the
border of the letters.
You can make all characters the same height using the same height button.
Editing Word Art
To edit the WordArt, click on the Edit Text button.
To re-size the frame, click once on the WordArt frame to display the handles, and then drag a handle in the same
way you did to resize text and graphic boxes. You can also rotate the WordArt using the green rotation button.
Place the mouse pointer on the green button to obtain the rotation arrow and then rotate the mouse. You can also
use the Rotation/Flip button on the toolbar. Note that this button changes appearance according to the last selected
action.
Drawing Tools
You can create interesting images using the Insert < Illustrations <Shapes to display the drop down menu.
Line Tool
From the drop down menu, click on the line button, place the pointer on the page, hold down the mouse button and
drag out a line.
To move the line, click on the line to display the handles, place the pointer on the line to display the four pointed
move symbol, and press and drag the line.
Holding down the Shift key as you draw your line will create lines with angles of 15, 30, 45, 60 and 75 degrees.
Arrow Tool
To create an arrow, from the drop down menu, click on the arrow button, move the mouse pointer onto the page and
drag out an arrow. To edit the appearance of the arrow, select the Shape Outline tool, select Arrows and then
More Arrows. You can change the thickness of the line, the beginning and ending style, etc.
Oval and Rectangular Tool
Click on the oval or rectangular tool, place the pointer on the page and hold down the mouse button to drag out a
rectangle or oval. To create a square or a circle, hold down the shift key as you draw the shape.
You can add borders, shadows or shading to these shapes, as well as rotate them.
AutoShape Tool
Select the Basic Shapes Tool and click on the Heart. Move to the page, click, hold and drag out a heart. To enter
text in an shape, start typing. Click on the heart shape and enter Happy Valentine==s Day. You can use the regular
editing tools, effects (bold, etc) and the alignment tools to format this text. Click on Callouts and select a callout
from the list. You are automatically prompted for some text.
Advanced Use of Fill Effects
Some interesting effects can be made by combining Autoshapes with some of the fill effects. Create a heart or other
shape from the Shapes selection. Select the shape, select the Fill Colour button drop down arrow and select Fill
Effects. Select the Gradient, Texture or Pattern tab.
Chapter 12
Microsoft Publisher 2010
Page 10
You can also insert a photograph into an Shape. Create an object and select it to display the handles. Click on
Select Picture, browse to locate the folder and image you wish to insert and click on Insert. Some samples are
shown below.
Nudge
There are times you want to move a graphic by a very small amount and you may find that moving it with the mouse
is very difficult. You will find it is easier to use the Anudge@ option. Click on the graphic to highlight the handles.
Hold down the Alt key and at the same time, move one of the directional keys in the required direction. The graphic
image will move by a very tiny amount each time the directional key is pressed. You may find Azooming in@ will
also help with making small adjustments.
Grouping Objects
If you have arranged several objects (pictures, clip art, text boxes, shapes) and then find you want to move them all
to a different part of your page, you could move each object separately. This can be time consuming.
If you want all the objects to stay together, you can Group them. To group objects, click on the first object, then
hold down the Ctrl key and click on the second object. (Click on other objects if you wish to group several objects
together). Click Group on the Home tab. You can now move them as one object.
To Ungroup the objects, select the grouped object, and select Ungroup from the Home tab.. Click on a blank part
of the screen to complete the un-grouping.
Align Objects
There are times you want several objects to be aligned, e.g the top of each object to be at the same distance from the
top margin. This can be done using the rulers but it can be difficult to be accurate.
Insert three clip art objects on to page, side by side. Select the first one. Hold down the Ctrl key and click on the
second and third objects (or use the mouse to select the three objects). The objects will appear ready to be grouped.
Do not lock the grouping by clicking the grouping button.
Select Align from the Menu tab and a number of options appear. You can align Left, Centre or Right or Top,
Middle or Bottom.
Explore the various options to ensure you understand them.
Photographs
It is possible to scan a photograph, use a digital camera or download images from the Internet and then insert the
images into your document by selecting Insert < Picture < From File. You can then move or resize the image as
you do with clip art.
Inserting Symbols
You can only insert symbols in a text box. There are occasions you want to
use special symbols, e.g. ( + _ E q : 4 , 8 á é.
To do this, create a text box, select Insert < Text < Symbols. Recnetly
used symbols appear. Select the symbol you require and click Insert. The
symbol is inserted.
Select More Symbols and symbols from a selected font appear. These
symbols in the dialogue box at the right are selected from the Times New
Roman font. Different fonts have different symbols so explore these by clicking on the arrow beside the font
selector. The Wingdings font has some excellent symbols. Try changing the font size to make the symbol larger.
Chapter 12
Microsoft Publisher 2010
Page 11
Bulleted Lists
You may wish to include bullets in your text, e.g. you have a list of items. To do
this:
<
<
<
<
<
<
Create a text box
type the list of items
Select the list
Click on the Bullet button on the Home tab and select a bullet type
If you want “custom” bullets, click on Bullets and Numbering at the
bottom of the list and the window shown will appear.
Select the bullet you want, change the size if needed and click OK.
When you return to your document, the bullet is placed on your page.
If you want a numbered list, click on the Numbered List option. You can select number (1, 2, 3...) or letters (a, b,
c...). Note you can also change the line spacing.
To select a bullet that is not displayed, click on the Character button beside the size box and the font family will
open. Change to a different font family, e.g. Wingdings, if you wish.
To turn off the bullets, press the enter key before typing any text for a bullet or click on the bullet button.
Inserting a Blank Page
To insert a blank page, select Insert < Page and a new page appears.
However, if you click on the small arrow at the bottom of the Page button, you
have three choices. Select the third option – Insert Page …
The dialogue box at the right appears. You have several options
such as indicating if the page is to be inserted before or after the current page and
the number of new pages to be inserted. You can also duplicate the objects on
another page.
When the page is inserted, a small page button with the page number appears on the status line at the bottom of the
page. Click on the appropriate button to go to that specific page.
Deleting a page
Right mouse click on the page you want to delete in the Page Panel and select Delete.
Connecting Text Boxes
To connect text boxes, click on a text box and the text box tools menu appears.
When the text box becomes full of text, the new text is stored in the box but is not visible. To see the text, you need
to make the box larger. To indicate the text box is full, a symbol with three dots appears.
However, it is also possible to connect two text boxes together so that as the first one becomes full, the text will
automatically flow into the second one. As you edit, add or delete text, it will flow freely between the two text
boxes. This is also useful if you have a newsletter and you start a story on page one and then want to continue it on
page two. You will also see the connecting symbols at the top or bottom of the text box.
Chapter 12
Microsoft Publisher 2010
Page 12
To explore this feature, start a blank Publisher document and insert a second page. Draw a small text frame on each
page and enter page 1 and page 2 in the appropriate frames. Being able to see the page numbers will make it easier
for you to know which page is active.
Create an second empty text frame on each page. In the empty text frame on page 1, type some text about a current
news item and continue until you fill the text frame and three dots appear at the side of the text frame.
Select the text frame on page 1 and then click on the Link button
on the Text Box Tools toolbar. Move to
page 2 and the mouse pointer becomes an upright beaker full of letters. Move the mouse pointer over the empty text
frame and a beaker full of Aletters@ appears to tip. Click the mouse button and the text is poured into the empty text
frame.
You will also notice that the text frame on the bottom of the first panel connects to the text frame on the top of the
second panel. The triangle symbols indicate this.
If you have a symbol on top of a text box with a left pointing arrow, this will indicate the text box from where the
text flows.
To disconnect the two text frames, select the text frame from where the link was originally made and click on the
ABreak@ button.
Layout Guides
There are times you need to create your own layout guides for a document, e.g. you want to create a set of tickets for
a draw or a show. To do this, start with a new document. Select Page Design < Layout < Guides and the options
will appear. Select Grid and Baseline Guides and set the number of rows and columns.
Tables
It is easy to make a simple table in MS Publisher.
You want to make a table for recording temperature readings. You want to obtain readings for one week at 9:00 a.m.,
12:00 noon and 3:00 p.m. You will need a column to indicate the time of day and five columns, one for each weekday
for a total of six columns. You will need a row for the titles, a row for a blank line and three more rows, one for each
time period for a total of five rows.
Chapter 12
Microsoft Publisher 2010
Page 13
Click on Insert < Table. You can select the rows and columns from the “squares” or select Insert Table.
Change the number of rows to five and the number of columns to six and press OK. The table will be created. Enter
data as shown in the following table for temperature.
A sample of the table is shown below. You can print the table and enter the readings.
Temperatures at Different Times of the Day
Time of Day
Monday
Tuesday
Wednesday
Thursday
Friday
9:00 a.m.
12:00 noon
3:00 p.m.
Changing Column Widths
To change the width of a column, move the mouse pointer (I Bar) onto one of the vertical lines and the I Bar changes
shape with arrows pointing left and right. Click and hold the mouse button as you drag in the required direction and
the column becomes wider.
Changing Row Height
To change the depth of a row, press the Enter key or type text and if the text doesn't fit, it will make the column
deeper to accommodate the word wrap.
Merging Cells
In the above example, the title is not in the table. If you want to place the title in the table, you may want to merge
the cells on the top row into one cell and place the title in this row. To do this, select the cells which you want to join
(merge) and select Merge from the Table menu. The cells will be merged as shown below.
Centred Title
Background (Master) Page
There are times when you want a symbol or a word to appear in the same spot on every page in a document. For
example, you may have a logo or crest you want at a specific spot. You can copy the symbol each time you start a
new page, but this is time consuming and difficult to place the symbol with complete accuracy.
A Microsoft Publisher page has two parts to it. So far you have only been working on the foreground page.
However, there is a background page on which you have not worked yet. All regular MS Publisher editing
commands can be used on the background. Add your symbol or text to the background and this will affect the
background of every page in your document. You can then "lay down" the foreground on top of it. It is as though the
foreground is a transparent sheet on which you write and the background is a white sheet of paper. As long as the
transparent sheet is on top of the background, any writing is on the transparency, not the background.
To move between the foreground and the background, select Page Design <Master Page. You will notice a blue
symbol with the letter. To return to the main working page, select Close Master Page.
Chapter 12
Microsoft Publisher 2010
Page 14
Page Numbers
You can place a number on each page but this can be inefficient, e.g. if you insert a page between existing pages,
then all subsequent numbers need changing.
A better solution is to place automatic page numbering on the background and then as you add new pages, they
automatically acquire a page number.
Start a new document and select the background, Page Design <Master Page. Create a small text box at the bottom
centre of your page, just below the margin guide. Enter: Page and leave two spaces after the word Page.
Select Insert < Page Numbers and a page number symbol is automatically inserted. Go to the foreground Close
Master Page and zoom in and you will see that page 1 is displayed. Insert a new page and you will see the new
page number changes to page 2.
Spell Checker
Create a text box and type the following exactly as it is indicated
below.
Thiss is a tesst of the spel cheker.
Move the insertion point to the start of the sentence. Select
Review < Spelling and the following dialogue box appears. The
first incorrect word is selected and a AChange to@ word is
suggested. Click Achange@ if you want this word. If you do not
want this word, check the suggestions to see if one of them is the
word you need.
You can also ignore the error or add the word to your dictionary.
Insert Date and Time
Create a text box. Select Insert < Date and Time and a list of options will appear. Choose the one you wish to use
and click OK.
Chapter 12
Microsoft Publisher 2010
Page 15
Autocorrect
Just like MS Word, Publisher has Autocorrect and Autoformat as You Type. To change the settings, select Tools
< Autocorrect. The options are shown below. You have the option to toggle several functions as indicated below.
Options
The Options feature lets you change a number of basic settings. Generally the defaults are acceptable but other users
may change your settings. For example, you can change the units from inches to centimetres. To access the Options
menu, select Tools < Options.
Cropping a Picture
If there is a part of a picture that you do not want, you can crop that part from your picture.
To do this, insert the picture of the school house
which can be found by selecting Insert < Pictures <
Clip Art, and selecting the Academic category. To
crop some of the students, select the picture.
Select Format < Crop Picture or click on the Crop
button and two pairs of joined scissors appear.
Click on the image and the circular handles change
to a line or an angle. Move the mouse on one of
the Anew style@ handles and move to remove the
part you do not want, in this case, two of the
students.
It is preferable to crop a picture using an image
editing program such as Adobe Photoshop
Elements before you insert it into Publisher.
Copying Digital Images from the Internet
To insert digital images from the Internet into your Publisher document, open
Internet Explorer. Do not use Netscape Communicator. Use Internet
Explorer to locate the image you wish to insert into your document, right click
the mouse button and select Copy from the pop up menu. Switch to your MS
Publisher document and click on the Paste button or select Edit - Paste. The
image is inserted into your document.
You could also select Save Picture As from the pop up menu, save the file on
your hard drive and then insert the image using the Insert < Picture < From
File. This works with both Internet Explorer and Netscape Communicator.
The advantage of this method is that you will have the image file available for
Chapter 12
Microsoft Publisher 2010
Page 16
future documents.
Wrapping Text
Insert a clip art picture. As you type, the text is
the picture. You can also make the text wrap around
using the wrap button on the Picture toolbar. Click on
toolbar should appear. Click on the wrap button and
You can see the difference in the wrap in these two
this paragraph is more difficult to read than the rest of
wrapped around the frame of
the contours of the picture by
the image and the Picture
select Square or Through.
pictures. You may also find
this chapter.
Wrap Button
For this reason, I always put images at the left or right side of the page.
The Picture toolbar is shown at the right.
Continued on Page ... Feature
When a document continues on another page, you can insert the prompt ACont. on page 2" in your document. To
do this, select the linked text box on page 1, select Format < Text Box and click on the Text Box tab. Place a
check mark in the AInclude AContinued on page ...@ at the bottom of the dialogue box. The program will
automatically insert the correct page number.
You can also insert a Cont. From Page .. on the second page in the same way. A text frame can have a Cont. on
page .. and a Cont. From Page...
When you use this feature, you should include a small sub-heading in a separate text box on the second connecting
frame to indicate the topic. This will help you as you read the story. This is really important when you have two
stories that are continued on the same page.


© Copyright 2026