
Sparta 60 - Polargos
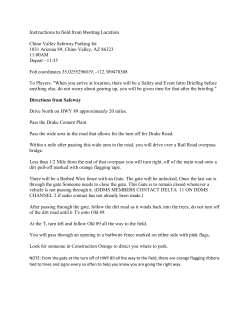
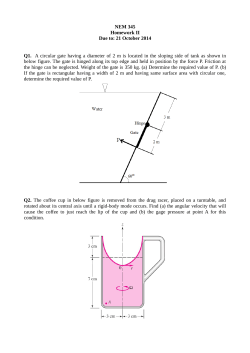
Installation instructions for the
System
installation
instructions
system’s
pedestrian
gate and
Sparta
double-leaf60
gate
Sparta 60
1. Installation instructions for the Sparta 60 system pedestrian gate and doubleleaf gate – page 3
2. Installation instructions for the Sparta 60 system sliding gate – page 10
3. Installation instructions for the Sparta 60 system span – page 14
Sparta is a robust fencing system based on galvanized, profiled and welded wire mesh.
It is perfect for industrial, commercial, sports and residential venues.
Available system elements:
gate 4 m
mesh size: 60/200 mm
3.8 mm, 4000 x 1530 mm
galvanized
galvanized+RAL 7016
pedestrian gate
right/left
mesh size: 60/200 mm
3.8 mm, 1000 x 1530 mm
galvanized
galvanized +RAL 7016
panel
mesh size:
60/200 mm, 3.8 mm
2500 x 1230 mm
2500 x 1530 mm
2500 x 1730 mm
galvanized
post
60 x 40 x 2000 mm
galvanized
galvanized
+RAL 7016
post
60 x 40 x 2400 mm
galvanized
galvanized
+RAL 7016
galvanized+RAL 7016
Sparta post 60
70 x 70 x 2150 mm
galvanized
+RAL 7016
Accessories:
end wrap
around clip
corner wrap
around clip
intermediate
wrap around clip
panel clips
handle
galvanized strike plate
The system is available in the following colours:
2
galvanized
bracket with screw
universal gate
stop
galvanized+RAL 7016
tension hook
Installation instructions for the
pedestrian gate and double-leaf
gate
Sparta 60
3
Necessary tools
List of elements
1 SET
1x B h=1530 mm
1 SET
1x C h=1530 mm
3 SETS
E
1x A 1000x1530 mm
4
3x D 70x70x2150 mm
1
Pedestrian gate and gate on-site positioning
PEDESTRIAN GATE AND GATE
LOCATION selected by the user
2
Excavating for foundations
FOUNDATION EXCAVATION - CROSS-SECTION
H
H+100
H - frost line
FOUNDATION EXCAVATION - TOP VIEW
400
250
400
POST LOCATION
5
3
Reinforcement
4x Bar Ø12
Bar Ø6 L=1140
75
75
150
150
975
150
1000
150
150
260
260
75
260
4
Placing reinforcement in excavations
REINFORCEMENT INSERTED IN FOUNDATION EXCAVATIONS - CROSS-SECTION
6
5
Assembly of pedestrian gate and gate with posts on a flat surface
!
PRESERVE LINEAR ARRANGEMENT OF
ELEMENTS
D
D
E
A
6
B
C
E
Mounting the gate and pedestrian gate onto the post
TOP VIEW:
1
2
3
4
3
2
post
gate
5
6
FRONT VIEW:
post
7
1
gate
8
1. elbow hinge M16-40
2. nut N6K-M16
3. washer ø16
4. hinge eye 80 x 30 mm
5. screw S6K-MB-25
6. washer ø8
7. pin
8. Seeger ring ø12
7
6
Mounting the gate and pedestrian gate onto the post (cont’d)
6
4
5
7
2
8
3
2
1
8
1. elbow hinge M16-40
2. nut N6K-M16
3. washer ø16
4. hinge eye 80 x 30 mm
5. screw S6K-MB-25
6. washer ø8
7. pin
8. Seeger ring ø12
9
6 Mounting the gate and pedestrian gate onto the post (cont’d)
10
7
Fixing lock strike plate
1
2
5
3
4
6
1. test post
2. lock part
3. strike plate stopper, small
4. BWW 4.2 x 25 DIN7504N – 3 pcs.
5. cap ø10 black – 3 pcs.
6. cap 30 x 20 – 2 pcs.
11
8
Positioning of stable pedestrian gate and gate with posts in excavations
where reinforcement is erected
POSTS PLACED IN FOUNDATION EXCAVATIONS - CROSS-SECTION
9
Supporting posts
Supporting bar
12
10 Filling excavation with concrete
FOUNDATION CROSS-SECTION
CONCRETE
11 Positioning of gate stop in concrete
GATE STOP
PURCHASED
SEPARATELY
CONCRETE
CONCRETE
Detailed installation instructions for double-leaf gates are available at www.polargos.pl and from authorised sellers.
13
Installation instructions for
Sparta 60
system span
14
Necessary tools
Option:
M8
pliers for panel
clips
additional protection for
wrap around clips
M8
List of elements
QUANTITY SELECTED
AS NECESSARY
QUANTITY SELECTED
AS NECESSARY
post 60x40x2000 mm
for panels:
- 2500 x 1230 mm
- 2500 x 1530 mm
!
2500 x 1230 mm + 2 POST FASTENERS
A 2500 x 1530 mm + 3 POST FASTENERS
2500 x 1730 mm + 3 POST FASTENERS
B
post 60x40x2400 mm
for panels:
- 2500 x 1230 mm
- 2500 x 1530 mm
- 2500 x 1730 mm
I. PANELS CONNECTED BY WRAP
AROUND CLIPS
(initial) bracket
with screw
II. PANELS CONNECTED
BY HOOK TENSION
AND CLIPS
intermediate wrap around clip
tension hook
D
G
corner wrap around clip
end wrap around clip
panel clip
E
F
H
C
NUMBER AND TYPE OF FASTENINGS SELECTED AS NECESSARY
15
1
Spans and posts on-site positioning
SPANS AND POSTS LOCATION
selected by the user
2
Excavating for foundations
FOUNDATION EXCAVATION - CROSS-SECTION
H
H+100
H - frost line
FOUNDATION EXCAVATION - TOP VIEW
250
400
400
16
POST LOCATION
3
Placing reinforcement in excavations
Reinforcement p. 6, step 3
REINFORCEMENT INSERTED IN FOUNDATION EXCAVATIONS - CROSS-SECTION
4
Positioning posts at appropriate distances depending on panel type
POSTS ARRANGEMENT - CROSS-SECTION
B
17
5
Fixing posts in concrete
FOUNDATION CROSS-SECTION
B
- 2500 x 1730 mm
CONCRETE
CONCRETE
CONCRETE
I. PANELS CONNECTED BY WRAP AROUND CLIPS
6
Post-to-span assembly - INITIAL FASTENER
I
C
B
B
II
A
A
GATE
PANEL
III
18
IV
V
7
Post-to-span assembly - INTERMEDIATE WRAP AROUND CLIP
I
D
B
A
A
M8
OPTIONAL
II
8
Post-to-span assembly - CORNER WRAP AROUND CLIP
E
A
I
B
A
II
19
9
Post-to-span assembly - END WRAP AROUND CLIP
B
F
I
A
A
II
II. PANELS CONNECTED BY TENSION HOOK AND CLIPS
10 Post-to-span assembly - PANEL CLIP, TENSION HOOK
H
G
G
H
G
H
H
Oziemkówka 57A, 08-420 Miastków Kościelny, ph.: +48 25 683 05 55, fax: +48 25 683 78 38
www.polargos.eu, e-mail: [email protected]


© Copyright 2026