
IN THIS GUIDE YOU WILL LEARN HOW TO GET
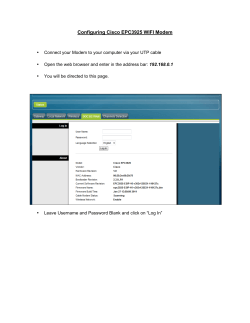
IN THIS
GUIDE YOU
WILL LEARN
HOW TO GET
YOUR ROUTER
GOING IN
NO TIME
THE INCREDIBLY EASY GUIDE TO SETTING UP
YOUR DGN2200 WIFI MODEM ROUTER
MAKE SURE YOU
HAVE THESE BITS
AND BOBS HANDY
The Netgear WiFi ADSL Modem Router supplied by Optus has been preconfigured by Netgear at the factory
with unique WiFi security settings to simplify your installation. These settings are printed on the underside of the
Netgear WiFi ADSL Modem Router and on the handy WiFi information card included in the box.
A. DGN2200 WIFI ADSL
MODEM ROUTER
1
2
3
E.YELLOW ETHERNET F. GREY PHONE CABLE
H.INSTALLATION GUIDE
I. WIRELESS INFORMATION CARD
CABLE (1.5M)
WALL
SOCKET
PHONE
C. ROUTER STAND BRACKET
4
D.ADSL FILTER
MODEM
B. POWER SUPPLY
G.WELCOME LETTER
(The thing you are reading)
Keep me handy
your user information for wireless
Network name: (SSID):
Network Key:
1
SAY HELLO TO YOUR
SHINY NEW ROUTER
BEFORE YOU INSTALL AND CONNECT YOUR ROUTER, TAKE A MOMENT TO FAMILIARISE YOURSELF
WITH THE FRONT AND BACK PANELS OF THE ROUTER.
THE FRONT PANEL
The wireless modem router front panel contains status LED lights. You can use the LEDs
to verify various conditions. See the table below to see what each LED means.
1
1
2
3
2
4
3 4 5 6
1.POWER,
FACTORY
RESET
SOLID GREEN, power is supplied to the router
SOLID RED, POST (Power-On Self-Test) failure or device malfunction
OFF, power is not supplied to the router
FACTORY RESET, during a reset, the lights blink red three times and then turn green as the modem resets
to the factory defaults. A factory reset will reverse any settings you’ve customised, e.g. it will change back to the
WiFi Network Name and Password printed on the WiFi card we sent you
2.ETHERNET
PORTS 1-4
SOLID GREEN, the powered device is connected to the associated Ethernet Local Area Network (LAN) port
BLINKING GREEN, data is being transmitted or received
SOLID AMBER, the powered device is connected to the associated Ethernet Local Area Network (LAN) port
BLINKING AMBER, data is being transmitted or received
OFF, no link is detected on this port, or modem powered off, or no cable or powered device is connected
to the associated port
3.USB
SOLID GREEN, USB device has been accepted by the Router and is ready to be used
FAST BLINK (GREEN), data is being transmitted or received over the USB link
OFF, no USB device is connected
4.DSL
SOLID GREEN, the ADSL port is synchronized with your ISP’s DSL Access Multiplexer (DSLAM)
BLINKING GREEN, the ADSL is synchronizing with Optus
OFF, no link is detected on the ADSL port
5.INTERNET
SOLID GREEN, the wireless modem router is connected to the internet. The LED will remain solid green
if the internet session is dropped due to an idle time-out, but an ADSL connection is still present
BLINKING GREEN, if the session is dropped for any other reason, the LED will turn off
RED, the wireless modem router is connected to the internet and traffic is passing through the device
OFF, the wireless modem router attempted to connect to the internet but failed
The wireless modem router is powered off, in bridged mode, or there is no ADSL connection
6.WIRELESS
SOLID GREEN, the Wireless Access Point is enabled
BLINKING GREEN, data is being transmitted or received over the wireless link
OFF, the Wireless Access Point is disabled
2
THE BACK PANEL
The back panel of the wireless modem router contains a number of port connections.
The ports are colour-coded to distinguish your internet port from the other four ports
that connect to the wired computer(s) on your LAN.
1
2
3
4
5
6
1
Wireless antenna
2
USB port
3
our local Ethernet RJ-45 LAN ports for connecting the router to the local
F
computers
4
RJ-11 ADSL port for connecting the router (2) to an ADSL line
5
Power switch
6
AC power adaptor input
WHAT DO THE BUTTONS MEAN?
WPS
You can use the WiFi Protected Setup (WPS) feature with clients on the network that are
WiFi certified and WPA capable.
WIRELESS
By default, the wireless modem router is set up to work as a wireless access point.
Pressing this button turns the wireless access point feature off and on. You can
also do this through the Wireless Settings screen.
WPS + WIRELESS
Pressing both buttons at the same time resets the unit to the factory default settings.
3
LET’S GET STARTED
STEP 1
CHECK THESE
THINGS FIRST
Please install your modem after your Optus service activation
date and ensure you have the following items before installation:
• Your Welcome letter with your username and password
TIP:
If you have a back-to-base alarm, ensure
you have a central filter installed.
• Filter (x2)
• Grey telephone cable
• Netgear ADSL WiFi Modem Router
• Yellow Ethernet cable
• Modem power cable
STEP 2
CONNECT THE
FILTERS AND
TELEPHONE
1To install the filter connect the side labelled Wall Socket to
the telephone wall socket.
2If you have a different wall socket (600 series as pictured)
you’ll need to use an adaptor (605 to RJ11). These can be
purchased from any electronics store.
3 Remove the sticker covering the rear ports.
4Connect the grey telephone cable to the filter port labelled
Modem and the grey port on the modem.
5 Connect your telephone to the port on the filter labelled Phone.
600 SERIES SOCKET
WALL
SOCKET
MODEM
4
PHONE
TIP:
To add additional telephone devices that
share the same telephone number as
your Optus DSL Broadband service
(for example: telephones, fax machines,
dial-up modems, answering machines
and some digital pay TV equipment),
you’ll need to use an additional filter
and install them as described for the
telephone above.
STEP 3
CONNECT THE
MODEM TO YOUR
COMPUTER
1Connect the yellow Ethernet cable to a yellow port on
your modem.
TIP:
I t is recommended you connect via
Ethernet first before setting up your
WiFi connection.
2Connect the other end of the yellow Ethernet cable to the
Ethernet port of your computer or laptop that is labelled
with this
symbol ( ) on most computers.
3Connect the modem power cable to a power point and
the other side to the modem power inlet.
ETHERNET PORT
WALL
SOCKET
MODEM
(2)
5
PHONE
STEP 4
START ’ER UP
1Switch your modem on by pressing the Power button on the
back of the modem.
2The Power LED and Ethernet LED will light up. The LED labelled
DSL will blink during installation then after a couple of minutes
will remain a steady green and the internet LED will light up.
TIP:
If the DSL LED keeps blinking your modem
is unable to establish a broadband
connection. Please check:
•The Power LED is steady green and
ensure all cables are connected
•You are installing your modem after
the activation date that we have
arranged with you
•Remove all other phone equipment or
test modem on a different wall socket.
POWER BUTTON
1
POWER
STEP 5
2
3
ETHERNET
4
DSL INTERNET
YOUR SETTINGS
1Open your internet browser and ignore any error messages
that may appear (e.g. Internet Explorer, Firefox, or Safari) and
type 10.1.1.1 in the address field of the browser.
2Replace the default email address (john_citizen@optusnet.
com.au) and password with your personal email and password
as provided in your Welcome letter and click apply. The
modem will now connect to the internet – this may take a few
minutes.
3 Close and reopen your browser.
6
TIP:
If it’s the first time you are using Optus
Broadband you will be directed to
ServiceNet to activate the service.
Service Net is an online facility to confirm
the status of your account or determine
if your login details are correct.
GET THE
WIFI GOING
1
2
Locate the WiFi settings on your computer or other device.
These will vary depending on the gadget you’re connecting to. Give
us a shout on 1300 739 407 if you’re having trouble finding them.
your user information for wireless
Network name: (SSID):
Enter the WiFi Network Name (SSID) and Password that’s on
your WiFi card and voila, you’re good to go!
Heads-up: if you choose to customise these settings, your details
will be different to what is printed on your WiFi card. A factory
reset will reverse any settings you’ve customised, e.g. it will
change back to the WiFi Network Name and Password printed
on the WiFi card we send you.
MANAGING
YOUR ACCOUNT
NOW THAT YOU’VE CONNECTED YOUR WIFI ADSL2+ MODEM, YOU CAN GET ON
WITH SETTING UP ANY OTHER FEATURES YOU MIGHT NEED.
CHANGING YOUR WIFI ADSL2+ MODEM PASSWORD
If you wish to change your WiFi ADSL2+ Modem password, please follow the steps below:
1.Open your web browser and change the address to http://192.168.0.1
2.Enter the default username and password as follows:
Default Username: admin
Default Password: password
3.From the menu on the top click Administration and then
select the management tab.
4.To change the password, type a new password and retype it in the Re-Enter New
Password box to confirm it. Then click Save settings to have the password changed.
5.Write down your new password and keep it safe. You may want to write it down with
the Settings Summary page if you printed it earlier.
Note: You will need to use this new password to access any of your WiFi ADSL2+ Modem’s
advanced features or to reconfigure your service. If you forget this password
you can reset
your WiFi ADSL2+ Modem by pressing and holding the reset button for five seconds. This
will also delete any other customised settings you have set.
YOUR ACCOUNT
For information on managing your Optus DSL go to:
optus.com.au/customerhelp
7
Keep me handy
Network Key:
I NEED
HELP!
GOT ANY ISSUES, PROBLEMS OR HEAD-SCRATCHERS?
Q.What should I do if I’m having trouble connecting?
A.Like any IT guru will tell you, first try restarting your modem by switching
off the power on the back, wait 10 seconds, then turn it back on again.
Give it a few minutes to restart and reset your connection. If you’re still having
trouble give us a shout on 1300 739 407.
Q. What if I can’t make or receive calls?
A.First, try restarting your modem by switching off the power on the back,
wait 10 seconds, then turn it back on again. Give it a few minutes to restart
and reset your connection. If you’re still having trouble give us a shout
on 1300 739 407.
Q. I’ve just received my shiny new modem. Do I need to call Optus first?
A.No. Just read the instructions and everything should be sweet.
Q. I’ve forgotten my WiFi password. What do I do?
A.Don’t panic! The default WiFi Network Name (SSID) and Password can be found
in the Wireless Information Card in the box. It’s also on the bottom of the modem.
Q. I need further help configuring the modem, for example with advanced WiFi features.
A. Tech-head huh? Download the full modem user guide at optus.com.au/helpme
8
EVERYTHING
YOU’VE DONE
SO FAR HAS
LED TO THIS
MOMENT
WE HAVE FAITH THAT YOU CARRIED OUT
YOUR TASK SPLENDIDLY.
BUT, IN CASE YOU NEED A LITTLE HELP,
PLEASE CONTACT OUR DSL TECHNICAL
SUPPORT AT 1300 739 407 OR VISIT
OPTUS.COM.AU/HELPME
OPTUS16716/1402301 (10/13)


© Copyright 2026