
A primer for Anodizing today Anodizing 101
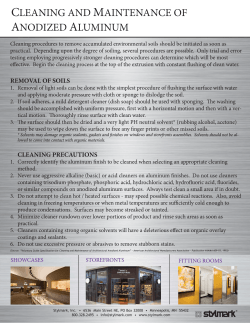
Anodizing 101
A primer for Anodizing today
Anodizing 101
Wiki-Pedia says:
Anodizing, or anodising, is an electrolytic passivation process
used to increase the thickness and density of the natural oxide
layer on the surface of metal parts.
This process is of no use on carbon steel because rust puffs up
and flakes off, constantly exposing new metal to corrosion. But
on many other metals, anodizing increases corrosion resistance
and wear resistance, and provides better adhesion for paint
primers and glues than bare metal.
Anodizing 101
Wiki-Pedia says:
Anodic films can
also be used for a
number of cosmetic
effects, either with
thick porous
coatings that can
absorb dyes or with
thin transparent
coatings that add
interference
effects to
reflected light.
Anodizing 101
Wiki-Pedia says:
Anodization changes the
microscopic texture of
the surface and can
change the crystal
structure of the metal
near the surface.
Coatings are often
porous, thick ones
inevitably so, so a sealing
process is often used to
improve corrosion
resistance.
Anodizing 101
Wiki-Pedia says:
The process derives its name from the fact that the
part to be treated forms the anode portion of an
electrical circuit in this electrolytic process.
Anode + (pos) Work piece
Cathode – (neg)
Cathode – (neg)
Acid Electrolyte
Anodizing 101
Wiki-Pedia says:
Anodizing can prevent galling of threaded components.
Anodic films are generally much stronger and more
adherent than most paints and platings, making them less
likely to crack and peel. Anodic films are most commonly
applied to protect aluminum alloys, although processes
also exist for titanium, zinc, magnesium, and niobium.
Anodizing 101
An overview
Materials Anodized
Chemical Finishing
Sealing
Assemblies
Brake Metal
Castings
Coil Material
Extrusions
Sheet & Plate
Small Parts
Bright Dip
Etching (Caustic)
Etching (Acid)
Type I (Chromic)
Type II (Sulfuric)
Type III (Hardcoat)
Teflon Seal
Dichromate Seal
Boiling DI Water
Nickel Acetate
Mid-Temperature
Trivalent Chrome Seal
Other
Mechanical Finishing
Fabrication Services
Special Services
Conversion Coat
Coloring
Anodizing 101
Introduction
•
•
•
•
Economics and Environmental concerns
Productivity and Efficiency
Support and Troubleshooting
Understanding the process is key to success
Anodizing 101
Steps to a Quality Anodized Finish
•
•
•
•
•
•
•
Raw Aluminum
Mechanical Finishing
Racking
Cleaning
Rinse
Etch/Bright Dip
Rinse
•
•
•
•
•
•
Anodize
Rinse
Color
Rinse
Seal
Rinse
Anodizing 101
Raw Aluminum
Problems
• Die Lines
• Buffing
• Different Soils
• Corrosion
Effect
• Too deep, hard to remove
• Burning, too much
compound, comet pits
• Cleaner not Effective
• Pitting, staining
Anodizing 101
Alloy and/or Material Temper
Problems
• Zinc
• Fe, Si, Mg ratio
• T-52 (overaged)
• Soft Metal
Effect
• Spangling
• Bright surface or Rough
Surface
• Smutting
• Bad etch, smut or grainy
appearance
Anodizing 101
Racking
• Used to transfer from
tank to tank.
• Acts as an electrical
conductor to deliver
power to parts.
• It is consumable.
• Problems not always
where it appears.
Anodizing 101
Racking Practices
• No worn out
racks
• Clean Contacts
• Uniform
Distribution of
Parts
• Rack of Similar
Alloy
• Load Bars
Anodizing 101
Rack Types
Spline, Twist, Stack, Welded
Bolt Clamps, Spring Clamps.
Anodizing 101
Rinsing
Soil
Breaking
Surface
Tension
Dissolving Soil
Soil
Residue
Soil
Lift
Off
Clean
Surface
Anodizing 101
Cleaning
•A clean surface will be soil
free and water break free
•You need the right cleaner
for the soil, environment
and materials involved.
•Alkaline cleaners
•Acid cleaners
•Both????
•Bath life factors
•Problems with Cleaners
•Does not clean
•Spent Solution
•Low concentration
•Wrong chemistry
•Too cold
•Etching
•High Temperature
•Temp beyond cloud point
•Redeposits soil
•Dirty bath
•Crystal on Surface
•High concentration
•Bath is spent
Anodizing 101
Etching
•Purpose
•Uniform surface
•Esthetically appealing
•Types of etching
•Conventional
•Recovery
•New generation recovery
•Acid Etching
•Tank maintenance
•Critical controls
•Additive levels
•Temperature
Anodizing 101
Desmutting &
Deoxidizing
•Purpose
•A desmut will remove residue from the finishing process.
•An oxidizer will remove oxides in addition to smut.
•All desmut/oxidizer solutions are acidic with proprietary
additives.
•Usually run at ambient.
•Problems usually are caused by low concentration.
•Drag out – not brought up to strength
•Neutralization – Drag in of alkaline residue
•Excess usage – Parts in bottom of tank consuming chemicals
Anodizing 101
Desmutting &
Deoxidizing
•If the smut or oxides are
not removed, you may
create stains in the finished
product.
•Deoxidizing for too long
will create acid etching and
will form smut which is not
soluble in acid. This often
results in a stain.
Anodizing 101
Anodizing
•A controlled electrochemical process in which the surface
of the aluminum is oxidized producing a porous
aluminum oxide.
Anode + (pos) Work piece
Cathode – (neg)
Cathode – (neg)
Acid Electrolyte
Anodizing 101
Anodizing
•This step in the process is critical for coloring. Inconsistency in
managing this step will lead to failures and non-uniformity at
other steps in the process.
Anodizing 101
Anodizing
•As you see in this
photograph, the surface is
very porous. The pores
can be filled with organic
or inorganic color and
sealed to provide an anodic
oxide coating that protects
the aluminum substrate.
Anodizing 101
Anodizing
•The thickness of the
resulting anodic oxide is
controlled by time and
current density. The
structure, i. e. cell size,
pore diameter and the
barrier thickness are
determined by voltage.
•Faraday’s Second Law: Film thickness
is proportional to Current and Time.
•Thickness in mils =
ASF * T
720
Anodizing 101
Anodizing
Guidelines for maintaining uniformity throughout the process:
1. Concentration levels must be maintained within narrow
specifications.
• Acid:
+/- 5 gram/liter
• Aluminum:
8 – 12 grams/liter
2. Temperature fluctuation will affect uniformity most. H2 SO4
conductivity changes dramatically with temp changes.
Uniform coloring requires consistency between multiple
anodizing tanks.
• Temperature: +/- 2 degrees Farenheit
Anodizing 101
Anodizing
Guidelines for maintaining uniformity throughout the process:
3. Additives reduce the dissolution
effect of H2 SO4 on the anodic
film.
4. Electrical connections tend to
corrode with time. Acidic
corrosion can lead to uneven
current distribution and uneven
anodic films. Cleaning and
monitoring connectivity must be a
regular practice.
Anodizing 101
Anodizing
Problems in this step are usually seen in the color or seal steps.
1. Burn Marks
• Current density too high or
no additive
• Bad or dirty contacts
• To quick of a ramp on the
rectifier.
Anodizing 101
Anodizing
Problems in this step are usually seen in the color or seal steps.
2. Uneven Coating
• Worn out cathodes
• Too quick of a ramp.
• Anode to cathode ratio off.
• Too much load for tank.
• Bad part distribution on
the rack.
Anodizing 101
Anodizing
Problems in this step are usually seen in the color or seal steps.
3. Pitting
• Contamination of solution, chlorides, nitrates or sodium.
Anodizing 101
Anodizing
Problems in this step are usually seen in the color or seal steps.
4. Soft Coating
• Low current density.
• Temperature too
high.
• No additives to
protect coating.
Anodizing 101
Coloring
Coloring is created by depositing material or
dyes in the pores of the anodic coating or by
dispersing particles in the coating. There are 3
basic methods used for anodized aluminum.
1. Electrolytic coloring
2. Organic or inorganic dyes
3. Integral
Anodizing 101
Electrolytic Coloring
In this process, parts are
immersed containing a metal
salt such as tin. AC power is
supplied and the metal is
deposited at the bottom of the
pore.
Anodizing 101
The Electrolytic Cell
Anodized Aluminum work
piece with anodic coating.
Power Supply Alternating
Current or Modified AC.
Negative/Positive (+-)
Counterelectrode –
Positive/Negative (+/-)
Counterelectrode –
Positive/Negative (+/-)
Stannous Sulfate +
Acid Electrolyte
Anodizing 101
Electrolytic Coloring
Electrolytic coloring is
accomplished by the
electrical disposition of
metallic particles near the
base of the anodic pores.
AC power is used to deposit
metal at the bottom of the
pore.
Anodizing 101
Electrolytic Coloring
The depth of the metal
deposit within the pores
determines the color of
the film that ranges from
Champagne through
various Bronzes to Black.
Anodizing 101
Electrolytic Coloring
Various metals can
be used such as:
Anodizing 101
Electrolytic Coloring
The thickness and pore structure of the anodized film regulates the coloring
rate and distribution. If the anodic film is not produced properly, color
uniformity and color ability will be compromised.
Anodizing 101
Electrolytic Coloring
Most problems arise from
improper anodizing, although
problems can occur from the
coloring system itself. These
problems are usually
controlled by keeping bath
chemistry constant.
Coloring additives and sulfuric
acid concentrations must be
maintained, the temperature
can not fluctuate and electrical
power must be programmed
correctly.
Anodizing 101
Electrolytic Coloring Problems
•Extrusions Not Colored
•Bad Contacts
•Broken Contacts
•Dark Ends
•Uneven Coating
•Wrong voltage on coloring power
•Wrong program on coloring power
•Non-uniform Color Across Extrusions
•Wrong ramp
•Chemistry of bath incorrect
•Uneven coating
•Color Wrong Shade
•Temperature of bath is wrong
•Time
Anodizing 101
Dyeing
The pores of the anodic film produce a capillary action
and will absorb easily. This property allows the use of
organic or inorganic dyes to color anodized aluminum.
Inorganic
Dying
Organic
Dying
Anodizing 101
Dyeing
Most dyes are designed so that dyeing is done by saturation of
the pore to get the proper color and stability. To achieve this,
temperature, pH, concentration and time must be controlled.
Inorganic
Dying
Organic
Dying
Anodizing 101
Dyeing
Dyes need a certain depth of the pore to achieve the colors, which
makes the anodizing step critical. Uniformity of thickness and
pore structure is very important for uniform results.
Anodizing 101
Organic & Inorganic Dyes
The inorganic dye (FAO or FSO) or the organic dye will
absorb into the pores of the anodic coating.
Inorganic
Dying
Organic
Dying
Anodizing 101
Dyeing Problems
•Non-Uniform Color
•Uneven anodic film
•pH of rinse too low
•Dye pH wrong
•Dye activity too high
•White spots of surface
•Pits
•Holding sulfuric acid from anodize
•Poor rinsing
•Airborne contaminants
•Color not dark enough
•Film thickness too thin
•Rate of Dye off
•Concetration wrong; pH off
•Dye bath is old with aluminum
build up
Anodizing 101
Electrolytic Coloring
combined with Dyeing
By combining Electrolytic
Coloring and Dyeing, you
have more color options.
Dye
Electrolytic Deposit
Anodizing 101
Integral Color Anodizing
An Organic Acid such as
Sulfophthalic Acid, is used in
anodizing to produce anodic
coating. The color results from
insoluble particles within the
anodic pores. A color range
from light bronzes to black can
be obtained. The depth of color
is dependent on the thickness of
the anodic coating and bath
conditions.
Anodizing 101
Integral Color Anodizing
This process makes use of the intermetallics (alloying material)
in the metal to give color. As the anodic film is grown, particles
are exuded into the film and color is dependent on the thickness.
The process is usually done under
cold conditions and high power.
The alloy and temper play a major
role in color uniformity and
thickness determines color depth.
Because of the cost, only 5 systems
remain in the US. The main
products are handrails and push
plates where heavy wear occurs.
Anodizing 101
Sealing of Anodic Coatings
• Sealing of anodized
• Sealing can be
aluminum changes the
accomplished by:
anodic coating to make
– Physically plugging with
oils, waxes, paints or
it:
–
–
–
–
Non-Staining
Non-Absorbing
Non-Reacting
Non-Corroding
aqueous sealing chemicals
– Chemical change of the
oxide layer through
hydration
– Combining both using
metal-based sealing salts
Anodizing 101
Sealing of Anodic Coatings
• This is the final step in the 1. Hydrothermic Sealing
process. A good rinse
• Hot water @ 210 Deg. F
prior to the sealing step
• Emersion in hot water
with a pH of 6.0 – 6.4
will reduce contamination
and allow the pore to be
• Film hydrothermically
sealed converting the
closed.
AL2O3 to AL2O3*H2O
• Here are the 3 most
• Larger hydrated
common methods of
molecules fills the pores
sealing the anodic film:
and “seals it.
Anodizing 101
Sealing of Anodic Coatings
2. Nickel Acetate Low Temp
•
•
Hot water @ 175 - 185
Deg. F
Nickel co-precipitates into
pores accelerating the
hydrothermic sealing.
3. Cold Sealing
•
•
Water @ 90 - 94 Deg. F
Nickel, the accelerator
and the aluminum react
to form a compound that
plugs the pores.
Anodizing 101
Sealing of Anodic Coatings
It is critical to manage the seal
bath. Time, temperature,
concentration and pH have
dramatic impact on the finished
seal properties. Improper seals
lead to smut or a non-sealed
part.
Anodizing 101
Sealing of Anodic Coatings
Smut was once a necessary evil.
Quality standards and increased
production rates require “no
smut”. Seal baths must be
maintained to control the
process. Use as recommended
with regular dumping and
recharging.
Anodizing 101
Sealing of Anodic Coatings
• White powder (Yellow tint)
– Electrolytic color dirty
• White powder (Greenish tint)
–
–
–
–
Nickel seal
Rinse after nickel seal dirty
pH too high on Nickel seal
Foam on seal tank
• Iridescent easily wiped off.
– Desmut tank not working
• Iridescent hard to wipe Off
– Too long of seal time
– Too soft coating
– Too low pH, rinse before seal
Eliminate problems with the proper
processing steps
1.
2.
3.
4.
5.
Proper racking
Good chemical management of
the baths
Good rinsing
Proper drainage of parts
Understand the function of each
bath
Anodizing 101
Sealing
Anodizing 101
Anodizing Line Safety
It is everyone’s responsibility to
see that the anodizing line runs
safely. The 3 areas of concern:
Anodizing 101
Anodizing Line Safety
1. Employee Training
2. Safe design of facilities and
equipment
3. Adequate safety equipment
readily available
Anodizing 101
Anodizing Line Safety
Employee Safety and Training
Safety consciousness is mandatory for anyone working around an anodizing line. You
must be aware of the potential risks and be able to react in case of an emergency.
The employer must ensure that the equipment is appropriate for the job, is within easy
access and that training is provided for new employees and refresher courses for
existing employees.
Management should assign a safety person who will be responsible for maintenance,
supplies and monitoring the day to day operations. Equipment should be inventoried
and readily available.
One tool is a checklist. This outlines all of the checks needed as well as the time and
the person conducting the activity. Studies show that 7 areas result in 80% of the
reported citations.
Anodizing 101
Anodizing Line Safety
1. General Housekeeping – 17% of citations. Blocked doors, improper storage and
clutter, improper posting of signs and exits.
2. Mechanical Guards – 16% of citations. Lack of adequate guards and shields
around abrasive wheels, exhaust fans, belts and pulleys.
3. Electrical Problems – 14% of citations. Improper grounding and potential
exposure to live current.
4. Safety Equipment – 12% of citations. Lack of adequate eye wash and safety
showers, along with worker failure to wear personal protective gear.
5. Railings and Platforms – 8% of citations. Slippery platforms and inadequate or
missing safety rails.
6. Signs and Labeling – 6% of citations. Failure to identify hazards, particularly
open tanks.
7. Others – 6% of citations. Availability of fire extinguishers and lack of poor
ventilation.
Anodizing 101
Anodizing Line Safety
Principles
1.
2.
3.
4.
Safety is first
Understand the risks
Provide Safeguards
Train for Action
Laws and Guidelines
Ontario Occupational Health &
Safety Act and Regulations for
Industrial Establisments
OSHA Regulations
29CFR 1910-1001 and
29 CFR 1910-1200
Anodizing 101
Anodizing Line Safety
1. Understanding the risks
2. Hazard Characteristics
1. Toxicity
2. Corrosivity
3. Flammability
4. Spontaneous combustion
5. Explosivity
6. Reactivity
3. Information Sources
1. MSDS’s
2. Container labels
3. Process tank labels
4. Chemical Manufacturers
5. Plant Management
Anodizing 101
Anodizing Line Safety
Wear Protective Clothing –
Goggles, face shields,
rubber gloves, aprons,
rubber boots and a
respirator as required.
Anodizing 101
Anodizing Line Safety
Store Chemicals Safely
Avoid high traffic areas
Allow for good ventilation
Identify Risks with placards
Anodizing 101
Anodizing Line Safety
Adopt Safety Habits
1. Never eat, smoke, drink or wear
contacts in chemical environments
2. Know where the nearest safety shower,
eye wash and emergency equipment is
located.
3. Wear personal protective equipment
4. Avoid breathing fumes
Anodizing 101
Anodizing Line Safety
Emergency Procedures
1. Eye contact: Flush immediately with water for 15 – 20 minutes.
Take other follow-up care as required by MSDS.
2. Skin contact: Flush with water for 15 -20 minutes. Seek additional
care as required by the MSDS.
3. Inhalation: Leave area immediately and seek treatment as required
by MSDS.
4. Ingestion: Contact medical personnel immediately with MSDS
information.


© Copyright 2026