
CREATING A SIX-PANEL, LETTER-FOLD BROCHURE
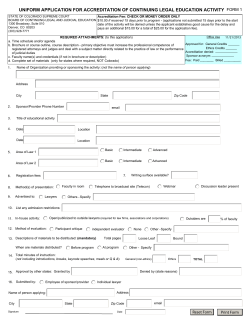
CREATING
A SIX-PANEL,
LETTER-FOLD
BROCHURE
set a 1/4 inch margin
around the page
page orientation
is Landscape
7 MS Word page setup
9 MS Word sample document
Open a new file in MS Word. Using the
Page Setup dialog box, set the Top, Bottom,
Left and Right margins all to 0.25". Set
Paper Size to Letter and Orientation to
Landscape.
With view set to Whole Page, when you
finish setting up Columns, the Word
document on your computer screen will
look something like the image above.
Click on Format on the menu
bar and select Columns from
the drop-down list
set the Number of
columns to 3
8 MS Word columns setup
Click on Format on the menu bar and
select Columns from the drop-down list. In
the Columns dialog box, set the Number of
columns to 3. Ensure that Equal column
width is selected. Word will automatically
compute the Width of the columns based
on the Spacing. The example above uses
0.5" column spacing — twice the 0.25"
page margin selected in Step 7 above.
10 Templates
MS Word comes with templates for
brochures and other kinds of publications.
Check the templates that come with your
software before you start your brochure
design. Click on Help in your software to
find more information about templates.
060130
Phone 416-923-3374
www.reprint.com
388 Parliament Street
Toronto, Ontario M5A 2Z7
n
With a d
or
MS W
setup
le
examp
Phone 416-923-3374
www.reprint.com
388 Parliament Street
Toronto, Ontario M5A 2Z7
1/4 inch margins around each panel combine to
produce a half-inch inside gutter between panels
8 ½ inches
11 inches
1/3
1/3
1/3
1 Getting started
To start, remember that the folds of the
finished brochure will divide each side of the
sheet of paper into three equal sections.
1/4 inch
margin
1/3
page
1/3
page
1/3
page
Inner side of a basic brochure
1/4 inch
margin
around
each
panel
1
2
5 Inside layout
3 Gutters
Text should not start at or extend to the
fold between two panels. In the image
above, notice how the 1/4 inch margin
around each panel produces a 1/2 inch
gutter between the center panel and the
left and right panels of the brochure.
When readers open your brochure they will
read the contents from left to right.
“Bleeds” extend past the edge of the page
A “bleed”
extends
beyond the
edge of the
paper
about 0.25".
Cover side of a basic brochure
1/3
This panel
folds in and
becomes
the inside
right-hand
page of your
brochure.
This panel
is the back
cover of
your
brochure.
This panel
is the front
cover of
your
brochure.
6 Bleeds
2 Margins
Text should not start at the edge of the
page. Leave a margin all around each
panel of the brochure. The grey area in
the image above represents a 1/4 inch
(0.25") margin. The actual margin you
should have in your design will depend on
the equipment you will be using to
print your brochure. A 3/8 inch margin is
sufficient for most equipment.
3
Caution:
4 Outside layout
The right-hand panel of the outside of your
brochure will be the front cover, and the
centre panel will be the back cover.
Designs with
bleeds must
be printed on
larger paper
and then
trimmed to
finished size,
which
increases the
printing cost.
Blocks of color or images you
would like to print right to the
edge of the page must be
formatted to extend beyond the
edge of the paper. This is called
a “bleed”. Ask your printer how
far bleeds should extend in your
design. 1/4 inch is sufficient for
most purposes. Only extend a
bleed over a fold if you want it to
print on more than one panel.


© Copyright 2026