
Small Commercial Building Design in Canton, Maine
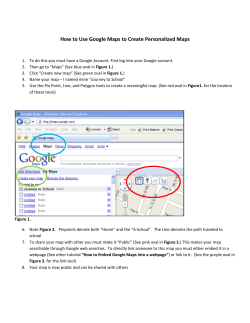
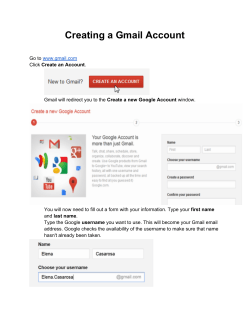
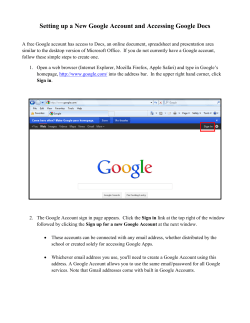
Small Commercial Building Design in
Canton, Maine
A Major Qualifying Project to be submitted to the faculty of
Worcester Polytechnic Institute in partial fulfillment of the
requirements for the Degree of Bachelor of Science
Submitted by:
Amanda Jenkins
Heather Trowbridge
Submitted to:
Dr. Malcolm Ray
Page | 1
Table of Contents
Table of Contents ................................................................................................................ 2 List of Figures ..................................................................................................................... 4 List of Tables ...................................................................................................................... 5 Abstract ............................................................................................................................... 6 Literature Review................................................................................................................ 7 Project Overview ............................................................................................................ 7 Canton, ME ..................................................................................................................... 7 Current Conditions ...................................................................................................... 7 History of Canton ........................................................................................................ 8 Basic Snowmobiling Information and Design Considerations ....................................... 9 Farmer’s Market............................................................................................................ 10 The Old Fire House ....................................................................................................... 11 Ice Cream Shop ............................................................................................................. 11 Methodology ..................................................................................................................... 13 Design of Snowmobile Bridge ...................................................................................... 13 Building Locations Plan for Downtown Canton ........................................................... 17 Design for Restoration of Firehouse ............................................................................. 18 Design for Main Street: Lots 39 and 41 ........................................................................ 20 Main St: Lot 41 ......................................................................................................... 20 Main St: Lot 39 ......................................................................................................... 23 Results ............................................................................................................................... 24 Technology Overview................................................................................................... 24 GPS Survey ............................................................................................................... 24 AutoDesk Revit ............................................................................................................. 26 Analytical Software ...................................................................................................... 27 RISA3D..................................................................................................................... 27 ANSYS Workbench .................................................................................................. 27 RISA 2D.................................................................................................................... 28 Google Sketch Up and Civil3D ................................................................................ 28 First Design Attempt ..................................................................................................... 29 Reconsidering Layout and Architectural Design .......................................................... 32 Structural Design .......................................................................................................... 34 Cost Estimate ................................................................................................................ 36 Warehouse Design ........................................................................................................ 38 First Design Attempt ................................................................................................. 38 Reconsidering Layout and Architectural Design .......................................................... 41 Structural Analysis of Warehouse ............................................................................ 42 Cost of Warehouse .................................................................................................... 44 Restored Firehouse........................................................................................................ 45 Design Attempt ......................................................................................................... 45 Structural Analysis .................................................................................................... 47 Cost of Firehouse ...................................................................................................... 50 Page | 2
Bridge Design ........................................................................................................... 51 Bridge Structural Calculations .................................................................................. 52 RISA2D Calculations................................................................................................ 54 Google Earth Placement ........................................................................................... 55 Cost Estimate ............................................................................................................ 55 Google SketchUp and Google Earth ............................................................................. 56 Conclusion .................................................................................................................... 59 Works Cited ...................................................................................................................... 60 Appendix A ....................................................................................................................... 63 Transferring a Revit File into Google Earth ................................................................. 63 Page | 3
List of Figures
Figure 1: Town of Canton, ME Overview with proposed buildings indicated. .................. 8 Figure 2: ITS Snowmobile Trail in the vicinity of Canton, Maine. .................................. 14 Figure 3: Truck Converted into a Snowmobile Trail Groomer. ....................................... 15 Figure 4: View of an unused bridge which might be recycled to the new location ......... 15 Figure 5: Dam Where Proposed Bridge Will be Located ................................................ 16 Figure 6: View of Proposed Bridge for Reuse .................................................................. 16 Figure 7: Overview of Buildable Area.............................................................................. 17 Figure 8: Firehouse SketchUp Drawing ........................................................................... 18 Figure 9: Current Firehouse Interior View ...................................................................... 19 Figure 10: Exterior Structural Damage to Firehouse ........................................................ 20 Figure 11: Potential Warehouse Design ........................................................................... 21 Figure 12: Existing Slab in Lot ......................................................................................... 22 Figure 13: Downtown Canton Survey Data ...................................................................... 24 Figure 14: Warehouse Existing Foundation ..................................................................... 25 Figure 15: Existing Bridge Piers ....................................................................................... 25 Figure 16: Historical Photo of Downtown Canton ........................................................... 29 Figure 17: Rendering of the First Design of the Ice Cream Shop .................................... 30 Figure 18: First Floor Plan of the First Ice Cream Shop Design ...................................... 31 Figure 19: Second floor Plan of the First Design ............................................................. 31 Figure 20: Exterior view of Ice Cream Shop .................................................................... 32 Figure 21: Final Design First Floor View ......................................................................... 33 Figure 22: Second Floor Final Design .............................................................................. 34 Figure 23: Structural Elements ......................................................................................... 35 Figure 24: Architectural Warehouse Rendering ............................................................... 39 Figure 25: Back of Warehouse ......................................................................................... 39 Figure 26: Structural View of Warehouse ........................................................................ 40 Figure 27: Floor Plan ........................................................................................................ 40 Figure 28: Wood Warehouse Revit Model ....................................................................... 41 Figure 29: View 2 of Warehouse ...................................................................................... 42 Figure 30: RISA Warehouse File ...................................................................................... 43 Figure 31: Level 1 Firehouse ............................................................................................ 46 Figure 32: Level 2 Firehouse ............................................................................................ 46 Figure 33: 3D Firehouse View .......................................................................................... 47 Figure 34: 3D Structural Firehouse................................................................................... 48 Figure 35: RISA wireframe of Firehouse ......................................................................... 48 Figure 36: Bridge Dimensions .......................................................................................... 51 Figure 37: Bridge Design Based off CAD File................................................................. 52 Figure 38: Revit Bridge Model ......................................................................................... 52 Figure 39: Maximum Loading Combination with Deflection .......................................... 54 Figure 40: Proposed and Existing Construction in Google Earth ..................................... 57 Figure 41: Google Earth Full View of Downtown with New Construction ..................... 57 Figure 42: View from Rt 140 of Downtown Canton ........................................................ 58 Figure 43: Overview of Site ............................................................................................. 58 Page | 4
List of Tables
Table 1: Loading Types .................................................................................................... 35 Table 2: Ice Cream Shop Joint Deflections ...................................................................... 36 Table 3: Ice Cream Shop Member Deflections................................................................. 36 Table 4: Ice Cream Shop Acceptable Deflections ............................................................ 36 Table 5: Cost Estimate of Ice Cream Shop ....................................................................... 37 Table 6: Warehouse Loading Conditions ......................................................................... 43 Table 7: Warehouse Joint Deflection Information............................................................ 43 Table 8: Warehouse Acceptable Deflections .................................................................... 44 Table 9: Cost Analysis for Warehouse ............................................................................. 45 Table 10: Loading Conditions for Firehouse .................................................................... 49 Table 11: Limiting Deflections for Firehouse .................................................................. 49 Table 12: Acceptable Deflection of Firehouse ................................................................. 49 Table 13: Firehouse Cost Breakdown ............................................................................... 50 Table 14: Acceptable Deflections for Bridge ................................................................... 54 Table 15: Bridge Cost Analysis ........................................................................................ 56 Page | 5
Abstract
Our major qualifying project combined structural design with Building
Information Modeling (BIM) technology. We applied our knowledge of wood structures
to the revitalization of downtown Canton, Maine. The scope of our project entailed
design and analysis of three buildings and a snowmobile bridge. Two of the buildings
were new construction and one was an old firehouse requiring structural restoration.
After evaluating the town’s needs, we created three dimensional BIM models using Revit
Architecture and Revit Structures. These models were then exported into Google Earth
where they were placed on the actual terrain, enabling a more accurate vision of the
downtown area.
Our final project provides structural analysis, cost estimates, and a visual
representation of the entire redevelopment potential. We hope that these designs will be
built in the future by the residents of Canton. Adding them to the area would greatly
increase the tourism and provide more services for current residents. This project has the
potential to become more than Google Earth images, and could eventually contribute to
the restoration of Canton, Maine.
Page | 6
Literature Review
Project Overview
The purpose of this Major Qualifying Project is to investigate the revitalization of
a portion of the town of Canton, ME and create feasible designs for the construction and
renovations of three buildings and a bridge in the downtown area. There are two empty
lots where small commercial buildings could be constructed; one could be used as an
indoor flea market and farmers market, and the other could be used as an ice cream parlor
and laundromat, with an apartment included on the second floor. An abandoned fire
house in bad condition with a collapsing roof is going to be investigated to determine if it
can be renovated, or if demolition and rebuilding is a better option. It could be used as a
small commercial space on the first floor and an apartment on the second. A snowmobile
trail runs through Canton, Maine, but there is currently no bridge across the river
providing access to the downtown area. The final component of our project is to design a
bridge that will provide this access and re-use the three abandoned concrete bridge piers
and two abutments currently in the middle of the river.
Canton, ME
Current Conditions
The town of Canton is located in Oxford County, in western Maine. It has a population
of approximately 1,100 (July 2008), and has not experienced much growth since 1870
when the population was 984 residents (Historical Sketch, 2009). Today the downtown
area consists of a few shops, and only has one main intersection although 50 years ago
the downtown area had many small shops and businesses. A lake used for recreation as
Page | 7
well as notable snowmobile trails draw in tourists and visitors throughout the year. In
this rural community, the most common industries for residents to work in are
construction and paper manufacturing for males, and healthcare and education for
females (City-Data.com, 2008). Because of the remote location of the town, residents
have to drive between 15 and 20 miles to reach many necessary services such as grocery
stores, discount department stores, malls and restaurants. Many of the businesses in
town, such as the convenience store, are designed to attract tourists and gain much of
their profit from the snowmobiling population in the winter (2008 IQP).
Ice Cream
Shop
Old
Firehouse
Farmer’s
Market
Snowmobile
Bridge
ITS 89
Figure 1: Town of Canton, ME Overview with proposed buildings indicated.
History of Canton
Canton, Maine was originally settled by the Ansagunticook Indians who were
wiped out by small pox. In the late 1700’s, the land was given to soldiers for their
services in the French and Indian War. It became incorporated as the town of Jay in
1795, while Maine was still considered to be a part of Massachusetts. Jay became known
Page | 8
as an agricultural town because of the rich soil and the nearby river and lake which could
provide power to the town. Mills, factories and a railroad came to the town in the 1800s,
and it became a place of commerce and tourism. This led to the Canton area splitting off
from Jay the name of the central village area being changed to Hayford Mills, then
Canton Mills, which was shortened to the current name- Canton. Since then, the town
has not experienced much growth, but continues to remain rural. (2008 IQP)
Basic Snowmobiling Information and Design Considerations
The town of Canton, Maine is a popular destination for snowmobilers. ITS 89, a
major state snowmobile route, crosses through town just at the edge of the downtown. A
new bridge leading into the down town area could draw in tourists and customers for the
local businesses. There are many factors that must be considered when designing this
bridge, such as the expenses, usage and general snowmobiling laws. There are no speed
limits for snowmobiles in Maine, so it is expected that people use common courtesy and
slow down before bridges and respect other users (Maine Snowmobile Association
2009). This means that a functional bridge should be easily visible and well marked to
avoid accidents. Funding for area snowmobile trails come from the fees that are required
by the state to register your snow vehicle. Since 75 percent of the fees are spent on trail
maintenance and improvements, this could be a possible source of funding for the bridge
restoration project. (Maine Snowmobile Association, 2009) Another source of funding is
the local businesses that would benefit from snowmobilers coming into downtown.
Page | 9
One of our objectives for designing this bridge is to make it adequate to the
anticipated snowmobile traffic. There are many snow mobile clubs in the area, including
one that is located in the town of Canton that would benefit from the bridge. The project
team will get in contact with the Canton Hi Riders to discuss their views on what should
be done.
An examination of similar bridge restoration projects showed that in many cases it
is less expensive to start with a completely new bridge, including supports. Depending
on the condition of the supports over the river in Canton, this may be a possibility that we
will investigate in our design process. The bridges examined were mainly designed from
steel and timber and were designed for a weight load of 12,000 lbs, and ranged in cost
from $50,000 to $75,000 with design and construction costs. These bridges ranged in
length from 45 to 85 feet, similar to the one that will be built in Canton (Snowmobile
Restoration, 2008).
Farmer’s Market
There are two open lots currently in the center of town that are owned by the
town. These two parcels could be developed and used by businesses that would help
draw more people to the town, as well as allowing the present citizens to be able to fulfill
needs without having to travel outside of their hometown. One of the structures being
considered could be used to house craft fairs and flea markets. This building would draw
visitors in from other towns and perhaps encourage tourists to stop on their way through
Canton.
In designing the farmer’s market, the functionality of the building as well as what
it will be mainly used for will determine the design choices. Things such as safety, price,
Page | 10
and maximizing the space are going to be vital in the success of the building (Hacker,
2009).
The Old Fire House
Presently, there is an old firehouse in Canton, ME which is vacant and in very
poor structural condition. In its decrepit state, it is not helping the economic growth of
the town because it has no function and is an eyesore located in a prominent area of town.
There are two options as to how this historic brick building can be renovated. It can
either be restored by framing the interior and keeping the existing walls in place, or it can
be torn down and rebuilt. Due to its age and historic value to the town, the preferable
solution might be to keep the exterior looking the same. The only difficulty with this
option is that it may not be the most cost effective way to complete the project
(Wallender, 2009).
If the building is to be renovated, certain aspects must be taken into consideration.
Depending upon how structurally safe the windows, walls, and roof are; they may still be
salvageable. Things such as plumbing and electricity will need to be brought up to code
so that the building will pass inspection. If this can successfully be accomplished, then
the old firehouse can be transformed into a diner with a small efficiency apartment on the
second floor.
Ice Cream Shop The 25 foot by 30 foot lot next to the proposed warehouse could be developed and
use as an two story building with the first floor reserved for businesses and the second for
a small two bedroom apartment. The desired businesses for this location are an ice cream
shop and a laundromat. The ice cream shop would draw customers and tourists into the
Page | 11
downtown area in the summer, and the laundromat would provide a place for apartment
dwellers in the downtown area, as well as nearby campers and vacationers to wash their
clothes. A wood structure would be the least expensive option and would blend in well
with the rest of the buildings in downtown Canton.
Page | 12
Methodology
This project develops preliminary designs of a snowmobile bridge, firehouse, and
two small commercial buildings on the two currently vacant lots. The construction of
these facilities would bring more visitors into the town of Canton, Maine and give
residents more local amenities as well as provide some jobs. In order to fully accomplish
the designs for these four structures, we must follow specific steps which we have
outlined in our methodology.
Design of Snowmobile Bridge
One component of our project is to reconstruct a snowmobile bridge crossing into
the downtown area of Canton. To construct an effective and safe bridge, many steps
must be taken prior to construction. First, an analysis of traffic and usage of the bridge
must be created, along with typical snow loads to determine what kind of loading the
bridge must be able to withstand. This was done by discussing with the Canton
snowmobile club the usage, and looking up local snow load indexes and building codes
for such bridges. A two lane design is necessary because of the volumes of traffic
coming in and out of the downtown area, as the bridge connects to one of the major
snowmobile “highways” in the area, ITS 89 (figure 2).
Page | 13
Figure 2: ITS Snowmobile Trail in the vicinity of Canton, Maine.
Types of materials were originally investigated to determine which types of
designs and materials are most effective for this type of bridge construction. Steel,
timber and concrete, among other types of materials were investigated in different
designs for safety and cost effectiveness.
During the October visit to Canton, Maine, a meeting with the Snowmobile club
in the area revealed that an older bridge from another stream was under consideration to
be moved to cross the river across the existing concrete pilings. This existing bridge was
48 feet long and would need to be added to and analyzed before a decision could be
made, to determine whether this bridge could safely be placed in this new location. The
snowmobile bridge must be able to support the largest groomers, pictured below, which
weigh up to 7,000 lbs with their equipment.
Page | 14
Figure 3: Truck Converted into a Snowmobile Trail Groomer.
Figure 4: View of an unused bridge which might be recycled to the new location
Figure 4 shows a photograph of the bridge that could be moved to the new location across
the concrete piers in the below photograph. This bridge currently runs across a different
part of the snowmobile trail and would be moved on the back of a truck to the new
location. The truss part of this bridge would be removed, and a railing would be added to
the base which would be secured to the existing concrete piers. An additional section of
Page | 15
bridge using the same dimension lumber will be added to the existing one to complete its
span.
Figure 5: Dam Where Proposed Bridge Will be Located
The existing bridge is a truss with 2x6 boards running across it laterally and
2x12s with plywood reinforcements running as girders through the length of it. The base
of the bridge has a width of 9’ 6” and is wide enough to allow for two snowmobiles to
cross in opposing directions, or for the largest grooming trucks to work on the path. This
is the most cost effective option and an analysis using hand calculations and the computer
program RISA 2D was used to determine if the deflections and stresses in each member
were acceptable.
Figure 6: View of Proposed Bridge for Reuse
Page | 16
Afterward, a model was created in Revit, which allowed the quantities of wood used to
be exported, as well as a 3 dimensional design which accurately depicted the existing
bridge. This design was then imported into Google SketchUp and Google Earth so that
how it looked across the river could be seen.
Building Locations Plan for Downtown Canton
The following map illustrates the locations of the building lots for our project.
The different lots in the downtown area are highlighted and numbered. The ice cream
shop will be located on lot number 39, the warehouse on 41, and the firehouse on the
corner of 37. The bridge is shown below as a yellow line crossing between lots 37 and
41. The red lines indicate required setbacks based on Maine’s zoning regulations. (2009
IQP)
Figure 7: Overview of Buildable Area.
Page | 17
Design for Restoration of Firehouse
After visiting Canton and speaking with Professor Ray and other town residents
such as the president of the Hi Riders, the local snowmobile club, it was determined that
the existing shell of the firehouse structure could be salvaged and a small diner would be
the business best suited for the first floor. The interior of the building is empty, and other
buildings which were in worse condition have also been restored to their former store
fronts. A quality restaurant would draw residents and summer and winter tourists into
town because there are no restaurants nearby on the snowmobile/ATV highway that are
easily accessible. The restaurant could be firehouse themed, and keeping the original
shell of the building would add character to the downtown area and maintain the small
town feel.
In order to make the plans for this fire station easier to visualize, we will create
Google SketchUp or Autodesk Civil 3D designs showing the building as we envision it to
be after completion. Below is an example from the Google Warehouse (Google SketchUp
2009) of what we would like the design to resemble.
Figure 8: Firehouse SketchUp Drawing
Page | 18
The surveys we completed using GPS equipment can also be imported and used
in this design. This will allow people to see our plans and also make it easier for them to
understand where all of the costs will be distributed. A cost estimate will be prepared for
the restoration of the firehouse. We will base our estimate on the structural repairs, and
also speak to professionals to ensure that we are making accurate assumptions for prices
of work and materials. It will also be important to compare the price of completely
knocking down the structure and rebuilding it to the price of restoring it as it is now.
Our visit to Maine in October was very enlightening as to the condition of the
firehouse that we were working with. The exterior of the firehouse is cracked in several
places, but the foundation appears to be in decent working condition. The roof has caved
in and needs to be replaced with a gabled roof that would allow for an efficiency
apartment to be built on the second floor.
Figure 9: Current Firehouse Interior View
The photograph below illustrates the work that needs to be completed on the interior of
the fire house, and the other illustrates the damage to the outside structure that needs to
be fixed before the building is usable again.
Page | 19
Figure 10: Exterior Structural Damage to Firehouse
Design for Main Street: Lots 39 and 41
There are two lots in Canton that are currently not being utilized for anything.
They would make a great addition to the town if they were to be built on and could
potentially bring visitors in depending on what kind of buildings are placed on the land.
We would like to design a farmer’s market/craft market to go on one lot and on the other
lot we could place an ice cream shop and laundromat as well as another small apartment.
Main St: Lot 41 The flea market and craft fair area would be a great way to bring outsiders into
town. The way that business is working in Canton currently is that most of the residents
must leave in order to get their basic needs. Adding this building would create the
opposite effect by drawing people from surrounding towns. People would be coming
from surrounding towns which would also increase the business in other areas of town.
Lot 41 in the downtown area of Canton currently has a foundation on the site that
could be reused in constructing the new warehouse flea market building. This facility
Page | 20
could be made out of corrugated steel, with large garage doors opening to the outside,
allowing for it to be closed and heated in the winter, and more of an open air style market
in the summer months. The following Google SketchUp illustration is a sample of a
similar style of multiuse building that could be added to the site. Since different tourist
groups are attracted during the different seasons, there would be a year round flow of
customers. The SketchUp drawings will help us to create a building that is aesthetically
pleasing and enhances the town, but that will serve as a large open space.
Figure 11: Potential Warehouse Design
In the above zoning plan (figure 11) the land that can possibly be constructed on
in this lot is outlined in red within the cyan lot border. Between the red and the cyan
lines is land that is too near the water front or other property to be zoned for a
commercial building. There is about 48,000 square feet of buildable land on this lot and
the large land available will be useful for both the building and fulfilling parking
regulations (2009 IQP). Using current building codes, last years’ site designs and survey
results we will determine the best site layout and building design for this facility. We
will also investigate the amount of traffic to the building because the amount of vendors
Page | 21
and customers using it on a regular basis will determine the square footage needed and
therefore the parking lot size required.
Our visit to Canton, ME gave insight into the usability of this site for a
warehouse. Currently, it borders Whitney Brook very closely on the back and Route 108
on the front side, with a small paved parking area already existing in the front. This
unique placement means that the original foundation could be used by pouring a new slab
over the existing one to avoid zoning complications, since buildings cannot currently be
constructed that close to the river without special permitting. Below is a photograph of
the site to be used with the foundation, which is approximately 65 feet by 35 feet, that
previously existed.
Figure 12: Existing Slab in Lot
Page | 22
Main St: Lot 39 The ice cream shop and laundromat would allow for people to use facilities close
to home. Anyone without the proper equipment to do laundry either has to travel to be
able to do it, or buy washers and dryers. Since there are many seasonal camps around the
lake without proper laundry facilities, a laundromat is thought to be a viable business.
With the addition of more apartments to the center of Canton, it is even more imperative
that a facility such as this is added to the area. By adding more apartments, they are also
adding more affordable living for those who cannot afford to buy a house, or living in the
center may be more convenient for certain people. The ice cream shop, although not a
necessity, will bring in customers during the summer months and could also be used as a
diner for times when it may be too cold. All of these additions will add to Canton’s
center and bring in more money to the town, as well as more visitors. A survey of the
existing foundation, which was 25 feet by 30 feet, that will be used for the ice cream
shop/laundromat building was conducted. The data will be imported to Autodesk Civil
3D for use in designing a building that corresponds with the location and existing
foundation. This foundation was mostly covered by dirt and grass, but a new slab could
be poured in the same area to ease problems with zoning regulations.
Page | 23
Results
Technology Overview GPS Survey Global Positioning System (GPS) is used by many different establishments to
create extremely accurate topographical information. GPS is a new technology for
surveyors that allows for an accuracy of +/- ½ inch. Upon our visit to the site, we used
GPS equipment to get detailed information about the existing foundations so that we
would know exactly what dimensions we should used in our design.
The following figure is a representation of the intersection abutting the lots that
our main buildings are located on. These points, taken using GPS equipment and
connected in a program called Sitework, can be linked to GIS systems such as Google
Earth and can also be transferred into Google Sketch up or Autodesk programs to further
design based on existing conditions. We will be able to use these coordinates to design
the building and place it in its exact location in Google earth to see how it will look, and
how the existing foundation will affect the building design.
Figure 13: Downtown Canton Survey Data
Page | 24
This is a visual aid showing the footprint that we will be using for the warehouse
foundation when designing the new farmer’s market.
Figure 14: Warehouse Existing Foundation
The existing bridge piers will be reused, and in order to get completely accurate
information to ensure that the bridge placed on the piers will be safe, we used GPS to
determine the area of the top of the piers, their distances apart, and the depth to the water
below.
Figure 15: Existing Bridge Piers
Page | 25
AutoDesk Revit AutoDesk Revit is a versatile program that allows for the design of structures
using parametric object design so that a model that contains data about its materials can
be created. Revit is divided into two different programs - Revit Architecture (RA) and
Revit Structures (RS) but both use the same type of file- .rvt. The two programs can
share files and contribute different things to the same design. RA allows for detailed
architectural design of the building and site and offers many different material options for
walls, floors and roofs that can be modified to most accurately reflect the actual design of
the building.
Revit Structure allows structural items such as foundations, load bearing walls,
columns, beams and girders. These items do not interfere with the architectural items
that are selected, and can be connected to each other to form a structural design. This
program can allow the whole structure to be examined through various 3D and 2D views.
Floor plans with architectural details, structural plans, 3 dimensional renderings and
exterior views are among those we used to design and view our structures. Since Revit
creates Building Information Models, editing one view of the structure modifies that
piece of it in every view, making it more efficient than AutoCAD drawings where
multiple plans and views must be edited. Revit also contains information about all of the
materials that are used in the project, and can create door, window, wall and structural
schedules, which were very useful when we estimated costs of the various structures.
Since Revit is a part of AutoDesk, the points that were imported from our original
on site survey can also be used to place the buildings accurately in Google Earth, or on
the existing terrain in the area. These files could also be exported as .dwg files to Google
SketchUp to be imported into Google earth.
Page | 26
Analytical Software RISA3D The first analytical software we attempted to use was RISA 3D. Since RISA is
difficult to create detailed structures in, and Revit does not complete the calculations, we
researched ways to combine the two programs. We found that both programs are
compatible with each other and we could export the Revit files in the .dxf format, then
import them into RISA. An outline of the structure will appear, complete with the loads
that were added in Revit. This allows the structure to be analyzed and the performance of
the elements of the structure to be calculated.
Unfortunately, after attempting this several times, we realized that although the
structure itself would import into RISA none of the material properties were retained.
Additionally, since our structure contained too many nodes and members, it was too large
for the trial version of RISA 3D to solve.
ANSYS Workbench After working with RISA3D, we tried using ANSYS, finite element analysis software
that can be used in more complex forms and is fully available on campus. Revit files
could be exported as .sat files and imported into ANSYS. Unlike RISA, ANSYS could
import the full 3D model, and it appeared to look like the original Revit files, however
once again, none of the material properties were maintained. The connections between
joints were also not correctly imported into ANSYS, which made all of the analyses
incorrect. Since there were so many connections, we decided to use a different program
to analyze more basic trusses in the structure.
Page | 27
RISA 2D RISA 2D was selected as the program to analyze slices of the building because of its
simplicity and ability to complete many load combinations at once. We were able to draw
the trusses and select the material, and all of the properties were preselected and
maintained. RISA2D also allowed us to select the desired loadings for each type of load
(Roof Live Load, Wind Load etc) and compiles and applies the ASCE loading
combinations automatically to the structure. After they are solved for, it is possible to see
deformations and results of each load combination, and it is simple to determine the most
severe deflections, and whether or not they are acceptable for the structure.
Google Sketch Up and Civil3D Rendered drawings are an integral part of this project, and two different programs
are being considered to create models of the buildings and bridge that our project
involves. Google Sketch Up and Civil 3D are both available on campus for the design
and visualization of these structures and allow integration of the drawn models into actual
terrain. SketchUp was released in 2000 and acquired by Google in 2006 and is free and
available online. Since it was acquired by Google, it has been partnered with Google
Earth, and allows for the importing of 3D renderings into Google Earth where they are
available to all users. AutoCAD Civil 3D allows terrain to be imported from GIS data
and creates more detailed drawings that can also be seen in their environments
(AutoCAD Civil 3D, 2009). Though they are not visible to other users, it is a powerful
program and allows for more detailed renderings than Google SketchUp.
The design of the building in down town Canton was created to fit in with the downtown
architecture and to house both an apartment and some small businesses. A two story
wood structure was selected so that the building would be similar to others in the
Page | 28
downtown area, and less expensive to construct.
The building was modeled after the
original one that stood on the cement slab foundation that is being reused for the new
construction. The original downtown area is shown in the figure below, as it looked
before it was damaged by floods and fires.
Figure 16: Historical Photo of Downtown Canton
First Design Attempt
The building was designed to incorporate two businesses on the first floor-an ice cream
stand in the front, easily visible from the street, and a laundromat in the rear section
accessible from a side entrance. The lot is the size of the existing foundation, 25 x 30
feet and abuts the river. The slab is in good enough condition that it can be reused, and is
close enough to bedrock that no excavation is needed. The first design attempt was very
simplistic and included the necessary services without much architectural detail. The
material for structural construction was chosen to be CMU blocks with a brick exterior to
match the restored hair salon and office building that was recently completed next door.
Page | 29
Figure 17: Rendering of the First Design of the Ice Cream Shop
The first floor was to include and ice cream parlor and laundromat with a storage area
and restroom facilities, while the second floor housed a 2 bedroom, one bathroom
apartment. The ice cream shop was designed to include indoor seating so that it could be
open year round. As can be seen in Figure 18, the ice cream shop had space for both
service and for customers to eat inside, as well as a restroom and storage closet. The side
hallway housed the staircase to the second floor apartment as well as several washers and
dryers.
Page | 30
Figure 18: First Floor Plan of the First Ice Cream Shop Design
The second floor layout can be seen in 19, below. Two bedrooms are located on the left
hand side of the drawing, and a bathroom on the upper right hand side. The remaining
open area was to be used for an open kitchen, living and dining room area.
Figure 19: Second floor Plan of the First Design
The walls of the second floor were 5 feet on the pitched roof sides, and the ceiling in the
middle was vaulted to a height of 10 feet. There was no use for attic space in this
Page | 31
building, since it would all be used by renters, so the ceiling would be insulated and
supported by 2x12 rafters.
This design was revised to provide more space to the apartment renters, as well as to
make the ice cream shop a seasonal facility and include more laundromat space.
Reconsidering Layout and Architectural Design
After examining the previously existing buildings, and the possible space constraints of
the first design, a second iteration was created.
Figure 20: Exterior view of Ice Cream Shop
As can be seen in the rendering, the lower floor was made smaller, and a porch and
window service area was created for the ice cream shop. The overhang of the second
story was designed to mimic the previous version of the building that was destroyed by
Page | 32
the fire and floods along the river. A combination of trusses and rafters were used to
create the roof structure with the gables.
The layout of the first floor can be seen below. The stairwell to the upstairs apartment
will serve as the division between the ice cream shop and the laundromat. This design
will allow employees to enter the store, and apartment dwellers to have easy access to the
laundromat below. The ice cream shop will consist mainly of a service counter and
storage space, with service windows where customers can buy their ice cream and a
bathroom will be located in the rear of the laundromat. Only employees of the ice cream
shop will be permitted to use it, since customers do not enter the shop.
Figure 21: Final Design First Floor View
The second floor will house a 2 bedroom, one bathroom apartment with a gabled roof.
The four peaks fall in line so that each bedroom will have vaulted ceilings, as well as the
kitchen and dining/living room area. The lowest ceiling falls above the bathroom and the
stairwell, and meets the wall at a height of 5 feet. The bedrooms are located in the rear
Page | 33
of the apartment and have views overlooking the river and fields behind it, which will
allow for more privacy than if they faced the street. The living and dining area is large
enough to house a dining room table as well as typical living room furniture.
Figure 22: Second Floor Final Design
As can be seen in the above floor plan, stairwell leads directly into the living/ dining
room area, as well as next to the first bedroom. The kitchen area is connected, as is a full
bathroom. The second bedroom opens near the bathroom. The bedroom areas are 10’8”
x 12’ and 10’8”x13’ which will provide adequate space for furniture and storage.
Structural Design
This building is to be constructed out of wood, and framed with 2x4 pieces of wood as
well as prefabricated Howe trusses that will form the gabled roof and allow for higher
interior ceilings on the second floor. The trusses are to be placed 2 feet on center, as are
the 2x4 studs inside the structural walls. The floor framing uses 2x6 foot girders which
Page | 34
are also located 2’ on center spanning between the structural interior walls and the beams
exterior studs.
Figure 23: Structural Elements
Slices of this design were analyzed using the program RISA 2D using ASCE 2005
loading combinations. The loads were applied in accordance with these combinations
and with the required loading (International Residential Code, 2000) for the uses and
location.
Table 1: Loading Types
Load Type
Wind Load
Snow Load
Residential 2nd Floor Live Load
Roof Live Load
Roof Dead Load
PSF
12.7
90
20
20
30
PLF
25.4
180
40
40
60
Page | 35
After these loads were applied the maximum deflections were found at each joint and in
each member in the structure. The maximum joint deflections that were found are shown
in the table below.
Table 2: Ice Cream Shop Joint Deflections
X axis
0.031
-0.038
MAX
MIN
Y Axis
0
-0.102
The maximum deflection in each member is shown in the table below in inches. These
deflections are acceptable since there is no access to the roof and the maximum
deflections under snow will not be very noticeable to residents of the apartment.
Table 3: Ice Cream Shop Member Deflections
Max Deflection
Min Deflection
X Direction
0.078
-0.106
Y Direction
1.202
-1.204
Under the worst case loading, the roof truss members only deflect -1.204 inches
downward which is acceptable. The maximum allowable deflection is 1.25 inches since
the span is 25 feet, using the L/240 standard equation (ASCE 2010).
Table 4: Ice Cream Shop Acceptable Deflections
Acceptable Deflection
Passes
1.2
Cost Estimate
The costs for this construction project were estimated using the average costs for typical
residential construction costs based on material and labor. (Ogershok, 2008) Revit
Architecture and Revit Structure allow for the exportation of schedules of material, which
Page | 36
allows you to review information about all of the building supplies that will be used in
construction. Once these quantities are determined, the unit cost can be applied, and the
total cost estimate calculated.
Table 5: Cost Estimate of Ice Cream Shop
Category
Cost
Structural
$14423.12
Flooring
$6654.70
Ceiling
$4770.88
Roofing
$18000.00
Doors and Windows
$6477.60
Walls
$10361.62
Electric
$16967.48
Plumbing
$8309.00
Stairs
$2800.00
Total
$85964.40
The cost of structural framing includes all structural work, from the prefabricated
trusses to the labor required to place all of the wood structures. Structural and stud grade
lumber is used based on the use of the wood, and plywood is used for subfloor
construction as well as a base for exterior walls. The flooring costs are based on
finishing the slab on grade basement as well as the plywood subfloor on the second floor.
Linoleum tiles will be laid over the slab on the first floor in both the laundromat and ice
cream shop as it is easy to clean and inexpensive. The apartment will have hardwood
flooring since it lasts a long time and is easy to clean and maintain. The ceilings will be
Page | 37
hung gypsum board on both floors. The second floor, due to the unusual ceiling design is
more expensive to insulate and cover, but since the design allows for extra height and less
wasted space between the ceiling and the roof, it is worth the cost.
The cost of the exterior walls includes the insulation, the interior gypsum board
and the exterior siding of the building. The wiring and plumbing costs, as well as the
furnace are based on typical residential costs for two story buildings of the same square
footage.
Since no foundation or site work is required for this project it is less expensive
than comparable construction would be on a site that did require such work.
Warehouse Design First Design Attempt To begin designing the warehouse for Canton, we first tried to use the program
RISA3D. After RISA3D failed to work, we began using Revit Architecture and
Structural. From our visit to the site where the warehouse would be located, we knew
that we would have to keep the dimensions the same as those of the original warehouse
foundation. As previously discussed, we used GPS surveying to get dimensions of the
existing foundation and used those dimensions, which are precise within +/- ½ inch, to
create our model. We knew that this space would be used for craft fairs, farmer’s
markets, and flea markets so we wanted to use garage doors to enable people to open the
building up in the summer, but also have the option of closing it during the winter and
using another entrance (i.e., see figure 24). We also wanted to keep the interior as one
large space to accommodate a flea market/farmer’s market function.
Page | 38
Figure 24: Architectural Warehouse Rendering
We also wanted to put in as many windows as possible so that the lighting would be
natural and require less artificial lighting (see figure 25). Also, the view to the water
down below would be attractive and we did not want to close the building off so that this
area would not be visibile.
Figure 25: Back of Warehouse
Page | 39
After creating a general outline for the architectural aspects of the warehouse, we
were then able to link the Structural and Architectural files together to begin creating
structural drawing for the warehouse (see figure 26).
Figure 26: Structural View of Warehouse
The first design that we explored used a concrete masonry unit (CMU) structural wall
with insulation to help keep the heat in the building. We then added Howe Gabled 6panel trusses 24” on center consisting of 2x12 dimension lumber. Finally, we put a
column in the center of the design to help distribute some of the loading from the roof to
the foundation.
Figure 27: Floor Plan
Page | 40
Reconsidering Layout and Architectural Design
We reviewed the designs more thoroughly and realized that by using CMU
structural walls and 2x12 dimension lumber, we were overdesigning the structure and
also that the cost could be lowered by construction the building solely out of wood. We
then created a Revit model to reflect our new design, which consists of 2x6 dimensional
lumber and wooden shingle siding, no CMU walls, and no center column. Shown below
is the 3-D structural view of the Revit model (see figure 28)
Figure 28: Wood Warehouse Revit Model
Figure 29 shows another rendered structural view of the warehouse with the exterior
plywood hidden to make the 2x6 wall studs more visible.
Page | 41
Figure 29: View 2 of Warehouse
The columns are also 2x6 dimensional lumber. After redrawing the Revit file, it was then
ready to be exported to a structural program.
Structural Analysis of Warehouse After we finished creating a potential structural plan, we worked on getting the
Structural file imported into RISA3D. The file created in Revit Structural can easily be
imported into RISA, but our license does not allow us analyze structures with as many
members as were in the warehouse design, so we redrew cross sections to be used in
RISA2D.
The next step is to determine if this design was adequate based on the anticipated
loadings, and if it is not, we will begin increasing the size of the elements involved in the
design.
Page | 42
Figure 30: RISA Warehouse File
The cross section was tested using the loads shown below and was evaluated for all ASD
2005 loading combinations. (International Residential Code 2000)
Table 6: Warehouse Loading Conditions
Loading Conditions
Loading (lb/f)
Wind Load
41.4
Roof Live Load
40
Snow Load
180
Dead Load
13.4
This loading combination carried out in RISA2D produced information for each of the
ASCE loading combinations. After exporting the joint deflection information into Excel,
the results were as follows.
Table 7: Warehouse Joint Deflection Information
Limiting Value
X-Direction (inches)
Y-Direction (inches)
.163
-.396
Page | 43
The span of the truss is thirty five feet so the deflection limitation is based off of the
equation length (inches)/240 (ASCE 2010). The result of that calculation is that the
allowable deflection is 1.75 inches which is significantly lower than the deflections
expected by the structure with the above loading.
Table 8: Warehouse Acceptable Deflections
Acceptable Deflection (inches)
Passes
1.75
Cost of Warehouse The cost of the warehouse was a big factor in determining how it would look.
Considering that we are not going to be pouring a slab because we will be using the
existing slab, and that we altered the warehouse to contain all wood, the cost was brought
down significantly. The people in the town of Canton wanted to be able to build these
structures for fairly low costs and potentially by hand, so this was also an important
factor.
Although we wanted the lowest cost, we also wanted to make sure the buildings
fit in with those existing in the area. To do so, we checked two different pricing options.
The first would be with a brick exterior (to match the other buildings) and the second
would be with wood siding. The breakdown of costs, which was obtained using RS
Means (Waier, 2009), is shown below.
Page | 44
Table 9: Cost Analysis for Warehouse
Shell
Interiors
Services
Fees
Total
Brick (cost/sqft)
Wood (cost/sqft)
$40.00
$10.00
$13.00
$34.00
$97.00
$25.00
$10.00
$10.00
$17.00
$62.00
After looking at the breakdown, it is evident that although brick would look nice
and match some of the other nearby existing buildings, if the town wants to build the area
up all at once for the least amount of money, wood is the best option. Using a unit cost of
$62.00 per square foot and the floor area of 2275 square-feet, the total cost of the
structure built on the existing foundation is $141,050. This is not extremely expensive,
and would bring many people into the town, so it would definitely be worth it!
Restored Firehouse Design Attempt The firehouse needed to be used as a small restaurant as well as an apartment. In
order to accomplish this, we decided to make a large open area closest to the street
because the street runs along the left side of the picture in figure 31. There is a bathroom
in the restaurant area for guests, and the staircase for the apartment leaser to use runs
along the side of the building so that they can park in the open area next to the parking lot
which will hopefully be a parking lot in the future!
Page | 45
Figure 31: Level 1 Firehouse
This is the second floor of the firehouse building (see figure 32). The living area
for the house is located at the area marked “1”. There are two bedrooms which could be
used for a single person with an office, or could be rented out for two people. The
bedrooms are located at number 2 and 3 and are about 120 square feet each. The
bathroom is in the bottom right at number 4. By doing this, we are able to keep the
firehouse in the same location and continue to use the existing walls, but add 2x4
structural framing on the interior because the exterior is not in a condition to hold
loading.
1
2
3
4
Figure 32: Level 2 Firehouse
Page | 46
The figure shown below is what we expect the firehouse to look like after
renovation. It will be more aesthetically pleasing, which is important because it is on the
main road in the center of Canton. It will keep the same feel as the old firehouse, and
take advantage of what is currently wasted space. This will allow for the center to bring
in more money.
Figure 33: 3D Firehouse View
Structural Analysis In order to make sure that these designs were possible, we took a cross section
and analyzed it in RISA2D. The picture below shows some of the structural elements of
the firehouse. We are leaving the exterior walls, so the only thing that we will be adding
are interior walls and structural elements to ensure that the interior is able to withstand its
own weight.
Page | 47
Figure 34: 3D Structural Firehouse
The figure below shows the cross sectional view of the firehouse that was used in
the structural analysis.
Figure 35: RISA wireframe of Firehouse
The loading situations (International Residential Code, 2000) are the same as were used
in the warehouse, but there is another consideration which was also used in the ice cream
shop. The building has two stories, so the dead load and live load of the second floor
must be tested also.
Page | 48
Table 10: Loading Conditions for Firehouse
Loading Conditions
Loading (lb/f)
Wind Load
41.4
Roof Live Load
40
Snow Load
180
Live Load (2nd Floor)
40
Dead Load
13.4
The values below are the deflections created using this scenario. The loading conditions
are all based off of ASD 2005 load combinations. (ASCE 2010).
Table 11: Limiting Deflections for Firehouse
X-Direction (inches)
Y-Direction (inches)
.06
-.238
Limiting Value
These are acceptable based on the equation of maximum allowable deflection length
(inches)/240. (ASCE 2010) The maximum deflection occurred in the center of the roof
truss which was expected. Although there are some minor deflections, none are as large
as the calculated value of 1.7 inches.
Table 12: Acceptable Deflection of Firehouse
Acceptable Deflection (inches)
Passes
1.7
Page | 49
Cost of Firehouse Calculating the cost of the firehouse was done slightly different than all of the other
buildings. There is an existing brick wall on the exterior so it is not necessary to consider
the cost of shingles for the building. We do not need a foundation because that is also
already poured. The rest of the building cost calculation was similar to that of the others
and was done with using RS Means. (Ogershok, 2008)
Table 13: Firehouse Cost Breakdown
Shell
Interiors
Services
Fees
Total
Interior Framing
$20.45
$12.34
$12.04
$25.00
$69.83
The total area of the building is 1122 square feet per floor, and it has two floors so
it has a total of 2244 square feet. This would work out to a total of $156,698.50 for the
project including the contractor and architectural fees. If the work were to be done by the
residents and not subbed out, then the project would be closer to $100,000 and it would
be fairly reasonable to complete for the town’s budget. Furthermore, it would be a great
addition to the center of Canton.
Page | 50
Bridge Design In order to evaluate the bridge, we first did hand calculations. The calculations
consisted of checking loading situations to ensure that the bridge that is already built can
be used across the existing piers. Below is an AutoCAD representation of the existing
bridge.
Figure 36: Bridge Dimensions
Once the AutoCad file was created with accurate dimensions, it was imported into Revit
Structures, where the bridge was constructed using structural members from the program,
and the CAD file as a template. Figure 37 shows a top view of the bridge Revit file.
Hand rails (required for the bridge) were added to replace the truss that will be removed
when the bridge is transported.
Page | 51
Figure 37: Bridge Design Based off CAD File
The rendered design can be seen below in Figure 38, as it will look when placed across
the preexisting concrete columns. The wood quantities and schedule were exported from
Revit so a cost model of a new bridge could be completed.
Figure 38: Revit Bridge Model
Bridge Structural Calculations Hand Calculations
In order to determine whether the snowmobile bridge currently crossing Whitney
Brook at another location could even be considered for use in the downtown location near
the dam, rough hand calculations had to be completed. These preliminary calculations
Page | 52
examined a worst case scenario over the widest spans to see if the bridge could resist the
moment caused by two snowmobile groomers placed in the middle of each of the spans.
Each of the spans (represented by the variable L) was estimated to be 26 feet, and the
weight of each groomer was estimated to be 7000 lbs. The 7000 lbs would be divided by
the four girders, meaning that each would receive a downward force (P) of 1750 lbs.
P
L
P
L
L
These calculations are repeated for the beams spanning the width of the bridge,
which are placed every three feet, and support the same 1750 lb loading as the girders.
According to chapter 3-22c of the AISC handbook, the multiplication factor to determine
the moment in a beam supported like the one above, for the maximum moment was 0.187
in the center of the beam. This resulted in a moment of 47,124 inch lbs in the girders and
a maximum moment of 11,781 inch lbs in the three foot planks.
The maximum stress in each beam and girder was determined using the equation
MC/I=σ, where M stands for the maximum moment, C is half the height of the beam and
I (moment of inertia) is equal to (base*height^3)/12 for each of the planks. Because the
girders were comprised of both 2x12 pieces of lumber with plywood sandwiched
between, we only included the strength of the timber, because the properties of the
plywood used were unknown. This allowed us to triple the moment of inertia for a
typical 2x12 piece of lumber and use that as our given value.
Page | 53
RISA2D Calculations Once the design of the bridge and loads were finalized, RISA 2D was used to create a
basic analysis of the structure using typical loads. The girders were analyzed by applying
the 90 plf snow load, as well as a 13.1 plf dead load and two point loads of 3500 lbs to
the 23 foot spans between the pre existing concrete columns. ASCE 2005 Strength
standard load combinations were used to determine the deflection of each piece of the
structure.
Figure 39: Maximum Loading Combination with Deflection
Figure 39 shows the deflections on each section of the bridge girders with the maximum
loading combinations. In the figure, the deflection is multiplied by a factor of 40 so that
it is more easily visible. The actual deflection for this load is 1.05 inches, which is less
than the allowable deflection of 1.15 inches. (Allowable deflection = length of section /
240) (ASCE 2010) The girders on this bridge are acceptable according to these
calculations and will support the weight of the groomers, as well as snow.
Table 14: Acceptable Deflections for Bridge
Acceptable Deflection (inches)
Passes
1.15
Page | 54
These calculations are based on new material, and the wood used is Douglas Fir
Larch. Since the bridge has already been used and the material has been deformed, the
bridge may not be capable of supporting the loads we have calculated.
Google Earth Placement Once the design and calculations for this bridge were completed, the final Revit drawing
was imported into Google Earth. It was placed in its proposed location, crossing the river
on the concrete pilings that currently exist.
Cost Estimate The cost of the extension of the bridge is estimated for typical wood construction for the
additional 23 feet that would need to be connected to the original bridge construction. If
the entire bridge were to be reconstructed, the cost would be much higher, and is also
estimated at the same rate. This does not include the price of transporting the original
bridge into place, since the exact method is unknown.
Page | 55
Table 15: Bridge Cost Analysis
Final Section
Entire Bridge Reconstruction
Materials
$806.50
$3226.00
Labor
$2070.00
$8280.00
Total
$2876.50
$11,506.00
Google SketchUp and Google Earth Google SketchUp and Google Earth are very valuable tools that help create images that
depict what the streetscape of downtown Canton will look like with the proposed
construction projects. We found several ways to bring our designs from Revit into
Google Earth. The first method we attempted was to export the Revit designs as .dwg
files and to import them into AutoDesk Civil3D. Civil3D has an option to publish the
drawings to Google Earth at a specified latitude and longitude. The buildings that were
imported were distorted, however and appeared in inaccurate colors and the location was
not always exact. Another problem with this was that only one picture could be imported
per file, so a full streetscape could not be viewed.
Google SketchUp was then used to import the .dwg files for each of the structures
where they could be modified in color then placed in the correct location on the
streetscape. Once imported into Google SketchUp, the buildings could be exploded,
meaning broken down into components, so that they could be colored and textured
differently. Multiple structures could be placed in the same file, which made the full
street view available. As can be seen in the figure below, the structures were added to the
terrain in Google Earth in their proposed locations. From left to right the buildings are the
renovated fire house, the proposed ice cream shop, an existing building owned by
Professor Ray and the proposed warehouse.
Page | 56
Figure 40: Proposed and Existing Construction in Google Earth
Figures 41 and 42 show all of the proposed construction for our project, including a
snowmobile bridge to the right of the warehouse. This view allows the viewer to see how
the new buildings will fit in with the current physical landscape as well as the building
footprints that come from the Google Earth satellite images. Since the terrain is three
dimensional, like the SketchUp objects, it provides a more accurate view of what the new
landscape will look like.
Figure 41: Google Earth Full View of Downtown with New Construction
Page | 57
Figure 42: View from Rt 140 of Downtown Canton
A view of the buildings as foot prints can also be created by zooming out from the street
level to a typical satellite map style view. This view was useful for determining that the
buildings were placed in the correct places in Canton. (To see directions on how to
import files from Revit to Google Earth as we have done here, see Appendix A.)
Figure 43: Overview of Site
Page | 58
Conclusion Our Major Qualifying Project began as just a structural design project, and it
turned into a learning experience that allowed us to explore the capabilities of Building
Information Modeling. The programs that we were able to use to design the buildings
allowed us to not only get a better understanding of structural analysis, but also to learn
software that the industry is just beginning to understand.
We set out to design buildings for three different locations in the center of
Canton, ME as well as a bridge connecting a snowmobile trail to the center. We were
able to do that, as well as publish all of the information to Google Earth so that when the
idea is proposed to the town, it will be easy for people to visualize the potential idea.
We hope that these buildings will be created in the near future to bring more
people into Canton and boost the economy of the town. They would also allow people to
stay in the town instead of going elsewhere for a laundromat, restaurant, farmer’s market,
and potential apartments. Until they are built, we have created a Google Earth file that
shows what they will look like on the actual topography of the area. Although they can be
seen online, our hope is that in a few years, you will be able to drive through Canton and
see them as well, and that our designs are not just Google Earth models, but buildings
that are actually being used and enjoyed by those in the town.
Page | 59
Works Cited
“American Society of Civil Engineers. Web. Winter 2010. <http://www.asce.org/>.”
"AutoCAD Civil 3D Civil Engineering Software - Autodesk." Autodesk - 2D and 3D
Design and Engineering Software for Architecture, Manufacturing, and Digital
Entertainment. 2009. Web. 15 Oct. 2009.
<http://usa.autodesk.com/adsk/servlet/pc/index?siteID=123112&id=3566722>.
"Bridge by JAWS - Google 3D Warehouse." Google SketchUp. Web. 15 Oct. 2009.
<http://sketchup.google.com/3dwarehouse/details?mid=3dbb3dcb048da4b568644
197e10427e0&prevstart=0>.
"Canton, Maine (ME 04221) Detailed Profile - relocation, real estate, crime, travel, jobs,
hospitals, schools, moving, houses, news, sex offenders." Stats about all US
cities. Web. 15 Oct. 2009. <http://www.city-data.com/city/Canton-Maine.html>.
"Downtown Warehouse by Andrew Armbruster - Google 3D Warehouse." Google
SketchUp. Web. 15 Oct. 2009.
<http://sketchup.google.com/3dwarehouse/details?mid=6169da35a3f614c2c8694
5123ccfbe7a&prevstart=12>.
"Firehouse by anonymous - Google 3D Warehouse." Google SketchUp. Web. 15 Oct.
2009.
<http://sketchup.google.com/3dwarehouse/details?mid=bcb2e2ae25f627d238c3cc
b6c332c5fd&prevstart=0>.
"Historical Sketch of CANTON, Maine." History Files at Rays-place.com. Web. 15 Oct.
2009. <http://history.rays-place.com/me/canton.htm>.
Page | 60
"Home Renovation - How to Renovate a House - Organize the Home Renovation
Process." Home Renovation - Home Remodeling - Home Improvement. 2009.
Web. 15 Oct. 2009.
<http://homerenovations.about.com/od/planningtorenovate/a/artremodelproce.htm
>.
International Residential Code for One- and Two-family Dwellings. Falls Church, Va.:
International Code Council, 2000. Print.
"Maine Snowmobile Laws." Snowmobile Maine. Web. 15 Oct. 2009.
<http://www.mesnow.com/SnowmobileLaws.html>.
"Map of Canton, ME by MapQuest." MapQuest Maps - Driving Directions - Map. Web.
15 Oct. 2009.
<http://www.mapquest.com/maps?city=Canton&state=me#a/maps/l:::Canton:ME
::US:44.440601:-70.315804:city:Oxford+County:1/m:hyb:7:44.742004:69.8804:0:::::1:1:1::/io:0:::::f:EN:M:/e>.
Ogershok, Dave, and Richard Pray. 2009 National Construction Estimator. 57th ed.
Carlsbad, CA: Craftsman Book, 2008. Print.
"Title page for E-project-030409-111324." Worcester Polytechnic Institute (WPI). Web.
15 Oct. 2009. <http://www.wpi.edu/Pubs/E-project/Available/E-project-030409111324/>.
Waier, Phillip R. RS Means Building Construction Cost Data. 67th ed. Kingston:
Construction & Consultants. Print.
Page | 61
"Warehouse | Whole Building Design Guide." WBDG - The Whole Building Design
Guide. 2009. Web. 15 Oct. 2009.
<http://www.wbdg.org/design/warehouse.php#bldgatt>.
Wisconsin Department of Natural Resources. 2007-2008 Snowmobile Rehabilitation
Requests, 2008. Web. 15 Oct. 2009.
<http://www.dnr.state.wi.us/org/caer/cfa/LR/snowmobile/SnowBridgeRehab08.p
df>
Page | 62
Appendix A
Transferring a Revit File into Google Earth Importing Revit File into Google SketchUp
1. Export the created Revit file as a .dwg file
2. Open the .dwg file in AutoCAD 2010 or Civil3D 2010
3. Export the file as a .dwg 2004 CAD file
4. Import the 2004 CAD file into Google SketchUp**
5. You can now apply different textures and patterns to surfaces using Google
SketchUp. All structural and architectural information will import, so beams and
columns will still be within the structure and will be able to be seen in Google
Earth.
Export from Google SketchUp to Google Earth
1. Open both Google Earth and Google SketchUp and locate the area that you
would like to place the model.
2. Import the terrain from Google Earth into SketchUp by going to Tools→Google
Earth→Get Current View.
3. Move the model around so that it is appropriately located in SketchUp.
4. Export the model from SketchUp into Google Earth by going to Tools→Google
Earth→Place Model.
5. This file can be saved in Google Earth as a .kmz and opened later and it will bring
you to the location of the models.
** If SketchUp does not have an option to import a .dwg file, visit this website
http://sketchup.google.com/support/bin/answer.py?hl=en&answer=161784 to download
a plug-in. The newer version of Google SketchUp does not allow .dwg file imports, but
downloading this will allow you to use these file extensions.
Page | 63


© Copyright 2026