
My Document - Blue Coat BlueTouch Online
Use the SSL Visibility
Appliance with a ProxySG
SSL Visibility Appliance First Steps Guide
Third Party Copyright Notices
© 2015 Blue Coat Systems, Inc. All rights reserved. BLUE COAT, PROXYSG, PACKETSHAPER, CACHEFLOW,
INTELLIGENCECENTER, CACHEOS, CACHEPULSE, CROSSBEAM, K9, DRTR, MACH5, PACKETWISE,
POLICYCENTER, PROXYAV, PROXYCLIENT, SGOS, WEBPULSE, SOLERA NETWORKS, DEEPSEE, DS
APPLIANCE, SEE EVERYTHING. KNOW EVERYTHING., SECURITY EMPOWERS BUSINESS, BLUETOUCH, the
Blue Coat shield, K9, and Solera Networks logos and other Blue Coat logos are registered trademarks or trademarks of Blue
Coat Systems, Inc. or its affiliates in the U.S. and certain other countries. This list may not be complete, and the absence of
a trademark from this list does not mean it is not a trademark of Blue Coat or that Blue Coat has stopped using the trademark. All other trademarks mentioned in this document owned by third parties are the property of their respective owners.
This document is for informational purposes only.
BLUE COAT MAKES NO WARRANTIES, EXPRESS, IMPLIED, OR STATUTORY, AS TO THE INFORMATION IN
THIS DOCUMENT. BLUE COAT PRODUCTS, TECHNICAL SERVICES, AND ANY OTHER TECHNICAL DATA
REFERENCED IN THIS DOCUMENT ARE SUBJECT TO U.S. EXPORT CONTROL AND SANCTIONS LAWS,
REGULATIONS AND REQUIREMENTS, AND MAY BE SUBJECT TO EXPORT OR IMPORT REGULATIONS IN
OTHER COUNTRIES. YOU AGREE TO COMPLY STRICTLY WITH THESE LAWS, REGULATIONS AND
REQUIREMENTS, AND ACKNOWLEDGE THAT YOU HAVE THE RESPONSIBILITY TO OBTAIN ANY LICENSES,
PERMITS OR OTHER APPROVALS THAT MAY BE REQUIRED IN ORDER TO EXPORT, RE-EXPORT, TRANSFER
IN COUNTRY OR IMPORT AFTER DELIVERY TO YOU.
Americas:
Blue Coat Systems, Inc.
420 N. Mary Ave.
Sunnyvale, CA 94085
Rest of the World:
Blue Coat Systems International SARL
3a Route des Arsenaux
1700 Fribourg, Switzerland
4/28/2015
Use the SSL Visibility Appliance with a ProxySG
Table of Contents
Table of Contents
3
Use the SSL Visibility Appliance with a ProxySG
4
Export Certificate and Key from ProxySG
6
Import the ProxySG Certificate and Key
7
Create a Custom CA List for the ProxySG Certificate
8
Create ProxySG Resigning Rule
10
Create a Segment
13
Add a Segment
13
Activate a Segment
14
Verify Decryption
15
3
Use the SSL Visibility Appliance with a ProxySG
Use the SSL Visibility Appliance with a ProxySG
This solution describes how to set up an SSL Visibility Appliance in a network where a Blue Coat ProxySG is deployed in
Forward Proxy mode (either explicit or transparent). This solution uses the decisions and policies on the ProxySG to
decide which traffic is decrypted by the SSL Visibility Appliance. For example, for privacy reasons, a customer may have
policies defined on the ProxySG to bypass (not intercept) personally identifiable information (PII); in this use case, all PII
categories defined on the ProxySG do NOT get decrypted by the SSL Visibility Applianceeither. The decision on what to
decrypt happens on the ProxySG.
In this architecture, SSL traffic is decrypted twice: once on the ProxySG, and then again on the SSL Visibility Appliance.
The IPS (or other security device) receives decrypted traffic from the SSL Visibility Appliance only, (not from the
ProxySG).
With this configuration, the ProxySG intercepts SSL web traffic, and the SSL Visibility Appliance uses the ProxySG's intermediate certificate to decrypt the SSL traffic and feed it to the security device. Be aware that the SSL Visibility Appliance
sends decrypted traffic, as well as the rest of the traffic (clear or non-decrypted traffic) to the security device. As mentioned previously, SSL Visibility Appliance will only decrypt SSL traffic intercepted by the ProxySG .Thus, if ProxySG is
configured to bypass (not intercept) Financial Services or Health category sites, SSL Visibility Appliance will not decrypt
this traffic either.
For this deployment, you need to reuse the ProxySG SSL resigning certificate (the keyring used to intercept HTTPS
traffic) on the SSL Visibility Appliance and trust only the ProxySG Certificate Authority.
1. Export the ProxySG's certificate and private key to text files. See "Export Certificate and Key from ProxySG" on
page 6.
2. On the SSL Visibility Appliance, add the ProxySG as one of the “Local Resigning Certificate Authorities.” See
"Import the ProxySG Certificate and Key" on page 7.
3. Create a custom external CA list that includes only the resigning CA from the ProxySG. This list will not include
other CAs such as Verisign, Thawte, GoDaddy, etc. See "Create a Custom CA List for the ProxySG Certificate" on
page 8.
4. Create a rule with a Decrypt (Resign Certificate) action that uses the newly added resigning CA from the ProxySG.
See "Create ProxySG Resigning Rule" on page 10.
4
Use the SSL Visibility Appliance with a ProxySG
5. Apply the ruleset to a segment and activate. See "Create a Segment" on page 13.
6. Use the SSL Session log to verify that the SSL Visibility Appliance is decrypting properly. The log should show
Decrypt (Resign Certificate) action for the re-signed sessions that the ProxySG has intercepted and a Cut Through
action for HTTPS traffic that the ProxySG has bypassed. See "Verify Decryption" on page 15.
5
Use the SSL Visibility Appliance with a ProxySG
Export Certificate and Key from ProxySG
To export the ProxySG certificate and private key, you issue commands in the ProxySG command-line interface to show
the certificate and key of a specific keyring; you can then copy the displayed text into text files for later importing into the
SSL Visibility Appliance.
Caution: The private key of a keyring cannot be displayed on the screen if private key visibility was set to Do not
show keypair during the keyring´s creation. It must be set to Show keypair.
1. Log in to the ProxySG CLI, in enable mode.
2. Enter the following CLI command to show the private key of a keyring named default (substitute the name of your
own keyring):
show SSL keypair default
3. Copy the output of this command, starting with -----BEGIN RSA PRIVATE KEY----- all the way through ----END RSA PRIVATE KEY-----.
4. Paste the text into a text editor such as Notepad.
5. Enter the following CLI command to show the certificate of the same keyring:
show ssl certificate default
6. Copy the displayed text, starting with -----BEGIN CERTIFICATE----- all the way through -----END
CERTIFICATE-----.
7. Paste the text into a text editor.
Next Step: "Import the ProxySG Certificate and Key" on the next page
6
Use the SSL Visibility Appliance with a ProxySG
Import the ProxySG Certificate and Key
Add the ProxySG as a local resigning certificate authority.
1. Log in to the SSL Visibility Appliance.
2. Select PKI > Resigning Certificate Authorities.
3. In the Local Resigning Certificate Authorities panel, click Add
window displays.
. The Add Local Resigning Certificate Authority
4. Click the Paste Text tab.
5. In the Certificate Data box, paste the certificate text that you copied from the ProxySG (in the "Export Certificate
and Key from ProxySG" on the previous page step).
6. In the Key Data box, paste the private key text you copied from the ProxySG.
7. If applicable, select the Encrypted checkbox and enter the Password.
8. Click Add. If the operation was successful, you will see a message similar to the following:
The Summary section in the Local Resigning Certificate Authorities panel now lists the certificate common name
(the ProxySG IP address) and organization (the ProxySG model number).
9. Apply the PKI Changes.
Next Step: "Create a Custom CA List for the ProxySG Certificate" on the next page
7
Use the SSL Visibility Appliance with a ProxySG
Create a Custom CA List for the ProxySG Certificate
In addition to adding the ProxySG certificate as a local resigning CA, you must also add it as an external CA. The basic
steps for this process are to add the certificate to the all-external-certificate-authorities list, create a custom CA list, and
then import the certificate into this list.
1. Select PKI > External Certificate Authorities.
2. In the External Certificate Authorities Lists panel, select all-external-certificate-authorites. The lower panel
displays all the certificates in this list.
3. In the lower panel, click Add
.
4. Click the Paste Text tab.
5. In the Certificate Data box, paste the certificate text you previously copied from the ProxySG (in the "Export
Certificate and Key from ProxySG" on page 6 step.)
6. If applicable, select the Encrypted checkbox and enter the Password.
7. Click Add. If the operation was successful, you will see a message similar to the following:
In addition, the certificate appears in the Summary list; the ProxySG IP address is the common name of the
certificate.
8
Use the SSL Visibility Appliance with a ProxySG
8. To create a custom CA list, click Add
in the top panel.
9. In the Add External Certificate Authority List window, enter a descriptive name for the list (such as ProxySG) and
click OK.
10. Select the ProxySG list in the upper panel, then click Add
in the lower panel.
11. In the list of All External Certificate Authorities, select the ProxySG certificate.
12. Click Add to Custom List. The ProxySG certificate displays in the Custom List panel.
13. Click OK.
14. Apply the PKI Changes.
15. Apply the Policy Changes.
Next Step: "Create ProxySG Resigning Rule" on the next page
9
Use the SSL Visibility Appliance with a ProxySG
Create ProxySG Resigning Rule
To use the ProxySG and SSL Visibility Appliance together, you need a ruleset with the following basic rules:
n
n
n
Ruleset options:
n Default Internal CA: ProxySG resigning certificate
n External CA: ProxySG custom list
n Catch All Action: Cut Through
A rule with a Cut Through action and Subject/Domain Name List of sslng-unsupported-sites
A rule with a Decrypt (Resign Certificate) action that uses the resigning CA from the ProxySG
You will likely have rules in addition to the ones above, but these are the basic ones you need for integrating the two appliances.
1. Select Policies > Rulesets.
2. In the Rulesets panel, click the Add
icon.
3. In the Add Ruleset window, enter a name for the ruleset and click OK.
4. In the Ruleset Options panel, click the Edit
icon.
5. For the Default RSA Internal Certificate Authority, select the ProxySG's certificate you imported (in the "Import
the ProxySG Certificate and Key" on page 7 step).
6. For External Certificate Authorities, select the ProxySG custom external CA list you created (in the "Create a
Custom CA List for the ProxySG Certificate" on page 8 step).
7. Confirm that the Catch All Action is Cut Through.
8. In the Rules panel, click the Insert
icon.
9. Confirm that the Action is Cut Through.
10
Use the SSL Visibility Appliance with a ProxySG
10. Select the Subject/Domain Name List item and choose the sslng-unsupported-sites list.
11. Click OK.
12. In the Rules panel, click the Insert
icon.
13. For Action, choose Decrypt (Resign Certificate).
14. For RSA Resigning CA, choose the resigning CA from the ProxySG. (The one you created in "Import the ProxySG
Certificate and Key" on page 7.)
11
Use the SSL Visibility Appliance with a ProxySG
15. Click OK.
16. Apply the Policy Changes.
Next Step: "Create a Segment" on the next page
12
Use the SSL Visibility Appliance with a ProxySG
Create a Segment
Note: Before you create the segment, make sure you have created a ruleset for the segment.
There are two steps to creating a segment: adding and activating.
Add a Segment
1. Select Policies > Segments.
2. Click the Add
icon.
3. Click Edit to select the Mode of Operation.
4. For Mode of Operation, choose the appropriate Passive or Active Inline mode:
Passive Inline
or
Active Inline, Fail to Appliance
or
Active Inline, Fail to Network
5. Click OK.
6. Select the Ruleset you previously created.
7. Choose the desired Session Log Mode.
8. Enter a brief description of the segment in the Comments box.
13
Use the SSL Visibility Appliance with a ProxySG
9. Click OK. The new segment appears in the Segments panel.
10. Apply the Policy Changes.
Activate a Segment
1. Select Policies > Segments.
2. In the Segments panel, select the segment to activate.
3. Click the Activate
icon. The Segment Activation window displays.
During segment activation, a series of screens appear that allow you to select the ports to be used for the segment,
and to select any copy ports and the modes in which the copy ports will operate. Connect any copy ports to your
passive security devices (for example, Security Analytics or an IDS). More on copy ports...1
4. Follow the prompts. Once the segment is active, the system dashboard displays a green background for the
segment, and there are entries under Main Interfaces and Copy Interfaces (if applicable to your deployment).
5. Apply the Policy Changes.
Next Step: "Verify Decryption" on the next page
1You may need more than one physical port to feed your passive device, depending on the amount of network
traffic. For example, if you have 1GB of traffic in each direction, you will need to connect two copy ports to the
security device, and decide whether you want to load balance or send all inbound traffic through one port and all
outbound traffic through another. Note that you can connect up to two passive devices to the SSL Visibility
Appliance and each device can connect to one or two copy ports.
14
Use the SSL Visibility Appliance with a ProxySG
Verify Decryption
The SSL Session log should show Decrypt (Resign Certificate) action for the re-signed sessions that the ProxySG has intercepted and a Cut Through action for HTTPS traffic that the ProxySG has bypassed.
1. To see a list of recent SSL sessions, select Monitor > SSL Session Log.
2. For each session, look in the Action column. Make sure that the action is Decrypt (Resign Certificate) for traffic that
the ProxySG is intercepting and Cut Through for traffic that the ProxySG is bypassing.
3. Log in to each of your passive security devices, and verify the device has received copied traffic from the SSL
Visibility Appliance.
15


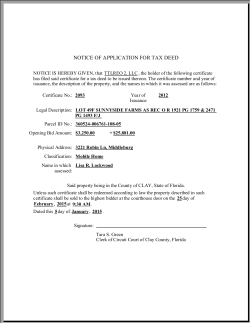


© Copyright 2026