
Creating a COT/SPEDFIST ePortfolio using
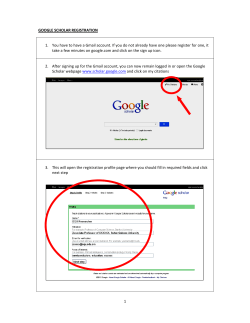
ePortfolio Instructions 1
Creating a COT/SPEDFIST ePortfolio using Google Sites
Using an online portfolio format can be much simpler to create, more efficient to
change and update, and easier to share than a traditional paper‐based portfolio. Follow
these instructions in order to create your personal ePortfolio to fulfill the expectation
requirements of the COT and SPEDFIST programs. These instructions are modified from
the “Help” section on Google Sites to specifically pertain to your program.
Table of Contents
Instructions for Creating a Google Site (using a template)
Page 2
Instructions for Creating a Google Site (from scratch)
Page 5
Creating/Editing Your Homepage
Page 7
Creating an Expectation
Page 8
Sharing a Word Document (1 option)
Page 10
Sharing a Word Document (another option)
Page 10
Embedding a YouTube Video
Page 11
Embedding an Audio Clip:
Page 12
Embedding a Picture:
Page 12
Creating a Hyperlink to Another Page
Page 13
Accessing Your Page
Page 14
How to Share with Advisors/Get Feedback
Page 14
Final Thoughts
Page 15
ePortfolio Instructions 2
Instructions for Creating a Google Site (using a template):
‐To start using Google Sites, simply sign in with your Google Account. (If you use Gmail,
you already have an account. If you are a current IU student and have a umail.iu.edu
account, you also have an account)
‐If you don’t have a Gmail or uMail account, you can quickly and easily sign up for an
account on the same page as the sign in.
‐After signing in, you will come to a page that looks like this:
‐Click on the “Looking for your sites in umail.iu.edu?” link (it will be Google if you did not
use a uMail account).
‐Click on the “Create New Site” button.
‐If you are not using uMail, you may also see this button:
ePortfolio Instructions 3
‐Enter your site name and the URL where it will be located (for example,
sites.google.com/site/yoursite) as well as an optional description of the site. The name
and URL you choose can't be changed after you create your site, or used again if the site
is deleted. A recommended title for your site is “yourlastname_eportfolio”
‐At the top of the page, choose the “Browse the gallery for more” option under which
templates to use. Click on the uMail tab on the left and enter one of the following into
the search field:
‐Select the template that is appropriate for you.
New CoT E-Portfolio Template for Initial License (16) Shared with everyone in
the world/site/revisedcoteportfolio/
https://sites.google.com/site/revisedcoteportfolio/
SPEDFIST/CoT License Addition E-portfolio Shared with everyone in the
world/site/spedfistcot1/
https://sites.google.com/site/spedfistcot1/
Select one of these sharing options: 'Everyone in the world can view this site' or 'Only
people I specify can view this site.' *When choosing an option, keep in mind that your
portfolio may contain information specific to students with whom you’ve worked that
may require parental permission to post publicly. If you limit your sharing options, this
can avoid potential problems with uninvited guests viewing your site.
‐Click the “Create Site” button.
ePortfolio Instructions 4
You may have to enter the wavy characters in the word verification section, and click
the Create site button. This is just to make sure you’re a real person creating a real site,
and not a spammer.
‐Congratulations! You’ve just completed the first steps to creating your SPEDFIST/COT
ePortfolio. Since you’ve chosen to use a template, you can skip ahead to the portions of
this instruction manual that outline how to upload evidence and edit your site.
ePortfolio Instructions 5
Instructions for Creating a Google Site (from scratch):
‐To start using Google Sites, simply sign in with your Google Account. (If you use Gmail,
you already have an account. If you are a current IU student and have a umail.iu.edu
account, you also have an account)
‐If you don’t have a Gmail or uMail account, you can quickly and easily sign up for an
account on the same page as the sign in.
‐After signing in, you will come to a page that looks like this:
‐Click on the “Looking for your sites in umail.iu.edu?” link (it will be Google if you did not
use a uMail account).
‐Click on the “Create New Site” button.
‐If you are not using uMail, you may also see this button:
ePortfolio Instructions 6
‐Enter your site name and the URL where it will be located (for example,
sites.google.com/site/yoursite) as well as an optional description of the site. The name
and URL you choose can't be changed after you create your site, or used again if the site
is deleted. A recommended title for your site is “yourlastname_eportfolio”
∙ Select one of these sharing options: 'Everyone in the world can view this site' or 'Only
people I specify can view this site.' *When choosing an option, keep in mind that your
portfolio may contain information specific to students with whom you’ve worked that
may require parental permission to post publicly. If you limit your sharing options, this
can avoid potential problems with uninvited guests viewing your site. *
∙ Pick a theme for your site. This can be your choice, but keep in mind that reader‐
friendly formats that are simpler put the emphasis on your work, rather than the design
of the site. The theme chosen for the example ePortfolio is called “Solitude: Cherry”.
‐Click the “Create Site” button.
ePortfolio Instructions 7
∙ You may have to enter the wavy characters in the word verification section, and click
the Create site button. This is just to make sure you’re a real person creating a real site,
and not a spammer.
Creating/Editing Your Homepage:
Your professors, mentors, colleagues, and potential employers may explore your
ePortfolio. It is important to have a clear introduction of what the purpose of your
ePortfolio is to outside readers. These steps will help you do that.
‐To do this, you will need a copy of your program’s current handbook. Currently, both
the SpEdFIST and COT programs share the COT handbook.
‐To begin, click on the “Edit Page” button in the top right corner.
‐From there, you can edit the text on your homepage. Give your portfolio an
appropriate title, such as, “John Hayes E-Portfolio”.
‐In the text box below the title, insert a descriptive paragraph that explains the purpose
of the portfolio. For the example, the description of the expectations that is within the
COT Handbook can be used as an introduction. Simply copy and paste from the Word
document on which the handbook is into your portfolio or you can personalize your own
narrative.
ePortfolio Instructions 8
‐When you’re done with your homepage, simply click on the “save” button in the top
right corner of your page.
‐Your page will now display all of the changes you’ve made. To make any further
changes after saving, return to and click the “edit” button and repeat these steps.
ePortfolio Instructions 8
Creating an Expectation:
‐The purpose of your portfolio is to demonstrate that you have met required
expectations that are set within your program guidelines. This section will share how to
set up a link to an individual expectation, wherein you can share your work with
readers.
‐Again, you will need a copy of your program’s handbook OR list of expectation
descriptions.
‐Click on the “Create page” button in the top right corner.
‐Choose the following options: web page, give your page a name reflecting the
expectation you will be sharing, and the second option for where to put your page (see
below). Then click “create page”
ePortfolio Instructions 9
‐After you create the page, you can see that a link to your expectation you’ve just
created is in the site menu. Click on the link to that page.
‐Like you edited your homepage, click the “Edit page” button on the top right corner.
‐When the page is open, insert the description of your expectation from your handbook.
You may also want to insert the program’s rationale for having students complete the
expectation. This is also a place for you to insert a list of the things you offer as evidence
toward your completion of this expectation. The seminar leaders require that you list
each piece of evidence that you offer in the expectation. Make sure you name the
evidence clearly under “activities offered as evidence” and you talk about each piece of
evidence in your reflection.
‐Click “save” and you have begun to create a skeleton for all expectations you will need
to share. Follow these steps to add more to your menu of expectations on your site. The
next sections will demonstrate how to actually share your evidence with others.
ePortfolio Instructions 10
Sharing a Word Document (1 option)
‐Perhaps the simplest way to share a Word document with others is to attach it to your
site. This will allow others who have Microsoft Word to open your document on their
own personal computers.
‐Go to your expectation page and click the “edit page” button in the top right corner.
‐Scroll down to the “attachments” section and click the “+” to the left of it. This will
allow you to upload the document onto your site.
‐Click the “Browse” button
‐From here, you will need to find the document’s location on your computer that you
wish to share. After you find the document, click “open” and it will automatically save it
to your page.
‐It will look something like the picture above. Save your page. After doing this, viewers
can then easily download and open your document on their computers.
Sharing a Word Document (another option)
‐Another simple way to share a Word document with others on your page is to simply
copy and paste it to your expectation page. Beware, however, you may lose the format
that is on your original word document. Some seminar leaders will ask that you copy
your opening reflection directly to your expectation page, just after you list the evidence
you offer for this expectation.
ePortfolio Instructions 11
Embedding a YouTube Video:
‐You may have been videotaped teaching or created a movie for a class that you want to
share on your portfolio. This section will demonstrate how to create access to a
YouTube video through your website.
‐Choose the expectation in which you would like to insert your video. For the example,
Expectation 1 will be used. Click the trusty “Edit page” button in the top right corner.
‐In the top left corner of your page, you can find a button that says “Insert”. Choose this.
‐From the “Insert” menu, choose “Video”, and then “YouTube” video (these instructions
also work for Google Video):
‐From there, all you need to do is copy the URL (website address) for your YouTube
video and paste it into the box.
‐Save this and then save your page and your video will appear!
ePortfolio Instructions 12
*If your video needs to be kept confidential due to the inclusion of students in your
video, please make sure to password protect your Youtube video and you can provide
the password to your seminar leader.
ePortfolio Instructions 13
Embedding an Audio Clip:
At this time, it has been difficult to find a way to directly embed an audio clip onto your
page. However, you may be interested in sharing a recording of something having to do
with your growth as a teacher. There are two possible options:
‐Upload your audio file in the “attachments” section (as shown in the Word document
instructions)
‐Turn your audio recording into a YouTube video and embed as you would a YouTube
video.
Embedding a Picture:
You probably have pictures that you would like to share within your portfolio. You can
always add them as an attachment, but embedding them makes for a cleaner and more
polished presentation. The example expectation used is 5.2.
‐Click on the “Edit Page” button.
‐As in the YouTube instructions, go to “insert”, followed by “image”. You will need to
find the name of your image in the “browse” section.
‐Click “OK” and your image will be uploaded onto your page.
ePortfolio Instructions 14
Creating a Hyperlink to Another Page:
You may have another great website that you would like to share with your viewers.
These instructions explain how to hyperlink to your other pages. For this example, the
Expectation 10.2 will be used.
‐Click on the “Link” button on the menu at the top of your page after clicking the “edit
page” button.
‐Choose the “web address” option and copy and paste the address for the site you plan
to share.
‐Click “OK” and the link will appear on your page. Save your page.
ePortfolio Instructions 15
Accessing Your Page:
It’s important that you remember the address to your ePortfolio to easily share it with
others. After you have saved your work and you are on your homepage, you can copy
and paste youraddress and put it in a safe place so you remember it.
https://sites.google.com/a/umail.iu.edu/spedfistexample_eportfolio/ is the address for
the example.
Also, you can access your site when you are logged onto your gmail/uMail account.
Simply click on the “sites” tab at the top of the page and you can access your site for
editing and updating.
How to Share with Advisors/Get Feedback:
Your advisor can give you site feedback by leaving comments on the bottom of your
pages for each expectation. This way, comments regarding progress toward expectation
completion can be easily written and shared with you. Not all pages allow for
comments, so another way to give advisors access is to grant them access to your site as
collaborators. Your advisor must use a Gmail or uMail account to be a collaborator.
‐To do this, go to “More Actions” on the right side of your homepage (you must be
logged on to do this).
‐Click on “Sharing” .
‐List the email addresses of those with whom you would like to share your site. Click
“Invite these people”.
ePortfolio Instructions 16
‐Note the “Advanced permissions” section‐ make sure that people at IU can only VIEW
your site and can’t edit it. Again, it is strongly suggested that your site is not public to
the entire world.
Here, you can uncheck this option to ensure that only collaborators at IU can view your
portfolio.
‐In the template for both the 14 and 32 Expectations, there is also a page located on the
bottom left sidebar entitled “Portfolio Feedback Page”. Your advisor has been given
instructions on how to share feedback through the “comments” section on each page,
and also has been instructed on how to upload the updated progress toward completion
of your portfolio in the “Student Evaluation Form” that is uploaded on the page. This
can be an easy way to keep track of your progress, but the advisor MUST be a
collaborator on your site in order to be permitted to upload the form.
Final Thoughts
In this instructional guide, you have been introduced to the creation of an ePortfolio,
which demonstrates your work and growth as an educator throughout your
CoT/SPEDFIST program. At this point, you should be able to complete an ePortfolio
using a template, upload pieces of evidence toward expectations through a variety of
media, and publish and share your site with others.
There are several resources at Indiana University that you can use to assist the creation
of your portfolio, should you run into a problem or question that is not addressed by
this guide. Below is the main information for general technology support and should be
able to assist you if you run into any problems:
University Information Technology Services (http://uits.iu.edu/ )‐ From the UITS
website, http://ithelplive.iu.edu, if you have an IU Network ID, you can chat with a
Support Center consultant (available daily 8am‐midnight) to answer specific technology
questions. Also, please use fellow CoT/SPEDFIST seminar members as possible supports
if you have difficulty.


© Copyright 2026