
How to build a garage from the ground up Home Sign Up! Explore
Home Sign Up! Explore Community Submit
How to build a garage from the ground up
by jmengel on November 21, 2007
Table of Contents
intro: How to build a garage from the ground up . . . . . . . . . . . . . . . . . . . . . . . . . . . . . . . . . . . . . . . . . . . . . . . . . . . . . . . . . . . . . . . . . . . . . . . . . . . . . . . . . . . . . .
2
step 1: I love it when a plan comes together! . . . . . . . . . . . . . . . . . . . . . . . . . . . . . . . . . . . . . . . . . . . . . . . . . . . . . . . . . . . . . . . . . . . . . . . . . . . . . . . . . . . . . . . .
2
step 2: Subcontractors . . . . . . . . . . . . . . . . . . . . . . . . . . . . . . . . . . . . . . . . . . . . . . . . . . . . . . . . . . . . . . . . . . . . . . . . . . . . . . . . . . . . . . . . . . . . . . . . . . . . . . . . .
4
step 3: Bill of materials . . . . . . . . . . . . . . . . . . . . . . . . . . . . . . . . . . . . . . . . . . . . . . . . . . . . . . . . . . . . . . . . . . . . . . . . . . . . . . . . . . . . . . . . . . . . . . . . . . . . . . . . .
5
step 4: Build a strong foundation . . . . . . . . . . . . . . . . . . . . . . . . . . . . . . . . . . . . . . . . . . . . . . . . . . . . . . . . . . . . . . . . . . . . . . . . . . . . . . . . . . . . . . . . . . . . . . . . .
6
step 5: Get ready to swing that hammer . . . . . . . . . . . . . . . . . . . . . . . . . . . . . . . . . . . . . . . . . . . . . . . . . . . . . . . . . . . . . . . . . . . . . . . . . . . . . . . . . . . . . . . . . . . .
8
step 6: Framing Basics . . . . . . . . . . . . . . . . . . . . . . . . . . . . . . . . . . . . . . . . . . . . . . . . . . . . . . . . . . . . . . . . . . . . . . . . . . . . . . . . . . . . . . . . . . . . . . . . . . . . . . . .
9
step 7: Framing and assembling the walls . . . . . . . . . . . . . . . . . . . . . . . . . . . . . . . . . . . . . . . . . . . . . . . . . . . . . . . . . . . . . . . . . . . . . . . . . . . . . . . . . . . . . . . . . . 10
step 8: Framing the overhead door header and top plate . . . . . . . . . . . . . . . . . . . . . . . . . . . . . . . . . . . . . . . . . . . . . . . . . . . . . . . . . . . . . . . . . . . . . . . . . . . . . . . 11
step 9: Outer Sheathing . . . . . . . . . . . . . . . . . . . . . . . . . . . . . . . . . . . . . . . . . . . . . . . . . . . . . . . . . . . . . . . . . . . . . . . . . . . . . . . . . . . . . . . . . . . . . . . . . . . . . . . . 13
step 10: Rough in the roof . . . . . . . . . . . . . . . . . . . . . . . . . . . . . . . . . . . . . . . . . . . . . . . . . . . . . . . . . . . . . . . . . . . . . . . . . . . . . . . . . . . . . . . . . . . . . . . . . . . . . . 14
step 11: Time out for beer . . . . . . . . . . . . . . . . . . . . . . . . . . . . . . . . . . . . . . . . . . . . . . . . . . . . . . . . . . . . . . . . . . . . . . . . . . . . . . . . . . . . . . . . . . . . . . . . . . . . . . 16
step 12: Roofing is fun and easy . . . . . . . . . . . . . . . . . . . . . . . . . . . . . . . . . . . . . . . . . . . . . . . . . . . . . . . . . . . . . . . . . . . . . . . . . . . . . . . . . . . . . . . . . . . . . . . . . 17
step 13: Shingling, your trip to the 8th circle of hell . . . . . . . . . . . . . . . . . . . . . . . . . . . . . . . . . . . . . . . . . . . . . . . . . . . . . . . . . . . . . . . . . . . . . . . . . . . . . . . . . . . . 18
step 14: Putting in the windows and doors . . . . . . . . . . . . . . . . . . . . . . . . . . . . . . . . . . . . . . . . . . . . . . . . . . . . . . . . . . . . . . . . . . . . . . . . . . . . . . . . . . . . . . . . . . 19
step 15: Next Steps . . . . . . . . . . . . . . . . . . . . . . . . . . . . . . . . . . . . . . . . . . . . . . . . . . . . . . . . . . . . . . . . . . . . . . . . . . . . . . . . . . . . . . . . . . . . . . . . . . . . . . . . . . . 20
Related Instructables . . . . . . . . . . . . . . . . . . . . . . . . . . . . . . . . . . . . . . . . . . . . . . . . . . . . . . . . . . . . . . . . . . . . . . . . . . . . . . . . . . . . . . . . . . . . . . . . . . . . . . . . . . . 21
Advertisements . . . . . . . . . . . . . . . . . . . . . . . . . . . . . . . . . . . . . . . . . . . . . . . . . . . . . . . . . . . . . . . . . . . . . . . . . . . . . . . . . . . . . . . . . . . . . . . . . . . . . . . . . . . . . . . 22
Customized Instructable T-shirts . . . . . . . . . . . . . . . . . . . . . . . . . . . . . . . . . . . . . . . . . . . . . . . . . . . . . . . . . . . . . . . . . . . . . . . . . . . . . . . . . . . . . . . . . . . . . . . . 22
Comments . . . . . . . . . . . . . . . . . . . . . . . . . . . . . . . . . . . . . . . . . . . . . . . . . . . . . . . . . . . . . . . . . . . . . . . . . . . . . . . . . . . . . . . . . . . . . . . . . . . . . . . . . . . . . . . . . . . 22
http://www.instructables.com/id/How-to-build-a-garage-from-the-ground-up/
intro: How to build a garage from the ground up
Need some workshop space, a fortress of solitude, or a place to house your beer fridge? A new spacious garage is the answer, and this is the Instructable to make it
possible. As a new homeowner and avid DIY type guy, I was up against a big challenge when tackling a brand new construction of this magnitude. Let my mistakes and
sage advice steer you clear of pitfalls and heartbreak. Read on for a step by step guide to building a new garage.
The general process can be summarized as consisting of the following steps.
1. Understand your local rules and make a plan
2. Get the appropriate permits
3. Get quotes and contracts from any subcontractors
4. Order materials (don't forget beer)
5. Begin construction. Getting periodic inspections as required.
6. Get more materials
7. Continue construction
8. Curse your incompetence
9. Get more materials
10. Repeat steps 7-9 ad nauseam
DISCLAIMER: While this Instructable details my experiences building a garage, your mileage may vary. Use your brain, at your own risk.
Image Notes
1. Driveway apron to alley
2. Originally was going to match house roof pitch. This made the building too high
and would require a variance.
3. Existing home and garage
4. step in property grading presented challenge in foundation
Image Notes
1. The finished product. With snow.
2. Accent lighting.
step 1: I love it when a plan comes together!
The key component of Colonel John "Hannibal" Smith's favorite saying, "I love it when a plan comes together!" is the plan. Take that to heart and you will spare yourself a
lot of trouble when building a garage. You will need to plan the layout of the new garage within your lot, plan the size, shape, and look of your garage, plan the materials
needed, plan the subcontractors, plan the permits and inspections, plan the zero-cost (beer compensated) workers, plan the timetables, plan the weather... well you get
the picture. If planning is not your cup of tea, then maybe you should just write a check for ~$25k to get it done by a crew of folks who will do a fine job without you
learning a damn thing.
So step 1 is simply this: do the legwork and get a plan together. Easier said than done.
Key areas to consider:
1. How big do you want the garage to be?
2. How big can the garage be (city ordinances!?!)?
3. Where and how many doors and windows?
4. What type of roof?
5. What parts are you going to subcontract?
The plan will depend on the rules in your local municipality. Since I undertook this project under the rules of a major metropolis, my example will be on the more restrictive
end of the spectrum. If you live in the sticks, then you can probably build as big and awesome a garage as you like. Not me. :( So from this point forward I will be
presenting the garage-building process from the point of view of a homeowner in the city of Minneapolis, which should transfer in large part to any city in the US of A.
The first thing to do is visit your city's website to learn about the permit and building plan process as well as any special restrictions in your area. Click here to go to the
Minneapolis permit page.
Take the time to talk with your neighbors as well to give them a heads up on your plans for dominating the landscape with your new garage. If they don't like it then at
least they can get used to the idea while you get underway. If you live in a neighborhood controlled by a homeowners association, you may need to talk to them as well.
They really know how to put the ass in association. In general, as long as you do not require a "variance" or exception from city rules on such things as garage height,
placement, and so forth you can build regardless of objections from neighbors.
In Minneapolis, we have alleys behind the houses in a lot of neighborhoods and very deep narrow building lots. As a result I didn't have room to expand the existing
attached one-car garage. So I decided on building a detached two-car off of the alley in the backyard. The key municipal codes of interest were the required distances
that must be maintained between the new structure and the property lines, adjacent structures, the alley right of way, and other urban features. Click here to read the
relavant document (PDF).
http://www.instructables.com/id/How-to-build-a-garage-from-the-ground-up/
You will want to draw up a sketch of your lot and your neighbors' lots so that you can get an idea of how things will fit in your yard in relation to the lot lines and other
buildings. Get out a tape measure and a friend and take a walk around the yard to get accurate dimensions for the sketch. You also need to locate the metal stakes that
mark the corners of your lot. These are often buried a few inches underground and are set 1 foot in from the actual lines. If you can't find the markers on your lot corners,
walk around and find your neighbor's. It is permissible to use theirs as a reference point if you know your lot dimensions. I located my neighbor's corner marker two doors
down which was very lucky. If you can't find these markers, you will have to commission an official survey ($$$) to locate them in order to draw up the site plan sketch.
This sketch is required by the city in securing a permit, you will need to show this sketch and get the plan approved before a building permit will be issued. See my
sketches below. The city of Minneapolis requires a top view building site plan with relevant dimensions as well as a series of detail and elevation drawings of the building
itself. As you can tell the level of artistry involved does not need to be high.
When making the drawings, be sure to use the wonderous series of tubes we call the Internets to check the city webpage for property line and lot size information as well
as using your favorite satellite imagery site to get info on the placement of buildings in your immediate vicinity . While a 3D model is not required by the city, I found
Google's SketchUp to be a useful tool for visualizing how the garage was going to look in relation to the rest of the house, trees, neighbors, etc. Download it here. A
sample shot of my model is below.
Once you have a set of drawings to your liking you can take some time and head down to the Minnesota Development Review offices at 250 S. 4th St., Room 300,
Minneapolis MN. As a first-timer this can be intimidating, but even though this bureaucratic organ qualifies as part of "The Machine" the people there are there to help you
out. If you read and understand the rules, bring in a good site plan and drawings, they will happily inform you of any problems, give you time to correct them, and then
take your money with a smile. For reference, our 440 square foot detached garage cost $300 for a building permit. I also had to lop off 2 feet of the width since the city of
Minneapolis allows a maximum of 676 square feet of accessory building. My existing 1-car attached counted towards that total, a fact I had overlooked. On your way out
of the review office, be sure to get a parking token. With the new permit in hand, I was ready to begin purchasing materials, locating subcontractors, and other details.
In summary:
1. Communication with the building permit office and your neighbors is helpful and important.
2. Take the time to know the city rules.
3. Take measurements of your lot and draw up your site plan on your computer. Experiments here are easier than moving foundations later.
4. Get your plan approved by the city and get your permit.
Image Notes
1. Driveway apron to alley
2. Originally was going to match house roof pitch. This made the building too high
and would require a variance.
3. Existing home and garage
4. step in property grading presented challenge in foundation
http://www.instructables.com/id/How-to-build-a-garage-from-the-ground-up/
step 2: Subcontractors
As the person who filed the permit, you are the main contractor and responsible for the building. I am not a lawyer, but I think then you are liable if the building falls over in
a stiff breeze and crushes your neighbor's Porsche. If you are doing all the actual construction work, then this is fine and dandy. Chances are however that you will hire
out some of the work, so-called subcontracting. In my case, I hired out the foundation. As a detached garage, I was able to do a slab on grade foundation rather than
having to dig footings below the frost line as would be required for an attached garage. However, I lacked the drive and expertise required for digging a 440 sqaure foot
hole and pouring a good foundation.
You will want to line up meetings with and quotes from at least 3 people for each subcontracting task. Try to get a feel for who are the reputable names in your area by
talking to your neighbors. Ride your bike around the neighborhood on a sunny Saturday and talk to people who have recent construction and get recommendations.
Check out the BBB (Better Business Bureau) for complaints against any potential subcontractors. The number of unresolved claims should be low and look for
companies that have been around a while. You can also turn to the yellow pages and make some calls. After talking with a bunch of foundation guys and getting some
quotes, I went with the most expensive quote for a number of reasons. They inspired the most confidence based on their referrals, approach to the project, and detailed
quote. Don't cut too many corners with your subcontractors or you can get burned. In general, the fewer references and thus shorter time in business the more risk there
is for half-ass work. If you have a friend of a friend, be wary as these types of hook-ups or under the table moonlighting work can be bottom priority on the "friend's"
schedule and cause delays and cost overruns. The good news is that most people in the business want to stay in business and thus will do a good job and be pleasant to
work with as long as you communicate your plan, expectations, and expected payment clearly.
Once you decide on a contractor you will need to sign a contract with them (often included with the quote) and schedule their work. In the case of subcontracting the
foundation, this work was required first so they kicked off the whole project and I had to wait for them before moving forward. A sample quote and contract is below.
http://www.instructables.com/id/How-to-build-a-garage-from-the-ground-up/
step 3: Bill of materials
With the foundation subcontracting taken care of, the next step is to get a bill of the materials (BOM) you will need to order and have delivered to do the actual
construction of the building. This can be difficult and daunting but I will fill you in on a little secret. Many building supply stores (such as Menards or Home Depot) have a
handy kiosk that will let you enter in a rough design and will print out a list of all the materials required to build your building and they will even order and deliver it for you.
A key decision to make prior to embarking on building the BOM is what framing system you want to use. 16" on center or 24" on center studs? For most garage needs
24" is fine and uses less lumber. Check your local codes, as you may not be able to have a 2nd story above the garage with 24" framing. 2x4 or 2x6 framing? If you plan
to have a heated garage and live in a cold part of the country, go 2x6 and insulate.
So I took my building sketch to the Menards design center kiosk and answered a series of questions about the building I wanted and viola I had a recommended bill of
materials in under 5 minutes. I would recommend going over this print out manually to add, remove, or substitute items. For example, you may want to use a pneumatic
nailer (recommended!) for framing/roofing and thus would not need to buy as many regular nails as the print out suggests. Additionally, you may want to add insulation,
space your studs to 24", use OSB (oriented strand board) instead of plywood, or specify a different style of window. The key thing that the print out gives you is an idea of
the number of pieces needed, and the parts that you might miss such as drip edge, drip cap, shingle starter strip, etc that you will need. It is also a good idea to add a few
extra pieces of lumber such as 2x4's and 2x6's in case you measure once and need to cut twice.
You will also need to be aware of building codes when ordering, although often the print out from the kiosk will take many of these issues into account. For example, the
bottom plate on your framing is in contact with concrete and thus must be treated to prevent rot. Also, when sheathing your roof, you need to use H-clips between the
trusses on the horizontal seams. Snow and ice shield membrane may also be required along the lower portions of the roof. These little details can be anticipated if you
spend some time reading the building code and chewing the fat with your experienced construction buddies. The International Residential Code is maintained by the ICC
(International Code Council) and serves as the basis for the home building codes in most municipalities. You can buy a copy of the code from the ICC website (click here)
and while comprehensive it can be tough to digest.
You don't need to make all the BOM decisions at once and may need to mix and match suppliers to get the right materials. For example, in order to match the shingles on
my existing house I had to order from a specialty roofing supply house. The key will be to get all the critical parts on the building site at the same time so that you can
effectively use your beer-paid volunteers and get to a stable work point (i.e. the roof shingled) in case you need to take a temporary vacation from your project. Details
such as what lights and color siding can wait a bit. Once you have finalized the BOM, place the order and arrange for delivery. Even the largest suburban command
vehicle will have trouble hauling a dozen roof trusses and 50 sheets of plywood so shell out the $50 for delivery.
The following is a sample bill of materials for a 20' by 22' garage with 5/12 roof pitch. This is not an exhaustive list (I must have run to the store about a hundred times to
get something I forgot), but the major components are there. All dimensional lumber is #2 grade or better.
Qty Item
Unit Cost Subtotal
75 2x4x8' Stud
2.18 163.5
20 2x4x12'
2.95 59
10 2x4x16'
4.58 45.8
6 2x6x10'
3.99 23.94
2 2x12x18'
20.49 40.98
12 1x6x12' Quality grade
6.75 81
8 2x4x12' AC2 treated
4.59 36.72
45 1/2" 4'x8' exterior grade OSB
7.49 337.05
14 5/8" 4'x8' exterior grade fire rated drywall 9.44
12 1/2" 4'x8' BC grade plywood
12 144
132.16
http://www.instructables.com/id/How-to-build-a-garage-from-the-ground-up/
10 5/12 20' Residential 60# Truss
30.25 302.5
20 Rafter tie hangers
0.63 12.6
2 5/12 20' Residential end frame truss 38.21 76.42
2 Roll of 15# felt roofing felt
13.25 26.5
2 Roll of 3' wide ice and water seal 25.85 51.7
2 Roll shingle starter strip
10.48 20.96
3 bags 1/2" H-clips
2.24 6.72
18 Bundles 3 tab 30 year shingles
20 360
2 3.5x50' roll sill seal foam
4.18 8.36
1 16' insulated sectional garage door 439 439
1 Garage door opener
179 179
1 Set vinyl garage door stop trim ~32' 23 23
1 Set vinyl garage door jamb ~32'
52 52
1 Set vinyl garage door brick mode ~32' 32 32
1 Set garage track hanging kit
16.98 16.98
11 10' D style roof edge
2.46 27.06
3 R11 3.5x23x70' kraft faced insulation 31.99 95.97
2 30x42 vinyl windows
107 214
1 5lb box of joist hanger nails
6.79 6.79
1 32x80 Prehung exterior door
153 153
1 Deadbolt and doorknob kit
55.92 55.92
4 6"x12' Aluminum fascia
11.79 47.16
2 16"x12' vented aluminum soffit
13.68 27.36
4 12' soffit frieze
6.99 27.96
4 1-1/4"x10' dripcap
2.38 9.52
1 Large box 16D size nails for pneumatic nailer 45 45
1 Large box 8D size nails for pneumatic nailer 40 40
2 5 lb box of galv roofing nails
4.28 8.56
1 Box 40' Ridge-vent
95 95
2 Box roofing staples for hammer-tacker 6.19 12.38
Total 3537.57
Whew! The above will get your garage framed, sheathed, roofed, and the windows and doors on. It is up to you to make the decisions on finishing touches like vinyl
siding, accent lights, etc.
If possible try and arrange delivery of your building materials after the foundation has been poured and is cured enough to build on. That way you can get your materials
delivered right next to or on the slab for convenience. I had to hand carry each and every piece around to the back, which was a pain. Sometimes an "alley" delivery will
cost extra, depending on your job site layout. Talk with the driver and if you can float him a few bucks you may have luck getting your materials dropped wherever you
want. Those guys are magicians with those forklifts.
step 4: Build a strong foundation
As mentioned, I paid someone else to do the foundation. It cost in the neighborhood of $6k. Worth every penny.
Be sure and talk the plan (pictured below) over with whoever is setting up the site so that the garage gets poured in the right spot. They know their business, so ask for
their advice. In my case, there was a utility pole that was interfering with the planned driveway somewhat. My plan originally called for a 2' set back from the property line,
but based on the recommendation of the concrete guys, we pushed it out to 3' in order to clear the utility pole with some cushion. They moved their lines and no sweat,
but once the forms are in place moving the placement gets more difficult, and once the concrete is in, then forget it.
The key steps to getting the foundation in are to lay out the lines for the foundation relative to the property lines, and to set up the site for the pour. To get the site ready
the hole needs to be dug, the soil compacted, backfilled with suitable class-5 gravel, the forms erected in accordance with the lines, and reinforcement placed in the hole.
The photo below shows my site just before concrete pour. You can see the grid of reinforcing metal rebar, the class-5 gravel and the forms.
Before you can pour in the concrete, you will need to have the site inspected by the city. They need to check and make sure you aren't doing anything stupid, are
following code, and have placed the structure correctly based on the drawings signed off on by the city during the permit process and in agreement with property survey
markers. This inspection will be arranged by the concrete subcontractor and everything should go smoothly if you have communicated with them well. If you are on your
own, you just need to put in the call to the inspector and arrange a time. When you get your permit with the city they will give you a checklist for the inspector to sign as
well as a phone number for your assigned inspector. Inspectors are friendly and helpful in general so don't hesitate to call and ask them questions. If they can answer a
question on the phone it saves them a trip out to your job site.
With the forms inspected, the concrete can go in. One key thing to talk with the concrete guys about is the anchor bolts that will go into the foundation. The building code
require anchors to be embedded in the concrete so that the bottom sill plate of the framing can be bolted to the foundation. There are specific rules about the placement
of these bolts. Every six feet, within 12" of any cut in the sill plate, etc. Your concrete guys should know the rules. Make sure they know and clearly make where you are
putting in your access door(s) and overhead door(s) so they can place the anchors correctly. In my case I had to have a single course of block around the foundation so
that also required communication so that the openings would fit my doors.
After a day or so the concrete guys will come and take down to forms and clean up any spilled concrete. Be sure to communicate any concerns you have about the job if
any at this time because this is the time that they will be expecting to get paid. Sometimes you will pay half up front and half upon completion. Once they get the second
half of the money it can be hard to get them to come around and correct any problems so speak up before you write that check.
The next inspection you will need is the framing, so after a few days (~4) to let the concrete cure you can start building. Right about that time, you should expect a bunch
of rain. Actually the rain will probably start as soon as the truck driver who delivered your lumber drives away.
http://www.instructables.com/id/How-to-build-a-garage-from-the-ground-up/
Image Notes
1. Site grade. Slope away from alley required large forms in back of garage.
2. Neighbor's property.
3. This board denotes the separation between the garage floor and the driveway
apron.
Image Notes
1. Forms for concrete pour
Image Notes
1. REbar reinforcement
2. Forms for pour
3. Class-5 gravel fill
http://www.instructables.com/id/How-to-build-a-garage-from-the-ground-up/
step 5: Get ready to swing that hammer
You should consider your tools for completing the job before you begin in order to save time and money. These tools consist of two groups, inanimate tools that you
swear at, and animate tools that you swear at. Those animate tools are you, your friends, and family that have agreed to help, so a fine line must be maintained in order
to avoid a workers strike.
Before you wade into that huge pile of lumber, make sure you have the inanimate tools needed. Below are photos of a typical construction tool belt designed to hold tools
and nails while you work. Depending on the job at hand you will want different tools and nails/screws in the pockets. I have laid out my typical load for framing and
sheathing as well as for roofing. Use these photos as a guide for what kind of hand tools you will need to build your garage successfully and with minimum pain and
suffering.
That said, the best way to minimize your pain and suffering is to have the right power tools for the job. One key tool is a pneumatic framing nailer that can sink 16D and
8D size nails in dimensional lumber such as 2x4's. This tool requires an air compressor with decent capacity as well as special nails but will save you a lot of pain. If you
don't have a friend to borrow a nailer from, then you can rent them for a reasonable daily fee. I would suggest buying an air compressor if you don't have one since they
come in handy for a lot of tasks. Pretty much any compressor that they sell at Home Depot will be big enough to run a nail gun, but look to get one in the 5 gallon or
greater size with 3-4cfm at 100psi capacity and a 1.5-2hp motor. That should serve you well for most future tasks as well. Below is a semi-complete list of the power tools
and specialty gear that will make your project go smoothly.
Air compressor (3-4 cfm at 100psi)
Framing nailer (3.5" nail driving capacity)
Circular saw
Jigsaw or reciprocating saw
Power drill (corded or cordless)
Hammer tacker
4' level
Pair of 6' step ladders
One extension ladder (or little-giant type pivoting ladder) capable of reaching 16'
Unless you plan on renting more than one nailer you will need tools and jobs for your friends and family to use. A good method is to have a team of people laying out and
marking the dimensional lumber for framing while another person moves along behind them with the nailer to put it all together. Have another person cutting lumber to
length based on instructions from the layout team, someone fetching lumber and beers, someone shaking their head in disapproval, etc. In this way you can efficiently
use 4-6 people at once. You will need tool belts and hand tools for the layout team and the person cutting, so they can measure and mark and put in temporary nails as
needed. The power nailer guy will need a way to hold extra nails and a hammer to sink stubborn nails. You get the picture. A big bucket or wheelbarrow makes a good
way to hold all of these hand tools and supplies during the chaos of the build so make sure everyone knows where to put things when they are done or you will be
chasing speed squares half the day.
Below are some pictures with typical tool needs for framing and roofing. In general they have the same tools, but there are some differences. The less you carry the
better, because lugging bundles of shingles up a rickety ladder isn't made any easier by carrying 2 pounds of 16D nails. The key tool that is never available is a pencil, so
I have pictured two. In reality the first task to beginning work should be to sprinkle pencils in every conceivable place so that you can find one when you need one and
someone has walked off with yours.
Image Notes
1. toolbelt
2. hammer
3. pencils. You always need more than one since they tend to walk off. The best
policy is to saturate the worksite with them so that one is always at hand. That
should require about 3500. Budget accordingly.
4. Chalk line
5. Needle-nosed plier with cutter. Use for holding nails in tight spaces when
pounding them in. Can also cut nail heads off in a pinch.
6. Tape measure
7. Speed Square. Essential
8. Utility knife
9. H-clips for roof sheathing
10. 8D nails for sheathing
11. Truss hanger nails for rafter tie plates on trusses
12. 16D nails for general framing and nailing needs
Image Notes
1. hammer
2. Pencils. Again, saturate the area to make sure you can find one when
needed.
3. Chalk line
4. Needlenose pliers
5. Toolbelt
6. Tape measure, 25' is adequate
7. Speed square
8. Utility knife with hooked roofing blade
9. Cat's paw for pulling nails
10. staples for stapling down roofing felt
11. roofing nails
http://www.instructables.com/id/How-to-build-a-garage-from-the-ground-up/
step 6: Framing Basics
The first construction step is going to be framing up the walls. To successfully frame your garage you need to decide where all your openings are going to be (windows
and doors) and plan for the sheathing on the outside and any interior covering (drywall, plywood) you plan to use. I framed my garage in 24" on center stud spacing but
the same approach applies to 16" on center construction. Based on my site plan and elevation drawings, there are more openings on the east wall, with the access door
and one window. Thus I am going to start there.
The first step to framing up the east wall is to measure the width of the slab/block. As designed mine is right on 20' within a half inch. Take this measurement and cut AC2
treated 2x4's to make the bottom or sill plate. Any lumber that contacts masonry must be treated to prevent rot. Keep in mind that building code requires that any cuts in
the sill plate be anchored with bolts within 12" from the cut on both sides of the cut. Place your cuts accordingly or buy a longer piece of wood. If you plan ahead you can
have the concrete guys put in some extra anchors for this purpose. With the sill plate cut, lay it on the slab/block and transfer the positions of the anchor bolts onto the
wood. Make your marks so that when the sill plate is mounted on the bolts it will be flush with the exterior surface of the slab/block. Then drill holes in the sill plate large
enough for the anchor bolts to clear (~3/4" ) and make sure all the bolts will fit through at once without too much binding. Leave the sill plate on the bolts on the
slab/block.
Then measuring from the outer edge, make marks on the top of the sill plate every 24". If the marks overlay any of the anchor bolts you may need to notch the
corresponding stud or cheat the stud to one side or the other. Also mark the opening for the door. Typically, the opening for the door is 1.5-2" larger than the door itself.
So for a 32" door you need a 33.5-34" opening.
Next, cut regular non-treated 2x4s to the same total length as the treated sill plate. This span should be made up of 2 pieces or less. This is the first layer of the top plate.
Then take the sill plate off the bolts and lay both the sill plate and top plate next to each other and transfer the stud measurement marks to the top plate. Now lay both the
sill plate and the top plate on an open flat area such as the slab about 8' apart. Now get your 8' studs and start laying them in place at the marks. Before you start nailing,
let's talk about openings.
The width of an opening for a window or door is defined by the distance between the innermost jack studs. The jack stud runs uninterrupted from the header to the sill
plate and provides support. Nailed to the outside of the jack studs are king studs that run from top plate to sill plate like normal studs. Generally you want one of the king
studs to be on your 16" or 24" spacing pattern. Above the header and below the top plate are so-called cripples that are placed on the 16" or 24" pattern. At the bottom of
the opening (for windows) there is a saddle stud that is toenailed into the jack studs and supported by more cripples that go from the saddle to the sill plate. See the
sketchup diagram below to clarify. It is very helpful to have your openings planned out before framing so you can quickly measure and cut the required lumber. The
header is often made from a pair of 2x6's cut to width and nailed together with a spacer in between to make the total header thickness the same as the wall. In the case
of 2x4 framing where the wall is about 3.5" thick the pair of headers will be around 3-3.25" thick and a spacer can be omitted if you are lazy.
Another thing to note is that your starting wall will be the full width of the slab/block foundation. The subsequent side walls will overlap the ends of the first wall. As you
can see in the opening framing sketch below I have added an interior wall stud that allows the creation of an interior corner for screwing/nailing your interior finishing
material to the framing. See the corner framing sketch to get a better idea of how this occurs. The sketch is a cross section of the framing at the corners of the walls.
When wall#1 and wall#2 come together, the end studs will sit such that there will be no way to attach the interior sheathing to the framing of wall#1. Thus an "interior wall
stud" is added. I have no idea what this is called, so take that name with a grain of salt. I suppose I should name is something catchy like "queen stud" or "naughty in the
corner stud". I leave that to the experts.
With your openings and corners planned you can cut the lumber and start nailing through the sill and top plates into the studs using the power nailer or your own elbow
grease. You want two nails per connection. There are a couple of types of nailing connection, that I will call end nailing, toe-nailing, and bond nailing. See the sketch
below to get an idea of how these are done. The only one that can be tricky is toe-nailing, but you will get the hang of it. For attaching the studs, jack studs, king studs,
cripples, etc to the sill and top plate you will need to put two end nails into each stud through the plate as drawn. You will use bond nailing to attach the headers together
and to attach the jack to the king studs. You will also end nail the headers to the king studs and the cripples to the saddle. The only place you need to do toe-nailing in
most framing is to attach the saddle to the jack studs and to attach upper cripples to the headers. Go to it.
http://www.instructables.com/id/How-to-build-a-garage-from-the-ground-up/
step 7: Framing and assembling the walls
Now that the basics of framing are understood, take a look at the sample diagrams for my framing. I have labeled all the four walls with their directions which correspond
to the north given in my site plan. You should be able to generate a similar plan for framing up your walls. The letters on the sides indicate the wall that meets up at that
end (N, E, S, W) and help match the walls with the correct direction
Once your starting wall is assembled on the ground (I started with the East wall below) you will want to move it out of the way and begin assembling one of your walls that
is at 90 degrees to the starting wall. I next built the North wall in order to get the window opening out of the way. Build that wall in the same fashion as discussed in the
framing basics step. You should save the wall with the large overhead door opening for last so plan accordingly.
Once two walls are built you will need to get a group together and lift the first wall onto the anchor bolts. Before you put the wall on there, get out the rolls of sill seal foam
and roll it out on the slab/block and punch the anchor bolts through it. Run this foam around the periphery of your wall and then place the first wall over the anchor bolts.
Hold it in place and thread some of the washers and nuts on the bolts. While someone holds the first wall, bring the second wall into place on the slab/block and put it
over the corresponding anchor bolts.
With both walls swaying in the wind, nail them together at the corners, being sure to match up the edges as shown in the corner diagram. These nails will not hold up the
wall well so you will need to get on a ladder and add a corner brace across the two top plates. See the sketch below, where there is a 2x4 nailed across the two wall top
plates and another 2x4 nailed to an upright stud to brace the wall against the slab. Also visible is the course of block running around my slab. With the 8" high block, the
three top plates and the 8' studs the "ceiling' in my garage is about 9'. If you do not plan on or require a course of block, then you might want to consider using studs
longer than 8' to give you more headroom.
With two walls up, repeat the process on a third wall. You should do the wall with the large overhead door opening last since the header beam will be very heavy and thus
more dangerous to install. This wall will be covered in the next step.
One last thing is that you must post your permit at the jobsite. You can put it in the window on your existing house until there is a structure to nail it to on the new building
but it needs to be visible.
Image Notes
http://www.instructables.com/id/How-to-build-a-garage-from-the-ground-up/
Image Notes
1. Overhead door beam. Save this wall for last. That beam is heavy and this wall is
not very rigid side to side without the other walls in place.
1. This is a dream wall. No holes.
Image Notes
1. This board braces the wall to keep your hard work in place
2. This cross member keeps the walls up and square.
Image Notes
1. Permit must be displayed on jobsite.
step 8: Framing the overhead door header and top plate
With the other three walls framed, you will want to tackle the big overhead door opening. Since most of this wall is empty space, it is easier to build two little walls on each
side with the jack studs for the main beam and then lift the overhead door header into place. You can nail the top plate in place across the king studs before lifting the
main beam in order to add some rigidity to the walls before hefting the big beam. The sequence of sketches below give an idea of one way to do this.
You will want to include at least two jack studs on the ends (as pictured) in order to support the large span and mass of the header beam. You can either bond nail the
two 2x12's that make up the header beam on the ground and lift them both or you can lift one in place, end nail it to the king studs, hold it in place and lift the other one
up and bond nail and end nail it as well. My opinion is that nailing the header together first while heavier is easier if you can muscle it. You will want at least four people
for this job. Two to lift the header from the ground, and two on ladders at each end to hold and nail the header in place. You should also toe nail the header to the jack
studs for security while you finish the wall.
The final step in framing the header beam is to cut and place cripple studs between the top of the header beam and the top plate. End nail them to the top plate and toe
nail them into the header beam.
Once all four walls are up, take your 2x4 bracing across the top plates off. Then measure and cut another set of 2x4's that will nail on top of the top plate to form a double
top plate. At the ends, be sure to cut the 2x4's so that the topmost top plate will overlap the lower plate and connect the two walls together. While nailing on the double
top plate, measure across the opposite corners of your four wall at the top. If the measurements are off, then your walls are not completely square. Get someone to help
wrestle the walls and corners so that the measurements are close and the walls square before nailing on the top plate.
With the top plate on and the walls square, nail on corner braces across the top plates again. Double check that the walls are square by measuring across the garage
corner to corner as in the sketch. Once you start sheathing it will be difficult to square up the building so take your time here.
http://www.instructables.com/id/How-to-build-a-garage-from-the-ground-up/
Image Notes
1. Double jack studs
2. double jack studs
Image Notes
1. Make sure to have people holding this heavy beam in place until it is securely
fastened
Image Notes
1. Add the cripples
Image Notes
1. These diagonal measurements should be pretty close. Try to shoot for within an
inch or two.
http://www.instructables.com/id/How-to-build-a-garage-from-the-ground-up/
step 9: Outer Sheathing
With the four walls all framed, it is time to sheath the outside. Since you took so much care in making the studs regularly spaced the sheathing should fly by. You will want
to swap out the 16D nails in the nailer for 8D nails at this point. Exterior grade OSB has an inner and outer side. This makes more of a difference when roofing as the
outer side is textured to improve traction when walking on it. However, the other feature of the outer side is a painted grid of 16" and 24" spaced lines to allow you to hit
the studs underneath when nailing. Make sure this side is out and you will save yourself some headaches.
The easiest way to sheath your walls is to sheathe right over the small door and window openings. Once they are nailed in place someone working from the inside can
drill holes at the corners, come around to the outside, and using a jigsaw or reciprocating saw connect these holes to open up the windows and doors. Presto chango!
While sheathing, you will need to put nails in every 6-8" or so on the edges and on the interior studs. Check your local codes. With 24" stud spacing there will only be one
interior stud. The hardest part is to hit the studs when your studs are off of the painted grid on the OSB. You can also have a spotter inside to tell you if you are missing
the studs. This is no big deal if you are going to insulate and close up the wall cavities, but if you plan on leaving the interior walls open you will want to pound those nails
back out so you don't cut yourself later down the road. Your spotter can do that while you nail.
Since my walls are about 8' 5" tall a single sheet of 4'x8' OSB will not cover the whole wall. My approach was to start the panel at the sill plate and to run the panel
vertically, leaving the last 5 inches or so open. The goal here is to stiffen up the walls with the sheathing so you can put on the roof. If you are so inclined you can have
someone following the nailer with strips of OSB to fill these gaps or wait for later. However, they can only do the "flat" walls since on the gable ends the sheathing will
need to extend up to the peak of the roof trusses.
See the pics below to get an idea of what the garage will look like with this lower course of OSB on.
Another thing to note is that the South wall on my garage has no windows. When you build within a certain distance of the property line (3 feet) in Minneapolis and
elsewhere you cannot have windows or doors in the wall. Additionally, I had to cover the exterior studs with fire-rated exterior drywall rather than OSB on the wall facing
my neighbor's property. The drywall also had to extend all the way to the lower surface of the roof deck. The interior wall on this side also had to be fire-rated drywall in
order to prevent a fire in my garage from spreading to the neighbor's. Check your local code, and read this document for more information.
With the lower 8' of the garage sheathed, it is time to put on the roof trusses.
http://www.instructables.com/id/How-to-build-a-garage-from-the-ground-up/
step 10: Rough in the roof
With pre-built trusses, roughing in a roof is pretty easy. You will need some ladders and some help since the trusses are heavy and big. The first thing is to rack the
trusses at one end of the garage upside down resting on the top plates. See the sketch below to see what I mean. This makes it alot easier to work with since as the roof
trusses go in, it gets tougher to fit them trough the opening in the roof. Also, you can stay up on the top plate and install the trusses without having to climb back down.
Using your ladders and tape measure, go along the top plate and mark the 24" on center points that you will install the trusses on. If you do this correctly the trusses
should sit right above your studs. Se I left the top part of the wall unsheathed I was able to just place the trusses right over the studs without measuring. Lazy!
When you are working on a roof, you need to take safety seriously. In an urban environment, overhead cables for phone, TV, and power can be running very nearby
while you are building the roof. If you have power lines overhead that you could potentially touch while working, you will need to be extremely careful. If the lines will touch
the building you will need to talk to your electric company about raising or moving the power lines. Take care as well to avoid falls, and always have someone else around
while you are working so they can help in an emergency. Be safe.
Now that all the trusses are racked and ready, take one of the end frame trusses (the ones with the vertical slats and start at the top plate at one end of the garage. In my
case the gable ends were E and W walls so I started at the E wall. Toe nail the truss to the top plate as best as you can. It can also help to nail a 2x4 from the lower
sheathing to the truss to hold it up or you can hold it while some other people install the second truss. See sketch. Take one of the normal trusses and toe-nail it in on the
first 24" mark on your top plate. Then take a long 2x4 and nail it to the bottom stringer of the trusses so that it ties the two installed trusses together. Do the same on the
top slanted surface. See the sketch to get an idea of what I mean. The toe nailing won't really hold the trusses so you need to tie them together temporarily until you can
get the sheathing on. If you have someone working on the rafter ties in advance you can set the trusses directly into them without having to toe nail. But with a power
nailer, toenailing is a breeze.
Continue installing the trusses as described until you have them all upright and square. When nailing a new truss to the 2x4 used to tie them together, make sure and
measure so that you maintain the 24" spacing at the bottom as well as the top of the truss. While the trusses are being installed, have someone install the rafter tie
hangers from below. Use joist hanger nails for this job. These nails are thicker and made is a different way so that they are strong in shear and will bear the loads
transmitted from the roof to the framing by the metal hangers. Click here to see the kind of hangers I used to tie the trusses to the top plate. A photo of them installed is
also below.
As we move towards sheathing the trusses, be careful not to trust the trusses for support. If you are falling, grabbing one will probably bring it down with you. The trusses
are not really stable until the sheathing starts tying them all together and to the gables. So take care with the first few sheets and stay on the top plate until you get some
nails into the sheathing.
Once all the trusses are tied to the top plate and spaced properly you can start work on closing up the roof. The tails on the trusses are probably too long for the eaves
you have planned. You can cut them off now of wait until after you have sheathed the roof. I think it is easier to cut them plumb before sheathing so I would trim them first.
Next, start at the bottom corner of one slanted face of the roof and nail a 4'x8' sheet of OSB to the trusses underneath. Be sure to have the OSB with the textured and
lined side up so you don't slide off the roof and so you can see where to nail. When positioning this first piece of sheathing, you will want to overhang the gable end as
pictured. Once you get the whole roof sheathed you can trim this to the desired overhang. When sheathing, the seams between panels must meet on top of a roof truss,
so you may have lots of overhang. It may be helpful to cut some OSB sheets in half to limit the overhang since you must also stagger the seams in the panels as
pictured. Nail into the truss every 6-8" or so using the 8D nails by hand or with the nailer. When you start on the second row of OSB panels, stagger the seams like in
brickwork and install H-clips between the abutting panels between the trusses. See the sketch for details. The purpose of the H-clips is to provide flexural strength by
tying the panels together where they are not supported by the trusses underneath.
Work your way up the roof towards the peak. Once at the peak you will have to trim your OSB panels so they stop at or before the peak. If you are installing a ridge vent,
you should leave about 1-1.5" open on each side by trimming the OSB panels. When the roof is completely sheathed this will leave a slit about 2-3" wide running along
the peak for ventilation. If you are really serious you can stop this slot a foot or so from the gable. Since I am lazy and was covering the gable ends with trim I ran the slot
all the way.
Repeat the sheathing process on the other side, removing the 2x4s from the top surface as you go. You can leave the interior 2x4 bracing or remove it before you
sheathe the gables. When both sides of the roof are sheathed you will need to get out your chalk line and snap a line along the slanted edges of the roof and use a
circular saw to trim the gable ends of the roof deck to the proper overhang. I used about 4". This measurement depends on your plan for finishing the gable ends. Since
this is a garage you can keep it pretty basic and just nail up a painted 2x4 or 2x6 if desired.
http://www.instructables.com/id/How-to-build-a-garage-from-the-ground-up/
Image Notes
1. This 2x4 stabilizes the trusses. You can use multiple 2x4s if you don't have a
spare 22 footer handy.
Image Notes
1. Truss here
2. H-clip midway to next truss
3. OSB is made translucent in this sketch for clarity and artistic reasons only. If
your OSB appears translucent on your roof, consider demanding a refund or
reducing your medication.
Image Notes
1. Trusses are going in like gangbusters.
2. The rule of the sea applies here, one foot for the ladder and one for
yourself.
Image Notes
1. Rafter ties. You can put these on the inside as well. The two pictured are
http://www.instructables.com/id/How-to-build-a-garage-from-the-ground-up/
actually the only two I put on the outside as it was a big PITA.
Image Notes
1. Ahhem...
2. Gable being sheathed
step 11: Time out for beer
The title says it all. Relax and take a load off. Crack open a cool one, you have earned it. Double fisting encouraged.
Image Notes
1. Rapid core temperature reduction method.
2. Proper.
http://www.instructables.com/id/How-to-build-a-garage-from-the-ground-up/
step 12: Roofing is fun and easy
Roofing IS fun AND easy, as long as you are watching someone else do it. But having come this far, there is no reason to quail at the prospect of falling to an
ignominious end while trying to catch a sliding hammer. In the following sketches, the sheathing is not shown on the structure because I was too lazy to draw it, your
garage should be sheathed before roofing. Get to it!
A word about roof pitch. Premade trusses and roofs in general are rated by their rise over a fixed distance, usually 12 feet. So a 5/12 pitch means that for every 12 feet of
horizontal travel, the roof will rise 5 feet. Many older homes, like mine, have a pitch that is closer to 10/12. Let me tell you that unless you are a planning a loft over the
garage or are a huge stickler for detail and want your new garage to match the pitch of the existing house, then do yourself a favor and go with a lower pitch. Additionally,
local building codes often limit the height of accessory structures and a steeper pitch can push you over the limit so that you will need to secure a variance permit which
will require approval by people who don't like to give variances. I thought I was being smart by choosing 5/12 over the more standard 4/12 in order to gain a few more
inches of storage space, and by the end of the job I cursed my incompetence and inexperience roundly. It turns out that right below 5/12 is the slope that shingles and
other objects will stay put on a slanted surface covered in roofing felt. So unless you like making frantic grabs for stuff that is sliding inexorably down the roof like Lando
into the maw of the Sarlacc then I suggest you opt for a modest 4/12 roof. This advice would have been helpful during the planning and purchasing phase, but like those
tests where the first instruction is to read all the instructions sometimes the devil is in the details. Muhahahaha!
OK, before we begin roofing, you will need to switch your tool belt to the "roofing' configuration pictured below. The key differences are that now you only need roofing
nails and staples, you will want to switch blade styles in your utility knife, and it can be helpful to have a cat's paw for removing nails without damaging shingles. Contrary
to the photo, it is helpful to have two utility knives for roofing, one with a standard straight blade for cutting roofing felt and a hook blade for cutting shingles. Another note,
I only had a framing nailer for my project and shingled by hand. Hammering the roofing nails by hand is not too bad since the nails have a big head, are shorter, and not
that many nails are used. You may want to track down a roofing nailer however, especially if it is really hot out. Surprisingly, a black felt covered roof is not top on any lists
of summertime hang out spots.
With the garage below fully framed and sheathed, the roof sheathed, and the eaves and truss tails trimmed, we can begin on covering the roof. The first step is to get
your D-style drip edge and haul it up on the roof. Using the 1 1/4" roofing nails, you want to nail this drip edge all around the edge of the roof. Use nails every 12-16" or
so. Cut the metal drip edge to length with a pair of tin snips, which will also come in handy when installing vinyl siding. On the slanted gable ends, be sure that the sloping
drip edge overlays the horizontal drip edge so that water does not get channeled under the drip edge and cause rot. Also, if you plan on putting gutters on your garage,
then you will want to use a different drip edge style on the lower, horizontal edges. This is called gutter flashing or fascia or something. You will find it in the same place
as the regular drip edge at your local building supply center.
After the edging is installed all around, get a broom and sweep the roof to remove any sawdust, nails, or other junk. This helps the ice and water barrier stick to the roof
deck, improves traction, and protects the roofing felt from damage. Then you want to unbox your ice and water barrier and install it along the lower edge of the horizontal
sides of the roof. Strictly speaking this ice and water barrier is only really needed if you heat your garage and you live in a cold climate with snow. Heat escaping through
the roof melts snow which runs down to the eaves which are cold and refreezes the water. A dam forms and water builds up and can penetrate the roofing material. The
membrane seals nail punctures and prevents water infiltration. If you live in a snowy climate this barrier is cheap insurance against water damage so I installed it anyway
even though I don't plan on heating the garage. Peel the protective backing off the barrier as you go. It helps to have two people. You can pop a few staples through
along the way to help hold it in place as you press the sticky side down to the roof. Working this close to the edge may be easier for you from a ladder. You want the ice
and water barrier to stick to the drip edge but not completely overlay it. Repeat the installation on the other side of the roof. It is OK to have a seam in the barrier, overlap
cut edges by a foot or so and press the adhesive down firmly. Take care when installing to avoid air bubbles.
Next get the rolls of 15# black roofing felt (AKA tar paper) and start rolling it out parallel to the ice and water barrier. You should overlap the horizontal seams by a good
6" inches, do not make any vertical seams if at all possible. Cut the roofing felt with a utility knife and make sure that it overlays the drip edge somewhat but doesn't hang
all the way out beyond it. Roofing felt is cheap so don't be shy. It should be noted that all seams in your roof should be made such that the uphill layer is on top of the
downhill layer. Use a hammer tacker or stapler to staple the roofing felt to the roof. When tacking the sheets in place, measure to make the roofing felt layers are as
horizontal and parallel as possible. If you do so, then the lines printed on the paper can be used for guiding shingle placement. Continue laying layers of roofing felt up the
roof until you reach the peak. Since we are using a ridge vent, we want to trim the felt so that it does not obscure the slot for ventilation. If you have any protrusions in
your roof for lavatory vent stacks, chimneys, etc you will have to cut holes in the roofing felt for them as well as do any needed flashing. I'll let you figure that out, because
you should have planned a hole-free roof. Repeat the process on the other side of the roof.
With the roof felted, it will withstand some light rain in a pinch but the best plan is to push through the whole roofing project in a single sprint if at all possible. See the
sketches below for clarification on the layers involved in the roofing.
Image Notes
1. hammer
2. Pencils. Again, saturate the area to make sure you can find one when needed.
3. Chalk line
4. Needlenose pliers
5. Toolbelt
6. Tape measure, 25' is adequate
7. Speed square
http://www.instructables.com/id/How-to-build-a-garage-from-the-ground-up/
8. Utility knife with hooked roofing blade
9. Cat's paw for pulling nails
10. staples for stapling down roofing felt
11. roofing nails
step 13: Shingling, your trip to the 8th circle of hell
Shingling is by far the hardest part of roofing and can be hellish in the heat and sun of summer. Add to that the itchy fiberglass and general abrasive nature of the
shingles and you can be suffering like a simonist or sorcerer in the 8th circle of Dante's Inferno. Again, my mistake in choosing 5/12 pitch came back to bite me as
shingles refused to stay put on the sloped roof. Bah!
All complaining aside, once you get the hang of it and take care in maintaining a straight line of shingles it is not all that bad. There is another good reason to avoid
shingling in the heat besides comfort. In the hot sun the shingles get soft and can tear when you carry them or walk on them. Also the adhesive on the bottom will begin
to bind the shingles together before you have them in place which can be a pain. So shoot for a cloudy day in the mid 70's if you can.
I used regular 3-tab shingles for my garage since the matched the house. The process is similar for architectural style shingles. The first step is to stick down your starter
strip over the roofing felt and ice barrier. The starter strip is like a shingle in roll form without tabs and keeps water from the tab cutouts from reaching the roof deck. Roll
the starter strip out while peeling the backing and nail it down every foot so near to top edge. You want the starter strip (and the first shingle course) to extend about 5/8"
beyond your drip edge on the lower horizontal edge so that water doesn't wick between the shingle and drip edge. The overhang is also important to allow water to drip
into gutters if you install them. See the sketch for more info.
There are several methods for shingling. The easiest is to snap a line up the sloped roof in the middle, equal distance from the gable ends. When beginning to shingle,
you will start at this centerline and move out towards the edges, staggering the shingles like the OSB panels so that the cuts in the tabs are offset a half tab from the
course below. This allows two people to work out from the center towards each gable. You can also start by cutting a shingle in half leaving 1.5 tabs and start in the lower
corner. This method can result in fewer measured cuts since if you keep everything square you can cut a bunch of shingles in half in advance and only have to measure
the far side. This assumes your roof is square to begin with, so the center method can result in a more even look for the beginner. If you start from a corner, one person
can move horizontally while the other builds up and diagonally as the first person's progress allows.
Each shingle may have a different recommended "exposure" or amount of the single below that shows when overlaid correctly by the upper shingle. Whatever the
exposure, you can use that number to snap chalk lines across the roof after you have the first course of shingles nailed down. Measure up from the top of the first course
this exposure distance and snap a line. Measure from this line another exposure distance and repeat snapping lines until you reach the peak. If your lines are not parallel
to the peak then you have a problem with the squareness of your roof, the lay of your first course, or your line snapping. In any case, you want the shingles to be parallel
to the peak at the top so you can cheat the shingles as you go without it being too obvious. If no exposure distance is available from the manufacturer, you can put a nail
in the top of the tab cutout of the lower shingle and let the top shingle rest on the nail to get a consistent exposure. This can lead to wandering rows as the shingles aren't
exactly machined to aerospace precision.
You should put 4 nails in each whole shingle. Nails should go right above the cutouts that define the tabs, far enough up so that they are not exposed and just below the
adhesive tar strip. See the sketch for details. You want to put the nails in deep enough so that they don't stick up and tear the overlaying shingle but not too deep that
they tear through the underlaying shingle. The nails should go in straight so that the heads don't cut into the shingles. If you mess up, use the cat's paw to pop the nail
without damaging the shingle and try again. If the shingle gets damaged, remove it and use a new one.
Start shingling as shown in the sketch and work your way out from the corner or from the center. When butting shingles together on the same course, try to space them
so that the resultant cutout resembles those on the middle tabs. A little space (1/16-1/8") will also prevent buckling when the shingles expand in hot weather. When you
get to the gable edge, measure and trim a shingle with your utility knife, using your speed square as a guide. Cut from the backside and use a scrap shingle as a cutting
pad. You don't need to murder the shingle, you can cut 75% of the way through and the shingle will easily tear on the line. On the gable ends, try to evenly overlap the
drip edge by 1/4' or so. If your cut shingle ends up with a tiny tab strip you can put another nail in or use roofing cement as needed to hold this piece in place. Be sure that
no nails are exposed to the elements as this will provide a route for water to get to the roof deck.
As shown in the sketches you can proceed with whole shingles working towards the edges and upwards diagonally until the bottom courses meet the gable ends. At this
point you need to start measuring and cutting shingles. Precision is not all that important, so do your best and don't sweat it. Continue up the roof, while hopefully another
crew works on the other side so you meet at the peak in short order. You may need to trim the top of the last course of shingles so that you cover all the nails on the
underlaying course but do not plug up the ridge vent slot. Use the vent as a guide to make sure that you will be covering all the nails with the vent.
When it comes to installing the ridge vent, follow the manufacturers instructions. Typically, the ridge vent comes in 4' sections that you nail to the roof using extra long
roofing nails (>2") that are nailed in at regular intervals marked on the ridge vent. The ridge vent is flexible and it is up to you to flex it over the peak and keep it centered.
You will also need long roofing nails for putting the cap shingles over the ridge vent. To make the cap shingles you cut the tabs off of some extra shingles and use just the
tabs. Start at one end and overlap the cap shingles by 50% or so, using two long nails in each covered corner that will go through the ridge vent and into the underlaying
roof sheathing. Proceed down the vent until you get to the end. The last cap shingle can be put in place with roofing cement. I don't have any pictures of the shingling
process since by that time in the project I was in a pretty big hurry to get the heck off the roof.
http://www.instructables.com/id/How-to-build-a-garage-from-the-ground-up/
step 14: Putting in the windows and doors
With the building sheathed and the roof shingled, you will want to put in the windows and doors to complete the illusion of a completed project. Depending on the
manufacture of your chosen doors and windows the installation method may vary slightly. The overhead door especially will require you to carefully follow the
manufacturer's instructions.
Windows are more general. With your opening roughed in and the outside sheathed, take the window out of its packaging and check to see if it fits in the opening. Better
late than never! If the window and jambs fit in, make sure that the space of the opening is not so large that the nail holes in the outer flange don't hit the framing. You will
need nails through these holes to hold the window in so if the opening is too big, get some 1x4 lumber and shrink the opening by nailing these strips to the jack studs,
header, or saddle as needed. During install, make sure the window is closed and latched so that the frame will remain as square as possible.
Before installing the window, cut a length of window wrap asphalt tape that is about 4" wider on each side than the window opening. Peel the backing and stick it to the
sheathing outside right below the window so that the lower nailing flange will overlay it. With that out of the way, run a good bead of exterior window grade silicone caulk
around the perimeter of the window flange just inside of the nail holes. Then with a partner, press the window into the opening and center it. Then put a nail in the top
right (from the outside) of the flange into the framing. Use roofing nails for this job because of their large heads. The inside person should measure the window frame
corner to corner, similar to when squaring the building. If the window is not square, the person on the outside can tweak the left side of the frame up or down to square
the window. You should also measure the sides of the window frame for plumb and the bottom and top of the window for level. Tweak it around until everything looks
good and then put a few more nails around the flange. Remeasure the squareness and plumb and level before fully nailing the flange.
If your windows have a built in jamb, you can use shims from the inside during the leveling process as well to help get the window in position. Since this is a garage, I
didn't sweat this too much. Next you need to cut a strip of drip cap to width and nail it on over the window. This is not needed if the window has integrated J-channels.
The drip cap should be trimmed so that it is the same width as the window frame so that it doesn't interfere with installing trim or siding later.
With the window nailed in and the drip cap on, cut some more window wrap tape and run pieces up the sides and a strip across the top. The top piece should be last and
should overlap the tops of the drip cap and the side strips so any water will not get under them. The side strips should overlap the lower strip so water running down the
window wrap tape doesn't get under the lower tape. If the weather is cold and the window wrap isn't sticking well to the sheathing, you can punch a few staples into it to
hold it in place until some hot weather seals it up. Alternatively you can get a heat gun or hair dryer to heat the tape so it seals to the wall. Repeat this process for any
other windows.
Entry doors are installed in a similar manner, but may have some variation depending on manufacture. Depending on the door, you may also need to apply construction
adhesive or caulk underneath the door threshold or otherwise secure it to the floor or landing. In the case of a simple pre-hung steel security door you need to apply
glue/caulk to the floor and threshold, caulk the integrated brick molding and nailing flange, push it in place, square and plumb the door in the opening, nail the door in
place through the exterior flange, check the measurements again, and then shim the hinge side and drive screws through the hinge plates as directed by the manufacture
and through the shims into the building framing for strength. Sometimes they recommend that you remove a few of the smaller hinge screws and swap them for longer
deck or drywall screws that will go through shims and into the framing. Check for squareness and operation of the door. Install a handle and lockset as desired. Screws
should also be driven through the door frame into the building framing and shims on the latching side of the door as well. Cut a strip of drip cap for the top of the door as
well, nail it in place and then add window wrap to the sides and finally top if you have some extra around. Otherwise it is overkill.
http://www.instructables.com/id/How-to-build-a-garage-from-the-ground-up/
step 15: Next Steps
Congratulations. Your garage is mostly weather tight and structurally complete. Before you can do anything else you need to get another inspection of the rough framing
and construction. Give your inspector a call and have him/her take a look and sign off so that you can start covering things up with siding and interior finish work. This
should be the second to last construction inspection that you will need to get. The final inspection will be a quick once over to make sure you have numbers on the
structure visible for emergency crews and to verify any corrections that the inspector wants you to make. Then you are done!
Except for the siding. Oh, and the fascia. And the soffits. Not to mention any trim you want to add. And if you want to do any work or have lights you will need to do the
electrical installation which requires a completely different permit and series of inspections. After all that you can then insulate and finish the interior.
The good news for me is that you have now built or at least have an idea of how to build a garage from the ground up, which is the limit of my involvement. Good luck
with the rest of it. The electrical is the only real challenge. Keep your eyes peeled for another Instructable detailing the electrical process. But don't hold your breath.
The photos below show the completed project from the front, back, and a show of the interior in all its messy glory. In the corner by the windows is a built-in workbench
that may be the subject of a future Instructable, it is sturdy as a tank and cost about $10 to build out of scrap lumber.
Thanks to all my friends and family who helped throughout the garage project. I could have done it without you, but it would have sucked a lot. And would probably have
fallen over on my head. Twice. Thanks also to the patient inspectors who answered my questions and put up with our shenanigans.
http://www.instructables.com/id/How-to-build-a-garage-from-the-ground-up/
Image Notes
1. Still need to build the steps.
2. Building permit in window
3. Electrical service from house
4. Handmade aluminum crown molding. Looks good from 40 feet away.
Image Notes
1. The finished product. With snow.
2. Accent lighting.
Image Notes
1. Beefy workbench made from scraps of garage project and some concrete
anchors.
2. Electrical panel.
3. Mess.
Related Instructables
GerTee Portable tent
home made of
recycled
materials by
AlaskanTentLady
Simple
Doghouse 1.0
by chrismake
Green Roofed
Dog Veranda by
Tool Using
Animal
Wind
turbine with
bicycle wheels
by frednerk
Build yourself a
portable home a mongolian
yurt by
davidbuzz
http://www.instructables.com/id/How-to-build-a-garage-from-the-ground-up/
Soundproof
Your Garage
Walls (Using My
Cleat Method)
by rik_akashian
backyard
terrace by carkat
GREENHOUSE
FROM OLD
WINDOWS by
cheft
Advertisements
Customized Instructable T-shirts
Comments
50 comments Add Comment
view all 54 comments
blbusha says:
Nov 11, 2008. 1:53 PM REPLY
This was a great "instructable". I followed it step by step and never had a problem. 61 years old and I was able to build the whole thing BY MYSELF!! Okay, I
lied. My wife held the level and tape measure a few times. The only things I contracted out were the slab (did my own footing and foundation), the garage
door and opener, and the electrical. Built the whole thing in 30 days and only cost me $8000. Thanks for your great "hand".
jdbuild says:
Oct 24, 2008. 6:42 AM REPLY
Jmengel,
Thanks for taking the time to post this information, it is very helpful! I am contemplating building a garage with living qtrs above and reading through your
project has increased my confidence that this is a "doable" project. Thank you.
reichel says:
Aug 11, 2008. 12:09 PM REPLY
Hi Jmengel, we are also building a garage and received an estimate of 19K !!!! for the foundation up to the slap of ciment. We're looking for other
submissions. Who did you use to get the job done for 6K?
jmengel says:
Aug 11, 2008. 6:36 PM REPLY
Not sure if my source in Minneapolis would extend to your situation but I used one of the highest bidding services due to their reputation for quality and
their understanding of what I wanted done. The company was J.C. Miller and Sons. They did a great job.
AlaskaErik says:
Aug 3, 2008. 4:11 PM REPLY
Just curious, but why the plywood sheathing on the inside? I was planning on using sheetrock.
jmengel says:
Aug 4, 2008. 6:58 AM REPLY
Plywood sheathing on the inside so I can hang stuff everywhere and anywhere I want. I hate being limited to the studs and with the plywood I can screw
or nail anywhere. Besides I like the woodgrain look. additionally, I can also remove the plywood by unscrewing it to repair or modify. I have already done
this once in order to run some additional wiring. Works great.
bsingin64 says:
Jan 15, 2008. 9:11 AM REPLY
What software are you using to model the garage in?
underroutine says:
Feb 19, 2008. 10:49 AM REPLY
he is using Google SketchUp its free
Dexxa says:
Jan 13, 2008. 6:02 AM REPLY
Nice idea.
can you make them bigger? so if wanted to build rooms inside them you can?
watermelon says:
Dec 8, 2007. 3:13 PM REPLY
Where did you get the plans for the stud layouts, anyway? I see many other anomalies. Notice that with the layout shown the exterior sheathing only has one
backing point on the end, which is bad. What you want is to maximize backing by turning the interior stud to be parallel with the end stud #1 using 32"x4"x6" spacers between the interior stud and the end stud #1, top middle and bottom. This still gives enough interior corner drywall support when you lay
this piece up first.
http://www.instructables.com/id/How-to-build-a-garage-from-the-ground-up/
tjkittle says:
Dec 27, 2007. 5:10 PM REPLY
Don't forget to mention that OSB sheeting on 24" center, does not work! especially if it is 7/16" like side wall sheeting should be, 16" centers only on side
walls. 24" centers on trusses is fine, plus I would use 1/2" sheeting for my roof sheeting. Plus the bottom plate should be treated if your going to build it
like the drawing. The other way is with the treated plate attached to the bolts as shown and then your common bottom plate.(common being untreated)
common lumber should never be in contact with masonary. other than that you did a great job. PS your corner framing is fine.
jmengel says:
Dec 30, 2007. 10:25 AM REPLY
The bottom plate is treated. AC2.
24" on center wall studs with OSB does work. See the pics, the walls are functioning perfectly. In regards to the code compliance of such
arrangement, the 24" on center studs with 1/2" OSB wall sheathing met code in my locale. Your mileage may vary.
In areas with hurricanes (FL e.g.) the corner may not be up to code as pointed out by Watermelon. Consult your local codes for more info.
watermelon says:
Dec 30, 2007. 4:26 AM REPLY
Not in Florida.
kaleb1999 says:
Dec 13, 2007. 4:53 PM REPLY
there is an eaiser way of doing this with 2 2X4s nailed together one on edge to the flush with the edge of the other, that way you have your SR backer
and can fully insulate the corner rather than a solid corner post.
watermelon says:
Dec 14, 2007. 10:36 PM REPLY
Deviating from code does not make things easier in the long run.
kaleb1999 says:
Dec 15, 2007. 4:58 AM REPLY
This is not a deviation from code, and is a fully acceptable corner. I have been framing with this corner for over 15yrs and have not failed an
inspection yet in Iowa and Minnesota.
charlie_r says:
Dec 15, 2007. 6:15 AM REPLY
As I understand it, out west they call it a "california corner" probably since the use of it started there.
jmengel says:
Dec 15, 2007. 7:11 AM REPLY
The sketch I drew in Step 6 is the so-called California corner, which like kaleb1999 says was perfectly acceptable to my inspector and
allowed me to insulate the corner.
kaleb1999 says:
Dec 15, 2007. 7:28 AM REPLY
As with even a solid post corner as Watermelon was referring to I would still suggest the use of a permanent steel strap brace
between the studs and the sheathing. These are very easy to use and will make your corners as solid as concrete posts. Just snap a
diagonal line on the studs before you stand it up, making sure it is square first, cut the line with a wide kerf saw about a 1/4" deep, lay
your brace into the cut and nail on each stud and sheath.
watermelon says:
Dec 16, 2007. 9:16 AM REPLY
Code in Florida requires minimum 3 stud corners as do many other States. Prior to the invention of plywood a 1 x 4 was used in
place of a steel strap for diagonal bracing. Most every compliant utility or garage building without plywood sheathing and with no
interior panel will reveal this type of bracing.
In Florida where codes have been extensively updated to reduce cost of insurance and cost for insurance companies. In addition
to bracing straps studs are now required to be anchored to plates with a quarter inch thick brace with a rounded bottom so the
stud can lean without breaking. There are many, many other such innovations and requirements popping up in code all over the
place.
http://www.instructables.com/id/How-to-build-a-garage-from-the-ground-up/
Fortunately, evaluation work done back in the Hippy generation means that geodesic dome construction, except perhaps for
additional foundation ties, naturally surpasses all requirements in code for bracing.
jmengel says:
Dec 16, 2007. 9:34 AM REPLY
:) Domes. I think that will be my next project.
watermelon says:
Dec 16, 2007. 10:00 AM REPLY
If you have never built one before, be sure to build a model first, especially if you go higher than 2V. I bought 400 bamboo
skewer sticks (popsicle sticks work well too) to build a model of the 6V sphere I'm planning.
jmengel says:
Dec 8, 2007. 4:29 PM REPLY
Plans? Come on, what self-respecting DIY'er would resort to plans? We built the walls based on the combined experience of the workers on hand, with
no plans. Potentially there are some anomalies, but none that the inspector had any problem with.
I assume you are referring to the cross-section where "end stud #1" is the only support for the horizontal exterior sheathing while the other (vertical in the
figure) sheathing corner has "end stud #1" and "end stud #2" to support it. While additional backing could provide more strength, I am not convinced that
it is needed. With 1/2" wood sheathing interior and exterior I am not too worried about structural strength. If I was using that "built-rite" junk I could see
your point. Is the configuration you describe required by code or is it a "best practice"?
Thanks for the input!
Senseless says:
Jan 14, 2008. 1:25 PM REPLY
Plans? Come on, what self-respecting DIY'er would resort to plans?
LOL, Hey nice to meet you nice Instructable your name is a bit spooky cause my Last is Engel but I literally got the permit to build my house with a
hand drawn set of floor plans, a cross section of a footer I did in the inspectors office cause I didn't know I needed it, and a sketch of what it would
look like from the front LOL.
That was eight years ago. Everytime I needed an inspection they had to dig records out of the closets to find my permit number.
Watermelon is right about the codes in Florida being upgraded. I'd need engineered drawings to get a permit now.
Austringer says:
Dec 9, 2007. 9:58 PM REPLY
This depends on your city. We wanted to modify the front of our house. In trial one with the design review board with had a front, side and top view
and they made annoying, non-committal sounds and asked for additional information before they'd give us a permit.
In round two I did the whole thing up in some cad software so they could flip through the nine pages and see every layer. That time they rolled around
of the floor and made cooing noises.
When it's just you, plans are no biggy (assuming your really know what you're doing). You don't have to look too long to realize that there are a lot of
people out there who don't but are sure that they do.
watermelon says:
Dec 9, 2007. 2:16 AM REPLY
A framed corner is a major structural element for both contracted and DIY projects which through culmination of improvement by many, many hands
has reached the stage of ultimate and efficient design.
It is definitely a "best practices" issue which code may defer to as the minimum standard. As for passing local inspection a lot depends on legal
jurisdiction, building department policy, inspector knowledge, etc. In most, if not all, legal jurisdictions in the US inspectors must follow code and are
not authorized to deviate without an architect's approval. Code often requires submission of plans to catch and correct such anomalies and to have a
record in case of problems later on. Most county property tax departments require a floor plan anyway so they can categorize the space and assign
the proper rate.
Building something that may put someone's life at risk, including your own, is the issue. "Can it put life at risk?" Is the common question that most
conscientious building departments and inspectors ask when coming across any anomaly. They have authority to pass only if an architect has
certified the anomaly safe and as representing no risk to anyone's safety, regardless of whatever improvement or advantage it offers in form or
function or cost.
I learned this the hard way with a very conscientious plumbing inspector on my first DIY construction project. He pointed out that knowing code
and/or "best practice" is a prerequisite to DIY design and independent of "common sense," individual intelligence, higher education or on-the-job
experience where code or "best practice" knowledge was not gained.
In fact, I know a licensed contractor who violated the DWV safety concept in his own home that the inspector had described to me although DWV
involves many other issues such as proper quantity, size and limit of vents and traps. Bottom line: read the books first then explore alternate design,
else risk accidentally putting safety of yourself and others at risk.
http://www.instructables.com/id/How-to-build-a-garage-from-the-ground-up/
jmengel says:
Dec 10, 2007. 6:14 PM REPLY
I did do my best based on the ICC residential code to follow the accepted best practices for the construction. This document is pretty dense and
the layout makes it tough to track down all the applicable rules unless you already have a good understanding of them. In the end my father inlaw was the go-to guy for clarification (he has built two homes from the ground up). You are correct that the corners of a building like this with no
interior walls are a prime contributor to the strength of the structure. The only wall I would worry about is the "protected wall" I had to put exterior
grade drywall on rather than plywood in order to meet fire code. Thanks for your expertise.
watermelon says:
Dec 10, 2007. 7:52 PM REPLY
One of the things I like most about the Instructables is the opportunity it presents to compare "right" versus "wrong" methods of doing
something based on using reader feedback for help.
hmcclain says:
Dec 28, 2007. 12:19 PM REPLY
This is great!! Now I can be master of my own garage- Heidi Mc
Kiteman says:
Dec 18, 2007. 11:52 AM REPLY
There is a very similar project in the latest Make magazine.
jmengel says:
Dec 18, 2007. 12:11 PM REPLY
Very as in they have a step by step on building a garage? Really. I'd be interested in checking it out. Isn't there a "share" feature for the Make digital
edition? You a subscriber?
Kiteman says:
Dec 19, 2007. 1:15 PM REPLY
It's a workshop called the "Barrage Garage" - it's the author's own workshop, also built from the ground up.
I wasn't implying plagiarism, just commenting on the coincidence.
Dimitrios says:
Dec 16, 2007. 8:40 PM REPLY
Very Nice. I have a leaking flat concrete roof, and was looking into making this kinda roof. Your excellent instructable with the drawings made me understand
a whole lot how roofing is put together. 5 stars! Thanks!
alfonso says:
Dec 16, 2007. 3:14 PM REPLY
My dad and I built a shed like this in our backyard about 5 months ago. I almost posted, but I decided I didn't have the time. Great instructable and garage!
jbm says:
Dec 14, 2007. 9:49 AM REPLY
Is that a drainage pipe running in from the back of the foundation to the center?
jmengel says:
Dec 15, 2007. 7:21 AM REPLY
I assume you are talking about the pipe sitting above the rebar in the foundation forms prior to pouring the concrete. No that pipe does not extend out of
the foundation and was a temporary thing the foundation guys installed to help set the pour depth and grade at the back of the garage. It was removed
prior to surfacing the concrete I believe.
chuckr44 says:
Dec 10, 2007. 11:55 AM REPLY
This is a great instructable. I've done framing and electrical work, and reroofed a house, but did not know all the steps for roofing, nor did I know the hints
(like starting shingles in the center of the roof so 2 people could work on each row).
Also, my sister's shingles slid off in a windstorm one day! All in one big chunk. I guess the guy thought he didn't need nails since there was a sticky strip on
the shingles. Note to self: use nails! Sad to think there are contractors out there like that.
kaleb1999 says:
Dec 15, 2007. 5:43 AM REPLY
Up here in the North during the cold months we shingle using the freeze method. It only requires 4 nails. You wet the shingles down as you apply them
and they will freeze together, then all ya gotta do is nail each corner. lol
charlie_r says:
Dec 14, 2007. 4:34 AM REPLY
A quick one--Good job on the build!
A little hint for sheathing.....Instead of going vertical with the long dimension of the OSB, place it horizontal, so there are more studs covered by each sheet,
and split your joints like you showed for your roof sheeting. If possible, before raising the wall onto the anchor bolts. Be sure to square each wall and put a
temp angle brace on each wall you don't sheath before raising, makes squaring the whole building much easier.
http://www.instructables.com/id/How-to-build-a-garage-from-the-ground-up/
kaleb1999 says:
Dec 15, 2007. 5:11 AM REPLY
This works, some don't believe that you can build a square wall this way. Just to add to your comment, we will build a full length exterior wall this way,
sheath it, to include putting the tyvek/ext vapor barrier on it, dutting out window holes, etc. Saves approximately 3 trips around the building on scaffolding
or ladders, not to mention it is alot quicker and safer to do this on the deck than trying to level up a ladder/scaffolding on uneven spoils from the
foundation. All you have to do is tie the outside corners together off a ladder. It can also be done with 16' to 20' sections of a long wall, though it takes
alittle prior planing as far as the seam tieing together.
dpocius says:
Dec 14, 2007. 5:00 PM REPLY
Oy. I've been at this for close to a year now, trying to get plans together for permits. I started with "canned" plans from the Internet that the supplier modified
to make the garage extra-long. Then I had to run them by a structural engineer to meet California seismic requirements. Then the county bounced them back
because the upstairs office area wasn't finished for human habitation (I was going to do that bit later by myself.). Then I took the plans to an architect to get
the habitation details taken care of, like title 24 energy calcs, etc. and I shortened the building a bit to get around a massive school impact fee, which kicked
off another round with the structural engineer and the roof truss engineer. This was after spending over 20K to get a driveway engineered and cut down the
hill to the building pad (it's a "difficult" lot).
But it will be real nice when it's done.
I'm happy to see yours came out well as an owner-built project. You're not living in California, I'll bet. I'll probably hire mine out just so it gets done pronto and
I can get back to making things again. My workshop has been packed in a PODS module in front of the house now for over a year and it's making me crazy
not having a place to work.
Thanx for letting me spew a bit. I'm feeling better now. Make on!
jakdedert says:
Dec 14, 2007. 8:05 AM REPLY
Absolutely outstanding job...both the construction and (especially) the instructable. It's truly amazing that people are willing to do this amount of work--for
zero dollars--in order to publish this level of detail for the benefit of others.
People pay a lot of money for this sort of thing. Perhaps you've opened a new career avenue for yourself.
Hats off and thank you!
xirekaj says:
Dec 12, 2007. 7:26 PM REPLY
Real men frame everything with hammers ;P
jmengel says:
Dec 13, 2007. 7:40 PM REPLY
Stone hammers.
Scupper says:
Dec 10, 2007. 4:46 PM REPLY
Great instructable. Lots of pictures and diagrams. Very complete detailed information. The only thing I did not see. Usually on the first course of shingles, you
reverse and add a second ply directly. That saves the tar paper.
jmengel says:
Dec 10, 2007. 6:07 PM REPLY
Yeah, I used a commercial product called "starter strip" that is basically a roll of sticky shingle that you put along the first course. I forgot to include it in
the diagrams. Will have to correct that. Thanks for the comments.
Scupper says:
Dec 11, 2007. 6:42 AM REPLY
Thanks for following up. I wouldn't want someone to miss a step and down the road have a leaky roof.
gmoon says:
Dec 8, 2007. 5:36 AM REPLY
Well done, Great ible!
(I've a similar project staring me in the face. But first I'll need to knock down the old one...)
jmengel says:
Dec 8, 2007. 9:23 AM REPLY
Thanks for the comments. Let me know if there is anything that is unclear and could use a diagram, more explanation, etc. I am working on getting some
diagrams for the window/door install.
Brennn10 says:
Nice job!
view all 54 comments
http://www.instructables.com/id/How-to-build-a-garage-from-the-ground-up/
Dec 8, 2007. 7:27 AM REPLY

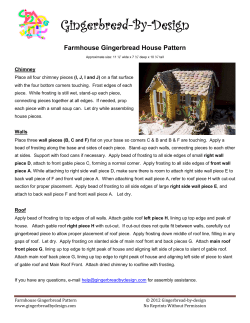


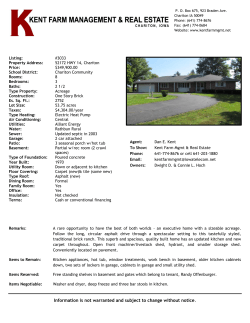


© Copyright 2026