
How to record using mydlink cameras
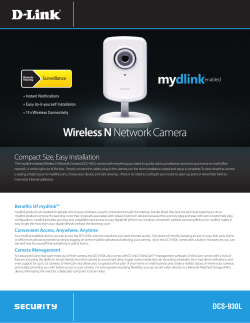
How to record using mydlink cameras
This document will detail how you setup your mydlink camera with D-Link D-ViewCam.
D-Link D-ViewCam is a comprehensive surveillance system designed to centrally manage
up to 32 network cameras from a Windows Operating System.
D-Link Technical Support – How to record using mydlink camera's.
Page 1 of 17
For this setup guide we will be using the DCS-942L to illustrate how you can record using
the D-Link D-ViewCam software application.
This document can be applied to all of the mydlink camera range, thus far it applies to
DCS-930L / DCS-932L and DCS-942L.
D-Link D-ViewCam Installation:
1. The D-ViewCam software is provided on the Installation CD-ROM. Insert the Installation
CD-ROM into your optical drive and allow it to autorun and or browse your optical drive
and double click on the 'autorun.exe' file. Allow it to run if asked for permission.
2. Click on the D-ViewCam (DCS-100) menu:
NOTE: Any prompts that require permission please click on 'Run', 'OK', 'Accept' and or
'Continue'.
D-Link Technical Support – How to record using mydlink camera's.
Page 2 of 17
3. Read the End User License Agreement before clicking on the Agree button:
4. The D-Link D-ViewCam Surveillance System Setup Tool will be displayed, click on Next:
5. Select your Language. This setup guide will use English. Click on Next:
D-Link Technical Support – How to record using mydlink camera's.
Page 3 of 17
6. Click Next to begin installation of D-Link D-ViewCam on to your computer:
7. Read the license agreement carefully again and select "I accept the terms of the license
agreement", click on Next:
D-Link Technical Support – How to record using mydlink camera's.
Page 4 of 17
8. Type in your Customer Information and click on Next:
9. Its recommended to leave the option on 'Complete' and click on the Next button:
D-Link Technical Support – How to record using mydlink camera's.
Page 5 of 17
10. Click on the Install button:
11. Patiently wait for the D-Link D-ViewCam software to install:
12. Click on the OK button to proceed:
D-Link Technical Support – How to record using mydlink camera's.
Page 6 of 17
13. Patiently wait for the Device Pack to install which is a component of the D-Link DViewCam software:
14. Patiently wait for the Microsoft Visual C++ 2005 to install which is a component of the
D-Link D-ViewCam software:
D-Link Technical Support – How to record using mydlink camera's.
Page 7 of 17
15. It is strongly advised that you select "Yes, I want to restart my computer now." Click on
the Finish button:
16. Patiently wait for your computer to restart.
17. Once computer has restarted, please start the application "Main Console" from the DLink D-ViewCam programs list. Click on Start > All Programs and select D-Link D-ViewCam:
D-Link Technical Support – How to record using mydlink camera's.
Page 8 of 17
18. On first execution of the Main Console, you will need to assign a password for the
administrator of the Main Console System. Please type in a Password and confirm the
Password again that you would like to secure your Main Console with. Click on the OK
button:
19. The D-Link D-ViewCam Main Console will look similar the below illustration:
NOTE: If you would like to understand or have a better idea on the General User Interface
I would advise consulting the D-Link D-ViewCam User Manual. This is provided on the
camera's Installation CD-ROM, please browse the contents of your optical drive. It's
located in the 'Manual' folder. D-Link D-ViewCam is also known as 'DCS-100'.
D-Link Technical Support – How to record using mydlink camera's.
Page 9 of 17
Adding a camera to D-Link D-ViewCam:
20. Click on General Settings > Setting:
21. Click on the Camera tab:
22. We can now 'Search' for the camera which will attempt to automatically detect the
camera. Or we can 'Insert' the camera which is a method of manually adding the camera
provided you know the IP Address of your camera. Select your options below (scroll down
for Insert instructions):
D-Link Technical Support – How to record using mydlink camera's.
Page 10 of 17
Search:
22a. Click on the Search button. Within a couple of seconds D-Link ViewCam would have
automatically found your camera. Click on the box field to select the camera. Type in the
User Name and Password used to access your camera's Web Configuration. Click on the
OK button:
22b. We can now see the camera has been added to D-Link D-ViewCam.
Click on the OK button to complete this process. Please jump to Step 23.
Insert:
D-Link Technical Support – How to record using mydlink camera's.
Page 11 of 17
22c. Click on the Insert button. The settings are as follows:
Name: Type in a name i.e. Room
IP Address: Type in the IP Address of the Camera.
HTTP Port: By default this is Port 80. If you have changed the default HTTP Port on the
camera, please change this value accordingly.
User Name: The Username of your camera's Web Configuration.
Password: The Password of your camera's Web Configuration.
Protocol: Recommended to leave it on HTTP.
Click on the Auto Detect button for it to automatically detect your camera model and or
from the Camera Model drop down select your camera model manually. Click on the OK
button:
22d. We can now see the camera has been added to D-Link D-ViewCam.
Click on the OK button to complete this process.
D-Link Technical Support – How to record using mydlink camera's.
Page 12 of 17
By default the Recording Schedule Configuration is set up to record 'Always' on a day to
day basis. You can customize or view this Schedule Configuration by clicking on the
Schedule Configuration button:
Please refer to the D-Link D-ViewCam User Manual for if you would like to change the
default Schedule Configuration:
D-Link Technical Support – How to record using mydlink camera's.
Page 13 of 17
23. Click on Start Menu > Start Recording Schedule:
Playback Recorded Video:
24. Click on Execute Playback System button:
D-Link Technical Support – How to record using mydlink camera's.
Page 14 of 17
25. The Playback System General User Interface will be now on screen:
NOTE: If you would like to understand or have a better idea on the General User Interface
I would advise consulting the D-Link D-ViewCam User Manual. This is provided on the
camera's Installation CD-ROM, please browse the contents of your optical drive. It's
located in the 'Manual' folder. D-Link D-ViewCam is also known as 'DCS-100'.
26. Click on the 'Date Time Search Dialog' button:
D-Link Technical Support – How to record using mydlink camera's.
Page 15 of 17
27. Using your mouse, highlight and drag over the red recorded line. It should now look
similar to the below illustration:
Before:
After:
Click on the OK button to complete this process.
D-Link Technical Support – How to record using mydlink camera's.
Page 16 of 17
28. Click on the Play button:
29. You should now be able to view the recorded video.
30. Once the video has ended, you may now Exit the Playback System.
31. Click on the Exit button:
~ End of Document ~
D-Link Technical Support – How to record using mydlink camera's.
Page 17 of 17


© Copyright 2026