
Android Email Setup Guide for Shared Base Accounts
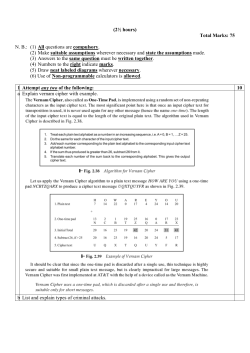
How to set up your Android phone for shared base emails
The following steps below will allow the shared base email address to be synced with you base issued
mobile phone. Please follow the steps carefully. Please delete the default entries that you might see. If
you have any questions please email [email protected]
Step 1: Click on the Email Accounts app. It is usually on the home screen and looks like this.
Step 2: Select Add Account (If you have already added an account you can find this by selecting settings)
Step 3: Select Other for the account type
Step 4: Enter the Shared Base Email Address
Step 5: Enter the Shared Base Password
Step 6: Select Manual Setup
Step 7: Select POP3
Step 8: Enter mail.4securemail.com for the POP3 Server
Step 9: Enter 995 for the Port
Step 10: Select SSL/TLS for the Security Type
Step 11: Authentication Method should be set to Auto
Step 12: Delete email from server should be set to never
Step 13: Select Next
Step 14: SMTP Server should be mail.4securemail.com
Step 15: Enter 465 for the Port
Step 16: Select SSL/TLS as the Security Type
Step 17: Verify that require sign – in is checked
Step 18: Authentication Method should be auto
Step 19: Select Next
Step 20: Choose the sync options you desire
Step 21: Select Done
Step 22: Enter the account name you would like to see displayed for this email
Step 23: Enter the name to be displayed on outgoing messages. I suggest using the base name and the
program type you are involved in such as MFLC or CYB. An example would Travis Air Force Base CYB.
This is what the POC and others would see as the To address in any email commuications that you send.
Step 24: Select Next to finish the setup and return to the email app.
Last Revised: 2012-12-11
1
Military Family Life Counselor


© Copyright 2026