
How to Produce High-Quality QuickTime Make the Most of Your Media! ™
How to Produce High-Quality QuickTime™
By Terran Interactive, Inc.
www.terran.com
®
Make the Most of Your Media!
How to Produce High-Quality QuickTime
Table of Contents
Introduction
Capturing Video for Optimum Quality
17
Scope of This Document
4
Capture Video at Full Screen
17
About the Authors
5
Capture with High-Quality Setting
18
Perspectives and Expectations
5
Capture from Master Tapes
18
To Out-Source or Not to Out-Source
6
Audio Settings
18
Quality Counts
6
Tune Your System
19
Sanity Check
7
Dropped Frames
19
Editing for Desktop Delivery
Overview of Production
Five Steps to Great QuickTime
8
Section 1: Planning
20
Transitions & Effects
20
Work at Full Resolution
20
High-Quality Renders
21
Correcting Problem Video
21
Film Source
21
The Importance of Planning
9
Determine Your Goals
9
Determine Minimum System Requirements
10
Exporting from Adobe Premiere
22
Pick Your Technologies and Tools
10
Exporting from Other Systems
22
Write it Down
10
Rendering High-Quality Masters
23
Proof of Concept & Testing
11
Archive Your Project!
23
Exporting and Archiving Your Movie
22
Section 2: Creating the Content
Section 3: Preparing Content
Overview
12
Overview
24
Shooting Video for Desktop Delivery
13
Understanding Compression
25
Use a High-Quality Camera
13
Why You Need to Compress
25
Blue- and Greenscreen
14
How Video Codecs Work
26
Lighting for Compression
15
Codecs in Action
27
The Specific Codecs
27
Use a Tripod and Reduce Movement 15
Keep Details to a Minimum
16
Producing Good Audio
16
How to Produce High-Quality QuickTime
Analyzing and Pre-Processing
28
Interlacing
28
Handling Material Shot on Film
29
Copyright © 1999, Terran Interactive, Inc. All rights reserved. http://www.terran.com
Page 2
Analyzing and Pre-Processing (cont.)
Color (contrast, gamma, etc.)
Section 4: Authoring the Project
29
Cropping
30
Noise Reduction
30
More Details
30
Choosing Compression Settings
31
Choosing the Codec
31
Choosing the Data Rate
32
Choosing Data Rate Units
34
Choosing Frame Rate
34
Choosing Frame Size
35
Frame Rate and Size Limitations
35
Choosing Keyframe Frequency
36
QuickTime’s New Codecs
37
Sorenson Video
37
QDesign Music Codec
38
QUALCOMM PureVoice
38
Using Media Cleaner Pro
Embedding Movies in Web Pages
42
Wired QuickTime Movies
42
Interactive Projects with Director
43
Section 5: Delivering the Project
Online Delivery
44
CD-ROM Delivery
45
DVD-ROM Delivery
45
Kiosk/Presentation
45
Tools and Resources
QuickTime Tools
46
Online Resources
48
Glossary
49
39
About Media Cleaner Pro
39
Producing QuickTime Alternates
39
This document may be reproduced in printed form for educational and instructional use provided no significant modifications
are made to the content or layout. Any other reproduction of this material, in whole or in part, requires the express written consent of
Terran Interactive, Inc. All material contained in this document is copyrighted 1999, Terran Interactive, Inc. All rights reserved.
Terran normally grants requests to use our material provided proper attribution is given including the URL of the original document. Please
email [email protected] or fax (408) 356-9373 for permission to use this material. You may link to the URLs on Terran's site containing
this material without written permission from Terran, although we reserve the right to have you remove such links upon written notice from us.
Inclusion of a product and/or technology in this document does not imply endorsement by Terran. All information is provided for reference
only, and Terran makes no guarantees as to the accuracy or suitability of this information for your particular projects or needs.
Terran Interactive, the Terran logo, Media Cleaner, Codec Central, and Intelecine are all trademarks of Terran Interactive, Inc. Apple, MacOS,
Macintosh, Power Macintosh, QuickTime, SoundManager, and the respective Apple logos are trademarks of Apple Computer Incorporated.
Sorenson Video, Sorenson Vision, and the Sorenson logo are trademarks of Sorenson Vision, Inc. QDesign Music Codec, QDesign, and the
QDesign logo are trademarks of QDesign Corporation. Adobe, Adobe Premiere, and Photoshop are trademarks of Adobe Systems Incorporated.
Cinepak is a trademark of Digital Origin, Inc. (formerly Radius). Windows, NetShow, ActiveMovie, and DirectShow are trademarks of Microsoft
Corporation. Indeo is a trademark of Intel Corporation.
How to Produce High-Quality QuickTime
Copyright © 1999, Terran Interactive, Inc. All rights reserved. http://www.terran.com
Page 3
How to Produce High-Quality QuickTime
Introduction
Welcome to “How to Produce High-Quality QuickTime”. This document will help you understand the process of
creating, preparing, and delivering professional-quality QuickTime projects.
This document is written for developers and video professionals who want to “do it right.” If you are new to creating
and delivering QuickTime movies, this document should help give you a good understanding of the basics, and help
you get started. If you're a QuickTime professional, we hope that the details and tips contained in this document will
help you deliver even better QuickTime movies.
Scope of this Document
A detailed description of every step, program, and aspect of producing high-quality QuickTime
would literally take several books.
To keep this document approachable, we'll present an overview of the entire process, but
focus primarily on how to prepare/compress QuickTime movies, because this is the least
understood part of the production process. We'll also discuss the creation of content in some
depth because it has such a profound impact on final movie quality.
QuickTime™
For the purposes of this document, we'll be focusing on audio and video QuickTime movies, and won't be discussing
QuickTime VR, QuickTime interactivity, and other QuickTime features in much depth. Please keep in mind that
QuickTime is much more than just synchronized audio and video – the breadth of the QuickTime architecture is a big
reason why it continues to be the industry standard for cross-platform multimedia delivery.
This document will briefly discuss local and network distribution of QuickTime, but won't discuss QuickTime Streaming.
Once Apple makes more public announcements about QuickTime Streaming, we'll add a section addressing this
exciting new technology.
Much of what is discussed here is equally applicable to MacOS and Windows. Remember that QuickTime 3 is a fully
cross-platform technology, and you can author QuickTime on the Mac for delivery on Windows machines, and vice versa.
For your convience, we’ve also added an extensive glossary at the end of this document to help you sort out many of
the terms used in multimedia and networks.
How to Produce High-Quality QuickTime
Copyright © 1999, Terran Interactive, Inc. All rights reserved. http://www.terran.com
Page 4
About the Authors...
This document is written by Terran Interactive, Inc., the makers of Media Cleaner Pro. Media
Cleaner is the industry standard for preparing high-quality QuickTime movies.
®
Terran has been deeply involved with QuickTime for over four years. Terran's roots lie in video
compression service work, and our products have sprung directly from needs we encountered
while producing high-quality video for clients on tight deadlines.
Terran provides media delivery solutions to our customers by offering QuickTime-related software products. To learn
more about Terran and the products we offer, please visit our Web page at http://www.terran.com.
Perspective and Expectations
A big part of learning how to effectively create and deliver QuickTime
movies is having realistic expectations.
Your computer is not a television – each technology has different
strengths and weaknesses, and they aren't interchangeable. For
Computers are not Televisions
example, the computer is more flexible than TV, and offers exciting
opportunities for interactivity missing from television. However, bandwidth limitations often mean desktop video
doesn't look as good as television.
While desktop delivery offers more options, it's also less standardized. There is never any doubt that TV viewers can
watch a specific channel, but desktop video isn't such a given. QuickTime simplifies distribution, but you still must
understand the system requirements for given technologies and make sure your viewers have the correct software
installed.
Desktop video, and especially video delivered over a network, is substantially lower bandwidth than television. This
means that as a developer you must make tradeoffs between size, image quality, and frame rate that aren't required
with television.
It is also important to understand what compressed QuickTime can look like at a given bandwidth. Many clients have
unrealistic expectations of the quality that is currently possible, and part of your job is to educate them on what can
and can't be done with today's technologies.
That said, QuickTime and its codecs and tools keep getting better. The quality that you can currently deliver with
QuickTime 3 was unattainable even a year ago. Plus, your knowledge as a producer of desktop video can make a
huge difference in the quality of your final movies.
How to Produce High-Quality QuickTime
Copyright © 1999, Terran Interactive, Inc. All rights reserved. http://www.terran.com
Page 5
To Out-Source or Not to Out-Source
Before we go much further in this document, a fundamental question you should ask yourself is whether you wish to
produce and prepare your material yourself, or hire a team of professionals to do it for you.
There are pros and cons with each option, and you should spend some serious thought on this question. This
document will give you a better idea of the work involved with producing a project yourself – if you're not sure if you
want to do it in-house or out-source the job, keep reading.
Even if you plan to have your material produced by a professional, we strongly recommend that you read the rest of
this document. Understanding what's involved with producing high-quality QuickTime will help you have realistic
expectations of what your production team can do, as well as give you some better ideas on how to plan your project.
Finally, even if you are sure you want to create the material yourself but are new to video, we recommend you
consider using a professional team for the actual production of your video. Shooting good video is tough, and
requires a lot of experience and hardware. This is one part of the production process that is often best left to
professionals. If you start with amateur video, you will end up with amateur-looking results, regardless of your skill
with editing or compression.
If you do decide to outsource your project or video production, we recommend that you visit Terran's User Gallery
for a list of production houses that are experts with QuickTime.
Quality Counts
The fundamental philosophy of making high-quality QuickTime is preserving the maximum quality possible at every
step. A “holistic” approach of keeping the entire production process in mind, and carefully planning each step to
minimize quality loss, is the key to producing excellent results.
When you create a movie, you start with the real world in all its three-dimensional glory. Video/film can only reproduce
a two-dimensional image of the real world, and the images, colors, sounds, etc. contain a lot less detail than the
original subjects. When you create this video, you must use a high quality camera, good lighting, and professional
production practices to preserve as much detail as possible from the real world.
In order to actually deliver your video to viewers, you will need to compress it. This compression will dramatically
reduce the amount of information contained in the final movie. Minimizing the loss of quality during this step is
critical to high-quality final results.
Understanding how to successfully accomplish this translation from the real world to the desktop is the purpose of
this document.
NOTE: Many developers mistakenly believe that because their final movie will be small and low-bandwidth, they don't need to
be careful in how they light, shoot, capture and edit their video. This is absolutely not true – the old saying “Garbage in,
garbage out” is a fundamental tenet of desktop video. The best final video is only possible when you start with careful planning
and excellent source material, and then prepare your video with the utmost care.
How to Produce High-Quality QuickTime
Copyright © 1999, Terran Interactive, Inc. All rights reserved. http://www.terran.com
Page 6
Sanity Check
Working with multimedia can be very exciting and rewarding, but it can also be a frustrating experience. Not everyone
will have problems, but our experience has been that the equipment and software used in multimedia production is
often “on the cutting edge” and you may experience occasional crashes or bugs.
This is not to say that you will have problems, but rather you're not alone if you do... and even if your computer
crashes, you may not be doing anything wrong.
Just remember to leave some room in your deadlines for unexpected problems,
especially with new hardware or software. Keep your system extensions and
devices to an absolute minimum. Once you've got your system working really
well, back it up (especially your System folder) so you don't have to start from
scratch if the multimedia gremlins attack.
NOTE: To back up your system completely on a Macintosh, you must boot from a
different drive – the Mac cannot copy certain System resources while that System is
running the computer. The easiest way to do this is to put a System disc in the CDROM drive, restart, and hold down the “C” key during startup – this will cause
your Mac to boot from the system on the CD. Once the computer is done
restarting, you can completely copy your normal System folder, because it isn't
currently in use.
How to Produce High-Quality QuickTime
Sanity Check - Multimedia is
fun, but can also be frustrating
Copyright © 1999, Terran Interactive, Inc. All rights reserved. http://www.terran.com
Page 7
How to Produce High-Quality QuickTime
Overview
Five Steps to Great QuickTime
Successfully producing high-quality QuickTime projects
involves five major steps, which are outlined below.
These steps taken together are often called “workflow.”
Understanding, planning, and testing each step in the
workflow prior to starting production is the best way
to ensure high-quality results while minimizing your
production time.
NOTE: The bulk of this document details the creation
and preparation steps, since these are the areas in
which most mistakes are made which lower the quality
of the final project. The other steps are provided here to
help place the preparation step in context while offering
you some helpful tips.
1. Planning the Project
To produce a successful project, you must first figure
out what you are trying to do with it, then create a
plan for accomplishing your goals.
2. Creating the Content
Creating the content involves actually shooting the
video, then getting it into the computer and editing it.
Professional production values are essential, and there
are several details you should understand to maximize
the quality of the final QuickTime movie.
3. Preparing Content for Delivery
Compressing your final movie to prepare it for delivery
is often the least understood step of the production
process, and the most common source of mistakes.
Compression has a huge impact on quality, and we’ll
outline how to do it right.
How to Produce High-Quality QuickTime
2. Create
3. Prepare
1. Plan
How to Produce High-Quality QuickTime
4. Author
Tools
5. Deliver
4. Authoring the Project
The authoring step is where you assemble your
compressed video, graphics, and elements into your
final interactive project or Web page. Careful prior planning
will make authoring the project dramatically easier.
5. Delivering the Project
Once you've finished producing your final project, you
need to get it to your viewers. Common delivery
methods include the Web, CD-ROM, DVD, and kiosk/
presentations.
Tools and Resources
To produce high-quality QuickTime, you need highquality tools and the professional codecs. We've also
listed some helpful online resources for further
research.
Copyright © 1999, Terran Interactive, Inc. All rights reserved. http://www.terran.com
Page 8
How to Produce High-Quality QuickTime
1: Planning
If you want to reliably deliver great results on time, we strongly recommendthat you carefully plan your projects.
Investing your time in early planning pays off later by eliminating reshoots and reworks. Getting the job done right the
first time helps you satisfy your clients while increasing your profits.
To plan effectively, you first need to determine the specifics of what you are trying to accomplish with your project.
You must evaluate your target audience and the requirements of delivering video to them. After you have a good idea
of the project goals and audience, you should choose your delivery methods. Then, you should create a project
specification, a storyboard/script and a proof-of-concept. Finally, be sure to get your client to "sign off" on the project
prior to starting production.
Determine Your Goals
It's hard to reach your goals unless you have a clear understanding of what they
are. This is so obvious it's often overlooked or too many assumptions are made.
Make sure you know your goals, including:
What are you trying to communicate to the viewer? Are you relating complex
technical information, such as online training, or are you trying to impress
prospective customers with a flashy advertisement?
How will it be delivered? Online, on a CD or DVD, or both? If it will be online,
how many users will need to be able to access it simultaneously?
Before you start, you should ask
several questions...
What should the final experience be? Will there be multiple media elements present at once? Will the media be
watched in a linear fashion, or will the user be able to randomly access the file? Are you just delivering movies, or do
you need to build an interactive experience?
Once you understand your high-level goals, you can start getting more detailed about the technology required to
deliver your message.
How to Produce High-Quality QuickTime
Copyright © 1999, Terran Interactive, Inc. All rights reserved. http://www.terran.com
Page 9
Determine the Minimum System Requirements
Early in the planning process you should determine the minimum system required for viewing your project.
What are you trying to achieve in terms of quality? Higher quality often requires faster machines and newer technologies.
Can you require that viewers have QuickTime 3 installed? Many of the new QuickTime 3 codecs, such as Sorenson
Video and QDesign Music, require a PowerPC or Pentium.
If you need to deliver video to 68K Macintoshes, you'll be stuck with older technologies such as Cinepak. If you must
support '486 systems and 14.4 modems, you should have realistic expectations for the lower quality this will entail.
There is always a conflict between the higher system requirements needed to deliver the highest quality video and the
lower requirements needed to maximize your audience. Fortunately, QuickTime 3 movie alternates often offer a
good solution to this problem.
By preparing multiple versions of your media, and then delivering the best version to each viewer, you can avoid
producing video that is only aimed at the “lowest common denominator.” For more information on making alternates,
please see page 40 of this document.
Pick Your Technologies and Tools
There are an impressive collection of multimedia technologies from which to choose. Each of them has their own
benefits and drawbacks, and picking a good fit for your project is important. You need to make sure the technology
can support your goals. This includes supporting your required media types, playback platforms, and interactivity. A
good resource to understanding the architectures and codecs available is Codec Central. You can visit CodecCentral
at http://www.CodecCentral.com.
Once you’ve picked your technologies, you'll need to choose the hardware and software tools to use in creating your
project. This includes the whole spectrum, including audio/video capture hardware, editing software, compression
tools, professional codecs and encoders, authoring software, CD or DVD burners, HTML tools, and media servers.
Creating a “proof of concept” (discussed later in this section) will also help you figure out exactly what tools you'll
need to actually produce your project.
Write it Down
This may seem obvious, but many developers start a project without a clear written document outlining the media
elements they need, how these elements will be created and prepared, and a schedule for all the work.
We strongly suggest you create a detailed project specification document. Staying organized during the actual creation
and preparation of the elements is much easier when you have a “master plan” from which to plan and track your progress.
You should also have a script written for your video prior to filming – “ad libbing” often causes reshoots when you
later realize you didn't get a piece of needed footage. If you are conducting an interview, having carefully prepared
questions will speed up the interview and often improve the subject's responses as well.
How to Produce High-Quality QuickTime
Copyright © 1999, Terran Interactive, Inc. All rights reserved. http://www.terran.com
Page 10
Proof of Concept & Testing
A wise man once said, “Test early and test often”. Before you fill a dozen hard
drives with footage, test your production process from start to finish on a few
sample files. It's very important to test the entire production process because
you are likely to find things later in the process that will make you want to change
what you're doing earlier in the process.
For example, you may realize that the interview video you are shooting looks
great when displayed full screen, but the people are too small when scaled down
to the size it will appear in the project. Filming the same video closer to the
subject might easily address this issue, but figuring this fact out before you've
shot all your material is vastly preferable to reshooting the video.
Create a proof of concept
and test it carefully.
For your CD-ROM projects, the best way to test your movies is to play them within the title interface (or a mock-up of
it) on your minimum target machine with the minimum CD-ROM drive on the project specifications. You should play
the movie all the way through and watch for dropped frames and skipping audio, or loss of sync. For example, if you
are using Macromedia's Director to make an interactive CD-ROM title, you should put your test movie into your
Director project to play it. If you list “486/66 PC, 2x CD-ROM” as the system requirement on the box, you should play
the movie on a typical 486/66 PC with a double-speed CD-ROM.
Playing the movie in a different application may not give you an accurate representation of how the movie will play in
your final project. For example, your Director project may take some extra CPU overhead while running – testing the
movie in MoviePlayer won't warn you of the lower performance you might see in the final project. Similarly, playing the
movie off of a hard drive when the final will be played off of a 2x CD-ROM won't tell you if the data rate is a problem.
NOTE: You should be aware that some CD-ROM drives don't “like” some CD-R media. If your movies don't play well
in some machines, but play fine in others, try using a different CD-ROM drive and/or different color CD-Rs.
To test a Web movie, upload it to your server and access it with the same connection for which you are optimizing. If
the Web server is on the same local area network as your test machine, you should disconnect the test machine from
the LAN and access the video via the target connection, such as a modem, to simulate your target user's experience.
How to Produce High-Quality QuickTime
Copyright © 1999, Terran Interactive, Inc. All rights reserved. http://www.terran.com
Page 11
How to Produce High-Quality QuickTime
2: Creating Content
Overview of Creating Content
Creating the content involves actually shooting the video, then getting the video into the computer for editing. Other media
elements, such as graphics, 3-D renders, etc. are also produced during this step, but aren't detailed in this document.
The basic video creation workflow consists of four main steps, outlined below.
1. Shooting Video for Desktop Delivery
It's important that you set up and shoot the video with
the realities of the final delivery medium in mind. Use a
high-quality camera and microphone, sturdy tripod and
proper lighting for the best results.
3. Editing for Desktop Delivery
Once you have the video on a hard drive, you can edit
and add special effects to your movie. Using simple
transitions and other editing techniques can improve
the final compressed movie.
2. Capturing Video for Optimum Quality
You must capture the video to get it into your computer,
and like all the other steps, there are ways you can
maximize your quality during the capture process.
4. Exporting and Archiving Your Movie
When you are done creating the source video, archive
it for future repurposing, then export it to Media
Cleaner for final compression.
How to Produce High-Quality QuickTime
Copyright © 1999, Terran Interactive, Inc. All rights reserved. http://www.terran.com
Page 12
Creating Content:
1. Shooting Video for the Desktop
Below are some general tips aimed at producing good desktop video. Most of these tips are focused on creating video
that will compress well – by carefully shooting video for desktop use, you can substantially improve how well the final
video will compress. Better compression results in higher-quality and/or smaller QuickTime movies.
The overall goal is to produce a video signal with the least amount of noise, camera movement, and fine detail possible
so that the final movie will compress effectively and look good at a small screen size.
It is critical that you shoot tests of your material and run it through your entire production process before you film the
whole project. It's important to view the final results on the desktop as they will appear in the final project, because
your image may look great when filmed and edited, but look less than optimal after resizing and compression. Early
and thorough testing will help spare you painful and expensive reshoots.
Finally, if you are new to video production, having professionals light and shoot your video may be a good idea. There
is a lot of expensive hardware required to do this right, and experience is critical to producing professional results.
Use a High-Quality Camera
The higher the quality of the original video signal, the better the final
QuickTime movie will look and compress.
A common misconception is that because the final movie will end up
small on the screen, a cheap camera won't make a difference – this is
absolutely wrong. Video noise substantially degrades compression, so a
“clean” video signal produced by a professional camera will compress
much better than a “noisy” signal produced by a consumer model.
A high-quality camera will help
you produce superior final results
In addition to lower noise, professional cameras generally produce a
sharper image with better colors given their superior optics and multi-chip design. Again, anything that improves the
quality of the original video will help you deliver better QuickTime movies.
Below is an overview of the four common classes of cameras used for desktop video:
Professional (BetaCamSP, D1, studio/broadcast equipment)
The professional formats, such as BetaCamSP, generally produce higher resolution and less noise than the other
formats listed here. BetaCamSP also contains adequate color information for bluescreen work.
The professional formats are not cheap – unless you are a professional videographer, you'll probably have to rent the
equipment. BetaCamSP is an analog format, so you'll need to digitize the signal with a capture card to work with it on
the desktop. Some of the other pro formats are digital, but not widely used for multimedia production.
How to Produce High-Quality QuickTime
Copyright © 1999, Terran Interactive, Inc. All rights reserved. http://www.terran.com
Page 13
DV (miniDV, DVCPro, DVCam)
DV is a high-quality, digital format that integrates well with desktop systems. There are currently three DV formats:
miniDV, DVCPro, and DVCam. MiniDV is the most common, and generally is the format used by consumer cameras.
DVCPro and DVCam are professional formats which are not as widely available as miniDV.
The primary difference between miniDV and the pro DV formats is the color subsampling. MiniDV's color subsampling
is fine for most projects, but is insufficient for high-quality bluescreen work. If you need to do bluescreen, you should
probably use a pro DV format, or an analog pro format such as BetaCamSP.
The DV format is far superior to Hi8, S-VHS, and other consumer formats. DV is digital, so it does not suffer from
generation loss – a copy of a DV tape is identical to the original. Most miniDV cameras can be connected to your
computer via Firewire.
Some DV cameras offer a “progressive scan” feature. This records each frame as a single non-interlaced image, instead
of two separate interlaced fields. Progressive scan source material often doesn't play as smoothly on television as
interlaced material, but is vastly superior for desktop delivery because it contains no interlacing artifacts. You should
look for this feature when buying a DV camera, and use it when filming for desktop delivery.
Consumer Formats (Hi8, S-VHS, and VHS)
These consumer formats produce substantially noisier signals with lower resolution than the professional and DV
formats. Hi8 and S-VHS are superior to VHS. As with BetaCam, these are analog formats, and a capture card is
required to get these formats into your computer.
Computer-Based Cameras (video conferencing cameras, etc.)
Generally these cameras produce very noisy and low-resolution images. They often hook up directly to your computer,
so a capture card isn't needed. We strongly recommend using a better camera if you are trying to deliver high-quality
QuickTime movies.
Blue- and Greenscreen
Properly executed blue- or greenscreen can significantly improve
your movies. For example, if you composite an actor in front of a
digital still, the background image will be perfectly steady and noisefree. The lack of video noise and movement in the background
improves both temporal and spatial compression of the movie, which
produces a higher quality final movie.
However, blue- and greenscreen work is very technically challenging
and shouldn't be attempted unless you have the experience and
Green- and blue-screen work is technically challenging
equipment to do it correctly. Simply shooting an actor in front of a
blue backdrop often won't work – there are very specific ways you must design your set and lighting to ensure good
results. Proper testing is critical, and poorly shot material cannot usually be saved in post-processing.
NOTE: MiniDV and the consumer formats do not contain sufficient color resolution for high-quality bluescreen
work. If you are doing bluescreen, you should use a professional format (BetaCamSP, etc.) for the best results.
How to Produce High-Quality QuickTime
Copyright © 1999, Terran Interactive, Inc. All rights reserved. http://www.terran.com
Page 14
Lighting for Compression
Generally speaking, video that is well-lit will compress better than under- or overexposed material. Most codecs work
best with moderate contrast material, and many codecs don't work as well with dark scenes. For example, Cinepak
normally produces better compression with lighter images.
Adequate lighting is critical to producing superior QuickTime movies, because low-light conditions produce excessively
noisy video signals lacking details in the shadows. Overexposure is less frequently a problem, but should also be
avoided.
You should not shoot video that you know is incorrectly exposed and plan to fix it in post-processing – detail that is
missing, and excessive noise can never be fully corrected after the fact. Lighting your video properly is the only way to
ensure the highest quality results.
Use a Tripod and Reduce Movement
The use of a tripod often makes a dramatic impact in the quality of the final movie. This is because keeping the camera
steady reduces subtle differences between frames, and therefore improves the temporal compression of the video.
Be sure to use a sufficiently heavy tripod for your camera. If you plan to pan the camera during filming, use a highquality fluid head and keep the pan smooth and slow. Irregular or “jerky” camera motion is hard to compress.
Avoid hand-held shooting if possible. If you need to film a hand-held shot, a motion stabilizer (Steadi-Cam™, gyro,
etc.) will improve your results. If your camera has an image-stabilization option (either optical or electronic), you
should generally use this feature to reduce subtle changes between frames from camera motion.
NOTE: Some codecs, such as Sorenson Video, are able to detect moderate camera motion and compensate for
pans. However, using a tripod and maintaining smooth camera motion with these codecs will usually improve the
image quality as compared to hand-held camera work.
How to Produce High-Quality QuickTime
Copyright © 1999, Terran Interactive, Inc. All rights reserved. http://www.terran.com
Page 15
Keep Detail to a Minimum
Keeping the detail within the scene to a minimum will help the video compress better spatially. It will also make the
video easier to see when the movie is reduced in size for desktop delivery.
If you are shooting an interview, keep the background simple. Painted or plain backdrops are often a good choice. If
you have the experience and equipment, blue- or greenscreen can work very well for interviews.
It is fairly common to film people in front of windows. If there is much detail or movement outside, you can throw the
background significantly out of focus to simplify the image.
Trees are often used as backdrops for interviews filmed outside. The excessive detail of the leaves poses a challenge
for compression, and should be avoided if possible. If you must film against a tree, using a shallow depth of field to
defocus the leaves will often improve the final movie. Beware of trees moving in a breeze – the high detail and subtle
changes between frames make both temporal and spatial compression difficult.
Ask your subjects to wear clothes that don't have high contrast patterns or lots of details. Plain colors are best – bold
stripes or checked patterns can do very odd things when resized and compressed.
Producing Good Audio
Audio production values are often overlooked when creating multimedia, but are critical
to professional results. As with video, your goal is to produce as high-quality and noisefree an audio signal as possible.
A professional mic
You should use high-quality audio equipment and remote microphones whenever
produces higher-quality results.
possible to reduce camera noise. You should try to minimize any unnecessary noise in
the audio signal such as wind or street sounds (cars, construction, etc.). Shotgun mics may be useful for minimizing
background noise, and lavaliere mics often work well for interviews.
If you are recording voice-overs in a studio, you should use professional equipment. The mics that come with computers
(both Mac and PCs) don't usually produce the audio quality of a real, professional mic. If you are recording directly
into a computer, beware of hard drive noise – this is often hard to hear when recording, but will decrease the quality
of the final audio signal. Many computers' built-in sound cards introduce line noise, so it is usually better to record
directly through your capture card.
How to Produce High-Quality QuickTime
Copyright © 1999, Terran Interactive, Inc. All rights reserved. http://www.terran.com
Page 16
Creating Content:
2. Capturing for Optimum Quality
Once you've shot your video, you need to get it into your computer for
editing and processing. Generally this is done with a capture card which
turns the analog video signal into a digital file. To properly capture video,
you'll need a high-quality capture card, a fast hard drive or RAID, and a
finely tuned system.
AV Macs have built-in digitizing boards, but for the best results you'll need
a card from vendors such as Media 100, Avid, or Pinnacle. Just like the
camera used to shoot your video, the quality of your capture card affects
the final image quality of your movie.
You must “capture” the video to get
it into your computer for editing.
DV cameras already store their video in a digital format, so you don't need to digitize DV source. However, you do
need to import the DV files into your computer via Firewire.
Capture Video at Full Screen
To get the highest quality results, you should capture your video at full screen resolution (640x480 or 720x486). Even
if you intend to deliver smaller final movies, a full screen capture will generally give you better results for a number of
reasons.
A major reason to capture at full screen and scale down is that doing so tends to improve the final image. When you
scale down an image, several of the original pixels are averaged to make each final pixel – this averaging tends to
reduce video noise and result in a “smoother” looking image which compresses better.
Full screen capture allows more deinterlacing options, such as blending the fields to preserve the “motion blur” effect
of interlacing. If the original source was shot on film and transferred to video tape, capturing at full screen resolution
and full frame rate allows you to remove the 3:2 pulldown and return your material to its original 24 fps, which will
compress better.
Most captured video has black edges around the perimeter (this is often called “overscan” or “edge blanking”). To
deliver professional results, you must remove these black edges. Starting from a larger image allows you to crop and
then scale the image down. If you capture at the final size that you wish to deliver your video, removing edge noise
requires you to crop and then scale the video up, which degrades image quality.
Finally, if you capture and edit your material at full screen resolution, and archive the source, you can later repurpose
your content to larger delivery sizes without having to re-capture and re-edit your project.
How to Produce High-Quality QuickTime
Copyright © 1999, Terran Interactive, Inc. All rights reserved. http://www.terran.com
Page 17
Capture with High Quality Setting
Most capture systems have a “quality” setting. This controls how much
hardware compression is used on the video during capture. Higher
settings produce larger files with superior image quality. However, if
you exceed the data rate your system can handle by choosing too high a
quality setting, the capture card will drop frames.
You should generally capture at the maximum quality your system can
Capture at the highest quality
your system allows.
properly handle (this should normally be at least 3MB/sec). If you can't
capture at a very high quality setting, you should seriously consider
buying a faster drive and a fast/wide/Ultra SCSI card, or possibly even a RAID. To find out the best way to capture full
screen material at a high quality setting, contact your capture card vendor.
Capture from Master Tapes
To maintain the absolute highest quality video signal, we strongly recommend that you digitize directly from your
master tapes, not copies of the originals. We specifically recommend that you don't assemble a “rough cut” of the
project on a new tape and then digitize this – since these clips are second generation, they will have more noise than
the original masters.
You should also avoid “scrubbing” (fast forwarding and rewinding) through your master tapes many times. Excessive
playing of the masters will degrade their quality, so you should only view the material a few times prior to capturing it.
If you need to view the material several times, we recommend that you make a duplicate and view the dub instead of
the master. This is particularly important with Hi8, which is a fairly fragile tape.
Audio Capture Settings
As with the video, you should capture the audio at the original quality. This is generally 44 kHz, 16-bit, stereo. We
strongly recommend that you capture in 16-bit audio depth if at all possible – having 16-bit source material generally
gives you more options and higher final quality, even if your final movie will be delivered with 8-bit audio.
Make sure to test your capture system before capturing all your clips. Audio levels are often different between capture
and playback, so you should monitor and test your results before capturing your whole project. Capture your audio
through your video capture card if possible – the built-in audio cards in most computers are lower quality than
dedicated capture hardware, and many introduce line noise.
How to Produce High-Quality QuickTime
Copyright © 1999, Terran Interactive, Inc. All rights reserved. http://www.terran.com
Page 18
Tune Your System
Getting your system properly configured to capture video can often be difficult. Below are a few general tips – please
see Terran’s site for more specific tips.
Generally speaking, you want as minimal a system as possible. Deactivate all unnecessary Extensions and Control
Panels. Turn off Virtual Memory and any memory-enhancing programs, such as RAM Doubler™. Make sure you have
the latest drivers for your capture hardware.
Capture to a fast/wide/Ultra SCSI drive that you've defragmented or just erased. Remove all unnecessary SCSI devices
(scanners, ZIP drives, etc.), and turn off AppleTalk. Place a disc in all internal drives (floppy, CD-ROM, and ZIP) to
prevent the system from periodically checking these drives.
Once you've got your system working well, take notes for future reference and back up your System folder. Write
down any changes you make in the future in case they adversely affect your capture system.
Dropped Frames
The biggest problem while capturing video is missing or “dropped” frames. The most common cause of dropped
frames is trying to capture your video at a higher data rate than your hard drive can write – as it falls behind, it starts to
lose frames. Dropped frames often appear sporadically in the captured video, causing the video to randomly stutter or jerk.
Be sure to configure your capture system to warn you of dropped frames, and stop capturing if you get errors. To stop
dropping frames, you may need to defragment your hard drive, remove unneeded Extensions from your system, buy
a faster hard drive, or lower the quality (and hence data rate) of your capture.
How to Produce High-Quality QuickTime
Copyright © 1999, Terran Interactive, Inc. All rights reserved. http://www.terran.com
Page 19
Creating Content:
3. Editing for Desktop Delivery
As with all the other steps in video production, how you edit and
add effects to your video can affect the final quality of the QuickTime
movie. Below are some general tips on optimizing your editing for
desktop delivery.
Careful editing and effects can improve your movies
Transitions & Effects
To improve the compression of your material, you should avoid elaborate transitions. Hard cuts and simple wipes are
usually the easiest transitions to compress. Fades are difficult for codecs, but are often unavoidable. Complex transitions,
such as page curls, pinwheel wipes, and paint spatters, are very difficult and will often become pixelated in the final
compressed movie.
Very frequent cuts between scenes make temporal compression difficult, which is why many music videos don't
compress well. If possible, try to keep the number of cuts in your piece to a minimum. Effects that add lots of minute
and/or random detail to an image, such as film noise and explosions, are especially difficult to compress both spatially
and temporally.
Often you don't have a choice on how a video is edited or the effects that are added, so these suggestions may be hard
to implement. Fortunately, using the Developer Edition of Sorenson Video with Media Cleaner's variable bitrate
(VBR) encoding can help improve the quality of difficult transitions and effects. Please see
http://www.terran.com/products/SorensonVideoOverview.html for more details.
Work at Full Resolution
If you are able to capture your video at full resolution, be sure to do your editing and effects at this size. Do not resize
your video with your editing or effects package. Also, be sure to render any effects with the highest quality possible.
For example, After Effects offers different rendering qualities – it's fine to use lower quality for quick previews, but be
sure to render the final piece at the best quality possible.
How to Produce High-Quality QuickTime
Copyright © 1999, Terran Interactive, Inc. All rights reserved. http://www.terran.com
Page 20
Use a High-Quality Format for Renders
If you are using After Effects to render an effect, and then editing this effect into a separate After Effects or Premiere
project, it is critical that you save the intermediate render file in a high-quality format.
The Animation codec at 100% is totally lossless, as is the None codec. Photo-JPEG, M-JPEG, and most capture card
codecs (Media100, Avid, etc.) are almost lossless at their highest quality, and will produce smaller files. Do not save
your render with a distribution codec, such as Cinepak or Sorenson – doing so will substantially degrade the quality of
the final project.
Correcting Problem Video
If your video has color shifts, gamma problems, or other issues that you couldn't fix during shooting or capture, you
should fix these problems on a clip-by-clip basis prior to editing.
It is possible to adjust colors, contrast, etc. during compression with Media Cleaner, but it's easier to do this earlier in
the production process. Also, transitions such as fades between corrected and uncorrected video are impossible to
fully correct after editing.
Film Source
If your material was originally shot on film and then transferred to video, you should generally return it to its original
24 fps prior to editing or adding effects. Media Cleaner's Intelecine feature can remove 3:2 pulldown from edited
material, but certain types of effects and transitions will limit the effectiveness of this feature.
How to Produce High-Quality QuickTime
Copyright © 1999, Terran Interactive, Inc. All rights reserved. http://www.terran.com
Page 21
Creating Content:
4. Exporting and Archiving Movies
Once you've finished editing and adding effects to your movie, you should export the movie to Media Cleaner for the
best final compression.
If you are using Adobe Premiere, you can simply export your project to Media Cleaner with the Export Module. If you
are using other systems/programs for editing and effects, you'll need to save a version (either by reference or selfcontained), then open this version in Cleaner for final compression. To keep your future options open, we recommend
that you always render a high-quality version of your movie from your editing/effects program and archive this master
for future repurposing.
Exporting from Adobe Premiere
Media Cleaner has a Premiere Export Module to simplify production.
The Export Module eliminates the need for Premiere users to save their
Premiere output as a separate file prior to optimization and compression
within Media Cleaner. The Export Module does this by generating a preview
within Premiere and then transferring that data directly into Media Cleaner.
Media Cleaner’s
Export module
streamlines
production.
Because Media Cleaner uses the Premiere preview movies for its final
compression, you must configure your Premiere presets correctly to save time and maximize your quality. Please see
“Chapter 18” of the Media Cleaner Pro 3 User Manual for details on using Cleaner and Premiere together.
Exporting from Other Systems
If you aren't using Premiere, you must save your movie as an intermediate QuickTime file prior to opening and
processing the movie with Cleaner. If possible, you should output your intermediate file at full frame size and frame
rate. You should also output the audio at full bit depth and rate for best results.
When you save an intermediate file, some systems allow you to save it “by reference” – this creates a small QuickTime
movie which “points back” to the original sources. If your system allows you to do this, saving a file by reference is very
fast, and won't take much additional disk space. However, this file is dependent on the original files, so you must not
move or rename the sources.
Most capture systems also have the option of creating a “self-contained” movie. If the reference option doesn't work
well for you, or if you wish to create a movie that doesn't require other files, use this option to render a high-quality
master. Please see the next section for more details on rendering a master.
Once you have saved your file to an intermediate QuickTime movie (either by reference or self-contained), you can
open this movie within Media Cleaner for final processing and compression.
How to Produce High-Quality QuickTime
Copyright © 1999, Terran Interactive, Inc. All rights reserved. http://www.terran.com
Page 22
Rendering High-Quality Masters
After you have finished your editing and effects, we recommend that you render a master of the file to a high quality,
self contained format. We generally recommend using the Animation codec at 100% quality for totally lossless files,
and JPEG, M-JPEG, or your hardware codec (Media100, Avid, etc.) at a very high quality setting (90 - 100%) for smaller
files with minimal loss.
If you use one of the “generic” QuickTime codecs, such as Animation, JPEG, or M-JPEG, you can process and
compress your files on any computer that hasQuickTime installed. If you use your hardware codec, you will need
to install this specific codec in computers on which you wish to process the movie. Also, some of the hardware
codecs aren't as reliable on systems which don't have the codec's capture hardware installed.
IMPORTANT: Do not save your master file to a distribution codec, such as Sorenson Video or Cinepak. You should
only compress your video once – for the best results, this final compression should be done with Media Cleaner Pro.
The compression of your video is discussed in detail in the “Preparing Content” section of this document, starting on
page 24..
Save your file at full screen, full frame rate, and full audio quality. Unless hard drive space is a problem, do not scale
your video down to the final size with your editing program – saving the full screen source will give your more options
during the compression phase.
Archive Your Project!
We strongly recommend that you archive your high-quality master file, as well as your original sources and project files.
Preserving the master will allow you to easily repurpose your content in the future by simply recompressing the
master. Given how fast delivery technology and Internet bandwidth is changing, there is a good chance you may want
to create a different version of your project in the near future.
Preserving your raw source files and project will allow you to re-edit or alter the project if needed with minimal hassle.
Also, having the original sources on hand is very convenient if you need to use the same material in a different project.
Tape drives often work well for archiving, because they provide large amounts of inexpensive storage. CD-ROM drives
are good options for small projects, but often aren't big enough for long video sources. DVD-ROM burners should be
an excellent option for archiving large source files once they become affordable.
How to Produce High-Quality QuickTime
Copyright © 1999, Terran Interactive, Inc. All rights reserved. http://www.terran.com
Page 23
How to Produce High-Quality QuickTime
3: Preparing Content
Overview of Preparing Content for Delivery
Preparing and compressing your movie for delivery is often the least understood step of the whole QuickTime
production process. Because of this fact, the bulk of this document addresses the details of preparing high-quality
QuickTime movies.
There are five major areas you should learn about in order to produce the best QuickTime.
1. Understanding Compression
Understanding how compression works can help you
create movies that will compress better, and therefore
be higher quality and/or smaller.
2. Analyzing and Pre-Processing
You should analyze your source material and use
preprocessing (such as deinterlacing and noise
reduction) to optimize your movie for compression.
4. Taking Advantage of QuickTime's New Codecs
QuickTime 3 has some excellent new codecs that
work differently than the old standards. This section
details some steps you can take to get better results
from Sorenson Video and QDesign Music.
5. Using Media Cleaner Pro
Using the right compression tool is critical. This section
briefly discusses how to process your movies with
Media Cleaner Pro, the industry standard for high-quality
QuickTime compression. We also demonstrate how to
easily prepare QuickTime alternate movies with Cleaner.
3. Choosing Good Compression Settings
Choosing good compression settings can be
complicated. We've provided some guidelines to help
get you started.
How to Produce High-Quality QuickTime
Copyright © 1999, Terran Interactive, Inc. All rights reserved. http://www.terran.com
Page 24
Preparing Content:
1. Understanding Compression
Why You Need to Compress
Video, in its raw form, takes up huge amounts of space. For example, uncompressed NTSC video is about 27 Megabytes
per second! At this size, you could fit only about 24 seconds of video on a CD-ROM... and no CD-ROM drive could
transfer such a file fast enough to play it smoothly.
On the audio side, compression is also important, especially for Web use. For example, uncompressed CD audio is
150 KiloBytes per second, which would completely saturate a T1 connection and leave no room for video.
In order to make desktop movies feasible, compression algorithms were created. Compression is the process by
which large movie files are reduced in size by the removal of redundant audio and video data. For more dramatic size
reduction, less important data may also be removed, resulting in image and/or sound degradation.
The codec is the algorithm that handles the compression of your video or audio, as well as the decompression when it is
played. QuickTime has several codecs available within it for free, and there are professional versions of certain codecs
which may be purchased for superior quality and options.
Why Compress – both frames contain the same amount of data (2.3K)
Sorenson Video Compressed Frame
320x180 pixels, 30 fps, 70KBps
(Each frame is aprox. 2.3 Kilobytes).
No Compression
How to Produce High-Quality QuickTime
With Compression
If no compression was used, this frame
could only be 36x21 pixels (2.3 Kilobytes).
Copyright © 1999, Terran Interactive, Inc. All rights reserved. http://www.terran.com
Page 25
How Video Codecs Work
Most codecs compress video using spatial and/or temporal compression techniques to remove redundant data.
Understanding the basics of how a codec compresses video can help you create and process your material to make the
codec's job easier, which in turn will produce superior final QuickTime movies.
Spatial Compression
One method of compressing movies is to remove the redundant data within any given image. For example, in a given
movie there may be areas of flat color with many identical pixels.
How Spatial Compression Works
Instead of specifying each pixel and its color, a codec can generalize
by specifying the coordinates of the area and the area's color; it
doesn't have to note all the little details. This manner of reducing
the size of an image is called “spatial compression.”
The less detail there is in the image, the better the codec is able to
generalize the image and compress it. Removing fine details in
preprocessing can improve the spatial compression of an image.
Video noise often looks like fine detail to a codec, and should be
removed to improve spatial compression. Creating video with simple
backgrounds will also improve how well the final movie compresses.
Temporal Compression
Another way to make a frame smaller is to look for
changes between consecutive frames and only store the
differences instead of the entire image. The original
reference frame on which these differences are based is
called a keyframe. Keyframes contain the entire image,
and look just like a normal picture.
Areas with little detail are spatially compressed,
such as those indicated above in red.
How Temporal Compression Works
The frames based on the changes between frames are
e
e
e
e
me
me
fram lta fram lta fram lta fram
called delta frames, or difference frames. They contain
yfra elta fra
e
Key
K
e
e
e
D
D
D
D
only information for the areas that are different from the
last frame, and are usually much smaller than the keyframes.
For example, the first frame of any movie is always a keyframe, and contains the entire image. After this initial keyframe,
there normally follows a series of delta frames. These delta frames show only the differences between the previous
frame and the current frame. The delta frame wouldn't contain information on a truly static background, because it
wouldn't be changing. Every second or so a new keyframe is added to correct for slight cumulative errors in the delta frames.
This kind of compression tracks changes over a period of time and is therefore called “temporal compression.” Video
content that changes very little from frame to frame is best suited for temporal compression. Whenever possible, you
should use a tripod when filming video for desktop playback and attempt to reduce camera and subject movement.
You should also avoid complex transitions and fast edits to minimize the differences between frames and improve the
final compression.
How to Produce High-Quality QuickTime
Copyright © 1999, Terran Interactive, Inc. All rights reserved. http://www.terran.com
Page 26
Codecs in Action
The actual process of analyzing each frame and creating a compressed version is what takes so long in video compression
– for each frame, vast numbers of mathematical calculations are performed to generate the final compressed frame.
On a midrange Power Macintosh, it may take a couple of seconds to compress a single frame.
The codec also controls the playback of the compressed video. It's no accident that the decompression routines are
usually much faster than the compression routines – this allows the frames to be decompressed fast enough to play in
real-time. A frame that took a couple of seconds to compress might take less than 1/30th of a second to decompress.
Codecs that take a long time to compress but decompress quickly are known as “asymmetric.” For example, the
Sorenson Video codec is extremely asymmetric, which means that movies made with Sorenson Video take a long time
to compress, but decompress in real-time and play smoothly.
Codecs that are intended for “live” broadcasts and video teleconferencing are usually “symmetric,” meaning they both
compress and decompress in the same amount of time. Fast compression and decompression is critical for real-time
broadcasting. H.263 is very close to being a symmetric codec.
Because symmetric codecs don't have as long to optimize each frame during compression as asymmetric codecs, the
results often don't look as good as movies made with asymmetric codecs. If you are planning to put video onto a Web site for
viewers to watch “on demand,” you should probably choose a high-quality asymmetric codec, such as Sorenson Video.
The Specific Codecs
There are many different codecs available within QuickTime. Most codecs have specific ranges of data rates in which
they will perform well.
For example, the Sorenson Video codec produces excellent quality video at all data rates, but its high CPU playback
requirements currently make version 1.0 a good fit for data rates of about 100 KBps and less. It is currently the best
QuickTime codec for low bandwidth delivery, and it is widely used on the Web.
Cinepak, on the other hand, has low playback requirements, but doesn't generally look good at less than 250 KBps.
Because Cinepak can play on a wide range of older machines, it is often used for CD-ROM titles that must reach the
biggest audience possible.
To learn more about the various codecs and understand better which ones are the best fit for your goals, please visit
Terran's informational resource, Codec Central, at http://www.CodecCentral.com.
How to Produce High-Quality QuickTime
Copyright © 1999, Terran Interactive, Inc. All rights reserved. http://www.terran.com
Page 27
Preparing Content:
2. Analyzing and Pre-Processing
A common question new developers ask when starting to make QuickTime movies is, “What is the right formula for
getting the best results?”
This question implies that there is a fixed set of steps that will work for any clip, and that's not true. The only way to
get optimum results is to look carefully at your source media, and apply the right pre-processing and compression
settings based on the specifics of the material. This section addresses the pre-processing steps you can take to improve
your material; the following sections address choosing your other settings.
One of the main things to keep in mind at this stage is that a computer screen is not a television set (nor a movie
theater). If you're working with material captured from tape, you'll need to compensate for some important differences
between television video and computer video.
Dealing with Interlacing
Conventional NTSC television sets are built to receive
interlaced video. Each interlaced video frame consists of two
images known as “fields” – each field is the even or odd lines
of the image. When displaying video, a television screen draws
the alternating field every 1/60th of a second. Our eyes put
the two alternating fields together to create 30 whole frames
per second and we don't normally notice the interlaced nature
of the display.
Interlacing creates a “comb”
effect that should be removed.
Because interlacing creates two unique images (fields) for each final frame, and these images are 1/60th of a second
apart, quickly moving areas in the video often become separated into alternating lines that look like the teeth on a
comb. Interlacing works well on a TV, where the phosphors are “slow” enough to smooth out the effect, producing
fluid motion and hiding the comb-like patterns of alternating lines. Computer monitors, on the other hand, use “fast”
phosphors and are much sharper – the result of which is that interlacing looks horrible in multimedia projects.
If your source material is captured at half height (320x240), it only has one field, so there's no interlacing to worry
about. If it's captured at full height (640x480 or 720x480), you'll want to look for interlacing. Do this by stepping
through the movie one frame at a time. Watch for horizontal stripes along the leading and trailing edges of moving
objects, especially those which contrast strongly with the background. If you see interlacing, you need to remove it
for high-quality final results.
There are two deinterlacing techniques from which to choose. One is to blend the two fields together. This preserves
motion better, and can produce sharper images in some cases. However, individual frames are composed of a composite
of two fields, so if you pause the movie, you'll generally see a sort of motion blur/double image in areas of motion. The
other way to deinterlace a movie is to throw away the even or odd fields. This avoids the “motion blur” in still frames,
but when playing the movie normally, motion may not be as smooth.
How to Produce High-Quality QuickTime
Copyright © 1999, Terran Interactive, Inc. All rights reserved. http://www.terran.com
Page 28
We suggest you try both techniques (Media Cleaner Pro supports both) to see which you prefer. Either deinterlacing
option is preferable to leaving the video interlaced – interlacing artifacts look very unprofessional and hinder the
compression of your material.
Handling Material Shot on Film
A more complicated form of interlacing occurs with material that was originally shot on film (at 24 fps) and transferred
to video (at approximately 30 fps) in what's called a “telecine process.” In order to make up the extra six frames per
second, new frames are made by interlacing frames of the source material.
The details of this process are a bit complicated, but the end result is clear if you know what to look for. Step through
the movie frame by frame, and look for a pattern of three non-interlaced frames... two interlaced frames... three noninterlaced... etc. If you see this pattern, the clip has been telecined.
It's even more important to correct for telecined material than interlaced, for several reasons. First of all, it's generally
possible to get back the original, non-interlaced frames perfectly, so there's no downside as with deinterlacing. Second,
24 frames per second take less data to store – and less computer power to play – than 30. Third, you're restoring the
original frame rate of the movie, which will make it play a bit more smoothly.
Inverse telecine, or “3:2 pulldown removal” is performed by special filters built into programs like Adobe After Effects
and Media Cleaner Pro. One advantage to Media Cleaner's “Intelecine” feature is that it automatically deals with a
potential problem introduced by editing video after it's been telecined. Again, the details are a bit complex, but the
result is that material which fails in the After Effects filter may come out perfectly with Media Cleaner. For more
details, please see the Media Cleaner Pro manual.
It should be noted that you cannot take advantage of the inverse telecine process unless you have a full size, full frame
rate capture. This is yet another reason to keep your captures at the highest possible quality.
Adjusting Color, Contrast, Gamma, etc.
Computer monitors are capable of displaying a broader color
range (gamut) than television screens. This allows for a more
accurate reproduction of vivid colors and pure black and white.
However, you're probably working with material which comes
from a videotape and has thus been forced into the compromises
necessary for TV. Fortunately, you can usually improve the image
before compression by applying various image adjustments.
The first thing to try is increasing the contrast. The majority of
video clips look noticeably better after a contrast boost. In Media
Cleaner, a value of about +15 is a good starting point. Use the
Dynamic Preview window's A/B slider to get it just right for your
clip, and often you'll find that it feels like wiping off a layer of
grime you didn't even realize was there.
How to Produce High-Quality QuickTime
Boosting contrast often improves video.
Copyright © 1999, Terran Interactive, Inc. All rights reserved. http://www.terran.com
Page 29
While you're at it, try to restore black areas to true black, using Contrast, Brightness, and/or Black Restore (not
Gamma). This will improve the image quality, and allow the material to compress better. You'll want to do the same
for white areas.
Once you've got the adjustments set, make sure to scrub through the movie to make sure there aren't specific scenes
or frames for which the changes are too extreme.
Cropping
This one's so easy, it's amazing how often it's overlooked. Televisions don't display the entire image received; an area
of several pixels on each side is defined as “overscan” (also called “edge blanking”) which will never be seen. Computers
don't work this way, so leaving unused black borders is wasteful and ugly. Besides, multimedia video is quite often
shown in a window or matted against a background, so any undesired borders will show up strongly.
All you have to do to remove the border is to click and drag in the source movie in Media Cleaner. The boxed area
will be preserved, and scaled up or down as necessary. With high-quality scaling, the loss of resolution from cropping
off even a generous 10% is pretty much invisible.
Noise Reduction
Reducing the fine detail in an image will help it compress spatially which will improve the final image quality.
Video noise (which is a lot of very fine detail as far as a codec is concerned) is a major enemy of compression.
Developers often use a blur filter in an attempt to reduce the noise. While this does reduce the noise and improve
compression, it also softens the image, which is a different problem. Fortunately, Media Cleaner offers adaptive
noise reduction, which is a much better solution.
The adaptive noise reduction filter only blurs areas of low contrast, and leaves edges sharp. This gives the codec the
advantages of a less noisy image, but doesn't introduce noticeable fuzziness in the image. When used, this filter is
often imperceptible to our eyes, but improves the final compression of the video. By default, this filter is always on
in Media Cleaner's pre-configured settings – we recommend that you use this filter with all your live video.
More Details
Please refer to “Chapter 15” of the “Media Cleaner Pro 3 User Manual” for significantly more detail on using Cleaner's
various filters and processing options to improve your compression.
NOTE: The Media Cleaner User Manual is another helpful online resource. You can read it at
http://www.terran.com/manual/.
How to Produce High-Quality QuickTime
Copyright © 1999, Terran Interactive, Inc. All rights reserved. http://www.terran.com
Page 30
Preparing Content: 3. Choosing Compression Settings
When compressing movies, there are many important choices to make. These
choices have a profound impact on the quality of the final compressed movie,
so it is important that you understand the parameters and tradeoffs involved.
Some of the more important movie options are the codec, data rate, frame rate
(fps), image size, and keyframe frequency. This section will give you an overview
of the factors limiting your options, and general guidelines in choosing your
settings. Using Media Cleaner's Settings Wizard and default settings are also
good ways to get started.
Choosing compression settings
can be complicated.
However, there is no “perfect formula” for all movies – achieving the best results requires experimentation and testing,
and often depends on your (or your client's) personal preferences.
Choosing the Codec
In order to choose the best codec for your movies, you must determine the minimum system requirements of your
viewers.
PowerMac or Pentium required
For movies under about 100KBps, Sorenson Video is generally the best video codec choice. If you want to encode the
highest quality Sorenson Video, you may want to buy the Developer Edition to enable variable bitrate encoding with
Media Cleaner. Please see “QuickTime's New Codecs” on page 37 for more details on using Sorenson Video.
For low-bandwidth audio, the QDesign Music codec is a good choice for most material. If you have speech-only
material, the Qualcomm PureVoice codec may be a better fit. For CD-ROM and kiosk presentations, IMA may be a
good choice because it takes less of the CPU's power, and therefore allows the computer to decode more challenging
video streams.
If you are creating a presentation for a CD-ROM or kiosk, MPEG-1 may be a good choice. However, QuickTime 3
doesn't currently support MPEG on Windows, so for now this is a Mac-only solution.
68K Macintosh or 486 Windows Machine
The newest QuickTime codecs (such as Sorenson Video, QDesign Music, and Qualcomm PureVoice) don't run on 68K
Macintoshes, and are too CPU-intensive for 486 computers. If you need to deliver video that plays well on these older
computers, your best option is generally using Cinepak and IMA audio.
How to Produce High-Quality QuickTime
Copyright © 1999, Terran Interactive, Inc. All rights reserved. http://www.terran.com
Page 31
Choosing the Data Rate
One of the most important decisions you must make when preparing movies is choosing the data rate. More than any
other factor, the data rate affects the final image and sound quality of your movie. It also affects how big the final file
will be, as well as what playback methods will be able to effectively deliver the movie.
Usually there are three factors that dictate the data rate you can use on your movie: The media or connection speed,
the amount of video you need to fit onto your disc, and the speed of the minimum target machine. This last factor has
become more significant as more CPU-intensive codecs, such as Sorenson Video, have become widely available.
Media or Connection Speed
There are many different vehicles for desktop video delivery. The most common are CD-ROMs and the Web, but
DVD-ROM is becoming a reality. To get a better feel for appropriate data rates for given applications, we suggest you
go through an interview with Media Cleaner's Settings Wizard to see what it recommends.
Below are some rough guidelines for data rates – we strongly recommend that you test your movies on your minimum
target machine to determine its actual throughput.
CD-ROMs
Generally for CD-ROMs a total data rate of 170 - 200 KBps is safe for cross-platform 2x speed titles. A Macintosh-only
product can usually be set somewhat higher, to about 220 - 250 KBps. Safe cross-platform 4x CD-ROM data rates are
often around 250 - 300 KBps. Macintosh-only products can push this data rate up to about 400 - 450 KBps.
NOTE: CD-ROM drives faster than 4X often have widely varying transfer rates – sometimes the manufacturers'
specifications are “burst speeds” and are not sustainable for use with movies. We strongly suggest that you test any
drive before assuming it will actually give you the transfer rate specified on the box. Also, with very fast CD-ROM
drives, the limiting factor often becomes the amount of video you wish to place on a disc instead of the transfer
speed of the drive.
DVD-ROMs
DVD-ROMs are essentially very big, very fast, CD-ROMs. Transfer speeds are usually in the 1MB per second range, and
DVD-ROMs can hold from 4 - 17 Gigabytes of data. However, the larger DVD-ROM discs are substantially more expensive
to press, so many developers keep their production costs lower by using the smaller discs. Even with “only” four
Gigabytes of space, a 1MB/sec movie would still be a little over an hour long.
Web/Internet
There are a wide range of connections to the Web, and the volume
of Web traffic at any given time substantially affects the possible
throughput. Because of this fact, there is no way to guarantee
the data rate your viewers will be able to see in real-time.
QuickTime allows you to create alternate movies so that users
will get an appropriate data rate for their connection.
Generally, if you want viewers to be able to watch your video in
real-time, the following numbers are reasonable starting points.
If you don't mind your viewer having some delays, you can as much
as double these data rates.
How to Produce High-Quality QuickTime
Web QuickTime Data Rates
28.8 Modems - 2.5 KBps
56.6 Modems - 5 KBps
ISDN - 12 KBps
T1 - 20 KBps
All data rates given in KiloBytes per second (KBps). To
convert to kilobits per second (kbps), multiply by 8.
Copyright © 1999, Terran Interactive, Inc. All rights reserved. http://www.terran.com
Page 32
Networks
The bandwidth available on a local area network (LAN) varies widely depending on the type of network. We suggest
you contact your network system administrator for specifications of the system. However, as a guideline, many high
speed local networks can handle video in the 20 - 50 KBps range.
Amount of Video that Fits on a Disc
If you have a fixed amount of content you need to fit onto a disc, the length of the movie and the size of the disc may
become the determining factors of the data rate instead of the throughput of the playback media.
The formula to determine the data rate for a movie if you know the room available on the disc and the length of the
movie is as follows:
Disc space (in Kilobytes) divided by the length of the movie (in seconds) = KBps for the final movie.
To determine disc size in KBytes, take the MB of the disc and multiply by 1000. For example, a CD-ROM is 650,000
KBytes. To determine the length of the movie in seconds, multiply the number of minutes by 60. If the movie length
is in hours, multiply the hours by 3600 (which is the number of seconds in an hour).
NOTE: When doing these calculations, don't forget to reserve enough space for the other components of your
project. For example, your Director projector, README, installers, etc., might take 50 MB of your CD-ROM, leaving you
only 600 MB for video.
For example, if you want to put two hours of video on a 4x CD-ROM, and your other project files are 50 MB, the data
rate you must use is about 83 KBps or less (the CD-ROM's 600,000 available KBytes divided by 7,200 seconds = 83.3
KBps). This data rate is substantially smaller than the 300 KBps data rate a 4x CD-ROM can safely handle, but it is what
you must use if you wish to put the two hours onto one CD-ROM. This lower data rate may not be a problem, however
– Sorenson Video can deliver impressively good results at 83 KBps.
Minimum Target CPU Speed
Some of the new codecs, such as Sorenson Video, are fairly CPU-intensive. When using these codecs, the limiting
factor for your data rate may be the minimum system on which you want your video to play, and not the connection
speed or amount of video you need to fit on a disk.
For example, the Sorenson Video codec can produce very high quality video at high data rates. However, as the data
rate increases, the playback requirement also increases, so it's possible to produce higher data rate movies that won't
play on your minimum target CPU.
For example, a 10 KBps Sorenson Video may play well on any PowerMac or Pentium computer (90 MHz or faster), but
a 200 KBps Sorenson Video movie might require a high-speed Pentium II or Macintosh G3 (250 MHz or faster) to play
smoothly.
Testing your material on your minimum target machine is important when using these newer, more CPU-intensive
technologies. For more performance details on the various codecs, please see Codec Central at
http://www.CodecCentral.com.
How to Produce High-Quality QuickTime
Copyright © 1999, Terran Interactive, Inc. All rights reserved. http://www.terran.com
Page 33
Choosing Data Rate Units
There are two confusingly similar units used for measuring data rates. Most multimedia developers are familiar with
KiloBytes per second (kps, KBps, or KBytes/sec) whereas many people working with Internet/network video specify
files in kilobits per second (kps, kbps, or kbits/sec). A Byte is eight times as large as a bit, so it is important to
understand in which unit a data rate is specified.
For example, it's fairly common for developers new to Internet video to assume the rating of a modem is specified in
KBps, which is wrong. A 28.8 modem transfers 28.8 kilobits per second, not 28.8 KiloBytes per second. A data rate of
28.8 kilobits per second equates to about 3.6 KiloBytes per second – a major difference from the assumed 28.8 KBps.
Choosing Frame Rate
Choosing an appropriate frame rate for your movie has a dramatic effect on video quality. Generally, higher frame
rates at a given data rate will produce smoother motion with lower image quality. Lower frame rates produce sharper
images with “jerkier” motion. Finding the right tradeoff depends on your material, data rate, and personal preferences.
We strongly suggest that you experiment to determine the optimal settings for your movie. Using Media Cleaner's
Settings Wizard can also give you a good idea of appropriate frame rates for given data rates.
You will produce smoother apparent motion if the final frame rate is an even divisor of the source frame rate. Media
Cleaner supports decimal frame rates.
Ideal NTSC frame rates
Ideal PAL/SECAM frame rates
30 fps (all frames)*
25 fps (all frames)
15 fps (every other frame)
12.5 fps (every other frame)
10 fps (every third frame)
6.25 fps (every fourth frame)
7.5 fps (every fourth frame)
5 fps (every fifth frame)
6 fps (every fifth frame)
* NTSC video is actually 29.97 frames per
second. However, this is so close to 30 fps that
you can generally treat it as 30 for the purposes
of desktop video.
How to Produce High-Quality QuickTime
Copyright © 1999, Terran Interactive, Inc. All rights reserved. http://www.terran.com
Page 34
Choosing Frame Size
Frame Size Guidelines
Like frame rate, choosing an appropriate frame size for your
movie has an important effect on video quality. All else being
equal, the higher the image size at a given data rate, the lower
the resulting image quality will be.
Modem - 160x120
ISDN - 192x144
T1 - 240x180
The best size for your video is highly dependent on your data
rate, frame rate, codec, source material, and personal
preferences. All of these factors are deeply interrelated, so
experimentation is the best way to find the optimal setting for
your project.
CD-ROM - 320x240
DVD-ROM - 640x480 (or 320x240 doubled)
This chart is a very rough guideline – you should experiment to find the best setting for your project, and certainly test
your results to make sure they will play on your minimum target machine.
You may get better results making video at a smaller size and doubling it upon playback. For example, you might find
that making an 80x60 pixel movie for modem playback, and then doubling it on your Web page provides superior
quality to making the movie 160x120 pixels. Again, experimentation is critical to achieving the best results.
Frame Rate and Frame Size Limitations
There are a few different factors that normally limit the frame rate and frame size you can effectively use on a project.
The most common limitation is the image quality. Larger frame sizes and higher frame rates require more data to
maintain acceptable image quality – if the data rate of the movie isn't high enough to accommodate the frame size and rate,
the image quality will suffer.
The other common limitation of frame size and rate is the codec you are using and the CPU of the target machine.
Some CPU-intensive codecs, like Sorenson Video, can produce high quality images at high frame sizes and frame rates
with reasonable data rates. However, these movies may require very high-end machines to play properly, so testing is critical.
To get a good guideline of appropriate frame rates and sizes for a given data rate, please try using Media Cleaner's
Settings Wizard, or take a look at the many predefined settings included with Media Cleaner. You may also find it
helpful to visit Terran's online video samples at http://www.terran.com/video.
How to Produce High-Quality QuickTime
Copyright © 1999, Terran Interactive, Inc. All rights reserved. http://www.terran.com
Page 35
Choosing Keyframe Frequency
Like frame rate, the keyframe frequency affects the image quality of your final compressed movie.
How frequently you should set keyframes in your movie depends on the content of your movie, and how the movie
will be viewed. With Cinepak and normal material, one keyframe every second is usually a good rule. For example, if
your movie is 15 fps, setting your keyframes to every 15 frames is probably fine. For very dynamic material, every half
second often works well. For example, with a high action 12 fps clip, you might want to set your keyframes to occur
every six frames.
When using the Sorenson Video codec, a keyframe every ten seconds is usually a better setting, as this codec doesn't
need nearly as many keyframes. For example, if your source is 15 fps, you should set the keyframe frequency to 150.
Also, allowing the codec to insert natural keyframes as needed usually provides the best results. Setting the "Natural"
keyframe slider to 50 is often a good starting point with Sorenson Video.
In some unusual cases, you may want to minimize or turn off the keyframes. This tends to work acceptably with static
material which users will play straight through and not randomly access.
NOTE: Higher keyframe frequency is important for movies that viewers will randomly access, because each time a
movie is accessed, the current delta frame must be calculated from the nearest keyframe. If the nearest keyframe is
many frames away, it can take a substantial amount of time to generate the current frame. Media Cleaner allows
you to insert keyframes at specific points in your movies to improve access to these points. You should test your
results to make sure your movie will play acceptably if you turn off or dramatically reduce the keyframe rate.
How to Produce High-Quality QuickTime
Copyright © 1999, Terran Interactive, Inc. All rights reserved. http://www.terran.com
Page 36
Preparing Content:
3. QuickTime's New Codecs
QuickTime 3 offers some excellent new compression technologies for both audio and video. It's important to know
how to use these new codecs properly; many developers treat them exactly like the older codecs, which often leads to
disappointing results.
QuickTime's new video codec is Sorenson Video. The new audio codecs are QDesign Music and Qualcomm PureVoice.
Free versions of these codecs are included in QuickTime 3, and you can purchase professional versions of both
Sorenson Video and QDesign Music for additional controls and features. Here are some specific tips on how to use
these codecs correctly.
Sorenson Video
Sorenson Video's single biggest advantage is its ability to
deliver excellent quality video at low data rates.
Sorenson Video offers superior
The first mistake people usually make with Sorenson is to
quality... but must be used
give it too much data rate. Giving Sorenson Video too
correctly for best results.
much data per second can “choke” the codec on playback,
and make it start skipping frames as it runs out of CPU
power. If you're used to compressing 320x240 movies with Cinepak at 200KBytes/second, try them with Sorenson
Video at 100 KBps, or even 50 KBps – you may be surprised with the resulting quality.
For the best results, always use variable bitrate (VBR) encoding with Sorenson Video. This is a two-pass technique
which analyzes each clip to determine which sections are the hardest, then allocates bytes as efficiently as possible. It
takes longer, and requires both Sorenson Video Developer Edition, and Media Cleaner Pro, but it's worth it. Some
clips can retain their quality at half the data rate they'd otherwise require, and transitions in particular tend to look
much better at low data rates. As a point of comparison, nearly every major DVD-Video title released uses variable
bitrate MPEG in order to get the best results – VBR is a really good thing.
Temporal compression is a real strength of the Sorenson Video codec. Movies with relatively low motion (such as
“talking head” clips of interviews, etc.) can compress extremely well. Also, doubling the frame rate does not usually require
doubling the data rate for comparable image quality.
Sorenson Video takes more computing power to get a pixel to the screen than Cinepak. So it's important to be
realistic about frame sizes and frame rates. 320x240x15fps will play fine on almost all new PowerMacs and Pentiums,
while 640x480x30fps won't even work on a 300MHz system. On the bright side, Sorenson-compressed movies scale
up much more smoothly than Cinepak. Try doubling 320x240 to fullscreen for impressive results on fast PowerMacs.
Another way to keep the pixel rate lower is to take advantage of wide aspect-ratio movies. A theatrical trailer shot in
16x9 aspect ratio, properly cropped, and Intelecine'd to its original 24 fps has almost half the pixel rate it would if left
at 320x240x30fps... but will look even better.
In some cases, it's worth making two versions of a movie: One high-end version for viewers with fast hardware, and
another smaller version for those with older systems. This allows you to deliver a truly outstanding experience to the
How to Produce High-Quality QuickTime
Copyright © 1999, Terran Interactive, Inc. All rights reserved. http://www.terran.com
Page 37
power users (who have the highest expectations), and still be compatible with the rest of the world. And given
Sorenson Video's small file sizes, you can often fit both versions into less room than a single Cinepak version.
Tips: always make your movies a multiple of four pixels in both dimensions. This allows Sorenson Video to use
hardware acceleration for better results when it is available. Also, be wary of bright saturated colors, especially primary
red. They tend to “smear” a bit regardless of how much data you give the codec. Avoiding saturated colors in lettering
is especially important.
For more tips on using Sorenson Video and the special features of the Developer Edition (such as enhanced watermarks,
media keys, and more) please see http://www.terran.com/products/SorensonVideoOverview.html .
QDesign Music Codec
As the name suggests, this codec is well-optimized for compressing music, or audio
content which includes music. It's possible to stream 44 kHz stereo material over a
28.8 modem, and provide a very satisfying listening experience. It's important to note
that the results depend on your material. Purely instrumental music compresses much
better than complex vocal music.
Unlike most QuickTime audio codecs, QDesign Music lets you pick the data rate, much like a video codec. A general
rule of thumb is to use about 1kilobit per kilohertz. For example, a 22 kHz track would take 22 kbits/sec, or roughly
2.5 KBytes/sec. Purely instrumental music can often sound good at half or a quarter of a kilobit per kilohertz. And
stereo generally requires about 25% to 50% more data rate than mono. Of course, the more data rate you provide, the
better it will sound.
QDesign produces the best result on audio which never exceeds about -3db (or 70% of full scale). While the codec
itself provides features to limit the input, you can often achieve better results by normalizing the entire input signal to
70% – Media Cleaner makes this simple.
Like Sorenson Video, QDesign Music uses a fair amount of CPU power to achieve its impressive levels of compression.
The amount of CPU it uses is proportionate to the sample rate of the signal, and doubles with stereo. A 44 kHz stereo
soundtrack can use up more than half of the CPU power of a low-end Pentium or PowerMac.
Because of this fact, it's important to have realistic expectations for what can be achieved on low-end systems. Also, it
doesn't generally make sense to use QDesign Music on movies of more than about 100 KBytes/sec, because the CPU
is often “tied up” with playing the video, and placing an additional load on the CPU with this codec may cause sync loss
or dropped frames.
QUALCOMM PureVoice
This codec is designed to provide good voice quality at extremely low bitrates. If you want to stream a “talking heads”
movie over a modem, this is definitely your choice. Even a 14.4 modem can deliver a quite intelligible narrative.
However, you shouldn't generally use this codec on music, or material which contains a lot of non-vocal effects.
PureVoice tries to model everything as speech, so a piano or race car may sound odd if it's compressed with this
codec. PureVoice is typically used at 8khz, but can be used at higher sample rates for higher-quality, larger files.
How to Produce High-Quality QuickTime
Copyright © 1999, Terran Interactive, Inc. All rights reserved. http://www.terran.com
Page 38
Preparing Content:
4. Using Media Cleaner Pro
A big part of getting the best results in any process is using the right tools. This is
especially true in processing and compressing QuickTime movies.
Many developers new to video compression make the mistake of simply using their
editing software to output final compressed video. While this works, it doesn't usually
produce the highest-quality results because editing programs provide limited
compression options, and don't support advanced features such as variable bitrate
encoding. Similarly, MoviePlayer is an essential general QuickTime application, but
isn't the best tool for producing compressed movies.
To get the best results, we strongly recommend using Media Cleaner Pro for your final QuickTime compression.
Cleaner is totally focused on providing you with the best processing and compression, which is why it has won numerous
awards and top reviews. Media Cleaner's great results continue to be the reason why Apple, Adobe, Digital Origin,
Media 100, Avid, and other companies recommend and/or bundle Media Cleaner for media compression.
About Media Cleaner Pro...
Media Cleaner works with your existing tools, and includes an Adobe Premiere Export Module to streamline your
workflow. Cleaner is easy to use, and has a friendly Settings Wizard for people new to video. Media Cleaner Pro also
provides total manual control over all the processing/compression options, and allows you to batch process up to
2,000 files at a time.
To learn more about Media Cleaner, and download a free demo, please visit the Media Cleaner page. You can also
review the online Cleaner manual. If you are interested in purchasing Media Cleaner, please visit our Online Store at
http://www.terran.com/sales or call Terran at (800) 577-3443 x1 or +1 (408) 356-7373 x1.
Using Cleaner to Produce QuickTime Alternates Movies
If you want to deliver the best online QuickTime, you should generally use alternate movies. QuickTime 3's alternate
movie feature allows you to create multiple versions of a movie and set criteria for when the various versions should
be displayed. This allows you to deliver movies with different data rates or codecs to users based on their connection
speed or other factors.
Media Cleaner is the only tool that makes alternate movie production simple. This section outlines how to make a movie
that has a 56K modem version, an ISDN version, a T1 version, and a still image for viewers with QuickTime 2. Depending on
the viewer's connection, they will automatically be shown the version of the movie with the most appropriate data rate. For
more information on alternates and fallbacks, please see page 124 of the Media Cleaner Pro 3 Manual.
How to Produce High-Quality QuickTime
Copyright © 1999, Terran Interactive, Inc. All rights reserved. http://www.terran.com
Page 39
Using Cleaner to Produce QuickTime Alternates Movies (cont.)
1. Getting Started
To begin, launch Media Cleaner and create a new
batch with the File menu. The Process window will
now be empty. Drag your source movie onto Media
Cleaner's Process window. A small icon of the movie
will appear.
2. Crop and Trim the Source
View the original movie by double-clicking on the icon or name of
the movie in the Process window. When the movie opens, click and
drag on it to set a cropping rectangle. You can also move the movie
controller to the points at which you want the clip to begin and end
and use the “Set In/Out Points” command from the Edit menu to
trim the movie. When you are done, close the Source window.
3. Choose your Settings
Make sure the Setting Pop-up at the bottom of the Process window is set to “Advanced” then double-click on the blank
setting column next to your movie's name. This will open the Advanced Settings dialog.
Open the toggle next to “QuickTime • Alternates” in the Setting list on the left. You will see several different default
settings for making alternate movies.
Hold down the “Shift” key and select the
following settings:
QT-56k modem alternate
QT-ISDN alternate
QT-Still fallback from mov
QT-T1/LAN alternate
When all of these settings are highlighted,
press the “Alternates” button at the
bottom of the window to apply them. The Advanced Settings
dialog will close, and your source movie is now listed four times
(once for each new setting). The blue bar connecting your movies shows that they are all part of the same alternate
group.
How to Produce High-Quality QuickTime
Copyright © 1999, Terran Interactive, Inc. All rights reserved. http://www.terran.com
Page 40
Using Cleaner to Produce QuickTime Alternates Movies (cont.)
4. Process your Movies
Press the “Start” button to begin processing your
movies. Cleaner will prompt you for a destination
for the final files, then begin compressing the movies.
During compression you can use the “Before/After”
slider in the output window to compare the original
movie to the final compressed results.
When Cleaner is done processing your alternates, it
will put them in a folder named after the source
movie. In our illustrated example, the source movie
is called “DirectorSite Source.” Cleaner will create a
folder called “DirectorSite_Source” which will contain:
“Director.mov”, “Direct00.mov”, “Direct01.mov”,
“Direct02.mov”
These files and folders are automatically named so that they will work correctly on most Web servers. The movie
without the numbers after its name is the "master movie" and contains the fallback still image. Viewers without
QuickTime 3 installed will see this movie. The numbered movies are the alternate versions that will be played according
to the viewers' connection speed.
5. Embed and Upload the Movies
Use your HTML editor to embed the master movie as you
would embed any other QuickTime movie. You don't need
to embed the alternates – as long as you don't rename the
alternates, and you leave them in the same folder as the
master movie, the QuickTime Plug-in will automatically find
them.
Upload the folder of alternate movies to your server, and
test your page. You will see the appropriate version of your
movie according to your QuickTime Plug-in settings.
To configure your QuickTime Plug-in settings, press the
rightmost button on the movie controller under a movie
within your Web browser. Pressing this downward pointing
triangle button will display a pop-up menu with several options – select the “Plug-in Settings” to configure the QuickTime
Plug-in. You may also set the connection speed by opening the “QuickTime Settings” control panel, selecting “Connection
Speed” from the pop-up, and choosing the type of connection your computer has to the Internet.
NOTE: You don't have to set the connection of the Plug-in to your actual connection speed – you may set it higher
or lower to test your movies.
How to Produce High-Quality QuickTime
Copyright © 1999, Terran Interactive, Inc. All rights reserved. http://www.terran.com
Page 41
How to Produce High-Quality QuickTime
4: Authoring
Most projects require that your final compressed media be integrated into some sort of presentation. This can be as
simple as a movie embedded in a Web page, or as complicated as a totally immersive Myst-like world. There are
several approaches, depending on the complexity of your project. Here are a few examples of the more common
authoring techniques.
Embedding Movies in Web Pages
A simple <EMBED> tag is all it takes to include a QuickTime movie in a Web page. This works great for demos,
introductions, and movie trailers. An audio-only movie can be embedded to provide a soundtrack to your Web page.
Many of the new HTML tools, such as Adobe GoLive (formerly GoLive CyberStudio), can automatically embed QuickTime
movies in your page. When you compress your movies with Media Cleaner, it can also create the <EMBED> tags for
you. Or you can write the tags by hand, since the syntax is fairly simple.
For more details about the syntax of QuickTime <EMBED> tags, drop by
http://www.apple.com/quicktime/authors/webmas.html#tags .
Wired QuickTime Movies
QuickTime 3 adds the ability to create “wired” (interactive) movies. Wired movies can include buttons which jump to
another point in the movie, go to a URL, or provide a custom controller. By using background pictures, you can make a small
movie look much bigger. And it's possible to include URL links back to your Web site on movies which are widely distributed.
The best part about wired QuickTime movies is that they don't require additional plug-ins, and they work either
online or on a CD-ROM. Electrifier Pro and Totally Hip’s LiveStage are currently the tools of choice for authoring
wired QuickTime movies.
Electrifier is an easy-to-use tool that supports many interactive options. For more details
about Electrifier, and sample movies, check out
http://www.terran.com/products/ElectrifierOverview.html .
Electrifier Tips: Make sure all your video tracks' upper-left coordinates are a multiple of four
in both dimensions. Also, make sure nothing overlaps any of your videos, and that your
video tracks are not on top of a sprite track.
How to Produce High-Quality QuickTime
Copyright © 1999, Terran Interactive, Inc. All rights reserved. http://www.terran.com
Page 42
LiveStage is a powerful, script-driven application which enables very complex interactivity.
Developers familiar with scripting languages such as Director’s Lingo and AppleScript can
generally pick up LiveStage’s QScript quickly. If you are unfamiliar with scripting, learning it
can take a significant amount of time.
For more details about LiveStage, and sample movies, check out
http://www.terran.com/products/LiveStageOverview.html
Interactive Projects with Director
The majority of interactive multimedia titles for the last several years have been authored with Macromedia Director.
It is possible to create extremely sophisticated projects with this tool, though learning to use Director can be challenging.
When including movies in Director projects, there are a number of important steps to remember. A movie which may
play fine by itself in MoviePlayer may not play as well when incorporated in a Director project, due to the overhead of
having other things going on at the same time.
While movies are playing, keep all other actions to a minimum, and look carefully at your Lingo to make sure
there isn’t too much going on during playback. Also, make sure that movies are being played “direct to stage”,
that their upper-left coordinates are a multiple of four in both dimensions, and that there isn't a single pixel of
anything else on top of them.
Finally, to import QuickTime 3 movies into your Director 6.5 projects, you must use the “Insert > Media Element >
QuickTime 3” command instead of the “Import” command. (“Import” only supports QuickTime 2 playback.)
How to Produce High-Quality QuickTime
Copyright © 1999, Terran Interactive, Inc. All rights reserved. http://www.terran.com
Page 43
How to Produce High-Quality QuickTime
4: Delivery
Once you've finished producing your final project, you need to deliver
it to your viewers. The major ways that developers typically deliver
projects are outlined below.
NOTE: We strongly recommend that you test your project prior to giving
it to your client or making your site available to the public. Please
see “Planning the Project” on page 11 for more details on how to
test your projects.
There are several different ways to deliver
your final QuickTime movies.
Online Delivery
QuickTime 3 enables progressive download (AKA “http streaming”), so you don't need special servers or protocols to
deliver your movies. Simply upload your movies to your Web server the same way you upload graphics. You can use
HTTP or FTP for accessing movies.
If you are using alternate movies, upload the whole folder of alternates that Cleaner created, and don't rename or
move the alternates outside of this folder. For more details on alternates, please see the Media Cleaner Pro 3 User Manual.
If your site will be experiencing high traffic, you may want to move your QuickTime movies to a different server to
prevent your primary Web server from becoming overloaded. Because QuickTime 3 movies are currently treated as
files, it is easy to store movies on a secondary site.
For example, Terran places many of our movies on a series of third-party FTP sites. This allows us to keep our primary
Web server focused on serving the HTML of our pages, and not get overloaded with large movie files. Because we
have different ISPs serving these files, we also have much greater bandwidth than if we served all of them from our
primary Web server.
For more information about putting QuickTime online, please visit Apple's site at
http://www.apple.com/quicktime/authors/auth-docs.html#web .
How to Produce High-Quality QuickTime
Copyright © 1999, Terran Interactive, Inc. All rights reserved. http://www.terran.com
Page 44
CD-ROM Delivery
If you will be producing a CD-ROM containing your movies, you'll need to create a CD master to give to your software
duplicator. Or, if you only need to distribute a limited number of CD-ROMs, you can burn these yourself with a CD-R
(recordable CD-ROM) drive.
In order to create your own CDs, you'll need a CD-R drive, CD-ROM mastering software such as Adaptec Toast™, and
blank CD-R media. The good news is that all of these items have dramatically come down in price the last few years, and
media is now very cheap.
CD-R issues
Certain CD-ROM drives have a hard time reading some CD-R media. This can cause movies stored on a CD-R to
“stutter” or lose audio sync because the CD-ROM drive isn't able to read the movie data fast enough to “keep up” with
the movie during playback.
CD-ROM drives were originally designed for standard, silver CDs if you look at CD-R media, you'll see that it's not
nearly as reflective as normal CD-ROM discs. Because of the difference in media, certain CD drives may play one color
of CD-R media fine, yet have problems with other colors. For example, some developers have better luck with gold
CD-R media as compared to green media.
If you have trouble with movies which play fine off your hard drive, but not from your CD-R, try playing these discs in
a different CD-ROM drive. You may also get better results by switching media (be sure to use a different color), or by
using a different CD mastering program, or a different CD-R burner.
DVD-ROM Delivery
Burning a DVD-R disc is very similar to burning a CD-R. To do this, you'll need a DVD-R drive, mastering software, and
blank media.
At the time this document was written, DVD-R drives were extremely expensive, but rapidly coming down in price.
Hopefully they will become affordable in the near future. Their immense size (4+ Gigabytes) makes DVD-ROM an
ideal medium for QuickTime movies.
NOTE: DVD-Video is different than DVD-ROM. DVD-Video is a specific format intended for playback on set-top
players, and allows for interactivity. Creating DVD-Video requires that your movies are compressed with MPEG,
and properly prepared and mastered with a DVD-Video mastering application. DVD-Video is outside the scope of
this document.
Kiosk/Presentation Delivery
If you are presenting your movies to viewers directly from your computer, or placing them on a computer within a
kiosk, you can simply copy your files to the final drive. For optimal playback, you should defragment your hard drive.
If your movies are encoded with a hardware codec, you must install the capture hardware in your system for optimal
playback. Similarly, if you are presenting MPEG-2 movies, you will need a hardware card to support proper playback
of these files.
How to Produce High-Quality QuickTime
Copyright © 1999, Terran Interactive, Inc. All rights reserved. http://www.terran.com
Page 45
How to Produce High-Quality QuickTime
Tools and Resources
Professional QuickTime Tools and Codecs
®
Media Cleaner Pro
Media Cleaner Pro is the industry standard for high-quality
QuickTime compression. Top
professionals use Media
Cleaner to prepare great video,
audio, and still images for delivery on the Web, CD-ROM,
DVD, kiosk, and intranet. Media Cleaner is easy to
use, and gives you total control over your compression parameters.
™
MPEG Power Professional
The award-winning HEURIS
MPEG Power Professional gives
you total control over your MPEG
encoding within Media Cleaner
Pro. Batch process, change
bitrates and aspect ratios, inject
I-frames, remove 3:2 pulldown, and much more. MPEG1, MPEG-2, and MPEG-2 DVD versions available.
How to Produce High-Quality QuickTime
™
Sorenson Video
The Developer Edition
allows you to produce
unmatched quality lowbandwidth QuickTime
video. When combined
with Media Cleaner Pro 3,
the Developer Edition gives you access to several
important advanced features, including variable bitrate
encoding, enhanced watermarking, and media keys to
protect your video.
™
QDesign Music Codec
This is a high quality, lowbandwidth QuickTime 3 audio codec. It does an excellent
job on instrumental music, allowing very high quality even
over a 14.4 or 28.8 modem. This codec is also very good
for vocal music. Get the Professional Edition for faster
encoding, more data rates, and additional controls.
Copyright © 1999, Terran Interactive, Inc. All rights reserved. http://www.terran.com
Page 46
Professional QuickTime Tools (cont.)
®
Electrifier Pro
Electrifier Pro is an easy-touse interactive QuickTime
authoring tool.
Use
Electrifier to enhance your
site with a wide range of content – animation, audio,
video, 3D, VR, and over 150 special effects... all within
QuickTime! Electrifier’s timeline interface makes
authoring easy for developers familiar with other
authoring tools, such as Director.
™
VideoPrism
VideoPrism brings real-time
professional video color
correction to the Mac desktop.
It offers a powerful array of tools
which provide complete control
for fixing color problems,
applying amazing color effects, and adding spectacular
color looks... all in a "non-destructive" manner.
How to Produce High-Quality QuickTime
™
LiveStage
LiveStage is a powerful, interactive QuickTime authoring
tool. If you're familiar with
scripting languages such as
Lingo, and want to create
complex interactive media,
then LiveStage is the tool you need. Totally Hip's
QScript scripting language gives you full access to all
the capabilities of QuickTime Wired Sprites – including
control of 3D, VR, and all other QuickTime media types.
™
MovieScript
Use MovieScript to automate
your repetitive movie production tasks, such as appending
trailers, changing copyrights,
creating custom movies, and
much more! With MovieScript,
you can now use AppleScript to create highly customized QuickTime solutions without writing any C++ code.
Copyright © 1999, Terran Interactive, Inc. All rights reserved. http://www.terran.com
Page 47
Online QuickTime Resources
Codec Central
Terran's online educational resource that lists all the
codecs and provides samples of each. Also includes
more in-depth articles.
Apple's QuickTime Homepage
Apple's official site is an excellent resource for
information, tools, and the latest versions.
http://www.apple.com/quicktime/
http://www.CodecCentral.com
Terran Interactive's Site
A good source of information on QuickTime and
related topics.
QuickTime FAQ
Charles Wiltgen's excellent FAQ does a great job
of explaining the basics and details of QuickTime.
http://www.QuickTimeFAQ.org
http://www.terran.com
Terran's Online Videos
See what carefully encoded online QuickTime
movies look like. Includes links to more movies.
QUICKTIME-DEV List
This is a great list if you're a QuickTime developer. Use Apple's mailing lists page to join at:
http://www.lists.apple.com/
http://www.terran.com/video/
Judy and Robert's Little QuickTime Page
This is a very useful publication focused on the
latest QuickTime news.
QuickTime Gazette
Another helpful publication focused on
QuickTime.
http://www.Blackstone.ca/QuickTimeGazette/
http://www.bmug.org/quicktime/
How to Produce High-Quality QuickTime
Copyright © 1999, Terran Interactive, Inc. All rights reserved. http://www.terran.com
Page 48
Glossary of Multimedia Terms
16:9 Aspect Ratio – a standard display aspect ratio of
DVD-Video. When displayed on a normal television
(which is 4:3), 16:9 material will be “letterboxed” with
black bars at the top and bottom of the screen.
16-Bit – color depth which allows thousands of colors
to be displayed simultaneously. Also called “Thousands
of Colors” on the MacOS.
2.21:1 Aspect Ratio – see “Cinemascope”
24-Bit – color depth which allows millions of colors to
be displayed simultaneously. 24-bit images can be truly
photographic in quality. Sometimes referred to as “true
color” and called “Millions of Colors” on the MacOS.
3:2 Pulldown – conversion of film frame rate material
(24 fps) to NTSC video (29.97 fps) which results in the
addition of approximately six frames per second.
Pulldown frames are created by blending frames from the
original source in a specific pattern, and is very undesirable
in compressed movies. Pulldown is introduced with a
machine called a “Telecine”, and may be removed with
Media Cleaner’s “Intelecine” feature.
4:1:1 Color – moderately compressed video color
subsampling in which the luminance channel is not
subsampled, but the chrominance channel has one
quarter the resolution. Standard color space for DV.
4:2:0 Color – moderately compressed video color
subsampling that is very similar to 4:1:1. Color space used
by MPEG.
4:4:4 Color – uncompressed video color which has no
subsampling
8-Bit – color depth which allows 256 colors to be
displayed simultaneously. The colors that will be
displayed at a given time are specified in the “Palette”.
Many older computers only have 8-Bit displays. Also
called “256 Colors” on the MacOS.
Adaptive Noise Reduction Filter – “intelligent” noise
filtering system that analyzes each pixel and applies an
appropriate filter to remove the noise. Normally
maintains edge detail while still improving compression.
ADSL – Asymmetric Digital Subscriber Line. A new highspeed Internet connection technology which enables
high speed connections over existing telephone lines.
ADSL is not widely available to the general public as of
this writing, but many believe it will be very popular for
Internet access in the next few years.
Alternate Movies (aka “Movie Alternates”) – QuickTime
3 option which allows you to create multiple versions of
a movie and set criteria for when the QuickTime Plug-in
should display the various versions.
Alpha Channel – an additional image channel which is
often used to store transparency or compositing
information. Alpha channels are often 8-bit, but some
applications support 16-bit alpha channels. Only certain
formats, such as PICT and the QuickTime Animation
codec, support alpha channels.
4:2:2 Color – mildly compressed video color
subsampling in which the luminance channel is not
subsampled, but the chrominance channel has half the
resolution. Often used in professional editing.
Analog-to-Digital Converter (A/D) – chip which
converts analog video signals to digital signals. Analogto-digital converters are used on capture cards to change
the video into a format that the computer can better
manipulate and store.
4:3 Aspect Ratio – a common display aspect ratio.
320x240 is a 4:3 aspect frame size.
Architecture – see “Multimedia Architecture”
How to Produce High-Quality QuickTime
Copyright © 1999, Terran Interactive, Inc. All rights reserved. http://www.terran.com
Page 49
Asymmetric Codec – codec which takes longer to
encode then decode. For example, Sorenson Video is
extremely asymmetric because it takes many times longer
to encode a video frame than it does to play back the
same frame.
B-frame (bi-directional frame) – A B-frame is an MPEG
difference frame which is based on both the previous
and next frame. Similar to a QuickTime delta frame, only
with the ability to see what’s ahead.
Bandwidth – amount of information that can be sent,
processed, etc., in a given amount of time. For example,
a double-speed CD-ROM drive has a maximum bandwidth
of 300 KBps; a 28.8 modem has a theoretical bandwidth
of approximately 3 KBps.
Batch Compression – grouping two or more movies
together to be compressed sequentially, so that each
compression doesn’t need to be started manually.
Binhex – MacOS encoding scheme which converts
normal computer files into ASCII (text) characters for
transmission over the Internet. Binhex’d files normally
end with “.hqx”, and must be returned to their binary
format prior to use.
Bit – Binary Digit. A unit of measure for computer data.
A bit is a single computer digit (either a “1” or a “0”).
Eight bits makes a Byte, which is a single character in
most languages.
Bitmap – collection of pixels that make up an image.
Often used to distinguish images which are pixel based
as compared to images which are vector based.
Blur – filter which averages together pixels to soften the
image, and can be used to minimize subtle frame-to-frame
differences. Normally when compressing movies, you
will get better results with Media Cleaner’s Adaptive Noise
Reduction filter.
Bottlenecks – points in a system that are slower than
the rest of the system, causing overall delays. In the
Internet, bottlenecks are often caused by localized
problems, such as overloaded switching complexes, slow
modems, etc.
How to Produce High-Quality QuickTime
Broadcast – used to refer to signals intended for delivery
over the television system, as well as network delivery to
a wide audience.
Burn – changing a text or sprite track into an image in
the video track. Often used as a work-around to the fact
that QuickTime for Windows 2.1.2 does not support text
or sprite tracks.
Byte – computer data unit, which represents a single
character for most languages. One Byte is made up of
eight bits.
Cable Modem – a special modem designed to operate
over cable TV lines to provide extremely fast access to
the Internet. As of this writing, availability is limited, but
expected to increase in the next few years.
CCIR601 – standard resolution specified by certain
formats, including DV. CCIR601 can be 720x486 or
720x480.
CD-ROM – Compact Disc - Read Only Memory. A
ubiquitous delivery medium used for distribution of
computer software, particularly multimedia.
Cinemascope – very wide (2.21:1) aspect ratio which is
one of the standards in MPEG-2. When displayed on a
normal television, Cinemascope material requires
pronounced “letterboxing” (black bars on top and
bottom).
Cinepak – commonly used codec for CD-ROM video
compression. Allows temporal and spatial compression,
as well as data rate limiting. Newer codecs, such as
Sorenson Video, offer superior image quality and features,
but Cinepak is still used for backwards compatibility.
Chapter List – QuickTime feature which allows users
to click on a pop-up to display the first text track of a
movie. Selecting text from this pop-up shows the viewer
the part of the movie associated with the selected text.
Chrominance – the color component of an image.
CLUT – abbreviation for Color Lookup Table. See Palette.
Copyright © 1999, Terran Interactive, Inc. All rights reserved. http://www.terran.com
Page 50
CMYK – Cyan Magenta Yellow Black. Color space
commonly used for images which will be printed with
4four-color ink on offset presses.
Codec – also called a compressor. A codec is a
compression/decompression software component which
translates video or audio between its uncompressed form
and the compressed form in which it is stored. Sorenson
Video and Cinepak are common QuickTime video
codecs.
Codec Central – section of Terran Interactive’s web site
which contains current information and pricing on the
various codecs and multimedia architectures. To get
there, select “Codec Central” in the Media Cleaner
Internet menu, or visit http://www.CodecCentral.com .
Color Depth – possible range of colors that can be used
in a movie or image. There are generally four choices
with video: Grayscale, 8-bit, 16-bit, and 24-bit. Higher
color depths provide a wider range of colors, but require
more space for a given image size.
Data Rate – amount of information per second used to
represent a movie, often expressed in KBps (KiloByte/
sec). A single speed CD-ROM movie is usually made at a
data rate of 100 KBps, and a double speed CD-ROM movie
about 200 KBps. The data rate of uncompressed NTSC
video is about 27 Megabytes per second.
Data Rate Spikes – short sections of a movie that have
significantly higher data rates than the rest of the movie.
If not properly managed, spikes may cause dropped
frames or other problems at certain points of the movie.
Decode – in multimedia, this term refers to
decompressing a compressed (encoded) file so that it
may be displayed. Codecs do this decoding while the
video/audio is played.
Deinterlace – to remove the interlacing artifacts caused
by the two-fields-per-frame nature of video.
Color Lookup Table – see “Palette”
Color Space – mathematical model which describes
colors. Common models include RGB, CMYK, HSV, and
YUV. Also called “Color Model”.
Color Subsampling – method of reducing the size of
an image by storing color data with lower resolution than
luminance data. Typically used in video with the YUV
color space. Common subsampling options include 4:2:2,
4:1:1, and YUV9.
Color Table – see “Palette”
Compression – the process by which files are reduced
in size by the removal of redundant or less important
data. See also “Lossy” and “Lossless”.
Compressor – see “Codec”
CPU – Central Processing Unit. The processor chip(s)
in a computer. Often used to refer to a computer in
general.
How to Produce High-Quality QuickTime
CPU-Intensive – describes processes which use large
amounts of processor power. CPU-intensive processes
tend to tie up the computer while they are running, and
not work well on slower machines.
Delta Frames – frames which contain only the changes
from the previous frame. Delta frames are created by
codecs which use temporal compression. Delta frames
are also called “difference frames.”
Difference Frames – see “Delta Frames”
Dial-up Modem – computer device that connects users
over phone lines to another computer or network.
Currently the most common consumer internet
connection, modems are much slower than other
options, such as ISDN and T1 connections.
DirectShow – (formerly known as ActiveMovie) the
successor to Microsoft’s Video for Windows architecture.
Dongle – hardware copy protection device. Usually a
dongle plugs into the ADB, USB, or serial port of the
computer, and the protected software won’t run unless
the dongle is present.
Copyright © 1999, Terran Interactive, Inc. All rights reserved. http://www.terran.com
Page 51
Download – to copy a file from a server or network to
your machine.
DVD – standards-based media format, which is intended
to replace CD-ROM, VHS, and audio CDs. DVD discs
look much like a CD-ROM or audio disc, but use higher
density storage methods to significantly increase their
capacity. There are different uses of the DVD media –
see “DVD-ROM” and “DVD-Video” for more details. (The
“DVD” acronym doesn’t have a specific meaning anymore
– it was originally short for “Digital Video Disc”, but then
DVD expanded beyond just video. Sometimes explained
as “Digital Versatile Disc.”)
DVD-ROM – version of the DVD disc format for
computers which is expected to replace CD-ROMs.
Similar to a fast (8x), large (4 - 17 Gigabytes) CD-ROM,
DVD-ROM can hold any type of computer data, and does
not require MPEG.
DVD-Video – version of the DVD disc format used for
storage of prerecorded movies which is expected to
replace VHS. DVD-Video specification uses MPEG.
Dynamic Preview – Media Cleaner feature which lets
you see the effects of your processing and/or
compression settings.
Edge Blanking – black part of the video signal that
normally falls outside the area that shows on a TV screen.
Most capture cards include some amount of edge
blanking around the captured image. Commonly referred
to as “edge noise” or “overscan”.
Embed Tag – HTML code that specifies how a graphic
or movie will be included within your WWW page.
Encode – in multimedia, this term means compressing
a file. See “Compression”
Export Module – plug-in for Adobe Premiere™ which
allows files to be transferred from Premiere to Media
Cleaner for optimization and compression.
How to Produce High-Quality QuickTime
Fallback – alternate movie, image, or text message
displayed to viewers who don’t have QuickTime 3
installed.
Fast Start – progressive download feature of QuickTime
which allows movies to be viewed inline before the whole
movie has been fully downloaded.
Field – half of an interlaced video frame consisting of
the odd or the even image lines. Alternating video fields
are drawn every 1/60th of a second in NTSC video to
create the perceived 30 frames per second video.
Firewall – a network device which may be configured
to limit unauthorized entry or use of a private network.
Often firewalls create issues with streaming media
delivery, especially with formats using protocols such as
RTSP.
Flat Field Noise – slight differences in areas that should
be identical, for example, “blotchiness” in the background
behind a title. Although often not objectionable to the
human eye, “flat field” noise degrades compression and
may be removed with the Adaptive Noise Reduction filter.
Flattening – final pass applied to a QuickTime movie,
which ensures that the movie data is laid out in a
completely linear fashion, and all external references are
removed. It also ensures that the sound is interleaved
properly with the video.
FPS – frames per second, a measure of the frame rate of
video or film. NTSC video is 29.97 fps, PAL and SECAM
video is 25 fps, and film is 24 fps.
Frame – one single still image among the many that
make up a movie. A video frame is made up of two fields.
A film frame is a single photographic image, and does
not have separate fields.
Frame Rate – number of frames per second of a movie.
FTP – File Transfer Protocol. A common Internet
protocol used for transferring files between computers.
Often used for downloading files, such as updaters.
Copyright © 1999, Terran Interactive, Inc. All rights reserved. http://www.terran.com
Page 52
Gamma – curve that describes how the middle tones of
images appear. Often incorrectly referred to as
“brightness” and/or “contrast,” gamma is a non-linear
function. Changing the value of the gamma affects middle
tones while leaving the white and black of the image
alone. Gamma adjustment is used to compensate for
differences between Macintosh and Windows video cards
and display.
HTTP – Hypertext Transfer Protocol. The most common
transfer protocol used on the Web.
Gamut – the range of possible colors within a given color
space. For example, the gamut of NTSC is dramatically
more limited than the gamut of the RGB color space.
IMA – 4:1 compression audio codec which works with
16-bit audio. Based on the standard created by the
Interactive Multimedia Association.
Generation Loss – image degradation that occurs each
time a movie is saved with a lossy compression codec.
Also occurs in each dub with analog video tape.
Indeo™ – codec developed by Intel, which allows
temporal and spatial compression as well as data rate
limiting for use on CD-ROM projects.
GIF – Graphics Interchange Format. A bit-mapped
graphics file format which supports images up to 256 (8bit) colors. The GIF format is widely used online and
works best with illustrations with areas of flat color. (JPEG
is a better option for photographic images.)
Inline – within the browser page, as opposed to needing
to be viewed with an external application.
GOP – Group of Pictures. A self-contained sequence
of MPEG frames starting with an I-frame, followed by B
and P-frames, and ending with a P-frame.
HHR – Half Horizontal Resolution. MPEG-2 files may
be stored at half normal horizontal resolution to create
lower data rate files. When displayed, the video is
normally “stretched” by the MPEG player to full
resolution.
HSV – Hue Saturation Value. Color space which defines
colors in terms of their hue (the color of an object, such
as green), saturation (how much grey is in the color),
and value (the lightness or darkness of the color).
Variations on this color space include HSB (Hue
Saturation Brightness) and HSL (Hue Saturation
Lightness).
HTML – Hypertext Markup Language. The
programming language the World-Wide Web uses to
display pages, links to other pages, etc.
How to Produce High-Quality QuickTime
HTTP Streaming – see “Progressive Download”
I-frame (intraframe) – complete MPEG frame containing
the entire image. This is the same thing as a “keyframe”
in QuickTime/AVI. See “Intraframe”
Intelecine™ – Media Cleaner’s inverse telecine process
which intelligently removes the 3:2 pulldown frames
added to movies when 24 fps film source is converted to
30 fps video.
Interframe – temporally compressed frame. Also called
a “difference” or “delta” frame in QuickTime. MPEG has
two types of interframes – “B-frames” and “P-frames.”
Interlaced Video – each NTSC or PAL video frame
consists of two “Fields”. When displaying video, an NTSC
television draws the alternating fields every 1/60th of a
second, and PAL televisions display the alternating fields
every 1/50th of a second. Our eyes put the two alternating
fields together to create 30 whole NTSC frames per
second (or 25 whole PAL frames). Because interlacing
creates two unique fields for each final frame, and these
images are 1/60th or 1/50th of a second apart, quickly
moving areas in the video often become separated into
alternating lines that look like the teeth on a comb. This
effect is undesirable for desktop video, and should be
removed (deinterlaced) prior to compression.
Copyright © 1999, Terran Interactive, Inc. All rights reserved. http://www.terran.com
Page 53
Interleaving – QuickTime and AVI term which refers
to intermixing the video and audio data in the final file.
Interleaving is required for proper playback of movies,
because it allows the drive to read the file in a linear
fashion and still receive the separate audio and video data
as needed. QuickTime’s standard interleave is one second
of video followed by one second of audio for the first
second of the movie, and a 1/2 second interleave
throughout the remainder. AVI has several different
interleave options, including interleaving each frame of
video with the audio.
Internet – decentralized global computer network. The
term “Internet” is often erroneously used to refer to the
World Wide Web, which is technically a specific
application of the Internet; the Internet encompasses
much more than just the Web, including email,
newsgroups, chat sites, and more.
Intraframe – spatially compressed frame from which
interframes are based. Also called a “keyframe” in
QuickTime, and an “I-frame” in MPEG.
Intranet – large private network, often in a corporate
environment.
IP – Internet Protocol. Commonly used protocol for
transferring data over the Internet. Most networks
combine IP with a higher-level protocol called Transport
Control Protocol (TCP).
ISDN – moderately fast connection to the Internet.
Theoretical throughput is either approximately 8 KBps
or 16 KBps depending on configuration.
ISP – Internet Service Provider. A company which
provides Internet related services, often including
connectivity, email accounts, and web hosting.
Increasingly, ISPs are starting to offer video hosting.
JPEG – graphic format developed by the Joint
Photographic Experts Group. JPEG is a lossy bit-mapped
image format which is widely used for online graphics.
JPEG works well for photographic images. (GIF works
better for flat color illustrations.)
How to Produce High-Quality QuickTime
KiloByte (KB) – unit of measure for computer data. This
unit is frequently used to designate file sizes. A KiloByte
(with upper case “K” and “B”) is 1024 Bytes. The term
“KBps” is short for KiloBytes per second, which is a unit
of data rate measurement frequently used in multimedia.
kiloByte (kB) – a unit of measure for computer data. A
kiloByte (with lower case “k” and captial “B”) is 1000
Bytes. This unit is rarely used.
Kilobit (Kb) – a unit of measure for computer data. A
Kilobit (with upper case “K” and lower case “b”) is 1024
bits. This unit is rarely used.
kilobit (kb) – a kilobit (with lower case “k” and “b”) is
1000 bits. The term “kbps” is short for kilobits per
second, which is a unit of data rate measurement
frequently used in reference to audio data rates and
telecommunications.
Keyframe – spatially compressed frame which contains
the complete video image and is the basis for the
following delta frames. See also “Intraframe”
kHz – kiloHertz, a unit of measure for audio sample
frequency.
kps – ambiguous term for data rate meaning either
Kilobytes or kilobits per second.
LAN – Local Area Network. A network that connects
computers within a geographically small region, often
within just one building.
Letterbox – to add black bars to the top and bottom of
images that are a different aspect ratio than the display
monitor. Many films are shot on wider formats than
NTSC’s 4:3 aspect ratio. When these movies are played
on a television, black bars can be added to the top and
bottom to preserve the entire original image. The other
option of handling different aspect ratios is to “Pan and
Scan” the image to make it the same ratio as the television.
Live – video or information that is captured, compressed,
and distributed in real-time, such as “Live” news
broadcasts. This is the other use of video as compared
to “On-Demand”.
Copyright © 1999, Terran Interactive, Inc. All rights reserved. http://www.terran.com
Page 54
Live Action – video that is shot on location or in a studio
which contains real-world subjects, such as people,
places, etc. The term “live action video” is usually used
to differentiate between real-world video and computer
generated video.
Local Area Network – see “LAN”
Lossless – describes a process in which no information
is lost. Saving a file repeatedly with lossless compression
will not affect the image quality. The QuickTime
Animation codec set to 100% quality is lossless.
Lossless Format Conversion – changing a file from
one format to another without having to recompress the
data. For example, changing an AVI file into a QuickTime
movie. Lossless format conversion is only possible with
files which use codecs that are supported under both
the old and new architectures.
Lossy – compression in which information is lost. Saving
a file repeatedly with lossy compression will additionally
degrade the image quality. This degradation is known as
“generation loss”. For example, Cinepak is a lossy codec.
Luminance – the brightness component of an image.
MacOS – Apple’s Macintosh operating system.
Master Movie – when making QuickTime 3 alternate
movies, the master movie is the one which contains the
display criteria for the other alternates as well as
containing the fallback. The master movie should be
embedded in a web page.
Mean Filter – filter which replaces a pixel with the
average value of its surrounding pixels. Applying a mean
filter effectively blurs the image.
Media – term with many different meanings. Within the
context of multimedia, it usually refers to:
1. Generic term for elements such as movies, sounds,
pictures, etc. (as in “multimedia”)
Median Filter – replaces a pixel with the “most typical”
value of its surroundings, while ignoring extreme values.
Applying a median filter to an image tends to remove
“stray pixels” and small details.
MIDI – Musical Instrument Digital Interface. An
architecture that is used to instruct electronic instruments
how to play a piece of music – think of MIDI files as
“PostScript” for music. QuickTime supports a data type
called QuickTime Music which is very similar to MIDI.
Modem – computer device that connects users to a
network. Telephone “Dial-up Modems” are the most
common, with “Cable Modems” being a faster, but not
widely available, alternative.
Movie Alternates – see “Alternate Movies”
MPEG – Moving Picture Experts Group. Often used to
refer to the standard file format and set of compression
algorithms, jointly developed by the Moving Picture
Experts Group to handle video and audio. The various
forms of MPEG are used for a wide range of video and
audio applications, from desktop computer presentations
and games to consumer DVD-Video players and satellite
video systems.
MPEG-1 – format which produces high quality video and
audio streams at approximately 2x CD-ROM data rates.
Standard MPEG-1 is full frame rate (24 - 30 fps, depending
on the source) with a quarter size image (352x240), and
is useful for playback on most new desktop computers.
MPEG-2 – format which produces high data rate, full
broadcast quality files. MPEG-2 playback requires an
extremely fast computer and video card, or a hardware
accelerator card. MPEG-2 is the format for DVD-Video
and many home satellite dish systems. Standard MPEG2 is full frame rate (24 - 30 fps) and full screen resolution
(720x480).
MPEG Layer-2 Audio – Generally used for high
bandwidth MPEG audio at near CD quality. Used for
audio with both MPEG-1 and MPEG-2.
2. Something that is used for storage or transmission,
such as tapes, diskettes, CD-R’s, Zip™ disks, networks,
etc.
How to Produce High-Quality QuickTime
Copyright © 1999, Terran Interactive, Inc. All rights reserved. http://www.terran.com
Page 55
MPEG Layer-3 Audio (MP3) – MPEG audio format that
is very popular on the Internet. Generally used in audioonly files (.mp3 files), this is a lower bandwidth format
than MPEG Layer-2 audio, but still not ideal for modem
streaming.
Multicast – transmitting the same media stream
simultaneously to many recipients. Multicast delivery is
similar to traditional television broadcast, in the sense
that a stream is made available at a given time, and viewers
may watch the part of that stream which is currently
playing. Multicast delivery results in less network traffic
than Unicast delivery, because the signal is sent once;
viewers watch this signal as it is sent instead of initiating
multiple unique streams.
Multimedia – refers to media presentations which
combine various elements such as sound, graphics, and
video.
Multimedia Architecture – software including system
extensions, plug-ins, servers, etc. which provides for the
creation, storage and playback of synchronized multiple
media types. For example, QuickTime, RealSystem, and
Windows Media.
Multiplexing (aka “Muxing” or “Interleaving”) – The
process of combining audio and video data in a final
MPEG file. See “Interleaving”
NetShow – former name of “Windows Media,” although
the servers for Windows Media 3 are still called “NetShow
Servers”.
Noise – any part of a signal which contains unwanted
randomness. In audio, noise makes the track have “hiss”
or “fuzz”. In video, it can make the image “grainy”, and
appear as pixel “shimmer” or “blotchy” areas. Noise
generally interferes with compression, and should be
minimized for good results.
Noise Reduction – removing unwanted noise from a
signal. For video this is accomplished with filters such as
blur, mean, or median. Uniform noise reduction applies
one filter equally to each pixel. Adaptive Noise Reduction
applies different filters to different kinds of noise.
How to Produce High-Quality QuickTime
NTSC – National Television Standards Committee. The
NTSC defines North American broadcast standards. The
term “NTSC video” refers to the video standard defined
by the committee, which has a specifically limited color
gamut, is interlaced, and is approximately 720x480 pixels,
29.97 fps.
On-Demand – video which is not broadcast “Live” as it
is filmed, but is compressed and made available on a
server for people to watch when they wish. A television
broadcast is “Live”; renting a video and watching it at
home is “On-Demand”.
Output Movie – compressed video ready for playback
and distribution.
PAL – Phase Alternating Line. The 25 fps video format
used by many European countries.
Palette – list of colors which are used in an 8-bit color
movie or image. There are several standard palettes, such
as the Macintosh System palette. Often referred to as a
“Color Lookup Table,” “Color Table,” or abbreviated as
“CLUT”.
Pan and Scan – advanced cropping technique used to
translate between different aspect ratio material. “Pan
and Scan” is often used to translate movies shot on wide
screen film formats to 4:3 television display. In the pan
and scan process, the image is cropped to the new aspect
ratio, and the transfer operator pans within the wider
original image to include important details which are near
the edge. (These details would be lost by a simple
cropping technique.) Movies which have been “pan and
scanned” don’t have any black bars (letterboxing) and
completely fill the television screen.
P-frame (predictive frame) – MPEG difference frame
which looks to previous frames. Very similar to a
QuickTime/AVI delta frame.
PICT – still image file format developed by Apple
Computer. PICT files can contain both vector images
and bitmap images, as well as text, and an alpha-channel.
PICT is a ubiquitous image format on MacOS.
Copyright © 1999, Terran Interactive, Inc. All rights reserved. http://www.terran.com
Page 56
Pixel – one dot in a video or still image. A typical lowresolution computer screen is 640 pixels wide and 480
pixels tall. Digital video movies are often 320 pixels wide
and 240 pixels tall.
Qualcomm PureVoice codec – QuickTime 3 low
bandwidth audio codec optimized for voice-only material.
See Codec Central for details at
http://www.CodecCentral.com
Pixelization – when the pixels that make up an image
get exaggerated or enlarged. Makes the image look
“chunky” or “jagged,” and is often the result of
compression artifacts.
QuickTime – Apple Computer’s cross-platform
multimedia architecture. Widely used for a range of
applications including CD-ROM, Web video, editing, and
more.
PNG – Portable Network Graphics (pronounced “ping”).
PNG is new bitmap still image format designed to replace
GIF. PNG is completely patent- and license-free, and is
superior to GIF in many respects. New browsers (version
4 and later of Navigator and Internet Explorer) now
support the PNG format.
Quicktime-Compatible Browser – browser (such as
Netscape Navigator 3.0 and later) that supports the inline
viewing of QuickTime movies.
Premiere Export Module – see “Export Module”
Process Window – “home base” for controlling
processing within Media Cleaner Pro. The Process
window displays the list of files to be processed, the
setting with which they will be processed, and the “Start”
and “Suspend” buttons.
Progressive Download – term referring to online media
which users may watch as it downloads. Progressive
download files don’t adjust to match the bandwidth of
the user’s connection like a “true streaming” format.
QuickTime’s “fast start” feature is a progressive download
technology. Also called “HTTP Streaming” because
standard HTTP servers can deliver progressive download
files, and no special protocols are needed.
Pulldown – introducing a pulldown is the process which
compensates for the differences in frame rates between
film and video by creating new frames. For 24 fps film to
be converted to 30 fps NTSC video, a 3:2 pulldown is
used which creates an extra six frames per second.
QuickTime Music – track that is very similar to MIDI.
Allows music to be stored as instructions rather than
digitized sounds, and then played back with defined
instruments within QuickTime. QuickTime Music tracks
are much smaller than digitized versions of the same
music. Often referred to as MIDI even though it
technically isn’t.
QuickTime Streaming – Apple’s streaming media
addition to the QuickTime architecture.
RealAudio – RealNetworks’ initial online audio format,
which has been replaced by RealG2.
RealSystem G2 – the second generation of RealVideo.
Also called simply “RealG2”.
RealMedia – another name for “RealVideo”.
RealVideo – RealNetworks’ streaming media
architecture.
Recompress – compressing an already compressed file
an additional time. Recompression should be avoided if
at all possible, because the video and audio quality will
generally be degraded with multiple compressions.
PureVoice codec – see “Qualcomm PureVoice codec”
QDesign Music Codec – QuickTime 3 low bandwidth
audio codec. See Codec Central for details at
http://www.CodecCentral.com .
How to Produce High-Quality QuickTime
RGB – Red Green Blue. A color space commonly used
on computers. Each color is described by the strength
of its red, green, and blue components. This color space
directly translates to the red, green, and blue phosphors
used in computer monitors. The RGB color space has a
very large gamut, meaning it can reproduce a very wide
range of colors.
Copyright © 1999, Terran Interactive, Inc. All rights reserved. http://www.terran.com
Page 57
RTP – RealTime Transfer Protocol. A transport protocol
created to deliver live media to one or more viewers
simultaneously. RTP is used as the transfer protocol for
RTSP streaming.
RTSP – RealTime Streaming Protocol. A standard now
commonly used to transmit true streaming media to one
or more viewers simultaneously. RTSP provides for
viewers randomly accessing the stream, and uses RTP as
the transport protocol.
Settings Wizard – Media Cleaner’s “expert” system
which interviews the user and creates compression
settings based on the user’s responses.
Sorenson Video Codec – high-quality, low bandwidth
QuickTime video codec – see Codec Central at
http://www.CodecCentral.com for details.
Source Movie – original movie to be compressed.
Subsample – see “Color Subsampling”
Sample – measurement of a signal level at one specific
instant in time.
Sample Size – accuracy with which a sound sample is
recorded. Generally, audio sample size is 8 bits or 16
bits. The latter is more accurate and provides more
dynamic range, but takes up more storage space.
Sample Rate – number of samples per second used for
audio. A higher sample rate yields higher quality audio
that is larger than lower sample rates. Common
multimedia sample rates include 11.025 kHz, 22.050 kHz,
and 44.100 kHz.
SECAM – video standard very similar to PAL which is
used in a limited number of countries.
Server – term which can either mean hardware or
software:
1. Hardware – computer that other computers connect
to for the purpose of retrieving information. Often used
to mean the computer that hosts a WWW site.
2. Software – software program that runs on a WWW
server to support online video (such as the “RealServer”).
Serverless – technologies which don’t require a server,
such as QuickTime.
Server-Optional – technologies which don’t require a
server, but may benefit from them, such as RealMedia.
Setting – name for all of the processing parameters in
Media Cleaner’s Advanced Settings window. Settings can
be saved, modified, deleted, etc.
How to Produce High-Quality QuickTime
SureStream – RealSystem G2 scalability feature which
allows multiple versions of a file to be encoded, and
delivered to users based on their connection.
Spatial Compression – compression method that
removes redundant data within any given image. For
example, a field of blue in a picture would be stored as
one large blue area rather than many individual blue
pixels.
Spikes – see “Data Rate Spikes”
Sprite Track – QuickTime track made of small graphic
elements which have position and time information
associated with them. These elements are called “sprites.”
A bouncing ball is a good example of a sprite track – only
the ball and its location are stored at any given time
instead of a series of bitmaps that describe each whole
frame.
Static Mask – Media Cleaner feature which composites
defined areas of an image across frames to improve
temporal compression.
Store and Forward – alternate term for “On-Demand”
Streaming – somewhat ambiguous term which refers
to network delivery of media. May refer to technologies
which match the bandwidth of the media signal to the
viewer’s connection, so that the media is always seen in
real-time (“True Streaming”). Also commonly used to
mean media which may be viewed over a network prior
to being fully downloaded (“HTTP Streaming” and
“Progressive Download”).
Copyright © 1999, Terran Interactive, Inc. All rights reserved. http://www.terran.com
Page 58
Suffix (aka “Extension”) – last part of a file name that
indicates the type of file. The common online video
suffixes are:
QuickTime
RealVideo
RealVideo metafile
Windows Media
Video for Windows
MPEG Layer-3 Audio
MPEG
.mov
.rm
.ram
.asf
.avi
.mp3
.mpg
Symmetric Codecs – codecs which encode and decode
video in the same amount of time. Live broadcast and
teleconferencing systems generally use fairly symmetric
codecs in order to encode the video in realtime as it is
captured.
T1 – fast network connection. Theoretical limit is 150
KBps, but the realities of the Internet usually cut the
throughput down dramatically.
TCP – Transfer Control Protocol. Common network
transfer protocol used widely on the Internet.
Text Track – track which is made up of text, style,
positioning, and time information. QuickTime text tracks
are often used for subtitles.
Target Machine – typical/minimal configuration (of
computer hardware and software) on which a movie will
be viewed.
Telecine – film-to-video conversion machine that
introduces the 3:2 pulldown necessary to compensate
for the differences in frame rates between film and video.
3:2 pulldown is undesirable in compressed movies, and
should be removed with Media Cleaner’s Intelecine
feature.
Temporal Compression – video compression which
compares frames and only transmits the differences
between them. Also called “interframe” compression.
Terran – of, or relating to, the planet Earth (as in “Terra
Firma”). Rhymes with “baron”.
How to Produce High-Quality QuickTime
TIFF – Tagged Image File Format. A widely supported
cross-platform file format for storing bit-mapped images.
Often used in pre-press.
Toggle – little triangle shaped button which rotates to
reveal more information. Similar to the little triangles in
the Finder that let you view the contents of a folder
without first opening it. Clicking once on them reveals
more information; clicking again hides the extra
information.
Tracks – separate media types that make up a movie.
Most movies include a video track and an audio track. In
some multimedia architectures such as QuickTime, there
are also text tracks, sprite tracks, music tracks, and more
unusual track types.
Transcode – term that generally is used to mean
“Recompression,” but can also mean “Lossless Format
Conversion.”
True Streaming – refers to technologies which match
the bandwidth of the media signal to the viewer’s
connection, so that the media is always seen in real-time.
The word “True” is added to differentiate this type of
streaming from “HTTP Streaming” (aka “Progressive
Download”). Media servers and streaming protocols such
as RTSP are required to enable true streaming.
UDP – User Datagram Protocol. The data transmission
standard used by RTP for broadcast data over IP networks.
UDP is designed for realtime broadcast, and thus lacks
many of the error correction features of TCP, because
there isn’t time to resend lost data. This means that UDP
may lose data in transmission if there are problems with
the network.
Unicast – delivery of a unique stream to each viewer.
Because each viewer initiates a new stream when viewing
the same source, this approach to media delivery can
result in increased network congestion as multiple,
identical streams are sent at the same time. However,
unlike “Multicast”, Unicast delivery allows for each viewer
to control their viewing, so this is much more akin to
“video on demand”, rather than a television broadcast.
Copyright © 1999, Terran Interactive, Inc. All rights reserved. http://www.terran.com
Page 59
Upload – to move a file from your computer to a server.
Web – short for “World Wide Web.”
Variable Bitrate (VBR) Encoding – a two-pass process
of analyzing and then compressing movies to an optimal
data rate. Produces movies with data rates which vary
from second to second instead of uniform, flat data rates.
Media Cleaner 3 supports VBR encoding with the
Developer Edition of Sorenson Video.
Wide Area Network – see “WAN”
Variable Frame Length Movie – movie that contains
frames that are not all of equal duration. Supported by
QuickTime, but not Video for Windows.
Windows Media – Microsoft’s streaming media
architecture. Formerly called “NetShow.”
Vector – in multimedia, vector refers to formats which
stores graphical information in terms of mathematical
algorithms, instead of as pixels. Because these images
don’t have any pixels, but are rather equations describing
the objects portrayed, vector images scale perfectly to
larger and smaller sizes. Illustrator files, Flash, and
QuickTime curve media are vector formats.
Vector Quantization (VQ) – a compression technique
used by Sorenson Video which uses representative pixel
patterns to compress an image and later reconstruct it.
Vertical Edge Blanking – see “Edge Blanking”
Video for Windows – (also called “AVI”) Microsoft’s initial
multimedia architecture primarily aimed at CD-ROM video.
It is being replaced by DirectShow/Windows Media.
Volume –
1. A hard disk drive, floppy diskette, CD-ROM, or other
storage device or piece of storage media.
2. The level of your audio track.
WAN – Wide Area Network. A network connecting a
large area, usually more than one building.
How to Produce High-Quality QuickTime
Windows – Microsoft’s operating system.
Windows Machine – IBM-compatible computer
running Microsoft’s Windows operating system.
Wizard – generic term for a system that helps users
configure computer software or settings. See “Settings
Wizard”
World Wide Web – hyperlinked, graphical application
of the Internet.
WWW – short for “World Wide Web”.
xDSL – refers collectively to all types of Digital Subscriber
Lines. See “ADSL” for more details.
YUV – Color model which describes color information
in terms of luminance (Y) and two chrominance channels
(U,V). The YUV space is commonly used in video, and
easily supports color subsampling.
YUV9 – color format with substantial subsampling often
used with online video technologies, such as Sorenson
Video. For every 16 luminance “Y” samples in a 4x4 pixel
block, there is only one “U” and one “V” sample. This
dramatic color subsampling produces smaller files, with
correspondingly lower color fidelity. YUV9 subsampling
often results in noticeable color artifacts around the edges
of brightly colored objects.
Copyright © 1999, Terran Interactive, Inc. All rights reserved. http://www.terran.com
Page 60


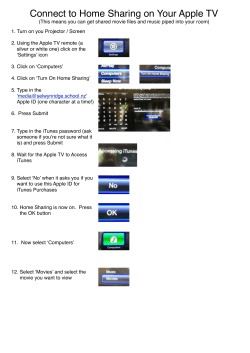

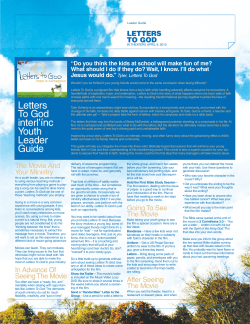
© Copyright 2026