
Document 196358
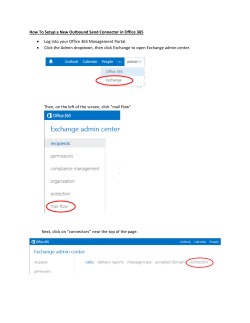
SME: Subject Matter Expert http://mssme.eu The purpose of that document is to explain you how to configure a custom Mail Flow for your organization. You can configure custom email-flow scenarios using Inbound and Outbound connectors. For example, you can configure a connector to redirect outbound mail to an onpremises server that applies additional processing before delivering mail to its final destination. The configuration steps vary for each scenario. The terms Outbound and Inbound connectors refer to the direction mail is traveling to and from Exchange Online Protection (EOP). An Outbound connector sends email to a partner or to your on-premises environment. An Inbound connector receives mail from a partner or from your on-premises environment. You can create and edit connectors in the Exchange admin center (EAC) under Mail flow > Connectors. For the different scenarios, you can have a look here: http://technet.microsoft.com/en-us/library/jj723138(v=exchg.150).aspx [email protected] Use Inbound and Outbound Connectors to Configure Custom Mail Flow November, 23 SME: Subject Matter Expert http://mssme.eu I will use the following scenario: Domain hosted by another registrar and validated into O365. MX pointed to the registrar mail flow server in priority 0 MX pointed to the Cloud Office 365 in priority 5 Inbound connector into ECP (Exchange Console Portal – also called EAC: Exchange Admin Console) Outbound connector into EAC The main goal is to use my hosting mail flow when I send an email from my domain to the Cloud and to use the same mail flow when an O365 user is sending me an email or reply to it. To do so, I will have to activate my domain in O365, configure the DNS zone of my Hosted Domain and the connectors into EAC. Reminder: Q. What’s the difference between an outbound connector and an inbound connector? A. The terms Outbound and Inbound refer to the direction mail is traveling to and from Exchange Online Protection (EOP). An Outbound connector sends email to a partner or to your on-premises environment. An Inbound connector receives mail from a partner or from your on-premises environment. Q. What’s the difference between the On-Premises connector type and the Partner connector type? A. An On-Premises connector is required for the cloud service to receive mail from or send mail to your on-premises environment. Without On-Premises connectors, you can’t route inbound and outbound mail through EOP for filtering. When you set up EOP standalone, where EOP protects your on-premises mailboxes, a portion of the configuration steps are devoted to creating On-Premises connectors. For more information, see Set Up Mail Flow Through Exchange Online Protection. On-Premises connectors are also required for a hybrid deployment. However, when you set up hybrid, the connectors are typically created automatically with tools provided for hybrid setup. For more information about configuring a hybrid deployment, see Exchange Server 2013 Hybrid Deployments. You can create a Partner connector to set up boundaries and restrictions for email sent to or received from your partners, including scoping the connector to receive email from specific IP addresses, or requiring Transport Layer Security (TLS) encryption. A Partner connector isn't required, but can be created by customers with cloud mailboxes or onpremises mailboxes. For more information about creating connectors to exchange secure email with a partner, see Scenario: Regulated Partner with Forced TLS. To see more FAQ, please reach the following: http://technet.microsoft.com/en-us/library/dn175715(v=exchg.150).aspx [email protected] Use Inbound and Outbound Connectors to Configure Custom Mail Flow November, 23 SME: Subject Matter Expert http://mssme.eu DNS hosted configuration: I want to use my MX to send and receive the email sent to my Domain, to use the Lync services of O365. My DNZ zone will looks like: IN MX 1 IN MX 5 600 IN TXT _sip _sip._tls _ sipfederationtls._tcp autodiscover lyncdiscover sip mail pop3 msoid mailflow.registrar.net. mydomain-eu.mail.protection.outlook.com "v=spf1 include:spf.protection.outlook.com -all" IN CNAME sipdir.online.lync.com IN SRV 100 1 443 sipdir.online.lync.com IN SRV 100 1 5061 sipfed.online.lync.com IN CNAME autodiscover.outlook.com IN CNAME webdir.online.lync.com IN CNAME sipdir.online.lync.com IN CNAME registrar.net. IN CNAME registrar.net. IN CNAME clientconfig.microsoftonline-p.net Registrar Provided by O365 Provided by O365 Provided by O365 Provided by O365 Provided by O365 Provided by O365 Provided by O365 Provided by O365 Registrar Registrar Provided by O365 Now, I need to configure the domain type into O365 and to set the connectors as needed. [email protected] Use Inbound and Outbound Connectors to Configure Custom Mail Flow November, 23 SME: Subject Matter Expert http://mssme.eu To change the domain type, go into EAC Mail flow Accepted Domains, choose you domain, edit it and you will see the following table: Move from Authoritative (by default) to internal relay domain and check make this the default domain. [email protected] Use Inbound and Outbound Connectors to Configure Custom Mail Flow November, 23 SME: Subject Matter Expert http://mssme.eu To change the domain type, go into EAC Mail flow Connectors: It the “+” sign and create an inbound connector Inbound connector details: Check “Enable inbound connector” and check “Connector type”: On-premises [email protected] Use Inbound and Outbound Connectors to Configure Custom Mail Flow November, 23 SME: Subject Matter Expert http://mssme.eu Check “Opportunistic TLS” and “Domain restriction”: “None” Scope: “*” sign for all domain – IP addresses: The public IP of you registrar – Accepted Domains – here Contoso.com [email protected] Use Inbound and Outbound Connectors to Configure Custom Mail Flow November, 23 SME: Subject Matter Expert http://mssme.eu Outbound connector details: Check “Enable outbound connector” and check “Connector Type”: On-premises Check “Opportunistic TLS” [email protected] Use Inbound and Outbound Connectors to Configure Custom Mail Flow November, 23 SME: Subject Matter Expert http://mssme.eu Check “Route mail through smart hosts” and click the “+” sign to provide the FQDN name of your registrar (Name of the MX of the registrar mail flow) Check “Route all accepted domains through this connector” and into Domains, click the “+” sign and add your domain, here Contoso.com. [email protected] Use Inbound and Outbound Connectors to Configure Custom Mail Flow November, 23 SME: Subject Matter Expert http://mssme.eu The last step is to verify your Intend and Connectors. Do to so, go into Office365 and under Domains, check your domain and click View DNS settings: Click Change domain purpose [email protected] Use Inbound and Outbound Connectors to Configure Custom Mail Flow November, 23 SME: Subject Matter Expert http://mssme.eu Check: I plan to set-up on-premises mailboxes to work with Office 365 or make sure they’re protected with Exchange Online Protection then click next button. Click Done go check. [email protected] Use Inbound and Outbound Connectors to Configure Custom Mail Flow November, 23 SME: Subject Matter Expert http://mssme.eu Check: I’ve run the tool and confirmed that my configuration is correct and click the Next button. You will be redirected to the DNS records that you need to add into your Registrar, once it’s done, click the Done, go check button. [email protected] Use Inbound and Outbound Connectors to Configure Custom Mail Flow November, 23 SME: Subject Matter Expert http://mssme.eu Then click the Finish button At this part of your document, you should been able to use your Domain and custom mail flow with O365. [email protected] Use Inbound and Outbound Connectors to Configure Custom Mail Flow November, 23


© Copyright 2026