
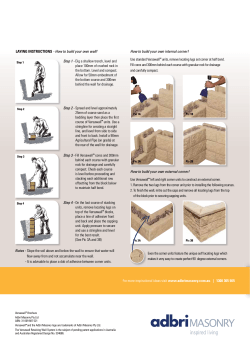
How to make a Browband Rosette and Flag set
How to make a Browband Rosette and Flag set
fit for the highest level of show riding
by Colleen Keen
Materials:
Vinyl template pieces
Small piece of webbing (to attach rosette to browband)
Pleated ribbon – 2-3 colours
Matching cotton
Fabric tape or duc tape
Double sided tape
2 x crystal rings
2 x crystal buttons
Strong craft glue (I use jewellers glue) (Tarzans grip is OK to use)
Equipment:
Fine point marking pen
Sewing needles
Sharp scissors
$1.00 or 20c coin (for marking circles)
Optional: craft cutting mat or thimble
To start: (pic 1) Mark circle on largest
vinyl circle piece.
Pic 1
Sew 1 or two layers of pleated ribbon aligning the
inside of the ribbon with the coin tracing - pic 2
Pic 2
Browband supplies available from: Extra Keen Craft and Scrapbooking
Email: [email protected] - Phone: 0402 059 581 - Web: www.extrakeen.com
Glue crystal rings to pleated
ribbon, (Pics 3 & 4), being
careful not to leave too much
excess glue, make sure the
rings are centred. Pop something onto the rings to hold
them in place, a book or similar is fine.
(allow 24 hours for the glue to
harden properly).
Pic 3
Take inner (smaller circle of
vinyl and sew 1 to 2 layers of
pleated ribbon, aligning the
outside of the ribbon with the
outside of the circle (this is
to fit inside the crystal ring).
Pic 5
Pic 4
Pic 5
Pic 8
To attach buttons, (Pics 6-11) thread
double cotton onto a needle. Push
the needle through from the back of
the vinyl through the pleated ribbon,
thread on the shank of the button
and directly opposite the initial entry
point of cotton, push needle back
through pleated ribbon and vinyl.
Pic 9
Then fill the centre space with good
quality glue, pull the thread tight
whilst manouvring the button into
the correct position and tie off the
cotton. Set aside for 24 hours to allow
the glue to do its work.
Whilst waiting for glue to dry start
work on flags: (Pics 12 & 13) Sew
the top of the webbing to the top of
the rosette, leave it flapping. It will
be threaded through the loop on the
browband and sewn into place once
the ribbon has been placed on the flag.
Pic 6
Pic 7
Pic 10
Pic 11
Pic 12
Pic 13
Browband supplies available from: Extra Keen Craft and Scrapbooking
Email: [email protected] - Phone: 0402 059 581 - Web: www.extrakeen.com
Thread the flap through the loop
of a pre-decorated browband and
stitch the flap in place at the bottom of the loop. Be careful not to
catch the browband loop with the
cotton. (Pics 14 & 15)
Pic 14
Pic 15
Pic 16
Pic 17
Covering the flag with ribbon:
Pics 16 to 19. Place double sided
tape onto the back (flat side) of
the ribbon going in the centre of
the flag, cut into suitable lengths.
Carefully take off the tape backing and place the ribbon on the
flags. Fold the ends to the back
of the flag to give a neat finish,
repeat for all the ribbon you want
to put on the flag.
Pic 18
Pic 19
Pic 20
Finishing the flag: Pics 20 to
22. Stick one or two layers of
duc tape or fabric tape to the
back of the flag. Carefully trim
the excess tape away from the
sides of the flag. Use sharp scissors for this.
Flag tips: Pic 22 - Carefully
place the flag tip over the end of
the flag, make sure it is straight
then hammer firmly so that the
back of the flag tip is very firmly
in place.
Pic 22
Pic 21
Browband supplies available from: Extra Keen Craft and Scrapbooking
Email: [email protected] - Phone: 0402 059 581 - Web: www.extrakeen.com
Finishing the rosette: Pics 23 to 25.
Pic 23
Thread matching cotton onto a
sewing needle and put a couple of
stitches over the buckle bar as in pic
23. Place the inside rosette section
over the rosette back (pic 24), and
sew the two together. This is fairly
tedious, so take you time, use a
craft mat or thimble to help push
the needle through and be careful
not to catch the pleated ribbon into
the stitching. The needle has to go
through both the back rosette template and the top rosette template.
Sew all the way around twice for
extra strength.
Pic 24
Pic 25
Attaching rosette to flag: Pics 26 to
29.
Put a 3 strips of double sided tape
onto the back of the rosette (this is so
it stays in place whilst you sew all the
elements together).
Pic 26
Stick the rosette onto the flag top,
making sure they are centred.
Stitch all the way around from the
flag on one side to the other as in pics
27 and 28. It is perfectly safe to gently fold the browband away from the
rosette while you do this. just make
sure you are stitching the flag and the
rosette backings each stitch.
Pic 27
Pic 28
Browband supplies available from: Extra Keen Craft and Scrapbooking
Email: [email protected] - Phone: 0402 059 581 - Web: www.extrakeen.com
Pic 29: This is what the back of your rosette
and flag should look like when it is finished.
Tip: You can have detachable rosettes by using velcro
at the bottom of the browband loop to attach the flap
which holds the rosette to the browband.
Pic 29
Pic 30
Congratulations: You have created a beautiful and durable show browband.
Don’t hesitate to contact me if you need any help.
I have more than 60 ribbon colours to choose from, templates, buttons and
buckles are available from my webstore or from my ebay store.
Browband supplies available from: Extra Keen Craft and Scrapbooking
Email: [email protected] - Phone: 0402 059 581 - Web: www.extrakeen.com


© Copyright 2026