
Welcome to FedEx Instructional Help Guides.
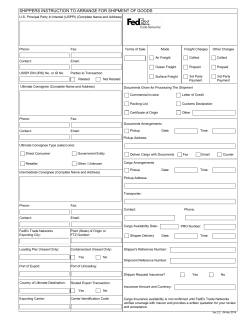
Welcome to FedEx Instructional Help Guides.
Continue reading to learn how to submit your customs documents
electronically using FedEx® Electronic Trade Documents.
First we will show you how to enable and set up your account to use FedEx Electronic Trade Documents.
1. Select “Preferences.”
2. Within the International Preferences section, check the “Enable Electronic Trade Documents (ETD)” box.
NOTE: If your user account does not have ETD as an option in International Preferences, your shipping administrator
will need to enable ETD by selecting the “customize privileges, references and default” option in the User Settings
from the User Tab in Administration.
1
3. Review the Terms and Conditions of Electronic Trade Documents. After reviewing, click the “I accept” button.
2
4. Although not required, FedEx highly recommends selecting the following options to help avoid regulatory or
customs delays with your shipment. Select “Always create Commercial Invoice” to make it a default option.
5. Select “Always print Commercial / Pro Forma Invoice on company letterhead” as a default option.
3
6. Click “Upload” to upload a letterhead image. Letterhead image files must be in either GIF or PNG format and
no larger than 700 pixels wide by 50 pixels high.
7. Select “Always include uploaded signature on the applicable customs documents” as a default option.
4
8. Click “Upload” to upload a signature image. Signature image files must be in either GIF or PNG format and
no larger than 240 pixels wide by 25 pixels high.
If you need to create your digital signature file, you will first need to scan, size and upload your signature.
9. To begin, sign your name on a blank piece of paper. It is suggested that you use a marker.
10. Next, use a scanner to capture your signature and save it to your computer.
11. To correctly size the image, use a tool such as Microsoft Paint.
12. Open the scanned signature file in Microsoft Paint. If necessary, rotate the image so that it is correctly
oriented on the screen.
5
13. Under the “Home” tab, click on the “Select” icon.
14. Using your mouse, draw a rectangle around the image, leaving limited white space around the signature.
6
15. Click on the “Crop” icon.
16. Next, click on the “Resize” icon.
7
17. Ensure that the “Maintain aspect ratio” box is selected.
18. Select the “Pixels” radio button.
19. Enter 25 pixels in the “Vertical” input field. Check the updated horizontal pixel number. If it is under 240,
no further changes are required. If the image is larger than 240 pixels wide, then enter 240 in the horizontal field.
NOTE: It is required that a signature file be no larger than 240 pixels wide by 25 pixels tall and for a logo file to be no larger
than 700 pixels wide by 50 pixels tall.
8
20. Click on “OK” .
21. Under the “utility tab”, click the “Save as” button.
9
22. Select “PNG picture”.
23. You can now upload the digital signature to fedex.com by clicking on “Upload” next to the “Always include
uploaded signature on the applicable customs documents” option.
10
24. Click on “Browse”.
25. Select the saved image file from your computer and then click the “Open” button.
11
26. Click “Upload” to upload your file.
27. Scroll to the top of the Preferences page and click the “Save changes” button. Your account is now set up to
submit customs documents using FedEx Electronic Trade Documents.
12
Now, let’s look at how to process an international shipment using FedEx Electronic Trade Documents.
28. Enter the recipient and shipping information or select a saved Shipment Profile.
29. Scroll down the page and click the “Continue” button.
13
30. You can electronically submit a Commercial or Pro Forma Invoice or Certificate of Origin with your
shipment in the Customs Documentation section.
31. You can also select “Attach additional trade document(s)” to attach documents not listed.
NOTE: Up to five documents can be electronically submitted with your shipment.
14
32. Click on “Commercial Invoice” to submit your Commercial Invoice using one of three different options –
“Use my own”, “Attach from Document Preparation Center” and “Use FedEx Generated.”
In the first scenario, we will submit a Commercial Invoice using a customs document you have already created
and saved on your computer.
33. Select “Use my own.”
15
34. Click on “Browse.”
16
35. Select the Commercial Invoice Document you would like to use and click on “Open” to attach it.
NOTE: The document should not exceed 1MB and must be in one of the following formats: .doc, .xls, .txt, .rtf, .jpg,
.gif, .bmp, .tif, .png, or .pdf. The file name size is limited to 30 characters.
36. Your document has uploaded successfully.
17
In the second scenario, we will submit a Commercial Invoice you have saved in the Document Preparation Center.
37. Select “Attach from Document Preparation Center.”
38. Select the document and click “Continue.”
18
In the third scenario, we will submit a FedEx generated Commercial Invoice with the company logo and signature.
39. Select “Use FedEx generated.”
40. To attach your company logo and signature first click on “Personalize FedEx customs documents.”
19
41. Next, select “Use company letterhead on file” and “Use company signature on file.”
42. Click the “Ship” button at the bottom of the page.
20
43. Confirm your shipment details.
44. Click the “Ship” button.
21
45. ETD is clearly marked on the shipping label.
46. To view your Commercial Invoice click on “View”.
22


© Copyright 2026