
How to Install a Broadcast Transmitter
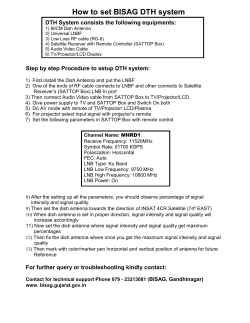
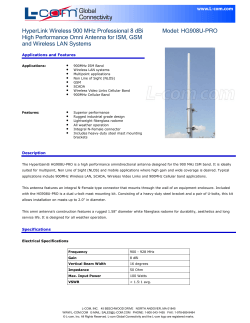
How to Install a
Broadcast
Transmitter
A short training manual
for low-power FM stations
Written / Compiled by
David A. Casement
Broadcast Technician
Galcom International
Revised September 2009
Revision 1.5
TABLE OF CONTENTS
Legal/Disclaimer
3
INTRODUCTION
4
SECTION 1: CONNECTION TO ANTENNA
A. Basic Concept
B. Standing Waves and Resonance
C. Coaxial Cable Characteristics
D. Connectors
E. Antennas
6
6
7
11
16
17
SECTION 2: POWER SOURCE
A. Introduction
B. Testing Outlet
C. Plugs and Connectors
D. Surge Protection
E. Grounding and Lightning Protection
24
24
24
25
26
27
SECTION 3: AUDIO FROM STUDIO
A. Audio Processors
B. Balanced vs. Unbalanced
C. Stereo FM Transmission Components
29
29
30
32
SECTION 4: INSTALATION: STEPS TO FOLLOW
Step 1. 50 Ohm Cable
Step 2. Check Connectors
Step 3. Prepare Antenna
Step 4. Pre-test Antenna
Step 5. Mount Antenna
Step 6. Ground the Shield of Coax
Step 7. Test the Electrical Outlet
Step 8. Connect Transmitter
Step 9. Connect Audio to Transmitter
Step 10. Monitor the Station
Step 11. Log all Readings
33
SECTION 5: MAINTENANCE
A. Antenna
B. Transmission, Lightning Protection, Ground
C. Transmitter
D. Audio Processing Equipment
37
37
37
37
38
Conclusion
38
ACKNOWLEDGEMENTS AND PERMISSIONS
39
2
Notice
This manual is intended as a short “How To” guide to installing a low
power Fm studio and associate equipment. For those who have
limited knowledge and experience in doing so read the manual
carefully before attempting to installing any studio equipment or put a radio station on the air. Incorrect procedures can cause great damage
which is very expensive to repair. Correct installation can provide years
of reliable service.
Legal
All copied material in this manual are used by permission. Copy write
material is the property of its original owner. Galcom International,
Africa by Radio, nor David Casement make any claim against such material. This manual is provided for educational purposes by Galcom International and Africa by Radio both of which are not-for-profit
entities. Any remuneration received will only be for the cost of media
used in distribution. All Logos and trade marks are property of their
respective companies. All trade marks and logos must remain in tact
when printing, copying, or forwarding this document.
Disclaimer
Safety must always come first when working with electricity and radio
equipment! Every effort has been made to provide accurate
information at the time of writing. As this manual is used outside of our
control and is provided for educational purpose, Galcom International nor
Africa by Radio take any responsibility for damage to equipment or personal injury which may result from the use of this manual.
3
Introduction
The purpose of this manual is to focus on how to install and maintain a low power broadcast transmitter
and the precautions which must be taken. In essence, how to install a broadcast transmitter without
blowing it up ☺. Also covered are the cable to the antenna, the antenna itself, and the basic tests needed
to prevent damage to the transmitter and system. There is also basic information on the audio signal from
the studio to the transmitter and proper alignment. A separate manual has been written for wiring a basic
broadcast studio.
The motivation for this manual has come from working with and hearing of a number of stations in which
the transmitter has been damaged because of a) a lack of knowledge of proper transmitter installation
procedure and b) not knowing how to assemble and test the antenna.
Stereo FM Transmission System
Components
Focus of this paper is on these parts of the station.
L
R
Compressor
Limiter
Stereo
Encoder
STL
Exciter
RF Power
Amplifier
Relation of Frequency and Wavelength
Direct current, the type of electricity which comes from a battery, flows in one
direction only and generally does not radiate. Alternating current, the type of
electricity from a wall outlet receptacle, flows first in one direction, then in the
opposite direction. This change of direction in current can be used to accomplish
different things. One of these things is that special equipment (i.e. radio
transmitters) can change that direction of current many times per second, thus
producing a radio frequency.
The slope to the top of the wave is the current flowing in one direction. The slope from the top back to
center is that current decreasing in that direction. The slope from center to the bottom of the wave is the
current flowing in the opposite direction. The slope from the bottom back to center is that current
decreasing in that direction.
4
With alternating current, every full cycle of current represents a wavelength. Cycles per second is also
called Hertz (Hz). Generally, sound waves have a frequency from 50 Hz to 16,000 Hz. Radio waves are
from 100,000 to several billion Hz.
There are prefixes to describe these large numbers. Kilo = 1000, Mega = 1 million, Giga = 1 billion. So
100,000 Hz = 100 Khz. And 98,500,000 Hz (an FM frequency) = 98.5 Mhz.
As frequency changes, the wavelength changes. Radio waves travel through the air at the speed of light;
300 million meters per second. Wavelength (Lamda) = 300,000,000 / frequency. So the higher the
frequency the shorter the wavelength. This is very evident in AM and FM broadcasting. AM broadcasts
are in frequencies of 530 Kilohertz or 0.530 Mhz to 1.6 Mhz. The wavelengths are so long that towers over
400 feet tall are the antennas. In FM broadcasting, the frequencies are 88 to 108 Mhz and the wavelengths
are approximately 3 meters or 10 feet. This shorter wavelength allows multiple antennas to be used in
order to multiply the signal from the transmitter.
Wave Length in Feet = 1130 / Frequency
The number 1130 is the approximate speed in feet per second of sound waves travelling through air at
normal room temperature and humidity. Sound waves travel much slower than radio waves.
Why do you need such special equipment for radio frequencies versus sound frequencies?
Low frequency means the wavelength is long. High frequency means the wavelength is short as can be
seen from the short equations above. It should be noted that sound waves must have conductors or
media to travel on. In a church sound system for example, an audible sound wave can travel on normal
wires because of the relatively low speed it travels. It requires that the wires be connected for there to be
sound produced. Radio waves on the other hand which travel much faster tend to travel even through air,
or can “radiate”. This requires special cables and equipment to control the waves making up the signal of a
radio station and direct to where it is intended to go.
λ
‘Lambda’ is the symbol for wavelength.
5
B. Standing Waves and Resonance
In any electrical device, there are different types of opposition to the flow of electrical current.
Impedance is the name for opposition to the flow of an alternating current such as radio waves.
Whenever there is a significant difference (mismatch) of impedance between transmission line
and load (antenna), reflections will occur. Reflections are waves of energy which are not accepted
by the load (antenna) and travel back toward the transmitter. If the incident signal is a continuous
AC waveform, these reflections will mix with more of the oncoming incident waveform to produce
stationary waveforms called standing waves. Standing waves can create very large voltages on
the transmission line. These voltages can cause damage to equipment if they become high
enough.
On the next page we will use an analogy of the rope tied to a tree, to illustrate the concept of
standing waves. The wave travelling toward the tree represents the power from a transmitter and
the tree is the termination or the impedance of the antenna. A high level of standing waves can
cause a reduction of the strength of the signal leaving the antenna, while at the same time, an
increase in the voltage and energy along the transmission line which reflects back to the
transmitter. This in turn can cause serious damage to the power amplifier of the transmitter if the
condition is bad enough.
Our goal is to have an antenna with an impedance which does not cause significant standing
waves. When the transmitter, transmission line and antenna are all the same impedance it is said
to be a matched system. This must happen at the operating frequency of the radio station. It is
extremely important that the antenna be designed for the frequency of the station where it will be
used.
An antenna must also be tested for the frequency range for which it has been manufactured.
Some antennas manufactured for the FM broadcast band will work over the entire band. Others
will work over only a portion of the band and the correct model must be purchased for the
frequency of the radio station. Still other antennas can be tuned to the correct frequency by adjusting the length of elements of the antenna. In this case, the manufacturer will provide
instructions which must be followed in order to get the antenna to be “resonant” or matched on
the desired frequency. Follow these instructions very closely before doing any tests or starting
broadcasting with the antenna!
6
SECTION 1: Connection to the Antenna
A. Basic concept
This is by far the most critical connection on the transmitter and in the radio station. Serious
consequences can result if the connection to the antenna, the antenna itself, and the cable between are
not correct. Consequences can vary from poor signal to extensive damage to the transmitter, which in
many cases can mean shipping it back to the factory for expensive repair.
To understand the basic concept of wave propagation in a transmission line, consider the graphic of the
rope tied to the tree. The objective is to send waves
out over the rope (transmission line) and not have any
return. If the free end is given a small movement up
and down, it sends an incident wave toward the tree.
The end tied to the tree, being in a fixed position, does
not absorb any of the energy. Hence, the wave is reflected back toward the free end of the rope. If the free end is moved up and down continuously, sending
a string of incident waves to the fastened or “terminated” end of the rope, there is a series of reflected
waves which travel back toward the free end. These reflected waves interact with the incident waves and
cause “standing waves” along the rope. The reflected waves subtract from the incident waves.
This principal is very similar to what can happen on a transmission line in a radio station. The free end of
the rope represents the transmitter end of the transmission line. The rope is the transmission line. The
incident waves represent the radio signal coming from the transmitter. The end of the rope which is tied to
the tree is like a transmission line which is terminated (connected) to a “load” or antenna which does not
match the “source” or transmitter. The reflected waves represent the part of the radio signal which is
reflected back along the transmission line, thereby subtracting from, or even canceling out, the radio
signal. This can do damage to the transmitter.
What is needed is a “load” (antenna) which will
make use of all the energy and not reflect any
back to the “source” or transmitter end.
Very Important: If the rope were not tied to
anything, the waves traveling from the “source”
would not do any useful work. But in the case
of a radio transmission line, this is dangerous!
If a radio signal, which is an electrical current,
is sent down a transmission line that is not
connected to an antenna at the other end, the
electromagnetic field collapses which sends a
large voltage back into the conductors in the
transmission line. That voltage sends waves back to the source (the transmitter) which will most likely be
damaged.
NEVER TURN ON A TRANSMITTER BEFORE CONNECTING IT TO A MATCHED ANTENNA. (Nearly all
modern transmitters are 50 ohm output and would require 50 ohm transmission line and 50 ohm antenna.)
If the rope were tied to a small
weight that was hung over a pulley, the result would be different.
When the free end was moved up
and down, the energy would then
move the weight up and down at
the end of the rope and there
would be very little or no reflected wave. When the transmitter, transmission line, and antenna are all
matched, useful work is done without creating harmful reflected waves. This means there will be maximum
signal to the listener and the safest and most effective use of the equipment.
7
SWR Meters
The waves sent by a broadcast transmitter contain both a magnetic and electrostatic (voltage) field. The
reflected waves are the same. The voltage and
current in these waves can be measured and
most often it is the voltage which is measured
or often the product of both as power. When it
is voltage that is being referred to the
measurement is “Voltage Standing Wave
Ratio” (VSWR or just SWR.)
Meter shows Forward Power 75 watts SWR is 1.1:1.
Most transmitters have a certain amount of
tolerance up to an SWR threshold before their
protection circuit starts to operate. (Refer to the
manufacturer’s operator manual to be sure of
the threshold for your specific transmitter. 1.0:1
is perfection. Up to 1.3:1 is an acceptable
range. 1.4:1 is on the edge of the SWR
threshold. 1.5:1 or higher means the
transmitter should be switched off to prevent
damage. Fix the problem on the
transmission line or antenna before you turn it
on again.)
If this protection circuit’s capability is exceeded
or fails then the power amplifier of the
transmitter will be damaged!
Meter shows Forward Power 70 watts SWR is 1.2:1.
Meter shows Forward Power 90 watts SWR is just over 1.5:1
When the meters measure power, the meters
will be labeled “Forward Power” and
“Reflected Power.” This measures the voltage
and the current of the same wave. Forward
power reads directly according to the power of
the transmitter. If it is a 50 watt transmitter,
the meter will read up to 50 watts. A perfect
reading of reflected power would be 0 watts,
which means there is no reflected signal into
the transmitter. (That is he same as an SWR
reading of 1.0:1.) If the forward power meter
reads 50 watts, the reflected meter should read
less than 2 watts.
Consider the Nomo graph on the next page. It shows the relation between SWR and reflected power. The
red lines show an example of forward power of 50 watts and reflected power of 2 watts. Where the two
lines meet is on the SWR “slope” of 1.5, hence the SWR is 1.5. The diagonal lines on the graph are the
calculated SWR for various forward and reverse power levels. Using this method makes relating SWR and
reflected power quick and easy without doing calculations.
SWR and power meters which are used for this purpose can be external units as the one pictured here or
they can be built into the transmitter. Generally, professional and more feature-filled transmitters will have
built in meters for this and other measurements. Smaller non-professional units generally have very little
built it metering.
8
9
Transmitters With Built– In Metering
Studio to Transmitter Link transmitter with built-in power meter. Forward power is 11 watts, reflected power is 0.1 watt. Reflected power
is too low to show on the nomograph on the previous page. This
means that the reflected power is low enough we do not have to
worry about it.
A Crown 2000 watt FM amplifier
reading 1490 watts output and an
SWR of 1.10:1. The SWR is very
good. The amplifier was able to
operate up to full power with no
difficulty.
10
C. Coax Cable Characteristics
A coax cable consists of an inner conductor, a dielectric
(insulation), an outer conductor, and usually an outer protective
jacket. The principle parameters to specify coax are its
characteristic impedance, frequency of operation, attenuation,
power handling, mechanical characteristics and cost.
i. Impedance
In DC and low-frequency AC circuits, the characteristic impedance of parallel wires is usually ignored.
However, in circuits involving high frequencies and/or extremely long cable lengths the effects of
capacitance (two parallel metal conductors separated by an insulator) and inductance (magnetic effects of
AC current through a conductor) distributed along the length of the cable act as a characteristic
impedance, drawing current proportional to an applied voltage.
What we would normally dismiss as being just a pair of wires becomes an important circuit element in the
presence of high-frequency AC signals, with its own characteristic properties. When expressing such
properties, we refer to the wire pair as a transmission line. Most communications systems have an
impedance of 50 Ohms. Therefore, for optimum operation, a 50 Ohm coax should be used. When a
transmission line is terminated by a load precisely matching its impedance, there are no reflected waves
and thus no problems with line length.
ii. Attenuation (Insertion Loss)
Whenever you choose a coax transmission line (also called a feed-line), the frequency of operation is a
very important consideration. Attenuation (loss of signal in the transmission line) is usually specified in
dB/foot and is a linear relationship. Therefore, if the specified attenuation is 8 dB/100 feet, a 20 foot length
would have attenuation of about 1.6 dB. Attenuation also increases with frequency as the square root of
the increase. Hence if the frequency is doubled, the attenuation increases by 40% and will double for a 4
times increase in frequency. It is important to pay attention to the amount of loss in a given length. If a
cable has greater then 3db power loss or is greater than 50%, half the power from the transmitter is
wasted in heat in the coax and is not going to the antenna as signal.
iii. Power Handling
The insertion loss and voltage breakdown of coax limits the amount of power that it can safely handle
before overheating or internal arcing. The power rating of coax decreases with frequency as the inverse of
the square root. Hence, as the frequency is doubled, the power handling capability decreases by about
30%. Sometimes smaller diameter coax power ratings can be increased by using a higher power dielectric
such as Teflon®. Always select coax with a higher capacity than your transmitter output. For example, if
you have a 500 watt transmitter, choose a coax with a minimum 800 watt to save guard from overheating
and arcing.
iv. Mechanical Characteristics
Coax installations must consider the size (diameter) and weight as well as flexibility. Generally speaking,
the larger the coax diameter, the less the flexibility. Furthermore, due to the internal structure and the
dielectric used, the “bend radius” must not be exceeded or cold flow will occur! If you bend coax beyond its
bend radius, the outer conductor may split and the cable will be kinked. This causes an abrupt change of
impedance at that point in the cable. This can show as high SWR or reflected power to the transmitter! A
right angle bend should be a minimum of 3-6 times the diameter of coax (see manufacturer's ratings) or
1.5-3.0" for a 0.5" diameter. It is usually preferred to have an outer jacket to protect the coax, keep out
moisture etc. and prevent short circuiting external devices.
11
Coax which has been damaged in a way that distorts it’s shape (i.e. reduced diameter or flattened), or is
kinked should not be used. Also, if it is punctured, or the outer layer is cut or removed, it should not be
used. This can allow water inside and it will have changed impedance and be unreliable and potentially
dangerous to the transmitter. All such cable should be replaced. (It is possible for a professional to remove
the damaged section, splicing in a special connector and adaptor, but this is only for emergency situations.
Please contact Galcom International for advice.)
v. Cost
Coax is usually priced by the foot. Small low power coax can be as inexpensive as 10-25 US cents per
foot. Coax with low loss or high voltage dielectrics can be up to several dollars per foot. Larger diameter
coax, especially the rigid types with aluminum or copper outer conductors can range from $1 to $10 per
foot and higher.
vi. Coaxial Transmission Lines
The advantages of coax(ial) transmission lines are numerous. They are shielded, relatively flexible
(depending on type) and easy to use and install. The shielding property is one of the most important
considerations since it prevents radiation losses and coupling to nearby circuits or other transmission lines.
Diame- Rel. cost Coax is usually easy to install since (within
Frequency Power* Loss
reason) it can be dressed into tight places or
Type
dB
ter
bent around corners.
MHz
Watts per 100 inches
ft
The disadvantages of coax are that it has
RG8/
0-3000
190
5.5-8 0.4"
moderate attenuation (loss), power limitations, and
RG213
increases system expenditures. Generally
speaking, the greater the flexibility and the
Belden
0-1000
275
3-4.2 0.4"
moderate
smaller the diameter of the coax, the higher
9913
the loss. Also, the smaller the overall diameTimes
0-2000
350
3.5-4 0.4"
moderate ter, the lower the power handling capability.
Likewise, the larger the diameter and the
LMR400
lower the dielectric loss, the higher the cost.
1/2" Alum. 0-3000
650
3-3.5 0.6"
moderate For short runs, especially at VHF frequencies, lower cost coax can be used. At UHF
and higher frequencies, especially when
1/2" Heliax 0-8000
900
2-2.5 0.6"
high
low-loss is mandatory, larger diameter coax
with either air or a low-loss dielectrics are
7/8" Heliax 0-5000
2,000 1.25- 1.0"
high
often used.
1.5
Table 1
* Typical at 1 GHz.
When a large diameter low-loss coax is used as the main feed-line, it is often difficult to connect the coax
directly to the antenna. In this case either a pigtail feed or a jumper cable is required to interface between
the low-loss coax and the antenna or transmitter. The pigtail or jumper is made of a short piece of RG8 or
suitable coax.
Selecting Proper Coax
There are thousands of types of coax available. Each has slightly different characteristics such as
impedance, dialectic, attenuation, size and price. Some of the most popular 50 Ohm coax types are shown
on table 1. A minimum choice is RG8 which is moderate in cost, flexible, and many connectors are
available. In recent years it has been superseded by RG-213, which has tighter specifications. Belden
9913 and Times Microwave LMR400 are also lower loss RG-213 substitutes. They are the same size as
RG-8/RG-213 but use special materials in manufacture to provide low loss.
12
Low loss 50 Ohm coax is usually larger in outer diameter (0.5-1.5" typical) and has aluminum or copper for
the inner and outer conductors. It is also more expensive, less flexible and uses either air or low-loss foam
dielectrics. Different companies use different outer conductor shapes such as tubular, corrugated or
spiral. Some configurations use a “helical” type of outer conductor and the cable is then called Heliax. This
is generally a low loss type of cable and higher cost.
To select the coax for a station the first factor to take into account is the length needed. To determine the
total length needed, an accurate measure of the height the antenna will be mounted up the tower/mast,
add to that the length from the tower to the building then the distance inside to where the transmitter will be
sitting/mounted. Add these together for the total length of cable needed. Using the frequency of the station,
look up the approximate loss and power handling of different cables in a chart such as the “Times
Microwave Systems” chart below. It is in two parts as it will not fit on one page.
13
LMR 600 is highlighted as an example in the chart above from
“TimesMicrowave”. Frequency shown as 150 MHz, Just above
the FM broadcast band.
Chart used by permission.
Select a coax which will give as low loss as practical within budget. Make sure that it will handle the power
of the transmitter with a good (30 to 40%) safety margin. It is not good practice to select a cable that is only
rated for the same output of the transmitter used. A safety margin is important for the cable to handle the
voltages that occur when standing waves are present at the time of installation or in the future if there
should be a change in condition of the antenna used. If the transmission cable used is at its’ electrical
limits when installed, the limits will be exceeded and could cause a second fault if high standing waves
occur from another condition.
Higher quality coax/heliax has a lot of weight per length and needs to be supported as it is being installed.
It should not hang for its full length from one lift point. When pulling it up to the antenna it should be pulled
by special “fingers” made for it and should never be pulled up by the connectors! An alternative method is
to lay the coax out straight on the ground. Then lay a rope parallel to the coax for 10 feet. Loop the rope
around the coax every 2 feet and pull snug. Wrap a high quality 3M electrical tape around the loops so the
rope is attached to the coax 6 times in the 10 foot length. Then, when you pull the coax up by the rope, the
stress on the coax is distributed safely and will not damage the connector or coax. Care must be taken to
keep the connector end from flopping around and banging against the tower/mast on the way up.
Once the cable is raised up the tower it should be supported and held in place every 8 feet by proper
hangers for the size of coax.
14
Care must be taken during installing so as not to chafe the outer protective jacket or to kink the cable.
Cables connected to antennas high above ground should have the shield or outer conductor connected to
ground. This can be done with a kit made for the specific cable. This involves removing a small amount of
the protective jacket as close to the base of the tower as possible and placing a specialized copper clamp
around it. The clamp has small bolts which hold it together and hold a ground cable to the clamp. Any
cable used to lengthen this ground cable must be the same or greater diameter as the one provided. When
grounding coax, the ground cable must be at least twice the diameter of the center conductor of the coax/
heliax. This is not a place to reduce cost. If smaller lesser expensive cable is used it will not provide
protection against surges to the transmission equipment caused by lightning strikes. When the shield of
the cable has been grounded, it should be sealed from moisture using special tape for this such as
“coax -seal” or other water proofing tape sealer. If only electricians’ tape is available then is should be very
high quality such as 3M number 88.
vii. Coax Accessories
Cable hangers by Andrew corporation, called a “round member adaptor”;
Andrew 294556
Andrew 206706A-5
Snap-In Hangers
15
D. Connectors
Manufacturers provide specific connectors for each cable. The connectors need to match the type for the
transmitter and the antenna. Installing basic connectors such as PL259 or “N” type on inexpensive cable
such as RG-8 or LMR 400 is not a difficult task and can be done on site. On larger cables with rigid outer
conductors, fastening “N” type or EIA “7-16 DIN” connectors and some others is more difficult and requires
critical measuring and cutting. It is recommended whenever possible to have the factory install these ends.
Compromising on a solid connection here can cause standing waves and/or improper or intermittent
operation of the transmission. Smaller connectors such as PL259 and “N” type have power handling limits
of around 500 watts for broadcast use. Above this power level a larger connector should be used. Follow
manufacturer’s specifications for power handling and maximum frequency of the connector.
Andrew
N Male
F1NM-7550
16
Andrew F2PDM-C
Andrew 44ASR
ProductDescription
F2PDMC 7/16 DIN, (M), STRAIGHT,
FSJ2-50, COAXIAL CORRUGATED,
CONNECTOR,CAPTIVATED,
44ASR 7/8 EIA, N/A, FLANGE, FSJ4-50B, COAXIAL,
CORRUGATED, CONNECTOR, TAB FLARE SELF-F 44ASR 7/8
EIA, N/A, FLANGE, FSJ4-50B, COAXIAL, CORRUGATED,
CONNECTOR, TAB FLARE SELF-F
E. Antenna
The final stage of the transmission system is the transmitting antenna. A transmitting antenna radiates the
RF energy into space. The listener’s radio set, or receiver, has a receiving antenna (aerial) that receives
some of this energy from space and it is turned into an audible signal.
i. AM Antennas
For AM, a quarter wavelength transmitting antenna is used. The low frequencies used for AM transmission
mean that the dimensions of a quarter wavelength are considerable; between 50 and 140 meters. This
means the AM antenna is a large structure. Most often the tower IS the antenna. It has to be designed to
match the broadcast frequency of the station. Great care must be taken in locating the antenna, and a lot
of excavation work will have to be done to secure the tower and install ground mats.
ii. FM Antennas
The FM transmitting antenna is much smaller and easier to install than the AM antenna. There are several
different kinds of FM antennas. Many community radio stations use a dipole antenna. This is an
omnidirectional antenna, which radiates equally in all directions. The antenna’s dimensions are the same
as half a wavelength of a station’s broadcast signal. Because FM signals are at frequencies so much
higher than AM frequencies, half a wavelength is much smaller, and FM antennas are less than two
meters in size.
There are several types of antennas which can be used for radio broadcasting. Some of these redistribute
the signal to create gain (increase in signal strength.) Some antennas focus the signal more than others
depending on the design and hence have more gain than others. This is a major factor in choosing a
suitable antenna for your station.
17
iii. Common FM Antenna Types
Type
Design
schematic
Gain
(dBi)
Isotropic
(theoretically)
•
0
(spherical)
Dipole λ/2
λ/2
Folded Dipole
λ/2 cylindrical
λ/2
Circular
5.64
3.85
λ/4
λ/4
5/8λ
5/8th
λ/4
Yagi
3 Elememt
λ/2 beam
2.15
l = λ/2+5% λ/2
3.35
λ/4
λ/2-5%
7.15
18
Pattern
3 Dimensional
Notice that the patterns shown in the chart illustrate different antenna characteristics under optimum
conditions. In field use, the RF pattern changes by various influences mainly through height of antenna
above ground and frequency. Please refer to the manufacturer data sheets to get detailed information.
An isotropic radiator as shown does not exist. It is a theoretical antenna used by engineers in antenna
design. A dipole antenna has 2.15 dB higher gain than an isotropic. It is important to note when gain of
antenna is quoted, dBi is above an isotropic, dBd is above a dipole.
Gain over a dipole is a more real life measure of the signal a given
antenna can produce.
Some antennas such as dipoles and yagis can also be combined to
form an antenna “array”. When this is done two, four, six or even
more in some cases, can be combined to increase the strength of
an FM station signal. When Omni-directional antennas such as
dipoles are combined in a vertical line (called stacking) the signal is
increased as its pattern is compressed in the vertical dimension
more than the horizontal. This gives a near Omni-directional pattern
with increased signal gain over a single dipole.
When directional antennas are combined they can redistribute the
signal in the horizontal dimension to give increased signal strength
and send the signal to areas desired to be covered and avoid areas
which should not or do not need to be covered.
Examples of this would be when the antenna is mounted on a
tower/mast which is on the side of a mountain and the signal cannot
go over the top but only out on the near side. It is a waste of energy
to use an antenna which will radiate (send) as much signal into the
side of the mountain as it will out to the intended broadcast area.
This can in some cases even lead to fading of the stations own
signal as the signal can bounce off the mountain and arrive at the
receivers slightly later than the direct signal and cause a
cancellation effect. Another example would be when the antenna is
mounted next to a large body of water in which there are no islands
or population to be reached. A directional antenna would put a
stronger signal into the populated areas on land and much less
would be wasted.
Manufacturers will give diagrams of the patterns for their antennas
in their literature or on request. The numbers in the diagrams are
normally in decibels. There should be a reference stated such as dBi or dBd. These make reference to an
isotopic radiator which is a theoretical antenna used in antenna theory and does not really exist and dBd is
reference to a single dipole in free space with no obstructions.
The diagrams below are a simplified example of an antenna pattern. The center of the antenna represents
the point in the antenna at which the signal is radiated. The red numbers are relative signal strength and
the numbers in degrees around the outside are direction as on a compass but 0 is relative to the front of
the antenna. These diagrams indicate that this antenna is highly directional with most of the signal going
out at 0 degrees, narrow lines of signal at 310 and 50 degrees from the front of the antenna. These are 20
db less than the main “lobe” at 0 degrees. There is a fairly wide spread signal out the back of the antenna
but it is 20 to 25 db smaller than the signal from the front of the antenna. This is read directly from the
diagram. The weakest signal area from this antenna is from the sides at 90degrees, there is almost no
signal at all.
19
iv. Antenna Radiation Patterns
Main signal
Almost no signal
Very small signal
Half power points of main signal – very significant
If this antenna were selected for a station the main “lobe” at 0 degrees would be aimed at the greatest
population for desired target area to provide the strongest possible signal from the station. The pattern
from this antenna is quite narrow. If needed two or three of this type of antenna can be combined to create
a wider pattern but still directional. The total gain will depend largely on how the antennas are combined.
20
Above patterns provided by; HCJB
v. Antenna Impedance
There is more than one factor which contributes to the impedance of an antenna but for the purposes of
this writing our interest is only on the “input impedance”. That is what the transmission system (transmitter
and coax) sees when it looks into the input terminal/connector of the antenna. It is very important that the
input impedance of the antenna, the impedance of the coax/heliax and the output of the transmitter are all
the same. This gives the most efficient transmission. Most modern broadcast transmitters use 50 ohm
output and high quality 50 ohm coax/heliax is readily available as we have previously seen. Because of
this there are many of the antennas mentioned which are manufactured to 50 ohm input impedance as
well. Many simple antennas such as dipoles and basic verticals will present a very low VSWR at
resonance to a 50 ohm system. Some of these have to be tuned to the desired frequency by setting pieces
of the antenna to length. Others do not. Some antennas such as multiple wavelength verticals will not
naturally present an impedance of 50 ohms. In this case the antenna has to be both set to the desired
frequency and a “matching” device adjusted to give minimum VSWR or reflected power. Both of these
adjustments should be set according to the manufacturers instructions. If the matching is set and the
lengths are not set properly the antenna will not radiate properly and the signal will not be strong. Be sure
to learn as much as you can about the antenna BEFORE connecting it to the transmitter.
vi. Power Rating
Any transmitting antenna has a power handling rating. This is the maximum amount of power which can be
applied to the input terminals of the antenna. There are components which make up an antenna that can
be overloaded. The input connector has an impedance rating, voltage limit, and maximum frequency at
which it will operate properly. The conductors used from the input connector to the elements of the
antenna also have voltage and current limits. Insulators used to isolate certain parts of the antenna such
as the connection on the input connector for the center conductor of the coax also has a maximum
operating voltage. When the maximum power handling rating for an antenna is exceeded these
components are stressed due to high voltages or currents. This can lead to break down and arcing on or in
the antenna. This is the kind of condition which, if used over an extended period of time, can lead to further
damage to the system. The antenna can be severely and permanently damaged and cause high VSWR. It
is very important to always operate an antenna at or below its power rating!
21
vii. Input Connector
The input connector of the antenna is an important detail. Professional low power broadcast antennas
use “N” type female connectors. PL 259 type connectors are generally used on smaller lower priced
antennas. As the power level is increased above 500 watts a different connector is used. Often this will
be the EIA 7-16 Din or EIA Flange type or similar. These larger connectors are capable of handling
greater power levels at frequencies through and above the FM broadcast band. The manufacturer of the
antenna will use an appropriate connector for the power rating of the antenna. The connector on the
coax used should mate with the connector of the antenna. The input of the connector should not be
modified or removed from the antenna. Attempts to modify or remove the connector can leave the
antenna un-useable. If an antenna is being used which has a greater power capacity than the station is
going to be putting out and the coax and connectors are different (smaller) than the input connector of
the antenna, it is recommended to use a proper adaptor to connect them together. For example coax
cable with a male “N” type connector attached can be connected to a female 7-16 DIN connector using
an adaptor which is made to do this. If at a later date the station is upgraded to a higher power level that
the antenna can still handle, the adaptor can be removed and a new coax with male 7-16 DIN can be
connected directly to the input of the antenna. The act of attempting to connect the coax to the antenna
without a proper connector is dangerous to the equipment. Connectors maintain the impedance of the
system and maintain reliable connection between the coax and the antenna.
viii. Mechanical characteristics
Other than the size of the antenna, it is important to consider the mechanical strength, mostly meaning
its ability to survive strong wind storms. In the manufactures literature this will be listed as “Wind Survival
Rating”. It will then give a wind speed in mph or kph. This rating should be higher than the normal
maximum wind speed of the location the antenna is to be installed. Wind speeds for a given location can
often be acquired from the government environment agency. If this is not available it may be possible to
obtain the information from the internet. The weight of the antenna should also be noted for future
reference when mounting (installing) the antenna.
ix. Location for Antenna
The location chosen for mounting the antenna on the tower/mast is very important. If the antenna is one
element (single antenna/bay) the weight and wind load is small and the antenna’s mounting bracket can
be mounted on a metal pipe that is approximately the same strength as itself. If the antenna is a number
of elements or antennas combined, such as dipoles being stacked in a vertical line, greater mechanical
strength is required to hold the antenna “array” in place. The wind load rating for a single element is now
multiplied by the number of antennas in the array. This means that the wind survival rating of the tower/
mast must be great enough to handle the combined load of the number of antennas in the array plus a
safety factor for the pipe(s) and mounting hardware.
Radio antennas are constructed of metal and are precision designed. The radiating portion of the
antenna is intended to be free of other metal objects. This means that they should be as far away as
possible from lightning rods, guy cables, other antennas, ladders, and other significant metal objects on
the tower.
It is a common practice to place lightning rods at the top of towers with ground cables running all the way
to the ground and connecting to ground rods pounded deep into the ground. The sharp points on these
are meant to discharge static electricity which can build up on a tower and lead to a lightning strike.
These lightning rods must not be placed close to antennas. There should be a minimum of 5 feet
clearance between any parts of either of them. If other metal objects are too close to an antenna the
resonant frequency will be changed. This can contribute to high VSWR or reflected power which can
decrease system efficiency or even lead to equipment damage. If the VSWR is not high enough to
damage the system, metal objects which are too close to the antenna can alter the radiation pattern of
the antenna and also degrade system efficiency.
22
At the frequencies used for FM broadcasting, the most effective way to increase the distance the signal
travels is to install the antenna as high as possible or as the station license will allow. Generally the
higher the better; the farther the signal will travel. Increasing the power of the transmitter does not
increase the distance in direct relation. The strength of the signal moving away from the antenna
decreases by the inverse square of the distance. Therefore you would have to increase the transmitter
power by four times to make a significant increase in signal distance. For example; Increasing from 100
watts to 200 watts would not make any significant difference in distance. A 100 watt transmitter would
have to be increased to at least 400 watts before it is worth the money to upgrade it. A 500 watt
transmitter would have to be increased to 2000 watts to make a noticeable increase in the distance of the
signal. Increasing the power will increase the strength of the signal in the coverage area. This will allow
the signal to penetrate buildings better than a lesser powered transmitter.
23
Section 2: Power Source
A. Introduction
One of the main things to establish before powering up a transmitter is that the electrical power source is
at the proper voltage and is stable. Improper voltage, surges (spikes) and low voltage (brown outs) can
cause serious damage to a transmitter and other broadcast equipment. Also, improper wiring of the
outlet can cause damage to equipment. Before plugging in the transmitter use a reliable voltmeter to
check that the voltage at the electrical outlet is correct. Also verify that the outlet is properly grounded.
This procedure must be done with care and is described in section B.
Be sure that the voltmeter being used is in good condition and operating properly. Check the test leads
and probes for breaks or bare wires. Make any repairs or replacements needed before using the meter.
B. Testing the Outlet
Each grounded or earthed electrical outlet has three terminals; Live, Neutral and Earth (or Ground.)
To verify that the outlet is properly grounded, place one lead in the live terminal and one in the neutral
and read the voltage. Now place the meter leads between the live terminal and the earth terminal. This
reading should be the same as the one taken from live to neutral. It is acceptable if the above reading is
within ten percent of its rating. If the outlet is 220 volts, then the reading should be between 200 and 240
volts and should not be any lower or higher. This should not fluctuate very much while taking the reading
but be stable. If the reading from live to earth is zero or very low (only a few volts) then the outlet is not
grounded and should not be used until the ground terminal has been solidly connected to earth with at
least a number 14 or 2mm diameter earth wire.
The next reading, with the ground/earth terminal grounded, should be from earth to neutral. The reading
should be zero or just a few millivolts. The earth and neutral should both be connected to earth/ground
but the neutral should also go back to the transformer which feeds power to the building. The earth wire
should not should go the shortest path to ground and be connected to a ground/earth rod.
The connection to the transformer is done by the electricity supply company. If the outlet and electrical
system in the building are wired properly the reading between neutral and earth should read zero or in
the millivolt range. If the reading is high, such as several volts or higher, the outlet is not wired correctly
and the transmitter or other equipment connected to this outlet will not function properly and can even be
damaged. This condition will cause surge protectors to be ineffective or even permanently damaged! In
extreme cases some protection devices can even EXPLODE!
Surge protection power bars have devices from live to earth and neutral to earth and depend on the
outlet being wired properly so the voltages on earth and neutral are in proper range. If either the earth or
neutral are “floating” too high then the limits of the protective devices can be greatly exceeded. If any
wiring beyond the outlet itself is required, call a qualified electrician to repair the wiring.
If the voltage in your location fluctuates or has frequent outages, a voltage stabilizer or an Uninterruptible
Power Supply (UPS) will be needed for a studio or low power transmitter such as 30 to 200 watts. A
generator will be needed for higher power transmitters.
Make sure that the outlets used for your station equipment are wired properly and are supplying the
proper voltages BEFORE plugging in any equipment! Many times basic items such as lights and portable
fans will appear to operate on power sources which are less than ideal. This does NOT mean that the
power source is correct. The above test must be done!
24
Type G
Mainly Great Britain
Rated at 15 amps.
Type M
South Africa, Swaziland, Lesotho
Rated at 15 amps.
Neutral
Earth
Live
North American Type B
Rated at 15 amps, 125 volts
C. Plugs and connectors
Electrical equipment often comes from the factory with molded ends on the power cords which plug into
the electrical outlets. Some manufacturers provide two or three cords with different ends or plugs for
various types of outlets which are used in different parts of the world. If the power cord(s) which are
provided with your transmitter are not the correct ones for the outlets in your country the correct one
must be installed properly.
Modifying electrical plugs to fit into outlets or removing earth pins is an unsafe practice and must not be
done. The earth pin is there for safety reasons. Removing it can cause severe electrical shock to
personnel and can also cause problems with the functioning of the transmitter. The practice of not using
a plug on the end of an electrical cord and just pushing the bare ends of the wires into an outlet is also
very unsafe. This practice can lead to electrical shock and the connection will be unreliable at best. Wires
by themselves in the outlets will not make proper contact with the inside of each terminal which can lead
to arcing in the outlet and burn the wires off. It is imperative that the proper plug be used for the outlet. If
a different plug is needed on the power cord provided it is best to purchase a new power cord at an
electrical shop. The second option is to cut off the plug on the power cord and properly wire on a new
one. Before doing this make sure the colors for live, neutral and earths are known on both the cord and
the plug. (Normally in Africa on power cords, brown is live; blue is neutral and green/yellow is earth.) If
there is any uncertainty have an electrician wire the new plug on the cord.
25
D. Surge protection
This is a very important part of a radio station. Surge protectors are just what the name says; they protect
the equipment from voltage surges or “spikes”. It is a good practice to use multiple outlet power bars
which have surge protection built in for studio use. With adequate power ratings these can be used for
low power transmitter sites as well. The power handling rating must be well above the total power
consumption of the transmitter plus any associated equipment. That is, the total of all the equipment
plugged into the power bar.
Along with this kind of surge protection it is also very important that there be a higher capacity surge
protector in the system. There are specific units which are designed to be wired into the circuit breaker
panel. Other units are plugged into an outlet and are in series with the
equipment they protect but are larger physically and will handle greater power
surges than what is built into power bars. Power bars tend to respond to
surges faster than the larger units. It is best to have both kinds of surge
protection in the system.
All of these systems rely on the electrical wiring to be correct and a good
connection to earth! Without a proper connection to earth they will not provide
adequate protection. Again, make sure the wire or cable used to connect to
earth is a larger diameter than the other wires in the system.
Superior Electric makes the PT series of surge suppressors which wire
parallel to the load. It can be wired in the breaker panel or even on a plug
and inserted into an outlet.
Tripp Lite is on manufacturer that makes different
models of Power Bars with surge suppression
built in such as this one.
26
E. Grounding and Lightning protection
When lightning strikes the earth or an object on the earth, highly-charged thunderstorm clouds pulse
"leaders" downward toward the earth. They are seeking a path to electrical ground. Objects on the
ground, such as buildings, trees, power lines and radio towers, emit different amounts of electrical activity
during this event. Streamers (lines of particles) are launched upward from some of these objects. Some of
the downward-going leaders connect with some of the upward-reaching streamers. It is at this point that
the circuit is completed and current flows. This creates the visible arc we call lightning.
Many 1000s of amps = 1000s of volts
The lightning charge is seeking ground and has huge electrical potential. A perfect connection to ground is
not possible, especially on objects such as towers which have many metal pieces joined together. Any
material connected to ground will have some DC resistance and some AC impedance. Even a small
amount of resistance in a connection to ground (earth) will create extremely large voltages when
thousands of amps of current, such as from a direct lightning strike, are forced through them. These
immense voltages and currents will cause great damage to radio stations if proper grounding is not
installed. It is essential that proper grounding be installed at a radio station.
Damage to radio stations can happen in different ways. A direct hit on an antenna or transmission line can
cause great physical damage. Where the lightning strikes, metal and other materials generally melt, fail,
and cannot be repaired. A lightning strike close by but not direct can cause a magnetic field to build up
which will create voltages in power and transmission lines. These voltages are not as high as in a direct
strike but can still be high enough to do damage.
What Should I Ground?
Proper connection to ground rod
At most transmitter tower sites it is common to ground the tower at the base.
This is very important and needs to be done with as large a conductor as
possible. The grounding cable (wire) should be at least twice the diameter of
the center conductor of the coax/heliax connecting the transmitter to the
antenna. If possible, it should be a braided cable. This will reduce the amount
of magnetic field caused by the large current flowing through it. In order to
reduce the resistance/impedance to ground as much as possible more than
one ground rod should be used to ground the tower/mast. A ring of at least
four should be put down equal distance around the tower base. The rods
should be two meters or more in length. These should be joined together with
the same large ground cable as on the tower (number 1 copper ground cable
if possible). Each of the rods should then have a cable attaching them to the
tower. The connections on the ground rods should be welded if possible. This
will make them last longer and have less resistance. If welding is not
possible, the proper clamps for ground rods should be used, two per rod. The connection of the rods to the
tower should also be welded. If welding is not possible then proper clamps with bolts should be used and
tightened to manufacturers’ specifications. This connection, once tightened, should be weather sealed.
If the earth around the base of the tower or transmitter building is rocky or shallow and difficult to get
ground rods deep, ground plates may be used in place of ground rods. They are solid copper plates with
posts for connecting to ground cables. They are meant to be buried in the ground lying horizontal and
provide a large surface area in contact with the soil. A network of these connected together will reduce
resistance to ground in shallow soil.
27
After this it is very important to ground the outer conductor of the transmission line connecting the
transmitter to the antenna. If this is not done, a great amount of damage can still occur to the radio station.
The transmission line is parallel to the tower/mast from the antenna to the point it comes down and leaves
the tower toward the transmitter building. If the outer conductor is not connected to ground/earth, it can still
carry currents from a lightning strike into the transmitter and other connected equipment. The electrical
current in a lighting strike will see this as another path to ground and may cause much damage to the
station equipment. The transmission line then must be connected to the tower/mast ground system just
before it leaves the tower. Most manufacturers of coax style transmission line offer kits for grounding the
shield or outer conductor. It comes with material for weather proofing the connection. It is also provides a
clamp which connects to the shield and a proper hardware for connecting a cable to ground. See Section 4
Installation Steps to Follow if this kit is not available.
At the Transmitter Building
All conductors providing ground/earth potential and that enter or leave the transmitter building, including
transmission lines shields and conduits, should be bonded (connected) to a ground system similar to the
one at the tower. This system should include two or three ground rods or plates connected together. These
rods should also have a ground cable connecting them to the safety ground rod of the electrical system.
There then should be one large conductor from them coming into the transmitter building. This ground
cable should be brought in as straight and as short a distance as possible. All ground/earth conductors in
the building should then be connected back to this ground connection. This creates a “common point”
ground or “star” ground. This is crucial in the building to minimize damage from surges and lightning.
When the tower is a long distance from the transmitter building and the transmission has a long horizontal
run it is best to ground the line just before it enters the transmitter building. The outer conductor or shield
should be connected to the ground system of the building described above. This prevents unwanted
voltage buildups caused by the resistance of the long length of cable.
In the case where the tower is very close to the transmitter building, say 15 feet (4 to 5 meters) the
additional ground is not needed. The transmitter building can have all of its ground cables brought to one
large cable and then connected to the tower ground system. This truly provides a single point ground for
the whole station! In most cases the distance between is more than this.
Different Grounds Mean Trouble!
Beware! Double check all the grounds on the electrical system even in the service entrance. Make sure all
ground leads are connected back to the service entrance then to the safety ground. Any ground wires that
are not connected to the
system service entrance
and the single point ground
may spell trouble in an
electrical storm.
Do Not Assume!
Providing a single,
low-impedance/resistance
path to ground here as well
for the energy in lightning
strikes is vital to minimizing
damage. Time and money
spent on this will pay off in
the long run!
This is a typical North American system. The 240 VAC transformer is located on the utility pole. The
neutral lead is grounded there as well as at service entrance. More than one Grounding “Electrode” should
be used for a radio station as outlined in the text. Note that inside the building, the neutral and ground
buses are connected together at the service panel ground connection and not before.
28
Section 3: Audio from the Studio
A. Audio Processors
All FM transmitters will have pre-emphasis. In normal speech the higher frequencies are weaker which
produces less frequency deviation than lower frequencies in the transmitter. It is desirable to increase the
amplitude of these higher frequencies before they modulate the transmitter. This is called pre-emphasis.
Pre-emphasis improves the noise suppression at the receiver. The receiver circuits restore these higher
frequencies to their proper amplitude, a process called de-emphasis. The result of the pre-emphasis/
de-emphasis process is to improve the signal-to-noise ratio at the higher modulation frequencies.
Not all transmitters have audio processing built in. You will have to read your owners manual to
determine if yours has processing or not.
There are mainly three things that can happen during audio processing; limiting, compressing, and
expanding.
A limiter is used to keep the audio signal from exceeding a preset level. Without this the transmitter will
be over-modulated resulting in signal splatter and distortion. Signal splatter will cause interference with
adjacent stations and distortion will be heard by your listeners.
The compressor will reduce the dynamic range of the audio. It takes really loud sounds and brings them
down, and really soft sounds and brings them up to mid range. Then the mid range can be turned up as
a whole. This will make the audio sound louder to the listener.
The expander will increase the level of weak audio signals to make them sound louder to the listener.
Some transmitters have audio processing built in; for example, the Crown FM series. And this is
adequate. If your transmitter does not have processing built in, it is very important that you add an
external audio processor. The minimum used should be a professional sound-reinforcement style
compressor/limiter which, at the time of writing, costs approximate US$200 from Behringer, Roland and
others. For bigger budgets there are FM broadcast processors from US$1000 and up, especially from
companies like Inovonics and Orbin, including the Optimod FM at US$5000.
If your transmitter is a stereo transmitter you will find that the processed stereo audio signals are sent to
a stereo generator. This complex stereo signal then modulates the exciter oscillator. If a stereo signal is
required the stereo generator can be internal to the transmitter or it also can be an external device. The
decision to broadcast stereo or mono should be made based on the audience. If the stations is in a city
and is competing with other stereo signals and there are a large number of listeners with cars with
stereos in them and also stereo systems in homes, then broadcasting in stereo is worth while. If your
station is in a smaller or rural community and most listeners own portable radios, broadcasting in stereo
is not necessary. A stereo signal is a more complicated signal for the transmitter and will not travel as far
as a mono signal.
It is important to keep as much distance between the studio gear and the transmitter as possible. RF
(radio frequency signals) will find their way into audio equipment and produce a hum or other types of
noise. You can separate the two areas by using a low impedance cable between the studio and the
transmitter. This can be a maximum of 150 feet although in extreme situations it is possible to run the
audio on low impedance cable over 300 meters with no problem.
29
B. Balanced vs. Unbalanced Audio Lines
There are two basic types of connections for audio signals to audio and radio equipment (other than
optical); balanced and unbalanced. Unbalanced is generally intended to be used for shorter cables, 6
metres or less, where it is not in close proximity to strong interfering signals such as high power radio,
wireless communication, or high power electrical motors. Balanced connections are intended for
situations where a much greater rejection of interference is crucial. They also allow much longer lines to
be run between pieces of equipment without degrading signals.
Unbalanced cables and connectors only use two conductors. One is the so-called 'hot' (live) wire. The
other is called 'return' (ground). Typically, the cable running between the pieces of equipment is a
co-axial style. The center conductor is the hot lead, which is surrounded by insulating material, which is
then surrounded by a second conductor which is the return. The return conductor is most often formed
into a screen-like fashion in order to shield outside electrical signals away from the hot lead.
Balanced cables and connectors use three conductors. Two of these are hot and the third is return. The
two hot wires carry the desired signal between pieces of equipment. The third conductor does not carry
any of the desired signal but only acts as a shield to keep out external interfering signals. Any interfering
signal which does get past the shield will then be present on both of the hot wires at the same time.
Because these wires are connected to a transformer which cancels out anything that is not desired,
interfering signals are not heard.
30
Balanced Lines Continued
31
C. Stereo FM Transmission Components
Stereo FM Transmission System
Components
L
R
Compressor
Limiter
Stereo
Encoder
STL
Exciter
RF Power
Amplifier
The Compressor Limiter and/or the Stereo Encoder is built into some Exciters.
Inovonics Model 235 FM Processor
Behringer Model 2600 Sound Processor
Crown FM 250 transmitter. Comes with stereo encoder and audio
processor built in.
32
Section 4: Installation - Steps to Follow
Step 1. 50 ohm Cable
Verify that the coax/heliax cable, transmitter and antenna are all the same impedance. Almost all FM and
broadcast transmitters are 50 ohm output, especially solid state output type.
Step 2. Check Connectors
Verify that the type of connectors on the coax/heliax match the connectors on the transmitter and the
input of the antenna/antenna system. Make sure that the connectors will handle the power level being
emitted from the transmitter. Generally, Galcom International and other missions use “N” type connectors
up to 500 watts and ½ inch coax. Above 500 watts to 2000 watts 7-16 DIN or EIA type connectors are
preferred and LMR 600 cable or equivalent. Other cable can be used depending on the length needed.
Step 3. Prepare the Antenna
Lay out all the pieces and make sure none are bent, damaged or missing. Then prepare the mounting
apparatus which will be used to attach the antenna to the tower/mast. This is normally the appropriate
diameter galvanized pipe. Verify the length of pipe needed for the antenna. A single dipole or vertical
antenna mounted on top of the tower may only need about 5 feet (1½ meters) of pipe. A “Four Bay” or
four vertical dipoles stacked, will need about 35 feet (11 meters) of pipe to mount the antennas.
Assemble the antenna(s) as per manufacturer’s instructions. Read instructions carefully and take note of
details. Some elements on each antenna may have to be adjusted to a specific length according to
frequency of operation. It is very important to follow instructions on this and make accurate
measurements. Normally in the manufacturers instructions there are diagrams and “tuning charts” to
show what the antenna should look like. Some “broadband” antennas do not require this tuning.
Step 4. Pretest the antenna before hoisting up the tower.
Mount each antenna on a pipe which is long enough to hold it
several feet in the air temporarily with a short length of coax
connected. With the antenna several feet in the air and clear
of other objects and people, connect the transmitter and
make sure that it is set as well, or will come on at a low power
level. If there is no SWR or Power meter in the transmitter
connect one “in line” with the antenna. This external meter
needs to be professional broadcast standard. Turn on the
transmitter and bring up the power slowly to about 5 or 10
watts. Read the SWR or reflected power. The SWR should
not be 1.5 or higher and well less than 1.5 is better. If it is a
power meter refer to the chart in Section 1 (subsection
Standing Waves and Resonance) and relate reflected power
rating to an SWR rating of less than 1.5:1. If the reflected
reading is more than this, turn the transmitter off and make
adjustments or repairs until the readings are within safe limits
or the manufactures claim.
33
Step 5. Mount the Antenna
After the antenna has been tuned/tested mount it on pipe permanently and prepare for hoisting up the
tower/mast. When hoisting up the mast take great care not to damage the antenna by hitting it on the
mast on the way up. Make sure all ropes, pulleys and lifting equipment are capable of handling more
combined weight than the antenna/s together.
Step 6. Ground the Shield of the Coax
As mentioned earlier, grounding the shield of the coax is very important. It should be done on the coax/
heliax just before it bends away from the tower/mast toward the building where the transmitter is located.
If the proper grounding kit from the manufacturer of the cable is not available the following pictures show
an alternative method. This is the minimum standard which is required. The pictures are in order of the
procedure. It is important that as much surface area as possible of the ground wire make contact with the
shield of the cable and be tightly held to it. The cable must not be put out of round and after the outer
jacket has been cut away as shown, it must be sealed at the top and bottom of the opening.
The ground wire is then attached to the shield. In the picture it is wrapped tightly then laid against the
shield with cable ties (tie wraps) holding it in place. The final step is also very important, everything is
wrapped with water tight putty tape such as coax-seal or 3M’s liner less slicing tape. This then can be
covered with high quality electrical tape such as number 33 or number 88.
Outer jacket cut away.
34
Sealing up the
opening.
Step 6. Ground the Shield of the Coax continued
Ground/Earth wire
attached to shield.
All sealed up to keep
dirt and water out!
Step 7. Test the Electrical Outlet
Make sure the voltage in the outlet for the transmitter is correct and the outlet is grounded. Follow the test
procedure as outlined on page 22. If there is any doubt about this or a proper voltmeter is not available
have a qualified electrician test the outlets in the building to make sure they are wired properly and the
correct voltage is being supplied to them. Do not assume that an outlet is grounded or is providing the
correct voltage because appliances such as fans and lights seem to work when plugged into it. If an outlet
has not been tested, have it tested before plugging in a transmitter or other electronic equipment!
35
Step 8. Connect the Transmitter
Make sure that the coax is securely in place and the outer conductor is grounded as outlined above.
Connect the transmission line to the transmitter. Take care when using screw in connectors not to
cross-thread them. They must go straight into the mating connector. They must be snug and hand tight or
just an eighth of a turn more. Do not tighten more than this!
Verify that the output power will be at a low value when the transmitter is turned on. Apply power to the
transmitter and turn the output up slowly to several watts. Check the vswr or reflected power reading. If it is
within safe limits continue turning up output power slowly. Take readings of forward and reflected power
until full output is reached. If the vswr or reflected power is too high, switch off the transmitter and check all
the connections in the transmission line and the antenna until the problem is resolved.
Step 9. Connect Audio to the Transmitter
When the transmitter is up to full power connect the audio input from the studio. This may be from a studio
to transmitter link system or cables directly from the studio. Refer to the owner’s manual for each piece of
equipment in the chain to set the proper input and output levels to be sure of proper operation. Pay close
attention to the indicators on the front panels of each piece of equipment for proper audio or modulation
levels. If an accurate external modulation monitor is available use it to monitor the deviation level while
increasing the audio levels into the transmitter. Set the audio until modulation peaks give a maximum
reading of plus and minus 75 KHz from the carrier (the frequency of the transmitter without audio applied).
Adjust the audio processor until the deviation stays near but not over the 75 Khz most of the time. Do not
let the modulation go beyond this level. Excessively high peaks or modulation levels which stay above 75
Khz will cause distortion on the signal and interference to stations on adjacent frequencies.
Step 10. Monitor the Station
Use a good quality radio receiver to monitor the signal from the radio station. Listen for good quality audio
in both speech and music. During pauses there should be no noticeable hum or buzzing. As much as
possible travel around the intended listening area with the same radio and a car radio and listen to the
station for the strength of the signal. This will help determine the coverage the station has. If listeners have
cell phones a test broadcast or call-in show can also help determine the distance the station is reaching.
Step 11. Log all Readings
It is important to record the meter readings on the transmitter, studio to transmitter link (if the station has
one) voltage on electrical outlets, batteries (if used), and any other significant pieces of equipment.
Computers should be organized and passwords should be known by more than one person. Meter
readings, audio levels and regular maintenance items should be recorded in log sheets or computer logs.
36
Section 5: Maintenance
A. Antenna
There should be a monthly visual check of the antenna. This can be done by a man standing on the
ground. Look for anything that is missing, bent, or out of place. This should especially be done after each
severe wind or electrical storm.
Once a year someone should climb the tower and inspect the antenna. Look for the same things. Also,
check that connectors and brackets are not loose, and for any sign of scorch marks from lightning.
Repair as needed.
B. Transmission Line, Lightning protection, Ground
During the monthly antenna check, also look for sections of the transmission line that may have come
loose from the tower and are blowing in the wind.
During the yearly climb, inspect the outer case of the transmission line all the way up for chafing, kinks,
punctures, or loose hangers.
Every 6 months, or especially after a severe electrical storm, inspect the connection of the transmission
line to the ground rods. They should still be snug, intact, and connections should not be corroded. There
will be some surface tarnish. Corrosions will look pebbled and grey at the connections. This should not
be allowed to build up over a long period of time, but cleaned with fine grade sandpaper/emery paper,
and with clean rags and vinegar.
C. Transmitter
Clean the transmitter monthly, including dust from air filters and inspect for tears or holes. Check that all
cooling fans are running smoothly.
Create a log sheet for monthly readings. This is important because it can help early detection of
problems and stop the station from going off the air. It can also help find problems that do happen. Take
readings of;
-RF power out
-SWR or Reflected power
-ALC
-PADC volts
-PADC amps
-PA temperature
-DC supply volts
Keep on hand several spares of fuses and surge protection MOV’s if they are installed in your transmitter
in case of any power surges to your equipment. Also check your manufacturer’s manual for any
recommended spare parts to keep on hand.
If the Power indicator lamp is not lit and your transmitter is not working, check the following;
-Make sure the power plug is securely in its receptacle.
-Make sure there is AC power at the receptacle by checking with a volt meter or plugging in an
appliance or lamp that you know is working.
-Make sure the power switch is on.
-Check the fuse for continuity. If you have a breaker, make sure it has not tripped by switching it
off and then back on.
37
-If the fuse fails or breaker trips a second time, then you will have to check for shorts after the fuse.
-Check the MOV if you have one to make sure it is not shorted.
-Check all diodes to make sure they are not shorted.
-Disconnect power supply output from the rest of the transmitter to determine if the short is in the
power supply or the transmitter stages.
D. Audio Processing Equipment
Basic maintenance is to keep the processor running at the same levels that were originally set-up. These
original readings should be kept in a book, then compared to what the actual readings are now. Adjust as
necessary to return to the original audio levels.
Keep the unit dust-free. Make sure all lights and indicators are functioning properly. Periodically check
the voltage source from which the unit is operating.
Conclusion
Hopefully this manual has steered you through some of the pitfalls of installing an FM transmitter. Your
attention to detail and excellence is very important to keep the equipment running properly.
“The heavens declare the glory of God, the skies proclaim the work of His hands. Day after day they pour
forth speech, night after night they display knowledge. There is no speech or language where their voice
is not heard. Their voice goes out into all the earth, their words to the ends of the world.” Ps. 19:1-4. Our
desire is that you will have many years of trouble-free broadcasting sending out God’s Word.
You have been given a very powerful tool but it is the power of God that will do the real work. God’s
blessing as you reach out in His name.
38
Acknowledgements and Permissions
Permission granted by;
Hutton Communications Inc., 2520 Marsh Lane, Carrollton,TX 75006, 877-648-8866 [email protected]
WORLD STANDARDS via
http://users.pandora.be/worldstandards/index.htm
Times Microwave Systems
358 Hall Avenue
Wallingford, CT 06492
mailto:[email protected]
References
www danalee.ca
Community Radio Course
by Roger Stoll of Radio World Wide
wwwsjsc.ca
Mackie Church Sound Notebook
http:\\www.mackie.com
39


© Copyright 2026