
AOL: Scheduling an Event
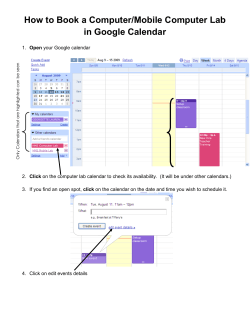
AOL:
Scheduling an Event
Calendar gives you the option of scheduling a one-time event, such as a party, as well as repeating
events, such as monthly bingo, weekly soccer practice, and the like. This section describes how to
schedule a one-time event; to create a repeating event, see
Scheduling a Repeating Event
You can quickly add a new event to your calendar by typing directly in the calendar area where you want
to schedule the event, or you can use the Add Event button.
To schedule an event by typing directly on your calendar
1.
2.
Point to the place on your calendar where you want to schedule the event.
Click and hold the left mouse button to stretch the event across the appropriate time slots, then
release the left mouse button. Type here appears in the calendar time slot that you created.
3.
Type the title of the event, then press Return. The event appears on your calendar.
4.
To add additional details regarding the event, click the event to display the View or Edit an Event
screen, in which you can type event details, specify reminders and repeating event details, and
share the event with friends and family.
To schedule an event through the Add a New Event screen
1.
In one of the calendar views -- Month, Week, or Day -- click Add Event. The Add a New Event
screen appears.
2.
To schedule the event on a different calendar, click the down arrow next to the Calendar label and
select the calendar you want to use.
3.
Click the text box next to Title and type the name of the event as you want it to appear on the
calendar.
4.
Type or select the date and time of the event. If the event is an all-day activity or has no specific
start time, click No specific time so the event appears above the timed events on the calendar
display.
5.
To receive a reminder, click the Remind me box and select the amount of time in advance of the
event when you want to receive the reminder. To specify reminder delivery -- e-mail, Instant
Message, or cellular phone -- click the Edit link that appears to the right of the Reminder line.
6.
To share the event information with friends and family, for example, if this event is a family
gathering, click the Share this event link. The Tell a Friend screen appears. You can specify
screen names and e-mail addresses ([email protected]) to which you want to send
information about the event, and recipients can with a single click add the event to their
calendars.
7.
When you finish specifying the event information, click Save.
Outlook:
1 Open the Microsoft Outlook program and go to the Calendar bar on the lower left hand side of the
screen. This will bring up your personal/professional calendar. You can view this calendar by day, work
week, week or month. To schedule a meeting, you should be looking at the "day" view.
2 Choose from the calendar on the left side of the screen the date you would like to schedule the
meeting. Click on whatever date you choose. On the right hand side of the screen your calendar for that
day will appear and be arranged by time of day. It is arranged in half hour increments. So, for example, if
you want to schedule a meeting for ten o'clock that day, put your cursor next to the ten o'clock time frame
so that it is highlighted.
3 Double click on the highlighted section. A box will pop up on your screen that says "Untitled Appointment." There are two tabs in the appointment planner. The one that opens automatically will be
the appointment tab. Here you can insert all of the important information regarding the meeting. Fill out
the subject line with the reason for the meeting and fill out the location line with where the meeting will be
held. Under that section is the time and date. Make sure that this section displays the correct time and
date of your meeting.
4 Click on the scheduling tab to invite attendees once all of the appointment information has been
inserted. On the left hand side of the screen in the box that says "All Attendees," you can insert the email
addresses ([email protected]) of the people who are supposed to attend the meeting. If you are
adding a contact from your address book, you can click at the bottom of the screen on the left hand side
where it says "Add Others" and choose the "Add from Address Book" option. This will bring up your
contacts and you can click on the names of the people who should be in attendance.
5 Go to the top left hand side of the screen once all of the information is included and click on the "Send
Invite" button found under the "File" button on the tool bar. This will send the meeting invite out to the
people you sent it to. They have the option to accept, modify or deny your meeting request. You will
receive a response back by email with the reply.
Read more: How to Set Up a Meeting Using Microsoft Outlook | eHow.com http://www.ehow.com/
how_4494055_set-up-meeting-using-microsoft.html#ixzz1LJsALRqJ
Outlook Express:
Instructions
◦
1
The Calendar Icon
Double click the desktop icon for the Microsoft Outlook Express program. Navigate your
mouse pointer to the lower left corner of the window and click the "Calendar" icon.
2
The Calendar
Locate the specific date you want to work with. It will appear in the upper-left side of the
window. Click on the left and right arrows to navigate between months, then click on the
number corresponding to the day you need to access.
◦
3
The Time Panel
Find the time of the day you want to set an appointment or reminder for in the panel on
the right side of the window. Use the scroll bar at the right to navigate between the 24
hours in the specific date you have selected. Double click the half hour slot you want to
work with to bring up a new appointment window.
◦
4
The Appointment Window
Type in the name of the appointment or reminder you need to set in the "Subject" text
box. Type the address of the appointment in the "Location" text box. Click the "End Time"
drop-down box if the meeting is scheduled to be longer than a half hour and choose the
exact ending time. Click the "All Day" box if the appointment will last the entire work day.
◦
5
The Recurrence Button
Click the "Save and Close" icon to save the meeting to the calendar. Double click the
name of the meeting in the time panel to bring the window back up. Click the
"Recurrence" icon at the top of the window if you need the appointment to appear on a
regular basis. Click the radio button that corresponds to the frequency of the
appointment, such as "Daily," "Weekly" or "Monthly." Click on the check boxes for specific
days of the week if it will not occur every day. Choose the "No End Date" option if the
reminder will continue forever or choose an end date from the drop-down box if the
reminder needs to stop at a specific date. Click "OK."
◦
6
Choose the "Invite Attendees" option at the left corner of the window if you want to send
the appointment to another person's Outlook calendar. Click on the "To" field and choose
an email address ([email protected]) from your address book or type the email
address in the "To" field. Type a message into the large text box at the center of the
window if you want a message to accompany the invitation. Click "Send" to send the
invitation.
Read more: How to Use the Calendar in Outlook Express | eHow.com http://
www.ehow.com/how_5009764_use-calendar-outlook-express.html#ixzz1LJspybEH
Google/Gmail/Droid phones:
Invite guests to your event
Share Comment Print
Google Calendar lets you create invitations for special events, send those invitations to friends, and keep
track of responses and comments all in one place.
To invite someone to your event, just follow these steps:
1.
Click on the event (or create a new event) and select Edit event details (alternatively, you can
click on the event's name to open the event details page).
2.
In the Guests section on the right, enter the email address of each of your guests
([email protected]) and click Add. You'll see each guest appear under the Added section
below.
3.
Select the appropriate options for your guests under the Guests can section.
4.
Click Save.
5.
In the Send invitations? pop-up window that appears, click Send if you'd like to notify your
guests of the event; if you do not want to notify your guests, click Don't send.
If you have shared access to others' calendars, check out the Find a time feature to learn how to
schedule events easily.
Please note that guests who use Google Calendar will receive an invitation based on their own
notification settings.
Get assistance from other users in the Google Calendar Help Forum.
Review our known issues page.
For those using a Droid Phone, Create an appointment in your calendar, then in the place where it says
“Who:” Type in the email address of the recipient ([email protected]). You will be notified if the
appointment has gone through via email. Please remember if your phone isn’t set to auto sync with the
system, you have to sync it once you complete the appointment, otherwise we won’t be notified.
If you don’t receive an email from us, you
didn’t get through...
Entourage2008 Cal endar
Accessing Your Calendar
Toopenthecalendar,eitherclickonthecalendariconinthe
baratthetopofthepage,orclickoncalendarinthe
navigationpanel.
Tomovefrommonthtomonthinthecalendar,clickontheleft
andrightarrowkeysoneithersideofthenameofthemonth
atthetopofthecalendarinthebottomoftheNavigation
Pane.Youcanaccessdifferentdaysinthecalendarbyselecting
thespecificdatefromthecalendarontheNavigationPane.
Youcanalsomovefromonedaytothenextbyclickingonthe
arrowkeysatthetop,leftͲhandcorneroftheindividualday,
weekormonth.
Byclickingoniconsinthebaratthetopofthepage,youcan
choosebetweenviewingaday,workweek,weekormonth
calendar.Alsoyoucanviewtodayonlyoraspecificdate.
Types of Calendar Entries
Nowthatyouseeyourcalendar,youcanstartscheduling.
Understandingthethreedifferenttypesofcalendarentries
inEntouragewillhelpyoudothisefficientlyandeffectively.
Appointment.Anappointmentisanactivitythatinvolves
onlyyou,atascheduledtime.AppointmentscanbereͲ
curring.
Meeting.Ameetingalsooccursatascheduledtime,but
youinviteotherpeoplebyusingameetingrequestsent
viaeͲmail.Meetingscanberecurring.
Event.Aneventisanactivitythatlastsallday.Eventscan
beallͲdaymeetings,outͲofͲtownconferences,vacation
time,etc.
Creating an Entry
Tocreateacalendarentry:
x ClickonthearrownexttotheNEWbutton.
x SelectCalendarEvent
x TypetheSubjectandLocationoftheappointment.Ifyouare
schedulingameeting,clickontheInvitebutton.TypetheeͲ
mailaddressesfortheinviteesintheToboxandthenclick
ADD.
x SelectthedesiredStartandEnddateandtimefromthedropͲ
downlist.ThenumberofminutesforthemeetingisthendisͲ
playedautomatically.SpecifyanallͲdayeventbyclickingon
thatcheckbox.
x Otherfieldsyoumaychoosetoupdateinclude:
1.Busy,Free,Tentative,Free,OutofOffice:
Toletothersknowwhetheryouareavailableduring
thistime,youcanchoosefromtheseoptions:Busy,
Free,Tentative,orOutofOffice.
2.Recurrence:ThisbuttonallowsyoutomaketheappointͲ
mentormeetingyouareschedulingtorecuronaregular
basis.Entouragedefaultstoonceonly.
3.Reminders:Thissettingreflectshowlongbeforethestart
ofaneventyouwillbenotifiedviaaneͲmailandapopͲup
message.
4.TravelTime:Thissettingallowsyoutobuildintraveltime
oneithersideofanappointment.
5.Categories:Tosetacolor
category,chooseacolorfrom
thecategorylist.Youcanalso
providenamesforthecolor
categoriesbychoosingAll
Categoriesfromthelist.
I know the above information didn’t do much in the way of telling you how to create the invitation, but if
you look on the first page of the Entourage information under 2., you will see in the upper left corner of
the picture they provided, the little icon you click to send the appointment information as an invitation.
Once you click that, you will be asked to enter recipients, this means the email address:
[email protected] Below is some more detailed information on responding through the Entourage
app.
Entourage2008 Cal endar
/#0$1)2()3.%1.4##%()3.5),(%+%(1)0.
!"#$%&'#&$#($)*+,#%-&+($.'##/($01#2+#%/3/"#
'##/($04(**.+/&'./().**-.$,(''#,(./#*-5#.,,#,/&
-&+1).*#$,.167$/(*-&+8(#4.$,1#%9&$,/&/"#'##/($0
($8(/./(&$3/"#'##/($04(**.99#.1($-&+1).*#$,.1.%
!"#$%$&'"6:&+4(**.*%&1#)#(8#/"#($8(/./(&$($/"#;&1'
&;.$#Ͳ'.(*.%<($04"#/"#1-&+4&+*,*(<#/&=
!"# !""#$%#
$"# &#"'()####
%"# &'()*+,-#,.+,#/012#+,,-'(+'*-#)3#*#)%+%(,#"##
#
#
#
#
#
#
#
#
&4#/01#!""#$%#,.-#)'5),+,)0'6#
+'#+**-7,+'*-#-8+)9#:)99#;-#
3-',#;+*<#,0#,.-#2-=1-3,026#+'(#
,.-#8--,)'>#:)99#;-#+1,08+,)?
*+99/#17(+,-(#)'#/012#*+9-'(+2#
4208#+#,-',+,)5-#8--,)'>#,0#+#(-4)'),-#8--,)'>"#
#
&4#/01#&#"'()##,.-#)'5),+,)0'6#+'#-8+)9#:)99#;-#3-',#,0#,.-#2-?
=1-3,02#)'()*+,)'>#/01#:)99#'0,#;-#)'#+,,-'(+'*-6#+'(#,.-#8--,)'>#
:)99#;-#+1,08+,)*+99/#2-805-(#4208#/012#*+9-'(+2"#
&4#/01#*#)%+%(,#'-.!""#$%.,.-#)'5),+,)0'6#+'#-8+)9#:)99#;-#3-',#,0#
,.-#2-=1-3,02#)'()*+,)'>#,.)36#+'(#,.-#8--,)'>#:)99#2-8+)'#)'#/012#
*+9-'(+2#+3#+#,-',+,)5-#8--,)'>"#
#
@01#+9:+/3#.+5-#,.-#07,)0'#04#)'*91()'>#*088-',3#:),.#/012#
2-370'3-#,0#+'#)'5),+,)0'"#
#
#
#
#
#
#
#
A/#07-')'>#,.-#-5-',#)'#,.-#*+9-'(+26#,.-#8--,)'>#*002()'+,02#
*+'#*.-*<#0'#,.-#3,+,13#04#,.-#+,,-'(--3"#
#
6$2+%()3.17.8+)"#'()3.9,#)%./#:;#0%0.
>&8(#43+9,./#3&1,#*#/#.$#?(%/($0.99&($/'#$/3'##/($03
&1#8#$/=
@6A.8(0./#/&/"#,./#&;/"#.99&($/'#$/3'##/($03&1
#8#$/6
B6C&%(/(&$-&+1)+1%&1&$/"#(/#'.$,)*()<&$(/&$)#&1
/4()#6
()D;/"##8#$//"./-&+4(%"/&+9,./#(%9.1/&;.%#1(#%&;
1#)+11($0#8#$/%3-&+4(**1#)#(8#/"#4.1$($0'#%%.0#
/".//"(%(%.1#)+11($0#8#$/.$,-&+4(**5#.%<#,(;-&+
4(%"/&&9#$E+%//"(%#8#$/&1(;-&+4(%"/&&9#$/"#%#Ͳ
1(#%6
*)D;-&+)*()<&$+,"#$-&./#"/"(%4(**&9#$.%($0*#&))+1Ͳ
1#$)#&;/"#(/#'3#8#$(;(/(%.1#)+11($0.99&($/'#$/&1
'##/($06
:&+4(**5#1#'($,#,/"./(/(%.1#)+11($0#8#$/6
0)>&8(#43'&,(;-3&1,#*#/#.$#$/(1#%#1(#%3)*()<&$/"#
+,"#$-"."1&".5+//&$6
F6>&).$)#*.'##/($03E+%/)*()<&$/"#2%#2"3&#'&$"5+//&$6
G6>&+9,./#/"#'##/($0($;&1'./(&$3)".$0#/"#/('#%.$,
/"#$)*()<&$/"#4"#56,5%$"5+//&$6
&#<()()3.=1;7.>17?.>##?.
@6H*()<&$/"#I$/&+1.0#J+//&$
B6K#*#)/C1#;#1#$)#%
L6K#*#)/H.*#$,.1+$,#1
M#$#1.*C1#;#1#$)#%
N6K9#)(;-/"#;(1%/,.-&;
/"#4##<.$,-&+1
4&1<,.-%.$,/('#%6
O6K#*#)/-&+1,#;.+*/
/('#P&$#6
F6K#*#)/-&+11#'($,#1
91#;#1#$)#%6
MSN:
See all Calendar tips
Instead of calling or emailing friends about an event, invite them to the event when you add
it to the calendar in Windows Live Hotmail. You won't have to worry whether you gave your
friends the correct information or whether they wrote it down correctly. And the calendar
helps you keep track of who accepted the invitation and prompts you to send updates if you
make any changes to the event.
Step 1: Select the day
Click the date of your event, and then click Add.
Add an event to your calendar and easily invite friends.
Step 2: Add event details
Fill in the details, and then click Add more details.
Add event details to tell your friends about your event.
Step 3: Invite people
Click Invite people. You can enter an email address in the To: field, or click Select people
from your contact list. After you click Save, you'll be prompted to send the invitation.
To invite your friends, enter their email addresses or select friends from your contact list.


© Copyright 2026