
How To... Create Custom Layouts SAP NetWeaver How-To Guide
SAP NetWeaver
How-To Guide
How To... Create Custom Layouts
For Web Page Composer in SAP NetWeaver Portal 7.3
Applicable Releases:
SAP NetWeaver Portal 7.3
Version 1.0
April 2011
© Copyright 2011 SAP AG. All rights reserved.
No part of this publication may be reproduced or
transmitted in any form or for any purpose without the
express permission of SAP AG. The information contained
herein may be changed without prior notice.
Some software products marketed by SAP AG and its
distributors contain proprietary software components of
other software vendors.
Microsoft, Windows, Outlook, and PowerPoint are
registered trademarks of Microsoft Corporation.
IBM, DB2, DB2 Universal Database, OS/2, Parallel
Sysplex, MVS/ESA, AIX, S/390, AS/400, OS/390,
OS/400, iSeries, pSeries, xSeries, zSeries, z/OS, AFP,
Intelligent Miner, WebSphere, Netfinity, Tivoli, Informix,
i5/OS, POWER, POWER5, OpenPower and PowerPC are
trademarks or registered trademarks of IBM Corporation.
Adobe, the Adobe logo, Acrobat, PostScript, and Reader
are either trademarks or registered trademarks of Adobe
Systems Incorporated in the United States and/or other
countries.
Oracle is a registered trademark of Oracle Corporation.
UNIX, X/Open, OSF/1, and Motif are registered
trademarks of the Open Group.
Citrix, ICA, Program Neighborhood, MetaFrame,
WinFrame, VideoFrame, and MultiWin are trademarks or
registered trademarks of Citrix Systems, Inc.
HTML, XML, XHTML and W3C are trademarks or
registered trademarks of W3C®, World Wide Web
Consortium, Massachusetts Institute of Technology.
Java is a registered trademark of Sun Microsystems, Inc.
JavaScript is a registered trademark of Sun Microsystems,
Inc., used under license for technology invented and
implemented by Netscape.
MaxDB is a trademark of MySQL AB, Sweden.
SAP, R/3, mySAP, mySAP.com, xApps, xApp, SAP
NetWeaver, and other SAP products and services
mentioned herein as well as their respective logos are
trademarks or registered trademarks of SAP AG in
Germany and in several other countries all over the world.
All other product and service names mentioned are the
trademarks of their respective companies. Data contained
in this document serves informational purposes only.
National product specifications may vary.
These materials are subject to change without notice.
These materials are provided by SAP AG and its affiliated
companies ("SAP Group") for informational purposes only,
without representation or warranty of any kind, and SAP
Group shall not be liable for errors or omissions with
respect to the materials. The only warranties for SAP
Group products and services are those that are set forth in
the express warranty statements accompanying such
products and services, if any. Nothing herein should be
construed as constituting an additional warranty.
These materials are provided “as is” without a warranty of
any kind, either express or implied, including but not
limited to, the implied warranties of merchantability,
fitness for a particular purpose, or non-infringement.
SAP shall not be liable for damages of any kind including
without limitation direct, special, indirect, or consequential
damages that may result from the use of these materials.
SAP does not warrant the accuracy or completeness of the
information, text, graphics, links or other items contained
within these materials. SAP has no control over the
information that you may access through the use of hot
links contained in these materials and does not endorse
your use of third party web pages nor provide any warranty
whatsoever relating to third party web pages.
SAP NetWeaver “How-to” Guides are intended to simplify
the product implementation. While specific product
features and procedures typically are explained in a
practical business context, it is not implied that those
features and procedures are the only approach in solving a
specific business problem using SAP NetWeaver. Should
you wish to receive additional information, clarification or
support, please refer to SAP Consulting.
Any software coding and/or code lines / strings (“Code”)
included in this documentation are only examples and are
not intended to be used in a productive system
environment. The Code is only intended better explain and
visualize the syntax and phrasing rules of certain coding.
SAP does not warrant the correctness and completeness of
the Code given herein, and SAP shall not be liable for
errors or damages caused by the usage of the Code, except
if such damages were caused by SAP intentionally or
grossly negligent.
Disclaimer
Some components of this product are based on Java™. Any
code change in these components may cause unpredictable
and severe malfunctions and is therefore expressively
prohibited, as is any decompilation of these components.
Any Java™ Source Code delivered with this product is only
to be used by SAP’s Support Services and may not be
modified or altered in any way.
Document History
Document Version
Description
1.00
First official release of this guide
Typographic Conventions
Icons
Type Style
Description
Icon
Example Text
Words or characters quoted
from the screen. These
include field names, screen
titles, pushbuttons labels,
menu names, menu paths,
and menu options.
Cross-references to other
documentation
Example text
Emphasized words or
phrases in body text, graphic
titles, and table titles
Example text
File and directory names and
their paths, messages,
names of variables and
parameters, source text, and
names of installation,
upgrade and database tools.
Example text
User entry texts. These are
words or characters that you
enter in the system exactly as
they appear in the
documentation.
<Example
text>
Variable user entry. Angle
brackets indicate that you
replace these words and
characters with appropriate
entries to make entries in the
system.
EXAMPLE TEXT
Keys on the keyboard, for
example, F2 or ENTER.
Description
Caution
Note or Important
Example
Recommendation or Tip
Table of Contents
1.
Business Scenario ..........................................................................................................1
2.
Background Information .................................................................................................1
3.
Prerequisites....................................................................................................................1
4.
Step-by-Step Procedure ..................................................................................................2
4.1
4.2
4.3
Build the Layout in SAP NetWeaver Developer Studio ..............................................3
4.1.1 Create a New Project in SAP NetWeaver Developer Studio ..........................3
4.1.2 Define the Page Layout as a Java Server Page ............................................4
4.1.3 Update the portalapp.xml File .......................................................................5
Deploy the Layout to the Portal ............................................................................... 10
4.2.1 Create EAR File..........................................................................................10
4.2.2 Deploy the EAR File to the Portal ................................................................ 11
Configure the Layout for Use .................................................................................. 11
4.3.1 Create a PCD-Object ..................................................................................11
4.3.2 Create a Delta Link .....................................................................................14
5.
Result .............................................................................................................................15
6.
Appendix........................................................................................................................ 17
6.1
Appendix A – Advanced Layouts............................................................................. 17
6.1.1 Change the overview.jsp File ...................................................................... 17
6.1.2 Define the Include Files ..............................................................................18
6.2. Appendix B – List of Abbreviations ........................................................................... 23
How To... Create Custom Layouts
1.
Business Scenario
Web Page Composer (WPC) enables key users and content authors to easily create and manage
portal pages in an intuitive and comfortable editing environment.
As an author you can select from various page layouts to structure the content on your web pages.
Customers can also configure and adjust the out-of-the box layouts to meet their requirements. In
addition you can develop your own custom layouts.
This How-To Guide explains how to create new custom layouts for Web Page Composer. In order to
do so, we use the layout called ‘Overview’ as an example.
2.
Background Information
Web Page Composer has been deeply integrated into the portal with SAP NetWeaver 7.3. WPC is no
longer a separate add-on and you can automatically take advantage of various portal services. You
need to install usage type EP Core – Application Portal (EPC) and optionally Enterprise Portal (EP) for
the Knowledge Management services.
3.
Prerequisites
Before you proceed please ensure that the following prerequisites are fulfilled:
Successful installation of SAP NetWeaver 7.3 including Portal and Web Page Composer
You have assigned the Content Administrator and the System Administrator roles
You have assigned the WPC Editor Role (required for testing)
You have installed SAP NetWeaver Developer Studio (corresponding version for your SAP
NetWeaver Portal)
You have an understanding about how portal pages are rendered, as described in Portal Page
at Runtime.
You have experience in Developing Portal Applications
You have experience in Writing JSP Pages
June 2011
1
How To... Create Custom Layouts
4.
Step-by-Step Procedure
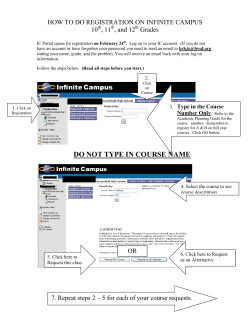
In the following example we will create a layout called ‘Overview’. It has one container at the top and
four at the bottom. Content can be dropped in any container.
In order to create a new layout for Web Page Composer pages, you need to follow these steps:
1. Build the layout in SAP NetWeaver Developer Studio (NWDS).
2. Deploy the layout to the portal.
3. Configure the layout for use.
June 2011
2
How To... Create Custom Layouts
4.1 Build the Layout in SAP NetWeaver Developer
Studio
To build a new page layout for Web Page Composer, you create a new project in SAP NetWeaver
Developer Studio and edit all layout relevant elements.
4.1.1 Create a New Project in SAP NetWeaver Developer
Studio
After opening NWDS, create a new Portal Application Project using the wizard.
S...
1. Navigate to File
New
Other…
2. Browse through the available wizards: Portal Application
Create a Portal Application Project.
3. Choose Next and change the name of your project. You also can change the Project Root
Folder.
4. Choose Finish to complete the wizard. The new project is created. The project folder and
several subfolders are visible in the navigation tree.
June 2011
3
How To... Create Custom Layouts
4.1.2 Define the Page Layout as a Java Server Page
...
1. Navigate to Overview Layout
2. Right-click jsp and choose New
dist
PORTAL-INF
jsp.
File.
3. Enter a file name and add the suffix .jsp. Your file must have the same name as your layout.
4. Choose Finish and your file is created.
5. With the help of the layout tag library, create a JSP page that defines the following:
a. One or more containers on the page in which iViews can be placed.
b. The iView tray, or frame, in which each iView is placed. If you do not specify a tray, the
portal displays the default tray, which provides links to standard tray functions, such as
refreshing, hiding, or personalizing the iView.
You can specify one tray for each container. The tray is displayed for all iViews in the
container.
c. Additional HTML that appears on each page.
June 2011
4
How To... Create Custom Layouts
In our example we use the following jsp page:
<%@ taglib uri="prt:taglib:com.sap.portal.reserved.layout.TagLibLayout"
prefix="lyt"%>
<lyt:template>
<table id="GridLayout1" width="100%" cellSpacing="2">
<tr>
<td width="100%" valign="top" colspan="4">
<lyt:container id="top" wrappingMethod="none" />
</td>
</tr>
<tr>
<td width="25%" valign="top">
<lyt:container id="bottom1" wrappingMethod="none" />
</td>
<td width="25%" valign="top">
<lyt:container id="bottom2" wrappingMethod="none" />
</td>
<td width="25%" valign="top">
<lyt:container id="bottom3" wrappingMethod="none" />
</td>
<td width="25%" valign="top">
<lyt:container id="bottom4" wrappingMethod="none" />
</td>
</tr>
</table>
</lyt:template>
4.1.3 Update the portalapp.xml File
The portalapp.xml file is the deployment descriptor for portal applications. For our layout project,
this file describes all the layout components and their properties.
Na...
1. Navigate to Overview Layout
dist
PORTAL-INF
portalapp.xml.
2. Create a <component> element in a portalapp.xml file for the EAR and set the name
attribute. Create one <component> element for each layout defined in the EAR.
3. In the <component> element's <component-config> element, create the following
<property> elements:
Property
Mandatory
Description/Value
ClassName
Yes
com.sap.portal.pb.layout.PageLayout
ResourceBundleName
Yes
pagebuilder_nls
June 2011
5
How To... Create Custom Layouts
4. In the <component> element's <component-profile> element, create the following
<property> elements:
Property
Mandatory
Description/Value
ComponentType
Yes
com.sapportals.portal.layout
com.sap.portal.pcm.Title
No
The display name of the layout
com.sap.portal.pcm.
Description
No
A layout description
com.sap.portal.reserved.
layout.TemplateFile
Yes
The name of the JSP page that defines the
layout (relative to the PORTAL-INF\jsp
directory)
com.sap.portal.reserved.
layout.Cont1,
Yes
Each container defined in the JSP must have a
property in the portalapp.xml.
The names of these properties should end with
ContX, where X is a sequence number starting
at 1
com.sap.portal.reserved.
layout.Cont2,
And so on
The value is a name for the container
Yes
LayoutTagLibrary
/SERVICE/com.sap.portal.
pagebuilder/taglib/layout/tld
For each container profile property described above, you can include the following metaproperties:
Property
Mandatory
Description
plainDescription
Yes
The display name of the container
orientation
Yes
Container orientation. Must be set to vertical.
designClass
No
A CSS class wrapping the HTML tag created by the
container:
If the container’s wrapping method attribute is
wrappingMethod=”table”, the class is added to
the table tag (<table class=”…”>)
If wrappingMethod=”div”, the class is added to
each div tag that wraps an iView (<div
class=”…”>)
If wrappingMethod=”none”, this setting is ignored
For more information about wrappingMethod, see
container and containerWithTrayDesign.
June 2011
6
How To... Create Custom Layouts
5. To ensure that your layout is correctly displayed in Ajax Page Builder (AJB), add the following
properties to the portalapp.xml:
Property
Mandatory
Description
XML_Template
Yes
Defines the XML schema of the layout used by
the Ajax Framework Page (AFP).
In the portalapp.xml, define this
property as a single line of text rather
than as structured XML:
<property name= “XML_Template"
value = “<?xml version="1.0"
encoding="UTF-8"?><PageLayout
xmlns:xsi="http://www.w3.org/20
01/XMLSchema-instance"...>
..."/>
The ContainerBehaviors tag is
optional; use it when you want to add
restrictions to the container.
The allowedDropTags attribute defines
which content types can be added to this
container. This attribute can be a
multivalue comma-separated list.
For more information, see Defining
Container Restrictions
com.sap.portal.layout
.BigImage
No
A large image that represents the layout in the
page authoring tool.
For example:
/com.sap.portal.pcc.pageutils/image
s/big_layout_T.png
com.sap.portal.layout
.SmallImage
No
A small image that represents the layout in the
page layouts section.
For example:
/com.sap.portal.pcc.pageutils/image
s/small_layout_T.gif
com.sap.portal.layout
.SelectedSmallImage
No
A small image that represents the selected
layout in the page content panel.
For example:
/com.sap.portal.pcc.pageutils/image
s/small_layout_T_x.gif
Note
The recommended image file types and sizes are as follows:
Big image: PNG, 96 x 70 pixels
Small image: GIF, 54 x 41 pixels
If you use different sizes, the images may be distorted in the layouts bar.
June 2011
7
How To... Create Custom Layouts
In our example we use the following portalapp.xml:
<?xml version="1.0" encoding="ISO-8859-1"?>
<application>
<application-config>
<property name="SharingReference"
value="com.sap.portal.pagebuilder"/>
</application-config>
<components>
<component name="overview">
<component-config>
<property name="ClassName"
value="com.sapportals.portal.pb.layout.PageLayout"/>
<property name="ResourceBundleName" value="pagebuilder_nls"/>
<property name="SafetyLevel" value="no_safety" />
</component-config>
<component-profile>
<property name="ComponentType"
value="com.sapportals.portal.layout" />
<property name="com.sap.portal.reserved.layout.TagLibLayout"
value="/SERVICE/com.sap.portal.pagebuilder/taglib/layout.tld"/>
<property name="com.sap.portal.pcm.Title" value="Overview (100,
25|25|25|25)"/>
<property name="com.sap.portal.pcm.Description" value="Overview
Layout (100% Top, 25% Bottom mostleft, 25% Bottom left, 25% Bottom right,
25 Bottom mostright)"/>
<property name="com.sap.portal.reserved.layout.TemplateFile"
value="overview.jsp"/>
<property name="AuthScheme" value="anonymous" />
<property name="com.sap.portal.reserved.layout.Cont1"
value="top">
<property name="title" value="Top Column"/>
<property name="orientation" value="vertical"/>
</property>
<property name="com.sap.portal.reserved.layout.Cont2"
value="bottom1">
<property name="title" value="Bottom Column leftmost"/>
<property name="orientation" value="vertical"/>
</property>
<property name="com.sap.portal.reserved.layout.Cont3"
value="bottom2">
<property name="title" value="Bottom Column left"/>
<property name="orientation" value="vertical"/>
</property>
<property name="com.sap.portal.reserved.layout.Cont4"
value="bottom3">
June 2011
8
How To... Create Custom Layouts
<property name="title" value="Bottom Column right"/>
<property name="orientation" value="vertical"/>
</property>
<property name="com.sap.portal.reserved.layout.Cont5"
value="bottom4">
<property name="title" value="Bottom Column rightmost"/>
<property name="orientation" value="vertical"/>
</property>
<property name="XML_Template" value="<?xml
version="1.0" encoding="UTF-8"?><PageLayout
xmlns:xsi="http://www.w3.org/2001/XMLSchema-instance"
xsi:noNamespaceSchemaLocation="../xsd/PBlayout.xsd"
layoutID="pcd:portal_content/templates/pcc/layouts/1Top4Bottom_(100__2
5_25_25_25)"
pageID="1Top4Bottom"><CustomAttributes><Attribute
key="JSP_Template"
value="gpar:/1Top4BottomLayout/1Top4Bottom"/></CustomAttrib
utes><TableLayout width="100%" height="100%"
cols="4"/><ContainersRow><Container
containerID="com.sap.portal.reserved.layout.Cont1"><TableCe
llData width="100%" height="100%" colSpan="4"
vAlign="top"/></Container></ContainersRow><Cont
ainersRow><Container
containerID="com.sap.portal.reserved.layout.Cont2"><TableCe
llData width="25%" height="100%" colSpan="1"
vAlign="top"/></Container><Container
containerID="com.sap.portal.reserved.layout.Cont3"><TableCe
llData width="25%" height="100%" colSpan="1"
vAlign="top"/></Container><Container
containerID="com.sap.portal.reserved.layout.Cont4"><TableCe
llData width="25%" height="100%" colSpan="1"
vAlign="top"/></Container><Container
containerID="com.sap.portal.reserved.layout.Cont5"><TableCe
llData width="25%" height="100%" colSpan="1"
vAlign="top"/></Container></ContainersRow></Pag
eLayout>" />
</component-profile>
</component>
</components>
<services/>
</application>
June 2011
9
How To... Create Custom Layouts
4.2 Deploy the Layout to the Portal
4.2.1 Create EAR File
...
1. Right-click your project folder.
2. Choose Export.
3. Navigate to SAP NetWeaver Portal
EAR File and choose Next.
4. Search for your layout project and choose Next.
5. Optional: On the next screen you can change the name of your EAR file and its location.
Optional: Mark “Include the source code of the portal application”.
6. Choose Finish. The EAR file is created.
June 2011
10
How To... Create Custom Layouts
4.2.2 Deploy the EAR File to the Portal
Deploy your new layout to the portal.
...
1. Navigate to the Deployment view in NWDS. If it is not yet opened, navigate to Window
Perspective
Other. Choose Deployment from the list.
2.
Open
Import your EAR file from the workspace.
3. Click Start to deploy the EAR file to the portal.
4.3 Configure the Layout for Use
Before you can use the new layout, you have to configure some settings.
4.3.1 Create a PCD-Object
...
1. Navigate to Content Administration
Overview Layout.
Portal Content Administration
Portal Applications
2. Right-click your layout and choose Copy.
June 2011
11
How To... Create Custom Layouts
3. Navigate to Content Administration
Portal Content Administration
Portal Content.
4. Choose a folder, or create a new one where you’ll store your layout.
5. Right-click the folder and choose Paste as PCD Object.
6. Enter the metadata of your layout.
June 2011
12
How To... Create Custom Layouts
7. Choose Next.
8. Choose Finish. Your layout is created as a PCD object.
June 2011
13
How To... Create Custom Layouts
4.3.2 Create a Delta Link
...
1. Right-click the new PCD object and choose Copy.
2. Navigate to Portal Content
Templates
WPC Templates
Layouts.
3. Right-click the folder and choose Paste.
4. Choose Create a delta link on the next screen.
5. Choose Next.
6. Choose Finish. Your layout is ready for use.
June 2011
14
How To... Create Custom Layouts
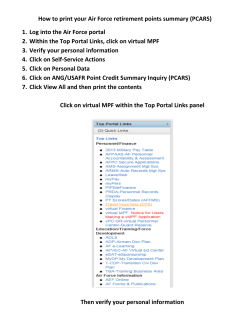
5.
Result
When you are creating a new web page with Web Page Composer you can choose the new layout. As
soon as you are in the editing mode, the new overview layout is chosen and displayed as follows:
Now you can drop your content in any of the containers.
June 2011
15
How To... Create Custom Layouts
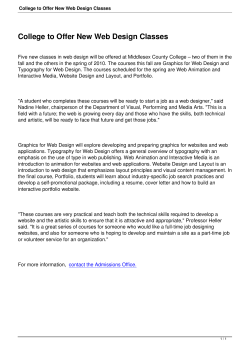
This is an example of a portal page using the new layout.
June 2011
16
How To... Create Custom Layouts
6.
Appendix
6.1 Appendix A – Advanced Layouts
You can further customize your layout by adding additional JSP pages, CSS pages, and .JS pages.
6.1.1 Change the overview.jsp File
In order to use included files you have to change the overview.jsp page.
<%@ taglib uri="prt:taglib:com.sap.portal.reserved.layout.TagLibLayout"
prefix="lyt"%>
response.include(componentRequest,
componentRequest.getResource(IResource.CSS, "css/layout.css"));
response.include(componentRequest,
componentRequest.getResource(IResource.SCRIPT, "scripts/layout.js"));
<%@ include file="commonTrayDesign.jsp" %>
<lyt:template>
<table id="GridLayout1" width="100%" cellSpacing="2">
<tr>
<td width="100%" valign="top" colspan="4">
<lyt:container id="top" wrappingMethod="none" />
</td>
</tr>
<tr>
<td width="25%" valign="top">
<lyt:containerWithTrayDesign id="bottom1"
wrappingMethod="none">
<%@ include file="commonTrayDesign.jsp" %>
</lyt:containerWithTrayDesign>
</td>
<td width="25%" valign="top">
<lyt:containerWithTrayDesign id="bottom2"
wrappingMethod="none">
<%@ include file="commonTrayDesign.jsp" %>
</lyt:containerWithTrayDesign>
</td>
<td width="25%" valign="top">
<lyt:containerWithTrayDesign id="bottom3"
wrappingMethod="none">
<%@ include file="commonTrayDesign.jsp" %>
</lyt:containerWithTrayDesign>
</td>
<td width="25%" valign="top">
<lyt:containerWithTrayDesign id="bottom4"
wrappingMethod="none">
<%@ include file="commonTrayDesign.jsp" %>
</lyt:containerWithTrayDesign>
</td>
</tr>
</table>
</lyt:template>
June 2011
17
How To... Create Custom Layouts
6.1.2 Define the Include Files
This section contains the following include files used in the JSP file that defines the layout JSP Page:
JSP include commonTrayDesign.jsp
CSS include layout.css
JavaScript layout.js
6.1.2.1 Define the commonTrayDesign.jsp File
This include file defines the tray design for all iViews. It uses a number of icon images that are
rendered into the HTML: ivuToggleClose.png for closing the iView, ivuToggleOpen.png for
opening it, and <IViewFamily>.png for each iView family that triggers the Options menu.
The background color of the tray depends on the iView family that has been set up for the iView by the
administrator. For more information, see IViewTrayColor.
...
1. Navigate to Overview Layout
dist
2. Right-click jsp and choose New
PORTAL-INF
jsp.
File.
3. Enter a file name and add the suffix .jsp.
4. Choose Finish. The file is created.
June 2011
18
How To... Create Custom Layouts
In our example we used the following commonTrayDesign.jsp:
<lyt:IfShowTray>
<div class="ivuTray"
style="background-color:<lyt:IViewTrayColor/>">
<ul class="ivuHeader">
<li class="ivuOptions">
<img src="<%=mimePath%>/images/<lyt:IViewFamily/>.png" />
<ul>
<lyt:IViewExpandAvailable>
<li>
<lyt:IViewExpand>
<lyt:IViewExpandTitle/>
</lyt:IViewExpand>
</li>
</lyt:IViewExpandAvailable>
<lyt:IViewRefreshAvailable>
<li>
<lyt:IViewRefresh>
<lyt:IViewRefreshTitle/>
</lyt:IViewRefresh>
</li>
</lyt:IViewRefreshAvailable>
<lyt:IViewPersonalizeAvailable>
<li>
<lyt:IViewPersonalize>
<lyt:IViewPersonalizeTitle/>
</lyt:IViewPersonalize>
</li>
</lyt:IViewPersonalizeAvailable>
<lyt:IViewRemoveAvailable>
<li>
<lyt:IViewRemove>
<lyt:IViewRemoveTitle/>
</lyt:IViewRemove>
</li>
</lyt:IViewRemoveAvailable>
<lyt:IViewHelpAvailable>
<li>
<lyt:IViewHelp>
<lyt:IViewHelpTitle/>
</lyt:IViewHelp>
</li>
</lyt:IViewAboutAvailable>
<lyt:IViewAboutAvailable>
<li>
<lyt:IViewAbout>
<lyt:IViewAboutTitle/>
</lyt:IViewAbout>
</li>
</lyt:IViewAboutAvailable>
</ul>
</li>
<lyt:IfIViewTitleAvailable>
<li class="ivuTitle">
<lyt:IViewTitle/>
</li>
</lyt:IfIViewTitleAvailable>
<lyt:IfIViewToggleAvailable>
<li class="ivuToggle">
<lyt:IViewToggleOpen>
June 2011
19
How To... Create Custom Layouts
<img src="<%=mimePath%>/images/ivuToggleOpen.png" />
</lyt:IViewToggleOpen>
<lyt:IViewToggleClose>
<img src="<%=mimePath%>/images/ivuToggleClose.png" />
</lyt:IViewToggleClose>
</li>
</lyt:IfIViewToggleAvailable>
</ul>
<div class="ivuContent">
<lyt:IViewContent/>
</div>
</div>
</lyt:IfShowTray>
<lyt:IfNotShowTray>
<lyt:IViewContent/>
</lyt:IfNotShowTray>
6.1.2.2 Define the layout.css File
This CSS file defines the styles used by the layout, both for the container columns and the single
trays, at runtime. Parts of the selectors use a CSS dropdown menu technique called “Suckerfish
Dropdowns” (see http://htmldog.com/articles/suckerfish/dropdowns/).
...
1. Navigate to Overview Layout
dist
2. Right-click css and choose New
css.
File.
3. Enter a file name and add the suffix .css.
4. Choose Finish. The file is created.
June 2011
20
How To... Create Custom Layouts
In our example we use the following layout.css:
.contTop {
clear: both;
width: 100%
}
.contBottom1 {
/*float: left; */
width: 25%;
}
.contBottom2 {
/*float: left; */
width: 25%;
}
.contBottom3 {
/*float: left; */
width: 25%;
}
.contBottom4 {
/*float: left; */
width: 25%;
}
.ivuTray {
border: 1px solid #666;
margin: 0 0 10px 10px;
}
.ivuHeader,
.ivuHeader li,
.ivuOptions ul,
.ivuTitle h3 {
padding: 0; /* reset */
margin: 0; /* reset */
}
.ivuHeader li {
list-style: none; /* reset */
}
.ivuOptions {
float: left;
display: block;
}
.ivuToggle {
float: right;
display: block;
}
.ivuHeader img {
display: block;
width: 24px;
height: 24px;
border: 0;
}
.ivuHeader li ul {
position: absolute; /* suckerfish menu */
top: -9999px; /* suckerfish menu */
width: 200px;
background: #ddd;
border: 1px solid #999;
}
.ivuHeader li:hover ul,
.ivuHeader li.hover ul {
June 2011
21
How To... Create Custom Layouts
top: auto; /* suckerfish menu */
}
.ivuOptions a {
display: block;
width: 100%;
text-decoration: none;
color: #333;
line-height: 24px;
text-indent: 5px;
}
.ivuOptions a:hover {
background: #333;
color: #ccc;
}
.ivuTitle {
float: left;
line-height: 24px;
text-indent: 5px;
}
.ivuContent {
clear: both; /* reset floats used in ivuHeader */
background: #fff;
}
6.1.2.3 Define the layout.js File
This JavaScript file defines a script that complements a missing feature of Microsoft Internet Explorer
(see http://htmldog.com/articles/suckerfish/dropdowns/).
...
1. Navigate to Overview Layout
dist
2. Right-click scripts and choose New
scripts.
File.
3. Enter a file name and add the suffix .js.
4. Choose Finish. The file is created.
June 2011
22
How To... Create Custom Layouts
In our example we use the following layout.js:
if (window.attachEvent) window.attachEvent('onload', function() {
var li = document.getElementsByTagName('LI');
for (var i = 0, l = li.length; i < l; i++) {
if (li[i].className != 'ivuOptions') continue;
li[i].onmouseover = function() {
this.className += ' hover';
}
li[i].onmouseout = function() {
this.className = this.className.replace(/ hover\b/, '');
}
}
});
6.2. Appendix B – List of Abbreviations
Abbreviation
Description
NWDS
NetWeaver Developer Studio
EAR
Enterprise Application Archive
PCD
Portal Content Directory
WPC
Web Page Composer
AFP
Ajax Framework Page
June 2011
23
www.sdn.sap.com/irj/sdn/howtoguides


© Copyright 2026