
How to Tread Lightly on Land and Water 1
How to Tread Lightly
on Land and Water
1
The Tread Lightly! Principles
Supporters of Tread Lightly! practice environmentally responsible outdoor recreation by adhering to
the TREAD principles. The TREAD principles are outdoor ethics messages that provide suggestions
and standards to teach people how to recreate responsibly including minimizing impacts to the
environment and other people.
This section will outline the Tread Lightly! principles and how they apply to the various outdoor
activities including motorized recreation, water recreation, winter recreation, backcountry sport,
hiking, camping, and more. This material will prepare you for enjoyable outdoor experiences and
at the same time, help you share the information on how to be a responsible influence on nature and
those around you.
THE TREAD PRINCIPLES: fundamentals of treading lightly on land and water
The following are the key messages for each of the principles.
On Land…
TRAVEL RESPONSIBLY on roads and trails or in permitted areas.
RESPECT THE RIGHTS OF OTHERS including private property owners and all recreational trail users,
campers, and others to allow them to enjoy their recreational activities undisturbed.
EDUCATE YOURSELF by obtaining travel maps and regulations from public agencies, planning for
your trip, taking recreation skills classes, and knowing how to use and operate your equipment safely.
AVOID SENSITIVE AREAS such as meadows, lakeshores, wetlands and streams, unless on designated
routes. This protects wildlife habitat and sensitive soils from damage.
DO YOUR PART by leaving the area better than you found it, properly disposing of waste, minimizing
the use of fire, avoiding the spread of invasive species, restoring degraded areas, and joining a local
enthusiast organization.
On Water…
TRAVEL RESPONSIBLY on designated waterways and launch your watercraft in designated areas.
RESPECT THE RIGHTS OF OTHERS including anglers, swimmers, skiers, boaters, divers, and others
to allow them to enjoy their recreational activities undisturbed.
EDUCATE YOURSELF by learning rules and regulations, planning for your trip, taking recreation
skills classes, and knowing how to use and operate your equipment safely.
AVOID SENSITIVE AREAS and operating your watercraft in shallow waters or near shorelines at high
speeds.
DO YOUR PART by leaving the area better than you found it, properly disposing of fuel, oil and
waste, avoiding the spread of invasive species, restoring degraded areas, and joining a local enthusiast
organization.
2
The Tread Lightly! Principles
TREAD LIGHTLY! ON LAND
Hills
• Driving safely up, down, or over hills requires
excellent judgment and an understanding of what
your vehicle can and cannot do. If you have any
doubt about you or your vehicle’s ability, don’t
drive up or down a hill; turn around and find
another route. Re-tracking is a normal part of safe
four-wheeling.
These are the basic tools for responsible
recreation. In the following pages you
will find in-depth information on how
to Tread Lightly! by minimizing your
impacts on land. By practicing these
principles and suggestions provided
in the guide, you will help preserve
access to public and private lands and
waterways.
• It’s especially important to avoid sudden
acceleration, sudden turns, or sudden braking.
Any of these actions could cause the vehicle’s
center of gravity to shift, destabilizing the vehicle,
leading to a collision or rollover.
• Travel straight up or down a hill or grade. Don’t
climb at an angle or cross the face of a hill below
the top—you may slide sideways or roll your
vehicle.
TRAVEL RESPONSIBLY on roads
and trails or in permitted areas.
• Use a low gear in the transmission and transfer
case.
The Fundamentals…
• Travel only in areas that are open to your type
of recreation.
Soft Spots (mud, soft or loose soils, sand)
• Stay on routes and trails designated for your
type of travel.
• Soft spots may be tempting challenges but
should be avoided.
• Don’t create new routes or expand existing
trails.
• Driving on wet trails increases rutting and
erosion.
• Cross streams only at fords where the road or
trail intersects the stream.
• Avoid mud if possible while remaining on the
road or trail. If you can’t avoid mud, use low
gears and just enough throttle to maintain
forward movement.
• Understand and practice proper techniques
related to negotiating terrain.
• Always travel with a partner. Traveling solo
can leave you vulnerable if you have an
accident or breakdown.
• Engage in locking differential or hubs. If
necessary, winch yourself through.
• To help generate additional traction, turn the
steering wheel rapidly from side-to-side if you
sense a loss of traction.
These are the fundamentals of reducing impacts
on the land. Each recreational activity requires
specialized techniques for negotiating terrain.
By learning and applying these techniques,
your impact on natural resources will be greatly
reduced.
• Don’t gun the engine. This will spin the tires
and dig you DOWN, not forward, and could
bury you to the frame. Smooth, easy power is
better than too much power.
Negotiating Terrain: Off Highway
Vehicles (OHV)
Obstacles
• Cross obstacles at an angle, one wheel at a time.
This increases the clearance of the vehicle.
• Don’t cross the obstacle straight on or you may
damage the undercarriage and you also run the
risk of high centering your vehicle.
Four Wheel Drive Use
Four-wheeling is a wonderful way to
experience the outdoors and if done properly,
is an environmentally sound way to enjoy the
backcountry. Here are a few tips to help you
negotiate terrain and enjoy your four-wheeling
experience while protecting the environment.
Large Rocks
• Carefully put a tire on the rock. Proceed very
slowly in low/low, with just enough throttle
to maintain headway. This raises the vehicle,
adding clearance to the undercarriage.
• Put your vehicle in four-wheel drive before
reaching hills, obstacles, large rocks, soft spots,
ravines, ruts, and crossing streams. Generally
low-range transfer gear is best for most offhighway use.
• Don’t straddle the rock. This may leave you
high centered on the frame or differential,
possibly damaging the frame and/or driveline.
• Know where the low points on your vehicle
are (the rock grabbers): the differentials,
transmission, transfer case, etc.
• Know the size of obstacles your vehicle can
3
The Tread Lightly! Principles
clear.
no problems; hub to bumper: check air intake height
and proceed slowly; bumper to bottom of headlights: use
extreme caution, sudden dips in the streambed could
mean water in the air intake, at headlights or above: do
not attempt, vehicle height is at or above the air intake.
Regardless, the best advice is to follow the guidelines in
your owner’s manual since all vehicles are different.
• Use a “spotter” in front of you to let you know
what is going on underneath your vehicle.
Crossing Ravines
• Turn into ravines, large depressions or “whoopt-dos” at about a 45-degree angle, left or right
(turning into, not away from, the depression)
and let the vehicle enter and leave one tire at a
time.
Turning Around
• Don’t try to turn around on a narrow road
or trail, unstable ground, or steep hillside.
You may slide off the road or trail or roll the
vehicle. Back up until there is adequate space
to turn around.
• Go slowly, allowing the vehicle to stabilize
itself.
• Don’t enter straight into a depression. You may
wedge yourself in front first or hang up the
front and rear as you attempt to exit.
• Back straight down a hill or steep incline, using
reverse and transfer case “low” range.
• Know your approach and departure angles.
• Stay in gear, keeping your foot off the
clutch and throttle. Apply the brake gently
(“feathering the brake”) to keep from locking
up the wheels, which may cause skidding.
Dealing with Ruts, Gullies, and Trail Washouts
• Straddle ruts, even if they are wider than your
vehicle. This may mean running your tires on
their sidewalls along the inside of the rut. This
will keep your vehicle level.
• Keep your foot off the throttle. This allows
engine compression to assist in braking.
• It is important to keep your vehicle level while
maintaining control. Be patient and drive
slowly in order to keep your vehicle balanced,
front to back and side to side.
Guiding
• Use a guide for safety whenever possible.
They can see things you can’t, especially when
backing up. Only assign one person to guide.
Guide from the uphill side of a vehicle or stay
well downhill.
• Don’t try to go forward with your vehicle tilted
to one side, because if the rut suddenly gets
deeper, your vehicle may roll or slide on its
side.
Hint: When guiding, locate the lowest point on the
vehicle and give instructions to avoid collisions. Give
clear and concise directions verbally and by using hand
signals.
• If you feel the vehicle tilt, turn into the
direction of the tilt. Gently apply more power
and as it levels out return your steering back to
the direction you want to go.
If You Stall
• Don’t spin your wheels: you may dig in, get
hung up, slide or roll your vehicle.
• Automatic Transmission: Apply the foot
and emergency brakes, and then put the
transmission in PARK. Start the engine. Keep
your foot firmly on the brake, and put the
transmission in low or reverse. Release the
emergency brake, and then slowly release the
foot brake until the vehicle begins to move.
Gently apply throttle.
Crossing Streams
• Cross slowly, at a 90-degree angle to the
stream, or at a slight angle to minimize
streambed damage. Crossing slowly also
helps keep water out of the engine’s air intake.
Create a steady “bow wake” that will form an
“air pocket” in and around the engine bay and
away from tires if water is bumper height.
• Manual Transmission: Don’t depress the
clutch. Keep vehicle in gear and engage the
starter. The combination of low range and first
gear or reverse will allow the engine to fire
and move at the same time. If you stall again,
repeat. This procedure allows you to maintain
full control. You won’t damage the starter and
this process preserves your clutch.
• Don’t charge across the stream, creating spray
and rooster tails.
• Don’t drive up and down the streambed; it
disturbs fish and other aquatic habitat.
• Cross streams only at trail fording points.
Check the water depth. If it is higher than your
engine’s air intake, don’t cross. Water in the
engine will stall it and can introduce pollutants
to the water resource.
• Check your brakes after water crossings.
Hint: Here’s a quick depth guideline for stream
fording—hub depth or less: you should generally have
4
• If you have a late-model vehicle with an
ignition lockout, do the following: Set the
emergency brake. With your left foot, depress
the clutch and with your right foot, depress the
brake. Shift into first or reverse (the transfer
case in low), and start the engine. Keep your
foot on the brake, and gradually release the
clutch until you feel it engage. Release the
emergency brake and the foot brake until the
vehicle begins to move. Gently apply throttle
to maintain forward momentum.
The Tread Lightly! Principles
pulley block to multiply the pulling power. Let
the winch pull you out; never drive the winch.
Keep Your Distance
• Keep a safe distance between vehicles. Enter
tough spots one vehicle at a time. A vehicle
on the other side of the problem area may be
able to help you by serving as a winch point or
assist you in towing.
• Righting an Overturned Vehicle: Attach
the tow strap (or if not available, the winch
cable) to an overturned vehicle’s far side
frame member (farthest from winching
vehicle). Wrap strap/cable starting toward
the winch vehicle, down the side, under the
overturned vehicle, up the far side and across
the overturned vehicle’s underside. Protect
the strap or cable from sharp objects on the
overturned vehicle’s body and undercarriage.
This multiplies the winching power and gives
greater control. Attach to the winching cable.
Engage the winch and let the winch do the
work. Be sure to have a spotter located in a
safe position away from the overturned vehicle
to direct the winching vehicle’s driver. To
keep the vehicle from slamming down when
rolling back on to tires, use another vehicle for
resistance using a strap or winch to let it down
smoothly.
• Wait for the vehicle in front of you to make
it successfully to the top of a hill before
proceeding. The vehicle may be unable to
make it and will need to back down.
• Keep the vehicle behind you in view to make
sure it doesn’t encounter any problems.
• Don’t tailgate. The vehicle in front of you may
stop suddenly, back up, or even begin to slide
backwards.
• Reconnoiter ahead on foot. When in doubt, get
out!
• Know what’s ahead of you. Even if you know
the trail, stop frequently. Get out, walk ahead,
and observe.
• Know what difficulties lie ahead before you
encounter them. Evaluate the alternatives
and find the easiest, least dangerous, and least
damaging choice.
Choosing the Right Winch
• As a general rule, choose a winch that is 1 _
times Gross Vehicle Weight Rating (GVWR) not
empty.
Winching
• For small vehicles, a 6,000 lb-rated winch is
generally adequate.
• A properly selected and mounted winch can
be an invaluable tool and can help reduce the
potential for environmental damage on any
four-wheeling adventure. The winch can be
used to remove fallen trees and rocks on the
road or trail, help pull vehicles out, or right an
overturned vehicle.
• For larger vehicles, an 8,000 or 9,000 lb-rated
winch is recommended.
• For heavy duty four-wheeling with heavily
loaded vehicles or full-size pickups, a 10,000 12,000 lb-rated winch is recommended.
• Direct Pull: After properly attaching the cable
to the object or vehicle, engage the winch. Put
the vehicle in low range/first gear and slowly
apply power. Follow the directions of the
spotter.
• Obtain or assemble a winch accessory kit with
heavy-duty leather gloves, wide tree strap,
clevis, and pulley. These are available from
most winch manufacturers. (A pulley block
effectively doubles the winch capacity).
• Winching a Stuck Vehicle: Attach the winch
hook to the tow hook or the frame (NEVER to
the bumper). Engage the winch to the frame
mounted attachment point. Never wrap the
cable to itself because it may damage the
cable. Never attempt to drive the vehicle while
winching; only assist the winch by driving if
the vehicle is on a bind or the tires hung rocks
or an embankment. Always drape a blanket
over the middle of the winch cable to keep it
from flying back at you if it comes loose or
breaks.
Driving Tips
• Be a “feather foot.” Go easy on the throttle and
brakes to maintain control.
• Keep your thumbs on top of the steering
wheel, hands positioned at 10 and 2 o’clock. If
you hit an obstacle, the tire may be deflected
and jerk the steering wheel suddenly. If the
thumbs are hooked over the steering wheel
spokes, you may suffer a severely sprained or
broken thumb. This happens more often with
manual steering, but it can also happen with
power steering.
• Pulling Stuck Vehicles or Removing Obstacles:
If you use a large tree as an anchor, use a tree
strap to protect the tree and place the strap as
low as possible on the tree. If you are attaching
your winch cable to a rock, use a chain to wrap
around the rock as the rock may chaff or cut
the nylon strap. Attach towing cable or chain
as low as possible. If a large tree or rock is not
available, use an in-ground anchor or bury
your spare tire as an anchor. If necessary, use a
• Lower the tire pressure to where you see a
bulge in your tire, generally not lower than
20 pounds. This will give you better traction
and provide a smoother ride by increasing the
footprint of the tire. However, increasing the
sidewall bulge makes it vulnerable to snags,
rocks, or sharp roots. Do not exceed 10-15 miles
per hour with the lowered air pressure. Back
up before you resume driving at higher speeds.
5
The Tread Lightly! Principles
slick or wet trails better. Usually, just the
opposite is true because high wheel spin
merely turns your drive tires into “slicks.”
It is much better to finesse the throttle for
maximum traction.
(Keep tire pressure high on ice or thin mud.)
Tire pressure that’s too low may also break the
seal of the tire to the wheel rim.
• Know where the differential is: this is the
lowest point on your vehicle. It could be on
the right, left, or in the middle. Knowing this
will help you know where to place your tires to
avoid hitting the differential.
• If your ATV has a manual clutch, you can
also use it to feel for traction. The goal is to
maintain forward motion while minimizing
wheel spin.
• Use the left foot braking technique.
Modulating the brake and throttle with both
feet helps maintain control, even on a vehicle
with a manual transmission. Light pressure
on the brakes helps reduce tire slippage before
wheel spin occurs. At the same time, an even
throttle feed keeps a uniform application of
power to the wheels. Going back and forth
from the throttle to the brake interrupts the
flow of power and can upset the vehicle’s
balance, causing loss of momentum.
Stream Crossings
• Cross only at established fording points, and
check water depth carefully.
• Take it slow and steady. Try to identify
big rocks or other obstacles before you
begin crossing. If you spill or drop into an
unexpected deep hole, shut off the engine
quickly to prevent water from being drawn
past the air cleaner.
• Beware of the passenger side; know the
parameters of tire placement.
• Avoid blasting through streams. It is
detrimental to fish and other aquatic life, not to
mention your engine. Stirring up the sediment
in the stream bottom makes it harder for fish to
breathe and find food.
• Look ahead of your vehicle about 30 yards to
pick your trail and align your vehicle for the
best route.
• Don’t ride the brakes or the clutch. Riding the
brakes can overheat the brake fluid, leading to
fade or failure when you need to brake. Tap
the brakes to maintain steering control and
avoid lock-up, skidding, or sliding. Riding
the clutch may cause the throw out bearing
and spring to wear and the friction surface
to overheat. Keeping the power going to the
wheels helps maintain control. Disengage the
clutch only at the last instant when coming to a
full stop.
• Avoid crossing streams at high speed; it
can cause water to rush into your air box,
drowning the engine.
Logs
• Ideally, it is best to move a fallen log off of the
trail, but if you can’t, go over it. Riding around
it makes another trail, which is undesirable.
• If you come across an obstacle you can’t move,
let the land manager know the location so he or
she can take appropriate action.
Hint: Borrow a page from the racing world. With your
front wheel pointed straight ahead, install a piece of
white tape around the steering wheel at the 12 o’clock
position. This will tell you when your wheels are
pointed straight, and how much steering input you are
giving the front wheels—eliminating the guesswork.
ATVs
• First, decide if your skill level and machine
capability are up to the maneuver you desire.
If unsure, turn off the engine, get off the ATV,
have a fellow rider help you lift your ATV’s
front end, and proceed to rear end over the log.
All Terrain Vehicle (ATV) and Dirt Bike Use
• If you choose to ride over it, approach the
log slowly, stand up with your weight
concentrated on the footrests, not the
handlebars.
ATV and dirt bike riding are two of the fastest
growing recreation activities in the country.
With large numbers of riders on the trails, these
activities can lead to damaged lands if not done
responsibly. Successful ATV and dirt bike rid ing
is all about skill. It is the skilled rider who can
ride slowly over challenging terrain with minimal
impact to the ground. Using skill and common
sense will help you get to your destination
smoothly, safely, and in style.
• Just before the front wheel(s) touch the log,
apply a small amount of throttle to lighten the
front end with just enough momentum to get
the rear tires over the log. Again, speed and
wheel spin won’t help; timing and technique
are everything.
Dirt Bikes
Slick Trails
• If you must go over a log, use the throttle and
shift your weight to the back of the bike just
enough to lift the front wheel over the log. You
will want to carry just enough momentum to
get the rear tire over. If you don’t, you could
dig a rut in front of the log, and spend a lot of
time and energy lifting your bike across.
• Please restrict recreation during periods of wet
or muddy soil conditions to reduce damage to
the trail surface.
• Minimize use of throttle. Many riders think
that using more throttle will get them through
6
The Tread Lightly! Principles
in meadows leave a terrible impression on the
environment and everyone who sees them.
• Again, too much throttle and wheel spin will
dig up the trail and could make the maneuver
dangerous.
• When you cross a meadow on a trail, stay on
the existing track. If the trail is too muddy,
turn around or find an alternate legal trail to
your destination. Don’t make new trails across
meadows or marshes.
Switchbacks
• Switchbacks are sharp, zigzag turns in trails
going up steep terrain. They exist for a reason:
to keep grades low and to prevent the trail
from eroding during storms.
Rocks
• Skilled riders work their way through these
challenging features, relying on weight shifts
and smoothness to negotiate the turns while
reducing wheel spin.
• Ride loose rocks with your rear end slightly off
the seat, looking ahead, keeping easy on the
throttle, and remaining in one gear higher than
you would normally.
• When riding switchbacks, avoid roosting
around the apex of the turn when climbing,
or brake-sliding while heading down. Both
techniques gouge the trail, requiring increased
trail maintenance.
• For big stationary rocks, rise farther off the
seat, keep knees bent, keep feet high on the
footrests, and pick your line very carefully.
• Beware of large rocks on a tight trail that can
damage the shift or brake levers, or worse yet,
punch a hole in the engine case.
ATVs
• A finger on the clutch lever can soften the
blow when you hit a well-anchored rock at the
wrong angle.
• If the turn is really tight, stop with the front
wheel touching the inside (apex) of the turn,
place the transmission in neutral, set the
parking brake and dismount the ATV on the
uphill side.
• If your ATV has a clutch, a slight pull on the
clutch lever softens the power delivery to the
ground, making a smoother ride.
• Pull the rear end to the outside of the turn,
remount, and resume riding. Using this simple
but safe technique can help you maneuver
your ATV around the tightest switchback.
Sand
• Ride sand relaxed, yet maintain a tight grip on
the bars. Look down the trail far enough to
react to upcoming obstacles, sit or stand with
your weight toward the rear of the bike, gently
squeeze the tank with your knees, and avoid
chopping the throttle abruptly to keep the front
end from “diving.”
Dirt Bikes
• If the turn is tight (going up), skilled riders can
“loft” the front wheel slightly while pivoting
on the rear tire. It is a tricky move. Don’t try it
in a dangerous spot.
• When riding down extremely tight turns, you
may find it easier (and safer) to get off the bike
(to the inside of the turn) and walk it around.
First, shut the engine off, put it in first gear,
pull the clutch gently to allow the bike to roll
forward, and release the clutch to use it like a
hand brake for the rear wheel.
• Easing off the throttle in loose, soft sand can act
as a natural brake for slowing down.
• Because of sand’s power and momentumrobbing characteristics, you may find it helpful
to accelerate a little sooner and brake a little
later than you normally would. This will
help keep you on top of the sand and keep
your movements more fluid. Only practice
this technique in areas with no obstacles or
hazards. Watch out for other riders.
Ruts
• Stay loose over the machine to allow for any
sudden directional changes the ruts may cause.
• Don’t ride at higher speeds where there is
limited visibility and watch for loose sand that
can cause the front wheel to “dive” or lose
control.
• Look ahead, and exercise smooth throttle
control.
• Avoid digging the grooves deeper and be wary
of slippery tree roots or rocks spanning the
ruts.
Winching with your ATV
• Whether you are clearing the trail of fallen
trees or recovering another vehicle, a winch
can be an invaluable tool and can help reduce
the potential for environmental damage on any
ATV adventure.
Meadows & Marshy Areas
• These sensitive habitats deserve special
protection; never go through them. Riding
through undergrowth or across meadows
can destroy nesting sites and other sensitive
habitats. Ride only on designated trails and
roads.
• Know how to use your winch before you need
it. Practice attaching it and removing it before
you head to the trail.
• Look for trails around the edge of such areas,
where the soil is more firm and dry. Ruts made
7
The Tread Lightly! Principles
changing: terrain features on the ride out may
not be the same on the way back.
• Take time to assess the situation and plan your
pull carefully. Analyze the situation and make
any decisions necessary for the proper use of
your winch.
• On windy days with shifting sand, use
stationary landmarks and/or global
positioning system (GPS) units to help identify
the way back.
• Use leather gloves to protect your hands.
Never let the wire rope slide through your
hands.
• In coastal duning areas, watch for quicksand in
the low unvegetated areas between dunes.
• A good, secure anchor is critical for winching.
While winching, make sure the anchor is
strong enough to hold. Trees, stumps, rocks,
and other natural anchors can be used. Use a
trunk protector, blanket, or wide strap when
anchoring to living trees to help protect the
tree.
• Avoid areas adjacent to rivers, streams, and
lakes. These areas in sand dunes are especially
sensitive.
• In areas adjacent to sand dunes, travel on
designated roads and trails. Ride in the middle
of the trail to minimize widening it.
• Never winch with less than five wraps of wire
rope around the drum.
Terrain Features
• Use the right equipment for your situation.
Know how much your winch can handle and
never exceed that limit.
• If you overdrive your line of sight by traveling
too fast you may inadvertently wedge yourself
in a “witch’s eye” or “blow hole” (a ravine or
depression in the sand).
• Inspect all your winching equipment before
and after each winching operation. If the wire
rope has become frayed or kinked, it needs to
be replaced.
• Watch for slip faces. Often found on the
leeward (downwind) side of a dune, slip faces
build up with unstable loose sand, which slips
and runs down slope creating steep drop offs.
• More specific information on using your winch
can be found in an Owner’s Manual.
• As you approach the top of a dune crest
(razorback), drive parallel to the edge to avoid
shooting over a steep drop-off. Try to do this
on the driver’s side so you have a better view
over the razorback.
Machine Tuning
• Riding an improperly prepared vehicle is not
only tiring, but can also cause damage to the
terrain while you’re trying to compensate for
poor performance.
• Heat haze and midday whiteouts can distort
terrain. Reduce speed to allow more time to
react.
• If your vehicle is not set up properly, it can
make otherwise simple obstacles more difficult
to overcome.
• Scout an area before traveling at higher speeds.
When traveling at higher speeds in unfamiliar
dunes it is easy to miss terrain features that
may cause accidents or lead to serious injury.
• To compensate for a poor tuning, you may
have to rev the engine at a much higher RPM
just to keep it running. This can make riding
dangerous and can increase wheel spin and
your impact on the trail. Gearing can have the
same effect; if first and second gears are too
high for tight trails, you won’t have much fun.
• When traversing, maintain speed and possibly
accelerate to maintain momentum to stay
on hills. Turn your wheels upslope and
use throttle to hold your height on the hill.
Traversing can help in spotting exit routes and
getting around obstacles.
OHVs in Sand Dunes
• When jumping hills or dunes, use a spotter.
Sand duning is a wonderful way to experience
the outdoors, and if done properly, is an
environmentally sound way to enjoy the area.
Here are a few tips to help you negotiate the
terrain while protecting the environment.
Driving Tips
• When driving a sand rail, know how to operate
a clutch, shift smoothly, and select gears that
maintain the middle RPM range.
• Decelerate into corners and accelerate through
corners to smoothly track the desired course.
• Determine the boundary of the designated
sand duning area. Don’t travel outside this
area.
• Braking should be smooth to minimize
“locking up.”
• Avoid running over plants. Not only does it
damage the environment, but it can also ruin
your tires.
• Use momentum to climb hills; downshift early
to avoid stalling.
• If you stall mid-slope, shift into reverse and
use the clutch and throttle to start a straight
backing movement. Before the vehicle gains
too much momentum, turn to the most
• Never take your eyes off the dunes, and watch
your speed. Obstacles appear quickly.
• Be aware that the dunes are constantly
8
The Tread Lightly! Principles
favorable side, turn to face downhill, then shift
into first gear.
Climbing
• When climbing, shift to a gear that provides
comfortable forward momentum and
maintains traction. Ride the tip of the saddle
with your nose over the axle.
• Berms created near campsites by repetitive
riding (also known as “worm tracks” or “speed
bumps”) are difficult to spot and extremely
hazardous. Keep speeds low in these areas.
• If you loose traction, lean back slightly, and
pull up on the bars.
• Avoid going around water bars or other
erosion control devices to prevent forming
a runoff channel. These devices are placed
across trails to direct water off the trail and
prevent erosion.
Negotiating Terrain: Nonmotorized
Travel
Mountain Biking
Mountain biking is a fantastic way to experience
the outdoors, and if done properly, is an
environmentally appropriate way to enjoy the
backcountry.
Downhill
• Ride back in the saddle keeping your weight
over the back wheel.
• When descending, apply enough brake to
maintain control. Use the front brake sparingly
relying mainly on the rear brake. Quick, light
pumping of the rear break reduces the chances
of locking your wheels and skidding.
Terrain Features
• Avoid trails when they are obviously wet and
muddy. Riding wet and muddy trails causes
ruts to appear. Ruts can lead to more damage
as users try to avoid them by moving to the
side, which widens the trail or causes multiple
trail ruts. If you are riding on an otherwise dry
trail and come across a wet section, carefully
go directly through the center of the mud or
puddle, or consider turning around and going
back the way you came.
• Ride switchbacks and corners as slow as
possible. Maintain your balance; stand out of
the saddle.
• Keep control of your bike at all times and
choose the safest line.
• Keep your pedals parallel to the ground while
maintaining good pedal contact.
• Cross streams only at designated fording
points.
Other Riding Tips
• Cross streams less than 1 foot deep to avoid
damaging your bike. Approach streams in low
gear at a 90-degree angle in standing position.
Keep your momentum. Remember stream
bottoms are often slippery. Walking across
moving water minimizes the risk of dumping
your bike and possibly injuring yourself.
• Dismount and walk the bike if you are
uncomfortable with the terrain or grade.
• Never make shortcuts on switchbacks. These
are sharp, zigzag turns on trails in steep
terrain. Shortcuts will lead to unnecessary
erosion.
• Always be in control of your bicycle. If you
find that your bike is running off the trail often,
ride slower or choose a wider, less technical
trail in the future.
• In sand it is best to keep your weight on the
back of your bike and let your front wheel
float, trying not to let it wonder off course.
Steer gradually and keep your momentum.
Very soft or loose sand may require you to
walk your bike to a more stable surface.
• Stay on designated trails, paths, routes, and
roadways when riding off-pavement.
• Make your presence well known when
approaching others or blind corners.
• Gravel requires good balance and attention.
Avoid sudden movements, steer gradually, and
keep your weight on the back of the bike.
Foot Travel
• Select a good line through rocks. Keep your
momentum and ride in a slightly higher gear.
Pull up on the handlebars for large rocks you
traverse. Remember to consider your rear
wheel when choosing your line.
Anyone who spends time in the great outdoors
will travel by foot at some point. Even foot traffic
can impact the land; therefore we should all learn
to tread lightly.
• Hopping logs can be great fun. Treat logs
similarly to rocks and approach them at a 90degree angle.
• Stay on the trail even if it is rough and
muddy. Walking on the track edge and cutting
switchbacks increase damage and cause
erosion and visual scarring.
• Leaves and pine duff can hide potential
hazards. Use caution and expect the
unexpected when riding through fallen leaves.
• Travel in small groups and walk single file to
avoid widening the trail.
9
The Tread Lightly! Principles
muddy. Walking on the track edge and cutting
switchbacks increase damage and cause
erosion and visual scarring.
• When allowed off designated trails, spread
out in open country. This disperses impacts
and avoids the creation of new trails. Select
off-trail routes that avoid fragile areas,
particularly wetlands, meadows, unstable
slopes, cryptobiotic soils, tundra, and places
covered by shrubs, dense-leafed herbs, or ferns.
These areas will show the effects of footprints
much longer than forested, rocky, or sandy
areas. Following in each other’s footsteps
concentrates impact.
• Walk single file to avoid widening the trail.
• When traveling in open country on foot where
there are no trails, spread out to disperse
impacts and avoid creating new trails.
Geocaching
• If traveling by vehicle, stay on designated
roads and trails.
• Avoid using game trails in open country.
• Follow best practices for negotiating terrain
with your vehicle.
• Watch where you put your feet to avoid
sensitive vegetation.
• Don’t create new routes or expand existing
trails.
• Be serious about animal-proof food storage,
and clean up leftover scraps. Pack out
whatever you pack in, as well as all litter you
may find as you recreate.
• Cross streams only at fords where the road or
trail crosses the stream.
• Take rest stops only in areas where your
presence will not damage vegetation.
• If hiking, walk single file to avoid widening the
trail.
• Flagging and marking trails is unsightly. If it is
necessary, remove flagging as you leave. Using
orienteering skills for route finding is more
challenging and leaves less of an impression on
the landscape.
• Spread out in open country where there are
no trails. Spreading out, rather than following
each other’s footsteps, disperses impact and
avoids creating a new trail. If possible travel
on hardened surfaces such as gravel, slick rock
or in sand washes.
Traveling with Horses and Stock Animals
• Use the “track back” feature on your Global
Positioning System (GPS) unit rather than
flagging and marking trails.
• Pack efficiently with your stock animals to
minimize the number of animals you will need
to bring.
• Comply with all signs and barriers.
• Ride single file to reduce trail damage, stay on
the trail, and don’t cut switchbacks.
Negotiating Terrain: Winter Travel
• Plan your trip to minimize travel in low, boggy
areas and marshes, which are easily impacted.
• Travel only in areas designated for your type of
winter travel.
Backcountry Sports
• Use good judgment when traveling on frozen
waterways. Check ice conditions before hand.
Many people spend time outdoors participating in
hunting and fishing sports. Practicing minimum
impact skills should complement the challenge
and excitement these sports provide.
• If you are out in the shoulder seasons (spring
and fall) when conditions are sometimes
muddy, stay on snow or walk in the middle of
the trail to avoid creating new trails.
Hunting
• Comply with signs and barriers.
• Keep scouting to a minimum. When you
spend time in the backcountry scouting, you
not only impact the areas you travel in but
when your presence is detected by game they
often retreat to isolated areas for safety.
Snowmobile
Terrain Features
• Obey all trail signs, including speed limit signs,
stop signs, and hazard warnings. Warning
signs can refer to bridges, sharp curves, steep
hills, large bumps, or road and trail crossings.
• Always practice minimum impact travel
techniques for your mode of transportation.
• When retrieving game, don’t travel crosscountry with your OHV. Get as close as
possible on a trail or road and then travel by
foot to the site of your kill.
• Stay on deep snow cover whenever possible.
• Observe speed limits; whether they are posted
on every trail or not, it is your responsibility to
obey local speed limits.
• Never ride an ATV with a loaded firearm.
When traveling on the trail, keep your firearm
secure in a protective case separate from the
ammunition.
• Operate your snowmobile only when there is
sufficient snow cover.
• Stay on the trail even if it is rough and
10
The Tread Lightly! Principles
• Be prepared with contact information on the
local search and rescue organization in case of
an emergency.
• When climbing a hill, approach the summit
with caution in case there is another
snowmobile, a steep downhill, a sharp turn, or
some other potential hazard beyond your line
of sight.
• Pack rescue gear. Wear an avalanche beacon
and know how to use it. A small pack with
a shovel and a probe should be worn on the
body at all times. Pack a cellular phone,
emergency phone numbers, and a GPS device
if possible.
• Do not ride off cornices (snowy overhangs), as
they are unstable and dangerous.
• Avoid riding on frozen waterways as much as
possible. If you must ride on lakes, streams, or
rivers, approach them with caution and check
ice conditions before hand. Ride at reduced
speeds to optimize your view of potential
hazards.
• If you travel in avalanche terrain, ALWAYS
travel with a partner. Have a rescue plan
before you begin. What will you do if you
trigger an avalanche? How will you respond if
you are the rescuer?
• Always cross roadways at a 90-degree angle to
the road to hasten the crossing.
• Use terrain to your advantage. Follow ridges,
thick trees, and slopes with safer consequences.
Avoid terrain traps such as gullies, creek beds,
and depressions. Don’t wait at the bottom of
steep slopes. Watch other riders and skiers
from a “safe spot” or area outside of an
avalanche path.
• Reduce your speed on the trail when
approaching a corner. Squeeze the brake
lightly, at least once, to evaluate how slippery
the snow is and to slow your snowmobile in
advance of the turn. Keep to the right side
of the trail on every corner. Do not slide the
snowmobile through the corner, or accelerate
hard out of the corner; you will damage the
trail.
• Any slope steeper than 25 degrees can
avalanche. Slopes 30 to 45 degrees are more
prone to slide. Avoid these steeper slopes.
• Periodically check for clues to an unstable
snow pack. These include recent avalanches,
new snow, wind loading, rain, whumping
noises or hollow sounding snow, shooting
cracks, and/or signs of rapid or intense
warming (roller balls and point releases).
• Be aware of trees, stumps, and branches near
the trails. Avoid them by maintaining control
at reasonable speeds.
Riding Tips
• Keep your feet in the foot wells when riding.
• Smooth steep wind loaded slopes can be very
dangerous. Check stability before attempting
to ride these slopes.
• Do not lock your brake when going downhill.
Rather, pump the brake repeatedly, releasing
it just as the track locks up and is about to
slide, then apply it again to further slow the
snowmobile.
• If you enjoy riding or skiing steep slopes
remember, ONE PERSON AT A TIME! NEVER
ride or ski above your partner.
• Lean into turns slightly with your upper body
to enhance the snowmobile’s maneuverability
and to avoid tipping the machine up onto one
ski.
• If a snowmobile gets stuck, don’t ride up
to help. The extra weight on the slope may
trigger an avalanche.
• Old tracks do not mean a steep slope is safe.
Always check for instability.
• Touring snowmobiles have extended seats
designed to accommodate up to two riders. Do
not ride two-up on a snowmobile designed for
only one rider because this could result in a
hazardous loss of control and maneuverability.
Make sure the passenger riding on the back of
a two-up seat leans slightly into turns with the
driver. Take advantage of having two sets of
eyes on board, and make sure the passenger is
watching for hazards and other snowmobiles.
• Understand cornice safety. Cornices are
overhanging deposits of wind-drifted snow
that form along the leeward side of a ridge.
Cornice breaks can be caused by the additional
weight of you or your machine. Make sure the
snow your on has solid ground underneath.
Do not ride or ski on slopes overhung by a
cornice.
Avalanche Awareness
The best way to avoid avalanches is to be
informed, travel with the appropriate gear, and
avoid high-risk areas. Check www.avalanche.org
for more information on avalanche safety and if
you have the opportunity, take an avalanche safety
course. The tips below serve as general safety
information for traveling in avalanche terrain.
• Before you go, contact the local avalanche
center for the latest avalanche forecast.
11
The Tread Lightly! Principles
RESPECT THE RIGHTS OF OTHERS
including private property owners
and all recreational trail users,
campers and others to allow them
to enjoy their recreational activities
undisturbed.
group or those traveling uphill. Dismount
and stand to the side if the trail is narrow. If
you are passing others, politely announce your
presence and proceed with caution.
• When encountering pack animals on the trail,
stop and ask the handler how to proceed. Do
not make sudden movements or noises, both of
which might startle the animals.
• Slow down when approaching blind corners or
hillsides.
The Fundamentals…
• Respect and be considerate of other users
so that all may enjoy a quality outdoor
experience. Keep a cheerful, pleasant attitude.
A gracious “Hello” goes a long way to building
a friendly relationship with other trail users.
Backcountry Sports
Hunting
• Be considerate and respectful of other hunters
and non-hunters in the area.
• Yield the right of way to those passing you or
traveling uphill and always yield to horses.
When driving also yield to hikers, and bikers.
Leave gates as you find them unless otherwise
posted.
• Be a sportsman and practice ethical hunting.
• Never take a shot unless you see the animal
clearly, you can identify it, and you know what
lies between you and the target. Also be aware
of what lies beyond the target.
• If crossing private property, be sure to ask
permission from the landowner(s).
• Don’t shoot across roads, trails, or waterways.
• Keep the noise and dust down.
• Do not leave animal remains in wetland or
riparian areas, campgrounds, or on roads or
trails where they are unsightly and may attract
predators.
• Don’t be a trail hog. Share with all those who
recreate, regardless of their means of travel.
Respect and common courtesy go a long way. By
valuing the environment and those who enjoy it,
you keep recreational opportunities available for
you and others to enjoy. Remember these basic
rules and you will find your outdoor experience to
be more rewarding.
Geocaching
• Check if permission is required before
placing a cache on private land, and respect
landowner(s) wishes.
Off-Highway Vehicles
Camping
• Yield right of way to drivers on the uphill
grade or those who may overtake you.
• Choose camping supplies in neutral colors that
blend with the natural surroundings and are
less intrusive to other campers’ experiences.
• Nonmotorized travelers maintain the right of
way. Yield to bicycles, horses, and hikers.
• Be respectful of those camping in the same
general area. Keep noise to a minimum,
especially in the early morning and evening
hours.
• When encountering pack animals use extra
caution. Slow down, move to side of the trail,
stop and ask the handlers how to proceed. If
you are wearing a helmet, remove it to look
human to the animals and don’t make sudden
movements.
• Be considerate of other campers’ privacy; keep
your distance and avoid traveling through
their campsites.
• Do not idly ride around in camping,
picnicking, trailhead, and residential areas.
Snowmobile
• Keep speeds low around crowds and in
camping areas.
• Before starting a day’s ride, agree as a group on
hand signals to use on the trails. You should
include signals for “stop ahead,” “oncoming
riders approaching,” “slow—hazard or sharp
curve ahead,” and “road crossing clear,
proceed with caution.” Common signals
among experienced trail riders include
holding up fingers to represent how many
snowmobiles are behind you in your group or
holding up a fist if you are the last one.
Mountain Bikes
• Faster bikers should take care not to throw
sand and mud from their wheels while riding
past other trail users.
• When encountering other hikers, bikers, or
stock users on the trail, yield to the passing
• Ride single file. Trails are typically groomed
wide enough for only two snowmobiles. You
12
The Tread Lightly! Principles
must leave room to your left for oncoming
snowmobiles to pass.
Other Winter Travel
• Keep to the right when meeting other winter
recreationists and yield the right of way to
downhill traffic.
• Excessive sound is bothersome to some
people and to wildlife. Retain and maintain
your snowmobile’s stock exhaust system.
Snowmobile exhaust is the single most
important issue causing user conflict.
• Respect established ski tracks. If traveling by
foot or snowshoe don’t damage existing ski
tracks.
• Be a courteous rider. Yield the right of way
when it helps the traffic flow to be safer and
smoother.
• When stopping, step to the right side of the
trail to let other skiers and recreationists pass.
• Move to the right to allow faster skiers to pass.
• Keep to the right on the trails—even when you
do not see any oncoming traffic. It is essential
to stay to the right while riding around corners
to avoid collisions with passing snowmobiles.
Reduce speeds as required to stay to the right
while cornering.
EDUCATE YOURSELF by obtaining
travel maps and regulations from
public agencies, planning for your
trip, taking recreation skills classes,
and knowing how to use and operate
your equipment safely.
• Pass on the left, but only pass another rider if
that rider is aware of your presence and has
waved you on. Make sure you have complete
visibility of the trail ahead so you know it
is safe to pull out to the left to pass. Slower
groups of riders should slow down and hug
the right edge of the trail to let faster riders
pass.
The Fundamentals…
• Know local laws and regulations.
• When stopping along a trail, pull your
snowmobile as far to the right side of the trail
as possible in a very visible stretch of the trail.
Do not stop near corners, and consider how
many riders are in your group so the last riders
aren’t parked near a corner. Park single file
and watch for oncoming snowmobiles.
• Know which areas and routes are open to your
type of recreation.
• Make your trip safe. Have the right
information, maps, and equipment and know
how to use them.
• If traveling by vehicle, make sure the vehicle is
properly maintained and compatible with road
or trail conditions.
• Show consideration for others, including
snowmobilers, ATV riders, land owners, skiers,
hikers, motorists, and wildlife.
With a little preparation and education, you can
make your next backcountry experience fun and
safe while protecting the environment. Plan
for the expected as well as the unexpected. If
the opportunity presents itself, take a course
or workshop related to your favorite outdoor
activity.. Universities, community education
programs, and outdoor retailers and outfitters
often offer classes related to recreational activities.
Education and preparation will make your trip
easier and more enjoyable.
• Ride only where permitted. Obey “no
trespassing” signs, even if you see tracks in the
posted areas. Being a responsible snowmobiler
can help all riders retain access to choice riding
areas.
• Unless a marked trail clearly routes you
around a locked gate, obey all gate closures as
you would in a vehicle. If you have permission
to go through a gate, leave it as you found it,
either open or closed.
• Respect fence boundaries and landowner(s)’
rights, even when the fences are snow-covered.
Always obtain permission to cross private
land, and stay on the trail.
Preparation
For Any Outing
• Obtain a travel map of the area you wish
to explore. After selecting a destination,
determine which areas are open for your
type of use. Select the safest route for your
ability, and determine what special rules and
regulations may be in effect.
• Park in designated areas at trailheads. Do not
park in restricted areas or in a way that blocks
traffic or other vehicles. If necessary, unload
the sleds from the trailer, and then park the
tow vehicle.
• Trails are for riding – not racing! Leave the
competition at the racetracks. If you absolutely
must go fast, enter a sanctioned snowmobile
drag race or radar run.
• Contact the land manager to see if there are
certain times or specific areas to avoid: times
when wildlife are particularly sensitive to
disturbance (e.g. nesting or birthing seasons) or
when soils are wet and prone to rutting; areas
that are particularly sensitive to disturbance
13
The Tread Lightly! Principles
backcountry, sometimes into remote areas at
great distance from roads and towns. The
buddy system is vital to avoiding tragedy
in case of emergencies such as a mechanical
breakdown or an accident.
because of rare or endangered plants and
animals, critical wildlife habitat, or fragile soil
or vegetation types; and problem areas that are
extremely crowded or where environmental
impacts are severe.
• Do not reach the point of mental or physical
exhaustion. Have fun, and end the day’s trip
before you are too tired to travel safely.
• Check the long-term weather forecast for the
location you will be visiting. Dress and pack
gear accordingly. A storm that you aren’t
prepared for can be a miserable experience at
best and an outright disaster at worst.
Off-Highway Vehicles
• Make a realistic plan and stick to it. Let
someone know where you will be and when
you will return, even on a day trip. Have
an itinerary of your overall trip and leave a
copy with family or friends in the event of an
emergency.
Preparation
• Contact the land management agency
responsible for managing the area. They
have specific information on road and trail
conditions, temporary or seasonal closures,
special permits, or low-impact driving
practices that apply to off-highway vehicle use.
• Carry local trail maps and area highway
maps to get the best idea of your location and
proximity to towns, roads, and trails. Better
yet, invest in a global positioning system
transceiver (GPS) to accompany your maps.
• If the area you wish to reach is on private
property, contact the land owner(s) to obtain
permission to access their land. Ask about
restrictions.
• Be familiar with the different signs that you
will see on the trail and proceed accordingly.
• Check to see if the state requires special
licensing or safety certification for the driver(s).
Is any special equipment required?
• If you are towing a trailer of any sort make sure
it is properly maintained and the tail lights
work.
• If needed, get your vehicle serviced or repaired
before the trip.
Safety
Four-Wheeling
For Any Outing
• Do a ‘dry run’ before you go to be sure
everything fits and that you haven’t forgotten
anything. Note what you have missed and
what you may need as you are en route (food,
fuel, water, emergency tools, or supplies).
• Be certain each member/vehicle in your party
has a map and knows where the group is
headed. Select predetermined rest stops and
designate meeting places in case of separation.
If you do become separated, stay on the
correct trail and let the group find you. Taking
different trails could facilitate you becoming
lost.
• Balance your load. Place heavy items that
won’t be needed in an emergency from the rear
axle forward for better traction.
• Don’t overextend daylight hours. Plan your
schedule to allow being back at the base,
campsite, or designated meeting place at a
predetermined hour.
ATV and Dirt Bike Riding
• ATV and dirt bike riders are exposed to the
elements. A great ride can turn into misery if
you are caught unprepared. It is always better
to have more clothing than you need.
• Always travel with a basic first aid kit and
survival supplies.
• Check local regulations for sound levels, spark
arresters, age limitations, training prerequisites,
and necessary registration requirements. Some
states may require a temporary user permit for
out-of-state visitors.
• Be prepared in case of an emergency that
requires you to spend the night in the
backcountry.
• A cellular phone is a smart, potentially
lifesaving link to help in case of an emergency.
Before your day’s trip, write down local
emergency telephone numbers and bring them
with you. Keep in mind, however, that you
may not have service in the area. In some
locations only satellite phones provide service.
• Be sure you know the location and operation of
all controls on your ATV or motorcycle: brakes,
engine stop switch, throttle, shifter, clutch, and
parking brake. Learn how to find and use the
controls without looking down at them. You
will not have time to look for controls when
riding or during emergency situations. Control
locations may vary from model to model. If
you switch to another vehicle, take the time to
familiarize yourself with its controls.
• Travel with a partner. Not only is there fun
in numbers, but traveling with at least one
companion is also essential to your safety.
Remember that you’re traveling in the
14
The Tread Lightly! Principles
• An ATV RiderCourse®, a DirtBike Schoolsm
class or another OHV safety training course
provides fast-paced hands-on training that
includes pre-ride inspection, starting and
stopping, quick turns, hill riding, emergency
stopping and swerving, and riding over
obstacles. You’ll also learn about protective
gear, local regulations, places to ride, and
environmental concerns.
Four Wheeling
• Buckle up! Seat belts are mandatory! They
help keep you in place on rough terrain.
Accidents can happen, even to the best fourwheel drivers.
ATV and Dirt Bike Riding
• Carry only the number of passengers your ATV
is designed for or, as local regulations require.
Certain areas prohibit double riding; contact
your local land manager(s).
OHVs In Sand Dunes
• Become familiar with the different signs you
see in the dunes and proceed accordingly. If the
area you wish to reach is on private property,
contact the land owner(s) to obtain permission
to access their land. Ask about restrictions.
• Always wear a helmet, eye protection, longsleeved shirt, sturdy pants, over-the-ankle
boots, and gloves. Specialized riding jerseys
and pants can keep you cool yet dry to combat
premature fatigue, while a chest protector
and knee pads can be cheap insurance against
injuries.
• Whips and approved flags may be required on
all vehicles in sand dunes at certain locations.
Contact your local land manager(s).
• Pace yourself. ATV and dirt bike riding are
physically demanding and can be compounded
by high altitude, heat or cold. Drink plenty
of water before and during the ride to avoid
dehydration. Know your limitations and keep
your body “fueled-up” at regular intervals
throughout the day. Don’t be too proud to take
a less challenging route if you feel tired.
• Check tire-pressure prior to any trip and daily
on multiple day trips.
• First-time duners should always travel with
someone who has experience in the area.
Safety
Safety on the road or trail is critical. Knowing
your limitations, your vehicle’s limitations, the
limitations of the soil or rock surface you’re
traveling on, and using common sense will ensure
your well-being.
• If your ATV or motorcycle is equipped with a
headlight, riding with it ON at all times will
allow other trail users to see you sooner.
• Be sure youngsters ride the right size ATV or
dirt bike. Supervise riders younger than 16.
• Use of a two-way radio or cellular phone may
be very helpful on a trip. Keeping in touch
with others in your party is essential and can
alert them if you are having a problem.
OHVs In Sand Dunes
• Ride at your skill level. Don’t try to keep
up with others if their riding is outside your
ability.
• Don’t drink and drive! Off-highway driving
requires every bit of skill and judgment you
can command. Drugs and alcohol can lead
you and your companions into dangerous
situations. If you are on medication, which
carries a vehicle/machinery operation
warning, let someone else drive.
• Keep your group together. Slow down if
someone lags behind and make all riders
accountable for the person riding behind them.
Use two-way radios to communicate and
designate lead and clean-up riders.
• It is easy to get separated or lost in the dunes.
If this happens, climb the tallest nearby hill and
make yourself visible.
• Maintain a reasonable distance between you
and your fellow OHV drivers. Tailgating can
lead to serious injury to you, your vehicle, and
others.
• In crowded areas make your camp easy to find
by flying a distinctive flag and using unique
lighting after dark. Consider use of a GPS.
• Start every trip with a full fuel tank.
Mechanical problems, weather conditions, or
other unforeseen problems can turn even a
short trip into a long trip.
• Global Positioning Systems (GPS) can be an
invaluable tool in sand dunes. Not only do
they help navigation, but they also help you
from getting lost and assist in locating you
during rescue.
• A multiple-use road or trail is not a racecourse.
Emulating racers you see on television or
at sanctioned events can be exciting, but
remember, those events are typically held
on closed courses and sites monitored for
safety. Aside from the potential for creating
environmental damage, reckless driving
endangers you and others sharing the road or
trail.
• Avoid running your vehicle completely out of
gas. If you are running low, travel to the edge
of the dunes and then make your way back to
camp. If you do have to walk out, it is much
easier and safer on stable ground.
15
The Tread Lightly! Principles
• Use common sense and know your limitations.
If you have doubts about your ability to ride
a section of trail, look at the map and see if
you can find a route that better matches your
personal abilities.
• A midday “white out” or sun glare may cause
loss of depth perception. Use goggles with
gradient lenses and reduce your speed when
such conditions occur.
Side By Sides (or UTVs) and Sand Rails
• Maintain a reasonable distance between you
and your fellow riders. Tailgating can lead
to disastrous results if the lead rider takes a
tumble.
• Every occupant should be buckled in, even if
you are planning on driving slowly.
• Make sure your golf cart is equipped with seat
belts and a roll bar.
• A multi-use trail is not a racecourse. Races
have strict rules. Aside from the potential for
creating environmental damage, reckless riding
endangers you and others sharing the trail.
• Lifted golf carts can be unstable and easy to
roll at high speeds. Ride at a reasonable pace.
• Side by sides (UTVs) stock brakes are not
designed to stop at high speeds. You may want
to consider upgrading your cart’s brakes.
Other Outdoor Recreation
Below are a few simple ideas to help in your
travels without mechanized vehicles and
suggestions on setting up a safe, comfortable
camp.
• All side by sides (UTVs), sand rails and
four wheel drive vehicles should carry a fire
extinguisher. They are required in some areas.
• A five-point harness with a crotch belt will
hold the lap and shoulder belts down and keep
riders in the sand rail.
Foot Travel
• Proper footwear is essential. Choose footwear
based on the terrain, the length of your trip,
and the load you will carry in your pack.
Sandals can be used for short hikes, hiking in
water, and around camp.
• Safety features to look for in your sand rail or
side by side (UTV) include suspension that will
take rough terrain, seats mounted to the frame
of the vehicle, properly installed seatbelts, a
sturdy roll cage, a skid plate mounted under
the seat, and sand tires mounted on bead lock
wheels.
• If you are carrying a pack for overnight trips,
its weight should not exceed 1/3 of your body
weight.
• Wear synthetic garments such as fleece or polypro. Cotton traps moisture and dries slowly.
Mountain Biking
• Always bring an extra layer of clothing.
Weather can change quickly and temperatures
may drop as you gain elevation.
Preparation
• First time to an area? It may be best to try a
lower rated trail to determine your personal
level of ability.
• Carry water and emergency supplies, even on
short hikes.
• Mountain bikers are exposed to the elements
and a great ride can turn into misery if you are
caught unprepared. It is always better to have
more clothing than you need rather than less.
Pack Animals
• Keep groups small and carry lightweight gear
to reduce the number of animals needed.
• Be sure your mountain bike is properly tuned.
• Check with land managers as some areas may
be closed to pack animals due to overuse or
fragile environments.
Safety
• Wear a helmet, eye protection, gloves, and
other personal safety gear.
• Pre-plan camp locations that provide plenty
of room and the proper environment for
confining animals.
• Wear appropriate clothing. Select clothing that
offers lightweight protection, “breathes,” dries
quickly, and keeps you warm.
• If possible, do not put new shoes on horses
prior to a trip. New shoes cut up the ground
more than worn shoes.
• Mountain biking requires a high level of skill
and judgment. Do not use drugs or alcohol.
They can impair your skills, leading to
accidents and/or serious injuries. If you are on
prescription or “over-the-counter” drugs which
carry a vehicle operation warning, don’t ride.
• Pace yourself. Mountain biking is physically
demanding. If you are riding at higher
altitudes, remember the air is thinner, and
you’ll tire more quickly than at lower altitudes.
Make realistic goals and stop frequently,
at least until you have adapted to the
environment.
Camping
• Plan for small groups, especially in remote
backcountry areas. Smaller campsites are
easier to find.
• Plan meals ahead of time. Repackage food in
reusable containers. This reduces weight and
the amount of trash to carry out.
16
The Tread Lightly! Principles
as possible with the machine’s power and
handling characteristics. Read the Owner’s
Manual. Make sure to perform regular
maintenance and familiarize yourself with
basic mechanics such as changing belts and
plugs.
• Prepare a list of all the required camping gear
for your trip and use it to pack.
• Talk to land managers about the location of
established campsites in backcountry areas to
help plan your travel itinerary.
• If you or another newcomer needs instruction
or riding tips, contact your local snowmobile
dealer or snowmobile club. Clubs usually have
members who are certified safety instructors;
they will be adept at teaching you the basics on
riding techniques and safe snowmobiling.
Backcountry Sports
Hunting
• Know the hunter education requirements for
your area and, whether required or not, take a
hunter education course.
• Wear a helmet when snowmobiling. It is your
head’s best protection in case of an accident. It
is also the best protection from wind and cold.
Full-face helmets provide the greatest safety
and protection.
• Hunt only when and where permitted, and
know your local hunting laws and regulations.
• Dress in layers and carry a jacket. Know your
state’s requirements regarding when to wear
Hunter Orange.
• Make sure your helmet fits properly. A helmet
should fit snugly, without pinching or hurting.
You should be able to slide a finger between
your head and the helmet padding. With the
chinstrap buckled, you should not be able to
pull the helmet forward off your head.
• Don’t mix hunting with alcohol or drugs.
Snow Sports
Preparation
• Snowmobile riders can find themselves
in harsh weather conditions. Current
snowmobile clothing is excellent at providing
warmth and preventing wind and moisture
from chilling a rider. Do not cut corners when
purchasing riding gear, because it is your best
protection against the elements. Be sure to
select garments that do not absorb moisture,
robbing you of body heat.
• Dress in layers so you can remove clothing
if you get warm or wet and put it on again
when needed. The clothing closest to your
skin should be non-absorbent so it wicks
moisture away from your skin to prevent chills.
The next layer or two should be comfortable
and loose enough to trap warm air. The
outer layer—your bibs, jacket, and gloves
or mittens—must be the most protective: as
waterproof and windproof as possible, and
durable enough to withstand branches along
the trail.
• Keeping your feet warm and dry is essential.
Choose boots that are waterproof and have
a warm lining or insulation, preferably a
removable liner you can dry at the day’s end.
Rubber is the most effective at keeping soles
sealed and waterproof. For uppers, thick
leather or waterproofed fabrics are good at
keeping water from reaching the insulation or
liner.
Snowmobile
• On state or federally managed lands, check
with rangers or land managers to clarify which
lands are open for riding. Watch for signs
at trailheads to verify that snowmobiles are
permitted on the trails you are entering. On
private land, check with landowner(s) for
permission to access their land.
• Some riders, especially those who ride in areas
laced with rivers, streams, and lakes, wear
flotation suits. These suits provide protective
shells and warm insulation as well as internal
flotation devices that keep a rider afloat if he
or she ends up in water. Look for suits whose
flotation materials are approved by regulatory
agencies. Remember that this extra protection
does not diminish the need for caution near
bodies of water.
• Check local rules. Ride only where permitted
and in areas where you may harm wildlife or
vegetation. Remember, designated Wilderness
areas are closed to all forms of mechanical use,
including snowmobiles. There may be some
exceptions in Alaskan Wilderness areas.
• Regardless of where you ride, be sure your
snowmobile is properly registered with your
home state or province. Learn whether you
need special local trail permits or registration
where you plan to ride. Some counties, states,
or parks require special permits.
Safety
• Pack emergency equipment, which will help
with survival if stranded.
• If a person develops hypothermia, warm up
the person as quickly as possible by rubbing
him or her vigorously and getting him or her
into dry clothes. Give the victim warm liquids.
Do not give alcohol.
• Make sure you are completely familiar with the
operation and controls of your snowmobile,
and use riding time to get as comfortable
17
The Tread Lightly! Principles
• Know how to build a snow cave for protection.
Practice making one during a trailside lunch
break. If using a snow cave, check stability
daily, and breakdown the snow cave after use.
Night Riding
• Night riding can be delightful. However,
be alert when riding at night and take
precautions. Pack emergency gear and notify
others of the routes you will take and when
you expect to return.
Snowmobile
• The number one cause of snowmobile
accidents is alcohol. Do not drink and ride.
Even one drink impairs response time and
judgment, two vital skills for snowmobiling.
Alcohol thins blood and allows your body
to cool faster, which may be the difference
between life and death in an emergency
situation.
• Avoid riding unfamiliar trails at night.
• Your vision is limited to only what your
snowmobile’s headlight illuminates, so reduce
your overall speed, and take your time when
riding at night. Be especially observant of
other snowmobiles, road crossings, and
hazards such as hills and sharp curves. You
should also keep an eye out for nocturnal
wildlife. Tinted goggles are effective on bright
days but can diminish vision at night.
• Learn the limits of your ability and drive at
safe speeds.
• Modern snowmobiles have excellent brakes,
but when riding on inherently slippery
surfaces (snow and ice), you cannot expect
to stop as quickly as is possible in a vehicle.
Be aware of your surroundings and of other
snowmobilers so you can react and respond in
time to avoid accidents. If you cannot stop a
safe distance from the snowmobile in front of
you, you are tailgating. Leave yourself plenty
of room to stop and watch for the brake lights
of snowmobiles ahead of you.
• Don’t override the area illuminated by your
headlights. If you ride too fast you may not see
hazards on the trail in time to react.
• Consider adding reflective tape to jackets,
helmets, and gloves or mittens so you will be
more visible to fellow riders.
Finally, one of the best ways to educate
yourself is to take a recreation skills class.
Local organizations, retailers and dealerships,
government agencies, and educational
organizations (colleges, universities local school
districts, non-government organizations) provide
a wide variety of education.
• When not on a groomed or marked trail,
be aware of unmarked hazards or obstacles
hidden beneath the snow, including fences,
rocks, gates, and ditches.
Simply put, a little planning and preparation will
make for a fantastic trip. Not only will all aspects
of your travel go smoother and safer, you are more
likely to leave less of a lasting impression on the
environment. `
• Play it safe as the daylight changes. Terrain
and snow contours can be difficult to see at
dusk. Reduce your speed, take a break, or stop
for the night.
• Ride defensively. Make safety the highest
priority when deciding whether to proceed or
to give way when encountering other riders
and road crossings. Do not assume that other
riders or motorists will always see you or
respond properly.
AVOID SENSITIVE AREAS such as
meadows, lakeshores, wetlands and
streams, unless on designated routes.
This protects wildlife habitat and
sensitive soils from damage.
• Watch out for trail groomers, especially at
night. They are big and typically move at slow
speeds on the trails. Make sure you can stop if
you round a corner and encounter a groomer.
Inquire at trail stops about whether any
groomers are on the next stretch of trails you
will ride. Always assume that a groomer is on
the trail.
The Fundamentals…
• Other sensitive habitats to avoid unless on
designated routes include cryptobiotic soils
of the desert, tundra, and, seasonal nesting or
breeding areas.
• Watch out for oncoming traffic. Make sure
your group’s leader is a safety-first rider
who signals to the group when oncoming
snowmobiles are spotted. Both groups of
riders should slow while passing each another,
and every rider should hug the trails outside
edge to make way for passing snowmobiles.
• Avoid disturbing historical, archeological, and
paleontological sites.
• Avoid “spooking” livestock and wildlife you
encounter and keep your distance.
• Motorized and mechanized vehicles are not
allowed in areas designated Wilderness.
• If you do experience operational problems or
breakdown, stay with your snowmobile and
stay on the trail.
With the number of recreationists rapidly growing
every year, the repeated and often unintentional
misuse of land creates environmental damage
18
The Tread Lightly! Principles
DO YOUR PART by leaving the area
better than you found it, properly
disposing of waste, minimizing the
use of fire, avoiding the spread of
invasive species, restoring degraded
areas, and joining a local enthusiast
organization.
especially in sensitive areas. By using common
sense and taking a few precautions, recreationists
will ensure that the natural places they frequent
will remain available and in good conditions for
future use.
For Any Outing
• Always stay on designated roads and trails or
other areas open for use (e.g. sand dunes).
• Leave what you find. Avoid picking wild
flowers or taking plants and cultural artifacts.
These things are best left in their natural
environment.
The Fundamentals...
• Leave it better than you found it. Carry a
garbage bag and pick up litter left by others.
• Avoid “spooking” livestock (horses, mules,
cattle, sheep, llamas) or wildlife you encounter
on the trail. Move slowly and keep your voices
low. These animals should be treated with
prudence. Proceed with caution.
• If you encounter repairable damage on the
road or trail, don’t pass it by. Stop and pick up
litter, and repair damage as best you can.
• Properly dispose of garbage, sanitary waste,
and gray water.
• Driving across a meadow or crashing through
undergrowth can destroy nesting sites and
other sensitive habitat.
• Follow practices to avoid spreading invasive
species.
• Protect the soundscape by preventing
unnecessary noise.
• Remember, designated Wilderness areas
are reserved for the most primitive outdoor
adventure. These areas were set aside by
Congress to protect the natural landscape and
the wilderness experience. These designated
areas are solely for non-mechanized travel—by
foot or horseback. OHVs, snowmobiles,
personal watercraft, or mountain bikes are not
allowed. Please respect the legacy of these
areas and leave it to those traveling by foot or
with pack animals.
• Join a local enthusiast group. They provide
great opportunities to learn more about your
sport and local recreation areas, volunteer
events, and a community to share your
experiences with.
Minimize Use of Fire
• Observe all fire restrictions. If you must build
a fire use existing fire rings, build a mound fire
,or use a fire pan. Keep fires small and allow it
to burn only while in use.
Snowmobiles
• Ride only where there is adequate snow cover
and where vegetation, including young trees
and plants, are not visible. Riding in marginal
snow conditions and on exposed soil can cause
damage to plants and soil.
• The best place to build a campfire is an
existing well-maintained fire ring in a suitable
campsite.
• Using a fire pan is a good alternative to
building a fire. A fire pan should have threeinch high sides and be placed on rocks or lined
with mineral soil so the heat won’t scorch the
ground.
• Be aware of wildlife you encounter during
your ride. Do not approach them. Animals are
commonly operating at lower energy levels in
winter, when food may be harder to find. Do
not scare or chase them away, which will force
them to expend precious energy.
• Mound fires are a great alternative in situations
when there is no fire ring or you can’t carry
a fire pan. To build a mound fire collect soil,
sand, or gravel from an already disturbed site.
Lay a ground cloth on the fire site and then
spread soil in a circular, flat-topped mound at
least six inches thick. Thickness of the mound
is important to insulate the ground from the
heat of the fire. Make sure the circumference
of the mound is larger than that of the fire.
The ground cloth under the mound allows for
quick clean-up of the fire remnants. Replace
the soil where you found it.
• For campfires, use only fallen timber. Gather
firewood well away from your camp. Do not
cut standing trees. There should be enough
wood that its removal for a fire is unnoticeable.
19
The Tread Lightly! Principles
• Learn how to identify invasive species in your
area and contact land managers if you discover
an outbreak.
• Let your fire burn down to a fine ash. Ensure
your fire is completely extinguished.
• For cooking, use a camp stove. They are
always preferable to a campfire in terms of
impact on the land.
• Invasive species are one more reason to always
travel on trails. Traveling off trails increases
your chances of encountering and spreading
these species.
• Never burn trash in a campfire.
Waste Disposal
Protecting the Soundscape
• Wash 200 feet away from streams and lakes.
Use biodegradable soap and scatter strained
wash water so it filters through the soil.
Natural sounds are essential to the health of
the environment. Man-made noise can reduce
the quality of the natural experience and can be
detrimental to the wildlife in an ecosystem.
• Do not wash in steams and lakes. Detergents,
toothpaste and soap harm fish and other
aquatic life.
• Check with a land manager to determine
if sound restrictions exist for your form of
recreation.
• In areas without toilets, use a portable latrine if
possible and pack out your waste.
• Make sure your engine and exhaust system are
well tuned. Your vehicle will run smoother
and quieter.
• In areas where use of a cat hole is necessary,
human waste should be disposed of in a
shallow hole (6”-8” deep) at least 200 feet from
water sources, campsites, or trails. Cover
and disguise the hole with natural materials.
Choose sites in un-traveled areas with good
organic soils and, if possible, in direct sunlight
to aid in decomposition.
• Avoid revving your engine or running at full
throttle, both of which create unnecessary
noise.
• Four-stroke engines run quieter than twostroke engines and meet the 96-decibel sound
level supported by national OHV enthusiast
organizations.
• Cat holes in desert environments require holes
to be only 4”- 6” deep and the site should be
in direct sun to aid in decomposition. Avoid
sandy washes were water flows during storms.
• If you are traveling on or around water,
remember sound travels faster on water.
• In sand dunes you must pack solid waste out.
Sand has no viable microorganisms to break
down human solid waste.
• Respect others’ desire for quiet solitude and
the sounds of nature. Early morning and late
afternoon is often the time when people enjoy
peace and tranquility.
• It is recommended to pack out your toilet
paper and hygiene products.
• Don’t overstay your welcome. When traveling
by OHV move around and stay away from
camping and picnicking areas.
• High use areas including river canyons may
have other restrictions so check with a land
manager.
• When camping, remember that others want to
enjoy the sounds of nature. Please refrain from
playing radios and music loudly.
• Repackage snacks and food in baggies. This
reduces weight and amount of trash to carry
out.
• Be aware that continued exposure to unnatural
noise could cause chronic stress to wildlife.
Take appropriate measures to reduce travel in
areas inhabited by wildlife.
• Pack out what you pack in.
• Don’t litter in the sand dunes! Blowing sand
easily covers trash that will reappear at a later
date. Broken bottles and sharp objects hidden
beneath the sand can damage tires and ruin
trips for you and others. Glass bottles are
prohibited in some areas.
Minimum Impact Camping
An overnighter or extended trip requires proper
preparation. Here are some helpful tips to assist
you in camping with minimum impact.
Invasive Species
General Camping Tips
Invasive species are non-native plants and animals
that out compete native species for valuable
resources within a particular habitat. Sometimes
referred to as noxious weeds or aquatic nuisance
species, these organisms damage the environment,
are costly to remove, and once established are
almost impossible to eradicate.
• Whenever possible, use existing campsites.
Camp on durable surfaces and set up tents and
cooking areas on a non-vegetated area. Take
the time to search for a suitable campsite in
areas without designated sites.
• Select a campsite approximately 200 feet
off trail and at least 200 feet from any water
resource. Camp near boulders or vegetation to
screen you from other campers.
• Following a trip, always wash your gear
and support vehicle to reduce the spread of
invasive species.
20
The Tread Lightly! Principles
• Provide information to wildlife managers to
help manage game and determine wildlife
inventories. Report any poaching incidents.
• Avoid camping near historical, archeological,
or paleontological sites or in areas of sensitive
or critical habitat.
Geocaching
Camping with Horses and Stock Animals
• When selecting a campsite, first consider your
stock. The site should be able to accommodate
your animals without damaging the area.
Cache Placers
• Avoid burying a cache in the ground.
• Before making camp, inspect the grazing
opportunities and determine whether the area
is overgrazed.
• It is the cache owner’s responsibility to
maintain the cache and the surrounding area.
If a cache’s area is impacted, confer with the
land manager on how you will mitigate the
impacts and seek their advice as to whether to
relocate the cache.
• Choose areas where stream banks or water
access can withstand hard use and are
downstream of the site. Avoid lakeshores and
soft meadows.
• Never place food items in a cache.
• Use hitchlines, hobbles, and staking to confine
animals. Erect hitchlines in rocky areas with
established trees and use straps or “tree savers”
to protect bark.
• Don’t modify the environment for any reason,
even when hiding a cache.
Cache Seekers
• If you use temporary corrals to contain pack
animals move the enclosure at least twice daily.
• Use maps to find a route that will minimize
impacts. Note waypoints during your journey
to assist you on your return trip.
• Bring pellets, grain, or weed-free hay to areas
where feed is limited or grazing is not allowed.
This reduces the chances of introducing
noxious and invasive weeds.
• If you notice a path has started to wear in the
vicinity of a cache, notify the cache owner via
email.
• When breaking camp remove or scatter
manure, remove excess hay and straw, and fill
areas dug up by animal hooves.
• Practice “lift, look, replace” technique, if you
lift a rock to look under it—then replace it
exactly as you found it.
• After you’ve finished searching for a cache,
the area should look as though you were never
there or better than when you arrived.
Winter Camping Tips
• Choose campsites in a safe location out of
avalanche paths and open wind affected areas.
Joining a local enthusiast organization is a great
way to get involved and protect your recreational
activities. These organizations provide many
services from organized events to educational
programming. These organizations are often
advocates for your type of recreation within
the local community and can provide expertise
on area trails, vehicle and gear repair, and
recreational skills.
• Camp at least 200 feet from a recognizable
water source.
• Avoid camping on designated summer
campsites to allow these areas time to recover
from summer use.
• Avoid using fires unless absolutely necessary.
Use a fire pan. Use dead or downed wood
no larger than your wrist. Do not depend on
campfires for cooking or heating. Cool ashes
should be scattered widely.
One of the best ways you can preserve the great
outdoors is to give your time. Volunteering for
clean-ups or trail restoration projects organized by
local groups or national events such as National
Public Lands Day helps to keep your favorite
recreational areas open.
• Pack out human waste or dig a shallow hole
in the snow to disguise it and ensure rapid
decomposition.
• Destroy any snow structures before departing
your site. Leaving snow structures encourages
others to use the structure, concentrating use.
They can also become a safety hazard.
Remember if you abuse it, you may lose it.
Careless impact on our natural resources can cause
damage and may result in closing of recreation
areas. By using common sense and common
courtesy, what is available today will be here to
enjoy tomorrow. Help preserve the outdoors for
yourself and generations to follow by recreating
responsibility.
Hunting
• Pack out nails, ropes, wire, rifle and shotgun
shells, and other trash.
• Dismantle meat poles and other structures
used while hunting.
• Remove flagging and biodegradable tape used
for route finding.
21
The Tread Lightly! Principles
keep a close look out for skiers and towables.
TREAD LIGHTLY! ON WATER
• Comply with all signs and barriers. This
includes speed limits, no-wake zones, and
underwater obstructions.
These are the basic tools for responsible
recreation. In the following pages you
will find in-depth information on how
to Tread Lightly! by minimizing your
impacts on waterways and shorelines.
By utilizing these principles and the
detailed suggestions provided in the
guide, public and private waterways are
more likely to remain open for recreation
and enjoyment.
• Because boats don’t have brakes, keep your
distance and don’t follow boats closer than 300
feet.
• If you are on a waterway before sunrise or after
sunset, turn your lights on.
• If you see a red flag on a tower at marina or
harbor, it signifies a small craft advisory. Take
action to move toward shore.
Personal Watercraft (PWC)
TRAVEL RESPONSIBLY on
designated waterways and launch
your watercraft in designated areas.
• Travel only in areas open to PWCs.
• Always wear a Personal Floatation Device
(PFD).
• When riding make sure that your automatic
engine stop lanyard is attached to your PFD,
wrist, or clothing.
The Fundamentals…
• Travel only on waters that are open to your
type of watercraft and recreation.
• If you fall off your craft, always reboard from
the rear.
• Understand and practice proper techniques
related to navigation on waterways.
• Do not attempt to ride at night. PWCs are not
equipped with lights.
• Always operate your watercraft at a safe speed.
• Wear a personal flotation device (PFD) and
make sure that you have one available for each
person on board.
Trailering Watercraft
• Make certain your trailer lights work and your
watercraft is secure on the trailer before you
travel to your destination.
• Have the required safety equipment in good
working order and onboard every time you
get underway (audio signaling device, flares
(where appropriate), PFDs)
• Balance your load—including items stowed
inside your boat. It also helps to empty water
and fuel tanks before traveling long distances.
• Comply with all signs and barriers.
• Make sure your boat is securely tied down to
the trailer.
• File a float plan with the appropriate parties
before getting underway (destination, ETA,
etc.)
RESPECT THE RIGHTS OF OTHERS
including anglers, swimmers, skiers,
boaters, divers and others to allow
them to enjoy their recreational
activities undisturbed.
• Always travel with a partner. Traveling
solo can leave you vulnerable if you have an
accident or breakdown.
Negotiating Waterways
Water recreation is a fun and exciting way to
experience the great outdoors. Motor powered
vessels offer an opportunity to travel waterways
with speed not offered by their human powered
counterparts. Still, these machines require smart
use to minimize impact on water resources and
other users.
Respecting the environment and the rights of
other users ensures future access to the water and
shines a positive light on boaters and PWC users.
Oftentimes, the opinions others have of your sport
may be based upon contact with a rider or two.
Much of water etiquette boils down to common
sense. Treat others on the water with respect and
courtesy. Of course, in addition to common sense,
there are important navigation rules you must be
familiar with. Collisions are the most common
type of PWC accident, and knowing a few basic
rules of the water greatly reduces the risk of
accidents. Be a good ambassador for your sport,
and make sure that those you encounter are left
with a positive image.
Motorized Watercraft
• Carry a personal flotation devise (PFD) for
each person on board.
• Keep your distance and avoid swimmers,
water-skiers, and all other boat traffic.
• Never jump a wake.
• Make sure you obey “no wake” zones.
• If crossing a wake, cross at lower speeds and
22
The Tread Lightly! Principles
• Leave ample room for other anglers so as not to
disturb their fishing experience.
The Fundamentals…
• Show consideration to all recreationists on and
around the waters.
• If fishing by boat, don’t crowd other anglers or
watercrafts.
• Be courteous to other boaters while in boat
ramp areas.
Always show consideration and respect for the
rights of others. Whether they’re fellow boaters,
swimmers, fisherman, or lakeside residents, a little
courtesy goes a long way toward creating good
will.
• Keep the noise down—especially around shore.
• If crossing private property, be sure to ask
permission from the landowner(s).
Motorized Boating
EDUCATE YOURSELF by learning
rules and regulations, planning for
your trip, taking recreation skills
classes, and knowing how to use and
operate your equipment safely.
• Motorized boats should stay clear of other
boats including those not under command,
with restricted maneuverability, fishing boats,
and sailing vessels.
• Navigation rules do not bestow right of way,
but provide a code of conduct to either giveway (stay clear) or stand-on (keep course)
preventing collisions on waterways. Boaters
should always take into consideration specific
circumstances when navigating waterways.
Preparation
Motorized Watercraft
• When overtaking a slower vessel, do so with
as much room as possible to avoid rocking the
other boat with your wake.
• Boating rules may vary from state to state.
Regulations such as operating age and distance
from other boats, swimmers, and the shore
often differ, so you must know local ordinances
before you go. The Personal Watercraft
Industry Association (PWIA) model legislation
recommends a minimum age of 16 for drivers.
In states where children under 16 are allowed
to operate watercraft, adult supervision is
recommended. These laws apply to all inboard
boaters including PWCs.
• When anchoring boats don’t get to close to
other boats. Changing winds and currents can
swing boats, causing anchor lines to tangle and
boats to bang against each other.
• Always offer help if you see another boater in
distress.
• Noise travels faster over water. Keep the noise
down especially near shore side residences,
campgrounds, and picnic areas.
• Weather, particularly over open water, can
change quickly. It’s crucial you get a weather
forecast before setting out for the day. This
will allow you to dress and plan accordingly.
Also, keep a close eye on the skies when on
the water. While riding, watch for increasing
winds, darkening skies, lightning, and thunder.
When faced with adverse weather, return to
shore. If caught in bad weather and faced with
threatening waves, reduce speed and approach
waves at a 45-degree angle.
Launching and Retrieving Watercraft
• The launch ramp is only for launching and
retrieving your watercraft.
• Launch and retrieve your watercraft as quickly
as possible.
• Prepare your watercraft including loading
supplies prior to entering the launch ramp.
• After retrieval, wipe down your boat and
prepare it for travel once you have cleared the
launch ramp.
• Modifications to your craft may reduce safety
and reliability and may make the vessel illegal
to use.
• Courtesy docks are available for loading and
unloading; they are not for long term docking.
• Make sure you have enough fuel and oil for
your entire trip. Waterways aren’t like the
open road, and fueling opportunities are far
less frequent. Think ahead; fill up on gas and
oil before leaving, bring extra fuel if necessary,
and know where potential fuel stops will be
along your route. A good rule of thumb is to
use no more than one-third going and onethird coming back; that way you’ll have onethird in reserve in case of an emergency.
Fishing
• Show consideration to all recreationists on and
around waterways and on the roads and trails
to fishing spots.
• Be courteous to other boaters while in boat
ramp areas.
• Know your machine and study your manual!
Jumping on and taking off is a lot more fun
than reading the Owner’s Manual first, but
you’ll have more fun and fewer problems in
• Understand and practice proper catch and
release techniques for the species you are
fishing for.
• Dispose of used monofilament line properly.
23
The Tread Lightly! Principles
the long run if you take the time to understand
your machine’s operating characteristics by
reading the information the manufacturer has
provided. Be sure you are completely familiar
with the controls and operation of your
watercraft, and be comfortable performing
basic maintenance.
Safety
Boating is meant to be fun. You can keep it that
way by using common sense and following a few
simple guidelines.
Motorized Watercraft
• The best teacher is experience. Learn from
someone very familiar with your type of
watercraft, and, if possible, take a boating
education class. Your local dealer, state
Department of Natural Resource (DNR), or
Coast Guard (800/366-BOAT) will know of
low-cost or free classes in your area.
• Don’t start your engine if you smell gas vapors.
Check the engine compartment, and identify
where the smell is coming from (i.e. fuel line,
gas tank, engine). In addition, it’s never a good
idea to smoke near your watercraft.
• More involved maintenance should be done
on a regular basis. If you are uncomfortable
performing any of the suggested functions,
have your local dealer tend to these tasks. It
will be worth it in the long run.
• It is essential that you know distress signals
and warning symbols. Local clubs, dealers,
or the Coast Guard can provide you with this
short list. You should also carry on board, a
whistle, flares (which are particularly useful
when riding on a large body of water), a
distress flag, or a brightly colored cloth.
• Always carry a U.S. Coast Guard approved,
working fire extinguisher with you when
boating. It’s the law, and all watercraft have
specific places to store the extinguisher.
Periodically, check the canister to be sure it is
still pressurized.
• Maintenance is vital to keep your machine
running trouble-free. Even casual inspections
before and after you recreate can prevent
problems.
• Pack a tool kit and carry a towrope in case you
or another boat needs a tow.
• Don’t overload your boat. It is dangerous
because boats lose buoyancy and stability,
risking capsizing.
Personal Watercraft (PWC)
• Licensing regulations for PWC vary from
state to state. Check with your local dealer,
enthusiast groups, or state department of
recreation for the laws in your area.
• Be aware of your surroundings at all times so
you can react and respond in time to avoid
accidents.
• Be sure to teach new users how to ride/drive
the watercraft, and better yet, see that they take
a boating education class.
• Consider purchasing PWC insurance.
• PWCs come with a standard tool kit. While
not fancy, the tool kit includes plug wrenches,
screwdrivers, other wrenches, among other
tools: everything you need to complete a minor
fix.
• You must report all accidents within 10
days when property damage exceeds $500.
Fatalities and missing persons must be
reported immediately, and formal reports are
due within 48 hours. To know whom to report
to, be familiar with the entity that manages
the waterway and numbers to call in case of
emergency.
Basic Water Safety
• Use the buddy system; never swim alone.
• Swim when a lifeguard is present.
• Follow all posted rules. If no rules are posted,
use common sense.
Personal Watercraft (PWC)
• Stay within your ability. It is natural for people
to want to push their limits, but remember you
are on a high performance vessel capable of
high speeds in an environment that can change
suddenly and without warning. Beginners
should always start at low speeds in uncrowded areas and gradually work their way
into more advanced riding.
• A PFD is recommended for inexperienced
swimmers when around the water.
• Swimmers with limited water experience
should stay in water less than chest deep.
• Know the water you are in and all possible
dangers associated.
• Do not swim if there are indications of bad
weather.
• Ride in control. PWCs have become more
powerful each year and can now cross a lot of
water per second. Racing should be saved for
sanctioned events.
• Do not dive headfirst unless the area is clearly
posted for diving.
• Learn to swim. Seek out your local partners in
the community that offer swimming lessons.
• Know and observe all speed limits; it’s your
responsibility.
24
The Tread Lightly! Principles
• Remember that you must apply throttle to
steer. If you try to steer without depressing the
throttle, the craft will continue in its current
direction.
• You may want to consider sunglasses or
goggles, as they can protect your eyes from the
wind, water, and sun. However, you might
find that they are distracting or distort your
vision.
• Know your PWCs load and towing limits, and
do not go beyond the established weight limits.
• Water gloves and footwear (booties) are also
recommended. Gloves can help keep blisters
at bay and protect you from cuts and bruises.
Booties help protect feet from injuries caused
by underwater objects.
• Many PWCs are capable of pulling a skier. In
addition to the driver and skier, you should
have a “spotter,” someone who sits on the back
of the PWC and monitors the skier.
• Make every effort to ride with a partner, even if
that person is on a different kind of boat. Not
only is there fun in numbers, but also riding
with at least one companion is essential to your
safety. The buddy system is vital to assure
quick assistance should problems arise. If your
group only has one boat, stay within eyesight
of shore.
• Pulling a skier requires a towrope of reasonable
length. A good rule of thumb is to stay at least
twice the length of the rope away from any
object or potential hazard.
• Be aware of all traffic and objects in your area.
The sun can often distort or disguise objects,
so pay attention to what is going on around
you. Because of a PWCs small size, swells,
obstructions, and other boats can affect sight
lines, so approach other objects with caution.
Do not operate directly behind other vessels
and do not turn sharply so that other boaters
cannot avoid you.
• PWC are not equipped with lights. Therefore,
do not attempt to ride at night.
Survival in the Water
Boating is a safe, fun activity, but as with any
sport, potential risks are involved. Knowing what
to do in case of an emergency could save a life.
• Riding a PWC can be strenuous and tiring, and
the wind and sun quickens fatigue. Use sun
block and take frequent breaks. When you are
tired, you are more susceptible to accidents.
• Knowing first aid is not the law, but it is a
smart idea. Being familiar with resuscitation,
heat exhaustion, hypothermia, and how to treat
a wound can be invaluable.
• Be sure to keep your lanyard attached to your
wrist, PFD, or clothing as appropriate. Its
smart, and it’s the law.
• You and your passengers should wear a Coast
Guard approved Personal Flotation Device
(PFD) which is acceptable for PWC use. All
PFDs contain information regarding the type of
PFD it is. Based on Coast Guard statistics from
the early 2000s, approximately three out of
four boat drowning victims were not wearing
a PFD, and the vast majority of accidental
boating deaths were due to drowning (www.
uscgboating.org/statistics/accident_stats.htm).
As a PWC user, you are far more likely to fall
into the water than any other boater.
• Any exposure to water that is colder than
your core body temperature (98.6 degrees
Fahrenheit) can eventually elicit symptoms
of hypothermia. Riding in water of less than
70 degrees greatly hastens the risk; so always
wear a wetsuit or dry suit in these conditions.
Signs of hypothermia include shivering,
dizziness, confusion, drowsiness, numbness,
weakness, and impaired judgment and vision.
Get any victim of hypothermia out of the cold
and into dry, warm clothing as quickly as
possible.
• No boater spends more time in the water than
a PWC user. Falls can be a fun, sometimes a
welcome part of riding. However, reboarding
can be difficult, especially in deep waters.
Always reboard your craft from the rear, and
ride carefully and slowly in traffic to avoid
unwanted spills that may make reboarding
difficult.
• If you fall in cold water, reboard your vessel
as quickly as possible. You lose body heat 25
times faster in water than from air of the same
temperature.
• Do not give the person with hypothermia
anything to eat or drink unless he or she is
fully conscious, and NEVER give the victim
alcohol. Warm the victim’s body slowly. After
full consciousness is restored, feed the victim
warm liquids and/or soup.
• You and your passengers should also wear
appropriate protective clothing, such as
wetsuits. You can receive severe internal
injuries if you fall into the water or are near the
jet thrust nozzle. These activities may force
water into body cavities. Normal swimwear
does not prevent water from entering body
cavities. Wetsuits can also help to protect
against hypothermia and abrasions.
25
The Tread Lightly! Principles
AVOID SENSITIVE AREAS and
operating your watercraft in shallow
waters or near shorelines at high
speeds.
• Recycle whenever possible. If a marina does
not recycle encourage them to start a program.
• Dumping plastics in navigable waters is
illegal in the United States. Marine animals
sometimes confuse plastics for food or get
entangled in it. Both are often fatal. Plastics
can also entangle propellers or clog intakes
damaging watercraft.
• Always launch at a designated boat ramp.
Backing a vehicle on a riverbank or lakeshore
can damage the area and leads to erosion.
Fueling Watercraft
• Always travel slowly in shallow waters and
avoid waters less than 2_ deep.
• Sensitive areas to avoid include seasonal
nesting or breeding areas.
• When filling your craft with gas and oil, take
every precaution not to spill into the water.
You may think a few drops don’t matter, but
if all boat users shared that attitude every
time they filled up, the damage would be
significant.
• Avoid “spooking” wildlife you encounter and
keep your distance.
• Be prepared; carry a spill kit, which includes
absorbent pads, socks, and booms.
• High speeds near shorelines leads to large
wakes, which can cause shoreline erosion.
• Avoid disturbing historical, archeological, and
paleontological sites.
• Use a fuel collar or bib when filling up to catch
drips and overflow and prevent backsplash.
• When anchoring choose areas with no aquatic
vegetation which can be damaged by dragging
anchors.
• Keep your engine tuned to prevent fuel and oil
leaks.
• Do not add soap to disperse fuel and oil spills.
It only increases damage to the environment.
• Motorized and mechanized vehicles are not
allowed in areas designated Wilderness.
Invasive Species
DO YOUR PART by leaving the area
better than you found it, properly
disposing of fuel, oil and waste,
avoiding the spread of invasive
species, restoring degraded areas,
and joining a local enthusiast
organization.
Aquatic nuisance species are becoming a costly
problem in our waterways. These non-indigenous
species threaten the health and diversity of the
aquatic ecosystem.
• Make sure to remove all plant material from
watercraft, motor, trailer and other gear and
dispose on dry land in a garbage container.
• Drain livewells, bilge water, and transom wells
at the boat launch prior to leaving.
• When you get home, wash your boat, gear, and
trailer with hot water.
• Pack out what you pack in.
• Flush water through your boat motor’s
cooling system and other parts of the boat that
normally get wet. If possible, let everything
dry for five days in the hot sun before using
your boat in another body of water.
• Carry a trash bag and pick up litter left by
others.
• When filling up your boat take every
precaution not to spill into the water.
• Observe proper sanitary waste disposal or pack
your waste out.
• Empty bait buckets on land, never into the
water.
• Following a trip wash your gear, watercraft,
and support vehicle to reduce the spread of
invasive species.
• Never dip your bait or minnow bucket into a
lake if the bucket contains water from another
lake.
• Don’t mix driving with alcohol or drugs.
• Never dump live fish or other organisms from
one body of water into another one.
Waste Disposal
Fishing
• Use marina pump-out or dump stations to
remove sewage. If you don’t have an installed
toilet use a portable toilet or on shore facilities.
• Never discard fish entrails in lake shallows
or any area where others might come across
it. It is unacceptable to bury it near the lake or
stream or burn it in camp. Suitable alternatives
include, bagging and packing out entrails,
disposing of it in water at least 25 feet deep, or
• Keep your trash on board and discard on shore
in garbage containers. Never dispose of fishing
line, cigarette butts, or other garbage into
waterways.
26
The Tread Lightly! Principles
burying it 100 yards away from any lake, trail,
or camps.
• Avoid using lead weights, which, if ingested, is
toxic to wildlife.
• Use only artificial lures. Live bait has to
potential to accidentally introduce exotics
and cause more damage to fish when being
released, as they often take live bait deeper.
• If practicing catch and release use barbless
single hooks to make release easier. Return
fish quickly, handling them with a wet hand to
minimize affects to the protective coating on
fish skin.
• Minimize fishing during spawning periods.
• Release smaller fish as they are forage for many
residents of the ecosystem. Larger and older
fish are often the best producers, collect more
contaminants, and are less healthy to eat—also
making them good choices for release.
Finally, join a local club! Clubs are a great way to
meet people with similar interests, pool resources,
and share experiences about trips and riding.
They often organize or provide information about
service projects around your favorite recreation
spot. Contact your local dealer for information on
boating and PWC clubs in your region.
27


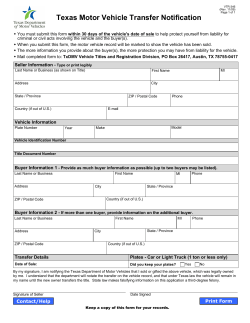


© Copyright 2026