
How to Register for an Event © OTN 2012
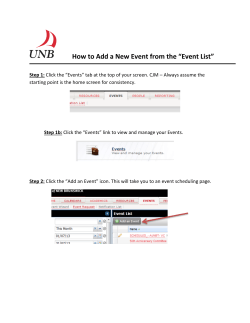
How to Register for an Event
© OTN 2012
How to Register for an Event
Table of Contents:
Register for an Event ………………………………………………Slide 3
E-mail Notifications ………………………………………………...Slide 4 - 8
Registering for a Public Event ..…………….................................Slide 5 -15
Business Rules…… ………………………...................................Slide 16
Terminology………………………………………………………………...Slide 17 - 18
Registering for Events
• There are two ways to self-register for an event:
– By accessing a link to an event sent to you by
email;
– By selecting an event that appears on the public
calendar.
Slide 3
E-mail Notifications
When planning an event, some organizers will send an
email announcing the details and inviting interested
parties to register or confirm their system details. This
email will contain both a description of the event and a
hyperlink in the body of the text.
Slide 4
1. When you receive an email notifying you of the
event, click on the link in the main body of the
message. This will launch the Ncompass
application. Log in to Ncompass with your
username and password.
Slide 5
2. Once in Ncompass, you will be able to view all
information regarding the event. If you are interested
in attending the event to which you have received an
invitation, indicate your interest by registering your
system.
Slide 6
3. Select the appropriate
system from the list of My
Systems. Enter a Contact
Name, Contact email and
Contact Phone.
4. Review this information to
ensure it is accurate. If you
are satisfied, click on the
register link to attend the
Event. The status bar should
display that your system has
been registered
successfully...
Slide 7
5. By clicking on your
system address – which is a
blue link - you are able to
change the system that you
are currently using and
select another system that
your profile is associated
with.
6. If you need to deregister
from the event, click on the
Unreq checkbox and confirm
that your system has been
removed from the event by
checking the message at the
top of the screen.
Slide 8
Register for Public Event
1. To view the public educational events listings , please
go our website at www.otn.ca and click the orange
“Members” button. When you are in the Members page,
click the “Learning Centre” button.
Slide 9
2. You can directly go to the Learning Centre using:
learning.otn.ca . Once in the Centre , you can search for
events by typing keywords in the Search field located at
the top right of the screen.
Slide 10
3. If you find an event that interests you, please click on the title link of the
event. The event details page will provide key information including:
Event Date, Registration Deadline, Event ID, Description and Registration
Instructions.
Slide 11
4. To directly register your system for
the event, logon to Ncompass and
select the Public Events link under
the Resources heading. This will
provide a listing of all the public
events for the month.
Slide 12
5. Locate the event that you are interested in attending
by searching for a key word. This can be done by
pressing the “Control” and F keys simultaneously.
Once you have found your event, click on the header
to access the event details.
Slide 13
6. If the bar is green and the words
"Registration Open" appear after an icon
depicting two open doors, then you will be
able to register for this event.
Slide 14
7. Select the appropriate system from the list
of My Systems. Enter a Contact Name,
Contact email and Contact Phone. Review
this information to ensure it is accurate. If
you are satisfied, click on the register link.
Slide 15
Register for Public Event
• Remember, there are rules about when changes can
be made to an event. The last possible time that
changes can be made in Ncompass is noon on the
business day before the event is to occur.
• Please contact Scheduling Services if you are unable
to make the change. You can contact the Scheduling
Services by dialing 1-866-454-6861.
• Finally, it is always good practice to inform the host
of the event of any alterations you have made to it.
Slide 16
Register for Public Event
Ncompass Terminology
Auto Initiate
An Ncompass feature that enables events to start and end
automatically without manual intervention. This means that if you
schedule an event to start at 8:00 AM, the systems involved will
automatically connect at that time, providing the
videoconferencing systems have been turned on
Clinical Event
An event that directly or indirectly discloses patient information.
Event Access
A field in Ncompass that determines whether participants can
register/deregister their own systems for the event.
Multipoint
An event involves more than three sites involved in the event
requires a bridge. A bridge acts like the hub of a wheel, bringing
together the spokes or in this case the individual sites in a
videoconference. All multipoints have a clearly defined start and
end time and must be scheduled at least one business day
before they are to occur.
Slide 17
Register for Public Event
Ncompass Terminology
Ncompass
Ncompass is an online scheduling tool designed for OTN
Members to schedule and manage videoconferencing events.
It’s simple to use, secure and gives OTN Members access to the
same scheduling information as OTN’s Scheduling Services.
Point-to-point
An event that takes place between two videoconference
systems and do not require the involvement of a bridge.
Consequently, point-to-point calls can be scheduled at any time.
In addition, point-to-point events provide users with portal calling
features.
Private Event
The host registers the sites that will attend the event. It is also
the host’s responsibility to contact all the participants that are
registered.
Public Event
The event is published in Ncompass and participants can
register their own system to the event.
Slide 18


© Copyright 2026