
Marge Skreko showed how to make beautiful coordinated fabrics from
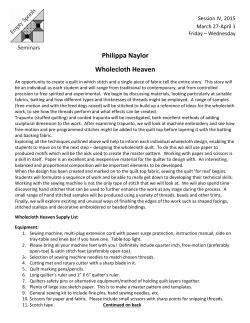
Marge Skreko from Rit Dye
showed how to make beautiful
coordinated fabrics from
unmatched, unused fabrics with
a quick over-dyeing process.
AQC406
Over-Dye Your Fabrics
Marge Skreko
Over-Dye Your Fabrics
M
any times you have odd fabrics that are perfectly good, but
that you just don’t like any more, or as Marge said, had
“expired inspiration”. Pick a color scheme, and jump right
in! Your results may not be quite what you expected, but they will be
beautiful, and coordinated!
Different colors come out different. For example, yellow fabric, dyed
blue, turns green! Here are different “before and after” pieces. You can
see the dramatic results! [Figures 1, 2 and 3]
Basic information when purchasing different types of Rit Dye powdered or liquid:
Sewing Supplies
✄ Pfaff creative 2144 Sewing and
Embroidery Machine
✄ Rit Dye
✄ Sulky Tear Easy
✄ Rowenta Expert Iron
✄ Warm and Natural Batting
✄ Pfaff Creative Card 338, quilt
Splendor #820148096
Rit Measurements:
• One box powder = 2 TBL
• 2 TBL powder = 1/2 cup liquid (4 oz.)
• 1 liquid bottle (8 oz.) = 4 TBL powder
You can dye samples to see what your results will
be before you dye all your yardage. The following
are the “recipes” to convert large quantities to
small to dye your samples.
Recipe 1
Figure 1
Sample dyeing prevents mistakes. Preview your results on a small
sample, not on five yards of fabric. The dye quantities listed for
sample dyeing convert into the amounts needed to dye one lb.
of fabric (dry weight) a medium shade, in three gallons of 140°F
water, with a timed dye bath duration of 30 minutes. If the color
is too light, add more dye: two times to four times as much depending upon the shade desired while keeping all else the same. If the
color is too dark, use less dye with all else remaining the same.
Dyeing procedure to determine a color:
Recipes are performed on a stove using one quart of hot water (60°F = 140°
F) in a non-reactive container (stainless steel or enamel).
Figure 2
A fat quarter and/or a swatch (small, representative piece) of the actual material can be used. All fabrics should be washed in detergent
before dyeing to remove any factory finishes. Timed duration for the
dyebath is 10 minutes.
All item are rinsed in cool water until the water runs clear. A small
amount (1/2 tsp.) of detergent can be added to the rinse water to
help remove any unbonded dyes.
Press sample fabrics between paper towels. If dye appears on the
paper towel, more rinsing is needed. Pressing can continue until fabric is dry, or fabric can be line or machine dried.
Figure 3
31
32 Over-Dye Your Fabrics
Chapter title
Sewing Supplies
Frankie’s Quilt
✄ Pfaff creative 2144 Sewing and
Embroidery Machine
✄ 5 fat quarters of coordinating print
fabrics (or use up a variety of print
scraps)
✄ 1/3 yard each of three
coordinating solid fabrics
✄ 1/2 yard of coordinating fabric for
binding
✄ 1-1/4 yard of coordinating fabric
for backing
✄ Warm and Natural Cotton batting
✄ Sulky Tear Easy Stabilizer
✄ Schmetz Size 90 Topstitch Needle
✄ Sewing Thread
✄ Sulky 30 or 12 wt. Cotton thread
for embroidery designs
✄ Pfaff #338 Quilt Splendor designs
#820148096
✄ Narrow Edge Foot w/IDT
#820217096
✄ 1/4 Inch Quilting Foot w/IDT
#820211096
Approximate finished size of quilt 39” X 42”
AQC406
TIP: Microwave setting: Fabric can also be dip-dyed and heat set in
the microwave:
• Dip fabric in dye solution mixed in one qt. quantities.
• Place fabric in a plastic bag or wrap in plastic wrap upon removal
from the dyebath and before rinsing.
• Microwave on high for two minutes.
• Follow rinse procedure.
TIP: Fasten the dye recipe to a swatch of the dyed fabric and save for
future reference.
Liquid Dye to Powder Dye Conversions
Converting sample dye quantities into amounts needed to dye one
lb. dry weight:
• 3 gallons 140°F water – 30 minutes dyebath duration
LIQUID DYE
Sample Amount to
one lb. Measure
4 tsp = 1 cup
2 tsp = 1/2 cup
1 tsp = 1/4 cup
1/2 tsp = 2 TBL
1/4 tsp = 1 TBL
1/8 tsp = 1 1/2 tsp
1/16 tsp = 3/4 tsp
POWDER DYE
Sample Amount to
one lb. Measure
or
or
or
or
or
or
or
1/2 tsp = 4 TBL
1/4 tsp = 2 TBL
1/8 tsp = 1 TBL
1/16 tsp = 1 1/2 tsp
1/32 tsp = 3/4 tsp
1/64 tsp = 3/8 tsp
1/128 tsp = 1/4 tsp
Once you have determined your chosen colors, dye the full yardages.
Frankie Seme-Bunevich, Pfaff creative Consultant, made a quilt with
the dyed fabrics. Here are the directions to make the quilt. [Figure 4]
Take the three 1/3 yard pieces of solid fabrics and cut each piece into
four even blocks. You should have twelve squares of solid fabric
roughly 12” X 12”. We will square the blocks up later, after the
embroidery is complete.
Hoop Tear-Easy Stabilizer and a block of solid fabric and
embroider one of the Quilt Splendor blocks design.
Embroider a different design on each of the twelve
blocks. When embroidery is complete, remove excess stabilizer from the back of the fabric and iron.
Cut the blocks 8” wide and a variety of lengths ranging
from 8” to 12” long, with the embroidery centered. The
quilt is designed to have a scrappy look, so cutting a variety of lengths will add interest to your quilt.
Cut the five fat quarter prints 8” wide and anywhere
from 8” to 12” long. Some of the lengths will be determined by the fabric scraps. Have fun with the lengths.
Next, lay out your quilt blocks in five columns, keeping
the embroidered blocks towards the inside of the quilt so
the design will not get cut off. Check that the total length
of the quilt is longer than 42”. Try not to put the same
Figure 4
AQC406
fabric or any of the future patchwork seams matching next to one
another and just have fun.
Snap on your 1/4 Inch Foot and thread with sewing thread top and
bobbin. Using 1/4” seam allowance sew the blocks together, forming
five strips roughly 42” in length or longer. Press all of your seam
allowances to one side.
Sew all of the strips together using your 1/4” seam allowance and
press seams to one side. Remember the seams should not match, this
is a scrappy quilt. Trim and square up the quilt top to 42” in length
and roughly 38” wide.
Over-Dye Your Fabrics
backing fabric right side down,
batting in the middle and quilt
top right side up on top.
Use the Narrow Edge Foot with
IDT to quilt the top, following
the seam lines.
Square up the layers and bind
the quilt with your favorite
binding method. To learn to
bind your quilt, see page 95.
Cut a piece of Warm and Natural Cotton batting and backing fabric
1” larger than the quilt top. Safety pin the layers together with the
QUILTING & TECHNOLOGY WITH HP
Choose the Correct Fabric for your Project
J
oe had a number of different examples of
the different types of fabric available to print
on. The Gloss Finish Artist Canvas sheets from
Vintage Workshop (#140001599) are perfect
for a handbag, but would be way too stiff for
a garment. An Iron-on Transfer from Vintage
Workshop (#140001600) is perfect to transfer an image to a project that can’t go
through the printer.
You can transfer directly to the bag, garment or project. Cotton Canvas from Vintage Workshop (#140001598) is perfect for
crafts projects and anything where a heavier,
stiffer fabric is desirable. Silk on the other
hand is ideal for scarves, blouse or vest panels or Home Dec projects where a soft, flowing fabric is desirable. Color Plus fabrics have
silk available in 14mm weights and 23mm weights.
• #140001086 Silk 14 mm 8.5” x 11” sheets
• #140001087 Silk 14 mm roll 8.5” x 3 yards
• #140001088 Silk 23 mm 8.5” x 11” sheets
• #140001089 Silk 23 mm roll 8.5” x 3 yards
Some other factors to look are the wash-ability factor, and wear and tear. Some of the heavier canvases
will show wear at the folds for example, on a project that would be used a lot. A button on purse was a
perfect solution to a bag where the image could be changed for the season or for different occasions. ■
33
34
What’s New to Do!
Blending Photos with Fabric
M
ary Ellen Kranz, teacher and co-author of Blending Photos with
Fabric by The Electric Quilt Company, joined Karen, Sue and
Andrea Poulimenos with ideas for blending photos into your quilts.
Mary Ellen has sewn many of the beautiful samples that Andrea brings to America Quilts creatively to share with our viewers. Andrea wanted
Karen and Sue wanted to meet her in person!
In Mary Ellen’s book, you will experience a new
way of using photographs in your quilts! Make
personal photos appear as fabrics, rather than
snapshots, by learning to blend photos
with quilt fabrics. Create quilts that capture memories of your garden, your vacation — anything reflecting your fascinations, moods, and passions. Complete
instructions for 10 quilts; 16 suggested variations are included.
Mary Ellen uses printed photos in quilts in such a
way that you can’t tell where the photo fabric
you’ve created ends and the purchased fabric begins.
It isn’t limited to just photos of family. You can use
photos of just about anything! Handwriting, grass, flowers nothing is
off limits for Mary Ellen.
She will often take everyday photos of everyday things and print
them. Try enlarging them and cropping out just one part, for example a flower pot. Then use the photos to choose fabric to coordinate.
Everyday items that are special to you, like old postcards and maybe
a stamp collection can be a quilt unto itself! [Figures A and B]
Figure A
Figure B
35
What’s New to Do!
Mary Ellen scanned in vegetables, seed packets and even books to
include, to all work into the vegetable garden theme. [Figure C]
When you have the photos printed the way you want them on paper,
then you are ready to print them on Electric Quilt Inkjet Fabric Sheets
#140001434. You can then incorporate them into your favorite quilt
design and have a truly one of-a-kind masterpiece!
Figure C (group)


© Copyright 2026