
TARANIS “HOW TO” THREAD 3/1 – 5/20/2014
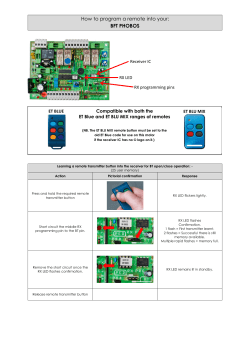
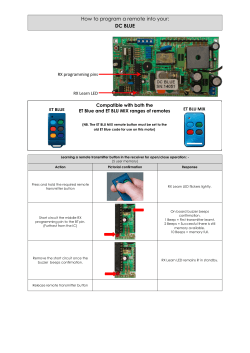
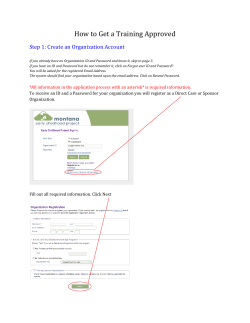
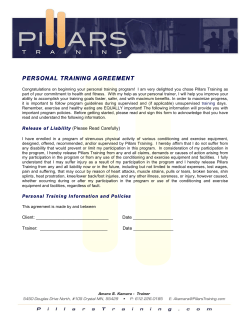
TARANIS “HOW TO” THREAD 3/1 – 5/20/2014 03 – Trimming Servos 04 – Analog Battery Sensor Hookup 04 – Variometer sensor 05 – Adjusting Mix Weight with S1 or S2 07 – Telemetry Alarm Warning 09 – Two Modes Operation with USB 09 – Setting Background Music Controlled by Slider 10 – THR Cut 10 – Setting Voltage Alarm 10 – THR Cut Problem 11 – Servo test 11 – Smart Port Voltage & Current Sensors 12 – Using Tablet PC with Companion 9X 12 – Adjustable Differential 13 – No Switch Warnings Until THR Able 14 – Multiple Sound Tracks 15 – Splash Screen 15 – THR – ELE Curve 16 – Down ELE with Flaps 17 – Change to Timer Stop/Start Function 18 – Program Switch To Read All Current Switch Positions 19 – 6‐Position Switch 21 – Stop Sound During Transition of 3‐Position Switch Movement 21 – “ONE” Is Going Away 22 – Training Mode Quick Takeback 22 – Sequential Switches 26 – New Sticky Function 27 – 6‐Position Switch Setup 1 28 – THR% 28 – VFAS Warning 30 – Buddy Box Setup 37 – Sound Files/Folders in 1.99 2 Set a track or sound to play when CS becomes true. 29 Setting up Buddy Box This is my understanding of the "buddy box" functions of the Taranis. There are enough different parameters to play with that I'm not sure of all the possibilities, so I'll explain what works for me, and then in the future add more information as it's learned and tested. I find the term "Buddy Box" somewhat misleading. In truth what we're doing is establishing connection for a CoPilot connection. DEFAULT TRAINER SCREEN. To access the default trainer screen give a long press to the MENU button and then press PAGE twice. The CoPilot connection can be established with many different parameters, and different transmitters. If a transmitter can output PPM signal it can be used for a CoPilot connection. In the best possible scenario both transmitters will be Taranis, but that's not necessarily going to be the case. Fortunately the Taranis can be either the primary or secondary transmitter. The primary transmitter is also referred to as the "master" or the "instructor" transmitter. The secondary transmitter is also referred to as the "slave" or the "student" transmitter. There are three different primary-secondary possibilities. With the Taranis as the primary transmitter, as the secondary transmitter, both the primary or secondary transmitter. As an additional parameter, the connection can be either wired or wireless. Regardless of whether the connection is wired or wireless, the transmitter that needs the 30 most "setup time" is the primary transmitter. The primary transmitter must be set up to fly the aircraft independently of the secondary so far as setting up the rates, expo, and subtrim. Additionally, if the Taranis is the primary transmitter it must have the Trainer screen set-up so the Taranis knows whether to accept the PPM signal as a 100% replacement for the primary controls, or mixed with the primary controls. If the controls are in 100% replacement mode this is denoted as := and if the control is mixed mode then it's denoted +=. Each of the 4 basic control channels are configured independently for mixed mode or replacement mode. In addition to establishing the mode you also must establish the % of the PPM signal to either mix or replace. For replacement mode you'll probably want to set the % at 100%. For mixed mode you'll need to experiment to find the optimal settings. The next thing that needs to be established is which incoming channel will correspond to the Taranis inputs for Ail, Ele, Thr, Rud. There is also a calibration setting which can be set to assure the incoming secondary PPM signal is balanced with the primary PPM. TRAINER SCREEN CONFIGURED FOR A BASIC SETUP I will start by explaining the most common setup. A 100% replacement mode and wired. In this example I'll consider the secondary transmitter as one having Ch 1 throttle, ch 2 aileron, ch 3 elevator and ch 4 rudder. I believe these are the default outputs of a spektrum transmitter. The order of the controls in the trainer screen is determined by the setting for the default channel order in the radio setup screen. The default channel order is near the bottom of the screen. Which default channel order is chosen doesn't matter - so long as the proper outputs from the secondary transmitter are mapped to the correct inputs in the trainer screen. 31 You can see in the diagrams below that I've chosen := for all channels to give the secondary transmitter complete control over each channel, and I've set the percentage for all controls to 100%. This would be the most basic setup - but as you can see, all sorts of different settings could be configured for individual situations. The secondary transmitter will not have control of rates or expo so I want to have the secondary transmitter set with 100% rates and 0% expo. The primary transmitter will control the rates or expo. Once the output channels from the secondary tx are mapped to the input channels in the primary tx you'll need to set up at least one custom function so you can toggle the trainer function and yield control from the primary tx to the secondary tx. Traditionally this is done with a "dead man" switch - also called a momentary switch. The idea is the primary pilot holds the switch the entire time the secondary pilot is flying, and upon releasing the switch the spring action will return it to the default position so the primary tx regains control. As with everything on the taranis this is very configurable - but I'll show the standard function here. I also like to have two functions to give a verbal report on the switch changing positions. One speaks a .wav file that says something like "Student has control". and the other direction (default) will speak "Instructor has control". In a wireless setup the signal being broadcast from the secondary tx to a receiver (bound to the secondary tx) located on the primary tx and the CPPM from the receiver is linked by a 1/8" mono plug to the trainer port. I have explained how I set up a wireless connection between two Taranis @ http://www.rcgroups.com/forums/showp...ostcount=26840 32 Recently there have been some intrepid individuals that have created more complex mixes that will yield control to the secondary tx with a flick of a switch on the primary tx and then does not require the primary to hold the switch - but rather the control switches to the primary when one of the primary gimbals is moved. Setting up the Taranis to buddy Box This is my understanding of the "buddy box" functions of the Taranis. There are enough different parameters to play with that I'm not sure of all the possibilities, so I'll explain what works for me, and then in the future add more information as it's learned and tested. I find the term "Buddy Box" somewhat misleading. In truth what we're doing is establishing connection for a CoPilot connection. DEFAULT TRAINER SCREEN. To access the default trainer screen give a long press to the MENU button and then press PAGE twice. The CoPilot connection can be established with many different parameters, and different transmitters. If a transmitter can output PPM signal it can be used for a CoPilot connection. 33 In the best possible scenario both transmitters will be Taranis, but that's not necessarily going to be the case. Fortunately the Taranis can be either the primary or secondary transmitter. The primary transmitter is also referred to as the "master" or the "instructor" transmitter. The secondary transmitter is also referred to as the "slave" or the "student" transmitter. There are three different primary-secondary possibilities. With the Taranis as the primary transmitter, as the secondary transmitter, both the primary or secondary transmitter. As an additional parameter, the connection can be either wired or wireless. Regardless of whether the connection is wired or wireless, the transmitter that needs the most "setup time" is the primary transmitter. The primary transmitter must be set up to fly the aircraft independently of the secondary so far as setting up the rates, expo, and subtrim. Additionally, if the Taranis is the primary transmitter it must have the Trainer screen set-up so the Taranis knows whether to accept the PPM signal as a 100% replacement for the primary controls, or mixed with the primary controls. If the controls are in 100% replacement mode this is denoted as := and if the control is mixed mode then it's denoted +=. Each of the 4 basic control channels are configured independently for mixed mode or replacement mode. In addition to establishing the mode you also must establish the % of the PPM signal to either mix or replace. For replacement mode you'll probably want to set the % at 100%. For mixed mode you'll need to experiment to find the optimal settings. The next thing that needs to be established is which incoming channel will correspond to the Taranis inputs for Ail, Ele, Thr, Rud. There is also a calibration setting which can be set to assure the incoming secondary PPM signal is balanced with the primary PPM. 34 TRAINER SCREEN CONFIGURED FOR A BASIC SETUP I will start by explaining the most common setup. A 100% replacement mode and wired. In this example I'll consider the secondary transmitter as one having Ch 1 throttle, ch 2 aileron, ch 3 elevator and ch 4 rudder. I believe these are the default outputs of a spektrum transmitter. The order of the controls in the trainer screen is determined by the setting for the default channel order in the radio setup screen. The default channel order is near the bottom of the screen. Which default channel order is chosen doesn't matter - so long as the proper outputs from the secondary transmitter are mapped to the correct inputs in the trainer screen. You can see in the diagrams below that I've chosen := for all channels to give the secondary transmitter complete control over each channel, and I've set the percentage for all controls to 100%. This would be the most basic setup - but as you can see, all sorts of different settings could be configured for individual situations. The secondary transmitter will not have control of rates or expo so I want to have the 35 secondary transmitter set with 100% rates and 0% expo. The primary transmitter will control the rates or expo. Once the output channels from the secondary tx are mapped to the input channels in the primary tx you'll need to set up at least one custom function so you can toggle the trainer function and yield control from the primary tx to the secondary tx. Traditionally this is done with a "dead man" switch - also called a momentary switch. The idea is the primary pilot holds the switch the entire time the secondary pilot is flying, and upon releasing the switch the spring action will return it to the default position so the primary tx regains control. As with everything on the taranis this is very configurable - but I'll show the standard function here. I also like to have two functions to give a verbal report on the switch changing positions. One speaks a .wav file that says something like "Student has control". and the other direction (default) will speak "Instructor has control". In a wireless setup the signal being broadcast from the secondary tx to a receiver (bound to the secondary tx) located on the primary tx and the CPPM from the receiver is linked by a 1/8" mono plug to the trainer port. I have explained how I set up a wireless connection between two Taranis @ http://www.rcgroups.com/forums/showp...ostcount=26840 Recently there have been some intrepid individuals that have created more complex mixes that will yield control to the secondary tx with a flick of a switch on the primary tx and then does not require the primary to hold the switch - but rather the control switches to the primary when one of the primary gimbals is moved. 36 Sound Siles/Folders in 1.99 How to have the switches automatically set up for a particular model so you don't need to program them in custom functions. So you have a model named Sky_Eye (spaces won't work) Then in the sound folder you have a folder named Sky_Eye places like such: \SOUNDS\en\Sky_Eye Inside that folder you have the sounds you want named like such SA-up SA-mid SA-down So if Switch A↓ gives me Low rates Elevator - I name the .wav file that says "low rates elevator SA-down and it goes in the Sky_Eye folder. The sound that has mid rate elevator is on SA- I name that sound SA-mid And so forth. This also works with named flight modes -- but that's enough for now. What's really cool is when you set up the next model .. say a Bixler and you use the same switches for rudder, elevator, aileron.. you can just duplicate the model sound folder and name it with the name of the new model and you're done. Then fill in the items specific to that model in Custom Functions. 37


© Copyright 2026