
How to Post a Blog on the RVS site
How to Post a Blog
on the RVS site
Blog
Wikipedia
A blog (a portmanteau of the term web log) is a discussion or information site published on the
web consisting of discrete entries ("posts") typically displayed in reverse chronological order so
the most recent post appears first. The modern blog evolved from the online diary where people
would keep a running account of their personal or work lives. The term "weblog" was coined by
Jorn Barger on 17 December 1997. The short form, "blog," was coined by Peter Merholz, who
jokingly broke the word weblog into the phrase we blog in the sidebar of his blog Peterme.com in
April or May 1999 leading to the popularization of the terms to blog, blogging, blogger etc.
Creating an RVS Blog
Getting started:
When ready to create your first blog, email RVS’ Communications Department with your request
for blog user I.D. and they will create a user account for you. You should receive an email with a
username, password, and directions to log in.
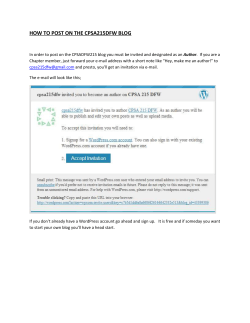
To access the Blog Site from our website click on the Blog icon at the top of the RVS homepage:
Alternatively you can log in via: http://blogs.rockyview.ab.ca/wp-admin
The following screen will open up. Scroll down to Site Login and click on Log in:
A WordPress screen will then open up for you to log into. WordPress is a free web platform used
for creating blogs.
1. Enter your username (ex. johnsmith) and newly assigned password
2. To change your password – once you have logged in you will see an option to enter a
New Password (at the bottom)
3. Click Update Profile
Posting a blog
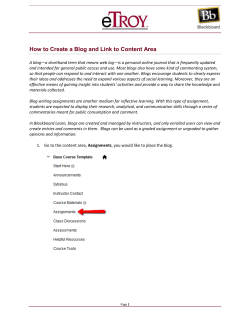
1. On the left-hand side navigation you will see the Dashboard. Under Dashboard, select
Posts/Add New
1.
2. Enter the title of your Blog/Post
2.
3. Copy your blog content from Word and paste into the window
Please note: each blog entry should start with Guest Author: Your name, title (if applicable):
Ex. Guest Author: John Smith, Principal – Blog
4. Format it as you see fit using the tool bar at the top.
4.
3.
Adding a hyperlink:
1. Highlight the word you would like to make a link (you can link to websites or videos this
way)
2. Click the
icon and insert the FULL link (ex. http://….)
2.
3.
4.
3. Check the box “Open link in a new window/tab”
4. Click Add Link -once linked, the word will turn blue and be underlined
Categorizing (tagging) your blog:
On the right-hand side, you will see a box with categories to choose from. Select the tag(s) that
are most appropriate for your blog. This is a way that readers can search for topics of interest
and will determine which tab your blog will sit under.
Important: DO NOT CHOOSE the Power to Enrich – this is not an option.
Setting a feature image (image that will appear next to your blog):
It is strongly recommended that each blogger set a feature image. You can do this by choosing
from your own image files or from one of the stock images provided.
1. On the right-hand side navigation (bottom of page) you will find a box titled Feature
Image
2. Choose Set featured image
3. Choose a file from your computer (browse), from a website (this is more to add a video to
your blog), or from the Media Library (stock photos)
From your computer:
1. Select file
2. Choose your image
3. Select Use as feature image (bottom middle)
4. Save all changes
5. Another box will open – no action required, just hit the X to close out.
From Media Library:
1. Choose an image
2. Click Show
3. Once info box opens up, select Use as featured image (middle of the box) – when it
disappears, select Save all changes (at bottom)
4. Hit the X to close out
From URL:
Use this for videos only. Do not use this for an image!
Previewing and posting your blog:
When you are ready to post the blog, you will work in the Publish Pane (right-hand side)
1.
1. Before posting your blog, you should Preview it (right-hand side). Please note: in the preview
pane, you will not see your feature image. Once you have previewed your blog, click on the X to
return to the edit screen. Alternatively, you can preview your blog with your feature image, select
The Power to Enrich tab on the top navigation bar (Visit Site). This will bring up your post. Click on
the back arrow to get back to your blog to edit or publish.
2. When you are certain that your blog is ready, click Publish. On the top navigation bar, you will
see a tab called View Post. Click on it (again, you will not see your feature image in this view).
2.
Once it’s been posted, you can still go back in and Edit the post by clicking Edit, located on the
top navigation bar (hover over it to bring it to the forefront), or by clicking All posts under
Dashboard – you can then go in Edit, View, or Trash it.
Once you have posted your blog, please send an email to Sarah McNab, Communications Officer
at [email protected] as well as to Angela Spanier, Director of Communications at
[email protected].
Responding to comments from readers
You will receive a notification email if a reader leaves a comment on your blog. You may
comment by logging once again into Word Press.
Blogging is a useful tool to post ideas, work or news of interest.


© Copyright 2026