
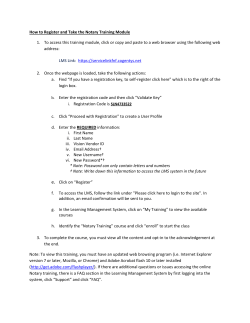
How to participate in an Adobe Connect session
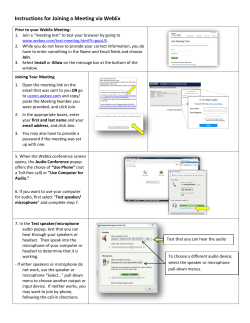
How to participate in an Adobe Connect session What is Adobe Connect? Adobe Connect is part of the Hunter Institutes Virtual Learning Environment (VLE) - it is our Web Conferencing tool and our Virtual Classroom. Web Conferencing is an internet technology that allows conferencing events to be shared with remote locations in real time, from one sender to many receivers. It’s a bit like holding a video conference at your workstation, with added features and tools. Adobe Connect can be used for teaching and learning to: Deliver learning content to students either synchronously (at the same time) or asynchronously (at the students own time, place and space) set up your very own virtual classroom complete with F:F classroom tools deliver tutorials, training and presentations mentor and coach students in small groups or 1:1 share information and demonstrate tasks and skills to students record your own online learning opportunities for students to view in their own time, place and space provide an alternative method of engaging with students communicate directly with your students use a whiteboard to brainstorm or chat rooms for live chat or discussions conduct meetings across your Faculty What does the Adobe Connect Room look like? The room consists of various display panels (pods) and components. There are several prebuilt room layouts, or you can customise a layout to suit your needs. The virtual classroom enables multiple users to share computer screens or files, chat, broadcast live audio and video, and take part in other interactive online activities. What do I need to do before I attend a Connect session? 1. Check your computer for system requirements It is recommended that you test your computer prior to attending a meeting. You can do this by clicking on the following web link: http://admin.adobeconnect.com/common/help/en/support/meeting_test.htm WfD Technologies Team – Leading Online Learning How to Participate in an Adobe Connect session – Manage and facilitate Page 1 This connection will check your computer to make sure all system requirements are met. If your computer passes all the tests then you will able to participate, present and host in the Connect virtual classroom. (If asked, it is recommended to install the plug in) NB: You should be able to see 4 “ticks” (√) before you progress. 2. Set up your headset Please set up your headset before you enter the Connect room – this is so Connect will automatically select your headset for audio and microphone. Check you have your headset plugged in correctly Check you have the volume turned up on your headset (if available) Check you don’t have the mute button selected (if available) What do I do when the time comes for my Connect Session? 1. Enter the Connect Room at least 10 minutes prior to start time You will have received an email invitation with access information to the virtual classroom. 10 minutes before the session time arrives. Click on the link The meeting login screen appears Login with your DEC username and password - follow the instructions to the right of the screen regarding login details. You will need to add @detnsw after your username to login to Connect. You will use your normal DEC password. The Connect room launches in your browser. If the host has not yet arrived or if classroom security requires the host to approve your attendance, you will be placed in a virtual waiting room. Once the host accepts you into the room, the virtual classroom screen appears. 2. Set up your audio Click on Meeting then Audio Set up wizard and follow the prompts exactly as described. Connect will automatically select your headset as the preferred sound and microphone provided you plug it in before you enter the room. Check you have your audio on your computer set to the right level by clicking on the audio button in the task bar (bottom right) 3. Participate In the chat pod, say hello to your facilitator and other participants. Look to see if there are any instructions already set up in the room. Your host will start the session - participate and communicate via the chat room or by using your status – found at the top of the screen in the menu. To talk, raise your hand by changing your status. Your facilitator will then activate your sound –activate your microphone by clicking on the microphone in the menu – then talk! WfD Technologies Team – Leading Online Learning How to Participate in an Adobe Connect session – Manage and facilitate Page 2


© Copyright 2026