
1. What is HTML anyway?
1. What is HTML anyway?
HTML stands for HyperText Markup Language. Developed by scientist Tim Berners-Lee in
1990, HTML is the "hidden" code that helps us communicate with others on the World Wide
Web (WWW).
When writing HTML, you add "tags" to the text in order to create the structure. These tags
tell the browser how to display the text or graphics in the document. For example, the
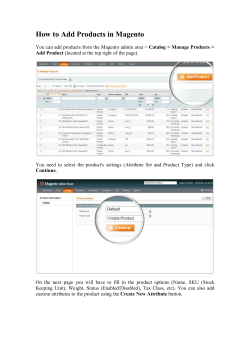
following document has a simple layout (structure). Notice there are three major parts: a
heading, two paragraphs and a bulleted list.
Why I like to go swimming in the summer.
Swimming is my most favorite activity in the summer. When the sun is shining and the air
is warm, you will find me dipping into my backyard pool. It’s not an impressive pool, only
three feet deep, but it’s mine.
There are three reasons I like to swim:
•
•
•
I get lots of exercise
I enjoy the freedom
I have an opportunity to be in the sun.
To achieve a similar layout in a WWW browser, you need to add tags. Here is the same
document with HTML tags (red) added:
<html>
<head>
<title>Why I like to go swimming</title>
</head>
<body>
<h1> Why I like to go swimming in the summer. </h1>
<p> Swimming is my most favorite activity in the summer. When the sun is shining and the
air is warm, you will find me dipping into my backyard pool. It’s not an impressive pool, only
three feet deep, but it’s mine.</p>
<p>There are three reasons I like to swim:</p>
<ul>
<li>I get lots of exercise</li>
<li>I enjoy the freedom</li>
<li>I have an opportunity to be in the sun.</li>
</ul>
</body>
</html>
And here is the resulting page in your browser. Notice the tags are gone? That’s because
the tags tell the browser how to display files but do not show themselves.
Viewing the hidden code!
When learning something new, it often helps to see how others are doing the same thing.
This is especially easy with HTML because every file that comes through your browser is
formatted in HTML. So how do you see other people’s stuff? By viewing their source code.
Here’s how:
•
•
•
•
Go online
Open Internet Explorer or Safari
Enter the address to your favorite site
Go to View on the toolbar and then click on Source for Explorer or Page Source for
Safari. In a matter of seconds, you will see the hidden code of that page.
By viewing the source code, you can see what the "big" guys are doing. In fact, viewing
other people’s code is considered one of the best ways to learn how HTML works.
Now that you’ve had a little taste of what it’s like to create an HTML document, it is time to
begin creating one from scratch.
2. Basic Concepts
The tools you need
Fortunately, HTML is written in plain text. That means you don’t need any fancy software
programs like a word processor to create your HTML files. All you need is a simple texteditor that’s already on your system. For Macs, that would be SimpleText and for Windows,
Notepad.
Some rules
As with most things in life, there are rules. In HTML, the rules are fairly simple. For starters,
HTML tags are always surrounded by what are called angle brackets < and >. You’ll find
these brackets on your keyboard just above the comma and period.
Elements
The words/letters between these two angle brackets are called elements. These are the
coded commands within HTML. Elements tell the browser how to display the web page. For
example: <hr> tells the browser to display a horizontal rule; <br> tells the browser to skip
a line.
Container and empty tags
There are two kinds of tags: container and empty.
The container tag always wraps around text or graphics and comes in a set with an
opening and a closing:
<html> opening tag
</html> closing tag
Notice the forward slash (/) on the closing tag. This tells the browser that the tag has
ended.
On the other hand, the empty tag stands alone. The tag <br> is one that adds a line
break. Empty tags do not have to be wrapped around copy and do not require a closing.
Case sensitive
HTML is also not case sensitive. That means, you can use either lowercase or uppercase.
<HTML> is the same as <html>. For consistency, use either one or the other. It's best not
to mix and match. For our purposes, I have written our code in lowercase.
HTML structure.
All HTML documents are divided into two main parts: the head and the body. It goes
something like this:
You must have the <html>, <head> and <body> container tags in every HTML file.
The <html> tag tells the browser that this is an HTML document. You must begin and end
your files with this tag. The <head> tag contains general information like the title of your
document. The <body> tag holds all your content: words, pictures, artwork and other stuff.
Nesting
Part of the web page structure is called nesting. Notice how the tag <title> is nested inside
the <head> tag, while <head> and <body> are nested inside <html>.
Each new set of tags are nested inside other tags, just like those Russian dolls, Matryoshka.
Think of it another way, like smaller boxes inside larger boxes.
3. Primary Tags
To build any web page you will need four primary tags: <html>, <head>, <title> and
<body>. These are all container tags and must appear as pairs with a beginning and
an ending.
<html>…</html>
Every HTML document begins and ends with the <html> tag. This tells the browser that the
following document is an html file. Remember, tags tell the browsers how to display
information.
<head>…</head>
The <head> tag contains the title of the document along with general information about the
file, like the author, copyright, keywords and/or a description of what appears on the page.
<title>…</title>
Appears within the <head> tag and gives the title of the page. Try to make your titles
descriptive, but not more than 20 words in length. The title appears at the very top of the
browser page on the title bar.
<body>…</body>
The main content of your page is placed within the body tags: your text, images, links,
tables and so on.
4. Creating your first web page
Using the primary HTML tags, mentioned in Chapter 3, you are now ready to create your
first Web page.
Step 1 Open up a text editor (SimpleText for Mac or Notepad for Windows)
Step 2 Enter the following:
<html>
<head>
<title> This is my first web page</title>
</head>
<body>
Hello world. This is my first web page. There's more to come.
</body>
</html>
Step 3 Save the document as: firstpage.html
Your file can be saved as either an htm or html file. Remember to save your document on
the computer in a place that you can find it again.
Step 4 To preview your new document, open Safari. On the tool bar (located up near the
top of the browser):
Select File menu.
Select Open File
Go to where you saved your file, click on it. This will bring you back to the dialogue box,
which should now be showing your file.
Click Open
Congratulations!
You have successfully completed your first web page. It actually doesn’t get any harder than
this for your simple, everyday page.
Let’s continue to build on this same page by adding more tags discussed in the following
pages.
5. Basic Text Formatting
After any length of time on the Internet, you’ll notice that a Web page is made up of more
than just plain words on a screen. There are headlines, paragraphs, graphics, colors and
much more. It’s a lively place to be.
Our next tags--headline, paragraph, line break and horizontal rule--will help us make our
current page a lot more exciting. Let’s learn how.
Headline tag
In HTML, bold copy is created by using the headline tag. There are six levels of headlines,
ranging from <h1>…</h1> to <h6>…</h6>. Here is an example of the code for all the
headline sizes:
<h1>Level
<h2>Level
<h3>Level
<h4>Level
<h5>Level
<h6>Level
1
2
3
4
5
6
Headline</h1>
Headline</h2>
Headline</h3>
Headline</h4>
Headline</h5>
Headline</h6>
Let’s add a headline to our Web page document.
Step 1 Load your text editor and open your file: firstpage.html This is what you should see:
<html>
<head>
<title>This is my first web page.</title>
</head>
<body>
Hello world. This is my first web page. There's more to come.
</body>
</html>
Step 2 Add the <h1> tag to the words "Hello world." as shown in red.
<html>
<head>
<title>This is my first web page.</title>
</head>
<body>
<h1>Hello world.</h1> This is my first web page. There's more to come.
</body>
</html>
Step 3 Save the file
Step 4 Open up Safari.
Go to File menu
Select Open File
A dialogue box appears.
Go to where you saved your file, click on it. This will bring you back to the dialogue box,
which should now be showing your file.
Click Open
Paragraphs & Line Breaks
To add space between paragraphs you use the paragraph tag:
<p>…</p>
This is a container tag and must have a beginning and an ending.
To add a single line of space, you use break tag:
<br>
This is an empty tag and stands alone. You can use the <br> tag to insert one or more
blank lines.
Horizontal Rule
To create a horizontal line on your page you use the empty tag:
<hr>
Wow, what a lot to take in. Let's apply what we've learned.
Step 1 Load your text editor.
Step 2 Open the file: firstpage.html. Your code should look like this:
<html>
<head>
<title>This is my first web page.</title>
</head>
<body>
<h1>Hello world.</h1> This is my first web page. There's more to come.
</body>
</html>
Let's add some more text so that we can use the new tags that we have learned. Add tags
and text that appear in red.
<html>
<head>
<title>This is my first web page.</title>
</head>
<body>
<h1>Hello world.</h1> This is my first web page. There's more to come.
<hr>
<p>
I am learning how to use the horizontal rule, headline, paragraph and line break
tags. Writing HTML isn't as hard as it appears.
</p>
<p>Here's a list of items I like about school:<br>
Science<br>
Reading<br>
But most of all--recess!<br>
</p>
</body>
</html>
6. Lists
People are usually in a hurry when using the Web. This behavior may be a carry over from
when folks used to pay for the actual time spent on the Internet. Back in the olden days,
say four years ago, users did not have the luxury of unlimited time on the Web. So they
would quickly go online, get the information they needed and sign off. In this way, the user
just paid for the little time used.
Things are different today. Mostly everyone has unlimited time access to the Web, but the
behavior hasn’t changed much. People are still in a hurry, and they don’t like to read a lot of
text. So putting your information in the form of a list seems to help.
Lists come in a variety of forms with most either numbered or bulleted. The numbered lists
are called ordered lists and the bulleted lists are unordered lists.
Lists are nested. There is a tag that identifies the type of list, like numbered or bulleted.
Then within that tag there is another tag that itemizes the list. Maybe some definitions
would help.
<ol>…</ol>
The ordered list is a container tag and is used for numbered lists.
<ul>…</ul>
The unordered list is a container tag and is used for bulleted lists.
<li>…</li>
The listed item tag is a container tag and is nested within the ordered or unordered tags.
Here is an example of the differences between ordered and unordered lists.
An ordered (numbered) list goes like this:
<ol>
<li>My
<li>My
<li>My
<li>My
</ol>
first item on the list.</li>
second item on the list.</li>
third item on the list.</li>
fourth item on the list.</li>
In the browser it will appear like this:
1.
2.
3.
4.
My
My
My
My
first item on the list.
second item on the list.
third item on the list.
fourth item on the list.
An unordered (bulleted) list goes like this:
<ul>
<li>My
<li>My
<li>My
<li>My
</ul>
first item on the list.</li>
second item on the list.</li>
third item on the list.</li>
fourth item on the list.</li>
In the browser it will appear like this:
•
•
•
•
My
My
My
My
first item on the list.
second item on the list.
third item on the list.
fourth item on the list.
Let's apply what we've learned
Step 1 Load your text editor once more and open our current HTML document:
firstpage.html.
Step 2 Your file should appear as below:
<html>
<head>
<title>This is my first web page.</title>
</head>
<body>
<h1>Hello world.</h1> This is my first web page. There's more to come.
<hr>
<p>
I am learning how to use the horizontal rule, headline, paragraph and line break tags.
Writing HTML isn't as hard as it appears.
</p>
<p>Here's a list of items I like about school:<br>
Science<br>
Reading<br>
But most of all--recess!<br>
</p>
</body>
</html>
Step 3. Let's add one of the lists noted above. Enter the tags and text that appear in red.
<html>
<head>
<title>This is my first web page.</title>
</head>
<body>
<h1>Hello world.</h1> This is my first web page. There's more to come.
<hr>
<p>
I am learning how to use the horizontal rule, headline, paragraph and line break tags.
Writing HTML isn't as hard as it appears.
</p>
<p>Here's a list of items I like about school:<br>
Science<br>
Reading<br>
But most of all--recess!<br>
</p>
<p>I can also create lists using numbers and bullets. Here is an example of a list
with numbers:
<ol>
<li>My
<li>My
<li>My
<li>My
</ol>
</p>
first item on the list.</li>
second item on the list.</li>
third item on the list.</li>
fourth item on the list.</li>
</body>
</html>
Step 4 Save your file.
Step 5 If Safari is still open, hit the reload button. If not, then load Safari and follow the
previous steps in Chapter 4.
7. Attributes: Adding interest to your page.
Bold headlines and organized lists are nice but there’s got to be more to a web page than
that. How about some color and variety? Glad you asked, because that’s where attributes
come in. Don’t let the word scare you. Attributes are just special codes placed within the
HTML tags that describe how the tags will look.
Color Attribute
For instance, let’s say you want to have a green background on your Web page with red
text, like for Christmas time. You would type this code:
<html>
<head>
<title>Color Page</title>
</head>
<body bgcolor="#bee3c2" text="#ff0000">
Hello. I am a page that can be used for Christmas.
</body>
</html>
Notice the attributes: bgcolor and text. They are placed within the <body> tag. There’s
that nesting thing again. Attributes never stand alone. Instead, they always appear inside a
body tag.
Let's look a little closer at the body attribute:
<body bgcolor="#bee3c2">...</body>
1.
2.
3.
4.
5.
The bracket and tag appear first (<body).
Always add a space between the tag and attribute.
Then enter the attribute (bgcolor).
Equal sign goes next (=).
Next are quotation marks that contain a description of how the attribute should look
like ("#bee3c2"). In this case, it's a code for the color green.
6.
Close with a bracket (>).
7.
Then, add your closing tag </body>.
It's that simple. Now let's try some more. But first, here's something to remember...
Tip to Remember
Colors are described in hexadecimal (hex) code—six digits or letters that represent a color.
Also, hex codes always start with a # sign.
For example the hex code for black is #000000, while white is #ffffff. For a complete list of
colors and their hex codes, see:
http://www.wdvl.com/Authoring/Graphics/Colour/666.html
Align Attribute
Another attribute that comes in handy is: align. Often used with headlines and graphics,
this attribute let’s you place text or pictures to the left, center or right side of the margin.
Here’s a simple example for the align attribute:
<html>
<head>
<title>My Spring Vacation</title>
</head>
<body bgcolor="#e3f04a" text="#000000">
<h4 align="center">My Spring Vacation<br>
by Russ Peabody</h4>
<p>My spring vacation was wonderful, except for the terrible storms we had during the first
part of the week. Snuggle, my dog, enjoyed the walks we had on the beach and Jimmy, my
teddy bear, liked the hotel room. He said the maid was very nice to him.</p>
</body>
</html>
You can use the align attribute with all sorts of tags like: headlines, paragraphs, rules,
graphics and so on.
Width Attribute
What if we wanted to add a rule to the above story just under the title and byline? But
instead of having the rule go from margin to margin, we wanted it centered just
underneath, like this:
My Spring Vacation
by Russ Peabody
The code would look like this:
<html>
<head>
<title>My Spring VacationII</title>
</head>
<body bgcolor="#e3f04a" text="#000000">
<h4 align="center">My Spring Vacation<br> by Russ Peabody</h4>
<hr align="center" width="40%">
</body>
</html>
Notice how we told the browser to center the rule <hr> tag and make it only 40% the size
of the screen. Although this may seem a bit confusing in the beginning, you will find it
becomes easier as you use these attributes to help design your web pages.
Let's apply what we've learned.
Step 1 Load your text editor and open your HTML document we have been working on:
firstpage.html Your file should appear as below:
<html>
<head>
<title>This is my first web page.</title>
</head>
<body>
<h1>Hello world.</h1> This is my first web page. There's more to come.
<hr>
<p>
I am learning how to use the horizontal rule, headline, paragraph and line break tags.
Writing HTML isn't as hard as it appears.
</p>
<p>Here's a list of items I like about school:<br>
Science<br>
Reading<br>
But most of all--recess!<br>
<p>I can also create lists using numbers and bullets. Here is an example of a list with
numbers:
<ol>
<li>My
<li>My
<li>My
<li>My
</ol>
</p>
first item on the list.</li>
second item on the list.</li>
third item on the list.</li>
fourth item on the list.</li>
</body>
</html>
Step 2 Let's add some attribute codes to your original HTML file. Enter the code listed below
in red:
<html>
<head>
<title>This is my first web page.</title>
</head>
<body bgcolor="#ffff00" text="#000000">
<h1 align="center">Hello world.</h1>
<p align="right"><b>This is my first web page. There's more to come.</b>
<hr align="center" width="50%">
<p>
I am learning how to use the horizontal rule, headline, paragraph and line break tags.
Writing HTML isn't as hard as it appears.
</p>
<p>Here's a list of items I like about school:<br>
Science<br>
Reading<br>
But most of all--recess!<br>
<p>I can also create lists using numbers and bullets. Here is an example of a list with
numbers:
<ol>
<li>My
<li>My
<li>My
<li>My
</ol>
</p>
first item on the list.</li>
second item on the list.</li>
third item on the list.</li>
fourth item on the list.</li>
</body>
</html>
Step 3 Save your file.
Step 4 If Safari is still open, hit the reload button. If not, then load Safari following steps in
Chapter 4.
Notice the new changes:
•
•
•
•
Background color is now yellow, text is black.
The heading is centered.
First paragraph is aligned to the right
Horizontal rule is now 50% of the margin and centered.
All created by you! Now let's learn more about text formatting.
8. Advanced text formatting
The main purpose of the Web is to communicate ideas. It’s been that way from the
beginning. In the early days, content was king—meaning, people just used the Web to
present thoughts or offer opinions through words. Pictures, clip art, movie clips and even
sound weren’t part of the Web yet. Nowadays, the Web has a totally different look and feel.
In fact, the Web has radically changed from its early years. What was once a place that
strictly exchanged information is now a place to entertain, sell goods and services, share
ideas and especially, learn new things. Designing an inviting page has become an important
issue. Now we see tons of graphics, animations, in-the-news movie clips, 3-D computer
games and much more. While content is still king, a well designed Web page is now
considered equally important—perhaps even the queen.
That brings us to topic at hand: text formatting. Here is where good design begins and
fortunately, HTML allows us to do quite a lot with text. There are several tags and attributes
to learn, but they all help you—the designer—to create an eye-pleasing page.
In this section, we will cover the following tags and attributes:
•
•
•
•
•
•
•
Font styles: <font>...</font>
Bold: <b>...</b>
Italic: <i>...</i>
Indented text: <blockquote>...</blockquote>
Smaller type: <small>...</small>
Larger type: <large>...</large>
Centered type: <center>...</center>
Font tag*
Not long ago, Times Roman was the only font you could use with HTML. It is still the font of
choice (the default) for the leading browsers. Today, we can choose different font styles as
well as several other font options by using the tag:
<font>…</font>
The font tag gives you some control over how your page will look. But unlike other tags
discussed so far, the font tag does nothing without an attribute (remember an attribute
describes what the tag should do).
We will cover three attributes used with the font tag:
<font size= "#">…</font>
<font face= "type style name">…</font>
<font color= "hex code">…</font>
*A Note to Remember: In the new HTML (version 4.0), the font tag has been
deprecated--a big word that means the tag will be dropped in favor of Cascade Style Sheets
(CSS). If you would like more information on CSS, please check out the Web site: Style
Master to learn more. This changeover--from the font tag to CSS--will happen sometime in
the future, but right now many Web sites are still using the font tag. We are in what is
called the "transitional period," meaning things are still changing.
Font Size
So far, we have learned that the only way to change the size of our text is through the
headline tag. But that causes a problem. One, if you use this tag, all the text changes and
secondly, you’ll have paragraph breaks before and after the text. So what can you do if you
want to change the size of some text within a sentence? Simple, add the attribute size to
the font tag. Here’s a coded example:
Learning HTML code <font size=5> does have it’s advantages, </font> especially
considering how important the WWW has become.
The resulting line in a browser:
Learning HTML code does have its advantages, especially considering how important the
WWW has become.
Notice how the type increased? You can also decrease your text. Let’s take the same
sentence but use size=1.
Learning HTML code does have its advantages, especially considering how important the
WWW has become.
By using the size attribute, you can change your text to whatever you like. (By the way,
your browser’s default size is number 3.) Here are all seven levels as they would appear in
your browser:
font
font
font
font
font
font
font
size=1
size=2
size=3
size=4
size=5
size=6
size=7
Font Face
You can also use an attribute that will change the type style of a font. It’s call face. But a
word of caution: the face attribute is system dependent. That is, it will only work if the end
user has the same typeface (type style) on his or her system. If not, the browser will
automatically go with the default of Times Roman. So what you see on your Safari or
Internet Explorer’s page may not be the same for each user.
So how can prevent this problem? Include more than one type face. For instance, let’s say
you want the following text to appear in Arial typeface. This is how you would do it.
<font face="Arial, Helvetica">Selecting type styles can be tricky at times. You must
always consider your end user.</font>
Your end result will look like this:
Selecting type styles can be tricky at times. You must always consider your end user.
If the user’s computer did not have Arial, the browser would automatically search for the
next typeface mentioned, which in this case is Helvetica. If no such type styles are on the
computer, then the browser will go to the default type of Times Roman.
Fortunately Windows® 7 and Macintosh® come with a variety of different typefaces:
Arial
Arial Black
Arial Narrow
Book Antiqua
Bookman Old Style
Century Gothic
Century Schoolbook
Courier New
Garamond
Times New Roman
Verdana
You can specify these typefaces, and the browser will easily find them. However, it’s best to
specify more than one typeface, just in case an end user is operating Windows 3.0 or has
for some reason, taken one of these typefaces off the computer system.
So how does the attribute look for other type styles?
<font face="bookman old style">
Selecting type styles can be tricky at times. You must always consider your end user.
<font face="arialblack">
Selecting type styles can be tricky at times. You must always consider your end user.
<font face="garamond">
Selecting type styles can be tricky at times. You must always consider your end user.
Font Color
In the last section, we discussed text color as an attribute in the body tag. The text color
attribute only permits you to color all the type on your Web page. But what if you want to
color only a word or two. Then use the attribute color within the font tag. Here’s an
example.
Selecting type styles can be tricky at times. <font color="#0033ff">You should always
consider your end user.</font>
This will create text that is bright blue:
Selecting type styles can be tricky at times. You should always consider your end user.
Notice two things here. First of all, the color has been specified in hex code (remember we
discussed that in the last lesson). Two, since we did not specify the typeface, the type
appeared as Times Roman.
Let's apply what we've learned
Step 1 Load your text editor and open the HTML document we have been working on:
firstpage.html
Step 2 Here's how to add some attribute codes to your original HTML file. Enter the code
listed below in red.
<html>
<head>
<title>This is my first web page.</title>
</head>
<body bgcolor="#ffff00" text="#000000">
<h1 align="center">Hello world.</h1>
<p align="right"><b>This is my first web page. There's more to come.</b>
<hr align="center" width="50%">
<p><font size="5" face="arialblack" color="#0033ff">
I am learning how to use the horizontal rule, headline, paragraph and line break tags.
Writing HTML isn't as hard as it appears.</font>
</p>
<p>Here's a list of items I like about school:<br>
Science<br>
Reading<br>
But most of all--recess!<br>
<p>I can also create lists using numbers and bullets. Here is an example of a list with
numbers:
<ol>
<li>My
<li>My
<li>My
<li>My
</ol>
</p>
first item on the list.</li>
second item on the list.</li>
third item on the list.</li>
fourth item on the list.</li>
</body>
</html>
Congratulations, you have just added a new font size, typeface and font color to your Web
page!
Other text formatting tags
The other text formatting tags are fairly simple to use and understand.
Bold and Italic tags
To create bold text use: <b>…</b>
To create italicized text use: <i>…</i>
Blockquote
Sometimes you may want to indent a sentence or an entire paragraph. That’s when you’ll
want to you the blockquote tag:
<blockquote>…</blockquote>
Small and big tags
To create copy that is slightly smaller than normal:
<small>…</small>
To create copy that is slightly larger than normal:
<big>…</big>
Center tag*
You learned about aligning copy with the align attribute in the last lesson. Fortunately HTML
allows us to center text without using an attribute. So when you want to center your copy,
it’s simple. Use the following tag:
<center>…</center>
*Please note the center tag is another one that is being replaced in HTML 4.0
9. Links down the street to around the world.
Back in 1945, an engineer predicted that someday we would have super computers talking
to each other. Today, this vision is a reality through hypertext links (or what others call
hyperlinks or just plain links).
Links are the power behind the World Wide Web. Through links, millions of pages, filled with
information and knowledge, are only a click away. Every Web site can become a virtual
library—a place to learn and grow! And it’s all so very simple to accomplish.
Uniform Resource Locator
Before we get into how to create a hyperlink in HTML, we have to cover some "techy" stuff.
Every Web site has an address call the Uniform Resource Locator or URL (pronounced
like "earl"). Think of an URL as an address. If you’ve done any Web surfing at all, you have
probably used an URL or two. But what does it mean? Let’s examine one more closely:
http:// (hypertext transfer protocol) is a code or what is technically called a protocol
that helps one computer talk to another computer. The Internet also has another protocol
called FTP (file transfer protocol).
www or world wide web lets the server (the computer) know the file is located on the
World Wide Web.
myschool.com is a domain name or where the Web site is hosted.
homework.html is the file or Web page you are seeking.
Hypertext Link
Okay, now that you understand URLs, you’ll find it easier to understand links.
There are two things you need to create a link:
1.
2.
the name of a file or the URL you want to link to
the link hotspot—the highlighted text or graphic that will be clicked on to get to
where you want to go.
To create a link in HTML, you need the anchor tag:
<a>…</a>
Inside the tag, you need the attribute: HREF (hypertext reference).
An example of a link looks like this:
Harry uses the website called Apple.
The code looks like this:
Harry uses the website called
<a href="http//:www.Apple.com">Apple</a>.
Let's take a closer look at the code:
Notice that the anchor tag must surround the hotspot and that the attribute HREF must
describe where the browser should look for the Web site (the URL).
It's that simple! Now let's look at putting some images on a web page.
10. Graphics
What would a Web page look like without graphics? Pretty boring to say the least! But not
so long ago, that’s just what the Web was like—just plain, boring text. Remember, in those
early days the Web’s sole purpose was to exchange information. The real change came
when designers added graphics. Nowadays, we’ve become used to seeing bright and colorful
pages.
Some details.
It wasn’t always so colorful and so easy to place images onto a Web page. From the start,
images have always been memory and space hogs. But during the past few years, designers
have worked hard to keep image files small, while also increasing the quality of the artwork
that appears on the Web today.
Two file formats have been developed to help keep files small, while maintain a high level of
quality:
.gif files: graphic interchange format (pronounced like Jif peanut butter)
.jpg files: joint photographic experts group (pronounced jay-peg)
There are some advantages particular to both. The gif format is the oldest, created by
CompuServe to provide a way to show graphics no matter what computer you are using (it’s
called cross-platform). Later, the "gif89" format was created so that the image background
becomes transparent. That’s a good thing when working with colored page backgrounds.
The gif format is also better for line art.
On the other hand, the jpg format was originally created to store photographs. Files
formatted in jpg are larger than those in gif, and they do not have transparent backgrounds.
If you have images that are not in one of these two formats, you will need an image editor
to convert them. Two such programs are Adobe® PhotoShop or Paint Shop Pro (a shareware
program that you can download at Jasc Software).
The Image tag
To place an image onto a Web page you will need to use the image tag. There are two very
important things to remember about the image tag:
1.
2.
It’s an empty tag (remember, that means there’s no closing tag, only a beginning).
It requires attributes to be effective.
The image tag <img> has several attributes:
src--identifies the image and tells the browser where to get the image
alt—gives alternative text for those who are not viewing their pages as images.
height & width—tells the browser the size of the graphic (speeds up the downloading
process
Let’s go through each one of the attributes in more detail.
SRC attribute
To help the browser identify and find an image, you use the following command:
<img src="filename.gif">
I’d like to cover a couple of important things here. While the name of the file is important, it
is equally important to direct the browsers to where the file is located. The browser will not
show your image if it can’t find it.
Notice that all the files are in the same folder or what is also called a directory. So the
browser will first look into the main folder (Mikes Bike Shop), find the HTML file (shop.html),
load the text and then load the graphic files (horn.gif and bike.gif). That’s why you see
those funny little boxes when a page is loading. The browser downloads all the easy stuff
first (the text) and then the larger and more complex graphic files last.
Alt attribute
Sometimes people turn off their image loading option in their browser, leaving a Web page
with lots of blank boxes. So all the work you have done to place those important images is
gone, leaving in its wake only blank, boring boxes.
The alt attribute lets the user know what’s in the picture by providing descriptive text. It
also has an added feature with the latest versions of Internet Explorer and Safari. When the
cursor arrow passes over artwork or a photo, a little rectangular box pops up that contains
the alt copy. It’s a great way to add interest to your page or even give instructions to the
user.
Here’s an example. Place your arrow (cursor) over the image below. If you have the latest
version of IE or Safari, you will see a pop-up box that says, "When things go wrong with
your code, you need to do some detective work!"
The image tag for this graphic looks like this:
<img src="mystery.jpg" alt="When things go wrong with your code, you need to
do some detective work!">
Height & Width attribute
When placing your images onto the screen, the browser looks for the height and width of
your images. This is an excellent feature because it allows the browsers to set the space
size aside while laying out the balance of the page. If you do not specify the size, the
browser will stretch it or reduce it to fit.
Height and width are listed in pixels--those little dots that make up an image on a
computer screen. If you want to know the size of your image, open it up in Safari. The pixel
size appears in the title bar. Here's an example using the following image that measures out
at 149 pixels by 140 pixels.
The code for this image is like this:
<img src="masks.jpg" width="149" height="140" alt="You can determine how
large your images are by opening them in Safari.">
Align Attribute
When you place a graphic on a page it will always appear to the left (that's the default or
the standard for the browser). However, you can place it to the right just by adding the
align attribute to the image tag.
And the code looks like this:
<img src="masks.jpg" align="right" width="149" height="140" alt="This is an
example of a right-aligned image.">
Centering an image
But what if you want to center an image. The best way is to use the paragraph tag with
the center attribute. Here's an example:
And here's the code:
<p align="center"><img src="masks.jpg" align="center" width="149"
height="140" alt="This is an example of a centered image."></p>
Image Hotspots
Instead of using text as a link (hotspot), it's very common to use an image. It's simple too!
Just take include the image tag within the anchor tag.
Here's the code for a link to the Blast-Off page:
<a href-"graphicsc10.html"><img src=atom.jpg width="119" height="120"
alt="Take this link to the Blast-Off page" border="0"></a>
A note about copyright
You should never use any graphics, images, text or photos without permission. There are
several sites available on the Web where you can receive free images. But under no
circumstances should you ever copy material unless the site says you can or you personally
have received permission. It's just better to create your own stuff or ask (and get an okay)
before you use someone else's stuff. Don't be a cheater!
11. Building Web pages with tables.
Tables have literally changed the look of the Web page. Originally, tables let people present
data (mostly numbers) in a column format. Designers quickly figured out ways to improve
the layout of their pages using tables. Although a bit complicated and sometimes difficult to
understand, tables do improve your layout and let you present your material in a more eyeappealing way.
For example, this page--in fact, this whole tutorial--has been developed using a four-column
table. The best way to understand tables is to look at the following illustration.
The structure of a table
Every table is wrapped by the <table>...</table> tag. Then, the columns are surrounded
by the <tr>...</tr> tag. You can have one column or as many as you want. In the above
illustration, we are looking at three columns. Now each column has its own tag: <td>...</
td>. Although these columns appear horizontally in code, they actually represent vertical
columns. So the above illustration represents a set of columns like this:
Tables can be very complex. However, we will create a simple column format. Using some of
the basic HTML tags you have learned so far, let's create a new Web page with tables.
Step 1 Open up a text editor (remember, Simple Text for Mac and Notepad for Windows.
Step 2 Enter the following code:
<html>
<head>
<title> This is a page using tables </title>
</head>
<body bgcolor="ffffff" text="000000">
<h1>A Web Page Using Tables</h1>
<table border="1">
<tr>
<td>This is column one</td>
<td>This is column two</td>
<td>This is column three</td>
</tr>
</table>
</body>
</html>
Step 3 Save the file as table1.html
Step 4 Opening the file in Safari
Notice that I've included a border with a value of 1. When designing a page, it helps to keep
the border attribute in the code just so you know where things are. Then after you are
pleased with the design, you can take out the border attribute. Some folks like the border
on all the time. It's your choice--you're the designer.
Now let's add some copy to our columns. And see what happens. Add the code listed in red.
Step 1 Open the file table1.html
Step 2 Add the code highlighted in red:
<html>
<head>
<title> This is a page using tables </title>
</head>
<body bgcolor="#ffffff" text="#000000">
<h1>A Web Page Using Tables</h1>
<table border="1">
<tr>
<td bgcolor="#000000">
<font color="#ffffff">
<b>This is column one</b>
<br>
I enjoy working on HTML code. It gives me a chance to be creative.</font>
</td>
<td bgcolor="#bee3c2"> <b>This is column two</b></td>
<td bgcolor="#ff8000">
<font color="#804000">
<b>This is column three<br>Notice what happens to the column when you add
copy. It gets larger. This can cause a problem. But we do have a way to control the
margins in tables.</b>
</font>
</td>
</tr>
</table>
</body>
</html>
Step 3 Save the file as table2.html
Step 4 Open the file in Safari
Table width
As you can see from the two examples above, the column widths change as you add text (or
an image). What you need is some control. And you have it in two ways:
1.
Setting the pixel measurement for the table and its columns as a fixed
measurement.
2.
Setting the widths based on the percentage of the screen's width.
Both ways are used by designers. It's really a matter of choice. Let's look at both methods.
Pixel table measurement
The average screen (across all platforms) measures at 595 pixels (width) by 295 pixels
(length). Any wider than 595 and some screens will run your text and images straight
through the right-hand side of your screen. Not a good option.
So you definitely want to keep your full table size at 595 pixels using the width attribute.
Each column within that table should not individually add up to more than 595. Let's use
our code as a way to learn:
Step 1 Open up your file table2.html.
Step 2 Now add the code in highlighted in red.
<html>
<head>
<title> This is a page using tables </title>
</head>
<body bgcolor="#ffffff" text="#000000">
<h1>A Web Page Using Tables</h1>
<table border="1" width="595">
<tr>
<td bgcolor="#000000" width="20">
<font color="#ffffff">
<b>This is column one</b>
<br>
I enjoy working on HTML code. It gives me a chance to be creative.
</td>
<td bgcolor="#bee3c2" width="100">
<b>This is column two</b>
</td>
<td bgcolor="#ff8000" width="475">
<font color="#804000">
<b>This is column three<br>Notice what happens to the column when you add copy. It
gets larger. This can cause a problem. But we do have a way to control the margins in
tables.</b>
</font>
</td>
</tr>
</table>
</body>
</html>
Step 3 Save the file as table3.html Now view it in Safari.
Notice the width in each column. If you add up the widths in each column, you will find it
comes to 595 pixels. It's important to do your math when you're working with columns.
Play around with the code, change the width numbers and see what happens. When you're
done, let me show you another way to control your table widths.
Control table width by percentages
The other way to control the width of your columns is by using percentages. This makes
your page more "dynamic" because the tables and columns adjust according to the screen
size. If the screen is 595 pixels wide, it will fit within 595 pixels. But if your screen is 640 or
more, the table will spread out to fit the entire 640. Let's try it with your current page.
Step 1 Open table3.html and save it as table4.html
Step 2 Add the changes indicated in red.
<html>
<head>
<title> This is a page using tables </title>
</head>
<body bgcolor="#ffffff" text="#000000">
<h1>A Web Page Using Tables<h1>
<table border="1" width="100%">
<tr>
<td bgcolor="#000000" width="20%">
<font color="#ffffff">
<b>This is column one</b>
<br>
I enjoy working on HTML code. It gives me a chance to be creative.
</td>
<td bgcolor="#bee3c2" width="60%"> <b>This is column two</b></td>
<td bgcolor="#ff8000" width="20%"><font color="#804000"><b>This is column
three<br>Notice what happens to the column when you add copy. It gets larger. This can
cause a problem. But we do have a way to control the margins in tables.</b>
</font>
</td>
</tr>
</table>
</body>
</html>
Step 3 Save the file as table4.html. Now view it in Safari.
Wow, you deserve a break. One last chapter--more stuff on tables. It's a pretty big topic.
12. More on tables
So far, we've covered some of the basics to table design. Now let's dig deeper to learn how
to change them to suit our needs.
First, let's again look at the table code illustration used in Chapter 11.
Table Tag
To create a table you must used the following container tag:
<table>...</table>
This let's the browser know that a table is forthcoming.
Row Tag
Each table has at least one row and within that row are columns or what is also referred to
as cells. The row tag looks like this:
<tr>...</tr>
See how the row tag wraps around the column (cell) tags? You can have several rows,
which will be exploring in this chapter.
Column/Cell tag
And finally, to complete your table you must have the column or cell tag--this is where you
information and images go. The column/cell tag looks like this:
<td>...</td>
Notice that I keep on using the words column and cell together. That's because in HTML
tables, these words are often used to mean the same thing. It can be confusing at times.
Maybe an illustration can help. Here is a table with lots of rows and cells (columns).
Notice how this table is like a grid made up of rows and cells. The word "cell" is also referred
to as a "column" and there lies some confusion. So when you work with tables, try to
remember that the word cells and columns are often used to mean the same thing.
Sometimes it will be hard to remember, so refer back to this chart to remind you.
A table with multiple rows and columns/cells
Now that we've gone through the table tags and have a beginning understanding of rows
and columns, let's create a table with several rows and a couple of columns each.
Step 1 Open up your text editor.
Step 2 Enter the following code.
<html>
<head>
<title> Rows </title>
</head>
<body>
<h1>Here's a table with two rows</h1>
<table border="1">
<tr>
<td>This is column one</td>
<td>This is column two</td>
</tr>
<tr>
<td>This is column A</td>
<td>This is column B</td>
</tr>
</table>
</body>
</html>
Step 3 Save the file as rows.html
Step 4 Open the file in Safari
If all went right, you now have two rows and two columns/cells. Now let's examine the
column/cell tag.
Column/cell tag and its attributes
In Chapter 11, we learned about a couple of attributes--bgcolor and width. You can use
these in the table tag (<table>), and the column/cell tag (<td>). You can also use other
attributes in the column/cell tag, such as:
1. align: sets your text or image to left, center or right
2. valign: sets your content vertically to top, center or bottom
3. colspan: expands across multiple columns/cells
4. rowspan: expands over multiple rows
Let's examine each attribute separately.
Align attribute
Leaving your text or image to the left of your column is usually pretty boring, so the align
attribute lets you center things, using "center" or place them to the right, using "right".
Valign attribute
When placing copy in a column, the browser will automatically place it in the center of the
column. You can change this default by using the valign attributes of "top", "center" or
"bottom".
Let's apply these two attributes now before we continue.
Step 1 Open up your text editor.
Step 2 Enter the following code.
<html>
<head>
<title> Alignment Attributes </title>
</head>
<body>
<h1>Here are some examples of alignment</h1>
<table border="1" width="100%">
<tr>
<td bgcolor="#ff0000" width="40%" align="right">
This is column one<br>
This is column one<br>
This is column one<br>
This is column one<br>
</td>
<td width="60%">
This is column two<br>
This is column two<br>
This is column two<br>
This is column two<br>
</td>
</tr>
<tr>
<td bgcolor="#ffff00" width="40%" align="center">
This is column A<br>
This is column A<br>
This is column A<br>
This is column A<br>
This is column A<br>
This is column A<br>
</td>
<td bgcolor="#0000ff" width="60" valign="bottom">
<font color="#FFFFFF">
This is column b<br>
This is column b<br>
This is column b<br>
</font>
</td>
</tr>
</table>
</body>
Step 3 Save the file as alignment.html
Step 4 Open the file in Safari
If all went well, you should have a very colorful table with two rows and four columns
(cells). Now we are ready to explore expanding these rows and columns (cells) in order to
add interest to a page.
Spanning rows and columns
Ever wonder how some pages have such wonderful layouts? They're using tables. To see
what I mean, take a look at these links:
•
Family.com
•
PBS
•
Barney & Friends
•
Demo of the Day by Bill Nye
Even though some of these Web sites are using some advanced things like frames and java
script (coming soon!), each one uses tables as their basic structure. Learning to span rows
and columns can help you add variety to your tables too!
To begin, let's look at our previous illustration, but this time with some rows and columns
expanded.
When creating a table and you want to expand a column or a row you use the following
attributes:
•
colspan: expands across a number of columns
•
rowspan: expands across a number of rows
Let's try this with some code:
Step 1 Open up your text editor.
Step 2 Enter the following code.
<html>
<head>
<title> Rowspan and Colspan </title>
</head>
<body>
<h1>Here's a table demonstrating rowspan and colspan</h1>
<table border="1">
<tr>
<td rowspan="2">This is an example of rowspan. It is spanning two rows.</td>
<td>This is column B</td>
<td>This is column C</td>
</tr>
<tr>
<td>This is column D</td>
<td>This is column E</td>
</tr>
<tr>
<td colspan="3">This is an example of colspan. It is spanning three columns.</td>
</tr>
</table>
</body>
</html>
Step 3 Save the file as span.html
Step 4 Open the file in Safari


© Copyright 2026