
User Guide iPLEX Pro Sample ID Panel ®
User Guide
iPLEX® Pro Sample ID Panel
The iPLEX Pro Sample ID Panel is For Research Use Only.
Not For Use in Diagnostic Procedures.
iPLEX ® Pro Sample ID Panel User Guide
DOC. SQNM-USG-CUS-050
CO 12-579
Version 1.0
11 January 2013
TRADEMARKS
MassARRAY, MassEXTEND, iPLEX, SensiPLEX, SEQUENOM, and SpectroCHIP are registered
trademarks of Sequenom, Inc. EpiTYPER, MassCLEAVE, SEQureDX, TypePLEX and any other marks so
indicated, are trademarks of Sequenom, Inc. All other trademarks or service marks set forth herein are the
property of their respective owners.
PATENTS
Sequenom's patented nucleic acid analysis by mass spectrometry methods and products are protected under
United States patent rights including but not limited to 5,869,242; 6,024,925; 6,238,871; 6,258,538;
6,300,076; 6,440,705;6,500,621; 6,558,623; 6,569,385; 6,979,425; 6,994,969; 7,025,933; 7,285,422;
7,332,275; 7,390,672; 7,419,787; and 7,501,251 and patents pending including but not limited to 20040081993A1, 11/089,805, and all of the foreign equivalent patent rights of the foregoing.
COPYRIGHT
© 2012. All rights reserved. No part of this publication may be reproduced, distributed, or transmitted in any
form or by any means, electronic, mechanical, photocopying, recording, or otherwise, or stored in a database
or retrieval system, for any reason other than a licensee's internal use without the prior written permission of
SEQUENOM. Printed in the United States of America.
i
Chapter 1 Introduction
Introduction .
. . . . . . . . . . . . . . . . . . . . . . .1
.
.
.
.
.
.
.
.
.
.
.
.
.
.
.
.
.
.
.
.
.
.
.1
Software Installation
.
.
.
.
.
.
.
.
.
.
.
.
.
.
.
.
.
.
.
.
.2
Contacting SEQUENOM .
.
.
.
.
.
.
.
.
.
.
.
.
.
.
.
.
.
.
.2
Chapter 2 Workflow Overview and Inventory Checklist . . . . . . . . . . 5
Workflow Overview
.
.
.
.
.
.
.
.
.
.
.
.
.
.
.
.
.
.
.
.
.5
Inventory Checklist .
.
.
.
.
.
.
.
.
.
.
.
.
.
.
.
.
.
.
.
.
.5
Laboratory Work Areas
.
.
.
.
.
.
.
.
.
.
.
.
.
.
.
.
.
.
.
.7
Chapter 3 Configuring the Software . . . . . . . . . . . . . . . . . . 9
Importing the Sample ID Assay Group File .
.
.
.
.
.
.
.
.
.
.
.
.
Setting Up Sample Identification
.
.
.
.
.
.
.
.
.
.
.
. 10
.
.
.
.
.9
Chapter 4 Assay Protocol . . . . . . . . . . . . . . . . . . . . . 17
Isolating DNA from Samples
.
.
.
.
.
.
.
.
.
.
.
.
.
.
.
.
. 17
Performing PCR Amplification .
.
.
.
.
.
.
.
.
.
.
.
.
.
.
.
. 17
Performing the SAP Treatment .
.
.
.
.
.
.
.
.
.
.
.
.
.
.
.
. 19
Performing the iPLEX Pro Extend Reaction .
.
.
.
.
.
.
.
.
.
.
.
. 20
Desalting the Extend Reaction
.
.
.
.
.
.
.
.
.
.
.
.
. 22
Designing a Sample ID Plate in PlateEditor .
.
.
.
.
.
.
.
.
.
.
.
. 23
.
.
.
.
Chapter 5 Dispensing Samples to a
SpectroCHIP® Array . . . . . . . . . . . . . . . . . . . 25
Preparing the Nanodispenser and Reaction Plate
Selecting Nanodispenser Settings
.
.
.
.
Loading the Reaction Plate and SpectroCHIP
.
.
.
.
.
.
.
.
.
.
. 25
.
.
.
.
.
.
.
.
.
.
.
. 26
.
.
.
.
.
.
.
.
.
.
.
. 26
Starting the Dispensing Run .
.
.
.
.
.
.
.
.
.
.
.
.
.
.
.
.
. 26
Removing the SpectroCHIP .
.
.
.
.
.
.
.
.
.
.
.
.
.
.
.
.
. 27
Chapter 6 Acquiring Data . . . . . . . . . . . . . . . . . . . . . 29
Starting the MassARRAY Analyzer Software
.
.
.
.
.
.
.
.
.
.
.
. 29
Loading the SpectroCHIP Array(s) .
.
.
.
.
.
.
.
.
.
.
.
. 29
Creating an Input File using Typer Chip Linker .
.
.
.
.
.
.
.
.
.
.
. 30
Setting Up the Automatic Run and Checking the Barcode Report .
.
.
.
.
. 31
Starting the Automatic Run .
.
.
.
.
.
.
.
.
.
.
.
.
.
.
.
.
.
. 32
Unloading the SpectroCHIP Array(s) .
.
.
.
.
.
.
.
.
.
.
.
.
.
. 33
iPLEX® Pro Sample ID Panel User Guide
.
.
SQNM-USG-CUS-050
ii
Chapter 7 Analyzing Data . . . . . . . . . . . . . . . . . . . . . 35
Generating Sample ID Reports .
.
.
.
.
.
.
.
.
.
.
.
.
.
.
.
. 35
Reading Sample ID Reports .
.
.
.
.
.
.
.
.
.
.
.
.
.
.
.
. 39
.
Appendix A Assay Information . . . . . . . . . . . . . . . . . . . . 49
Appendix B UNG PCR Protocol
Appendix C Troubleshooting
Appendix D Licensing
. . . . . . . . . . . . . . . . . . . 51
. . . . . . . . . . . . . . . . . . . . 53
. . . . . . . . . . . . . . . . . . . . . . . 55
iPLEX® Pro Sample ID Panel User Guide
SQNM-USG-CUS-050
Chapter 1
Introduction
Introduction . . . . . . . . . . . . . . . . . . . . . . . . . . . . . . . . . . . . . . . . . . . . . . . . . . . . . . . . . . . . . . . . . . . . . . . . . . 1
Software Installation . . . . . . . . . . . . . . . . . . . . . . . . . . . . . . . . . . . . . . . . . . . . . . . . . . . . . . . . . . . . . . . . . . . 2
Contacting SEQUENOM . . . . . . . . . . . . . . . . . . . . . . . . . . . . . . . . . . . . . . . . . . . . . . . . . . . . . . . . . . . . . . . . 2
1.1 Introduction
The iPLEX® Pro Sample ID Panel is designed to screen DNA extracted from FFPE samples, cell
lines, and/or tissues in order to identify sample mismatch, sample duplication, and/or sample
identification, and to quantify input DNA prior to further genotyping assays. It is intended for
research use only and is not for use in diagnostic procedures.
The panel uses Sequenom’s iPLEX Pro biochemistry with a specific Sample ID oligo mix.
After spectra are obtained on the MassARRAY ® Analyzer, the Typer Sample ID software
performs sample quality control, determines the gender of the sample based on three gender
assays, does a pairwise comparison of all samples across a set of 44 SNPs for sample
identification, and generates a results report. (See Appendix A for a list of the assays used.)
Sample Quality Control
The Sample ID software performs a quality control check on each sample by:
• Calculating the number of amplifiable copies of DNA, based on five quantitative assays.
Samples with fewer than 500 amplifiable copies will fail quality control.
• Counting the number of successful SNP calls made. Samples with fewer than 30 successful
SNP calls will fail quality control.
Sample Matching
After quality control, the Sample ID software performs a pairwise comparison of all valid
samples across a set of 44 SNPs and determines which samples match each other (i.e., originate
from the same person). These comparisons are reported in three categories:
• Unexpected mismatch (i.e., two samples were supposed to match but did not).
• Unexpected match (i.e., two samples were not supposed to match but did).
• Expected match (i.e., two samples were supposed to match and did).
Results for non-tumor vs. non-tumor comparisons and non-tumor vs. tumor comparisons will be
reported separately in each of these three categories. The vast majority of results are expected
mismatches and these results are not explicitly reported by the software.
When two samples are compared, each of the 44 pairs of SNP calls are compared individually. If
either sample generated a no call, that SNP is ignored for that comparison. If a non-tumor and a
tumor sample are being compared, only SNPs that are homozygous for the non-tumor sample are
considered, to account for potential loss of heterozygosity in the tumor. If the two SNP calls do
not match, an assay-specific penalty is applied to the comparison score between those two
samples, with homozygote to homozygote mismatches penalized more heavily than homozygote
to heterozygote mismatches
iPLEX® Pro Sample ID Panel User Guide
SQNM-USG-CUS-050
2
Chapter 1 Introduction
Sample ID Database
The Sample ID software allows you to develop a repository of known samples against which
future samples can be compared. As samples are run on the MassARRAY system and analyzed
on the Typer software, you can choose to add them to the Sample ID database. Then as new
samples are run on the system, you can compare them to all previously run samples in your
database by choosing to generate a historical report. See page 35 for more information.
1.2 Software Installation
The iPLEX Pro Sample ID Panel software requires Typer version 4.0.52 or higher. For
instructions on installing Typer 4.0.52, and for information on Oracle client compatibility, see
MassARRAY Typer 4.0.52 Release Notes.
iPLEX Pro Sample ID Panel reports are generated in both .csv and HTML versions; Internet
Explorer or Chrome are required to open the HTML reports.
1.3 Contacting SEQUENOM
Please contact your local Sequenom office for customer support.
CORPORATE HEADQUARTERS & NORTH AMERICA OFFICE
3595 John Hopkins Court
San Diego, CA 92121-1331
USA
Phone: 1-858-202-9000
Fax: 1-858-202-9001
Order Desk: 1-858-202-9301
Order Desk Fax: 1-858-202-9220
E-mail: [email protected]
Help Desk: 1-877-4GENOME (1-877-443-6663)
Help Desk: 1-858-202-9300
E-mail: [email protected]
E-mail: [email protected]
E-mail: [email protected]
EUROPEAN OFFICE
Mendelssohnstrasse 15D
D-22761, Hamburg
Germany
Phone: (+49) 40-899676-0
Fax: (+49) 40-899676-10
Order Desk: [email protected]
E-mail: [email protected]
ASIA PACIFIC OFFICE
300 Herston Road
Herston, QLD 4006
Australia
Phone: (+61) 3088 1600
Fax: (+61) 3088 1614
E-mail: [email protected]
iPLEX® Pro Sample ID Panel User Guide
SQNM-USG-CUS-050
Contacting SEQUENOM
SEQUENOM, K.K
PMO Nihonbashi Odemmacho, Building 5F
6-8 Nihonbashi Odemmacho, Chuo-ku
Tokyo 103-0011
Japan
Phone: (+81) 3 6231-0727
Fax: (+81) 3 3668-6088
E-mail: [email protected]
BEIJING REPRESENTATIVE OFFICE
Technology Building, Suite 702B, No. 28, Tian-Zhu Road
Tian-Zhu Airport Industrial Zone A Shunyi District
Beijing, 101312
China
Phone: (+86) 10-8048 0737
Fax: (+86) 10-8048 0740
E-mail: [email protected]
iPLEX® Pro Sample ID Panel User Guide
SQNM-USG-CUS-050
3
4
Chapter 1 Introduction
iPLEX® Pro Sample ID Panel User Guide
SQNM-USG-CUS-050
Chapter 2
Workflow Overview and Inventory Checklist
Workflow Overview . . . . . . . . . . . . . . . . . . . . . . . . . . . . . . . . . . . . . . . . . . . . . . . . . . . . . . . . . . . . . . . . . . . 5
Inventory Checklist . . . . . . . . . . . . . . . . . . . . . . . . . . . . . . . . . . . . . . . . . . . . . . . . . . . . . . . . . . . . . . . . . . . . 5
Laboratory Work Areas . . . . . . . . . . . . . . . . . . . . . . . . . . . . . . . . . . . . . . . . . . . . . . . . . . . . . . . . . . . . . . . . . 7
2.1 Workflow Overview
Running the iPLEX Pro Sample ID Panel involves performing the iPLEX Pro
biochemistry, designing a plate in Typer PlateEditor, dispensing samples to a
SpectroCHIP, acquiring data on the MassARRAY Analyzer, and running the Sample ID
reports in TyperAnalyzer, as outlined in Table 2.1.
Table 2.1 Workflow Steps
Step
Description
1
Import the Sample ID Assay Group file to the Typer software. NOTE: This only needs
to be done once, before first use of the Sample ID software.
See Page
9
10
2
Set up sample identification conventions in the Sample ID software. NOTE: Only
required before first use of the Sample ID software if you want to change the default
settings. You need to repeat this step for future runs only if you want to change your
naming system.
3
Purify sample DNA from FFPE or fresh tissue or cell line of choice and prepare DNA
working dilutions.
17
4
Amplify DNA using the provided iPLEX Pro Sample ID Panel primers.
17
5
Dephosphorylate any remaining free deoxynucleotides in the amplification reaction
mixture (SAP treatment).
19
6
Process the iPLEX Pro Sample ID Panel Extend reactions using the provided Extend
Primers.
20
7
Desalt the extension products.
22
8
Design a Sample ID plate in Typer PlateEditor.
23
9
Dispense the Extend reaction products to a SpectroCHIP array (chip).
25
10
Acquire data by analyzing the chip on the MassARRAY Analyzer instrument.
29
11
Generate an iPLEX Pro Sample ID Panel assay report in TyperAnalyzer.
35
2.2 Inventory Checklist
Kit Contents
The following items are included in the iPLEX Pro Sample ID Panel Assay Kit (catalog
#25093 for 10 x 96 kit, sufficient for 960 samples; #25094 for 2 x 384 kit, sufficient for
768 samples). Upon receipt, store the items as described.
iPLEX® Pro Sample ID Panel User Guide
SQNM-USG-CUS-050
6
Chapter 2 Workflow Overview and Inventory Checklist
Table 2.2 iPLEX Pro Sample ID Panel Assay Kit Component Storage Conditions
Materials Provided
Shipping Condition
Storage
Temperature
Quantity
iPLEX Pro Sample ID Panel PCR Primer Mix
Dry Ice
-10 to -25°C
1
iPLEX Pro Sample ID Panel Extend Primer
Mix
Dry Ice
-10 to -25°C
1
iPLEX Pro Sample ID Q-Mix
Dry Ice
-10 to -25°C
1
Note: Do not subject
the Sample ID Q-Mix
to more than 5 freeze/
thaw cycles.
Sequenom PCR Reagent Set, including:
Dry Ice
-10 to -25°C
1
iPLEX Pro Reagent
Set: Dry Ice
iPLEX Pro Reagent
Set: -10 to -25 °C
SpectroCHIPs and
Resin: Room
Temperature
SpectroCHIPs and
Resin: Room
Temperature
• PCR Accessory Reagents
• PCR Enzyme
iPLEX Pro Reagent Set, including:
• Thermosequenase Enzyme and iPLEX
Pro Reagents
• SpectroCHIP 384 element arrays
(2 arrays, sufficient for 768 samples;
cat. # 25094)
1
OR
OR
1
• SpectroCHIP 96 element arrays
(10 arrays, sufficient for 960 samples;
cat. # 25093)
• CLEAN Resin
Optional: Users wishing to use UNG enzymes for PCR must order the following
separately:
• Uracil-N-Glycosylase (UNG), 5 U/μl, 2,500 units: cat. no. 1744.
• dNTPs, 25 mM: cat. no. 1745.
Required Instruments
and Equipment
Table 2.3 Required Instruments and Equipment
Instruments and Equipment
Supplier
Quantity
MassARRAY Analyzer 4 OR MassARRAY Analyzer Compact
Sequenom
1
MassARRAY Database Server
1
MassARRAY Nanodispenser
Sequenom
1
384-well semi-skirted resin plate
Sequenom
1
96-well plate centrifuge
Any
1
Microtube centrifuge
Any
1
Spectrophotometer for quantifying DNA
NanoDrop
1
Standard thermocycler
Any
1
OR
96-well semi-skirted resin plate
iPLEX® Pro Sample ID Panel User Guide
SQNM-USG-CUS-050
Laboratory Work Areas
Required Software
Table 2.4 Required Software
Required Consumables
Software
Supplier
Quantity
Typer 4.0.52 or higher (purchased separately)
Sequenom
1
’R’ Environment R–2.9.1
http://cran.r-project.org
1
Table 2.5 Required Consumables
Item
Supplier
Full-skirted 384-well reaction plate
Sarstedt or Abgene
Quantity
1
Clear adhesive sealing film-PCR CS/100 (for PCR
cycling)
Myriad Industries
part no. 3150-0558
1
Sealing film, non-sterile
Myriad Industries
part no. 0425-0197
1
Sealing roller tool
MJ Research (Bio-Rad) part no.
MSR0001
1
Single and multi-channel pipettors
(0.5, 20, 200, and 1000 μl)
Any
2 sets
(pre- and
post-PCR)
Repeater pipettors
Eppendorf Repeater Plus with
Combitips Plus 0.1 ml or 0.5 ml
2 sets
(pre- and
post-PCR)
Filtered pipette tips (10, 20, 300, 1000 μl)
Any
Varies
Microtubes (0.5, 1.5, and 2 ml)
Any
50
Reagent reservoirs
Any
2
Water, HPLC grade
J.T. Baker part no. 4218-02
DNA AWAY
Molecular Bio Products (MBP)
250 ml
100% ethyl alcohol, HPLC grade
EMD part no. EX0276-3
1 gallon
OR
Un-skirted 96-well reaction plate
1L
2.3 Laboratory Work Areas
The laboratory space should include three separate (non-contiguous) work areas to prevent
contamination of PCR products. Table 2.6 shows the activities that are conducted in each
area.
Table 2.6 Lab Area Activities
Lab Area
Activities
1
Isolation and dilution of DNA.
2
Pre-PCR preparation and addition of DNA template to the PCR cocktail.
3
Post-PCR processing.
iPLEX® Pro Sample ID Panel User Guide
SQNM-USG-CUS-050
7
8
Chapter 2 Workflow Overview and Inventory Checklist
iPLEX® Pro Sample ID Panel User Guide
SQNM-USG-CUS-050
Chapter 3
Configuring the Software
Importing the Sample ID Assay Group File . . . . . . . . . . . . . . . . . . . . . . . . . . . . . . . . . . . . . . . . . . . . . . . . . 9
Setting Up Sample Identification . . . . . . . . . . . . . . . . . . . . . . . . . . . . . . . . . . . . . . . . . . . . . . . . . . . . . . . . . 10
Before using the Typer software to analyze iPLEX Pro Sample ID Panel data for the first
time, you must:
• Import the Sample ID assay group file into Typer AssayEditor. The file,
“SampleID_Assay_Design.xls”, is downloadable from mysequenom.com and
contains all the essential assay design specifications for the iPLEX Pro Sample ID
Panel procedure.
• Configure the software to indicate how samples will be identified and whether a
sample is a normal or tumor sample.
3.1 Importing the Sample ID Assay Group File
1.
Open Typer AssayEditor.
2.
Create a new Assay Project in the Database Browser by right-clicking the root node
and selecting Project Administrator.
3.
Add a new Assay Project with an appropriate name.
The new Assay Project will appear in the database browser. The Sample ID assay
group file will be stored in this project.
4.
Right-click on the newly created Assay Project and select Import Assay Group in
Designer format...
5.
Remove the check marks next to Design Summary and SNP Group. Make sure that
there is a check mark next to Assay Group.
6.
Click the Browse button next to Assay Group.
7.
Navigate to folder docs under Typer 4.0 install and select
“SampleID_Assay_Design.xls”.
8.
Click the Import button to import the group file.
9.
You can now use the imported Sample ID assays to design a Sample ID plate using
PlateEditor that corresponds with your plate layout.
NOTE
The instructions presented here are for users who are familiar with importing assays using
Typer AssayEditor and designing plates with Typer PlateEditor. For comprehensive
information on using Typer, refer to the Typer 4.0.20 User’s Guide (UG 11557), which is
available by contacting Sequenom Customer Support or from mysequenom.com.
iPLEX® Pro Sample ID Panel User Guide
SQNM-USG-CUS-050
10
Chapter 3 Configuring the Software
3.2 Setting Up Sample Identification
There are two important pieces of information that the user needs to provide for each
sample, in addition to the sample name:
• a sample identifier, which is a sequence of characters that determines whether two
samples are expected to match.
• an indicator whether or not a sample is a tumor sample.This is important because the
algorithm for comparing a non-tumor sample with a tumor sample is different than
the algorithm for comparing two non-tumor samples. Additionally, two tumor
samples can never be compared with each other.
NOTE
The different options for specifying this information, described below, may impact the way
you name your samples.
The default method for specifying sample identifiers and tumor identifiers is for the user
to provide a file with the identifiers listed (see page 13 and page 14 for instructions on
how to construct those files).
However, there are other options that may be chosen, which involve deriving the
identifiers from the sample names. Instructions are given below for choosing one of these
methods.
Once you have made your sample identification choices, they will remain in effect
indefinitely. If you wish at some point to change the way you are identifying your samples,
you can navigate to the settings window again and change your choices.
To configure your identification settings:
1.
Open TyperAnalyzer and in the Project Explorer pane double click on the chip(s) to be
compared.
The chip(s) will be added to the Chip list.
2.
Load the chip(s) by checking the box next to the chip name(s) in the Chip list.
3.
Once the chip(s) are loaded, select File → Reports
TyperAnalyzer menu bar. (See Figure 3.1.)
iPLEX® Pro Sample ID Panel User Guide
→ Launch Sample ID in the
SQNM-USG-CUS-050
Setting Up Sample Identification
Figure 3.1 Launching the Sample ID Panel software
The main control panel will appear (see Figure 3.2).
Figure 3.2 Main control panel
iPLEX® Pro Sample ID Panel User Guide
SQNM-USG-CUS-050
11
12
Chapter 3 Configuring the Software
4.
Click on Settings.
The Settings window will appear. The left side of the window contains options for
assigning identifiers to samples, and the right side contains options for determining
whether or not a sample is a tumor sample.
Figure 3.3 Settings window
Specifying a Sample
Identifier
5.
Click on a method for identifying matching samples. (See page 13 for a description of
these choices.)
6.
Click on a method for identifying tumor vs. non-tumor samples. (See page 14 for a
description of these choices.)
7.
Click Save.
The sample identifier is a sequence of characters that determines whether two samples are
expected to match. It may be equal to the sample name, derived from the sample name, or
completely different from the sample name. Consider the following three samples. If we
specify that the sample identifier is the first 5 characters of the sample name, we get the
following:
Sample Name
Sample Identifier
Sample B
12345_1_N
12345_2_T
Sample C
67890_1_N
12345
12345
67890
Sample A
Samples A and B share a common identifier, indicating that they are expected to match.
Samples A and C and samples B and C do not share common identifiers, so these are not
expected to match.
iPLEX® Pro Sample ID Panel User Guide
SQNM-USG-CUS-050
Setting Up Sample Identification
The choices available in the Settings window for specifying sample identifiers are
described below.
Options for Identifying Matching Samples in the Settings Window
• A file will be provided when the Sample ID panel is run (this is the default setting)
If this option is selected, each time you start a new comparison the software will ask you to
specify a file that contains a list of sample names and the identifiers assigned to these
samples. You may also select a default location for these files to be located.
The sample name/identifier file must be a .csv file, with the following format:
If a line has two columns:
Column 1 = Typer sample name
Column 2 = Sample identifier
If a line has three columns:
Column 1 = Plate ID
Column 2 = Well
Column 3 = Sample identifier
You may mix and match different acceptable formats on different lines of the same file.
• A delimited section of the sample name
If this option is selected, the sample name is separated into sections based on a delimiting
character, and then the nth section is chosen as the sample identifier. You must specify the
character to be used (Separator) and the value of n (Section Number), which must be an integer between 1 and 30 or between -1 and -30 (negative numbers start from the last section and
work backwards). See the examples below.
Separator
Sample Name
Section Number
Sample
Identifier
-
12345-45-67
1
12345
_
12345_678_90
-1
90
• A character range of the sample name
If this option is selected the sample identifier will be a character range of the sample name.
You must specify a starting and an ending character, and the sample identifier is the range of
characters between and including these characters. Each must be an integer from 1 to 60 or
from -1 to -60 (negative numbers start from the last character and work backwards). See the
examples below.
Starting
character
Ending
Character
Sample Name
Sample
Identifier
1
8
ABCDEFGHIJKLMNOP
ABCDEFGH
5
6
1234567890
56
-5
-1
1234567890
67890
2
-2
1234567890
23456789
iPLEX® Pro Sample ID Panel User Guide
SQNM-USG-CUS-050
13
14
Chapter 3 Configuring the Software
• Keep Typer sample name
If this option is selected the sample identifier will be the same as the sample name defined in
the Typer software. See the examples below.
Sample Name
Sample Identifier
12345_1
12345_2
12345_1
12345_2
67890_1
67890_1
Specifying a Tumor
Identifier
Each sample must be identified as either tumor or non-tumor. Consider the following three
examples. In this case the last character could be used to determine whether or not a
sample is a tumor sample, with the presence of a “T” indicating a tumor sample.
Sample Name
Tumor Sample?
Sample B
12345_1_N
12345_2_T
Sample C
67890_1_N
No
Yes
No
Sample A
These definitions lead to the following comparison algorithms being used by the Sample
ID software:
Samples A and B: Non-tumor vs. tumor algorithm
Samples A and C: Non-tumor vs. non-tumor algorithm
Samples B and C: Non-tumor vs. tumor algorithm
The choices available in the Settings window for specifying tumor identifiers are
described below.
Options for Identifying Tumor Samples in the Settings Window
• A file will be provided when the Sample ID panel is run (this is the default setting)
If this option is selected, each time you start a new comparison the software will ask you to
specify a file that contains a list of sample names labeled as tumor samples. You may also
select a default location for these files to be located.
The tumor identifier file must be a .csv file, with the following format:
If a line has one column:
Column 1 = Typer Sample Name (this will be defined as a tumor sample)
If a line has two columns:
Column 1 = Plate ID
Column 2 = Well (this well on this plate will be defined as a tumor sample)
You may mix and match different acceptable formats on different lines of the same file. Any
sample not present in the tumor identifier file is considered a non-tumor sample.
• A delimited section of the sample name
If this option is selected, the sample name is separated into sections based on a delimiting
character, and if the nth section matches a designated tumor value then the sample is labeled
a tumor sample.
You must specify the character to be used (Separator), the Tumor Value, and the value of n
(Section Number), which must be an integer between 1 and 30 or between -1 and -30 (negative numbers start from the last section and work backwards). See the examples below.
iPLEX® Pro Sample ID Panel User Guide
SQNM-USG-CUS-050
Setting Up Sample Identification
Separator
-
Section Number
1
Tumor Value
T
Sample Name
Tumor Sample?
T-12345-ABC
Yes
12345-ABC
No
N-12345-ABC
No
• Starts with the given value
If this option is selected, the sample will be identified as a tumor sample if the sample name
starts with a user-specified tumor value. See the examples below.
Tumor Value
Sample Name
Tumor Sample?
12345
No
T
T12345
Yes
12345-T
No
• Ends with the given value
If this option is selected, the sample will be identified as a tumor sample if the sample name
ends with a user-specified tumor value. See the examples below.
Tumor Value
T
Sample Name
Tumor Sample?
12345
No
T12345
No
12345-T
Yes
12345T
Yes
• Contains the given value
If this option is selected, the sample will be identified as a tumor sample if the sample name
contains a user-specified tumor value in any location. See the examples below.
Tumor Value
T
iPLEX® Pro Sample ID Panel User Guide
Sample Name
Tumor Sample?
12345
No
T12345
Yes
12345T
Yes
123T456
Yes
SQNM-USG-CUS-050
15
16
Chapter 3 Configuring the Software
iPLEX® Pro Sample ID Panel User Guide
SQNM-USG-CUS-050
Chapter 4
Assay Protocol
Isolating DNA from Samples . . . . . . . . . . . . . . . . . . . . . . . . . . . . . . . . . . . . . . . . . . . . . . . . . . . . . . . . . . .
Performing PCR Amplification . . . . . . . . . . . . . . . . . . . . . . . . . . . . . . . . . . . . . . . . . . . . . . . . . . . . . . . . . .
Performing the SAP Treatment . . . . . . . . . . . . . . . . . . . . . . . . . . . . . . . . . . . . . . . . . . . . . . . . . . . . . . . . . .
Performing the iPLEX Pro Extend Reaction . . . . . . . . . . . . . . . . . . . . . . . . . . . . . . . . . . . . . . . . . . . . . . . .
Desalting the Extend Reaction . . . . . . . . . . . . . . . . . . . . . . . . . . . . . . . . . . . . . . . . . . . . . . . . . . . . . . . . . . .
Designing a Sample ID Plate in PlateEditor . . . . . . . . . . . . . . . . . . . . . . . . . . . . . . . . . . . . . . . . . . . . . . . .
17
17
19
20
22
23
4.1 Isolating DNA from Samples
For each sample, prepare 10 ng of genomic DNA in a volume of 2 μl.
!
IMPORTANT
Perform this procedure in laboratory area 1.
Types of Samples
The iPLEX Pro Sample ID Panel can be performed on genomic DNA isolated from
fresh tissue, frozen tissue, formalin-fixed paraffin-embedded (FFPE) tissue, or cell
lines.
Method
You may use any method that you prefer to isolate genomic DNA from your
samples. Note that DNA isolated from FFPE samples is usually of lower molecular
weight than DNA from fresh or frozen samples. The degree of fragmentation
depends on the type and age of the sample and the conditions used for fixation. A
commercial, lysis-based kit such as Qiagen’s QIAamp DNA FFPE Tissue Kit or a
similar product is recommended for processing FFPE samples.
Purity
Use a spectrophotometric or fluorometric method to determine the concentration
and relative purity of your genomic DNA.
Amount
The amount of genomic DNA needed for the iPLEX Pro Sample ID Panel is
10 ng per sample. A maximum of 960 samples (for the 10 x 96 kit) or 768 samples
(for the 2 x 384 kit) can be assayed.
Storage
Purified genomic DNA can be stored at 2-8 °C for up to 24 hours. To store DNA
longer than 24 hours, we recommend storage at -25 to -10°C. Avoid freezing and
thawing DNA.
More Information
For further detailed information on purification, storage, quantification. and
analysis of genomic DNA, refer to the Genomic DNA Bench Guide, available at the
Qiagen web site.
4.2 Performing PCR Amplification
Genomic DNA from your samples will be amplified using the supplied iPLEX Pro Sample
ID Panel PCR primers in either a 96-well or a 384-well plate in a final reaction volume of
5 μl.
iPLEX® Pro Sample ID Panel User Guide
SQNM-USG-CUS-050
18
Chapter 4 Assay Protocol
!
IMPORTANT
Perform the PCR cocktail preparation and addition of DNA to the cocktail in the reaction
plate in laboratory area 2.
Preparation
performing pre-PCR cycling work, clean the bench areas, pipettes, and hood work area
• Before
with DNA AWAY or similar solution, followed by 70% ethanol, and illuminate with UV light
for 30 minutes.
• Clean post-PCR bench areas with DNA AWAY.
vortex and centrifuge tubes and plates that contain reagents or samples before
• Briefly
proceeding to the next step in the protocol.
• When not in use, seal plates with adhesive PCR sealer and store at the appropriate temperature.
• Plate seals are recommended to minimize evaporation:
Adhesive PCR Film Cs/100 (Myriad Industries)
Bio-Rad Pressure Pads (#ADR-5001)
following thermocyclers are recommended due to the high likelihood of evaporation of the
• The
low reaction volume in 96-well plates:
Perkin Elmer PE7500, PE9700
ABI: GeneAmp PCR System 9700 96-well
NOTE
The use of MJ Research Tetrad cyclers is strongly discouraged.
• Store stock reagents and finished cocktails in plates at -20°C when not in use.
• Wear gloves during the entire procedure.
Procedure
1.
Add the following reagents to a 1.5 ml Eppendorf tube.
NOTE
If using UNG enzyme during PCR, see the alternative UNG PCR protocol in Appendix B.
iPLEX® Pro Sample ID Panel User Guide
SQNM-USG-CUS-050
Performing the SAP Treatment
Volume per
96-well
Plate*
Volume per
384-well
Plate*
Initial
Concentration
Final
Concentration
HPLC-grade water
N/A
N/A
0.3 μl
36.3 μl
145.1 μl
10X PCR Buffer
10X
1X
0.5 μl
60.5 μl
241.9 μl
Reagent
1X
MgCl2
25 mM
2 mM
0.4 μl
48.4 μl
193.5 μl
dNTP Mix
25 mM
500 μM
0.1 μl
12.1 μl
48.4 μl
iPLEX Pro Sample ID
Panel PCR Primer Set
500 nM
100 nM
1.0 μl
121.0 μl
483.8 μl
Sequenom PCR
Enzyme
5 U/μl
1 U/rxn
0.2 μl
24.2 μl
96.8 μl
10X
1X
0.5 μl
60.5 μl
241.9 μl
3.0 μl
363.0 μl
1451.4 μl
Q-Mix
Final Volume
*includes 26% overhang
2.
Mix well by brief vortex and centrifuge briefly.
3.
Dispense 3 μl of the PCR mix into each well of a 384-well plate if using a 384-plate
set up OR a 96-well plate if using a 96-plate set up.
4.
Dispense 2 μl of DNA into each well of the plate containing the PCR mix. Make sure
that the pipette tips do not come into contact with the PCR cocktail already in the plate
to avoid cross-contamination of assays.
5.
Seal the plate with thermal sealing film, vortex briefly, and centrifuge.
6.
Perform thermocyling using the following conditions:
95°C
2 minutes
95°C
30 seconds
56°C
30 seconds
72°C
1 minute
72°C
5 minutes
4°C
Hold
45 cycles
4.3 Performing the SAP Treatment
After amplification, any remaining free deoxynucleotides in the amplification reaction
mixture must be dephosphorylated to prevent interference with the iPLEX Pro reaction.
Shrimp alkaline phosphatase (SAP) dephosphorylates unincorporated dNTPs and converts
them to dNDPs, making them unavailable for future reactions. The SAP is then heat
inactivated at 85°C.
!
IMPORTANT
Perform the SAP addition in laboratory area 3.
.
iPLEX® Pro Sample ID Panel User Guide
SQNM-USG-CUS-050
19
20
Chapter 4 Assay Protocol
Procedure
1.
Prepare the following SAP mix in a 1.5 ml Eppendorf tube:
Volume per
96-well
Plate*
Volume per
384-well
Plate*
Initial
Concentration
Final
Concentration
HPLC-grade water
n/a
n/a
1.53 μl
198.3 μl
793.2 μl
10X SAP Buffer
10X
1X
0.17 μl
22.0 μl
88.1 μl
SAP (1.7 U/μl)
1.7 U/μl
0.07 U/μl
0.30 μl
38.9 μl
155.5 μl
259.2 μl
1036.8 μl
Reagent
1X
Final Volume
*includes 35% overhang
2.
Dispense 2 μl of SAP mixture to each well of the reaction plate containing the PCR
products. You can also use the SAP addition protocol on the Sequenom Liquid
Handler.
3.
Seal the plate with thermosealing film, vortex plate briefly to mix, and centrifuge
plate.
4.
Perform thermocycling using the following conditions:
37°C
40 minutes
85°C
5 minutes
4°C
Hold
1 cycle
4.4 Performing the iPLEX Pro Extend Reaction
The iPLEX Pro Sample ID Panel extend reaction is a method for determining sample
identification and genomic copy number quantification. The iPLEX Pro Extend reaction
cocktail is added to the amplification products produced in the previous step.
The amplification products and reaction cocktail are thermocycled, allowing the
enzymatic addition of a nucleotide into the diagnostic site. The primer is extended by one
nucleotide, terminating the primer extension. The iPLEX Pro Extend reaction produces
allele-specific extension products of different masses depending on the sequence analyzed
(Table 4.1).
Table 4.1 iPLEX Pro Extend Reaction Products
Required Materials
Analytes
Peak Description
Length of Product
(bp)
Calculated Mass
(Da)
Unextended primer
Extension primer
20
6163.0
Low mass allele
Extension Primer + A
21
6434.2
High mass allele
Extension Primer + G
21
6450.2
You will need the following materials on hand before beginning:
• SAP-treated PCR samples in 384 plate(s) OR 96 plate(s)
• Sequenom iPLEX Pro Reagent Set
• iPLEX Pro Sample ID Extend primer, thawed
iPLEX® Pro Sample ID Panel User Guide
SQNM-USG-CUS-050
Performing the iPLEX Pro Extend Reaction
• 1 full-skirted 96-well PCR plate
• PCR sealing film
• RNAse and DNAase-free water
• 12-multichannel pipettors and sterile pipette tips
• Ice bucket with ice
Procedure
!
IMPORTANT
Perform the extend reaction in laboratory area 3.
1.
Prepare the iPLEX Pro Extend reaction mix on ice in a 1.5 ml Eppendorf tube as
follows:
Reagent
Initial
Concentration
Final
Concentration
1X
Volume per
96-well
Plate*
Volume per
384-well
Plate*
HPLC-grade water
n/a
n/a
0.755 μl
97.8 μl
391.4 μl
iPLEX Pro Buffer Plus
(10X)
10X
0.222X
0.200 μl
25.9 μl
103.7 μl
Thermosequenase
Termination Mix
10X
0.222X
0.200 μl
25.9 μl
103.7 μl
Extension Primer Mix
n/a
n/a
0.804 μl
104.2 μl
416.8 μl
32 U/μl
0.15 U/μl
0.041 μl
5.3 μl
21.3 μl
2.000 μl
259.1 μl
1036.9 μl
ThermoSequenase
(32 U/μl)
Final Volume
*includes 35% overhang
2.
Dispense 2 μl of the Extend reaction mix into each well of the SAP-treated PCR
reaction plate. Make sure the tips of the multichannel do not come into contact with
the PCR product already in the plate to avoid assay cross-contamination.
3.
Seal the plate and vortex briefly to mix.
4.
Centrifuge at 4,000 rpm for 5 seconds.
5.
Thermocycle the plate using the following reaction conditions:
95°C
30 seconds
95°C
5 seconds
52°C
5 seconds
80°C
5 seconds
72°C
3 minutes
4°C
Hold
iPLEX® Pro Sample ID Panel User Guide
5 cycles
40 cycles
SQNM-USG-CUS-050
21
22
Chapter 4 Assay Protocol
4.5 Desalting the Extend Reaction
Required Materials
You will need the following materials on hand before beginning:
• CLEAN Resin
• 384/6 mg dimple plate for 384-plate set up OR 96/15 mg dimple plate for 96-plate
set up
• iPLEX Pro Extend reaction plate from previous procedure
• PCR sealing film
• HPLC-grade water
• 12-multichannel pipettors and barrier filter pipette tips
• Plate rotator (at room temperature)
Procedure
!
IMPORTANT
Wear gloves and safety glasses during the desalting procedure.
1.
Spread CLEAN Resin on a clean, dry dimple plate (~3 scoops per plate) using the
scraper plate. Make sure that the resin settles evenly into all wells.
2.
Let the resin plates dry for 10 minutes at room temperature.
3.
While the resin plates are drying, add 16 μl (for 384-well plate setup) OR 41 μl (for
96-well plate set up) HPLC-grade water to each well of the iPLEX Pro Extend reaction
product plates using a 12-channel multipipettor.
4.
To add dried CLEAN Resin to each well:
a. Gently invert the sample plate on top of the dimple plate, making sure that the plate
wells are aligned over the resin samples.
b. Keep the sample and dimple plates pressed together, and invert both plates so that
the dimple plate is on top of the sample plate.
c. Gently tap the dimple plate and let the resin fall into the sample wells.
5.
Check the plate to make sure that the resin height is the same in all wells. Make note
of any wells that have more resin.
6.
Seal the plate and rotate for 30 minutes at room temperature. The rotator must rotate
the microplate 360° around its long axis.
7.
Centrifuge the plate at ~3,200 g for 5 minutes to pellet the resin.
iPLEX® Pro Sample ID Panel User Guide
SQNM-USG-CUS-050
Designing a Sample ID Plate in PlateEditor
4.6 Designing a Sample ID Plate in PlateEditor
The Sample ID plate layout and sample specifications have to be designed in PlateEditor in order
to acquire data on the MassARRAY system and to perform data analysis in Typer.
Design a Sample ID plate using PlateEditor that corresponds with your plate layout. See page 10
for information on choosing sample names.
NOTE
For comprehensive information on using Typer, refer to the Typer 4.0.20 User’s Guide (UG
11557), which is available by contacting Sequenom Customer Support or from
mysequenom.com.
iPLEX® Pro Sample ID Panel User Guide
SQNM-USG-CUS-050
23
24
Chapter 4 Assay Protocol
iPLEX® Pro Sample ID Panel User Guide
SQNM-USG-CUS-050
Chapter 5
Dispensing Samples to a
SpectroCHIP® Array
Preparing the Nanodispenser and Reaction Plate . . . . . . . . . . . . . . . . . . . . . . . . . . . . . . . . . . . . . . . . . . . .
Selecting Nanodispenser Settings . . . . . . . . . . . . . . . . . . . . . . . . . . . . . . . . . . . . . . . . . . . . . . . . . . . . . . . .
Loading the Reaction Plate and SpectroCHIP . . . . . . . . . . . . . . . . . . . . . . . . . . . . . . . . . . . . . . . . . . . . . . .
Starting the Dispensing Run . . . . . . . . . . . . . . . . . . . . . . . . . . . . . . . . . . . . . . . . . . . . . . . . . . . . . . . . . . . .
Removing the SpectroCHIP . . . . . . . . . . . . . . . . . . . . . . . . . . . . . . . . . . . . . . . . . . . . . . . . . . . . . . . . . . . . .
25
26
26
26
27
You will dispense the samples from the conditioned reaction plate onto a SpectroCHIP array
using the RS1000 Nanodispenser. The main steps to dispense samples from the microplate onto
the array include:
• Preparing the Nanodispenser and reaction plate.
• Selecting Nanodispenser settings.
• Loading the reaction plate and SpectroCHIP.
• Starting the dispensing run.
• Removing the SpectroCHIP after the run is completed.
!
IMPORTANT
The iPLEX Pro Sample ID Panel was validated using a MassARRAY Nanodispenser RS1000.
For further operating information, see the appropriate MassARRAY Nanodispenser User’s
Guide.
NOTE
Before dispensing samples, confirm that the daily and weekly instrument maintenance
procedures have been performed.
NOTE
The instructions presented here are for users who are familiar with dispensing samples using a
MassARRAY Nanodispenser. For comprehensive instructions refer to the MassARRAY
Nanodispenser RS1000 User’s Guide, which is available by contacting Sequenom Customer
Support or from mysequenom.com.
5.1 Preparing the Nanodispenser and Reaction Plate
1.
Turn on the Nanodispenser and log on.
2.
Check the supply and waste tanks, and the ultrasonic wash supply bottle.
• A full supply tank is enough to process ten 384-well SpectroCHIPs.
• An empty waste tank has enough capacity to process ten 384-well SpectroCHIPS.
• A full bottle of ultrasonic wash supplies enough solution for a day of instrument use.
iPLEX® Pro Sample ID Panel User Guide
SQNM-USG-CUS-050
26
Chapter 5 Dispensing Samples to a SpectroCHIP® Array
Fill the calibrant reservoir with 80 μl of 3-point calibrant.
3.
!
CAUTION
If there is calibrant in the reservoir that will not be used within a few hours, remove the calibrant
with a pipette and return it to the calibrant bottle for storage.
4.
Check to make sure that the resin levels and liquid are uniform across the microplate wells.
The liquid level must be at least 2.5 mm above the resin.
5.
Record the instrument, SpectroCHIP barcode, and dispensing parameters for your records.
5.2 Selecting Nanodispenser Settings
1.
Park the pin array assembly.
2.
On the Main Menu screen, tap Transfer. On the Transfer screen, tap Open and select the
appropriate method file, either “96 Plate to 96 Chip” or “384 Plate to 384 Chip.”
3.
On the Transfer screen, tap the Methods button, and select the aspirate/dispense tab.
“dispense settings” enter a dispense speed of approximately 80-120 mm/sec,
• Under
depending upon environmental conditions. The target volume for dispensing iPLEX Pro
Sample ID Panel assays is 15 nl.
• Under “calibrant” enter a dispense speed of at least 140 mm/sec.
• Under “operation” choose analyte & calibrant.
4.
On the Method screen, select the setup tab, and under “Analysis” select volume check.
5.3 Loading the Reaction Plate and SpectroCHIP
1.
Place the 96- or 384-well reaction plate on plateholder 1, such that well A01 is to the lower
left. Be sure to turn the hold-down latches so they clip onto the top of the plate.
2.
Remove the SCOUT plate or Compact plate adapter from the processing deck and insert a
SpectroCHIP into the plate in the chip position you selected earlier.
3.
Place the SCOUT plate or Compact plate adapter back onto the processing deck.
4.
Close the main door.
5.
In the safety interlock is disengaged! dialog box, tap the HOME button.
5.4 Starting the Dispensing Run
1.
On the Transfer screen, tap the step icon to start the dispensing run.
2.
When the instrument pauses, tap the volume button to check droplet volume. If necessary,
adjust the dispense speed to get to a target volume of 15 nl per droplet.
3.
Disable volume check, and then continue the run by tapping the run icon on the Transfer
screen.
iPLEX® Pro Sample ID Panel User Guide
SQNM-USG-CUS-050
Removing the SpectroCHIP
5.5 Removing the SpectroCHIP
1.
Park the pin array assembly and transfer the chip to the appropriate chip holder for analysis
in the MassARRAY Analyzer.
NOTE
It is recommended that you process the SpectroCHIP array immediately on the MassARRAY
Analyzer. However, if you are not able to process the chip immediately, return it to the protective
clamshell case and store in a desiccator with fresh desiccant away from ambient light.
\
2.
Remove the sample microplate, seal, and store at -20°C if you want to save the plate for
future analysis.
iPLEX® Pro Sample ID Panel User Guide
SQNM-USG-CUS-050
27
28
Chapter 5 Dispensing Samples to a SpectroCHIP® Array
iPLEX® Pro Sample ID Panel User Guide
SQNM-USG-CUS-050
Chapter 6
Acquiring Data
Starting the MassARRAY Analyzer Software . . . . . . . . . . . . . . . . . . . . . . . . . . . . . . . . . . . . . . . . . . . . . .
Loading the SpectroCHIP Array(s) . . . . . . . . . . . . . . . . . . . . . . . . . . . . . . . . . . . . . . . . . . . . . . . . . . . . . . .
Creating an Input File using Typer Chip Linker . . . . . . . . . . . . . . . . . . . . . . . . . . . . . . . . . . . . . . . . . . . . .
Setting Up the Automatic Run and Checking the Barcode Report . . . . . . . . . . . . . . . . . . . . . . . . . . . . . . .
Starting the Automatic Run . . . . . . . . . . . . . . . . . . . . . . . . . . . . . . . . . . . . . . . . . . . . . . . . . . . . . . . . . . . . .
Unloading the SpectroCHIP Array(s) . . . . . . . . . . . . . . . . . . . . . . . . . . . . . . . . . . . . . . . . . . . . . . . . . . . . .
29
29
30
31
32
33
The main steps in acquiring data from the MassARRAY Analyzer are:
• Start the MassARRAY Analyzer software
• Load the SpectroCHIP array(s)
• Create an input file using Typer Chip Linker software
• Set up the automatic run and check the barcode report
• Start the automatic run
• Unload the SpectroCHIP array(s)
NOTE
The instructions presented here are for users familiar with analysis using the MassARRAY
Analyzer 4. For more information on how to operate the MassARRAY Analyzer, or for
MassARRAY Analyzer Compact instructions, refer to the appropriate user’s guide [MassARRAY
Analyzer 4 User’s Guide (UG 161099) or MassARRAY Analyzer Compact User’s Guide (UG
11533)], available from Sequenom Customer Support or from mysequenom.com.
6.1 Starting the MassARRAY Analyzer Software
To launch the MassARRAY Analyzer 4 application, double-click the Analyzer 4
on the desktop.
instrument icon
To launch the MassARRAY Analyzer Compact application, double-click the Start RT Processes
icon
on the desktop.
6.2 Loading the SpectroCHIP Array(s)
1.
To load a SpectroCHIP array into the chip holder, or to place a SpectroCHIP arraycontaining chip holder on the chip carrier/target, probe the chip carrier out by pressing
the appropriate manual control button on the front of the MassARRAY Analyzer, or
by clicking Probe Sample In/Out or Target In/Out on the software toolbar. It takes
approximately one minute for the chip holder to move to the load position.
iPLEX® Pro Sample ID Panel User Guide
SQNM-USG-CUS-050
30
Chapter 6 Acquiring Data
!
CAUTION
When the chip holder is moving in or out of the analyzer, do not start or quit data
acquisition. Do not move the chip holder during spectra acquisition. Wait until acquisition
is completed, or abort the run.
2.
Open the sample chamber lid and take out the chip holder. Remove the previously run
chips from the chip holder.
3.
Place the chips to be processed into the chip holder. Orient the SpectroCHIP array in
the chip holder so that the Sequenom logo is at the bottom. Make sure the lower left
corner of the SpectroCHIP array is flush against the chip holder. Chip 1 is seated on
the left and chip 2 is seated on the right. If there is only one chip with samples, it is
recommended that you place a second dummy chip in the chip holder for better results.
Also make sure that the samples are dried and no liquid or dust is on the chip before
loading.
NOTE
Always wear gloves and use the supplied tweezers when handling SpectroCHIPs.
4.
Close the sample chamber lid and retract the target by pressing the manual control
button on the instrument, or selecting Target In/Out or Probe Sample In/Out in the
software tool bar.
The chip holder moves to the “sample in” position. The analyzer ready light
illuminates when the required vacuum pressure (5 x 10 -6) is reached. This takes
approximately two minutes.
!
IMPORTANT
Only use the chip holder that was supplied with the MassARRAY Analyzer. The chip holder
design is instrument-specific and chip holders are not interchangeable between
instruments.
6.3 Creating an Input File using Typer Chip Linker
An input file provides the information that SpectroACQUIRE needs to process a chip and save
data to the MassARRAY database.
1.
Double-click the Chip Linker icon
2.
In the dialog box that appears, enter your user name, password, and server.
3.
Click Connect or OK. The Chip Linker window appears. See Figure 6.1.
4.
In the Chip Linker directory tree, browse to your experimental folder and select your plate
that was created in Plate Editor.
5.
Select the iPLEX Terminator Chemistry button.
6.
Select "genotype+area" for the process method.
7.
For Dispenser, select Nanodispenser 384 to 384 OR Nanodispenser 96 to 96 as
appropriate.
iPLEX® Pro Sample ID Panel User Guide
on the workstation desktop.
SQNM-USG-CUS-050
Setting Up the Automatic Run and Checking the Barcode Report
8.
Enter an experiment name. When entering the information, use alphanumeric
characters excluding special characters such as \/:*?<>|, and spaces.
9.
For Chip Barcode, enter the SpectroCHIP barcode located on the chip.
10. Click Add. The input information appears in the Chip Linker table.
11. If a second chip will be processed, repeat step 4 to step 10 for the second chip.
12. Click Create to create an input .xml file. This file will be selected for use when you
set up the automatic run. Close the Typer Chip Linker software.
Figure 6.1 Chip Linker window
!
IMPORTANT
In the Chip Linker table, "Index 1” refers to chip holder position 1 and “Index 2” refers to
chip holder position 2.
6.4 Setting Up the Automatic Run and Checking the Barcode Report
1.
In SpectroACQUIRE, click the Automatic Run Setup tab.
2.
Enter Acquisition Parameters and Geometry settings as shown in Figure 6.2.
3.
In the Chip 1 box, enter the barcode that was entered in Chip Linker.
iPLEX® Pro Sample ID Panel User Guide
SQNM-USG-CUS-050
31
32
Chapter 6 Acquiring Data
NOTE
The chip number in the Automatic Run Setup tab corresponds to the chip position in the chip
holder. Chip 1 is seated on the left and chip 2 is seated on the right.
4.
Click Barcode Report. In the dialog box that appears, each chip position should have a
FOUND status. This means that the SpectroCHIP is properly associated with an experiment
in the MassARRAY database.
5.
Click CLOSE and correct any chip positions with an Error status.
Figure 6.2 SpectroACQUIRE Automatic Run Setup Tab
6.5 Starting the Automatic Run
1.
In SpectroACQUIRE, click the Automatic Run Setup tab.
2.
To start the run, click the
button on the SpectroACQUIRE toolbar or select
Run → Start Auto Run on the menu bar.
The software:
!
•
Checks the name of the SpectroCHIP array and confirms that the name is associated
with an experiment in the MassARRAY database.
•
Checks the position of the chip in the chip holder and performs autoteaching.
•
Validates SpectroCHIP 2D barcode.
•
Acquires calibration spectra.
•
Acquires spectra.
IMPORTANT
The software checks the name of each SpectroCHIP array when the SpectroACQUIRE software
begins to process it. If the software encounters an error in a name, the run stops with that
particular SpectroCHIP array. Click Barcode Report (on the Automatic Run Setup tab) to check
all SpectroCHIP names before starting a run.
iPLEX® Pro Sample ID Panel User Guide
SQNM-USG-CUS-050
Unloading the SpectroCHIP Array(s)
6.6 Unloading the SpectroCHIP Array(s)
Do not unload SpectroCHIP arrays while SpectroACQUIRE is acquiring spectra. Wait until the
data acquisition is completed.
1.
In the SpectroACQUIRE software, click the Automatic Run Setup tab.
2.
Press the Probe Sample In/Out or Target In/Out button on the front of the Analyzer to
extend the target. It takes approximately one minute for the chip holder to move to the load
position.
!
CAUTION
When the chip holder is moving in or out of the analyzer, do not start or quit the
SpectroACQUIRE software or start acquisition. Do not move the chip holder during spectra
acquisition. Wait until acquisition is completed, or abort the run.
3.
Open the sample chamber lid and take out the chip holder. Remove the chips from the
chip holder. Replace chip holder onto the chip carrier. Click the Probe Sample In/Out
or Target In/Out button on the front of the Analyzer to retract the chip carrier.
iPLEX® Pro Sample ID Panel User Guide
SQNM-USG-CUS-050
33
34
Chapter 6 Acquiring Data
iPLEX® Pro Sample ID Panel User Guide
SQNM-USG-CUS-050
Chapter 7
Analyzing Data
Generating Sample ID Reports . . . . . . . . . . . . . . . . . . . . . . . . . . . . . . . . . . . . . . . . . . . . . . . . . . . . . . . . . . 35
Reading Sample ID Reports . . . . . . . . . . . . . . . . . . . . . . . . . . . . . . . . . . . . . . . . . . . . . . . . . . . . . . . . . . . . 39
This section contains instructions for generating the Sample ID reports, and descriptions of the
Sample ID report files.
NOTE
The instructions presented here are for users who are familiar with analyzing data with Typer. For
comprehensive information on using Typer, refer to the Typer 4.0.20 User’s Guide (UG 11557),
which is available by contacting Sequenom Customer Support or from mysequenom.com.
7.1 Generating Sample ID Reports
1.
Open TyperAnalyzer and in the Project Explorer pane double click on the chip(s) to be
compared.
The chip(s) will be added to the Chip list.
2.
Load the chip(s) by checking the box next to the chip name(s) in the Chip list.
3.
Once the chip(s) are loaded, select File → Reports → Launch Sample ID in the
TyperAnalyzer menu bar. (See Figure 7.1.)
Figure 7.1 Generating Sample ID Reports
iPLEX® Pro Sample ID Panel User Guide
SQNM-USG-CUS-050
36
Chapter 7 Analyzing Data
NOTE
Only one chip per plate may be loaded in the Sample ID software. If you load two chips from the
same plate, an error message will appear.
The main control panel will appear (see Figure 7.2). At the top of the window the plates that are
currently loaded in Typer are displayed. The Stored column indicates whether or not these plates
are currently stored in the Sample ID database.
Figure 7.2 Main control panel
From the main control panel you may generate reports, delete loaded plates from the Sample ID
database, access the Sample ID settings window, or quit the Sample ID software (see Table 7.1).
iPLEX® Pro Sample ID Panel User Guide
SQNM-USG-CUS-050
Generating Sample ID Reports
Table 7.1 Functions in Main Control Panel
Button
Function
Historical
Performs a Sample ID comparison of the loaded plates against themselves and against the
entire Sample ID database. Data from these plates will be stored in the Sample ID
database and a report will be generated.
Local
Performs a Sample ID comparison of the loaded plates against themselves. This option
does not query the Sample ID database and will not store information about these plates
in the Sample ID database. A report will be generated.
Delete
Deletes the loaded plates from the Sample ID database. This has no effect on the data
stored in the Typer database, and does nothing if the loaded plates are not currently stored
in the Sample ID database.
Settings
Opens the Sample ID settings window (see page 10 for more information).
Quit
Quits the Sample ID panel software and returns you to TyperAnalyzer.
NOTE
If you load a chip from a plate that already has another chip stored in the database, a notice will
appear in the main control panel, because you may only store one chip per plate in the Sample
ID database.
You may run a local comparison on the loaded chip, and this will use data from the loaded chip
only, as the database is not used for a local comparison. You may run a historical comparison,
but data from the currently loaded chip will be ignored and data from the chip previously stored
in the database will be used.
4.
To generate a report, click on either Historical or Local in the main control panel.
The software will indicate what type of comparison is being done (“Performing comparison
only within loaded plates” in Figure 7.3 indicates that Local was selected.).
iPLEX® Pro Sample ID Panel User Guide
SQNM-USG-CUS-050
37
38
Chapter 7 Analyzing Data
Figure 7.3 Sample ID Report being generated
5.
When the comparison is complete, results will be made available in two different formats
(.csv and HTML) and stored in the Typer\bin folder, as indicated in the main control panel
(see Figure 7.4). The HTML index file (the Summary Report) will automatically open in
your browser.
Figure 7.4 Sample ID Report completed
iPLEX® Pro Sample ID Panel User Guide
SQNM-USG-CUS-050
Reading Sample ID Reports
NOTE
If the HTML reports do not open properly, make sure you are using a compatible browser, i.e.,
Internet Explorer or Chrome.
7.2 Reading Sample ID Reports
The two .csv files contain all the comparison and sample data generated; the four HTML files
contain data in a more readable format (see Table 7.2).
Table 7.2 Report Files Generated
File type
Folder or
file name
.csv
matches
This file contains information on all of the comparisons from the three reported
categories (unexpected mismatches, unexpected matches, and expected matches).
It contains information about the two samples involved in the result, the score of the
match, whether or not it was a match or a mismatch, and whether or not it was
expected.
samples
This file contains information on all of the samples from the loaded plate(s),
including information about the SNP calls, the number of amplifiable copies, the
gender, and the quality control results.
matches
This folder contains files for each unexpected match and mismatch and each
expected match; each match file includes information for the two samples involved
in the comparison, details of the SNP calls for each sample, and the match scoring.
plates
This folder contains files for each of the loaded plates. Each plate file contains
results for each well on that plate, including number of SNP calls, number of
amplifiable copies, gender, whether it passed quality control, and the number of
unexpected matches and mismatches and expected matches found.
samples
This folder contains files for each sample in the loaded plates. Each sample file
contains copy number, gender, and SNP assay results for that sample, as well as
details of any unexpected matches or mismatches or expected matches of that
sample with any other sample. If the sample failed quality control the reason(s) will
be stated.
index
This file contains the Summary Report, including a list of unexpected matches and
mismatches and information on samples that did not pass quality control. This file
will automatically open in your browser once the report files have been generated.
HTML
HTML files
Contents
Upon completing a Sample ID comparison, the HTML-formatted Summary Report will
automatically open in your browser window. (See Figure 7.5.) The Plate Report, Match Report,
and Sample Report may all be accessed from the Summary Report. Note that expected matches
are not listed in the Summary Report, but are included in the Plate, Match, and Sample Reports.
Summary Report
The Summary Report consists of four sections, as shown in Figure 7.5:
• Report identifying information, including type of report, date, plates compared, etc.
Clicking on the plate ID name will take you to the Plate Report.
• Summary results, showing how many samples failed quality control and how many
unexpected results were generated in each comparison category (non-tumor vs. non-tumor
mismatches, non-tumor vs. non-tumor matches, non-tumor vs. tumor mismatches, and
non-tumor vs. tumor matches). Clicking on the number of failed samples will take you to
the QC Summary section farther down the Summary Report; clicking on the number of
unexpected results will take you to the more detailed unexpected results section farther
down the Summary Report.
iPLEX® Pro Sample ID Panel User Guide
SQNM-USG-CUS-050
39
40
Chapter 7 Analyzing Data
• Unexpected results details, including identifying information for each of the samples that
were compared, as well as a match score (see Table 7.3). Low confidence match scores are
indicated by a yellow background. Clicking on the match score will take you to the Match
Report.
Table 7.3 Match scores
Non-tumor vs. non-tumor comparisons
Non-tumor vs. tumor comparisons
Match
0 to 10; 10 is a perfect match
Mismatch
<0
Low confidence score
-5 to 5
Match
0 to 5; 5 is a perfect match
Mismatch
<0
Low confidence score
-3 to 3
• Quality control (QC) details, lists all samples that failed quality control, and gives the
reason(s). Clicking on the sample name will take you to the Sample Report. Samples may
fail quality control for the following reasons:
-Sample contains fewer than the minimum allowable number of amplifiable copies
(500).
-Sample contains fewer than the minimum allowable number of SNP calls (30).
-Sample contains assays that are not a part of the Sample ID Panel.
-Sample is missing assays that are a required part of the Sample ID Panel.
iPLEX® Pro Sample ID Panel User Guide
SQNM-USG-CUS-050
Reading Sample ID Reports
Identifying
information
Click to
see Plate
Report.
Click to move to QC Summary
below.
Click to move to
unexpected
matches list
below.
Summary
results
Click to
see Match
Report.
Unexpected
matches/
mismatches
detail
Click to see Sample Report.
Quality control
results details
Figure 7.5 Sample ID Report Summary
iPLEX® Pro Sample ID Panel User Guide
SQNM-USG-CUS-050
41
42
Chapter 7 Analyzing Data
Plate Report
There is a separate HTML file for each plate that was loaded. The Plate Report lists results for
every well in the plate, including number of SNP calls, number of amplifiable copies, gender,
whether it passed quality control, and the number of matches and mismatches found. Clicking on
the sample name will take you to the Sample Report, where you can see details on unexpected
matches and mismatches and expected matches for that sample.
Click here to access
Sample Report
Figure 7.6 Plate Report
Sample Report
There is a separate HTML file for each sample on the loaded plate(s). Each Sample Report
contains results of the five copy number assays, the three gender assays, and the 44 SNP assays.
It also reports the details of each unexpected match or mismatch and each expected match with
other samples; clicking on the match score will take you to the Match Report for that comparison
(see Figure 7.7). If the sample failed quality control, the Sample Report will list the reason(s)
(see Figure 7.8).
The legend at the end of the report shows how SNP calls are categorized as aggressive, moderate,
or conservative, and how SNP matches and mismatches are color-coded.
iPLEX® Pro Sample ID Panel User Guide
SQNM-USG-CUS-050
Reading Sample ID Reports
Click here to see the Sample Report
for this sample.
Click here to see the Match Report for this
comparison.
Figure 7.7 Sample Report
iPLEX® Pro Sample ID Panel User Guide
SQNM-USG-CUS-050
43
44
Chapter 7 Analyzing Data
Figure 7.8 Sample report for a failed sample
iPLEX® Pro Sample ID Panel User Guide
SQNM-USG-CUS-050
Reading Sample ID Reports
Match Report
There is a separate HTML file for each unexpected match or mismatch and each expected match.
The Match Report lists identifying information for the two samples involved in the comparison,
and details of the SNP calls for each sample and the match scoring (see Figure 7.9).
When two samples are compared, each of the 44 pairs of SNP calls are compared individually. If
either sample generated a no call, that SNP is ignored for that comparison. If a non-tumor and a
tumor sample are being compared (see Figure 7.10), only SNPs that are homozygous for the nontumor sample are considered, to account for potential loss of heterozygosity in the tumor. If the
two SNP calls do not match, an assay-specific penalty is applied to the comparison score
between those two samples, with homozygote to homozygote mismatches penalized more
heavily than homozygote to heterozygote mismatches.
Figure 7.9 Match Report for an Unexpected Mismatch
iPLEX® Pro Sample ID Panel User Guide
SQNM-USG-CUS-050
45
46
Chapter 7 Analyzing Data
Figure 7.10 Match Report for an Expected Match
.csv Files
All the data from the samples and comparisons are contained in two .csv files, samples and
matches, which are saved in the Typer\bin folder location stated in the main control panel once
the report generation is complete. Note that the samples.csv file will always only contain
information on the samples from the loaded plates. If a historical comparison was done, however,
the matches.csv file may also contain information on samples from non-loaded plates that are in
the Sample ID database.
Samples.csv File
The samples.csv file contains data from all the samples from the loaded plates, including the SNP
calls, the number of amplifiable copies, the gender, and the quality control results for each
sample. See Table 7.4 for a description of all the columns in the samples.csv file.
iPLEX® Pro Sample ID Panel User Guide
SQNM-USG-CUS-050
Reading Sample ID Reports
Table 7.4 Columns in the samples.csv file
Column Name
Description
Customer
The Customer value from Typer.
Project
The Project value from Typer.
Plate
The Plate value from Typer.
SAMPLE_ID_PANEL_RE
SULT_PK
A unique identifier for the sample. This can be used to cross-reference with
the matches.csv output file.
Date
The date of the report.
Experiment
The Experiment value from Typer.
Gender 1/Gender 2/
Gender 3
The gender as determined by the individual gender assays (M = Male, F =
Female, 0 = No Call).
SIDv1_SNP01 to
SID_v1_SNP44
The genotype calls of the 44 SNP assays.
PLATE_PK
A unique identifier for the plate.
Missing Assays
QC flag for detecting missing assays.
Superfluous Assays
QC flag for detecting superfluous assays.
DNA Amount
QC flag for the number of amplifiable copies of DNA.
Num SNP Calls
QC flag for the minimum number of SNP calls.
SIDv1_SNP01_quality to
SIDv1_SNP44_quality
The quality values for the individual SNP calls. These match Typer quality
values with the exception of "i", which indicates a low intensity call
(Intensity < 1).
Amplifiable Copies
1/2/3/4/5
The number of amplifiable copies as determined by the individual
quantitative assays. A value of -1 indicates a failed assay.
SAMPLE_PK
A unique sample identifier with the Typer database.
Sample Identifier
The sample identifier used to link samples and determine expected
matches.
Passed QC
Whether or not the sample passed the QC checks.
Tumor
Whether or not the sample is a tumor sample.
User
The Typer user.
Version
The version of the Sample ID panel.
Well
The well.
Typer Sample ID
The Typer sample name.
Amplifiable Copies (Avg)
The average number of amplifiable copies.
Amplifiable Copies (SD)
The standard deviation across the 5 assays.
Gender
The overall gender determined from the individual gender assays.
iPLEX® Pro Sample ID Panel User Guide
SQNM-USG-CUS-050
47
48
Chapter 7 Analyzing Data
Matches.csv File
The matches.csv file contains information about all of the matches from the three reported
categories (unexpected mismatches, unexpected matches, and expected matches), including
information about the two samples involved in the result, the score of the match, whether or not it
was a match or a mismatch and whether or not it was expected. See Table 7.5 for a description of
all the columns in the matches.csv file.
Table 7.5 Columns in the matches.csv file
Column Name
Description
Plate1
The plate of the first sample.
Plate2
The plate of the second sample.
Plate1 Date
The date of the plate from the first sample.
Plate2 Date
The date of the plate from the second sample.
Sample1 Name
The name of the first sample.
Sample2 Name
The name of the second sample.
Sample1 Identifier
The identifier of the first sample used to link samples.
Sample2 Identifier
The identifier of the second sample used to link samples.
Sample1 Well
The well of the first sample.
Sample2 Well
The well of the second sample.
SAMPLE_ID_PANEL_
COMPARISON_PK
A unique value for this match.
SAMPLE_ID_PANEL_
RESULT_PK1
A unique value for the first sample. Can be used to cross-reference with
SAMPLE_ID_PANEL_RESULT_PK from the samples.csv file. Note:
This value may reference a sample that was not in the loaded plates and
thus is not present in the samples.csv file.
SAMPLE_ID_PANEL_
RESULT_PK2
A unique value for the first sample. Can be used to cross-reference with
SAMPLE_ID_PANEL_RESULT_PK from the samples.csv file. Note:
This value may reference a sample that was not in the loaded plates and
thus is not present in the samples.csv file.
Score
The match score.
Homozygous Mismatches
The number of homozygous to homozygous mismatches in the
comparison.
Heterozygous Mismatches
The number of homozygous to heterozygous mismatches in the
comparison.
Homozygous Matches
The number of homozygous to homozygous matches in the comparison.
Heterozygous Matches
The number of heterozygous to heterozygous matches in the comparison.
Match Type
Whether or not it is a match or a mismatch.
Expectation
Whether or not the result is expected.
Date
The date of the report.
User
The Typer user.
iPLEX® Pro Sample ID Panel User Guide
SQNM-USG-CUS-050
Appendix A
Assay Information
Table A.1 Sequenom iPLEX Pro Sample ID Panel Assay Information
Assay Name
Marker Name
Location
Function
SIDv1_QC01
albumin
chr4
DNA copy number assay
SIDv1_QC02
albumin
chr4
DNA copy number assay
SIDv1_QC03
albumin
chr4
DNA copy number assay
SIDv1_QC04
albumin
chr4
DNA copy number assay
SIDv1_QC05
albumin
chr4
DNA copy number assay
SIDv1_XY01
AMEL_XY
chrX/Y
Gender assay
SIDv1_XY02
ARSD_XY
chrX/Y
Gender assay
SIDv1_XY03
TGIF2L_XY
chrX/Y
Gender assay
SIDv1_SNP01
rs1005533
chr20
Genotyping SNP assay
SIDv1_SNP02
rs1024116
chr18
Genotyping SNP assay
SIDv1_SNP03
rs1028528
chr22
Genotyping SNP assay
SIDv1_SNP04
rs10495407
chr1
Genotyping SNP assay
SIDv1_SNP05
rs10771010
chr12
Genotyping SNP assay
SIDv1_SNP06
rs11781516
chr8
Genotyping SNP assay
SIDv1_SNP07
rs13050660
chr21
Genotyping SNP assay
SIDv1_SNP08
rs1335873
chr13
Genotyping SNP assay
SIDv1_SNP09
rs1357617
chr3
Genotyping SNP assay
SIDv1_SNP10
rs1360288
chr9
Genotyping SNP assay
SIDv1_SNP11
rs136337
chr22
Genotyping SNP assay
SIDv1_SNP12
rs1382387
chr16
Genotyping SNP assay
SIDv1_SNP13
rs1413212
chr1
Genotyping SNP assay
SIDv1_SNP14
rs1454361
chr14
Genotyping SNP assay
SIDv1_SNP15
rs1463729
chr9
Genotyping SNP assay
SIDv1_SNP16
rs1468118
chr17
Genotyping SNP assay
SIDv1_SNP17
rs1493232
chr18
Genotyping SNP assay
SIDv1_SNP18
rs1982986
chr1
Genotyping SNP assay
SIDv1_SNP19
rs1994997
chr12
Genotyping SNP assay
SIDv1_SNP20
rs2010253
chr17
Genotyping SNP assay
SIDv1_SNP21
rs2040411
chr22
Genotyping SNP assay
SIDv1_SNP22
rs2046361
chr4
Genotyping SNP assay
SIDv1_SNP23
rs2056277
chr8
Genotyping SNP assay
SIDv1_SNP24
rs2076848
chr11
Genotyping SNP assay
SIDv1_SNP25
rs214054
chr6
Genotyping SNP assay
SIDv1_SNP26
rs2247221
chr18
Genotyping SNP assay
SIDv1_SNP27
rs2518968
chr15
Genotyping SNP assay
SIDv1_SNP28
rs251934
chr5
Genotyping SNP assay
SIDv1_SNP29
rs2714854
chr7
Genotyping SNP assay
SIDv1_SNP30
rs2831700
chr21
Genotyping SNP assay
iPLEX® Pro Sample ID Panel User Guide
SQNM-USG-CUS-050
50
Appendix A Assay Information
Table A.1 Sequenom iPLEX Pro Sample ID Panel Assay Information
Assay Name
Marker Name
Location
Function
SIDv1_SNP31
rs354439
chr13
Genotyping SNP assay
SIDv1_SNP32
rs3819854
chr3
Genotyping SNP assay
SIDv1_SNP33
rs717302
chr5
Genotyping SNP assay
SIDv1_SNP34
rs727811
chr6
Genotyping SNP assay
SIDv1_SNP35
rs729172
chr16
Genotyping SNP assay
SIDv1_SNP36
rs740910
chr17
Genotyping SNP assay
SIDv1_SNP37
rs8037429
chr15
Genotyping SNP assay
SIDv1_SNP38
rs826472
chr10
Genotyping SNP assay
SIDv1_SNP39
rs876724
chr2
Genotyping SNP assay
SIDv1_SNP40
rs891700
chr1
Genotyping SNP assay
SIDv1_SNP41
rs901398
chr11
Genotyping SNP assay
SIDv1_SNP42
rs914165
chr21
Genotyping SNP assay
SIDv1_SNP43
rs9583190
chr13
Genotyping SNP assay
SIDv1_SNP44
rs964681
chr10
Genotyping SNP assay
iPLEX® Pro Sample ID Panel User Guide
SQNM-USG-CUS-050
Appendix B
UNG PCR Protocol
If you choose to use UNG enzyme during PCR, substitute the following protocol for the
standard one on page 17.
1.
Add the following reagents to a 1.5 ml Eppendorf tube.
Volume per
96-well
Plate*
Volume per
384-well
Plate*
Initial
Concentration
Final
Concentration
1X
HPLC-grade water
N/A
N/A
0.175 μl
21.2 μl
84.7 μl
10X PCR Buffer
10X
1X
0.500 μl
60.5 μl
241.9 μl
MgCl2
25 mM
2 mM
0.400 μl
48.4 μl
193.5 μl
dUTP/dNTP Mix
25 mM
500 μM
0.100 μl
12.1 μl
48.4 μl
UNG Enzyme
5 U/μl
0.625 U/rxn
0.125 μl
15.1 μl
60.5 μl
iPLEX Pro Sample ID
Panel PCR Primer Set
500 nM
100 nM
1.000 μl
121.0 μl
483.8 μl
Sequenom PCR
Enzyme
5 U/μl
1 U/rxn
0.200 μl
24.2 μl
96.8 μl
10X
1X
0.500 μl
60.5 μl
241.9 μl
3.000 μl
363.0 μl
1451.5 μl
Reagent
Q-Mix
Final Volume
*includes 26% overhang
2.
Mix well by brief vortex and centrifuge briefly.
3.
Dispense 3 μl of each of the PCR mix into the wells of a 384-well plate if using a 384plate set up OR a 96-well plate if using a 96-plate set up.
4.
Dispense 2 μl of DNA into the wells of the plate containing the PCR mix. Make sure
that the multichannel pipette tips do not come into contact with the PCR cocktail
already in the plate to avoid cross-contamination of assays.
5.
Seal the plate with thermal sealing film, vortex briefly, and centrifuge.
6.
Perform thermocyling using the following conditions:
30°C
10 minutes
95°C
2 minutes
95°C
30 seconds
56°C
30 seconds
72°C
1 minute
72°C
5 minutes
4°C
Hold
iPLEX® Pro Sample ID Panel User Guide
45 cycles
SQNM-USG-CUS-050
52
Appendix B UNG PCR Protocol
iPLEX® Pro Sample ID Panel User Guide
SQNM-USG-CUS-050
Appendix C
Troubleshooting
Table C.1 Troubleshooting
Problem
Possible Reason
Possible Solution
Too many unexpected
matches or mismatches.
Improper sample naming.
Rename samples using nomenclature
as described on page 10.
Chips are over or under-dispensed. Check the spotting and perform a
volume check to make sure correct
volumes are dispensed on the chip. Redispense if necessary.
Too many samples failed
analysis.
Input DNA amount for sample(s)
is too low.
Repeat sample run with at least 500
amplifiable copies.
Copy number is higher than
expected.
Reagents may be degraded.
Repeat biochemistry with new
reagents.
Copy number is lower than
expected.
Sample DNA is degraded.
Frequently observed with formalinfixed paraffin embedded tissue; may
repeat extraction.
Copy number assays show a
large variation amongst one
another within a sample.
This observation is part of the
panel design; variation is due to
high multiplexed assays.
Software provides an average of the 5
markers for relative quantification.
Peak intensities are too low.
Laser energy is too low.
Before running the chip, fire on one of
the calibrant pads and check that the
highest calibrant peak is 150 +/- 25%.
Chips are over or under-dispensed. Check the spotting and perform a
volume check to make sure correct
volumes are dispensed on the chip. Redispense if necessary.
Peak shape is too wide.
MassARRAY Analyzer may need
calibration.
Contact SEQUENOM Customer
Support.
Non template control wells
have genotype calls.
PCR contamination.
Pre-PCR preparations must be
performed in a UV-sterilized chamber;
review laboratory practices.
Self-extension of extend primers.
Can occur in wells with no DNA. If
self-extension is observed in wells with
DNA, then the assay may need to be
repeated.
Peaks are slightly off and not
aligned to the expected calls.
MassARRAY Analyzer may need
calibration.
Contact SEQUENOM Customer
Support.
No genotype calls, with the
presence of unextended assay
peaks.
iPLEX Pro Reagent Set enzyme,
terminator mix, or buffer may be
missing from the master mix, or
the dNTP mix may be degraded.
Repeat biochemistry.
Poor sample quality.
Repeat DNA extraction.
No genotyping calls, with no
unextended assay peaks.
Extension primer mix missing in
the master mix.
Repeat biochemistry.
No genotyping calls, with
poor quality spectra for some
wells.
Chips are over or under-dispensed. Check the liquid level of wells on the
sample plate; check the spotting and
perform a volume check to make sure
correct volumes are dispensed on the
chip. Re-dispense if necessary.
No genotyping calls, with
peaks present but not at the
expected masses.
Wrong extension mix added.
Repeat biochemistry.
MassARRAY Analyzer may need
calibrating.
Contact SEQUENOM Customer
Support.
iPLEX® Pro Sample ID Panel User Guide
SQNM-USG-CUS-050
54
Appendix C Troubleshooting
Table C.1 Troubleshooting (continued)
Problem
Possible Reason
Possible Solution
Incorrect genotype call leads
to incorrect scoring for
matches or mismatches.
Sample quantity may be too low.
Check that sample passed DNA quality
control, i.e., had at least 500
amplifiable copies.
Incorrect reagent additions.
Delete plate from Sample ID database,
use Typer to correct the genotype call,
and re-run the Sample ID analysis on
that plate; and/or repeat experiment if
reagent additions were incorrect.
One sample has a poor spectra.
Manually inspect the affected spectra
and re-dispense the affected sample.
Unexpected mismatch
between a paired normal and
tumor sample.
iPLEX® Pro Sample ID Panel User Guide
SQNM-USG-CUS-050
Appendix D
Licensing
License. Sequenom's patented nucleic acid analysis by mass spectrometry methods
(including iPLEX ®, SensiPLEX TM, OncoCartaTM, and MassCLEAVE TM methods and assays)
are protected under United States patent rights including but not limited to, 6,500,621,
6,300,076, 6,258,538, 5,869,242, 6,238,871, 6,440,705, 6,994,969, 7,019,288, 7,419,787,
7,390,672, 7,888,127, and 8,003,317 patents pending including but not limited to 20040081993A1, 11/089,805, and all of the foreign equivalent patent rights of the foregoing.
With the purchase of specially designated Sequenom SpectroCHIP ® chips and reagent kit
products as set forth in Table D.1. Customer is granted a limited right to practice
Sequenom's patented iPLEX ®, OncoCartaTM, ADME PGx, and MassCLEAVE TM methods
for certain Licensed Fields of Use as set forth in Table D.1, and subject to the commercial
terms which will be provided separately. The licensed rights are not transferable, are for
the benefit of Customer only, and expire with the consumption of the SpectroCHIP ® chips
purchased. Transfer or resale of products and their components, purchased from
Sequenom is prohibited. The license rights granted are limited to one-time use only for
each element per SpectroCHIP ® chip purchased. For example, Sequenom's SpectroCHIP ®
384 chip is provided with 384 elements and each element may be used only once. Remanufacture or re-use of Sequenom's SpectroCHIP ® chips and/or elements in conjunction
with performing Sequenom's patented nucleic acid analysis methods, is prohibited.
Reverse engineering Sequenom products is prohibited. Except as expressly licensed with
the purchase of chips and reagent kit products as set forth herein, Sequenom reserves all
rights and no additional license rights are granted or implied. For the avoidance of doubt,
license rights to patent rights owned or controlled by Sequenom related to analysis of
specific biomarkers or genetic regions and/or related to analysis of fetal nucleic acids, are
not granted pursuant to these terms and conditions, are not granted with the purchase or
license of Sequenom products, and must be separately and independently licensed from
Sequenom under a separate written agreement.
Table D.1 Sequenom Kits, Applications, and Licensing
Sequenom Kit
1.
®
iPLEX reagents and
SpectroCHIP ® chips
2.
OncoCartaTM reagents
and SpectroCHIP® chips
3.
ADME PGx reagents and
SpectroCHIP chips
MassCLEAVE TM reagents
and SpectroCHIP ® chips
Application
Licensed Field of Use With Kit Purchase
• Genotyping
Internal research and development, clinical
trial research, for-profit clinical trial support,
and for-profit research services that do not
require CLIA* registration or licensure (or
regional equivalent for Customers outside the
United States), by mass spectrometry, and
specifically excluding Diagnostic use and
Laboratory Developed (a.k.a home-brew) Test
use**
• QGE quantitative gene
expression analysis
• SNP Discovery
Internal research and development, clinical
TM
• EpiTYPER methylation research, for-profit clinical study support, and
pattern analysis
• iSEQ TM comparative
sequence analysis and
microbial and viral
identification and typing
for-profit research services that do not require
CLIA* registration or licensure (or regional
equivalent for Customers outside the United
States), by mass spectrometry, and
specifically excluding diagnostic and
prognostic use and use in the development of
Laboratory Developed Tests**
*(Clinical Laboratory Improvement Amendments, 1988)
** "Diagnostic use" and Prognostic Use" and "Laboratory Developed Test use" include within their meanings, but
are not limited to, providing a service, information, or data in conjunction with diagnostic, prognostic, predictive,
therapeutic, prophylactic, or pharmacogenetic testing, determination, or analysis on human subjects, and further
include diagnosing or monitoring any disease or its sequelae, state of health, or condition in humans, and testing
for treatment selection or response to treatment for any disease, state, or conditions in humans.
Software Licenses. For purposes of this Agreement, "Software" means computer software
or programs supplied by Sequenom to Customer including but not limited to such software
iPLEX® Pro Sample ID Panel User Guide
SQNM-USG-CUS-050
56
Appendix D Licensing
that is embedded in or forms an integral part of Sequenom's hardware products in addition
to separately provided software for application specific purposes. For purposes of this
Agreement, Software does not include Oracle Corporation software products provided by
Sequenom as such Oracle products are separately governed by the attached Oracle End
User License Terms.
(a) Sequenom grants Customer a non-exclusive and non-transferable license to use
the Software for processing data for the applicable Licensed Field of Use(s) as set
forth in Table D.1 above, and subject to the commercial terms which will be
provided separately. Customer shall not permit another party to use the Software
and Customer shall effect and maintain adequate security measures to safeguard
the Software from access or use by unauthorized persons. Customer shall not
transfer, rent, lease, sublicense, loan, copy, modify, adapt, merge, translate,
reverse engineer, decompile, or disassemble the Software or create derivative
works based on the whole or any part of the Software.
(b) The Software license shall not be deemed to extend to any of Sequenom's
intellectual property rights, including rights in source code. No copies may be
made of the Software without the prior written consent of Sequenom, except that
Customer may make a single back up or archival copy. The Software license shall
apply to any copy as it applies to the Software.
(c) With specific reference to Sequenom's iPLEX ® application Software (the "iPLEX ®
Software") that is part of Sequenom's Typer Software product, Customer is
provided a non-exclusive and non-transferable license to use the iPLEX® Software
subject to the terms and conditions in subsections (a) and (b) above, solely upon
the condition that such iPLEX ® Software is used exclusively in conjunction with
specially designated SpectroCHIP ® chips and iPLEX® reagent kit products
purchased from Sequenom. License rights to use the iPLEX® Software are not
granted by or with the iPLEX ® Software by itself, separate and apart from use in
conjunction with the specially designated kit products purchased from Sequenom.
(d) With specific reference to Sequenom's MassARRAY® QGE Analyzer Software,
Customer is provided a non-exclusive and non-transferable license to use the QGE
Analyzer Software subject to the terms and conditions in subsections (a) and (b)
above, solely upon the condition that such QGE Analyzer Software is used
exclusively in conjunction with specially designated SpectroCHIP ® chips and
iPLEX ® reagent kit products purchased from Sequenom. License rights to use the
QGE Analyzer Software are not granted by or with the QGE Analyzer Software
by itself, separate and apart from use in conjunction with the specially designated
kit products purchased from Sequenom.
(e) With specific reference to Sequenom's SNP Discovery Software, Customer is
provided a non-exclusive and non-transferable license to use the SNP Discovery
Software subject to the terms and conditions in subsections (a) and (b) above,
solely upon the condition that such SNP Discovery Software is used exclusively
in conjunction with specially designated SpectroCHIP ® chips and
MassCLEAVETM reagent kit products purchased from Sequenom. License rights to
use the SNP Discovery Software are not granted by or with the SNP Discovery
Software by itself, separate and apart from use in conjunction with the specially
designated kit products purchased from Sequenom.
(f) With specific reference to Sequenom's EpiTYPERTM Software, Customer is
provided a non-exclusive and non-transferable license to use the EpiTYPER TM
Software subject to the terms and conditions in subsections (a) and (b) above,
solely upon the condition that such EpiTYPERTM Software is used exclusively in
conjunction with specially designated SpectroCHIP ® chips and MassCLEAVE TM
reagent kit products purchased from Sequenom. License rights to use the
EpiTYPER TM Software are not granted by or with the EpiTYPER TM Software by
itself, separate and apart from use in conjunction with the specially designated kit
products purchased from Sequenom.
iPLEX® Pro Sample ID Panel User Guide
SQNM-USG-CUS-050
57
(g) With specific reference to Sequenom's iSEQTM Software, Customer is provided a
non-exclusive and non-transferable license to use the iSEQ TM Software subject to
the terms and conditions in subsections (a) and (b) above, solely upon the
condition that such iSEQ TM Software is used exclusively in conjunction with
specially designated SpectroCHIP ® chips and MassCLEAVE TM reagent kit
products purchased from Sequenom. License rights to use the iSEQ TM Software are
not granted by or with the iSEQ TM Software by itself, separate and apart from use
in conjunction with the specially designated kit products purchased from
Sequenom.
(h) With specific reference to Sequenom's OncoCarta TM Software, Customer is
provided a non-exclusive and non-transferable license to use the OncoCarta TM
Software subject to the terms and conditions in subsections (a) and (b) above,
solely upon the condition that such OncoCarta TM Software is used exclusively in
conjunction with specially designated SpectroCHIP ® chips and OncoCarta TM
reagent kit products purchased from Sequenom. License rights to use the
OncoCartaTM Software are not granted by or with the OncoCarta TM Software by
itself, separate and apart from use in conjunction with the specially designated kit
products purchased from Sequenom.
(i) With specific reference to Sequenom’s ADME PGx Software, Customer is provided
a royalty-free, non-exclusive and non-transferable license to use the ADME PGx
Software subject to the terms and conditions in subsections (a) and (b) above,
solely upon the condition that such ADME PGx Software is used exclusively in
conjunction with specially designated SpectroCHIP ® chips and ADME PGx
reagent kit itself, separate and apart from use in conjunction with the specially
designated kit products purchased from Sequenom
All Software licenses shall terminate automatically and immediately if Customer fails to
abide by any of the terms and conditions of this Agreement. Except as expressly licensed
herein, Sequenom reserves all rights. Other than as expressly set forth herein, no license
rights are granted or implied.
No Governmental Approval. Customer is hereby put on notice that all of Sequenom's
products and Software currently available as Research Use Only have not been subjected
to regulatory review or cleared or approved by the United States Food and Drug
Administration, by any other United States governmental agency or entity, or by any
equivalent or similar governmental agency or entity outside the United States, and are not
CLIA (or the regional equivalent thereof) registered or licensed or otherwise registered,
licensed, or approved under any statute, rule, law, or regulation, for any purpose, research,
commercial, diagnostic, medical, or otherwise. Customer bears sole responsibility and
liability for validating all products purchased by Customer for Customer's intended use.
ORACLE END USER
LICENSE TERMS
ORACLE CORPORATION ("ORACLE") SOFTWARE PRODUCTS
(a) The Customer shall limit its use of Oracle's products to the scope of the application
package and to its business operations;
(b) The Customer shall not transfer Oracle's products except for temporary transfer in the
event of computer malfunction;
(c) The Customer shall not assign Oracle's products or any interest in Oracle's products. If
a security interest is granted in Oracle's products, the secured party has no right to use or
transfer Oracle's products;
iPLEX® Pro Sample ID Panel User Guide
SQNM-USG-CUS-050
58
Appendix D Licensing
(d) The Customer shall not operate a timeshare, service bureau, subscription or rental use
of Oracle's products;
(e) Title to Oracle's products remains with Oracle and shall not pass to the Customer or to
any other party;
(f) The Customer shall not reverse engineer, disassemble or decompile Oracle's products
unless required for interoperability and then only to the extent so required for such
interoperability;
(g) The Customer shall not duplicate Oracle's products except for a sufficient number of
copies for the Customer's licensed use and a single back up or archival copy;
(h) Oracle shall not be liable for any damages whether indirect, incidental or
consequential arising from the use of its products;
(i) Where the licence which is granted by Sequenom in respect of Oracle products expires
or terminates and is not renewed, the Customer shall discontinue use and destroy or return
all copies of Oracle's products and documentation to Sequenom;
(j) The Customer shall not cause to be publicised any results of benchmark tests run on
Oracle's products;
(k) The Customer shall comply fully with all relevant export laws and regulations of the
United States and other applicable export and import laws to assure that neither the Oracle
products themselves nor any direct products thereof are exported, directly or indirectly in
violation of applicable laws;
(l) Oracle is not required to perform any obligations other than to the extent agreed by
Sequenom and Oracle;
(m) Sequenom has the right to audit Customer's use of Oracle's products and report such
use to Oracle, or to assign such right to another person;
(n) Oracle is a third party beneficiary of these Customer license terms;
(o) The Uniform Computer Information Transactions Act shall not apply; and
(p) To the extent that Oracle source code is included with any application package, such
source code is similarly governed by the terms above.
iPLEX® Pro Sample ID Panel User Guide
SQNM-USG-CUS-050


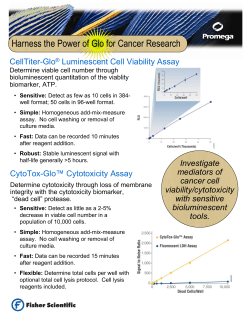

© Copyright 2026