
Sample Questions om www.lightroomqueen.com
Sample Questions Free sample questions - buy the book from www.lightroomqueen.com Adobe Lightroom 3 - The Missing FAQ Free sample questions - buy the book from www.lightroomqueen.com Sample Questions Adobe Lightroom 3 The Missing FAQ Real Answers to Real Questions asked by Lightroom Users Victoria Bampton Lightroom Queen Publishing Free sample questions - buy the book from www.lightroomqueen.com Adobe Lightroom 3 - The Missing FAQ Adobe Lightroom - The Missing FAQ - Version 3.0 Copyright © 2010 Victoria Bampton. All rights reserved. Published by The Lightroom Queen ISBN - 978-0-9560030-3-4 (PDF Format) ISBN - 978-0-9560030-4-1 (Paperback) No part of this publication may be reproduced in any form without prior written permission of the publisher, with the exception that a single copy may be printed for personal use. Permissions may be sought by email to [email protected] or via the website http://www.lightroomqueen.com/ The publisher/author assumes no responsibility or liability for any errors or inaccuracies that may appear in the informational content contained in this guide. Adobe, the Adobe logo, Flash, Lightroom, and Photoshop are either registered trademarks or trademarks of Adobe Systems Incorporated in the United States and/or other countries. Microsoft and Windows are either registered trademarks or trademarks of Microsoft Corporation in the United States and/or other countries. Apple, Mac, and Macintosh are trademarks of Apple Inc. registered in the U.S. and/or other countries. All other trademarks are the property of their respective owners. Free sample questions - buy the book from www.lightroomqueen.com Sample Questions Table of Contents Introduction 51 Quick Start Essentials 55 Import 61 Shooting Raw, sRAW or JPEG 61 The Import Dialog 65 Selecting Folders & Files for Import 67 Import Options 74 Renaming 77 Destination Folders 82 Import Presets 90 Proprietary Raw vs. DNG 91 Other Import Questions 102 Tethered Shooting & Watched Folders 111 Free sample questions - buy the book from www.lightroomqueen.com Adobe Lightroom 3 - The Missing FAQ Workspace 117 The Main Workspace 117 Thumbnails 126 Selections 131 Viewing & Comparing Photos 133 Working with Sliders & Panel Icons 136 Working with Dialogs 138 Secondary Display 139 Frequent Workspace Questions 143 Library Module 147 Folders 147 Collections 154 Stacking 158 Rating & Labeling 160 Renaming, Moving & Deleting 166 Viewing & Editing Metadata 170 Keywording 173 Editing the Capture Time 182 Managing Videos 186 Sorting, Filtering & Finding Photos 187 Smart Collections 196 Quick Develop 198 Missing Files 200 Free sample questions - buy the book from www.lightroomqueen.com Sample Questions Working with Catalogs 205 Managing Catalogs 205 Catalog Corruption 212 Single or Multiple Catalogs 215 Backup 221 Restoring Backups 227 Moving Lightroom on the Same Computer 229 Moving Lightroom to a New Computer 232 Working with Multiple Machines 234 XMP 241 Networking 247 Offline Archives 251 Previews & Speed 253 Previews 253 Preview Problems 257 Speed Tips 263 Develop Module 271 Raw File Rendering 271 Process Versions 274 White Balance 276 Basic Adjustments 279 Working with Sliders & Targeted Adjustment Tool 283 Free sample questions - buy the book from www.lightroomqueen.com Adobe Lightroom 3 - The Missing FAQ Tone Curves 287 HSL, Color, B&W & Split Toning 288 Adjusting Multiple Photos 291 Before / After Views 295 Histogram & RGB Values 296 Presets 300 Defaults 306 Snapshots & Virtual Copies 308 History & Reset 312 Detail—Sharpening & Noise Reduction 314 Lens Corrections 319 Effects—Post-Crop Vignette & Grain 327 Calibration Profiles & Styles 329 DNG Profile Editor 330 Cropping 336 Spot Removal—Clone & Heal Tools 340 Red Eye Reduction Tool 342 Local Adjustments—Graduated Filter & Adjustment Brush 343 Editing in Other Programs 353 Editing in Other Programs 353 Adobe Camera Raw Compatibility for Photoshop 359 Free sample questions - buy the book from www.lightroomqueen.com Sample Questions Export 367 Export Locations & File Naming 367 File Settings 370 Color Space 375 Sizing & Resolution 381 Output Sharpening 388 Copyright & Watermarking 389 Post-Processing Actions & Droplets 394 Plug-ins 399 Other Export Questions & Troubleshooting 403 Publish Services Setting Up Your Publish Services Creating Collections & Photosets 407 407 412 Synchronizing Changes 413 Flickr Account Questions 415 Publish Services Troubleshooting 417 Slideshow Module 419 Styles & Settings 419 Music 425 Saving & Exporting Slideshows 426 Errors 430 Free sample questions - buy the book from www.lightroomqueen.com Adobe Lightroom 3 - The Missing FAQ Print Module 431 Laying Out Your Photos 431 Styles & Settings 437 Printing 441 Web Module 447 Styles & Settings 447 Additional Galleries 451 Exporting & Uploading 453 Troubleshooting & Useful Information 457 Troubleshooting Steps 457 Preferences & Settings 461 Default File Locations 461 64-bit 465 Initial Installation 467 Upgrading from Lightroom 1, 2, or version 3 beta 468 Installing, Updating & Downgrading 472 Languages 474 Licensing Information 476 Final Words… 478 Keyboard Shortcuts 479 Index 489 Free sample questions - buy the book from www.lightroomqueen.com Sample Questions Table of Contents… in Detail Table of Contents 3 Table of Contents… in Detail 9 Acknowledgements Introduction 49 51 The Book Format 52 Windows or Mac? 52 Paperbacks and FREE digital formats 53 Updates 53 Talk to me! 54 Quick Start Essentials 55 The Basics 55 Basic Workflow 57 Free sample questions - buy the book from www.lightroomqueen.com Adobe Lightroom 3 - The Missing FAQ The Top 10 Gotchas 59 Remember Lightroom’s Rule Number 5 60 Import 61 SHOOTING RAW, SRAW OR JPEG 61 Can I use Lightroom on JPEG files as well as raw files? 62 If I can use all of Lightroom’s controls on JPEG files, why would I want to shoot in my camera’s raw file format? 62 If I shoot raw, can Lightroom understand the camera settings? 63 If I shoot sRAW format, can Lightroom apply all the usual adjustments? 64 THE IMPORT DIALOG 65 What’s the difference between the compact Import dialog and the expanded Import dialog and how do I switch? 66 What’s the difference between ‘Add,’ ‘Copy,’ ‘Move,’ and ‘Copy as DNG’? 66 SELECTING FOLDERS & FILES FOR IMPORT 67 How do I import multiple folders in one go? 67 Is it possible to import from multiple card readers at the same time? 68 Why do the folders keep jumping around and what is Docking? 68 Can I use the operating system dialog to navigate to a folder instead of using Lightroom’s Source panel? 69 Can I save favorite folders? 69 How do I select only certain photos to import? 69 How do I select photos from a specific date? 70 How do I select specific file types to import? 71 Free sample questions - buy the book from www.lightroomqueen.com Sample Questions Why are some photos unavailable or dimmed in the Import dialog? 72 Can I see larger previews of the files before importing? 73 IMPORT OPTIONS 74 Why do I have to create previews? Why can’t I just look at the photos? 74 What does ‘Don’t Import Suspected Duplicates’ do? 74 What does the ‘Make a Second Copy’ option do? 75 What Develop settings, metadata and keywords should I apply in the Import dialog? 75 How do I apply different settings to different photos while importing? 77 RENAMING 77 How do I rename the files while importing? 77 What’s the difference between Import#, Image#, Sequence# and Total#? 79 Can Lightroom continue my number sequence from my previous import? 80 How do I pad the numbers to get Img001.jpg instead of Img1.jpg? 80 Can I have more than 5 digit numbers? 81 DESTINATION FOLDERS 82 I’ve chosen ‘Copy’ or ‘Move’—how do I organize the photos into a folder structure that will suit me? 82 Why are some of the Destination folders in italics? 83 How should I organize my photos on my hard drive? 84 Can I create a different dated folder structure automatically? 87 Can I leave Lightroom to manage my photos like iTunes moves my music files? 90 IMPORT PRESETS How do I create Import presets, and what do they include? Free sample questions - buy the book from www.lightroomqueen.com 90 90 Adobe Lightroom 3 - The Missing FAQ PROPRIETARY RAW VS. DNG 91 Should I convert to DNG? 91 Do I lose quality when converting to DNG? 94 If I convert to DNG, can I convert back to the proprietary raw file format again? 95 Which preferences should I choose when converting to DNG? 95 How do I convert to DNG? 97 Should I convert other formats like JPEG or TIFF to DNG? 100 How do I update my embedded preview? 100 How do I change my embedded preview size? 100 Why do some files get bigger when converting to DNG? 101 I embedded the proprietary raw file—how do I extract it to use it? 101 I embedded the proprietary raw file—is there any way to remove it? 101 OTHER IMPORT QUESTIONS 102 How do I import my existing photos into Lightroom? 102 Why does Lightroom load or open the Import dialog every time I insert a memory card or device? 103 I can’t see thumbnails in the Import dialog, I just see grey squares. How do I fix it? 103 Can I set Lightroom to delete the photos from the memory card once they’ve uploaded? 104 What happens to the other files on a memory card, such as sound or video files? 105 Can I import CMYK photos into Lightroom? 105 It says: ‘Some import operations were not performed. Could not copy a file to the requested location.’ 105 It says: ‘Some import operations were not performed. The file is too big.’ 106 Free sample questions - buy the book from www.lightroomqueen.com Sample Questions It says: ‘Some import operations were not performed. The file is from a camera which isn’t recognized by the raw format support in Lightroom.’ 106 It says: ‘Some import operations were not performed. The files use an unsupported color mode.’ 107 It says: ‘Some import operations were not performed. The files could not be read. Please reopen the file and save with ‘Maximize Compatibility’ preference enabled.’ 107 It says: ‘Some import operations were not performed. The file appears to be unsupported or damaged.’ 108 Lightroom appears to be corrupting my photos—how do I stop it? 108 Why is Lightroom changing the colors of my photos? 109 I shot Raw+JPEG in camera—why have the JPEGs not imported? 110 TETHERED SHOOTING & WATCHED FOLDERS 111 Which cameras are supported by the built-in Tethered Capture? 111 How do I set Lightroom up to use Tethered Capture? 112 Crops can’t be saved in presets, so how do I get it to apply a crop to my Tethered photos? 114 Can I convert to DNG while tethering? 114 How do I set Lightroom up to use a watched folder? 115 Workspace THE MAIN WORKSPACE 117 117 Menu bar, Title bar and screen modes 118 Module Picker 118 Identity Plate / Activity Viewer 118 Panel Groups & Panels 120 Free sample questions - buy the book from www.lightroomqueen.com Adobe Lightroom 3 - The Missing FAQ Panel Auto Hide & Show 121 Filmstrip 122 Preview Area 123 Toolbar 123 Grid View & Filter Bar 124 Loupe View, Info Overlay & Status Overlay 124 Zooming using the Navigator panel 125 THUMBNAILS 126 Thumbnail (1) 128 Cell Border (2) 128 Index Number (3) 128 Top Label (4) 128 Flag (5) 128 Metadata Status Icon (6) 129 Quick Collection Marker (7) 130 Badges (8) 130 Video Icon (9) 130 Rotation (10) 130 Bottom Label (11) 131 SELECTIONS 131 What’s the difference between the selection shades of grey? 131 Why don’t the rest of my photos deselect when I click on a single photo? 132 How do I select multiple photos? 132 Free sample questions - buy the book from www.lightroomqueen.com Sample Questions I’ve got multiple photos selected—why is my action only applying to a single photo? 132 VIEWING & COMPARING PHOTOS 133 Grid View 133 Compare View 134 Survey View 135 Loupe View 135 Lights Out 135 WORKING WITH SLIDERS & PANEL ICONS 136 Moving Sliders 136 Resetting Sliders 137 Disclosure Triangles 137 Panel Switches 137 WORKING WITH DIALOGS 138 Saving Presets in Pop-Up Menus 138 Renaming, Updating and Deleting Presets in Pop-Up Menus 138 Using Tokens in Dialogs 139 SECONDARY DISPLAY 139 Which views are available on the Secondary Display? How are they useful? 140 Why do shortcuts and menu commands only apply to a single photo even though I have multiple photos selected on the Secondary Display Grid? 141 Why does the Secondary Display switch from Grid to Loupe when I change the Main Screen to Grid? 142 What does ‘Show Second Monitor Preview’ do? 142 Free sample questions - buy the book from www.lightroomqueen.com Adobe Lightroom 3 - The Missing FAQ How do I move the Library Filter bar to the Secondary Display? FREQUENT WORKSPACE QUESTIONS 142 143 My toolbar’s disappeared—where’s it gone? 143 How do I stop the panels opening every time I float near the edge of the screen? 143 Where have my panels gone? 143 Can I detach the panels and rearrange them? 143 Where have the Minimize, Maximize and Close Window buttons gone? 144 It’s all gone black! How do I change the view back to normal? 144 I can see Badges in Grid view, but not in my Filmstrip. Where have they gone? 144 How do I turn off the overlay which says ‘Loading…’? 144 Is it possible to see camera setting information while in Develop module, rather than constantly switching back to the Metadata panel? 145 Why is there an exclamation mark near the preview in the Develop Module? 145 How do I bring back the warning dialogs I’ve hidden? 146 Why won’t Lightroom show a dialog, such as the Export dialog? 146 Library Module FOLDERS 147 147 Can I change the way the folders are displayed? 148 When I look at a parent folder in Grid view, I see the photos in the subfolders as well. Can I turn it off so I can only see the contents of the selected folder? 149 I have a long list of folders—can I change it to show the folder hierarchy? 149 Why aren’t ‘Add Parent Folder’ and ‘Promote Subfolders’ showing in my context-sensitive menu? 151 Free sample questions - buy the book from www.lightroomqueen.com Sample Questions How do I expand or collapse all of a folder’s subfolders in one go? 151 How do I find out where a photo is stored on my hard drive? 152 I’ve added new photos to one of Lightroom’s folders—why don’t they show in my catalog? 152 How does the Synchronize Folder command work? 152 COLLECTIONS 154 How are Collections different from Folders? 154 How do I organize my collections into collection sets? 155 How do I add photos to a collection? 156 What are the Quick Collection and Target Collection? 156 How do I see which collections a photo belongs to? 157 STACKING 158 How do I stack photos? 158 Why are the stacking menu options disabled? 158 How do I move a photo to the top of the stack? 158 How do I apply metadata to multiple photos in a stack? 159 I’ve placed retouched derivatives into the same folder as the originals and I’d like them stacked in pairs. Can I do it automatically? 159 When I create a virtual copy, it should automatically stack them, but it hasn’t—why not? 160 RATING & LABELING 160 Which rating or labeling system should I use? 161 How do I apply ratings and labels quickly? 162 How do I use the Painter tool to quickly add metadata? 163 Free sample questions - buy the book from www.lightroomqueen.com Adobe Lightroom 3 - The Missing FAQ Is it possible to view flag/rating/color labels status when in other modules? 163 I’ve flagged my photos, but the flags disappear when I view these photos in another folder or collection—why? 164 I gave my photos stars or color labels in Lightroom—why can’t I see them in Bridge? 164 I gave my photos different color labels in Lightroom—why are they all white in Bridge? Or I labeled my photos in Bridge—why isn’t Lightroom showing my color labels? 164 Lightroom’s not quick enough to sort through a large shoot—is there anything I can do to speed it up? RENAMING, MOVING & DELETING 165 166 How do I rename one or more photos? 166 How do I move or copy photos between folders? 167 When I delete photos, am I deleting them only from Lightroom, or from the hard drive too? 168 Why can’t I delete photos from the hard drive when I’m viewing a collection? 168 I’m deleting photos in Lightroom, set to send to Recycle Bin/Trash, so why isn’t it deleting them? 169 I accidentally deleted my photos from my hard drive and I don’t have backups! Can I create JPEGs from Lightroom’s previews? 169 VIEWING & EDITING METADATA 170 How do I add metadata to multiple photos at once? 170 How do I create a Metadata preset? 171 How do I select which metadata to view in the Metadata panel? 172 Can I import and listen to my camera’s audio annotations? 172 Why do some files say CR2+JPEG and some just say CR2? 173 Some of my lenses are listed twice in the Metadata filters, for example 24.0-105.0 mm and also as EF24-105 IS USM. Why? 173 Free sample questions - buy the book from www.lightroomqueen.com Sample Questions KEYWORDING 173 How should I keyword my photos? 173 How do I change my long list of keywords into a hierarchy? Or change the existing hierarchy? 175 How many keywords can I have? 176 How can I keep certain keywords at the top of the list? 176 Is there a quick way of finding a particular keyword in my long list? 176 What do the symbols in the Keyword panels mean? 177 Is there an easier way to apply lots of keywords in one go, other than typing or dragging them all? 178 Why are there only 9 keywords in the Keywords panel? 179 I mistyped a keyword and now Lightroom keeps suggesting it—how do I clear the autofill? 179 Is it possible to display all of the photos in a catalog that aren’t already keyworded? 180 I use multiple catalogs, but I’d like to keep my keyword list identical and current across all of the catalogs—is there an easy way? 180 How do I import my keywords from Bridge? 181 If I can import keywords from Bridge using a text file, does that mean I can create my keywords manually using a text file and then import them into Lightroom? 182 EDITING THE CAPTURE TIME 182 What do the different options in the Edit Capture Time dialog do? 183 The time on my camera was incorrect—how do I change it? 183 How do I sync the times on two or more cameras? 185 MANAGING VIDEOS What can I do with my imported videos? Free sample questions - buy the book from www.lightroomqueen.com 186 186 Adobe Lightroom 3 - The Missing FAQ How I do change which program opens my videos? SORTING, FILTERING & FINDING PHOTOS 186 187 How do I change my sort order? 187 Can I set a default sort order regardless of folder? 187 How do I sort my entire catalog from earliest to latest, regardless of their folders? 187 Why can’t I drag and drop into a custom sort order or User Order? 188 Why does Lightroom add new photos to the end of the sort order when editing in Photoshop? 188 Why does my filter disappear when I switch folders? 189 What does the Filter Lock icon in the Filter bar do? 189 How do I filter my photos to show photos fitting certain criteria? 189 Can I save the filters I use regularly as presets? 191 How can I view all of the photos tagged with a specific keyword or keyword combination? 191 How do I filter my photos to show… just one flag/color label/rating? 191 Can I select all photos with a specific flag, color label or rating without changing the filtering? 192 How can I use the Text filters to do AND or OR filters? 192 How do I change the Metadata filter columns? 194 How do I select multiple options within the Metadata filter columns? 194 Can I combine Text filters, Attribute filters, and Metadata filters? 195 How do I search for a specific filename? 196 SMART COLLECTIONS Why would I use smart collections instead of standard collections or filters? Free sample questions - buy the book from www.lightroomqueen.com 196 196 Sample Questions How do I create smart collections? 197 How do I transfer smart collection criteria between catalogs? 198 QUICK DEVELOP 198 Why is the Quick Develop panel so useful? 199 Why am I missing some Quick Develop buttons? 199 Can I adjust any other sliders using Quick Develop? 200 MISSING FILES 200 Lightroom thinks my photos are missing—how do I fix it? 200 How do I prevent missing files? 201 Why does Lightroom keep changing my drive letters and losing my files? 202 Where has the Missing Files collection gone? How do I find all of the missing files in my catalog now? 202 I’ve renamed the files outside of Lightroom and now Lightroom thinks the photos are missing. Is it possible to recover them? 203 I’ve deleted some renamed photos. I do have backups but they have the original filenames, so Lightroom won’t recognize them. Is it possible to relink them? 203 Working with Catalogs MANAGING CATALOGS 205 205 How do I create a new catalog and switch between catalogs? 206 Why do I have a few different files for my catalog? 207 What does the catalog contain? 207 Is there a maximum number of photos that Lightroom can hold? 208 Free sample questions - buy the book from www.lightroomqueen.com Adobe Lightroom 3 - The Missing FAQ Is there a maximum number of photos before Lightroom’s performance starts to degrade? 208 Is there a maximum image size that Lightroom can import? 209 Can I move or rename my catalog? 209 How do I set or change my default catalog? 209 How can I remove everything I’ve done and start again? 210 What general maintenance will keep my catalogs in good shape? 210 Why can’t I open my catalog? 211 CATALOG CORRUPTION 212 How do catalogs become corrupted? 212 How can I keep my catalogs healthy and prevent corruption? 212 Lightroom says that my catalog is corrupted—can I fix it? 213 SINGLE OR MULTIPLE CATALOGS 215 Should I use one big catalog, or multiple smaller catalogs? 215 Can I search across multiple catalogs? 217 How do I set default Catalog Settings to use for all new catalogs? 217 I seem to have 2 catalogs. I only use 1, so can I delete the other? 218 How do I split my catalog into multiple smaller catalogs? 218 How do I merge multiple catalogs into one larger catalog? 219 How do I transfer photos between catalogs? 219 When I used ACR I only kept the XMP files archived—can’t I just do that? 220 BACKUP I run my own backup system—do I have to let Lightroom run backups too? Free sample questions - buy the book from www.lightroomqueen.com 221 221 Sample Questions Does Lightroom back up the photos as well as the catalog? 222 How do I back up Lightroom? 222 I back up photos using the Import dialog—isn’t that enough? 223 How often should I back up my catalog? 224 Where does Lightroom save the backups? 224 How do I change the backup location? 225 Should I turn on ‘Test integrity’ and ‘Optimize catalog’ each time I back up? 225 Can I delete the oldest backups? 225 Is it safe to have Time Machine back up the catalog? 226 I’m worried about keeping all changes in one catalog—are there any other options? 226 I haven’t got time to back up now—can I postpone the backup? 226 Why does Lightroom say it’s ‘unable to backup’? 227 RESTORING BACKUPS 227 How do I restore a catalog backup? 228 How do I restore everything from backups? 228 If I’m restoring from backups, does the catalog or the XMP data take priority? 229 MOVING LIGHTROOM ON THE SAME COMPUTER 229 How do I move only my catalog to another hard drive, leaving the photos where they are? 230 How do I move only my photos to another hard drive, leaving the catalog where it is? 230 How do I move my catalog & photos to another hard drive? 231 MOVING LIGHTROOM TO A NEW COMPUTER How do I move my catalog, photos and other Lightroom files to a new computer? Free sample questions - buy the book from www.lightroomqueen.com 232 232 Adobe Lightroom 3 - The Missing FAQ How do I move my catalog & photos from Windows to Mac or vice versa? WORKING WITH MULTIPLE MACHINES 234 234 How does Export as Catalog work? 234 What are the limitations of offline files? 235 How does Import from Catalog work? 236 I need to work on my photos on my desktop and my laptop—what are my options? 237 How do I use a portable catalog with originals, for example, the whole catalog on an external drive with the photos? 238 How do I use a portable catalog without originals, for example, the whole catalog copied without the photos? 238 How do I upload and start editing on my laptop, and then transfer that back to the main catalog? 239 How do I export part of my catalog to another computer and then merge the changes back later? 239 How can I use my presets on both computers? 240 Can I synchronize two computers? 241 XMP 241 Why would I want settings written to XMP? 242 Which of Lightroom’s data isn’t stored in XMP? 242 Where are the XMP files for my JPEG/TIFF/PSD/DNG files? 242 How do I write settings to XMP? 243 Should I turn on ‘Automatically write changes into XMP’? 243 What’s the difference between ‘Write Metadata to Files’ and ‘Update DNG Preview & Metadata’? 244 Should I check or uncheck ‘Include Develop settings in metadata inside JPEG, TIFF, and PSD files’? 244 Free sample questions - buy the book from www.lightroomqueen.com Sample Questions How do XMP files relate to the catalog? 245 Can I view the content of my XMP sidecar files? 245 XMP has been updated on another program or computer. Why don’t the changes show in Lightroom? 246 Lightroom says it can’t write to XMP—how do I fix it? 246 NETWORKING 247 Can I share my catalog with multiple users on the same machine? 247 Can one catalog be opened simultaneously by several workstations across a network? 247 Is it possible to have the catalog stored on a Network Accessible Storage unit (NAS) but open it on a single machine? 248 Is it possible to use XMP files to allow some degree of sharing across the network? 248 OFFLINE ARCHIVES 251 How do I archive photos to offline hard drives? 251 How do I archive photos to CD/DVD/Blu-Ray? 252 Previews & Speed PREVIEWS 253 253 What’s the difference between Minimal, Embedded & Sidecar, Standard and 1:1 previews? 253 What size and quality should I set for Standard-Sized Previews? 255 When I choose Render 1:1 Previews from the Library menu, does it apply to the entire catalog or just the selected photos? 255 The previews folder is huge—can I delete it? 256 If I delete a photo, is the preview deleted too? 256 Free sample questions - buy the book from www.lightroomqueen.com Adobe Lightroom 3 - The Missing FAQ I’ve discarded 1:1 previews—why hasn’t the file/folder size shrunk? 256 Can I move the previews onto another drive? 257 PREVIEW PROBLEMS Why do I just get grey boxes instead of previews? 257 257 Everything in Lightroom is a funny color, but the original photos look perfect in other programs, and the exported photos don’t look like they do in Lightroom either. What could be wrong? 258 How do I change my monitor profile to check whether it’s corrupted? 259 How should I calibrate my monitor? 260 The previews are slightly different between Library and Develop and Fit and 1:1 views—why is that? 260 My photos have imported incorrectly rotated and distorted—how do I fix it? 262 SPEED TIPS 263 How can I get Lightroom to import faster? 263 How can I speed up browsing in Library module? 263 How can I speed up moving files between folders? 264 It’s taking forever to delete photos—should it really take this long? 265 How can I speed up browsing in Develop module? And what are these Cache*.dat files? 265 Are there any other Lightroom tweaks to make it run faster? 268 Are there any hardware or operating system tweaks to make Lightroom faster? 268 Free sample questions - buy the book from www.lightroomqueen.com Sample Questions Develop Module RAW FILE RENDERING 271 271 Why do my raw photos change color? When the first preview appears, it looks just like it did on the camera—how do I stop it changing? 272 I set my camera to black & white. Why is Lightroom changing them back to color? 273 How do other programs like iView, PhotoMechanic, Apple’s Preview, Windows Explorer, Breezebrowser, etc., get it right? 273 There are some hot pixels on my sensor in other programs, but I can’t see them in Lightroom. Where have they gone? 274 PROCESS VERSIONS 274 Which settings are affected by the Process Version? 275 Which Process Version should I use? 275 How do I switch between PV2003 and PV2010? 275 Why are my new imports set to Process Version 2003? 276 WHITE BALANCE 276 Where should I be clicking with the White Balance Eyedropper? 277 The White Balance Eyedropper disappears every time I click anything—how do I keep it turned on? 277 Why don’t the Temp and Tint sliders have the proper white balance scale when I’m working on JPEGs? 278 Where have the other White Balance presets gone, such as Cloudy and Flash? 278 Why is Lightroom showing different Kelvin values than I set in my camera custom white balance? 278 Can I change the eyedropper averaging? 279 How do I adjust for an extreme white balance, under 2000k or over 50000k? 279 Free sample questions - buy the book from www.lightroomqueen.com Adobe Lightroom 3 - The Missing FAQ BASIC ADJUSTMENTS 279 What’s the difference between Exposure and Brightness? 280 Why does the Recovery slider add a colored tint? 281 Fill Light creates halos and drops the contrast too far—is there an easy solution? 281 What does the Clarity slider do? 282 What’s the difference between Vibrance and Saturation? 283 WORKING WITH SLIDERS & TARGETED ADJUSTMENT TOOL 283 The slider movements are too coarse—how can I adjust them? 283 How do I apply Auto settings to individual sliders? 284 Does it matter in which order I apply sliders? 286 How do I use the TAT, or Targeted Adjustment tool? 286 TONE CURVES 287 How do I use the standard Parametric Tone Curve? 287 What do the three triangular sliders docked at the base of the Tone Curve do? 287 How do I use the Point Curve? 288 Where have the Tone Curve sliders gone? 288 HSL, COLOR, B&W & SPLIT TONING 288 What is the HSL panel used for? 289 What’s the difference between the HSL and Color panels? 290 How do I create a Black & White photo? 290 How do I use the Split Tone panel? 290 How do I create a Sepia photo? 291 Free sample questions - buy the book from www.lightroomqueen.com Sample Questions ADJUSTING MULTIPLE PHOTOS 291 How do I copy or synchronize my settings with other photos? 291 Why won’t my white balance sync? 294 What does ‘Match Total Exposure’ in the Settings menu do? 294 Can I make relative adjustments, for example, brighten all selected photos by 1 stop? 295 BEFORE / AFTER VIEWS 295 Can I see a Before / After preview? 295 Can I change the ‘Before’ state to something other than the Import state? 295 Can I turn off the effect of a whole panel’s settings, to see the preview with and without those settings? 296 HISTOGRAM & RGB VALUES 296 Is it possible to see clipping warnings? Or, why are there red and blue areas on my photos? 298 Why does the Histogram look different when I open the exported sRGB photo in Photoshop? Why are my highlights clipping in Photoshop but not in Lightroom? 298 Can I view RGB values using a normal 0-255 scale? 300 PRESETS 300 Where can I download Develop presets? 300 How do I install Develop presets? 301 How do I preview and apply presets to my photos? 301 How do I create my own Develop Presets? 302 How can I organize my presets into folders or groups? 303 How do I rename Develop presets? 303 How do I remove the default Develop presets? 303 Free sample questions - buy the book from www.lightroomqueen.com Adobe Lightroom 3 - The Missing FAQ How do I uninstall Develop presets? 304 Where have my presets gone? 304 Can I apply multiple presets to the same photo, layering the effects? 305 I have some Develop presets that I use in ACR in CS4—can I use them in Lightroom? 305 Why do my presets look wrong when used on JPEG/TIFF/PSD files, even though they work on raw files? 305 Is there a way to add a keyboard shortcut to a preset? 306 DEFAULTS 306 Why would I change the default settings instead of using a preset? 306 How do I change the default settings? 307 Why would I want different defaults for each ISO and serial number combination? 308 Why don’t all of the sliders default to 0? 308 What settings should I use as the defaults? 308 SNAPSHOTS & VIRTUAL COPIES 308 Why would I want to use virtual copies? 309 When would I use a snapshot instead of a virtual copy? 310 Can I rename virtual copies? 310 Can I turn virtual copies into snapshots and vice versa? 311 Can I swap virtual copies for masters and vice versa? 311 What do Sync Copies and Sync Snapshots do? 312 HISTORY & RESET 312 How do I reset a single slider or panel section to its default setting? 312 How do I reset photos back to their default settings? 313 Free sample questions - buy the book from www.lightroomqueen.com Sample Questions If I don’t like the last adjustment I made, can I just undo that step, rather than resetting everything? 313 How long do the adjustments stay in the History panel? 314 DETAILSHARPENING & NOISE REDUCTION 314 Why are my pictures softer and noisier than other programs? 314 What is multiple pass sharpening? 314 How do the sharpening sliders interact? 315 Can I apply or remove sharpening selectively? 316 How do I use the different Noise Reduction sliders? 317 I’ve turned sharpening and noise reduction right up to the maximum, but it doesn’t seem to be doing anything—why not? 318 Why is the Noise Reduction sometimes visible in Fit View and other times only visible in 1:1? 318 LENS CORRECTIONS 319 How do I apply lens corrections to my photo? 319 Why is the lens profile not selected automatically? 319 How do I set a default lens profile? 320 In the Setup pop-up menu, what’s the difference between Default, Auto & Custom? 320 How do the Amount sliders interact with the profile? 321 Can I use the profiled lens corrections to correct the chromatic aberrations without removing the distortion? 321 Why have the lens corrections created new chromatic aberration and vignetting instead of fixing it? 321 Can I correct multiple photos in one go? 321 Can I turn on the lens corrections by default? 321 Free sample questions - buy the book from www.lightroomqueen.com Adobe Lightroom 3 - The Missing FAQ What are my options if my lens profile isn’t available? 322 What do the Manual Lens Corrections sliders do? 322 How is the Rotate slider different from Straighten in the Crop options? 323 How is the Scale slider different to cropping? 324 What does the ‘Constrain Crop’ checkbox do? 324 Why doesn’t the Lens Correction Vignette adjust to the Crop boundaries? 324 How do I fix Chromatic Aberration? 325 Can I save Manual lens corrections as defaults for lenses? 325 When in my workflow should I apply lens corrections? 325 How do I turn off the grid overlay? 326 How do I create a Lens Profile using the Lens Profile Creator? 326 Does it matter which camera body is used when creating a lens profile? 326 EFFECTSPOSTCROP VIGNETTE & GRAIN 327 What’s the difference between Highlight Priority, Color Priority and Paint Overlay? 327 How do the Post-Crop Vignette sliders interact? 328 How do the Grain sliders interact? 328 Why does my grain not always look exactly the same in the exported file as in the Develop preview? 328 CALIBRATION PROFILES & STYLES 329 How do I install and use the profiles? 329 Which are the profiles for my camera? 329 Why does my Nikon D300 have D2X profiles? 330 Why does the profile pop-up menu just say ‘Embedded’? 330 Free sample questions - buy the book from www.lightroomqueen.com Sample Questions Why do I only have Matrix listed? 330 The ACR version number in the Calibration section is an old version—how do I update it? 330 DNG PROFILE EDITOR 330 Why is the DNG Profile Editor better than the Calibration sliders? 331 Can I use the profiles on proprietary raw files, not just DNG? 331 Why doesn’t it use ICC profiles? 331 Where do I download the DNG Profile Editor? 333 How do I use the DNG Profile Editor? It looks complicated! 333 Is there a simpler way of creating a DNG Profile for my camera? 335 CROPPING 336 Why does the crop go in the wrong direction when I try and move the grid around? 336 How do I crop a vertical portion from a horizontal photo? 337 Can I zoom while cropping? 337 How can I change the default crop ratio? 337 How do I set a custom crop aspect ratio? 338 How do I delete a custom crop aspect ratio? 338 How do I set my crop grid back to thirds or bring the Crop Overlay back when it goes missing? 338 Is it possible to change the Crop Overlay color? 338 How do I straighten or rotate a photo? 339 Can a crop be saved in a preset? 340 Is there a way to see what the new pixel dimensions will be without interpolation? 340 Free sample questions - buy the book from www.lightroomqueen.com Adobe Lightroom 3 - The Missing FAQ SPOT REMOVALCLONE & HEAL TOOLS 340 How do I retouch a spot? 341 How do I adjust the brush size or the size of an existing spot? 341 How do I adjust the opacity of an existing spot? 342 How do I move or delete an existing spot? 342 Can I copy or synchronize the clone/heal spots? 342 RED EYE REDUCTION TOOL 342 How do I work the Red Eye Reduction tool? 343 Lightroom’s Red Eye Reduction tool can’t lock on to the red eye—is there anything I can do to help it? 343 Why doesn’t the Red Eye Reduction tool work properly on my dog’s red eye? 343 LOCAL ADJUSTMENTSGRADUATED FILTER & ADJUSTMENT BRUSH 343 Why would I use the Graduated Filter & Adjustment Brush rather than editing a photo in Photoshop? 344 How do I create a new brush mask? 345 What do Size and Feather do? 345 What’s the difference between Flow & Density? 346 Is the Adjustment Brush pressure sensitive when used with a graphics pen tablet? 347 What does Auto Mask do? 347 Why are there speckles in the brushed area? 347 How can I tell if I’m applying a color tint when using the Adjustment Brush? 347 Can I select a color tint from the photo itself? 347 Can I brush on a lens blur effect? 348 Free sample questions - buy the book from www.lightroomqueen.com Sample Questions If I apply sharpening using the Adjustment Brush, where do I adjust the Radius, Detail and Masking? 348 Where have my mask pins gone? 349 How can I tell whether I’m creating a new mask or editing an existing mask? 349 How do I reselect and edit an existing mask? 349 How do I create a new gradient mask? 350 How do I adjust an existing gradient? 350 How do I show the mask I’ve created? 350 Can I change the color of the mask overlay? 351 How do I fade the effect of an existing mask? 351 Can I layer the effect of multiple masks? 351 Can I invert the mask? 352 Can I synchronize my settings with other photos? 352 Can I save my Adjustment Brush strokes in a preset? 352 Editing in Other Programs 353 EDITING IN OTHER PROGRAMS 353 How do I change my Edit in… file settings? 353 In the Edit in… options, should I choose TIFF or PSD? 354 Can I have more than two External Editors? 354 How do I get Lightroom to use a different version of Photoshop? 355 Lightroom can’t find Photoshop to use Edit in Photoshop—how do I fix it? 356 Can I open the raw file into another raw processor? 356 Free sample questions - buy the book from www.lightroomqueen.com Adobe Lightroom 3 - The Missing FAQ Why isn’t Lightroom creating a TIFF or PSD file according to my preferences? 357 How do I open my layered file back into Photoshop without flattening it? 357 What’s the difference between ‘Edit Original,’ ‘Edit a Copy,’ or ‘Edit a Copy with Lightroom Adjustments’? 358 What do the other options in the Edit in… menu do? 358 ADOBE CAMERA RAW COMPATIBILITY FOR PHOTOSHOP 359 How do I check which Lightroom and ACR versions I have installed? 360 Which ACR version do I need for the settings to be fully compatible? 360 What happens if I’m still using an older version of ACR and Photoshop? 361 What’s the difference between ‘Render Using Lightroom’ and ‘Open Anyway’ in the ACR mismatch dialog? 362 Can I open a raw file directly into the ACR dialog? 363 Rendered Files (JPEG/TIFF/PSD) 364 Raw Files 365 If I use ACR to convert, having created XMP files, will the result be identical to Lightroom? 366 I’d prefer to let Bridge run the conversion to JPEG using Image Processor to run an action. Is it possible? 366 Why is Bridge not seeing the raw adjustments I’ve made in Lightroom? 366 Export 367 EXPORT LOCATIONS & FILE NAMING 367 Can I set Lightroom to automatically export back to the same folder as the original? 367 Can I set Lightroom to automatically re-import the exported files? 368 Why is the ‘Add to Stack’ checkbox unavailable? 369 Free sample questions - buy the book from www.lightroomqueen.com Sample Questions Can I set Lightroom to overwrite the original when exporting? 369 Can I stop Lightroom asking me what to do when it finds an existing file with the same name? 369 How do I burn the exported files to CD or DVD? 369 How do I change the filename while exporting? 370 FILE SETTINGS 370 What’s the equivalent of JPEG quality…? 371 How do I set Lightroom to a JPEG level 0-12 so that Photoshop doesn’t ask me every time I save? 371 If a photo is imported as a JPEG, and it’s not edited it any way, is what I am exporting identical to what I imported? 371 Why won’t Photoshop allow me to save my Lightroom file as a JPEG? 372 Should I choose 8-bit or 16-bit? 372 I am a high volume photographer (weddings, etc.)—do I have to convert to PSD or TIFF for light retouching, or can I use JPEG? 374 COLOR SPACE 375 Which color space should I use? 376 Why do my photos look different in Photoshop? 377 Why do my photographs look different in Windows Explorer or on the Web? 380 Can I export with a custom ICC profile? 381 SIZING & RESOLUTION 381 What’s the difference between Width & Height, Dimensions, Longest Edge & Shortest Edge? 382 When I enter 4x6 as my output size, why do the vertical photos become 4x6 but the horizontal photos become 2.5x4? 383 What does the ‘Don’t Enlarge’ checkbox do? 384 Free sample questions - buy the book from www.lightroomqueen.com Adobe Lightroom 3 - The Missing FAQ What PPI setting should I enter in the Export dialog? 384 I set the export PPI to 300—why is it 72ppi when I open it in Photoshop? 386 When I crop to 8x10 in Lightroom and then open in Photoshop, why is it not 8”x10”? 386 Is it better to upsize in Lightroom or in Photoshop? 387 Can I export to a specific file size? 387 OUTPUT SHARPENING Why does the Export Sharpening only have a few options? How can I control it? 388 388 Which Export Sharpening setting applies more sharpening—screen, matte or glossy? 388 COPYRIGHT & WATERMARKING 389 How do I create a basic watermark? 389 Are the watermarks intelligent for vertical and horizontal images? 390 Which file formats can I use for the graphical watermark? 391 Can I overwrite an existing watermark? 392 What is ‘Simple Copyright Watermark’ in the watermark menu? 392 Where can I use my watermarks? 393 How do I change the watermark placement for each photo? 393 Can I create more complex watermarks, such as text and a graphic? 393 POSTPROCESSING ACTIONS & DROPLETS 394 How do I get Lightroom to attach the exported files to an email? 394 Can I run a Photoshop action from Lightroom? 395 The droplet runs, but it doesn’t save—what have I done wrong? 397 The droplet runs, but it keeps asking what JPEG compression to use—what have I done wrong? 397 Free sample questions - buy the book from www.lightroomqueen.com Sample Questions The droplet doesn’t run at all—why not? 397 The droplet only works on some of the photos and then stops—what’s wrong? 398 In my droplet I used a ‘Save for Web’ instead of a standard ‘Save As’—why won’t it overwrite the original file? 398 PLUGINS 399 What plug-ins are currently available? 399 How do I install Export plug-ins? 400 Where should I store my plug-ins? 401 Why can’t I remove this Export plug-in? 401 How do I use Export plug-ins? 402 Can I export directly to an FTP server? 403 OTHER EXPORT QUESTIONS & TROUBLESHOOTING 403 Can I save my Export settings as a preset? 403 Do I have to use the Export dialog every time I export? 404 Can I strip the metadata from my files, like Save for Web in Photoshop? 404 Why can’t CS2 save as JPEG when I’ve used Local Adjustments on the photo? 404 It gives an error message—‘Some export operations were not performed. The file could not be written.’ or ‘The file could not be found.’ What went wrong? 406 The files appear in the export folder and then disappear again. Why is Lightroom deleting them? 406 Publish Services SETTING UP YOUR PUBLISH SERVICES Why is Flickr the only website? Where’s my favorite photo sharing website? Free sample questions - buy the book from www.lightroomqueen.com 407 407 407 Adobe Lightroom 3 - The Missing FAQ What can I use the Hard Drive option for? 408 How do I set up my Publish Services accounts? 408 Can I choose the size of the photos to upload? 410 How do I prevent it uploading a particular version of a photo? 411 How do I control which keywords are visible on my published photos? 411 Which settings should I use for Privacy & Safety? 411 CREATING COLLECTIONS & PHOTOSETS 412 Can I divide my photos into different sets? 412 How do I add photos into a photoset that already exists on Flickr? 412 I didn’t mean to remove a photo from a photoset—how do I restore it? 413 SYNCHRONIZING CHANGES 413 How do I publish to Flickr or my hard drive? 413 Does it automatically publish changes I make to my photos? 413 How do I update Flickr or my hard drive with the changes I’ve made to my photos? 414 How do I remove photos from my Lightroom catalog without removing them from Flickr? 414 I deleted a photo on the Flickr web interface—how do I upload it again? 415 What happens if I rename a photo and then republish it? 415 Can I use Export as Catalog to transfer my Publish collections between catalogs? 415 FLICKR ACCOUNT QUESTIONS 415 What are the limitations of the Free vs. Pro Flickr accounts? 415 How do I upgrade Lightroom to a Pro account? 416 Can I have more than one Flickr account connected to my catalog? 416 Free sample questions - buy the book from www.lightroomqueen.com Sample Questions Can I have the same Flickr account connected to multiple catalogs? 416 How do I disconnect Lightroom from my Flickr account? 417 I accidentally revoked the authorization on Flickr’s website—how do I fix it? 417 PUBLISH SERVICES TROUBLESHOOTING 417 Why is the new Comments panel unavailable? 417 Why is there a question mark on my Flickr service? 418 What does ‘Flickr API returned an error message (function upload, message Not a Pro Account)’ mean? 418 Slideshow Module STYLES & SETTINGS 419 419 How do I create my first slideshow? 419 How do I add my Identity Plate to my slideshow? 420 How do I adjust the anchor point? 421 How do I add captions to the slides? 421 How do I change the font on my text overlays? 422 How do I remove the quotation marks when a caption is blank? 422 How do I change the background? 423 What does ‘Zoom to Fill Frame’ do? 423 Can I add Intro and Ending slides? 424 Can I advance the slides manually, but still have them fade from one to the next? 424 Can I rate photos while a slideshow is running? 424 How do I make the slideshow display on my second screen? 425 Free sample questions - buy the book from www.lightroomqueen.com Adobe Lightroom 3 - The Missing FAQ MUSIC 425 How do I select or change the music track? 425 Which music formats can Lightroom play? 425 How do I adjust the slide timings to fit the length of the music track? 425 Why can’t Lightroom find my iTunes playlists? 426 How do I play multiple different music tracks during my slideshow? 426 SAVING & EXPORTING SLIDESHOWS 426 Can I save my settings for a specific slideshow? 427 How do I save my settings as a template for use on other photos? 427 Can I export my slideshow to run in a DVD player? 428 Can I export my slideshow for viewing on the web? 428 Can I export the slideshow with the music? 428 Where has the ‘Export to JPEG’ option gone? 428 I exported to PDF, but it doesn’t automatically start the slideshow when I open the PDF. Why not? 429 Which movie size option should I choose? 429 ERRORS 430 Why does it stall part way through the slideshow or go much slower than the times I’d chosen? 430 Everything appears to be running correctly, then the screen just goes plain grey or black when I try to running the slideshow. Why? 430 Why is my noise reduction and sharpening not applied to my slideshow? 430 Free sample questions - buy the book from www.lightroomqueen.com Sample Questions Print Module LAYING OUT YOUR PHOTOS 431 431 How do I set up a single borderless print, for example, a 4x6 snapshot? 431 How do I change the page size? 432 How do I create a contact sheet? 432 How can I change the order of contact sheet photos? 433 How do I use Picture Package? 433 What does the exclamation mark in the top right corner mean? 434 How do I create a Custom Package? 434 What’s a pinned or anchored cell? 434 How do I replace a photo in an existing cell? 434 How do I see the cell size? 435 How can I stop the photos being cropped by the cells? 435 How do I rotate a photo within a cell? 435 How do I move a photo within a cell? 435 How do I scroll through custom package pages? 436 Can I use the Print module to design albums and books? 436 STYLES & SETTINGS 437 How do I add the filename and watermark to my contact sheet? 437 Is it possible to personalize my print by changing the background color? 438 How can I overlay a graphic such as a border onto my print? 438 With 1 photo on a sheet, I can place the Identity Plate anywhere on the photo. Is that possible for multiple photos? 439 Free sample questions - buy the book from www.lightroomqueen.com Adobe Lightroom 3 - The Missing FAQ I have the Rulers and Grid checked in the Rulers, Grid & Guides panel—why can’t I see them? 440 How can I save my Print settings for later? 440 PRINTING 441 Why do Page Setup, Print Settings and Print buttons show the same dialog? 441 Which Print Sharpening option do I choose? 441 When should I turn on 16-bit printing? 442 What is ‘Draft Mode Printing’? 442 How do I set up my printer to match the preview I see on screen? 442 Why do Lightroom’s prints not match the preview on screen? 444 How do I print to a file such as a JPEG to send to my lab? 444 How do I get Lightroom to see my custom printer profile? 445 Why does my custom ICC printer profile not show in Lightroom’s list of profiles? 446 Web Module STYLES & SETTINGS 447 447 How do I create my first web gallery? 447 How can I change a web gallery I’ve already created? 448 How do I save my settings as a template for use on other photos? 449 The default flash gallery appears to be capped at 500 photos—how do I increase the number of photos it can hold? 449 Is it possible to add music to the galleries? 451 Why do my galleries show stray white pixels on some photos? 451 Free sample questions - buy the book from www.lightroomqueen.com Sample Questions ADDITIONAL GALLERIES 451 Where can I download additional web galleries? 451 Are there any web galleries with download links or an integrated shopping cart such as PayPal? 452 How do I install new web galleries? 452 When using some third party galleries, the panels are clipped—can they be resized? 453 EXPORTING & UPLOADING 453 How do I upload my gallery? 453 Why doesn’t the FTP upload work—it says ‘Remote Disc Error’? 455 Why are my FTP settings not saved in the templates? 455 Can I have multiple galleries on my website? 455 Is it possible to embed a web gallery into an existing website or webpage? 456 I changed an existing gallery—why hasn’t it changed on the website? 456 Troubleshooting & Useful Information TROUBLESHOOTING STEPS 457 457 I have a problem with Lightroom—are there any troubleshooting steps I can try? 457 How do I delete the Preferences file? 459 What is deleted when I delete my Preferences file? 459 I installed Lightroom, but it says ‘An error occurred while attempting to change modules’. How do I fix it? 459 It says ‘There was an error working with the photo’ or there’s an exclamation mark in the corner of the thumbnail and a small fuzzy preview. What’s wrong? 460 Free sample questions - buy the book from www.lightroomqueen.com Adobe Lightroom 3 - The Missing FAQ PREFERENCES & SETTINGS 461 Lightroom Preferences & Catalog Settings are… 461 Photoshop Preferences are… 461 Photoshop Color Settings are… 461 DEFAULT FILE LOCATIONS 461 The default location of the Lightroom catalog is… 462 The default location of the Preferences is… 462 The default location of the Presets is… 463 The default location of the Camera Raw Cache is… 464 The default locations of the Adobe Camera Raw & Lens Profiles are… 464 Your custom Camera Raw & Lens Profiles can also be installed to the User folders… 464 64BIT 465 How do I install the 64-bit version? 465 Lightroom isn’t certified for XP x64—does that meant it won’t run? 466 My Mac version doesn’t have an ‘Open as 32-bit’ checkbox. Why not? 466 How can I check whether I’m running the 32-bit or 64-bit version? 466 INITIAL INSTALLATION 467 Should I buy the download or the boxed version? 467 Do I have to install the 3.0 version from my CD before installing updates? 467 Why won’t Lightroom 3 install on my Mac? 467 UPGRADING FROM LIGHTROOM 1, 2, OR VERSION 3 BETA How do I upgrade Lightroom? Free sample questions - buy the book from www.lightroomqueen.com 468 468 Sample Questions Do I have to install Lightroom 1 or 2 if I purchased an upgrade version? 468 If I install Lightroom 3, will it overwrite my current 1.x or 2.x version? 468 Which catalog versions will upgrade to 3.0? 468 How do I upgrade my catalog from version 2 to version 3? 469 If I upgrade, can I go back to version 2? 470 Do I have to upgrade a catalog before I can import it into version 3 using Import from Catalog? 470 What happens if I try to upgrade a catalog that I’ve already upgraded? 471 Can I delete my previous installations? 472 INSTALLING, UPDATING & DOWNGRADING 472 How do I check which update I’m currently running? 472 How do I find out whether my new camera is supported yet? 473 How do I update Lightroom with the latest version of ACR? 473 How do I update to a newer Lightroom dot release? 473 How do I downgrade to an earlier Lightroom dot release in the case of problems? 473 LANGUAGES 474 How do I switch language? 474 Some of the shortcuts don’t work with my language version or non-English keyboard—can I fix it? 475 LICENSING INFORMATION 476 I’m switching from PC to Mac—how do I switch my Lightroom license? 476 How many machines can I install Lightroom on? 477 How do I deactivate Lightroom to move it to another machine? 477 Free sample questions - buy the book from www.lightroomqueen.com Adobe Lightroom 3 - The Missing FAQ FINAL WORDS… 478 Where else can I go to find solutions to my problems that aren’t covered here? 478 I’ve got a great idea, or I’ve found a repeatable bug—how do I tell Adobe? 478 Keyboard Shortcuts 479 Keyboard Shortcuts 479 Standard Modifier Keys 488 Index 489 Free sample questions - buy the book from www.lightroomqueen.com Acknowledgements Acknowledgements It’s funny, I still stare at my Missing FAQ books on the shelf and wonder whether I really wrote them. I did, honestly—I have the grey hairs to prove it! But I’ve had a lot of help along the way, for which I’m very grateful. I’d never have started this project if Lightroom users on various forums hadn’t given me so much encouragement, so I have to start by thanking the members of Digital Wedding Forum and Lightroom Forums for constantly challenging me with questions, problems to solve, and giving me the idea for this book. I couldn’t go without thanking the Lightroom engineering and QE teams who created our favorite program, especially Tom Hogarty, Mark Hamburg, Troy & Melissa Gaul, Dan Tull, Eric Chan, Eric Scouten, Julie Kmoch and Becky Sowada who have willingly answered my endless questions. Thanks are also due to the team of Lightroom Gurus, who are always happy to discuss, debate and share their experience, especially Jeff Schewe, Andrew Rodney, Peter Krogh, Ian Lyons, Jeffrey Friedl, Sean McCormack, John Beardsworth, Mark Sirota, Lee Jay Fingersh, Brad Snyder, Don Ricklin, Gene McCullagh, Gilles Theophile, John Hollenberg and the rest of the crew! Of course, then there are those who have helped put this book together. Many thanks go to Paul McFarlane, who did a great job of proof-reading and untangling my scribbles, cheered me up when I was shredding drafts that weren’t quite working, and most importantly provided the HobNobs™ biscuits that fueled this project! Also Petra Hall, who stepped in to assist with the design at short notice, Erik Bernskiold who designed the cover, and Denis Pagé who has the most incredible eye for detail. And finally I have to thank you, the Reader. This book has been completely rewritten since the Lightroom 3 beta 2 release, based entirely on the suggestions and questions that you’ve sent in. The lovely emails I’ve received make all the late nights and early mornings worthwhile—so thank you. Page 51 Adobe Lightroom 3 - The Missing FAQ Page 52 Sample Questions Introduction Adobe® Photoshop® Lightroom™ 1.0 was released on February 19th 2007, after a long public beta period, and it rapidly became a hit. Thousands of users flooded the forums looking for answers to their questions. In the 3½ years that have followed, Lightroom has continued to gain popularity, becoming the program of choice for amateur and professional photographers alike. When you have a question or you get stuck with one of Lightroom’s less intuitive features, where do you look? Do you trawl through thousands of web pages looking for the information you need? Perhaps post on a forum and wait hours for anyone to reply? Maybe you try to figure out the Help files? From now on, you look right here! Adobe Lightroom 3 - The Missing FAQ is a compilation of the questions most frequently asked by real users on forums all over the web. This book isn’t intended to be a basic step-by-step introduction to Lightroom. There are already books to fill that need and some things are far too obvious to need a book anyway. But there is one big gap— troubleshooting and reference material. I know you’re intelligent (after all, you chose to buy this book!), and I’ll assume you already have some understanding of computers and digital photography. You’ll find a quick introduction at the beginning of each section, to give you an overview if you’re a new user, but unlike those step-by-step books, I’m not going to tell you what you ‘must’ do—I’m going to give you the information you Free sample questions - buy the book from www.lightroomqueen.com Adobe Lightroom 3 - The Missing FAQ need to make an informed decision about your own workflow so you can get the best out of Lightroom. The Book Format As you glance through the pages of this book, you’ll notice it’s designed primarily as a reference book, so similar topics and questions are grouped together. I’ve tried to keep things in a logical order for newer users who may decide to read the book cover-to-cover, but feel free to skip around to find the answers to your questions. In the front you’ll find a list of all of the questions covered in this book and, of course, no book would be complete without an index in the back. In the eBook format you can use the search facility or bookmarks to find the specific information you need, and better still, you can use your eReader software to add your own bookmarks and notes too. As you read on, you’ll also notice clickable sidebar links to other related topics marked with a pin, which are particularly useful if you’re searching for the answer to a specific issue, or want to find out a little more about the current topic. Those cross-references usually refer to questions outside of the current section, rather than the question on the previous page. If you follow one of those cross-references, most eReader software includes a Back button to take you back to your previous page. The final chapters list other useful information, including default file locations for preferences, presets and catalogs for each operating system, and a list of all of the known keyboard shortcuts. Also check... Windows or Mac? Sidebar links are clickable - and then you can use your software’s back button to return It doesn’t matter whether you’re using the Windows or Mac platform, or even both. Lightroom is cross-platform, and therefore this book will follow the same pattern. The screenshots are mainly of the Mac version because I’m writing on a Mac, but the Windows version is Free sample questions - buy the book from www.lightroomqueen.com Sample Questions almost identical in functionality, and any significant differences will be explained and illustrated. Where keyboard shortcuts or other commands differ by platform, both are included. The one exception will be the shortcut to view a contextsensitive menu, which is right-click on Windows or Ctrl-click on Mac. I’ll keep that simple and just refer to right-clicking, as many Mac users today use 2-button mice, however if you’re a Mac user with a one-button mouse, just remember that right-click is the same as Ctrl-click. Paperbacks and FREE digital formats As this book is primarily designed for the PDF format, with easy search and clickable links, anyone purchasing the paperback version can also request the color PDF or other digital format ABSOLUTELY FREE! To claim your free eBook copy, all you need to do is email me at [email protected] with a copy of your purchase receipt and this code: [blank - sample sections only] If you’ve bought a digital version, decided it’s wonderful, and would now like a paperback copy (black & white print), visit http://www.lightroomqueen.com/shoppingcart.php for a discounted upgrade price on the paperback, which just covers the cost of printing and shipping. Updates Every time Adobe announce a new dot release (such as 3.1), I get an influx of emails asking whether there’s a book update available, so let me save you a job… Adobe doesn’t usually add new features to dot releases, so the book should still be current even when 3.6 is released. If there are any major changes, an update will be sent out automatically by email to anyone who has joined the mailing list at the time of purchase, Free sample questions - buy the book from www.lightroomqueen.com Adobe Lightroom 3 - The Missing FAQ and a post will go up in the Book Updates category on my blog: http://www.lightroomqueen.com/blog/category/book-updates/ Talk to me! I’d love to hear your feedback on the things you like about this book, and the things you don’t. I’m always looking for ways to make this book even better, so if you come across a question that I’ve missed, something that’s not clear, or you just want to tell me how much you love the book, my email address is [email protected]. I do reply! If you enjoy the book, posting a review on Amazon or your favorite online bookstore would make my day. Now, where shall we start…? Free sample questions - buy the book from www.lightroomqueen.com Sample Questions Quick Start Essentials If you’re anything like me, the first thing you want to do with a new program is dive right in. Who wants to read an instruction manual when you can experiment? If you’re nodding in agreement, that’s fine, but do yourself a favor and just read this short chapter before you jump in head first. You’ll save yourself a lot of headaches! There’s no doubt about it, Lightroom has a mind of its own. It’s a great mind, but it doesn’t always think in exactly the same way that you and I do, or in the way that we’re used to working with other programs, so there are a few things that you really need to understand. Read on… The Basics Lightroom’s designed for nondestructive editing. That’s to say, changes you make to your photos within Lightroom’s interface aren’t applied to the original image data until you export them, and even then it doesn’t overwrite the original file, but creates an edited copy. Firstly you ‘import’ your photos into Lightroom. That doesn’t mean they’re actually in Lightroom. They’re still on your hard drive as normal files, and in the Import dialog you can decide whether to leave them where they are, or whether to copy or move them to a new location of your choice. To be clear, don’t delete your files thinking that they’re in Lightroom—they’re not. Free sample questions - buy the book from www.lightroomqueen.com Adobe Lightroom 3 - The Missing FAQ The Lightroom catalog holds data about your photos. It’s just a long text database with small JPEG preview files in a nearby folder structure. It keeps a record of where the photos are stored on your hard drive, and other metadata describing your photos. That’s where any changes you make in Lightroom are stored too. So next essential tip—don’t tidy up your photos on your hard drive or rename them in other programs, or Lightroom will ask you to find them all. If you need to tidy up, do it within Lightroom’s interface. Next in line, you’re going to organize your photos in the Library module, sorting them into groups, choosing your favorites, adding metadata describing the photos such as keywords, and then editing the photos in the Develop module. Because it’s a database, you don’t have to hit ‘Save’ every few minutes. All of the changes you make are recorded as you go along, but this isn’t like resaving a JPEG over and over again, which would reduce the image quality. Instead, all of your changes are saved as text instructions in the catalog until you choose to remove the photos from the catalog. Here comes another essential—if you remove photos from your Lightroom catalog, and then import them again, all of the work you did in Lightroom will be gone. There is a partial exception called XMP, but we’ll come back to that later. The main things to remember are to back up the catalog regularly, and if you lose track of the files, don’t use Synchronize to remove them and re-import—redirect the links to the new file locations by clicking on the question marks instead. Finally, how do you get your adjusted photos out of Lightroom? You ‘export’ them. Consider it a ‘Save As’—it creates a new file in the location of your choice, in whatever file format, size and color space that suits your purpose. But that’s the great thing about Lightroom—you don’t have to keep different sized finished copies of every photo unless you want to, because as long as you have the originals and the catalog, you can output finished photos on demand. You’re not just limited to exporting single photos either. The Slideshow, Print and Web modules allow you to create… well, slideshows, prints and web galleries. Publish Free sample questions - buy the book from www.lightroomqueen.com Sample Questions Services also allows you to keep your photos synchronized with online photo sharing websites such as Flickr. Basic Workflow Capture t Think about your file format - raw vs. JPEG t Expose the photo correctly in the camera to produce the best quality Import t Store photos in organized folders t Consider renaming and converting raw files to DNG format t Apply basic metadata such as copyright and general keywords t Apply any Develop presets as a starting point, such as a camera profile t Render previews to save time later Organize t Browse through your photos t Manage photos in folders t Group photos into collections and stacks t Add star ratings and labels to identify your favorite photos t Add additional metadata, such as keywords t Search for photos using filters and smart collections t Don’t forget to back up the catalog as well as the photos themselves Free sample questions - buy the book from www.lightroomqueen.com Adobe Lightroom 3 - The Missing FAQ Develop & Retouch t Adjust tone & color t Remove noise, sensor dust, sharpen and apply lens corrections t Straighten & crop t Apply effects, such as black & white or split tones t Switch to Photoshop and other external editors for pixel based editing t Create panoramic shots and HDR photos in external editors Output t Create finished files in the size, format and color space of your choice t Use Export plug-ins to enhance your export, such as adding borders t View slideshows and export them to video, PDF and JPEG formats t Print to a local printer or save layouts to JPEG to print at a local print lab t Create web galleries to upload to your website t Use Publish Services to synchronize with Flickr and other photo sharing websites or folders on your hard drive Free sample questions - buy the book from www.lightroomqueen.com Sample Questions The Top 10 Gotchas There are a few things that catch most people out at some stage, so I can’t repeat these often enough. We’ll go into them in more detail in later chapters. t Lightroom is designed for nondestructive editing, so don’t try to save over your originals. t Lightroom doesn’t ‘contain’ photos—it just holds data about them—so don’t delete your photos from your hard drive thinking that they’re safely stored in Lightroom. t Lightroom’s backups only back up the catalog and not your photos—you still need to do that. t Lightroom’s catalog is just a database and, while comparatively rare, databases can become corrupted—so backup regularly, and keep older backups for a while. t Lightroom needs to know where the original files are, so don’t move or rename files outside of Lightroom (for example in Explorer or Finder) otherwise you’ll have a long job fixing all of the links. t Lightroom will not exactly match your camera’s rendering when working with raw files, as it’s just raw data and there’s no right or wrong way of processing it. If you like the camera manufacturer’s rendering, you can use profiles in the Calibration panel to emulate that style, or you can build your own profiles to suit your taste. t Lightroom has 2 or 3 different levels of selection—there’s mostselected or active, shown by the lightest grey shade, there’s the mid-grey shade denoting the photos are also selected but are not the active photo, and there’s the dark grey showing the photo isn’t selected. Notice the difference, otherwise you could accidentally apply a command to multiple photos. t Lightroom’s Grid view behaves differently to other views— anything you do in Grid view on the primary monitor applies to Free sample questions - buy the book from www.lightroomqueen.com Adobe Lightroom 3 - The Missing FAQ all selected photos, whereas most other views only apply to the active or most-selected photo (unless you have AutoSync turned on—there’s always an exception)! t Lightroom’s flags are local to the folder or collection, whereas star ratings and color labels are global. As a result, a photo can be flagged in one collection but not flagged in another. t Lightroom offers a choice of different color spaces when you output photos, but Adobe RGB and ProPhoto RGB will look odd in programs that aren’t color managed, such as web browsers. Use sRGB for screen output, emailing or uploading to the web. Remember Lightroom’s Rule Number 5 If you want an additional quick start introduction, visit Adobe’s website and watch the short Getting Started videos at: http://tv.adobe.com/show/learn-lightroom-3/ They’ll give you a quick overview of the basics, and then read on or dive right in. And most importantly, never forget Lightroom’s rule number 5… Free sample questions - buy the book from www.lightroomqueen.com Sample Questions Why are some photos unavailable or dimmed in the Import dialog? Dimmed photos that don’t have a checkbox are unavailable for import. That’s because they’re either already imported into your current Lightroom catalog in that location, or you have ‘Don’t Import Suspected Duplicates’ checked in the File Handling panel and they’re duplicates of existing photos that are stored somewhere else. Photos shown with a vignette are unchecked photos, but can be imported by toggling the checkbox. Free sample questions - buy the book from www.lightroomqueen.com Adobe Lightroom 3 - The Missing FAQ Also check... “How do I rename one or more photos?” on page 115 What’s the difference between Import#, Image#, Sequence# and Total#? When you’re setting up your file naming structure in the Filename Template Editor, you will notice that there are a number of different types of sequence number available. Import # is a number identifying that particular import, which you may want to combine with Image #. It increases each time it’s used, for example, if you import some photos from a memory card, that token would be replaced with the number 1, and the next time you import a batch of photos, it would be 2, and so forth. As it’s specific to Import, you won’t find it in the Library module renaming. Image # is another ever increasing number that doesn’t automatically reset. Both Import # and Image # have starting numbers set in Catalog Settings > File Handling tab, with ‘Import Number’ used for ‘Import #’ and ‘Photos Imported’ used for ‘Image #’. Sequence # is an increasing number which starts at the number of your choice each time you use it—you set the start number in the File Naming panel in the Import dialog or later in the Rename Photos dialog. It’s probably the most useful of the automatic numbers, and the variety we’re most familiar with from other programs. Total # refers to the number of photos it’s renaming in one go, so if you’re renaming 8 photos, the Total# token would be replaced with ‘8’. Like the Import # token, it usually needs to be used with a sequence number, otherwise Lightroom will have to add -1, 2, -3, etc., to each filename to make them unique within the folder. Total# only appears in the Library module Rename Photos dialog, which we’ll come back to in a later chapter. Free sample questions - buy the book from www.lightroomqueen.com Sample Questions PROPRIETARY RAW VS. DNG One of the Import options available is to convert to DNG—but what does that actually mean? DNG stands for Digital Negative. It’s another file format, designed primarily for raw image data, but the biggest difference is that it’s openly documented unlike proprietary raw files (CR2, NEF, etc.), so anyone can download the information to decode the file. A DNG file is comprised of 3 different parts—the image data itself, the metadata that describes that photo, and an embedded preview which can be updated to show your adjustments without affecting the raw data. = So why consider DNG as an alternative to storing files in your camera manufacturer’s format? Should I convert to DNG? DNG is a well worn debate on every forum on the web, and there’s no right or wrong answer, but there are a few pros and cons to consider when weighing your personal decision. Long Term Storage Also check... The DNG format is openly and completely documented, which means that it should be supported indefinitely, whereas proprietary formats “Lightroom thinks such as CR2, NEF, RAF, etc., aren’t. The question is, will you be able to my photos are find a raw converter in 20 years time that will convert your camera’s missing—how do I proprietary format when that camera model is ancient history? Some fix it?” on page 200 of Kodak’s early digital formats are already unsupported by Kodak Free sample questions - buy the book from www.lightroomqueen.com Adobe Lightroom 3 - The Missing FAQ themselves, so how long will it be before other formats start to go the Also check... same way? It may not be an issue at the moment, but do you want to “XMP” section Although DNG is Adobe’s baby, there are a long list of other companies on page 114 supporting it, including Apple, Corel, Extensis, Hasselblad, Leica, Pentax, have to keep checking your old files to make sure they’re still supported? Ricoh and Samsung, to name a few. It’s also been submitted to the ISO to become an ISO Standard, just like Adobe’s PDF format many years ago, so it’s here to stay. XMP In addition to storing metadata in your Lightroom catalog, it’s also possible to write that data back to the files in a header section called XMP. Because proprietary raw formats are largely undocumented, it’s not safe to write most data back to those original files, so it has to be written to a sidecar file instead, whereas DNG files can have that information stored within the DNG wrapper, like JPEG, TIFF and other documented file types. The question is, do you find sidecar files a pro or con? If you use an online backup service, they could be a disadvantage as they would need uploading again each time you updated the embedded metadata, but on the other hand, sidecar files can easily become separated from their raw files. Embedded Preview If you choose the DNG format, along with that XMP data in the DNG wrapper, there’s an embedded preview. You’re in control—you choose how big you want that preview to be, and you can update it to show the Develop adjustments you make in Lightroom. That means that other programs that rely on the embedded preview will be looking at your processed image preview rather than the original camera preview. Updating that preview doesn’t touch the original raw data, so it’s a nondestructive way of updating the photos to look their best. Free sample questions - buy the book from www.lightroomqueen.com Sample Questions File size The DNG lossless compression algorithms are better than those applied by the camera, so DNG files are generally 10-40% smaller than their original proprietary format, depending on the camera and on the size of the preview that you choose to embed. Although hard drives may be comparatively cheap now, they’re not free, so space savings are still a benefit. Early Corruption Warning If the file’s seriously corrupted, it often won’t convert, and instead will warn you of the corruption, so you can download the file again before you reformat the cards. It’s not infallible, and it’s not a replacement for a visual check, but it’s an additional check worth having. DNG Hash One of the most promising new features is the DNG Hash, which is written into files created by Lightroom 1.4.1, ACR 4.4.1, and DNG Converter 4.4.1 or later. The DNG hash allows you to validate that the image data itself hasn’t changed since the DNG file was created. Very few programs can currently check that DNG hash, but the technology is moving forward rapidly, and any DNG files created now will be able to make use of that validation software in the future. Manufacturer’s Software Until the main manufacturers start supporting the DNG format, their own software will not read a DNG file. If you use the manufacturer’s software regularly, that may be an issue, although if you only use it occasionally, keeping one of your backup copies as the proprietary format for those occasions, could give you the best of both worlds. MakerNotes Never heard of MakerNotes? Then you probably won’t care. All of the important data is carried over into the DNG file, but some camera manufacturers also put some secret data in their files. There is DNG Free sample questions - buy the book from www.lightroomqueen.com Adobe Lightroom 3 - The Missing FAQ support for MakerNotes, however some manufacturers don’t stick to the rules, and therefore MakerNotes embedded in an undocumented format can’t always be carried over completely to the DNG file. If you shoot CR2 or NEF, as well as a few other formats, all of the data is copied to the correct place in the DNG file, even if Adobe doesn’t understand it. Compatibility with older ACR and Lightroom versions In order to open files from the latest cameras newly introduced to the market, you have to be running the latest version of Photoshop/ACR or Lightroom. If you buy a new camera, but choose not to upgrade Photoshop or Lightroom to the latest release at the same time, converting the raw files to DNG using the latest free standalone DNG Converter allows you to open those files with your older versions. The DNG Converter may need to be updated before it will convert the latest camera’s files. Free sample questions - buy the book from www.lightroomqueen.com Sample Questions SELECTIONS To work on photos in Lightroom, you have to first click on the photos to select them. Selections in Lightroom catch most people out at some stage, because there are multiple levels of selection, rather than simply selected or not selected. What’s the difference between the selection shades of grey? When you select photos in Lightroom’s Grid view or in the Filmstrip, you’ll notice that there are 3 different shades of grey. Because Lightroom allows you to synchronize settings across multiple photos, there needs to be a way of choosing the source of the settings as well as the target photos, so Lightroom has 3 levels of selection, rather than 2—or 2 levels of selection plus a deselected state, depending on how you look at it. The lightest shade of grey is the active, or most-selected, photo. If you’re synchronizing settings across multiple photos, Lightroom will take the settings from that active photo and apply it to the others. The mid grey is also selected, but is not the active photo. If you’re synchronizing settings across multiple photos, Lightroom will apply the settings to those photos. The darkest shade of grey isn’t selected. Free sample questions - buy the book from www.lightroomqueen.com Adobe Lightroom 3 - The Missing FAQ Also check... “How do I copy or synchronize my settings with other photos?” on page 291 I’ve got multiple photos selected—why is my action only applying to a single photo? If you’re in Grid view, actions will apply to all selected photos, however in any other mode or module, for example, Loupe view, Survey view, Develop module, etc., most actions will only apply to the active (mostselected) photo by default. You can change that behavior by turning on AutoSync under the Metadata menu, which will cause any actions to apply to all selected regardless of the current view—but use it with caution, as you could just as easily apply a setting to all of the photos without realizing they’re selected, undoing hours of work. There’s also a separate AutoSync in the Develop module for applying Develop changes to multiple photos in one go, but we’ll come back to that in the Develop chapter. Of course, with every rule, there are always exceptions, and on this occasion the main exception is the right-click context-sensitive menu on the Filmstrip or Secondary Display Grid view, which applies the menu selection to all selected photos regardless of the AutoSync setting, and also a few commands such as Export which export all selected photos regardless of your current view. Also check... “Secondary Display” section on page 139 Free sample questions - buy the book from www.lightroomqueen.com Sample Questions I have a long list of folders—can I change it to show the folder hierarchy? Depending on your Import dialog settings, the folders may be in one long list regardless of their hierarchy on the hard drive, which can make them hard to find and relocate if they’re ever marked as missing. Instead, as a preventative measure, you can configure Lightroom to show a few top level folders, with subfolders below. If Lightroom ever loses track of your photos, perhaps as a result of a hard drive failure or the drive letter changing, you will only need to relink the top level folders and that will cascade through the rest. So how do we go from this slightly nondescript tangle of folders on the left… to the tidy hierarchy on the right…? Right-click on the current top level folder and select ‘Add Parent Folder.’ This doesn’t import new photos—it just adds an additional hierarchy level to your Folders panel, and does a lot more behind the scenes. Keep repeating that process on each top level folder until it shows your chosen parent folder. If you go too far and want to remove a top level folder, right-click on that folder and choose ‘Promote Subfolders.’ It does the opposite of ‘Add Free sample questions - buy the book from www.lightroomqueen.com Adobe Lightroom 3 - The Missing FAQ Parent Folder,’ and will ask for confirmation before removing that top level folder from your Folders panel, as there may be photos directly in that folder that would be removed from the catalog. Free sample questions - buy the book from www.lightroomqueen.com Sample Questions How does the Synchronize Folder command work? If you right-click on a folder and choose Synchronize Folder… from the context-sensitive menu, it gives you a few different options, but be careful as they can cause trouble! It’s main purpose is to update Lightroom’s catalog with changes made to that folder by other programs, for example, adding or deleting photos or updating the metadata. First, it searches the folder and subfolders for any new photos not currently in this catalog and asks you if you want to import them. If you’ve dropped photos into the folder using other software, it saves you navigating to the folder in the Import dialog. Synchronize Folder also checks for photos that have been moved, renamed or deleted from that folder and gives you the option to remove those missing photos from the catalog. Be very careful using that option because any metadata for those photos, such as Develop settings and ratings would be lost, even if the photos have simply been moved to another location. When in doubt, leave that option unchecked, as we’ll cover relinking missing photos later in the chapter. Synchronize doesn’t do intelligent relinking at this point in time. Scan for metadata updates checks the metadata in the catalog against the file, to see whether you’ve edited the file in any other programs, such as Bridge. If it’s changed in another program, but not in Lightroom, Lightroom’s catalog will be overwritten by the external metadata. If both Free sample questions - buy the book from www.lightroomqueen.com Adobe Lightroom 3 - The Missing FAQ Lightroom’s catalog and the external file have changed, you’ll get a Also check... Metadata Conflict badge, and you’ll have to click on that icon to be able “Lightroom thinks my the metadata in the file. We’ll come back to that XMP header section in photos are missing— more detail in the next chapter, including the use of that Metadata how do I fix it?” on to choose which set of data to keep—the metadata in your catalog or Conflict dialog. page 200 and “XMP” The ‘Show Missing Photos’ button searches for photos missing from that section on page 114 folder and creates a temporary collection in the Catalogs panel. You can then decide whether to track them down and relink them, or whether to remove those photos from the catalog. If you want to check your entire catalog for missing photos, it’s quicker to use the Library menu > Find Missing Photos command instead. Once you’ve finished with that temporary collection, you can right-click on it to remove it. Free sample questions - buy the book from www.lightroomqueen.com Sample Questions The time on my camera was incorrect—how do I change it? 1. First, make sure you’re in Grid view so that your changes apply to all selected photos. 2. Find a photo for which you know the correct time and note that time down—we’ll call this the ‘known time’ photo for the moment. 3. Select all of the photos that need the time stamp changed by the same amount. 4. Click on the thumbnail of the ‘known-time’ photo that we identified in step 2, making that photo the active (most-selected) photo without deselecting the other photos. 5. Go to Metadata menu > Edit Capture Time… to show the Edit Capture Time dialog. The preview photo on the left should be your ‘known time’ photo. 6. If you need to change the time by full hours, you can select the ‘Shift by set number of hours’ and enter the time difference, but otherwise, choose the first option, ‘Adjust to a specified date and time,’ as this allows you to change by years, months, days, hours, minutes or seconds. 7. If you’ve selected the ‘Adjust to a specified date and time’ option, enter the correct time—the time you noted down earlier for the ‘known-time’ photo. You can select each number (hours, minutes , etc.) individually, and change the value either using the arrows or by typing the time of your choice. Free sample questions - buy the book from www.lightroomqueen.com Adobe Lightroom 3 - The Missing FAQ 8. Click Change All to update all of the selected photos. While not entirely obvious, when changing the time stamp on a series of photos, the active (most-selected) photo will be set to the time you enter in step 7, and the rest of the photos will be adjusted by the same incremental time difference. It won’t set them all to the same date and time, and that applies whether your active (most-selected) photo is the first in the series or not. For example, if you’ve selected 3 photos and you set the correct time for the middle one to 16:26, that photo will be the ‘known-time’ photo identified in step 2, and the others will be adjusted by the same time difference. So you would have: Original Time New Time Photo 1 10:14 14:26 Photo 2 12:14 16:26 Photo 3 15:34 19:46 If you make a mistake, the original time stamp is stored in the catalog until the photo is removed, and you can return to that original time stamp by using Metadata menu > Revert Capture Time to Original. The updated capture time is stored in the catalog, and if you write to the files using Ctrl-S (Windows) / Cmd-S (Mac), it will be written to the metadata of the file too. For proprietary raw files, most other metadata is written to an XMP sidecar file, however the updated capture time can be written back to the raw file itself. Writing to the file shouldn’t cause any problems, as it’s written to a known portion of the metadata file header and doesn’t affect the raw image data itself. However it’s a point of concern for some people who feel that those undocumented raw files should never be touched in any way. For that reason, there’s a checkbox in Catalog Settings > Metadata tab which allows you to choose whether the updated time is stored only in the catalog, exported files, and XMP sidecar files, or whether it can be updated in your original raw files too. Free sample questions - buy the book from www.lightroomqueen.com Sample Questions MISSING FILES At some stage, most people run into worrying question marks denoting missing files, which are usually a result of files being moved or renamed outside of Lightroom, or an external drive being unplugged and changing its drive letter. If that happens, Lightroom can no longer find the photos at their original location and needs pointing back in the right direction. Missing files can be identified by a little question mark in the corner of the Grid thumbnail, or if the entire folder can no longer be found, the folder name in the Folders panel will go grey with a question mark folder icon. When you switch to the Develop module or try to export those files, Lightroom will tell you that the file is offline or missing. Lightroom thinks my photos are missing—how do I fix it? If Lightroom tells you that files are missing, before you start relinking, first check whether it’s only specific files, or whether the folders are missing too. If you relink a file, it won’t then allow you to relink the whole folder hierarchy as that new location will already exist in the catalog. If the whole folder’s missing and the folder name has turned grey, you can right-click on the folder and select ‘Find Missing Folder…’. Point Lightroom to the new location, and it should update the links for all of the photos contained in that folder and its subfolders as long as their names haven’t changed. If a whole hierarchy of folders has gone missing, perhaps because the drive letter’s changed, you can relink just the parent folder, and it will cascade through all of the Free sample questions - buy the book from www.lightroomqueen.com Adobe Lightroom 3 - The Missing FAQ other missing files without further interaction. That’s why it’s useful to Also check... set your Folders panel up as a hierarchy before you run into problems. If it’s just specific files which have moved, click on the question mark “I have a long list icon, and a dialog will appear giving you a clue to its last known location. of folders—can I Locate the missing file, and change it to show check the ‘Find nearby missing the folder hierarchy?” on page 149 photos’ checkbox shown in the dialog above in order to try to automatically relink other files in the same folder. Unfortunately if you’ve renamed the files outside of Lightroom, each file will need linking individually, but there are a couple of workarounds that we’ll cover in a moment. Free sample questions - buy the book from www.lightroomqueen.com Sample Questions SINGLE OR MULTIPLE CATALOGS Since version 1.1, Lightroom has made it easy to create and use multiple catalogs, but the question is, just because you can, should you? We’ll consider some of the pros and cons, and how to make it work if you do decide that multiple catalogs are right for you. Should I use one big catalog, or multiple smaller catalogs? There’s no ‘right’ number of catalogs. As with the rest of your Lightroom workflow, it depends on how you work. So should you use multiple catalogs for your main working catalog, or should you split your photos into multiple catalogs? We’re not referring to temporary catalogs which are created for a purpose, for example, to take a subset of photos to another machine before later merging them back in, but more specifically your main working or master catalogs. The main benefit of keeping all of your photos in a DAM (Digital Asset Management) system is being able to easily search through them and find specific photos, but there are a few other pros and cons to consider. Pros of Multiple Catalogs Cons of Multiple Catalogs t Smaller catalogs may be faster t Can’t search across multiple on lower spec hardware t Multiple catalogs give a clear distinction between types of photography, i.e., work vs home catalogs t Potential variation in metadata and keyword spellings t Harder to track backups t Have to keep switching catalogs t Some photos not in any catalog t Duplicate photos in multiple catalogs by accident Free sample questions - buy the book from www.lightroomqueen.com Adobe Lightroom 3 - The Missing FAQ There are few questions to ask yourself: t How many photos are you working on at any one time? And how many do you have altogether? t How fast is your computer—can it cope with a huge catalog at a reasonable speed? Or does it run much better with a small catalog? t Do you want to be able to search through all of your photos to find a specific photo? Or do you have another DAM system that you prefer to use for cataloging your photos? t If you decide to work across multiple catalogs, how are you going to make sure your keyword lists are the same in all of your catalogs? t If you use multiple catalogs, is there going to be any crossover, with the same photos appearing in more than one catalog? t How would you keep track of which photos are in which catalog? t Do you want to keep the photos in your catalog indefinitely or just while you’re working on them, treating Lightroom more like a basic raw processor? t How would you keep track of catalogs and their backups? Your answers will likely depend on your reasons for using Lightroom. For some people, using multiple catalogs isn’t a problem—they already have another system they use for DAM, and they want to use Lightroom for the other tools it offers. For example, some wedding photographers may decide to have a catalog for each wedding, and if they know that a photo from Mark & Kate’s wedding is going to be in Mark & Kate’s catalog, finding it really isn’t a problem. But then, if you had to find a photo from a specific venue, or to use for publicity, you’d have to search through multiple catalogs. Many high-volume photographers need the best of both worlds—a small fast catalog for working on their current photos, and then transferring them into a large searchable archive catalog for storing Free sample questions - buy the book from www.lightroomqueen.com Sample Questions completed photos. That’s certainly another viable option, and a good compromise for many. There are some easy distinctions, for example, you may also decide to keep personal photos entirely separate from work photos. Those kind of clear-cut distinctions work well, as long as there’s never any crossover between the two. Keeping the same photo in multiple catalogs is best avoided, as it becomes very confusing! The more catalogs you have, the harder they become to track. Free sample questions - buy the book from www.lightroomqueen.com Adobe Lightroom 3 - The Missing FAQ Also check... “I have a long list of folders—can I change it to show the folder hierarchy?” on page 149 How do I move only my photos to another hard drive, leaving the catalog where it is? If you need to move photos to another hard drive, perhaps because you’ve outgrown your existing hard drive, there are a number of options, but these are the easiest: Option One—move in Explorer/Finder and update Lightroom’s links 1. First follow the instructions in the Library chapter to show the folder hierarchy. That will make it easy to relink the files that will be marked as missing in the process. 2. Close Lightroom and use Explorer (Windows) / Finder (Mac) or file synchronization software to copy the files to the new drive. 3. Check the files have arrived safely, and then rename the original folder using Explorer (Windows) / Finder (Mac) temporarily, while you confirm that you’ve reconnected everything correctly. 4. Open Lightroom and right-click on the parent folder. 5. Select Find Missing Folder… or Update Folder Location… from the list, depending on which option is available. 6. Repeat the process for any other parent folders until all of the photos are shown as online, without question marks. 7. Once you’ve confirmed that everything has transferred correctly, you can safely detach the old hard drive or delete the files from their previous location using Explorer (Windows) / Finder (Mac). Option Two—move the photos using Lightroom’s Folders panel Also check... “Lightroom thinks 1. Go to Library menu > New Folder… 2. Navigate to the new drive and create a new folder or select an my photos are existing folder where you plan to place the photos. missing—how do I 3. Drag the folders and/or photos onto that new location. fix it?” on page 200 Free sample questions - buy the book from www.lightroomqueen.com Sample Questions 4. Check that the entire folder contents have copied correctly before deleting the originals, particularly if you’re dragging and dropping the photos themselves, rather than the folders. Remember that Lightroom might not move/copy files that aren’t currently in the catalog, such as text files, as Lightroom won’t know that they exist. Personally I prefer to use the first option when moving between hard drives, because file synchronization software, that we mentioned earlier in the backup section, allows me to verify that all of my files have moved correctly, byte-for-byte. File synchronization software will allow you to do a one-off copy, as well as proper drive synchronization. Free sample questions - buy the book from www.lightroomqueen.com Adobe Lightroom 3 - The Missing FAQ How do I back up Lightroom? Ideally you’ll be running a full system backup, but as far Lightroom is concerned, there are a few essentials to ensure you’ve included: t The catalog(s) (*.lrcat extension)—holds all of the information about your photos, including all of the work you’ve done on the photos within Lightroom. t The catalog backups—just in case your working catalog is corrupted. t The previews (*.lrdata extension)—these would be rebuilt on demand as long as you have the photos, but if you have available backup space, you would save time rebuilding them. If you run a versioned backup system, which keeps additional copies each time a file changes, you’ll want to exclude the previews as they change constantly and will rapidly fill your backup hard drives. t The photos—in their current folder structure, in case you ever have to restore a backup. You’ll want to include your edited files too. t Your presets—includes Develop presets, Slideshow, Print and Web templates, Metadata presets, Export presets, etc. t Your plug-ins—includes export plug-ins, web galleries and any other extensions that you may have downloaded for Lightroom. t Your profiles—includes any custom camera profiles and lens profiles that you’ve created. Also check... “Default File Locations” section on page 461 and “Where should I store my plug-ins?” on page 125 t The preferences file—includes last used catalogs, last used settings, view options, FTP settings for uploading web galleries, some plug-in settings, etc. The preferences could be rebuilt if necessary, but you would save yourself some time by backing them up and restoring them. You’ll find the default locations of all of those files in the Useful Information chapter at the end of this book. If you’ve saved all of those files and you ever have to restore from your backups, you can simply Free sample questions - buy the book from www.lightroomqueen.com Sample Questions return those files back to their correct locations, open your catalog, and carry on working as if nothing has happened. Matt Dawson’s Config Backup plug-in makes it very easy to back up presets automatically, along with your catalog, and it’s continuing to be developed, so other files such as custom camera profiles are likely to be added in the near future. You can download it from: http://thephotogeek.com/lightroom/config-backup/ Free sample questions - buy the book from www.lightroomqueen.com Adobe Lightroom 3 - The Missing FAQ Also check... “Backup” section on page 115, “Where should I store my plugins?” on page 125 and “I have a long list of folders—can I change it to show the folder hierarchy?” on page 149 How do I move my catalog, photos and other Lightroom files to a new computer? Firstly, you need to make sure that all of the essentials are backed up— the catalogs, photos, preferences, presets, plug-ins and any other related files. We covered these in more detail in the earlier Backup section. If you’re wiping the hard drive in the process, rather than running both machines at the same time, it’s even more important to make sure that you don’t miss anything. For extra security, you may choose to write most of your settings to XMP as well. To do so, select all of the photos in Grid view and press Ctrl-S (Windows) / Cmd-S (Mac). That stores your most crucial settings with the files themselves, and can be particularly useful if you make a mistake. It’s a good idea to make sure that Lightroom’s Folders panel shows a tidy hierarchy before you back up the catalog. This makes it very easy to relink the files if the folder location, or the drive letter for an external drive, changes. We covered those instructions earlier in the Library chapter. Once everything’s safely backed up, we’re ready to set Lightroom up on the new computer. There’s no need to install Lightroom from the CD and then run the updates, as the downloads on Adobe’s website are the full program. You can just download the latest version or trial, and then enter your serial number(s). If your license is an upgrade version, you may need the serial number from an earlier version as well as the Lightroom 3 serial number. Transfer the files—the catalog, the photos, preferences and so forth— and place them in their same locations as the old computer. The locations for the preferences, presets and profiles, are listed in the Useful Information chapter. If you’re moving from Windows XP to Vista or 7, or from Windows to Mac or vice versa, some of the new file locations will change. Free sample questions - buy the book from www.lightroomqueen.com Sample Questions Then it’s time to open the catalog. Double-click on the *.lrcat catalog file to open it, or hold down Ctrl (Windows) / Opt (Mac) to show the Select Catalog dialog when launching Lightroom and navigate to the catalog. Also check... You might find that there are question marks all over the photos and “Lightroom thinks folders because they’re no longer in the same location, but don’t be my photos are tempted to remove them and re-import, and don’t try to relocate by missing—how do I clicking on a thumbnail question mark icon as you’ll create a bigger job. fix it?” on page 200 Instead, right-click on the parent folder and choose Find Missing and “Plug-ins” section Folder… from the context-sensitive menu, and navigate to the new on page 399 location of that folder. Relocate each top level folder in turn, until all of the photos are online. Finally, you might find your plug-ins need reloading as the locations may have changed in the move. Go to File menu > Plug-in Manager… and check whether all of the plug-ins have green circles, rather than red. If any plug-ins are incorrectly loaded, remove and add them again at their new locations. Free sample questions - buy the book from www.lightroomqueen.com Adobe Lightroom 3 - The Missing FAQ Everything in Lightroom is a funny color, but the original photos look perfect in other programs, and the exported photos don’t look like they do in Lightroom either. What could be wrong? Strange colored previews that don’t match the exported photos in color managed programs are usually caused by a corrupted monitor profile. Lightroom uses the profile differently to other programs (perceptual rendering rather than relative colorimetric), so corruption in that part of the profile shows up in Lightroom even though it appears correct in other programs. It often happens with the canned profiles that come with many monitors. The easiest way to tell that Lightroom’s displaying incorrectly is to check the Histogram on a grayscale photo. It should be neutral but corrupted profiles can create some weird color casts which also show on the Histogram. (Obviously you can’t see the cast in the greyscale copies of this book, but you know what a color cast looks like.) Ideally you should recalibrate your monitor using a hardware calibration device. If you don’t have such a tool, put it on your shopping list, and in the meantime, remove the corrupted monitor profile to confirm that is the problem. Free sample questions - buy the book from www.lightroomqueen.com Sample Questions How do I change my monitor profile to check whether it’s corrupted? Windows XP 1. Close Lightroom. 2. Go to Start menu > Control Panel > Display. 3. Click the Settings tab. 4. Click the Advanced button. 5. Click the Color Management tab. 6. Click the Add… button. 7. Choose a standard sRGB color profile, such as sRGB IEC61966 - 2.1. 8. In the ‘Color profiles currently associated with this device’ field, select that sRGB profile. 9. Click the Set As Default button. 10. (Optional) Select the old profile and click the Remove button. 11. Click the OK button. Windows Vista or 7 1. Close Lightroom. 2. Go to Start menu > Control Panel > Color Management. 3. In the ‘Profiles associated with this device’ field, select the default monitor profile. 4. Click the Advanced tab. 5. Select any existing profile and click the Remove button. 6. Change the device profile to a standard sRGB color profile, such as sRGB IEC61966 - 2.1. Mac OS X 1. Close Lightroom. 2. Go to System Preferences > Display. Free sample questions - buy the book from www.lightroomqueen.com Adobe Lightroom 3 - The Missing FAQ 3. Select the Color tab. 4. Press the Calibrate… button and follow the instructions. 5. Turn on the Expert Options and calibrate to gamma 2.2. Remember this is only a temporary measure—sRGB isn’t an accurate profile for your monitor, and calibrating the monitor with a hardware calibration device is the only way of building an accurate monitor profile. Free sample questions - buy the book from www.lightroomqueen.com Sample Questions The previews are slightly different between Library and Develop and Fit and 1:1 views—why is that? The previews you see are rendered differently between the Library and Develop modules. Library, and the other modules, use pre-rendered Adobe RGB compressed JPEGs for speed, so there may be slight losses compared to Develop, particularly if your previews are set to Medium or Low Quality. Develop module, on the other hand, renders a preview from the original data and then updates it live as you make adjustments. There’s also a difference in the resampling methods used in the 2 modules, which can result in a significant difference in the preview display at less than 1:1 view. The Library module takes the largest rendered preview it has available, and resamples that preview to show smaller zoom ratios, whereas Develop works on the full resolution raw data. Remember that lower zoom ratios aren’t 100% accurate, and high sharpening and noise reduction values can be wildly inaccurate. Then comes a difference between the sharpening and noise reduction. Because there have been significant changes to the Sharpening, Noise Reduction and Fill Light algorithms in Lightroom 3, Adobe introduced a new concept—a Process Version, often shortened to PV. PV2003 is for photos that were already in your catalog, and it uses the old algorithms. PV2010 uses the new rendering. We’ll go into more detail in the Develop chapter, but as far as previews are concerned, there’s a difference in the preview rendering depending on that Process Version setting, as well as whether the file is rendered (JPEG/TIFF/PSD) or raw. PV2003 Library Fit Rendered PV2003 PV2010 Sharp Noise Sharp no (except no (except no (except PV2010 Noise yes low res) low res) low res) Library Fit Raw no no no adaptive Develop Fit Jpeg no no yes yes Free sample questions - buy the book from www.lightroomqueen.com Adobe Lightroom 3 - The Missing FAQ Develop Fit Raw no no adaptive adaptive Library 1:1 Jpeg yes yes yes yes Library 1:1 Raw yes yes yes yes Develop 1:1 Jpeg yes yes yes yes Develop 1:1 Raw yes yes yes yes In summary: t In all modules, 1:1 view will show the sharpening and noise reduction, but lower zoom ratios vary t In Library, PV2003 won’t show sharpening or noise reduction unless there are 1:1previews rendered t In Library, PV2010 won’t show sharpening unless there are 1:1 previews rendered, but may show noise reduction t In Library, rendering 1:1 previews will also apply the sharpening and noise reduction to smaller previews t In Develop, PV2003 won’t show sharpening or noise reduction at less than 1:1 view t In Develop, PV2010 can show sharpening and noise reduction on all rendered files at less than 1:1 view, but adaptively on raw files, depending on how likely you are to see the noise. Free sample questions - buy the book from www.lightroomqueen.com Sample Questions How can I speed up browsing in Library module? If you’re browsing in the Library module, your choice of pre-rendered Also check... preview size can make major improvements in the speed. There’s a big difference between rendering previews that have never been built or “What size and that need updating, and loading those ready-built previews from disc. quality should I If the ‘Loading…’ overlay stays on the screen for a long time, Lightroom’s likely rendering a preview for the first time, updating an old existing preview, or building a larger preview for your current zoom ratio—and set for StandardSized Previews?” on page 255 you’re having to wait for it! Either set Lightroom to render the previews when it imports, by selecting your chosen preview size in the Import dialog, or switch to Grid view, select the photos and go to Library menu > Previews > Render StandardSized Previews or Render 1:1 Previews, and leave it until it’s finished. It’ll skip any that already have current previews, and you’ll find browsing much quicker once it’s finished rendering. If you need to zoom into 1:1 view in the Library module (not Develop), and you’re still seeing the ‘Loading…’ overlay for a long time, then you’ll need to render 1:1 previews rather than Standard-Sized previews, either in the Import dialog or using the menu command noted above. If you rarely zoom in Library module, you’re better off using Standard-Sized previews, as they’ll take up less disc space and be slightly quicker to read from the preview cache. Each time you make Develop changes, the previews have to be updated. If you’ve made Develop changes to the photos, for example, by applying a preset, and you don’t want to wait for the previews to update one at a time as you browse through them, use the same Library menu > Previews > Render Standard-Sized Previews command to update all of the previews in one go. Free sample questions - buy the book from www.lightroomqueen.com Adobe Lightroom 3 - The Missing FAQ Also check... “The previews are slightly different between Library and Develop and Fit and 1:1 views—why is that?” on page 115 How can I speed up browsing in Develop module? And what are these Cache*.dat files? We’ve mentioned before that there’s a difference between the way that the Library and Develop modules display previews. Library shows you lower quality previews from the previews cache. Develop, on the other hand, assumes you need an accurate, rapidly changing view, so it first shows you the preview from the preview cache, then does a quick read of the raw file, and then finishes loading properly, before it turns off the ‘Loading…’ overlay. You don’t have to wait for the overlay to disappear before starting work on the photo. If you find the overlay distracting, you can turn it off going to the View menu > View Options > Loupe tab and turning off the ‘Show message when loading or rendering photos’ checkbox. Particularly with the size of camera sensors today, there’s a lot of raw data to load and process each time you switch photos. Have you ever noticed, though, that when you adjust a photo in Develop module, move to other photos, and then come back to that first photo again, it loads much quicker than it did the first time? If you’ve only just viewed the photo, it may still be stored in RAM, but once it’s disappeared from RAM, the Camera Raw cache, also known as the ACR cache, comes into its own. When Lightroom reads the data the first time, it adds it into the shared Camera Raw cache in a partially processed state, with the initial demosaic and other background work already done. Those are the Cache*.dat files that you might see appearing. When you load a photo into the Develop module, it will first check that cache to see if the data is Also check... already there to reuse, which is much quicker than reading and processing the original raw file data. “The default location of By default, that Camera Raw cache is only 1GB in size, and when new the Camera Raw Cache data gets added, the oldest data is removed. With only 1GB of space, is…” on page 464 that happens quite quickly, so you’re not seeing the benefit if you’re processing large raw files. If you go to Lightroom’s Preferences > File Free sample questions - buy the book from www.lightroomqueen.com Sample Questions Handling tab, you can change the cache size to suit—up to a maximum of 200GB. If you have spare hard drive space available, bigger is better! You can also change the location of that cache, but make sure it’s on a fast hard drive. The Camera Raw cache settings that you change in Lightroom also apply to ACR in Bridge/Photoshop, and can also be changed in the ACR Preferences dialog. Once that data is cached, it’s much faster moving between photos in the Develop module—almost instantaneous on high end machines. Of only course, helpful that’s when Lightroom has recently read the raw file, and added it to the cache, and there isn’t currently a menu command to pre-load the Camera Raw cache. All is not lost! There’s a trick to preloading the Camera Raw cache. In addition to actually viewing the photo in the Develop module, there’s another obvious time when Lightroom has to read, and therefore caches, the raw data—namely, when rendering previews. If you haven’t already rendered previews for your photos, simply using the Library menu > Render Standard-Sized Previews command will also pre-load the photos into the Camera Raw cache. If, however, you already have current previews, you can force them to re-render by making a minor or reversible Develop adjustment Free sample questions - buy the book from www.lightroomqueen.com Adobe Lightroom 3 - The Missing FAQ to the photos (i.e., by using a Quick Develop button) and then using the Render Standard-Sized Previews menu command. Leave it to finish, and by the time you come back, even the Develop module should be moving through the photos at a much more comfortable speed. Free sample questions - buy the book from www.lightroomqueen.com Sample Questions Why do my raw photos change color? When the first preview appears, it looks just like it did on the camera—how do I stop it changing? A raw file isn’t an image file like a JPEG or a TIFF. You can’t look at it— there’s nothing to see. You need some software to process it into a photo, and that software is called a raw converter. The initial preview you see in Lightroom is the JPEG preview embedded in the raw file by the camera. That JPEG preview has the manufacturer’s own processing Also check... “Calibration Profiles & Styles” section on page 129 and “DNG Profile Editor” section on page 330 applied in-camera, just as if you would set your camera to shoot a JPEG rather than a raw file format. The camera manufacturer’s don’t share their processing secrets, so each raw converter creates its own interpretation of the sensor’s data. There is no right or wrong—it’s just different. Lightroom builds its own preview to show you how it will process your photo using its current settings. So how do you get your file in Lightroom to look like that original camera JPEG preview? One of the major benefits of shooting in your raw file format is that you can tweak the photo to your own taste, rather than being tied to the manufacturer’s rendering, but Adobe listened to the user’s cries and created a new profiling system which allows greater flexibility. The DNG Profile Editor allows the creation of much more detailed profiles than have ever been available to ACR (Adobe Camera Raw) and Lightroom before. As well as being able to create your profiles, Adobe have created ready-made profiles to emulate the most popular in-camera JPEG rendering for many Pro-level SLR’s. Although the name ‘DNG Profiles’ makes it sound like they’re limited to DNG files, these profiles can actually be used on proprietary raw files too. You’ll find those profiles in the Profile pop-up menu in the Calibration panel, installed automatically with each Lightroom update, and you can add your own profiles too. If you find a profile that you’d prefer to use as a starting point for all of your photos, you can also set it as the default, Free sample questions - buy the book from www.lightroomqueen.com Adobe Lightroom 3 - The Missing FAQ so that your newly imported photos automatically use that profile. Many choose to set ‘Camera Standard’ as their default profile, so that the initial preview is closer to the camera rendering. We’ll come back to creating your own profiles and setting default settings later in the chapter. Free sample questions - buy the book from www.lightroomqueen.com Sample Questions PROCESS VERSIONS There have been significant changes under the hood of Lightroom 3 to improve the image quality that it can produce. Also check... “The previews are The initial demosaic algorithms have been rebuilt to extract more detail slightly different from the raw data and produce an artifact-free file that will respond between Library and better to noise reduction. That happens behind the scenes with all Develop and Fit and photos, so you might find your existing photos show a little more noise 1:1 views—why is and sharpness than previous releases, and you may want to increase the that?” on page 260 and Luminance Noise Reduction by 20-25. There have also been significant changes to the Noise Reduction, Capture Sharpening and Fill Light too. If your photos with existing Noise “Detail—Sharpening & Noise Reduction” section on page 125 Reduction, Sharpening and Fill Light settings had these new changes automatically applied, the photos would render significantly differently, and you would have to process them all again. To avoid this situation of significantly different rendering, Lightroom 3 has introduced Process Versions named 2003 and 2010, often shortened to PV2003 and PV2010. That simply refers to the date that each process engine was introduced. Any photos set to Process Version 2003 will use the old Noise Reduction, Sharpening and Fill Light algorithms, so will look very similar to the Lightroom 2 rendering, apart from the new demosaic. They’ll show a warning exclamation mark in the lower right hand corner of the preview area in the Develop module. Any photos set to Process Version 2010 will use the new improved Noise Reduction, Sharpening and Fill Light. As we mentioned in the previous chapter, there have also been changes to the way the different Process Versions preview in the Develop module, with sharpening now being applied to Process Version 2010 previews even at less than 1:1, and noise reduction being intelligently applied at less than 1:1 on the noisiest images. Free sample questions - buy the book from www.lightroomqueen.com Adobe Lightroom 3 - The Missing FAQ How do I switch between PV2003 and PV2010? Also check... To update from PV2003 to PV2010, you can simply click on the warning exclamation mark to the lower right of the preview in Develop. That “Can I synchronize my shows a dialog asking whether to review the changes with a before/ settings with other after preview. It also gives you the option of updating all of the photos photos?” on page 352 currently in the filmstrip, which are those in the same folder or collection and “History & Reset” that aren’t hidden by a filter. section on page 312 If you decide to update your entire catalog, selecting ‘All Photographs’ with filters disabled and then clicking that ‘Update All Filmstrip Photos’ button will update all of the photos in one go. If you choose the before/after preview, and you decide you want to stick with the PV2003 rendering for now, you can revert using Ctrl-Z (Windows) / Cmd-Z (Mac) or by selecting the previous state in the History panel. There are a few other options for updating or reverting the Process Version. You will find it under the Settings menu > Process in Develop module, and in the Calibration panel, where Sync and AutoSync can apply your choice to multiple photos in one go. You’ll find it in the Library module too, under the context-sensitive right click menus in the Develop Settings section. Free sample questions - buy the book from www.lightroomqueen.com Sample Questions How do I apply Auto settings to individual sliders? Holding down Shift and double-clicking on the slider label sets the slider Also check... to its Auto position without adjusting the other sliders. You’ll also find an Auto button in the Basic and B&W panels, and an Auto Tone command “Presets” section under the Settings menu with the shortcut Ctrl-U (Windows) / Cmd-U on page 300 (Mac). The Auto controls often produce a good starting point, more so on raw files than JPEGs. That’s great if you’re working on one photo at a time, but how do you apply that to multiple photos? You could switch to the Grid view, select the photos, and press the Auto button in the Quick Develop panel, and then apply a preset to reset some sliders back to their default settings, but there’s an easier way. You can create a preset which only applies one or more of the Auto settings, and you can even edit existing presets to do the same. First, create a Develop preset by clicking the + button on the Presets panel, giving it a name such as ‘AutoBlacks’ and check only the Auto Free sample questions - buy the book from www.lightroomqueen.com Adobe Lightroom 3 - The Missing FAQ Tone checkbox. We’ll come back to customized Presets in more detail later in the chapter. Now right-click on the preset and choose Show in Explorer (Windows) / Show in Finder (Mac) to find the preset on your hard drive, and open it with a plain text editor, such as Notepad (Windows) / TextEdit (Mac). To create an AutoBlacks preset, for example, you need to remove the AutoBrightness, AutoContrast, AutoExposure and AutoTone lines, and change the AutoShadows line from false to true. Don’t change anything else. Now save the text file, restart Lightroom, and then apply it to a photo to check it’s working. You now have an AutoBlacks preset, and the same principle applies to any of those other auto settings, so you could create a whole set of Auto Presets or add that same line into any of your other favorite presets. Free sample questions - buy the book from www.lightroomqueen.com Sample Questions How do I copy or synchronize my settings with other photos? As with most things, Lightroom gives a number of different options, so you can choose the one that suits you best at the time: Copy/Paste option Copy and Paste allows you to select which settings to copy to the new photo, and they stay in memory until you copy different settings or close Lightroom, so you can apply the same settings to other photos later. 5. Adjust the first photo, which will become the source of your settings. 6. Press Ctrl-Shift-C (Windows) / Cmd-Shift-C (Mac) to show the Copy Settings dialog, or use the ‘Copy…’ button at the bottom of the left hand panel in the Develop module. 7. Select the checkboxes for the slider settings that you want to copy to the other photo. 8. Move to the target photo. 9. Press Ctrl-Shift-V (Windows) / Cmd-Shift-V (Mac) to paste those settings onto the selected photo, or use the ‘Paste’ button at the bottom of the left hand panel. Previous option The Previous option copies all of the settings from the most recently selected photo to the next photo you select. 1. Adjust the first photo. 2. Move on to next photo. 3. Press Ctrl-Alt-V (Windows) / Cmd-Opt-V (Mac) to apply all of the settings from the previous photo, or use the ‘Previous’ button at the bottom of the right hand panel. Free sample questions - buy the book from www.lightroomqueen.com Adobe Lightroom 3 - The Missing FAQ There’s one exception—if you’re moving from a photo with no crop, to a photo with an existing crop, the crop will not be reset. If you use ‘Previous,’ watch out for Red Eye Reduction and other local adjustments which are copied over too, as they can end up being small dots in strange places if the photos aren’t identical. Sync option Sync uses the data from the most-selected or active photo, and pastes it onto all of the other selected photos. That’s why there are 3 different levels of selection, as we mentioned early in the Workspace chapter. 1. Adjust the first photo, which will be the source of the settings. 2. Keeping that photo active (most-selected), also select the other photos by holding down Ctrl (Windows) / Cmd (Mac) or Shift key while clicking directly on their thumbnails, rather than the cell borders. 3. Ctrl-Shift-S (Windows) / Cmd-Shift-S (Mac) shows the Sync Develop Settings dialog so you can choose which settings to Synchronize, or use the ‘Sync…’ button in the Develop module or ‘Sync Settings’ in the Library module to do the same. Holding down the Alt (Windows) / Opt (Mac) button while pressing the ‘Sync’ button, or using Ctrl-Alt-S (Windows) / Cmd-Opt-S (Mac), will synchronize the settings but bypass the dialog. If you’re bypassing the dialog, make sure you’ve got your chosen settings checked the first time, as it’ll use the last used checkbox settings. AutoSync option The AutoSync behavior matches the behavior of ACR—when you have multiple photos selected, any slider adjustments are applied to all of the selected photos. It can be slow for large numbers of photos, particularly when used with the Crop or Straighten tools. Free sample questions - buy the book from www.lightroomqueen.com Sample Questions 1. Select multiple photos. 2. Toggle the switch next to the ‘Sync’ button so that the label changes to ‘AutoSync.’ 3. As you adjust the photos, all of the selected photos will update with any slider adjustment at the same time. AutoSync is powerful but dangerous, as it’s easy to accidentally apply a setting to multiple photos without realizing that they’re all selected. It gets particularly confusing if you often switch between standard Sync and AutoSync, so you may find it easiest to leave it turned on at all times, or at least leave the Filmstrip visible so you can see the number of photos that are selected. When you have AutoSync turned on, you can still use the keyboard shortcuts for the other sync options such as Previous, Paste or standard Sync, but they will apply to ALL selected photos, not just active (mostselected) photo, as AutoSync will still be active. Free sample questions - buy the book from www.lightroomqueen.com Adobe Lightroom 3 - The Missing FAQ How do I change the default settings? Go into Preferences > Presets panel and decide whether you want ‘Make defaults specific to camera serial number’ and ‘Make defaults specific to camera ISO setting’ turned on or off. 1. Select a photo and set your new settings. 2. Go to Develop menu > Set Default Settings… 3. Press ‘Update to Current Settings’. 4. Repeat with a sample photo from each camera, and each combination of ISO/Serial Number if those options were selected in Preferences. Although that dialog gives the warning that the changes aren’t undoable, you can return to that dialog at any time to restore the Adobe’s own default settings. Free sample questions - buy the book from www.lightroomqueen.com Sample Questions How do I use the different Noise Reduction sliders? Just because there’s now an array of noise reduction sliders doesn’t mean you need to use them on every photo. Most photos will only require the Luminance and Color sliders. The other sliders are there for more extreme cases, and can be left at their default settings most of the time. The Luminance slider controls the amount of luminance noise reduction applied, moving from 0, which doesn’t apply any noise reduction, through to 100 where the photo has an almost painted effect. The Color slider tries to suppress color noise blobs without losing the edge detail. The other sliders will only make a real difference to extremely noisy images, such as those produced by the highest ISO rating that your camera offers, or where a high ISO file is extremely underexposed. You’re unlikely to see a difference at lower ISO ratings, for better or for worse, so in most cases you won’t need to change those settings from their defaults. The Luminance Detail slider sets the noise threshold, so higher values will preserve more detail but some noise may incorrectly be identified as detail. The Luminance Contrast slider at 0 is a much finer grain than 100. Higher values help to preserve texture, but can introduce a mottling effect, so lower values will usually be preferred. The Color Detail slider refines any fine color edges. At low values it reduces the number of color speckles in those edges but may slightly desaturate them, whereas at high values, it tries to retain the color detail but may introduce color speckles in the process. If you’re looking for an Auto setting, 25 on both the Luminance and Color sliders, with the other sliders at their defaults, will often be a good balance between detail and noise. The values automatically adapt depending on the camera and ISO rating when used with raw files. It’s a matter of personal taste, so you might prefer a different value. Free sample questions - buy the book from www.lightroomqueen.com Adobe Lightroom 3 - The Missing FAQ In the Lens Corrections Setup pop-up menu, what’s the difference between Default, Auto & Custom? ‘Auto’ leaves Lightroom to search for a matching profile automatically. If it can’t find a matching profile, either because the profile doesn’t exist yet, or because it doesn’t have enough information in the photo’s EXIF data, then it will show an error saying ‘Unable to locate a matching profile automatically.’ ‘Default’ does the same, but also allows you to customize the settings for specific lenses. For example, if ‘Auto’ can’t find a lens because it doesn’t have enough information, you can select the correct profile from the pop-up menus below and save it as a default for the future. From that point on, whenever you select ‘Default’ for a photo with that camera/ lens combination, it will apply your new default lens setting. It’s also useful if you have multiple profiles for a lens—perhaps one provided by Adobe and one you’ve created yourself—and you want to automatically select one of those profiles. ‘Custom’ shows that you’ve manually changed the profile or one of the Amount sliders. Free sample questions - buy the book from www.lightroomqueen.com Sample Questions What’s the difference between Flow & Density? Flow controls the rate at which the adjustment is applied. With Flow at 100, the brush behaves like a paintbrush, laying down the maximum effect with each stroke. You can see this in the screenshot, where the effect is applied equally with each stroke. With Flow at a lower value such as 25, the brush behaves more like an airbrush, building up the effect gradually. Each stroke adds to the effect of the previous strokes, giving the effect shown in the screenshot, where areas that have multiple brushstrokes are stronger than those with a single stroke. Density controls the maximum strength of the stroke. Regardless of how many times you paint that stroke or the settings used, it can never be stronger than the maximum density setting. In the screenshot, the top line—the one that you can’t see—is set to 0. The center line is set to 25 and the bottom line is set to 100. Unless you need the Density control for a specific purpose, I would suggest leaving it set at 100. To fully understand these controls, try creating a single 50% grey file and testing different combinations of sliders. It’s easier to see the differences when you’re not distracted by an image. Free sample questions - buy the book from www.lightroomqueen.com Adobe Lightroom 3 - The Missing FAQ Can I select a color tint from the photo itself? To select a color tint from the photo, first click on the Color icon to bring up the Color Picker. Click in the Color Picker and while holding the mouse button down, drag the cursor onto the photo itself. As you drag across the photo, Color Picker will update live to reflect the color beneath your cursor. When you release the mouse button, the color under the cursor will be selected in the Color Picker. To find a complimentary color to remove a tint, select the color as above, but then click in the Hue field in the Color Picker and type a value 180 degrees from the current value, keeping within the limits of 360 degrees. For example, if the current value is 30, adding 180 will make it 210, but if the current value is 330, you would have to remove 180 to make it 150. Free sample questions - buy the book from www.lightroomqueen.com Sample Questions What happens if I’m still using an older version of ACR and Photoshop? If you’re using a mismatched version of ACR, it may not understand all of Lightroom 3’s new settings, and therefore the rendering may be different. Besides the new camera support, there are a few other changes involved, depending on the version number. In recent years, there have been changes to the demosaic, new sliders added such as Grain, existing sliders redesigned resulting in the introduction of Process Versions, and Also check... “Process Versions” section on page 274 and “Can I open a raw file directly into the ACR dialog?” on page 363 now the new lens corrections too. The demosaic, in basic terms, is the initial translation of the raw data into an image, which applies to all of the photos regardless of your Process Version setting. ACR 5.6 and earlier use an older demosaic, whereas Lightroom 3 and ACR 5.7 and higher all use the new demosaic. The visible difference is an increased amount of detail in the newer demosaic, which can affect the amount of sharpening and noise reduction you choose to apply. If you open a Lightroom 3 photo into a version of ACR with the old demosaic (5.6 or earlier), for example, opening a photo directly into CS3 with ACR 4.6, then it will appear softer and less detailed than Lightroom 3, even if you’ve used sliders that it understands. There are also new sliders which older ACR versions may not understand, for example, Grain and the post-crop vignette Highlight Priority and Color Priority options, are understood by 5.7 but no earlier. The original post-crop vignette, local adjustments, and camera profiles are understood by 4.6 but no earlier. Further down the line are the processing algorithms, including Fill Light, Also check... Noise Reduction and Sharpening, which have changed so significantly this time that they now come in 2 different versions – Process Versions “Detail—Sharpening 2003 and 2010, more often shortened to PV2003 and PV2010. We & Noise Reduction” discussed those in more detail in the Develop chapter. section on page 314 And of course, last but not least, there are the new lens corrections which require ACR 6.1 or later. and “Lens Corrections” section on page 319 Free sample questions - buy the book from www.lightroomqueen.com Adobe Lightroom 3 - The Missing FAQ Here’s a quick reference of the most recent ACR versions for each Photoshop release, and the differences you’re likely to see if you leave ACR to process your files. Demosaic PV2003 CS3 / 4.6 Mismatch Close CS4 / 5.7 Match Close CS5 / 6.1 Match Match PV2010 New Lens Sliders Correct Mismatch Mismatch Mismatch Close Close (no UI) (no UI) Match Match Mismatch Match There’s an additional dialog which often appears when the ACR version is mismatched, offering you the choice of ‘Render Using Lightroom’ or ‘Open Anyway’. Free sample questions - buy the book from www.lightroomqueen.com Sample Questions What’s the difference between ‘Render Using Lightroom’ and ‘Open Anyway’ in the ACR mismatch dialog? If you’re working with a mismatched ACR version, you should see the ACR Mismatch dialog, which allows you to choose how to handle the file. There’s a diagram of the options and their results on the following pages. ‘Render using Lightroom’ uses Lightroom’s own processing engine to render a new file which is then automatically opened into Photoshop. Also check... “Raw Files” diagram on page 365 and “Rendered Files (JPEG/ TIFF/PSD)” diagram on page 364 This does mean that an additional TIFF or PSD file is created, depending on your preferences, however all of your Lightroom adjustments will be applied correctly. ‘Open Anyway’ ignores the mismatch and passes the image data and settings to Photoshop for ACR to process, which may produce something close to the correct rendering or may be completely different, depending on how great the mismatch is, and which sliders you’ve used. It doesn’t save the TIFF/PSD until you choose to save the changes. If you choose ‘Open Anyway’ but support for your camera was added after that ACR version, Photoshop will open but the photo won’t open, as Photoshop won’t know what to do with it. Free sample questions - buy the book from www.lightroomqueen.com Adobe Lightroom 3 - The Missing FAQ Rendered Files (JPEG/TIFF/PSD) Edit Original Edit Copy Edit Copy with LR Adjustments Opens Original File into PS Duplicates Original File in same format and opens into PS Behaves like a raw file, see other diagram Save in PS updates that original file Save in PS updates that duplicate file Close without Save in PS closes but leaves that duplicate file on disc Free sample questions - buy the book from www.lightroomqueen.com Sample Questions Raw Files Mismatched ACR Version Matching ACR Version Render Using Lightroom Open Anyway LR creates TIFF/ PSD according to your LR preferences and passes that to PS LR passes raw data to PS through ACR with varying results Save in PS updates that TIFF/PSD on disc Close without Save in PS closes but leaves TIFF/ PSD on disc Save in PS creates TIFF/PSD according to your LR preferences LR passes raw data to PS through ACR with exactly the same rendering Close without Save in PS closes with no residue Free sample questions - buy the book from www.lightroomqueen.com Adobe Lightroom 3 - The Missing FAQ Why do my photos look different in Photoshop? A mismatch in colors between Lightroom and Photoshop is usually due to either a corrupted or incompatible monitor profile or incorrect color space settings. For example, a ProPhoto RGB photo mistakenly rendered as sRGB will display as desaturated and flat. ProPhoto RGB photo correctly displayed as ProPhoto RGB: ProPhoto RGB photo incorrectly displayed as if sRGB: The corrupted monitor profile is very easy to check, and we covered that in the earlier Previews & Speed chapter. We’ll also need to confirm that the color spaces match across the 2 programs. The same principles will also apply to opening photos in other software, not just in Photoshop. First, check your color settings. In Photoshop, go to Edit menu > Color Settings to view the Color Settings dialog. Free sample questions - buy the book from www.lightroomqueen.com Sample Questions The RGB Working Space is your choice, but whichever you choose to use, you’re best to set the same in Lightroom’s External Editor preferences and Export dialog. We’ll come to that in a moment. Also check... Selecting ‘Preserve Embedded Profiles’ and/or checking the ‘Ask When “Which color space Opening’ for Profile Mismatches in that same dialog will help prevent should I use?” on any profile mismatches. ‘Preserve Embedded Profiles’ tells Photoshop to page 376 and use the profile embedded in the file regardless of whether it matches “How do I change your usual working space. ‘Ask When Opening’ for profile mismatches my monitor profile shows you a warning dialog when the embedded profile doesn’t match to check whether your usual working space, and asks you what to do. it’s corrupted?” on page 259 Free sample questions - buy the book from www.lightroomqueen.com Adobe Lightroom 3 - The Missing FAQ Then you need to set your External Editor settings in the Lightroom Preferences dialog > External Editing tab, and select the same color space that you’ve selected in Photoshop. You’ll also want to check the color space that you’re using in the Export dialog, and again, if passing those photos to Photoshop, select the same color space for photos you’re going to edit in Photoshop. As long as your Photoshop and Lightroom color settings match, or you have Photoshop set to use the embedded profile, your photos should match between both programs. Free sample questions - buy the book from www.lightroomqueen.com Sample Questions What PPI setting should I enter in the Export dialog? The PPI (Pixels Per Inch) setting, or Resolution, is generally irrelevant as long as the overall pixel dimensions are correct. As a side point, DPI refers to Dots Per Inch, which doesn’t apply to digital images until they’re dots on a piece of paper. We won’t go into a lot of detail as a web search on ‘ppi resolution’ will produce a multitude of information, but you’re simply defining how to divide up the photo. When you’re talking in pixel dimensions, it doesn’t mean anything. It’s only useful when combined with measurements. Imagine you’ve finished baking your cake—you can divide it into 4 fat slices, or 16 narrow slices, but the overall amount of cake doesn’t change. Your photo behaves the same way. The PPI setting just tells other programs how many slices you think the photo should be divided into, but there’s the same amount of data overall. The PPI setting becomes more useful when resizing in inches or cm rather than in pixels, as it saves you calculating pixel dimensions. For example, creating a small image of 0.5” x 0.5” at 300ppi will give you Free sample questions - buy the book from www.lightroomqueen.com Adobe Lightroom 3 - The Missing FAQ 150px x 150px. That tiny image will look good when printed in that small size, but if you try to spread those same pixels over a larger area, for example, 3” x 3” at 50ppi which is also 150px x 150px, then the result will be lower quality and pixelated. To create a good quality print in the larger size, you’d need more data, so you’d need a larger number. If your image was 900px x 900px, or 3” x 2” at 300ppi, you’ll see less pixelation. Moving on from smiley faces, when sending photos to a lab for printing, you may decide against sending them the full resolution file, and choose to downsize to a smaller file size for faster upload. As a rule of thumb, about 250-300ppi, with the correct print dimensions in inches or centimeters, is a good trade-off for printing. Selecting a photo size of 4”x6” at 300ppi, or the equivalent pixel dimensions of 1200x1800, is plenty for most labs to print a good quality 4”x6” print. On the other hand, using 4”x6” at 72ppi will give pixel dimensions of just 288x432, which will be pixelated and low quality. If you’re just starting out, here are some sample export settings for different uses: Email—Longest Edge 800px, and you can ignore the resolution as we’re specifying the size in pixels. Format JPEG, quality 60-80. 4” x 6” digital print—Dimensions 4” x 6” at 300ppi. Format JPEG, quality 80-100. 8” x 10” digital print—Dimensions 8” x 10” at 300ppi. Format JPEG, quality 80-100. Full resolution master—uncheck the ‘Resize to Fit:’ checkbox. Format TIFF/PSD or JPEG quality 100. Free sample questions - buy the book from www.lightroomqueen.com Sample Questions Can I run a Photoshop action from Lightroom? Lightroom’s not designed to be a file browser, so it doesn’t work quite like Bridge, but it’s still possible to run Photoshop actions on your exported photos without user intervention. The solution involves creating a droplet in Photoshop from an existing action, and then telling Lightroom to run the droplet after exporting the photos. Create the Action In Photoshop, you need to have already created an action—if you’re not familiar with creating Photoshop actions, there are plenty of web resources which will take you through step-by-step. If you’re going to run the action on JPEGs, it must include a ‘Save As’ step to set the JPEG quality, otherwise it’ll ask for a quality setting for each and every photo, defeating the object of automating it! To do so, in the Save As dialog, just press OK without changing the filename or location, and make sure you choose your quality setting—you’ll override the location in the Create Droplet dialog. The resulting Action will look something like this simple ‘re-save as quality 12’ action. Create the Droplet Go to File > Automate > Create Droplet to view the Create Droplet dialog. Save your droplet somewhere safe with a logical name, and make sure you’ve set the save location to ‘Save and Close’ to overwrite the exported file, and tick the ‘Override save location’ box. If you don’t Free sample questions - buy the book from www.lightroomqueen.com Adobe Lightroom 3 - The Missing FAQ want to overwrite the exported file when running the droplet, set your destination folder instead. Click OK to create your droplet. Add the Droplet to Lightroom Open Lightroom, select a photo, and go to the Export dialog. At the bottom of the dialog, you’ll see the Post-Processing pop-up menu. Click ‘Go to Export Actions Folder Now’ at the end of the pop-up menu to show you that folder in Explorer (Windows) / Finder (Mac). Drop a shortcut/alias to your droplet in the folder which appears, or move the droplet itself, and then close the Export dialog box. Export Actions When you reopen the Export dialog box to export your photos from Lightroom, your droplet will appear in the Post-Processing pop-up menu. Export your photos from Lightroom, with your new droplet selected in that pop-up menu, and once the photos have finished exporting they should automatically open Photoshop and run your action. Free sample questions - buy the book from www.lightroomqueen.com Sample Questions TROUBLESHOOTING STEPS As with all computer software, problems can occur with Lightroom, so it’s useful to have some simple troubleshooting steps to try before you need to ask for additional help. I have a problem with Lightroom—are there any troubleshooting steps I can try? Also check... “How do I check which Lightroom and ACR versions I have installed?” on page 360 On the following pages are some standard troubleshooting steps for the most frequent issues, but as always, make sure you have backups before you try any troubleshooting steps. 5. Restart Lightroom. 6. Restart the Computer. 7. Make sure you’re running the latest updates, both for Lightroom and for your operating system. 8. Optimize the Catalog. Also check... Go to File menu > Optimize Catalog and wait for it to tell you it’s completed before moving on. 9. Delete the Preferences file. Close Lightroom and find the Preferences file. The Preferences may be in a hidden folder on some systems, which you may need to show. You could move or rename that Preferences file, rather than deleting, and if it doesn’t solve the problem, you can put it back. 10. If your catalog won’t open, check for a *.lock file alongside your “What general maintenance will keep my catalogs in good shape?” on page 210, “Lightroom says that my catalog is corrupted—can I fix it?” on page 213, “How do I create a new catalog catalog file, and delete it, and then try to restart. The lock file and switch between can get left behind if Lightroom crashes, preventing you from catalogs?” on page opening the catalog. If you find a *.lrcat-journal file, do not delete 206 and “The default that as it contains important information. location of the Presets 11. Create a new catalog to rule out catalog corruption. is…” on page 463 Restart Lightroom while holding down Ctrl (Windows) / Opt Free sample questions - buy the book from www.lightroomqueen.com Adobe Lightroom 3 - The Missing FAQ (Mac). Select Create New Catalog. Import some photos into that new catalog to check everything is working as expected. If this works, the problem is with the catalog, possibly corruption. (Don’t panic, that can usually be fixed!) 12. Move all user presets to another location in case a corrupted preset is causing the problem. 13. Update drivers on your machine, particularly the graphics card drivers. If you have a nVidia Graphics card, turn off the nView software as it’s known to cause conflicts. 14. Damaged RAM can also cause some odd problems - Lightroom will find dodgy memory quicker than almost any other program. Run software such as Memtest to check your memory. If none of those troubleshooting steps solve the problem, post a description at http://www.lightroomforums.net/ and we’ll help you figure it out! Free sample questions - buy the book from www.lightroomqueen.com Sample Questions How do I delete the Preferences file? Deleting Lightroom’s Preferences file can solve all sorts of ‘weirdness,’ so Also check... it’s always a good early step in troubleshooting. On Windows, it’s a hidden file by default. The easiest way to find it is to go to Lightroom’s Preferences dialog > Presets tab and press the ‘Show Lightroom Presets Folder…’ button. Once you’ve found that folder, close “The default location of the Preferences is…” on page 462 Lightroom. In that folder will be a Lightroom 3 Preferences.agprefs file— move it to another folder or delete it, and then restart Lightroom. On Mac, you’ll find com.adobe.Lightroom3.plist with the other Preferences files at Macintosh HD/Users/[your username]/Library/ Preferences/. As with Windows, close Lightroom and move it to another folder or delete it, and then restart Lightroom. Moving or renaming that preferences file, rather than deleting it, does mean that you can put it back if it doesn’t solve the problem, to save you recreating your preferences again. What is deleted when I delete my Preferences file? When you delete your Preferences file, the obvious settings that you lose are those in the Preferences dialog, but it also includes other details such as your View Options settings, last used catalogs, last used settings, FTP server details, some plug-in settings, etc. Your original photos, Develop settings, collections, presets and suchlike aren’t affected by deleting the Preferences file. Free sample questions - buy the book from www.lightroomqueen.com Adobe Lightroom 3 - The Missing FAQ DEFAULT FILE LOCATIONS If you need to find Lightroom’s files at any time, you’ll need to know where to look, so here are the most popular Lightroom file locations. By default, the boot drive is C:\ on Windows and Macintosh HD on Mac. If your operating system is installed on a different drive, you may need to replace the drive letter/name on the file paths that are listed below. [your username] refers to the name of your user account, for example, mine is called Vic. The default location of the Lightroom catalog is… Windows XP—C: \ Documents and Settings \ [your username] \ My Documents \ My Pictures \ Lightroom \ Lightroom 3 Catalog.lrcat Windows Vista or 7—C: \ Users \ [your username] \ My Pictures \ Lightroom \ Lightroom 3 Catalog.lrcat Mac—Macintosh HD / Users / [your username] / Pictures / Lightroom / Lightroom 3 Catalog.lrcat The catalogs are fully cross platform, and the catalog file extensions are: *.lrcat is version 1.1 onwards. *.lrdb was version 1.0. *.aglib was the early beta. The default location of the Preferences is… Windows XP—C: \ Documents and Settings \ [your username] \ Application Data \ Adobe \ Lightroom \ Preferences \ Lightroom 3 Preferences.agprefs Windows Vista or 7—C: \ Users \ [your username] \ AppData \ Roaming \ Adobe \ Lightroom \ Preferences \ Lightroom 3 Preferences.agprefs Free sample questions - buy the book from www.lightroomqueen.com Sample Questions Mac—Macintosh HD / Users / [your username] / Library / Preferences / com.adobe.Lightroom3.plist Preference files aren’t cross-platform. It’s a hidden file on Windows, but to find it easily, go to Preferences > Presets tab and press ‘Show Lightroom Presets Folder…’ The default location of the Presets is… Windows XP—C: \ Documents and Settings \ [your username] \ Application Data \ Adobe \ Lightroom \ Windows Vista or 7—C: \ Users \ [your username] \ AppData \ Roaming \ Adobe \ Lightroom \ Free sample questions - buy the book from www.lightroomqueen.com Adobe Lightroom 3 - The Missing FAQ Mac—Macintosh HD / Users / [your username] / Library / Application Also check... Support / Adobe / Lightroom / Each type of preset has its own folder, for example ‘Develop Presets’, “How can I speed up ‘Filename Templates’ and ‘Metadata Presets’. Presets are cross-platform browsing in Develop and are saved in a Lightroom-only format (.lrtemplate) module? And what are these Cache*.dat files?” on page 265 To find them easily on either platform, go to Preferences > Presets tab and press the ‘Show Lightroom Presets Folder…’ button. The default location of the Camera Raw Cache is… Windows XP—C: \ Documents and Settings \ [your username] \ Application Data \ Adobe \ CameraRaw \ Cache \ Windows Vista or 7—C: \ Users \ [your username] \ AppData \ Local \ Adobe \ CameraRaw \ Cache \ Mac—Macintosh HD / Users / [your username] / Library / Caches / Adobe Camera Raw / The default locations of the Adobe Camera Raw & Lens Profiles are… Windows XP—C: \ Documents and Settings \ All Users \ Local Settings \ Application Data \ Adobe \ CameraRaw \ CameraProfiles \ Windows Vista or 7—C: \ ProgramData \ Adobe \ CameraRaw \ CameraProfiles \ Mac—Macintosh HD / Library / Application Support / Adobe / CameraRaw / CameraProfiles / For the lens profiles, substitute the LensProfiles folder for the CameraProfiles folder. Free sample questions - buy the book from www.lightroomqueen.com Sample Questions Your custom Camera Raw & Lens Profiles can also be installed to the User folders… Windows XP—C: \ Documents and Settings \ [your username] \ Application Data \ Adobe \ CameraRaw \ CameraProfiles \ Windows Vista or 7—C: \ Users \ [your username] \ AppData \ Local \ Also check... “DNG Profile Editor” section on page 330 Adobe \ CameraRaw \ CameraProfiles \ Mac—Macintosh HD / Users / [your username] / Library / Application Support / Adobe / CameraRaw / CameraProfiles / For the lens profiles, substitute the LensProfiles folder for the CameraProfiles folder. Free sample questions - buy the book from www.lightroomqueen.com Adobe Lightroom 3 - The Missing FAQ How do I switch language? On Windows, it’s easy to switch to one of the other supported languages. Just go to Edit menu > Preferences > General tab, select the want language to use you and restart Lightroom. On a Mac, Lightroom follows the system language preference at the time of opening, like other multi-language Mac applications. To change your operating system language, visit the System Preferences and drag your language to the top of the list before restarting Lightroom. Some Mac users prefer to have the operating system in their native language and Lightroom in English, which isn’t quite so simple. There are a couple of unofficial undocumented tricks you can try: Option 1—go to System preferences > Language and change English to the main language, open LR, and then immediately change it back to your native language ready for opening other software in that language. The language setting is set at the time of opening a program, so it’ll stick Free sample questions - buy the book from www.lightroomqueen.com Sample Questions until the next time you open Lightroom. For those who prefer an easier option, there’s a small donationware application which can do that automatically. I have no affiliation with the company, but it appears to do the job nicely. http://www.tj-hd.co.uk/en-gb/languageswitcher/ Option 2—go to the application, right click and choose Show Package Contents, and navigate through Contents > Resources to find the .lproj folder for your language and delete or rename it. That will force Lightroom to open in English until you next install a Lightroom update. Free sample questions - buy the book from www.lightroomqueen.com Adobe Lightroom 3 - The Missing FAQ I accidentally deleted my photos from my hard drive and I don’t have backups! Can I create JPEGs from Lightroom’s previews? If you’ve deleted your original files, you don’t have backups, and they’re not in the Recycle Bin (Windows) / Trash (Mac), the next thing to check is whether the photos are still on the memory card. If you haven’t reshot the entire card, it may be possible to rescue some of the original photos using recovery software. If that’s not possible, before you do anything else, close Lightroom, find the catalog on the hard drive, and duplicate the catalog and previews just in case something else goes wrong. It’s possible to retrieve Lightroom’s previews using Marc Rochkind’s free LRViewer software, which can be downloaded from: http://basepath.com/ImageIngester/LRViewer-info.php The resulting JPEGs will only be the size and quality of the previews, but they’re better than nothing. Having downloaded the software from the link above, install and open it. It’ll ask for your catalog location, and once you’ve navigated to your catalog, it’ll open into the viewer window. You can then select the photos and go to File menu > Export JPEGs… to export the previews to the location of your choice. Free sample questions - buy the book from www.lightroomqueen.com Sample Questions Keyboard Shortcuts On the following pages are all of the known keyboard shortcuts for Adobe Lightroom, both Windows and Mac versions. They’re also available in printable format from the Lightroom Queen website: http://www.lightroomqueen.com/lrqshortcuts.php Many of the shortcuts work in more than one module, so those modules are marked in the last column. L=Library, D=Develop, S=Slideshow, P=Print, W=Web. Keyboard Shortcuts Windows Shortcuts Mac Shortcuts Works In.. Import Import Photos... Tethered Capture Ctrl Shift I Cmd Shift I LDSPW Hide Tethered Capture Window Ctrl T Cmd T LDSPW New Shot Ctrl Shift T Cmd Shift T LDSPW Go to Grid view G G LDSPW Increase Grid Size = = L Decrease Grid Size - - L Show/Hide Extras Ctrl Shift H Cmd Shift H L Show/Hide Badges Ctrl Alt Shift H Cmd Opt Shift H L Cycle Grid View Style J J L Go to Loupe view E E LDSPW Workspace Grid View Loupe View Free sample questions - buy the book from www.lightroomqueen.com Adobe Lightroom 3 - The Missing FAQ Windows Shortcuts Mac Shortcuts Works In.. Show Info Overlay Ctrl I Cmd I LD Cycle Info Display I I LDP Go to Compare view C C LDSPW Switch Select and Candidate Up arrow Up arrow L Make next photos Select and Candidate Down arrow Down arrow L Survey View Go to Survey view N N LDSPW Zoom Toggle Zoom View Z Z LD Zoom In Ctrl = Cmd = LD (Zoom In Some) Ctrl Alt = Cmd Opt = LD Zoom Out Ctrl - Cmd - LD (Zoom Out Some) Ctrl Alt - Cmd Opt - LD Open in Loupe Return Return L Compare View View Options... Moving between Modules Panels Ctrl J Cmd J LD Show / Hide Toolbar T T LDSPW Library Module G/E/C/S or Ctrl Alt 1 G/E/C/S or Cmd Opt 1 LDSPW Develop Module D or Ctrl Alt 2 D or Cmd Opt 2 LDSPW Slideshow Module Ctrl Alt 3 Cmd Opt 3 LDSPW Print Module Ctrl Alt 4 Cmd Opt 4 LDSPW Web Module Ctrl Alt 5 Cmd Opt 5 LDSPW Go Back to Previous Module Ctrl Alt up arrow Cmd Opt up arrow LDSPW Go Back Ctrl Alt left arrow Cmd Opt left arrow LDSPW Go Forward Ctrl Alt right arrow Cmd Opt right arrow LDSPW Expand / Collapse Left Panels Ctrl Shift 0 - 9 (panel number) Cmd Ctrl 0 - 9 (panel number) L Expand / Collapse Right Panels Ctrl 0-9 (panel number) Cmd 0-9 (panel number) L Open/Close All Panels Ctrl-click header on panel Cmd-click header LDSPW Toggle Solo Mode Alt-click header on Open Additonal Panel in Solo Shift-click Mode header on on panel panel Opt-click header on panel L D S P W panel Shift-click header on panel LDSPW Show / Hide Side Panels Tab Tab L Show / Hide All Panels Shift Tab Shift Tab L Show / Hide Module Picker F5 F5 L Show / Hide Filmstrip F6 F6 L Show Left Panels F7 F7 L Show Right Panels F8 F8 L Free sample questions - buy the book from www.lightroomqueen.com Sample Questions Selections Moving between photos Screen Mode Lights Out Secondary Display Windows Shortcuts Mac Shortcuts Works In.. Select All Ctrl A Cmd A LDSPW Select None Ctrl D or Ctrl Shift A Cmd D or Cmd Shift A LDSPW Select Only Active Photo Ctrl Shift D Cmd Shift D LDSPW Deselect Active Photo / / LDSPW Select Photos Shift-click on photos Shift-click on photos LDSPW Select Multiple Non-Contiguous Ctrl-click on photos Photos Cmd-click on photos LDSPW Add previous/next photo to Shift left/right arrow selection Shift left/right arrow LDSPW Select Flagged Photos Ctrl Alt A Cmd Opt A LDSPW Deselect Unflagged Photos Ctrl Alt Shift D Cmd Opt Shift D LDSPW Select Rated/Labelled Photo Ctrl-click on symbol in Cmd-click on symbol in Filter bar Filter bar LDSPW Previous Selected Photo Ctrl left arrow Cmd left arrow L Next Selected Photo Ctrl right arrow Cmd right arrow L Normal Ctrl Alt F Cmd Opt F L Full Screen and Hide Panels Ctrl Shift G Cmd Shift G L Next Screen Mode F F L Previous Screen Mode Shift F Shift F L Lights Dim Ctrl Shift L Cmd Shift L L Next Light Mode L L L Previous Light Mode Shift L Shift L L Show Secondary Display F11 F11 L Full Screen Ctrl Shift F11 Cmd Shift F11 L Show Second Monitor Preview Ctrl Shift Alt F11 Cmd Shift Opt F11 L Grid Shift G Shift G L Loupe - Normal Shift E Shift E L Loupe - Locked Ctrl Shift Return Cmd Shift Return L Compare Shift C Shift C L Survey Shift N Shift N L Slideshow Ctrl Alt Shift Return Cmd Opt Shift Return L Show Filter View Shift \ Shift \ L Zoom In Ctrl Shift = Cmd Shift = L (Zoom In Some) Ctrl Shift Alt = Cmd Shift Opt = L Zoom Out Ctrl Shift - Cmd Shift - L Zoom Out Some Ctrl Shift Alt - Cmd Shift Opt - L Increase Thumbnail Size Shift = Shift = L Multiple Contiguous Free sample questions - buy the book from www.lightroomqueen.com Adobe Lightroom 3 - The Missing FAQ Decrease Thumbnail Size Windows Shortcuts Mac Shortcuts Works In.. Shift - Shift - L Cmd H LDSPW Hide Lightroom Hide Others Cmd Opt H LDSPW Close Window Cmd W L (Close All) Cmd Opt W L Minimize Cmd M L Cmd Opt M L Lightroom Help... (Minimize All) F1 F11 L Current Module Help... Ctrl Alt / Cmd Opt / L Current Module Shortcuts... Ctrl / Cmd / L Plug in Manager Ctrl Alt Shift , Cmd Opt Shift , LDSPW Preferences... Ctrl , Cmd , LDSPW Catalog Settings... Ctrl Alt , Cmd Opt , LDSPW Quit Lightroom Ctrl Q Cmd Q LDSPW Undo Ctrl Z Cmd Z LDSPW Redo Ctrl Y Cmd Shift Z LDSPW Add to Quick Collection B B SPW (Add to Quick Collection and Next) Shift B Shift B SPW Show Quick Collection Ctrl B Cmd B LDSPW Save Quick Collection... Ctrl Alt B Cmd Opt B LDSPW Clear Quick Collection Ctrl Shift B Cmd Shift B LDSPW Set Quick Collection as Target Ctrl Alt Shift B Cmd Opt Shift B LDSPW New Collection... Ctrl N Cmd N L New Folder... Ctrl Shift N Cmd Shift N L Expand all subfolders Alt-click on folder dis- Opt-click on folder disclosure triangle closure triangle LDSPW Show in Finder Ctrl R Cmd R L Group into Stack Ctrl G Cmd G L Unstack Ctrl Shift G Cmd Shift G L Collapse/Expand Stack S S L Move to Top of Stack Shift S Shift S L Move Up in Stack Shift [ Shift [ L Move Down in Stack Shift ] Shift ] L Flagged P P L Library Module Undo/Redo Quick Collection Folders / Collections Stacking Toggle Flag Free sample questions - buy the book from www.lightroomqueen.com Sample Questions Windows Shortcuts Mac Shortcuts Works In.. Unflagged U U L Rejected X X L Toggle Flag ` ` L Increase Flag Status Ctrl up arrow Cmd up arrow L Decrease Flag Status Ctrl down arrow Cmd down arrow L Auto Advance Hold shift while using P, U, X or turn on Caps Lock Hold shift while using L P, U, X or turn on Caps Lock 0 - 5 stars 0, 1, 2, 3, 4, 5 0, 1, 2, 3, 4, 5 L Decrease Rating [ [ L Increase Rating ] ] L Auto Advance Hold shift while using 0-5 or turn on Caps Lock Hold shift while using L 0-5 or turn on Caps Lock Red, Yellow, Green, Blue Label 6-9 6-9 Auto Advance Hold shift while using 6-9 or turn on Caps Lock Hold shift while using L 6-9 or turn on Caps Lock Painter Tool Enable Painting Ctrl Alt K Cmd Opt K L Rename Rename Photo... F2 F2 L Rotation Rotate Left (CCW) Ctrl [ Cmd [ L Rotate Right (CW) Ctrl ] Cmd ] L Delete Photo... Delete Delete L Remove Photo from Catalog... Alt Delete Opt Delete L (Remove and Trash Photo...) Ctrl Alt Shift Delete Cmd Opt Shift Delete L Copy Metadata... Ctrl Alt Shift C Cmd Opt Shift C L Paste Metadata Ctrl Alt Shift V Cmd Opt Shift V L Enable Metadata AutoSync Ctrl Alt Shift A Cmd Opt Shift A L Save Metadata to File Ctrl S Cmd S L Show Spelling and Grammar Mac only Cmd : LDSPW Check Spelling Mac only Cmd ; LDSPW Cut Ctrl X Cmd X LDSPW Copy Ctrl C Cmd C LDSPW Paste Ctrl V Cmd V LDSPW Go to Add Keywords field Ctrl K Cmd K L (Change Keywords...) Ctrl Shift K Cmd Shift K L Set Keyword Shortcut... Ctrl Alt Shift K Cmd Opt Shift K L Toggle Keyword Shortcut Shift K Shift K L Next Keyword Set Alt 0 Opt 0 L Toggle Rating Toggle Color Label Delete Metadata OS Copy/Paste fields) Keywording (within text Free sample questions - buy the book from www.lightroomqueen.com L Adobe Lightroom 3 - The Missing FAQ Windows Shortcuts Mac Shortcuts Works In.. Previous Keyword Set Alt Shift 0 Opt Shift 0 L Apply Keyword (Alt numberpad for 1 9) (Opt numberpad for 1 9) L Enable/Disable Filters Ctrl L Cmd L LDSPW Show Filter Bar \ \ L Refine Photos... Ctrl Alt R Cmd Opt R L Select Text Filter Ctrl F Cmd F L Starts with... + at beginning of word + at beginning of word L Ends with... + at end of word + at end of word L Doesn’t Contain... ! at beginning of word ! at beginning of word L Delete Rejected Photos... Ctrl Delete Cmd Delete L Open Catalog... Ctrl O Cmd Shift O LDSPW Open Specific Catalog when opening Lightroom Hold down Ctrl while opening Lightroom Hold down Opt while opening Lightroom Go to Develop D D LDSPW Copy Settings... Ctrl Shift C Cmd Shift C LD Paste Settings Ctrl Shift V Cmd Shift V LD Paste Settings from Previous Ctrl Alt V Cmd Opt V LD Sync Settings... Ctrl Shift S Cmd Shift S LD Sync Settings - no dialog Ctrl Alt S Cmd Opt S D Enable Develop Auto Sync Ctrl Alt Shift A Cmd Opt Shift A D Match Total Exposures Ctrl Alt Shift M Cmd Opt Shift M LD Select next Basic panel slider . . D panel , , D Filtering Text Filters Working with Catalogs Develop Module Copying, Pasting & Syncing Sliders Select slider Auto previous Basic Increase slider value = = D Decrease slider value - - D Move slider value by larger Shift while using = or increment Shift while using = or - D Move slider value by smaller Alt while using = or increment Opt while using = or - D Go to White Balance Tool W W LDSPW Auto White Balance Ctrl Shift U Cmd Shift U LD Auto Tone Ctrl U Cmd U LD Free sample questions - buy the book from www.lightroomqueen.com Sample Questions Windows Shortcuts Mac Shortcuts Works In.. Black & White Toggle Black & White V V LD Snapshots & Virtual Copies Create Snapshot Ctrl N Cmd N D Create Virtual Copy Ctrl ’ Cmd ’ LDSPW New Preset... Ctrl Shift N Cmd Shift N D New Preset Folder... Ctrl Alt N Cmd Opt N D Toggle Before/After \ \ D Left / Right Y Y D Top / Bottom Alt Y Opt Y D Split Screen Shift Y Shift Y D Copy After’s Settings to Before Ctrl Alt Shift left arrow Cmd Opt Shift left arrow D Copy Before’s Settings to After Ctrl Alt Shift right arrow Cmd Opt Shift right D arrow Swap Before and After Settings Ctrl Alt Shift up arrow Cmd Opt Shift up arrow D Deselect TAT Ctrl Alt Shift N Cmd Opt Shift N D Tone Curve Ctrl Alt Shift T Cmd Opt Shift T D Hue Ctrl Alt Shift H Cmd Opt Shift H D Saturation Ctrl Alt Shift S Cmd Opt Shift S D Luminance Ctrl Alt Shift L Cmd Opt Shift L D Black & White Mix Ctrl Alt Shift G Cmd Opt Shift G D Show Clipping J J D Temporarily Show Clipping Hold Alt while moving slider Hold Opt while moving slider D Reset Slider Double-click on slider label Double-click on slider label LD Reset Group of Sliders Double-click on group Double-click on group D name name Reset All Settings Ctrl Shift R Cmd Shift R LD Go to Crop Tool R R LDSPW Reset Crop Ctrl Alt R Cmd Opt R D Constrain Aspect Ratio A A D Crop to Same Aspect Ratio Shift A Shift A D Rotate Crop Aspect X X D Crop from Center of Photo Alt while dragging Opt while dragging D Rotation Angle Ruler Ctrl-click on start and Cmd-click on start and D end points end points Cycle Grid Overlay O O D Cycle Grid Overlay Orientation Shift O Shift O D Go to Spot Removal Q Q LD Presets Before / After Previews Targeted Adjustment Tool Clipping Indicators Reset Cropping Spot Removal Free sample questions - buy the book from www.lightroomqueen.com Adobe Lightroom 3 - The Missing FAQ Local Adjustments Windows Shortcuts Mac Shortcuts Works In.. Increase spot size ] ] D Decrease spot size [ [ D Hide Pins or Spots H H D Delete Pin or Spot Select Spot then Delete Select Spot then Delete D Go to Adjustment Brush K K LDSPW Go to Graduated Filter M M L Show Overlay O O D Cycle Overlay Colour Shift O Shift O D Switch brush A / B / / D Temporary Eraser Hold Alt Hold Opt D Increase brush size ] ] D Decrease brush size [ [ D Increase brush feathering Shift ] Shift ] D Decrease brush feathering Shift { Shift { D Set Flow value 0-9 0-9 D Constrain Brush to Straight Line Shift while dragging Shift while dragging D Constrain degrees Shift while dragging Shift while dragging D Invert Gradient ‘ (apostrophe) ‘ (apostrophe) D Hide Pins or Spots H H D Confirm brush stroke Return Return D Delete Pin or Spot Select pin then Delete Select pin then Delete D Click and drag horizontally on pin D Gradient to 90 Increase or decrease Amount Click and drag slider horizontally on pin Edit in Photoshop & Other Programs Edit in... Edit in Photoshop... Ctrl E Cmd E L Edit in Other Application... Ctrl Alt E Cmd Opt E L Export... Ctrl Shift E Cmd Shift E LDSPW Export with Previous Ctrl Alt Shift E Cmd Opt Shift E LDSPW Ctrl Return Cmd Return LDSPW Export Slideshow Module Impromptu Slideshow Free sample questions - buy the book from www.lightroomqueen.com Sample Questions Windows Shortcuts Mac Shortcuts Works In.. New Template Ctrl N Cmd N SPW New Template Folder Ctrl Shift N Cmd Shift N SPW Save Slideshow Settings Ctrl S Cmd S S Go to Next Slide Right arrow Right arrow S Go to Previous Slide Left arrow Left arrow S Show / Hide Guides Ctrl Shift H Cmd Shift H SP Run Slideshow Return Return S Pause Slideshow Space Space S End Slideshow Escape Escape S Export PDF Slideshow... Ctrl J Cmd J S Export JPEG Slideshow... Ctrl Shift J Cmd Shift J S Export Video Slideshow... Ctrl Alt J Cmd Opt J S New Template Ctrl N Cmd N SPW New Template Folder Ctrl Shift N Cmd Shift N SPW Save Print Module Settings Ctrl S Cmd S P Go to First Page Ctrl Shift left arrow Cmd Shift left arrow P Go to Previous Page Ctrl left arrow Cmd left arrow P Go to Next Page Ctrl right arrow Cmd right arrow P Go to Last Page Ctrl Shift right arrow Cmd Shift right arrow P Print Module Show / Hide Guides Guides Ctrl Shift H Cmd Shift H SP Page Bleed Ctrl Shift J Cmd Shift J P Margins and Gutters Ctrl Shift M Cmd Shift M P Image Cells Ctrl Shift K Cmd Shift K P Dimensions Ctrl Shift U Cmd Shift U P Show/Hide Rulers Ctrl R Cmd R P Page Setup... Ctrl Shift P Cmd Shift P LDSPW Print Settings... Ctrl Alt Shift P Cmd Opt Shift P P Print... Ctrl P Cmd P LDSPW Print One Ctrl Alt P Cmd Opt P P New Template Ctrl N Cmd N SPW New Template Folder Ctrl Shift N Cmd Shift N SPW Web Module Free sample questions - buy the book from www.lightroomqueen.com Adobe Lightroom 3 - The Missing FAQ Windows Shortcuts Mac Shortcuts Works In.. Save Web Gallery Settings Ctrl S Cmd S W Reload Ctrl R Cmd R W Use Advanced Settings Ctrl Alt Shift / Cmd Opt Shift / W Preview in Browser... Ctrl Alt P Cmd Opt P W Export Web Photo Gallery... Ctrl J Cmd J W Standard Modifier Keys On both platforms, in addition to keyboard shortcuts, the standard modifier keys are used in combination with mouse clicks to perform various tasks. Ctrl (Windows) / Cmd (Mac) selects or deselects multiple items that are not necessarily consecutive. For example, hold down Ctrl (Windows) / Cmd (Mac) to select multiple photos, select multiple folders, select multiple keywords, etc. Shift selects or deselects multiple consecutive items. For example, hold down Shift while clicking to select multiple photos, select multiple folders, select multiple keywords etc. Alt (Windows) / Opt (Mac)—Changes the use of some controls. For example, in Quick Develop, it swaps the ‘Clarity’ and ‘Vibrance’ buttons for ‘Sharpening’ and ‘Saturation.’ In Develop panels, it changes the panel label to a panel ‘Reset’ button, and holding it down while moving some sliders shows masks or clipping warnings. To switch catalogs when opening, hold down Ctrl (Windows) / Opt (Mac). Free sample questions - buy the book from www.lightroomqueen.com

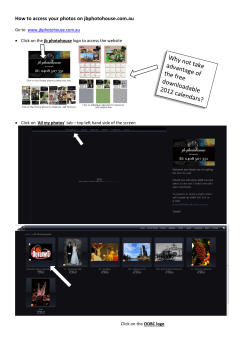


© Copyright 2026