
ARTISTS’ BOOKS Volume 11, Number 3 $8.50
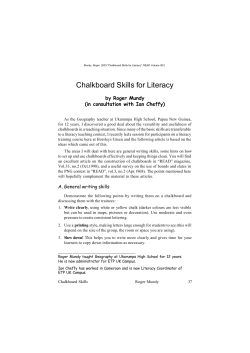
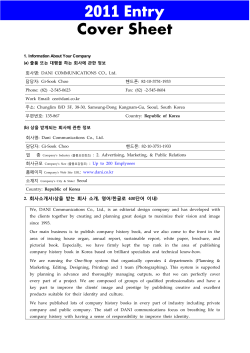
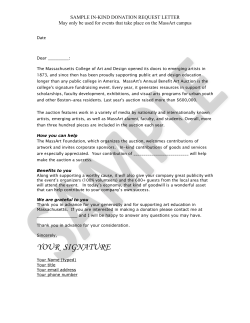
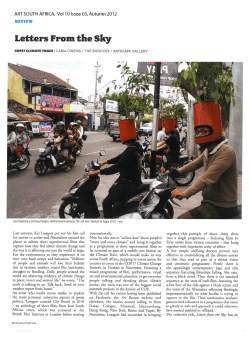
Volume 11, Number 3
$8.50
ARTISTS’ BOOKSbBOOKBINDINGbPAPERCRAFTbCALLIGRAPHY
Volume 11, Number 3, July 2014.
3 Pseudochrysography by Beth Lee
7 Eliza S. Holliday: Letterist
8 Alphabet Block Play by Anne Mackechnie
12 Pulp Paper Pages & Korea by Dea Fischer
18 Bar Code Art Books by Phawnda Moore
21 Book Reviews by Annie Cicale
22 Judy Melvin
24 Letters In Chalk: Creative Chalkboards by Catherine Langsdorf
28 A Syringe Pen by Carol DuBosch
29 New Tools & Materials
30 Wire-edged Accordion Binding by Dennis Ruud
36 The William Stafford Calligraphy Project by Carol DuBosch
42 Contributors / credits
47 Subscription information
Children of the World. 11" x 13½".
Black Arches Cover, bleach, gouache, nibs,
brushes, pastels. “Judy Melvin,” page 22.
Bound & Lettered b Summer 2014
1
3
2
4
5
1
6
7
8
9
10
The inks and paints, the palette, and the many test sheets from my exploration of gold metallic writing fluids. The results of my trials are provided
in chart form on page 6. The metallic media: (1) Finetec Pearl Colors, (2) Golden High Flow Acrylic Gold, (3) Daniel Smith Metallic Watercolor,
(4) Golden High Flow Acrylic Copper, (5) Schmincke Calligraphy Gouache Gold, (6) Schmincke Calligraphy Gouache Silver (not on chart),
(7) Holbein Artists’ Gouache, (8 & 9) Dr. Ph. Martin’s Iridescent Calligraphy Color and Spectralite, (10) Daler-Rowney FW Acrylic Artists Ink.
PSEUDOCHRYSOGRAPHY
All that glisters is not gold
BY BETH LEE
If chrysography is writing in letters of gold, then writing in letters of
metallic gold colors must be pseudochrysography, right?
When real gold is too expensive or simply inappropriate for the
work at hand, we as calligraphers have a bewildering array of metallic writing fluids from which to choose. It is amazing how different
they are from each other, across the range of inks and paints. It
can be a challenge to find the one or ones that are appropriate for
a project. Let’s look at the issues to be considered, and also how
to efficiently determine the right gold.
I ask several questions to help narrow the choices: What markmaking tool will be used? What is the writing surface? Which
writing fluid contrasts best with the color of the writing surface?
Do I need to color-match an existing metallic? Must the finished
lettering be water-resistant? Will I be penciling in guidelines to
be erased later?
Bound & Lettered b Summer 2014
3
Hand lettering and decoration turn plain wooden craft blocks into a perfect gift.
ALPHABET BLOCK PLAY
BY ANNE MACKECHNIE
1
Cheryl Adams and I started making custom, alphabet block baby names over
a dozen years ago. They are easy and fun
to make and are wonderful baby gifts –
even when the parents are not lettering
artists. Everyone seems to adore them.
They started out as gifts for friends, but
now I receive commissions for them.
I use two-inch square blocks that you
can purchase at an art or craft store. The
blocks are first sanded to get completely
smooth surfaces. I then draw the letters
in pencil, color in the letters using acrylic
folk art paints, and outline the letters with
a black Sharpie marker. Next, I have fun
with decorating and flourishing. Last, I
spray four coats of protective varnish. So
simple, but they do take a certain amount
of time.
8
Bound & Lettered b Summer 2014
To create a name,
buy a block for
each letter plus a few
extra to have on hand
just in case you want
or need to redo a letter
or two. I use Lara’s
Crafts brand blocks.
They are 2" square and
a little over a dollar
each. I’ve found them
at Michael’s, the art
and crafts store.
You will also need
180 grit sandpaper.
Nothing special, just
regular sandpaper for
sanding wood, which
you can find at home
improvement stores
and sometimes at craft
stores.
PULP PAPER PAGES & KOREA
BY DEA FISCHER
Last year was a busy one, filled to brimming with writing assignments and publications, public acquisitions of my work, and travel
for teaching engagements. By the fall, I was ready for a breather. Yet
before I had a chance to catch my breath, I was whirled into a trip of
a lifetime. The opportunity came about as a result of my star book
Chinese Zodiac being part of the Alberta Craft Council Pulp Paper
Pages exhibition. A collaboration between the Council and the Canadian Bookbinders and Book Artists Guild (CBBAG), the exhibition
was a showcase of the best of contemporary book and paper arts
happening in Alberta at the time. First shown in Edmonton in the
spring and summer of 2012 and then in Calgary during the summer
of 2013, the entire exhibition was packed up and shipped across
the Pacific to the Hanji Theme Park in South Korea, to be on view
12
Bound & Lettered b Summer 2014
during its annual paper festival. Funding was secured to form a delegation of artists to accompany the exhibition to Korea. By the luck
of the draw, I was chosen as one of the artists. And so, in September
2013, I travelled to South Korea in company with other Alberta book
and paper artists.
The festival, held in Wonju, a city in the Gangwon Province of
South Korea, is an annual celebration of the hanji paper form. In
South Korea, hanji continues to be made by hand in the traditional
way in the workshops of masters. Formed from the inner bark of the
paper mulberry tree, a few technological innovations have crept into
its production, but essentially the paper is made today much in the
way it was hundreds of years ago. The paper has a soft, cotton-like
texture and drape and an absorbent surface that lends itself well
BAR CODE
ART BOOKS
BY PHAWNDA MOORE
It began in 2010 with Judy Melvin’s mixedmedia workshop, which was all about fearless experimenting. I joined other longtime
calligraphers who were eager to try new stuff:
acrylics, bleach, black paper, stencils, Neuland
letters, pastels, and decorative paper. (Judy
shares projects from this class in her book, Art
Exposé: A Collection of Techniques for Creative
Expression.) For a week, Judy served up an
artistic buffet in the spirit of “Life is either
a daring adventure or nothing.” In time our
tables were heaped with colorful papers, and
Judy announced that it was time to make “bar
code art.” Trial sheets and discarded efforts
would be cut into narrow strips and assembled
as parallel bars on contrasting paper to create
new art, a colorful play on everyday black-andwhite bar codes. Everyone gladly donated a few
failures to the cause. I remember that project
well; mine is framed on a wall in my studio.
A few years later, Jacqueline Sullivan encouraged me and my fellow students to “Let art
have its way,” and in another class, Barbara
Close invited us to “Throw away the rules.” This
direction took me to a new world of creativity
that I now share with my own students.
When I teach mixed-media techniques, students complete weekly exercises that I believe
Below: Candidates for a new identity in an art book. At right: The “bar code” that will be used for
the back cover. Black paper was chosen for the highest contrast to the kaleidoscope of colors.
18
Bound & Lettered b Summer 2014
LETTERS IN CHALK
CREATIVE CHALKBOARDS
BY CATHERINE LANGSDORF
Introduced in America in the early 1800s, large
chalkboards (also called blackboards) made it
possible for teachers to instruct a larger numbers of students at one time. Some chalkboards
were simply wooden boards covered with a
gritty black paint, others were large slabs of
slate, shipped across the country by the growing
railroad industry. By the middle of the 19th
century, they had become common fixtures in
one-room schoolhouses and in the classrooms
of larger schools – and remained so until the
mid-1990s, when dry-erase boards began to
replace them. Those of us who attended school
prior to then remember the horrible sound of
fingernails scratching across the board’s surface
and the white dust on our teachers clothing –
maybe good enough reasons to get rid of the
chalkboard in classrooms.
Perhaps fueled by nostalgia, this once common
surface is making a comeback – not in schools
but in advertising and for wedding events. The
chalkboard look is popping up in magazines,
Above: Catherine Langsdorf adding a colored shadow to letters as she works on the final details
for a very large chalkboard for a wedding reception. At right: Her first chalkboard commission, a
menu (28" x 42") created for an earlier wedding reception.
Opposite page, top: A ladder was needed to letter the top portion of the board – the board was
eight feet high! Middle: A full-size sketch of the wording for the lower portion of the board is
being used as a guide for spacing. Bottom: Flourishes are being added to the letters that have
ascenders and descenders to finish the text.
24
Bound & Lettered b Summer 2014


© Copyright 2026