InDesign 2 LAB 5 Sample pages
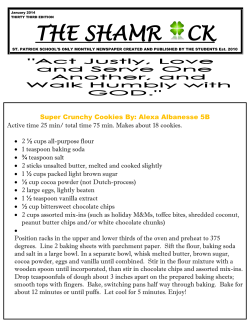
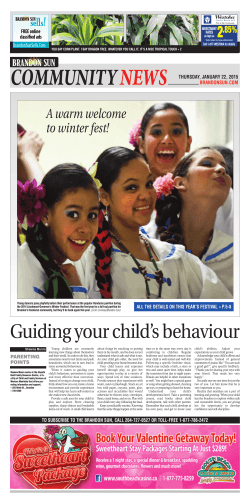
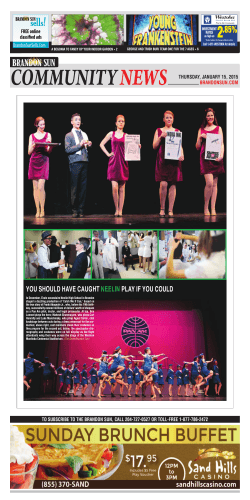
InDesign 2 Sample pages Windsor Green • Fall 2012 LAB 5 Part 1: Set up a sample InDesign document Now that you’ve decided on the dimensions of your book project, create a document that is a prototype of a sample page or two in your project and the front cover. The goal of this lab is to get you started on your book layout. I do not expect this to be the final version; it is a work in progress hat will be “tweaked” many times before you are satisfied. There are several more weeks of lectures that will present you with new techniques that should be included in your project. Next week you should have the opportunity of getting feedback on your project from 2 of your classmates. Create a facing-pages docu ment based on the dimen sions you have selected from either Lulu or Blurb. The con tents of this document will eventually be pasted into an InDesign template. As you start the document, consider the following: • Your margins should be set to where you normally include text and graphic elements in your layout. Put some thought into the inside margin and the type of binding you’ve selected. A perfect bound book might consider a bigger inside margin. A book with coil binding needs to allow space for the holes and binding. • In the File..New menu command, choose the More Options button and include a bleed of .125” on all four sides. This is a common bleed value for commercial printing and also used for Lulu and Blurb settings. [Note: the Blurb template does not include an inside bleed, but that will be addressed later in the class] Experiment with the Application bar settings of Preview, Normal and Bleed. • If you plan on having the occasional element that extends outside of the margin settings, you might also consider including a set of ruler guides on the master page 1/4” from the edges of the document. This is a common value for a safe zone which establishes how close important elements should be from the edge of the printed paper. For example, you’d never include important footer text at the exact left edge of the document especially since the printing process might shift and you could lose some of this text. Part 2: Front cover page Creating a cover page is one of the most creative and fun pages in a book project. It is delivered as a separate document to both Lulu and Blurb. At the end of the semester I will go through a demonstration of creating the front and back cover for each of these online printshops. For this assignment, create a sample cover layout on page 1. Include the title of your book and your name as the author. Somewhere on this cover, include your email address. Next week, each student’s sample pages will be displayed at the class website. Two of your classmates will evaluate your sample pages and offer helpful comments. if you do not want to share an important email address, consider creating a free yahoo or google address. Part 3: Sample pages When you create the content for sample pages of your book project start with page 2: • If you are planning different page layouts in each chapter, such as pages of narrative text and other pages dedicated to images, make sure that you create a sample page for each layout. Do you have a special layout for the first page in a new chapter? You can fill up text frames with placeholder text and graphic frames with “fake” graphics. The more you experiment with your prototype, the happier you will be not having to make lots of changes once you go into production with your template. Apply the fonts and colors selected from Lab 4. Think about master pages and styles. [A thorough review of styles is scheduled for next week’s lecture and a review of master pages is scheduled before you finish your template.] • Use lecture techniques from Week 5 to make any text “fit” into its frame. Are you going to include multiple columns of text with baseline grid alignment? What about hyphenation? How are you going to include vertical spacing between heads, subheads, and body text? How are you going to format your heads, subheads, body text and captions? Would paragraph rules be beneficial for captions or heads/subheads? • Think about book design. Although this is not a design class, there’s no harm in offering tips and tricks to make your book be the best it can be! Part 4: The Project Evaluation There needs to be a balance between what you have selected for your project and my requirements. Look at the grading sheet posted in Week 4. Your book needs to include both text and graphic content. • If your project is content heavy on graphics, think about how you are going to incorporate text that is formatted using advanced features from this class. The next two weeks will be devoted to text styles, so you may have extra ideas that you would like to incorporate at that time. Perhaps you can include pages of text with stories about the graphic content and specially formatted captions. • If your book is heavy on text content, plan on including graphics to enhance the pages using object styles. Again another future lecture. Save your document as Lab5. Create a smallest file sized PDF and print it or submit it to CATE. Lab 5 inbox Master of None andom Master of None I ants I am what you would call a dilettante. If you look this word up in the dictionary it says, ”one who dabbles in a field of interest, like Julia Roh”. For example: I sing, but never in public because I don’t like violence. I write, but not seriously, because frankly, I neether spill or type wellll. I draw, but my technique is such that everything comes out looking like a cartoon (even my paintings, which is so weird). I play several instruments really well at the beginner level. Let’s put it this way; mastery has never been the guiding principle of my life’s endeavors. h a i ul Ro J By gn si De In • Cyndi 2006/ pring Reese Fashion Statement S • Fashion Statement I I know what fashion is. Fashion costs approximately 170 times as much as clothes, no matter how ugly it is. And fashion can be mind-smashingly ugly. Take the current trend in adolescent shoes for example. Now, I’m no Versace, but even I know a shoe shouldn’t be bigger than your head! And since we’re on the subject, let’s talk about the kind of clothes we are expected to buy for our kids these days. And WE do buy them, because our kids don’t have jobs. This is not their fault. With the current trend to out-sourcing, they can’t be expected to commute to Malaysia and still keep up their grades. S o there we are at Ross, where we shop for less because less is what we have, and here is what we get: skin tight, spaghettistrap tops and spray-on jeans that end 2 molecules short of plumber-butt. This is poured on over a foam-padded bra and cheetah-print thong underwear. Now, 10 years ago, this would have been the ideal William Eugene Teutschel’s World War II Journal Aboard U.S.S. General H.S. Hodges (AP 144) 1945 – 1946 1 A book designed and produced by Sarah Teutschel b CIS 73.41B Adobe InDesign 2 b Spring 2008 b Maiden Voyage Cyndi Reese April 6, 1945 I was transported with the rest of the crew to Kaiser Shipyards in Richmond. There we boarded the Hodges for the first time, and proceeded to get her in shipshape for her commissioning that afternoon. At 1:00 pm the General Harry Foote Hodges became the U.S.S. Gen. H. F. Hodges AP144. My folks were there, and I showed them around the best I could, for she was new to me too. Then came time to say “goodbye Mom.” Later we shoved off for Naval Supply Depot, Oakland for our supplies. April 16, 1945 we sailed for San Diego on our shakedown cruise. April 18, 1945 at 1630 we hit San Diego. That night we had the busiest night that we signalmen will probably ever have on this ship. We hardly left the ship’s lights more than a few minutes. Thank God it was only one night. Thursday April 19, 1945 we pulled out of harbor for our cruise. It was a lonesome, cold, weary trip, and had entirely too many General Quarters. April 27, 1945 we got back to “Dago” again. There we docked for our availability, which is, straightening a few odds and ends that were found wrong on shakedown. Bill’s Journal: WWII Tours with US Coast Guard, 1945 b 13 17 An infant watches her hands and feels them move� Gradually she fixes her own boundaries at the complex incurved rim of her skin. Later she touches one palm to another and tries for a game to distinguish each hand’s sensation of feeling and being felt. What is a house but a bigger skin, and a neighborhood map but the world’s skin every expanding? Excerpt from An American Childhood –Annie Dillard BIRDLAND edited by Stephanie Odeh photography by Alisa Haller InDesign 2* Fall 2007 * Cyndi Reese 5 The Rowley and Cheney Family of Vermont and Pennsylvania Family Letter Album of the Rowley and Cheney Family Chapter 1 Memories of Vermont Family Letter Album "Be it remembered that at Brandon in the said county on the 11th day of August, 1805 Daniel Rowley and Polly Cheney both An antique postcard of Rutland County, Vermont towards the of said Brandon proverbially "Green Mountains". The view hasn't were dulychanged joined much in over two hundred years... in marriage by me Ebenezer Hubard Minister of the gospel."1 F 1 Brandon Town ship Land Records, Volume 4, page 361. Antique postcard of Conant Square, Brandon, Vermont. Brandon Vermont by Irene Rowley This story begins1 in the New England village of Brandon, Rutland County, Vermont, located at the foot of the Green Mountains and overlooking Lake Champlain, where a young blacksmith named Daniel Rowley came to town and married the pioneer's daughter Polly Cheney (also known as Polley) in 1805. After ten years in Ver mont, they left behind everything to move to Freeport, Pennsylvania. This album features their lives, reconstructed from their saved letters and papers, as well as photos of some of their early descendents and pictures of places they knew. Daniel was born in the area of Canaan, New York in 1782. Daniel's family were mem bers of the Congregational Church in Canaan. His father Joseph Langrell Rowley, had served as a coxswain in the navy during the American Revolution and his mother has never been identified. His mother had died when he was a young child and Joseph had remarried and was moving west. Joseph was moving west in the 1790's and Daniel seems to have set off on his own at this time. Daniel migrated to Vermont, possibly by way of Orwell Ver mont where some of his uncles and aunts lived, settling in Brandon Vermont as a young man by 1803. Polly was born in 1786 and lived on a farm in Brandon, one of the eight children of Edward and Abigail (Hale) Cheney. Edward Cheney was one of the first settlers of Brandon who had come to town on an ox-sled with his wife and first children from New Hampshire. He was a deacon and a founding member of the Baptist Church. Daniel and Polly had many things in common: Both can trace their lineage back to an ancestor who came to America in the 1600's with the Separatists from England. Both of their fathers fought in the American Revolution in the old colonies, that had after the war travelled north into the American frontier. They both grew up in rustic villages where every one worked hard to cultivate the forested lands and create new towns. 2 18 Home Cooking and Sweets By 1 2 Soups & Sides Larissa Alchin Main Course CornChowder 1 ½ ½ ¼ 2 2 1½ ¼ ¼ 1 1 ¼ ¼ 2 green pepper cup sliced carrots cup sliced celery cup chopped onion cups diced red potatoes cups water teaspoon salt teaspoon pepper teaspoon thyme cup grated cheddar cheese can cream of corn Roux: cup butter cup flour cups milk Soups & Sides Kate’s 15 C ook all veggies in boiling water for about 20 min utes. Add cheddar cheese and corn to the pot and stir well. In a separate small pan make the roux with the butter and flour. Cook for 1-2 minutes then add the milk while stirring until thickened. Add to the soup slowly while stirring. Simmer for a couple of minutes to heat though. 19 Thank you, Cyndi Reese for the lab
© Copyright 2026


