
Montana Ecological Integrity Assessment Field Manual
Montana
Ecological Integrity Assessment
Field Manual
May 2014
Table of Contents
Section 1.
Section 2.
Section 3.
Section 4.
Section 5.
Section 6.
Section 7.
Section 8.
Assessment Area Information...................................................................................................................... 2
Physical Patch Types within the Assessment Area ............................................................................. 6
Plant Zone Descriptions for the Assessment Area .............................................................................. 8
Level 2 Assessment Metrics .......................................................................................................................... 8
Onsite and Surrounding Disturbances .................................................................................................. 22
Soil Profile Descriptions .............................................................................................................................. 27
Adjacent Upland Vegetation Characterization ................................................................................... 28
Vegetation Measurements for Intensive Wetland Assessment................................................... 29
REFERENCES .......................................................................................................................................................................... 39
APPENDICES ........................................................................................................................................................................... 40
Appendix A: Field Key to Wetland and Riparian Ecological Systems of Montana .................................... 41
Appendix B. Hydrogeomorphic (HGM) Classification of Wetlands in the Rocky Mountains .............. 45
Appendix C. Key to the Cowardin Systems and Classes of the Rocky Mountains .................................... 47
Appendix D. Montana Noxious Weed List by County .......................................................................................... 49
Appendix E. Soil Profile Description Protocol......................................................................................................... 52
Appendix F: Montana’s Threatened or Endangered Plant Species ................................................................ 64
Appendix G: Plant Collection Protocol ....................................................................................................................... 67
Appendix H: First Aid Considerations and Common Field Ailments............................................................. 70
-1-
WETLAND ECOLOGICAL INTEGRITY ASSESSMENT PROTOCOL
May 2014
Section 1. Assessment Area Information
A. Establishing the Assessment Area (AA)
1. Standard Layout of the AA: Navigate to the original target coordinates using the GPS; this is
the AA center. In open vegetation, pull a tape out 40 meters to the north and walk in a circle,
flagging the boundary of the AA with pin flags or flagging tape. At least eight flags should be
used to mark the AA boundary, one in each of the four cardinal directions (N, S, E, W) and
one in each of the ordinal directions (NE, SE, SW, NW). More flagging can be used if it is
difficult to see all of the flagging. This 40-m radius circular plot (0.5 hectares) is the AA. If
the total area of the wetland is smaller than 0.5 hectares, then the entire wetland is the AA. If
the entire wetland can hold an AA with a 40-m radius, but the original target coordinates are
too close to the wetland perimeter, then go to Alternate AA Layout 1, below. If the wetland is
linear (e.g., riverine sites) and cannot hold an AA with a 40-m radius, then go to Alternate AA
Layout 2, below. If the wetland area is smaller than 0.5 ha OR the wetland is larger than 0.5
ha but the wetland boundaries are such that a 0.5 ha AA cannot be established, then go to
Alternate AA Layout 3, below.
2. Alternate AA Layout 1 - Adjusting the AA for wetlands that can hold an AA with a 40-m
radius: If the entire wetland can hold an AA with a 40-m radius, but the original target
coordinates for the AA center are too close to the wetland perimeter, then the center of the
AA can be moved up to 60 meters from the original coordinate location.
3. Alternate AA Layout 2 – Rectangle:
Adjusting the AA for wetlands that are too narrow to hold an AA with a 40-m radius: If
a 40-m radius circle does not fit within the wetland area, then field crews may decide to use a
rectangular shape to define the AA. Rectangle dimensions should reflect the target AA size of
0.5 ha (5,000 m2). For example, a square AA should be 71 meters on each side (71 x 71 =
5041). If the wetland is 50 meters wide, the rectangle should be 50 x 100 m. The maximum
length of a rectangular AA is 200 meters and the minimum width is 20 meters. Beyond 200
meters in length, the wetland may be highly variable and too difficult to assess in one visit.
An AA less than 20 meters in width is too difficult to establish the vegetation plot.
Rectangular AAs may be centered on the point. Rectangular AAs should only be used
where the wetland area is generally straight, and the size of the AA is not compromised
by bends in the wetland boundary. The boundary of the AA should be flagged as often as
necessary so the boundary is easily visible. GPS waypoints should be taken at each of the four
corners of rectangular AAs, and their coordinates should be recorded on page 1 of the field
form under AA Corner #1, AA Corner #2, AA Corner #3, and AA Corner #4
If the wetland is >25 m wide and linear, then the AA will be laid out beginning at the point
and moving upstream the distance needed to produce a rectangular AA of 0.5 hectares . For
example, if the wetland habitat along a river is 40 m wide, then the length of the AA would be
5,000 m2/40 m2 = 125 m.
-2-
4. Alternate AA Layout 3 – AA Polygon: If the wetland area is smaller than 0.5 ha OR the
wetland is larger than 0.5 ha but the wetland boundaries are such that a 0.5 ha AA cannot be
established, then the AA shape can be determined by the shape of the wetland itself. If the
entire wetland is smaller than 0.5 ha, then the entire wetland becomes the AA. If the wetland
is large enough but oddly shaped, the field crew must estimate the general dimensions of the
wetland using the aerial photos provided and determine the best way to establish a 0.5 ha
AA. The field crew will walk the AA perimeter with the GPS in TRACK mode, flagging the AA
perimeter as they walk. Once the perimeter is walked and the shape is complete, the GPS
unit will calculate the area of the shape and the crew can adjust it as needed to create a 0.5
ha AA. The GPS track is saved to the GPS unit and named by the point code (e.g., RV-001TRACK).
Once the AA is established, the crew will check off the dimensions of the AA on the field form and
mark whether the point is one of the following:
AA is centered at point
AA is not centered at point
AA is shifted but within 60 meters of the original sample point
The field crew should note any changes to the AA and the reasoning behind such selection (e.g.,
wetland too narrow, required a rectangular AA of 40 x 125 m).
B. General Principles of AA Establishment:
1. The AA should be 0.5 ha (5,000m2) whenever possible but can be as small as 0.1 ha (1,000
m2) if necessary.
2. The maximum AA length is 200 meters, regardless of shape.
3. The minimum AA width is 20 meters, regardless of shape.
4. The AA should contain no more than 10% water > 1 meter in depth. This includes water in
a stream channel.
5. The AA can cross and contain a stream channel that is < 1 meter in depth. The AA should
not cross streams that are too deep or unsafe to wade.
6. If the wetland is < 25 meters in width and linear (e.g., riparian zone or lacustrine fringe), the
AA will be a rectangle starting at the point and moving upstream no more than 200 m. The
AA will be smaller than 0.5 hectares. For example, if the wetland habitat is 20 m wide, then
the AA would be 20 x 200 = 4,000m2 = 0.4 hectares. Note: The AA should occur on only one
side of the channel.
7. The AA should contain no more than 10% upland inclusions.
8. The AA center should be as close to the original sample point as possible but can be moved
up to 60 m.
Before establishing an AA, the field crew should take a GPS waypoint at the original target sample
point. If the AA is centered on the sample point, this waypoint can also be written for the AA center.
If the AA is not centered on the original sample point, a new GPS waypoint will be taken at the
approximate AA center. RECORD THE GPS COORDINATES OF ALL WAYPOINTS.
C. General Assessment Area (AA) Information
1. Site ID: This is the unique identifier assigned during the sample selection process. This
identifier MUST be maintained throughout the project duration. Place the Site ID on each
sheet of the data form.
-3-
2. Site Name: This is not required, but assigning a name to an assessment area may help
organize different sites in the field.
3. Visit Number: Indicate whether this is the first, second, etc. visit to the site.
4. Level of Assessment: Indicate whether this assessment is a Level 2 or a Level 3
assessment.
5. Date: Record the date the wetland was assessed written as month, day, year (e.g.,
7/12/2014).
6. Observers: List the full names of all observers present during the wetland assessment.
7. Level 4 Ecoregion: This should be assigned in the office.
8. Land Ownership: This should be determined prior to any site visit and then filled in on the
form during the assessment.
9. USGS Quad Name: This should be determined prior to any site visit and then filled in on the
form during the assessment.
10. HUC4/HUC5/HUC6: The hydrologic unit codes for the subbasin, watershed, and
subwatershed should be assigned in the office using the National Hydrography Dataset.
11. Is This a Mitigation Wetland?: Select Yes or No. If yes, answer questions regarding preand post-construction visits.
12. Slope and Aspect 1 and 2: The field form contains two places to record slope and aspect
for assessment areas that have two general slopes and aspects (e.g., a riverine wetland
might slope down to the river channel and also with the general gradient and direction of
the stream). Use a compass to measure both the slope and the aspect.
13. AA location relative to the target AA coordinates: Check the appropriate case for the
location of the AA relative to the original target coordinates. Determine if the AA is centered
around the original target coordinates; the AA is not centered on the original target
coordinates; shifted within 60 meters of the original target coordinates.
14. AA dimensions: Check the appropriate case for the AA dimensions. The AA is a 40 meter
radius circle; the AA is a rectangle (record width and length); the AA has an alternate layout.
D. GPS Coordinates at the AA Center
1. Target AA Center Coordinates: Record the original target coordinates of the selected AA
center.
2. GPS Unit Information and Unit Number: Record the make and model of the GPS unit and,
if applicable, the unit number.
3. Waypoint ID: This is the ID assigned to the waypoint taken at the center of the AA. The GPS
usually assigns a three digit number, which can be edited if you choose. Be certain to keep
the waypoint ID consistent between the data form and the GPS.
4. Accuracy: Record the accuracy in meters given on the GPS unit.
5. Datum: This should be NAD83. Methods for changing the datum on the GPS will depend
upon the model used.
6. Elevation: Record the elevation in meters given on the GPS unit.
7. Longitude (X) and Latitude (Y): Changing the coordinate system on the GPS unit depends
upon the model used.
-4-
8. GPS Coordinates for alternate AA layout: Record the waypoint ID, coordinates, and
accuracy for the AA corners (rectangular AA) or the name of the GPS track.
E. General Assessment Area Description
Include a general description of the assessment area and the surrounding uplands. Describe the
wetland type, dominant vegetation, general location, and any notable feature about the AA that may
not have been captured in the classification or other information. Note surrounding vegetation
(including uplands) and land use.
F. Directions to the Assessment Area and Access Comments
Detailed directions to the site can be written back at the office using the gazetteer. Note any issues
that affected access to the AA.
G. Topographic Position and Water Information
1. Topographic Position: Select the appropriate topographic position category based on the
position of the AA in the landscape.
Slope- Intermediate slope position, not the toe of the slope but actually on a sloping
face.
Toeslope- Outermost gently inclined surface at base of a slope. In profile, commonly
gentle and linear and characterized by alluvial deposition.
Valley bottom- Valley floor or shoreline representing the former position of an
alluvial plain, lake, or shore.
Basin floor- Nearly level to gently sloping, bottom surface of a basin.
2. Amount of Assessment Area Covered by Standing Water: Select the appropriate cover of
standing water in the AA.
3. Estimated Depth of Standing Water: Select the appropriate depth of standing water
(averaged over the entire AA).
4. Surface Water Permanence: Based on vegetation, soil characteristics, and topographic
position, select whether the presence of surface water during the growing season is
semipermanent, seasonal, or temporary within the AA.
H. Photos of the Assessment Area
1. Camera Information: Record the camera make, model, and serial number.
2. Photos of the AA: The Photo Card appears in the corner of the photo (Figure 1). Using a
dry erase pen, fill in the Site ID, date, and bearing of the photo on the Photo Card. Be sure
that the Photo Card takes up very little of the photo, but that the information on the Photo
Card is visible in the photo. Note: Watch for glare off of the Photo Card. From the AA center,
take four photos; one in each cardinal direction. Record a description on the data form,
when necessary. Record the number of the photo from the camera onto the form. Be certain
that this number is maintained when the photos are downloaded onto the computer.
3. AA Overview: Take a photo showing an overview of the entire AA. The Photo Card should
appear in this photo as well. Record the bearing of the photo on both the Photo Card and
the form.
-5-
4. Additional Photos: Take any additional photos that you feel would provide additional
information for the AA. Record the number of the photo from the camera onto the form. Be
certain that this number is maintained when the photos are downloaded onto the computer.
Figure 1. Examples of AA photos. Note placement of photo card in the corner of each photo.
I. Classification of the Assessment Area
1. Ecological System: Select the appropriate Ecological System of the AA from the list using
the Key to Wetland Ecological Systems of Montana (Appendix A). If none of the provided
Ecological Systems is appropriate, check “Other” and provide a detailed explanation. If
possible, select only one dominant Ecological System. Select the appropriate Confidence
Level for your selection and provide reasoning for your selection on the data form.
2. Hydrogeomorphic (HGM) Class: Select the appropriate HGM class of the AA using the Key
to the Hydrogeomorphic Classification of Wetlands in the Rocky Mountains (Appendix B).
The AA should encompass only one dominant HGM class. Select the appropriate Confidence
Level for your selection and provide reasoning for your selection on the data form.
3. Cowardin Classification: Record the appropriate Cowardin classification codes using the
definitions provided in the Key to the Cowardin Systems and Classes of the Rocky
Mountains (Appendix C; Cowardin et al. 1979). Cowardin classifications should be applied
to patches larger than 0.1 ha (1,000 m2) within the AA. The total percentages should equal
100% of the AA. Select the appropriate water regime based on the descriptions on page 2 of
the field form.
J. Assessment Area Drawing
Provide a drawing of the assessment area, including major plant zones, direction of drainage into
and out of the wetland, water inlets and outlets, soil pit placement, and vegetation plot
placement. Anthropogenic features like culverts, berms, or impoundments should also be
included in the sketch. Also, indicate any major plant zones on the aerial photo of the AA.
Section 2. Physical Patch Types
Physical patches such as open water, mudflats, floating mats, etc. increase the structural complexity
of wetlands as well as perform important ecological functions and can be important indicators of
wetland function. Patch types are recorded on the datasheet by selecting all that apply from a
checklist of different physical surfaces or features that may provide habitat for species (Table 1).
For patch types that occur within the AA, estimate the overall cover class of each in the AA.
-6-
Table 1. Checklist and Descriptions for Physical Patch Types.
PHYSICAL PATCH TYPE
Present
in AA
Percent
Cover
within AA
Description
Cover Classes 1: trace 2: <1% 3: 1–<2% 4: 2–<5% 5: 5–<10% 6: 10–<25% 7: 25–<50% 8: 50–<75% 9: 75–<95% 10: >95%
Open water-pond or lake
Medium to large natural water body
Areas that hold stagnant or slow moving water from
Open water -pools
groundwater discharge but are not associated with a defined
channel.
Open water-river/stream
Areas of flowing water associated with a sizeable channel.
Open water-small rivulet
Areas of flowing water associated with a narrow stream channel.
Areas holding stagnant or slow moving water that have been
Open water-oxbow/backwater channel
partially or completely disassociated from the primary river
channel.
Areas of flowing water entering the main channel from a
Open water-tributary/secondary channel
secondary source.
Areas that hold stagnant or slow moving water behind a beaver
Open water-beaver pond
dam.
Debris damming a stream clearly constructed by beaver (note
Active beaver dam
gnawed ends of branches)
Beaver canals
Canals cut through emergent vegetation by beaver.
River channel consisting of a network of small channels
Braided river channel
separated by small and often temporary islands or bars.
Localized point of emerging groundwater, often on or at the base
Adjacent or onsite springs/seeps
of a sloping hillside.
Aggregated woody debris in a stream channel deposited by high
Debris jams/woody debris
flows.
Deep, slow-moving pools alternating with shallow, fast-moving
Pool/riffle complex
riffles along the relatively straight course of a stream or river.
A low ridge of sediment (sand or gravel) formed on the inner
Point bars
bank of a meandering stream.
A bank slump is the portion of a stream or other wetland bank
that has broken free from the rest of the bank but has not
Bank slumps or undercut banks in channel or
eroded away. Undercut banks are areas along the bank or
along shoreline
shoreline of a wetland that have been excavated by waves or
flowing water.
An accumulation of mud at the edge of shallow waters, such as a
Mudflats
lake or pond. Often intermittently flooded or exposed.
Dry open area of fine-grained sediment and accumulated salts.
Salt flat/alkali flat
Often wet in the winter months or with heavy precipitation.
Mounds or holes associated with animal foraging, denning,
Animal mounds or burrows
predation, or other behaviors.
A mound composed of plant material resulting in a raised
Plant hummocks
pedestal of persistent roots or rhizomes.
Depressions between hummocks or mounds that remain
Water tracks/hollows
permanently saturated or inundated with slow moving surface
water.
Naturally occurring islands surrounded by water. Island can be
Natural island
dominated by either wetland or upland vegetation.
Anthropogenic island
Island created by artificial means, often for nesting waterfowl.
Mats of peat held together by roots and rhizomes of sedges.
Floating mat
Floating mats are underlain by water and /or very loose peat.
Marl is a calcium carbonate precipitate often found in calcareous
Marl/limonite beds
fens. Limonite forms in iron-rich fens when iron precipitates from
the groundwater incorporating organic matter.
Other:
-7-
Section 3. Plant Zone Description for the Assessment Area
A. Distinguishing Individual Plant Zones: Plant zones often consist of more than one plant
species, but some zones can be monospecific. In some cases, one or two plant species dominates
each zone. Identify and describe the plant zones that occur within the assessment area. A plant
zone should be described if it meets the following rules:
1. The plant zone is dominated by a stratum distinctly different from the stratum that
dominates other plant zones; OR
2. The plant zone is dominated by the same stratum as other plant zones, BUT each plant
zone is dominated by different species.
3. The plant zone makes up more than 5% of the AA (e.g., 250 m2 for an AA of 0.5 ha).
4. Each individual patch of the plant zone is greater than 10m2.
B. Identify and Describe Each Plant Zone within the AA:
1. Select the appropriate strata (e.g., forest, shrubland, herbaceous, etc.) that occur in each
plant zone.
2. Record the dominant species observed in each stratum, and the height and cover class of
each species from the height and cover class scales.
3. Indicate the location of each plant zone on the AA drawing and on the aerial photo.
4. Estimate the percent cover of each plant zone within the AA using the cover class scales.
Section 4. Level 2 Assessment Metrics
A. Landscape Context Metrics
1. Landscape Connectivity: This metric measures the percent of unfragmented landscape
within a 200 m envelope around the AA perimeter (non-riverine) or the degree to which the
riverine corridor above and below a floodplain area exhibits connectivity with adjacent
natural systems (riverine). Use either metric a. or metric b. depending on the HGM class.
Metric Measurement Protocol:
a. Non-riverine: The intensity of human activity in the landscape often has a proportionate
impact on the ecological processes of natural systems. The percentage of altered landscape
(e.g., anthropogenic patches) provides an indirect estimate of connectivity among natural
ecological systems. To assess this metric, estimate the percent unfragmented area within the
200 meter envelope. Dirt roads count as fragmentation, but hiking trails can be included in
unfragmented blocks. Estimate the landscape connectivity using the following narrative
descriptions:
Metrics for Landscape Connectivity – Non-riverine.
(1)
Intact: Assessment area embedded in >90–100% unfragmented, natural landscape.
(2)
Variegated: Assessment area embedded in >75-90% unfragmented, natural landscape.
(3)
Fragmented: Assessment area embedded in >50-75% unfragmented, natural landscape.
(4)
Severely fragmented: Assessment area embedded in 25-50% unfragmented, natural
landscape
(5)
Relict: Assessment area embedded in <25% unfragmented, natural landscape.
-8-
b. Riverine: For Riverine wetlands (where the channel is within or adjacent to the AA),
landscape connectivity is the continuity of the riparian corridor 200 m upstream and 200 m
downstream of the AA. Of special concern is the ability of wildlife to enter the riparian area at
any place within 200 m of the AA and to move easily through adequate cover along the
riparian corridor from either upstream or downstream. Refer to maps and aerial photos
provided to estimate the percent of anthropogenic, non-buffer patches within the riparian
corridor (the width of the geomorphic floodplain) 200 m upstream and downstream of the
AA. Anthropogenic patches include heavily grazed pastures, roads, bridges, urban/industrial
development, agriculture fields, and utility right-of-ways. Estimate the landscape
connectivity using the following narrative descriptions:
Metrics for Landscape Connectivity – Riverine.
(1)
Intact: Assessment area embedded in >90–100% unfragmented, natural landscape.
(2)
Variegated: Assessment area embedded in >75-90% unfragmented, natural landscape.
(3)
(4)
(5)
Fragmented: Assessment area embedded in >50-75% unfragmented, natural
landscape.
Severely fragmented: Assessment area embedded in 25-50% unfragmented, natural
landscape
Relictual: Assessment area embedded in <25% unfragmented, natural landscape.
2. Buffer Index: Wetland buffers are vegetated, natural (non-anthropogenic) areas that
surround a wetland (Table 2). This metric calculates the overall area and condition of the buffer
immediately surrounding the AA using three measures: percent of AA with buffer (buffer
length), average buffer width, and buffer condition.
Metric Measurement Protocol:
a. Buffer Length: This metric can be assessed first using aerial photography but must be
verified in the field. Visually estimate the total percentage of the AA perimeter that adjoins
land cover types that provide buffer functions. To be considered as a buffer, a suitable land
cover type must be at least 30 meters in width. For Riverine wetlands, do not include the
area immediately upstream or downstream as part of the buffer. Only consider areas on one
side of the channel or the other.
Use the following narrative descriptions to estimate the buffer length:
Metrics for Buffer Length.
(1)
A buffer of at least 30 m occurs around 76–100% of the AA perimeter.
(2)
A buffer of at least 30 m occurs around 51–75% of the AA perimeter.
(3)
A buffer of at least 30 m occurs around 25–50% of the AA perimeter.
(4)
A buffer of at least 30 m occurs around <25% of the AA perimeter, OR NO BUFFER
EXISTS.
-9-
Table 2. Examples of land cover that should be included and excluded from wetland buffer
calculations.
Examples of Land Cover
Included in Buffers
Additional wetland/riparian area
Natural upland habitats
Nature or wildland parks
Bike trails
Foot trails
Horse trails
Open rangeland with light grazing
Swales and ditches
Open water
Vegetated levees
Examples of Land Cover
Excluded from Buffers
Commercial developments
Residential developments
Paved roads
Dirt roads
Railroads
Parking lots
Fences that interfere with the movements of
wildlife
Sound walls
Intensive agriculture (row crops, orchards,
vineyards)
Dryland farming
Horse paddocks, animal feedlots
Rangeland with intensive grazing
Lawns
Golf courses
Sports fields
Urbanized parks with active recreation
Paved or heavily used pedestrian/bike trails
(frequent traffic)
b. Buffer Width: This metric can be assessed first using aerial photography but must be
verified in the field. Where buffers exist, visually estimate the average distance between the
perimeter of the AA and the edge of the buffer at eight evenly spaced intervals up to 200
meters from the perimeter of the AA. For Riverine wetlands, do no include the area
immediately upstream or downstream as part of the buffer. Only consider areas on one side
of the channel or the other. See Table 2 for land covers included and excluded from buffers.
Use the following narrative descriptions to estimate the buffer width:
Metrics for Buffer Width.
(1)
Average buffer width between edge of the AA and the edge of the buffer is >200 m.
(2)
Average buffer width between edge of the AA and the edge of the buffer is >100–200 m.
(3)
Average buffer width between edge of the AA and the edge of the buffer is 50–100 m.
(4)
Average buffer width between edge of the AA and the edge of the buffer is <50 m, OR NO
BUFFER EXISTS.
- 10 -
c. Buffer Condition: Estimate the overall condition of the buffer within 200 meters of the AA
perimeter based on plant species composition, extent of soil disturbance, and the extent of
trash or evidence of human visitation or recreation using the narrative descriptions below.
ONLY consider portions of the 200 m envelope considered buffer (i.e., exclude non-buffer
areas such as roads).
Metrics for Buffer Condition-Plant Species Composition.
Abundant (>95%) native vegetation cover and little or no (<5%) cover of non-native
(1)
plants.
(2)
Substantial (>75–95%) native vegetation cover and low (5–25%) cover of non-native
plants.
(3)
Moderate (50-75%) native vegetation cover.
(4)
Low (<50%) cover of native vegetation, OR NO BUFFER EXISTS.
Metrics for Buffer Condition-Extent of Soil Disturbance.
(1)
Soils are intact.
(2)
Soils are slightly to moderately disturbed.
(3)
Soils are moderately to extensively disturbed.
(4)
Soils are highly disturbed OR ground is unnaturally bare, OR NO BUFFER EXISTS.
Metrics for Buffer Condition-Extent of Trash or Evidence of Human Visitation or Recreation.
(1)
No trash present OR no evidence of human visitation or recreation.
(2)
Little trash OR evidence of minor human visitation or recreation.
(3)
Moderate or greater amounts of trash OR evidence of moderate human
visitation/recreation.
(4)
Excessive amounts of trash OR evidence of high intensity human visitation/recreation,
OR NO BUFFER EXISTS.
- 11 -
B. Vegetation Structure Metrics
1. Relative Cover of Native Plant Species: A measure of the relative percent cover of all plant
species that are native to the region.
Metric Measurement Protocol
Estimate the percent of the vegetation cover within the AA that is comprised of native plant
species. Note: If 50% of the AA is covered by water and 50% of the AA is covered by vegetation,
then estimate the percent of the AA covered by vegetation that is comprised of native vegetation.
Estimate the relative cover of native plant species in the AA based on the following narrative
descriptions:
Metrics for Relative Cover of Native Plant Species
(1)
>99% of the vegetation cover within the AA is comprised of native vegetation.
(2)
95-99% of the vegetation cover within the AA is comprised of native vegetation.
(3)
80-94% of the vegetation cover within the AA is comprised of native vegetation.
(4)
50-<80% of the vegetation cover within the AA is comprised of native vegetation.
(5)
<50% of the vegetation cover within the AA is comprised of native vegetation.
2. Relative Cover of Listed Noxious Weed Species within the AA: A measure of the relative
percent cover of listed noxious weed species and the distribution of noxious weed species in the
AA.
Metric Measurement Protocol
Estimate the percent of the relative vegetation cover within the AA that is comprised of listed
noxious weed species plant species from the Montana County Weed List (Appendix D). If noxious
weed species are present in the AA, then identify and rank the three most common species
observed. Estimate the relative cover of listed noxious weed species and the distribution of
noxious weed species in the AA based on the following narrative description:
Metrics for Cover of Listed Noxious Weed Species
(1)
(2)
(3)
(4)
No noxious weed species are present in the AA.
<1-3% of the vegetation cover within the AA is comprised of noxious weed species. If
weeds occur in patches, then patches are small and isolated (1-2 patches) within the
AA.
>3-10% of the vegetation cover within the AA is comprised of noxious weed species. If
weeds occur in patches, then patches are moderate in size and common (3-5 patches)
within the AA.
>10% of the vegetation cover within the AA is comprised of noxious weed species. If
weeds occur in patches, then patches are relatively large and abundant (>5 patches)
within the AA.
- 12 -
3. Relative Cover of Aggressive Graminoids within the AA: For the purposes of this metric,
aggressive graminoids include reed canarygrass (Phalaris arundinacea), common reed
(Phragmites australis), cattail (Typha ssp.), smooth brome (Bromus inermis), Kentucky bluegrass
(Poa pratensis), common timothy (Phleum pratense), and meadow foxtail (Alopecurus pratensis).
Both native and non-native ecotypes of reed canarygrass and common reed occur in Montana.
The nativity of these species often cannot be known with certainty because they are difficult to
distinguish in the field. Similarly, two cattail species can occur in Montana, Typha latifolia is a
native species, whereas T. angustifolia is native to the eastern U.S. Both species tend to increase
and dominate sites with excessive nutrients. Smooth brome, Kentucky bluegrass, common
timothy, and meadow foxtail are aggressive, non-native pasture grasses that often invade
temporarily and seasonally flooded wetlands.
This metric is a measure of the absolute percent cover of graminoids that are aggressive
competitors with other native plant species and are obviously changing the species composition
of the wetland.
Metric Measurement Protocol
Estimate the absolute percent cover of aggressive graminoids within the AA. If aggressive
graminoids are present in the AA, then identify and rank the three most common species
observed. Estimate the absolute percent cover of aggressive graminoids within the AA using the
following narrative descriptions:
Metrics for Relative Cover of Aggressive Graminoids
Aggressive graminoids are present, but with low cover (<10% relative cover of cattails
(1)
or <5% cover of reed canarygrass, common reed, smooth brome, Kentucky bluegrass,
common timothy, or meadow foxtail).
Aggressive graminoids are common (10-25% relative cover of cattails or 5-10%
(2)
relative cover of reed canarygrass, common reed, smooth brome Kentucky bluegrass,
common timothy, or meadow foxtail).
Aggressive graminoids are abundant (>25-50% relative cover of cattails or 10-25%
(3)
relative cover of reed canarygrass, common reed, smooth brome, Kentucky bluegrass,
common timothy, or meadow foxtail).
Aggressive graminoids are dominant (>50% relative cover of cattails or >25% relative
(4)
cover of reed canarygrass, common reed, smooth brome, Kentucky bluegrass, common
timothy, or meadow foxtail).
4. Herbaceous Litter/Woody Debris Accumulation: The accumulation of litter and/or woody
debris is integral to a variety of wetland functions, such as surface water storage, percolation
and recharge, nutrient cycling, and support of wetland plants. Intact litter layers and/or woody
debris provide areas for primary production and decomposition that are important to
maintaining functioning food chains. They nurture fungi essential to the growth of rooted
wetland plants. They support soil microbes and other detritivores that comprise the base of the
food web in many wetlands. The abundance of litter and/or woody debris on the substrate
surface can significantly influence overall species diversity and food web structure. Fallen
debris serves as cover for macroinvertebrates, amphibians, rodents, and even small birds. Litter
is the precursor to detritus, which is a dominant source of energy for most wetland ecosystems.
Note: The site must have the potential to accumulate woody debris (i.e., woody plant
species should be present at the site).
- 13 -
Metric Measurement Protocol
Use the following narrative descriptions to describe the herbaceous litter/woody debris
accumulation within the AA:
Metrics for Herbaceous Litter/Woody Debris Accumulation
Site has moderate amount of fine litter/woody debris. New growth is more prevalent
(1)
than previous years’ growth. Layers of litter in pools or areas of topographic lows are
thin.
Site is characterized by small amounts of litter/woody debris, with little plant
(2)
recruitment, OR litter/woody debris is somewhat excessive.
Site has scant litter/woody debris OR litter/woody debris is excessive and is blocking
(3)
plant recruitment.
6. Interspersion of Plant Zones within the AA: Refer to the diagrams below and circle the
number that best illustrates the interspersion of plant zones within the AA. Use the plant zones
identified on pages 5 and 6 of the field form. Along with the plant zones, include zones of open
water when evaluating interspersion.
1
2
3
2
1
3
4
4
7. Woody Species Establishment and Regeneration within the AA: Select the statement on
the form that best describes the regeneration of native woody species establishment and
regeneration within the AA.
Metric Measurement Protocol
Use the following narrative descriptions to describe the woody species establishment and
regeneration within the AA:
Metrics for Native Woody Species Establishment and Regeneration within the AA
All age classes of native woody species present OR woody species are naturally
(1)
uncommon or absent.
(2)
Middle age group(s) absent. All others well-represented.
(3)
Seedlings and saplings absent and stand comprised of mainly mature species.
(4)
Woody species predominately consist of relict or dying individuals or AA has a > 5%
canopy cover of Russian Olive and/or Salt Cedar.
- 14 -
8. Utilization of Trees and Shrubs within the AA: Estimate the extent of browse on woody
species throughout the AA.
Metric Measurement Protocol
Use the following narrative descriptions to describe the woody species establishment and
regeneration within the AA:
Metrics for Utilization of Trees and Shrubs within the AA
0-5% of the available second year and older stems are browsed OR woody species are
(1)
naturally uncommon or absent.
(2)
>5%-25% of the available second year and older stems are browsed.
(3)
>25%-50% of the available second year and older stems are browsed.
(4)
More than 50% of the available second year and older stems are browsed.
C. Physicochemical Metrics
1. Soil Surface Integrity: An indirect measure of soil condition based on stressors that increase
the potential for erosion or sedimentation, assessed by evaluating intensity of human dominated
land uses on the site.
Metric Measurement Protocol: Use the narrative descriptions provided to describe the soil
surface integrity of the AA.
Metrics for Soil Surface Integrity within the AA
Soil disturbance is limited to naturally caused disturbances such as flood deposition or
(1)
game trails.
Some soil disturbance due to human causes (including livestock) is present but the
extent and impact is minimal. The depth of disturbance is limited to only a few inches
(2)
and does not show evidence of ponding or channeling water. Any disturbance is likely
to recover within a few years after the disturbance is removed.
(3)
(4)
Soil disturbance due to human causes is common and will be slow to recover. Damage
is not excessive and the site will recover with the removal of degrading human
influences and moderate recovery times.
Soil disturbance is widespread and substantially degrades the site. Water, if present,
would be channeled or ponded. The site will not recover without restoration and/or
long recovery times.
- 15 -
2. Water Quality: An assessment of water quality based on visual evidence of water clarity and
eutrophic species abundance.
Metric Measurement Protocol: Use the narrative descriptions provided to describe the water
quality of the AA.
Metrics for Water Quality-Algae.
(1)
No visual evidence of degraded water quality. No potential source of water quality
degradation observed. Water is clear with minimal algae growth.
(2)
Some negative water quality indicators are present and/or some potential sources of
water quality degradation observed. Algae are limited to small and localized areas
within the wetland. Water may have a minimal greenish tint, cloudiness, or sheen.
(3)
Algal growth occurs in large patches throughout the AA. Potential sources of water
quality degradation are apparent. Water may have a moderate greenish tint or sheen.
(4)
Algal mats may be extensive, blocking light to the bottom. Potential sources of water
quality degradation are apparent. Water has strong greenish tint, sheen, or turbidity.
The bottom is difficult to see during the growing season.
Metrics for Water Quality-Turbidity.
No visual evidence of degraded water quality. No potential source of water quality
(1)
degradation observed.
(2)
Water is slightly cloudy and/or some potential sources of water quality degradation
observed, but there is no obvious source of sedimentation.
(3)
Water is cloudy, but the bottom is still visible. Potential sources of water quality
degradation are apparent.
(4)
Water is milky and/or muddy. The bottom is no longer visible. Potential sources of
water quality degradation are apparent.
Metrics for Water Quality-Sheen (petroleum-based. Note: Sheens can be caused by bacteria. When
disturbed, a bacterial sheen will break up into small platelets; petroleum sheens will quickly reform.
No visual evidence of degraded water quality. No potential source of water quality
(1)
degradation observed. Water is clear with no sheen.
Some negative water quality indicators are present and/or some potential sources of
(2)
water quality degradation observed. Sheen on the water is limited to small and
localized areas within the wetland/AA.
Sheen occurs in large patches throughout the surface water of the wetland/AA.
(3)
Potential sources of water quality degradation are apparent. Water may have a
moderate sheen.
(4)
Sheen is extensive throughout the surface of the water in the wetland/AA. Potential
sources of water quality degradation are apparent. Water has a strong sheen.
- 16 -
D. Hydrology
1. Water Inputs into the AA: Water inputs encompass the forms or places of direct inputs of
water into the AA. Inputs of water affecting conditions during the growing season are especially
important because these strongly influence the structure and composition of wetland plant and
animal communities. The water inputs metric focuses on conditions affecting growing season
hydrology.
Natural water sources include precipitation, ground water discharge, and flooding of the AA due
to naturally high flows, seasonal runoff, etc. Examples of unnatural sources include storm drains
that empty directly into the AA or into an immediately adjacent area. For seeps and springs that
occur at the toe of an earthen dam, the reservoir behind the dam is an unnatural water source.
Large reservoirs and lakes that do not drain directly into the AA should not be considered water
sources, although they can have systemic, ubiquitous effects on the condition of the AA.
Engineered hydrological controls, such as pumps, weirs, flashboards, grade control structures,
check dams, etc., are not considered water sources.
Metric Measurement Protocol:
The assessment of this metric is the same for all wetland systems. For all wetlands, including
fringe habitat, this metric focuses on direct inputs of water as defined above. The natural
sources will tend to be more obvious than the unnatural sources. Evaluation of this metric
should therefore emphasize the identification of the unnatural sources or diversions that
directly affect the dry season conditions of the AA.
Use the narrative descriptions provided to describe the water inputs into the AA.
Metrics for Water Inputs into the AA.
(1)
Sources are precipitation, groundwater, and/or natural runoff, or natural flow from an
adjacent freshwater body, or the AA naturally lacks water in the dry season.
(2)
Sources are mostly natural but can include occasional or small effects of modified
hydrology. No large point sources or dams control the overall hydrology.
(3)
Sources are primarily from anthropogenic sources (e.g., urban runoff, pumped water,
impoundments, regulated releases through a dam).
(4)
Natural sources have been eliminated based on the following indicators: impoundment
of all possible wet season inflows, diversions of all dry-season inflows, predominance
of xeric vegetation, etc.
- 17 -
Identify all major water sources feeding the AA during the growing season in the table provided
on the form (Table 3). Rank the top sources (up to three) as 1, 2, 3. Mark all others present as 4
and those not present as NA. For discrete inlets (stream channels, springs, ditches, etc.), count
the number of each within the AA and a 200 m envelope of the AA. Enter NA for those not
present. Mark all inlets on the aerial photo and those within the AA on the site sketch. If there is
an indication that inflow during the growing season is controlled by artificial water sources,
please explain in comments.
Table 3. Checklist of major water sources into the assessment area.
Natural Sources:
Overbank flooding
Alluvial storage/hyporheic flow
Throughflow
Groundwater discharge
Precipitation
Snowmelt
Anthropogenic Sources:
Irrigation run-off/ditches
Urban run-off
Pipes directly feeding into wetland
Culvert
Pumps
Other:
Count of Discrete Inlets:
Channels
Spring
Ditches
Culvert
Pipes
Pumps
Other:
2. Water Outlet of the AA: Whether or not water can leave the wetland and where it goes can
also influence the structure and composition of wetland plant and animal communities. Identify
all major pathways through which water leaves the AA during the growing season in the table
provided on the form (Table 4). Rank the top pathways (up to three) as 1, 2, 3. Mark all others
present as 4 and those not present as NA. For discrete outlets (stream channels, culverts,
ditches, etc.), count the number of each within the AA and a 200 m envelope of the AA. Enter
‘NA’ for those not present. Mark all outlets on the aerial photo and those in the AA on the site
sketch. If there is an indication that outflow is modified by anthropogenic disturbance, please
explain in comments.
Metric Measurement Protocol:
The assessment of this metric is the same for all wetland systems. For all wetlands, including
fringe habitat, this metric focuses on water outlets as defined above. Evaluation of this metric
should therefore emphasize the identification of the unnatural outlets that directly affect the dry
season conditions of the wetland/AA.
Use the narrative descriptions provided to describe the water outlets of the wetland/AA.
- 18 -
Metrics for Water Outlets of the Wetland/AA.
Water leaves the site through natural runoff, natural flow, evaporation, or outlet is
(1)
blocked by natural features (e.g., beaver dam), OR the site naturally lacks water in the
growing season.
(2)
Outflow is mostly natural, but there is some modification due to anthropogenic
restrictions (e.g., filling or development, channelization).
(3)
Withdrawals are primarily from anthropogenic sources, and outflow has been
significantly altered by flow obstructions (culverts, paved stream crossings,
impoundments, ditching).
(4)
Natural outflow has been completely eliminated due to the following indicators:
dike/levees, railroads, or roads with no culverts.
Table 4. Checklist of major water pathways out of the assessment area.
Types of Water Outlet
Count of Discrete Outlets:
Channelized flow (headwater wetland)
Channels
Recharge to adjacent stream
Throughflow
Non-channelized flow to contiguous wetland area
No natural outlet
Anthropogenic Outlets:
Culverts under roadways / trails
Ditches established to drain wetland
Natural outlet blocked/bermed
Culvert
Ditches
Pumps
Other/Comments:
Water is being pumped out of the wetland
Other:
3. Hydroperiod: An assessment of the characteristic frequency and duration of inundation or
saturation of a wetland during a typical year. Depressional, lacustrine, and riverine wetlands
typically have daily variations in water height that are governed by diurnal increases in
evapotranspiration, and seasonal cycles that are governed by wet season rainfall and runoff.
Slope wetlands that depend on groundwater may have relatively slight seasonal variations in
hydroperiod.
Metric Measurement Protocol:
This metric evaluates recent changes in the hydroperiod, flow regime, or sediment regime of a
wetland and the degree to which these changes affect the structure and composition of the
wetland plant community. Common indicators are presented for the different wetland classes.
This metric focuses on changes that have occurred in the last 2-3 years.
Depressional, Lacustrine, and Slope Wetlands (except fens): Assessment of the hydroperiod for
these kinds of wetlands should be initiated with an office-based review of diversions or
augmentations of flows to the wetland. Field indicators for altered hydroperiod include pumps,
spring boxes, ditches, hoses and pipes, encroachment of terrestrial vegetation, excessive exotic
vegetation along the perimeter of the wetland, and desiccation during periods of the year when
- 19 -
comparable wetlands are typically inundated or saturated. Use the following narrative
description to describe the hydroperiod of the AA:
Metrics for Hydroperiod for depressional, lacustrine, and slope wetlands (except fens).
(1)
Hydroperiod of the AA is characterized by natural patterns of filling or inundation and
drying or drawdowns.
(2)
The filling or inundation patterns in the AA are of greater magnitude or duration than
would be expected under natural conditions, but thereafter the AA is subject to natural
drawdown or drying.
(3)
Hydroperiod of the AA is characterized by natural patterns of filling or inundation, but
thereafter, is subject to more rapid or extreme drawdown or drying, as compared to
more natural wetlands. OR The filling or inundation patterns in the AA are of
substantially lower magnitude or duration than would be expected under natural
conditions, but thereafter, the AA is subject to natural drawdown or drying.
(4)
Both the inundation and drawdown of the AA deviate from natural conditions (either
increased or decreased in magnitude and/or duration).
Metrics for Hydroperiod for fens.
(1)
Hydroperiod of the site is characterized by stable, saturated hydrology, or by naturally
damped cycles of saturation and partial drying.
(2)
Hydroperiod of the site experiences minor altered inflows or drawdown/drying, as
compared to more natural wetlands (e.g., ditching).
(3)
Hydroperiod of the site is somewhat altered by greater increased inflow from runoff,
or experiences moderate drawdown or drying, as compared to more natural wetlands
(e.g., ditching).
(4)
Hydroperiod of the site is greatly altered by increased inflow from runoff or
experiences large drawdown or drying, as compared to more natural wetlands (e.g.,
ditching).
4. Surface Water Connectivity: An assessment of the ability of the water to flow into or out of
the wetland, or to accommodate rising flood waters without persistent changes in water level
that can result in stress to wetland plants and animals.
Metric Measurement Protocol:
Assessment of this metric is based solely on field indicators and is different by HGM class. See
tables and figures below for guidance.
- 20 -
Metrics for Surface Water Connectivity for depressional, lacustrine, and slope wetlands (except
isolated fens).
(1)
Water, when present, has unrestricted access into or out of the wetland. There are
no artificial obstructions to surface water flow.
(2)
Artificial obstructions limit the access of surface water into or out of the wetland,
but the limitations exist for < 50% of the AA perimeter.
(3)
Artificial obstructions limit the access of surface water into or out of the wetland for
50–90% of the AA perimeter. Flood flows may exceed the obstructions, but drainage
into or out of the AA is probably obstructed.
(4)
Artificial obstructions limit the access of surface water into or out of the wetland for
>90% of the AA perimeter.
Metrics for Surface Water Connectivity for fens that are naturally isolated.
(1)
(2)
(3)
No natural surface water connectivity with surrounding water bodies.
Partial surface water connectivity with surrounding water bodies exists via
artificial means (e.g., ditching or draining to dry the fen).
Substantial to full surface water connectivity exists via artificial means that has
obvious drying effects on the peat body.
- 21 -
Section 5. Onsite and Surrounding Disturbances
Definition: Document the scope and impact of disturbances observed and expected to impact the site
both within a 200 m envelope around the AA perimeter and within the AA. Using Table 5 (provided
below and on the field form), check each land use/disturbance that occurs and enter the total on the
form. Note also the field indicator observed. Estimate the scope and impact of each disturbance using
the ratings in Table 6.
Table 5. Onsite and Surrounding Disturbances.
Disturbances Observed and Expected
to Impact the Site
Scope
200 m
AA
Impact
200 m
AA
Transportation Disturbances
Paved surfaces (e.g., roads, parking
lots)
Unpaved roads
Railroads
Land Use Disturbances-Development or Recreation
Domestic or commercial
development
Intensively managed sports fields,
golf courses
Recreation or human visitation
Filling or dumping of sediment or fill
Trash or refuse dumping
Land Use Disturbances-Agriculture
Dryland farming (e.g., wheat, barley,
etc.)
Open range livestock grazing
Horse paddock
Feedlot
Irrigated cropland
Irrigated hay pasture
Irrigation ditches affecting wetland
Cropland treated with pesticides
Disturbed fallow lands dominated by
exotic species
Haying of native grassland
Fallow fields (no human use in past
10 years)
Fields with recent plowing or discing
Shelterbelts
Fences that impede wildlife
Permanent tree plantation
- 22 -
Field Indicator Observed
Disturbances Observed and Expected
to Impact the Site
Scope
200 m
AA
Impact
200 m
AA
Land Use Disturbances-Resource Extraction
Gravel pits, open pit mining
Small scale mining activity or
abandoned mines
Abandoned oil/gas wells
Oil/gas pump jacks (active)
Injection wells, tank batteries,
collection facilities, or other oil/gasassociated infrastructure
Intensive logging (50-75% trees of
>50 cm diameter removed)
Selective logging (<50% of trees >50
cm diameter removed)
Land Use Disturbances-Vegetation Removal/Conversion
Chemical vegetation control
Evidence of intentional burning
Mechanical vegetation removal
Vegetation conversion (e.g., from
shrubland to grassland)
Natural or Environmental Disturbances
Beetle-killed Pinus species
Other diseased conifers
Evidence of recent fire (<5 years)
Beaver activity
Evidence of prolonged drought
Browsing of woody vegetation by
native ungulates
Hydrologic Disturbances
Upstream spring box
Impoundment of flowing water
Potential for agricultural runoff
Potential for urban runoff
Culvert
Upstream dam
Reservoir/stock pond
Weir or drop structure
Dredged inlet/outlet channel
Engineered channel (e.g., riprap)
Pumps, diversions, or ditches that
move water into wetland
Pumps, diversions, or ditches that
move water out of wetland
Berms/Dikes/Levees
- 23 -
Field Indicator Observed
Table 6. Scope and Impact Ratings for Disturbances.
Scope of Disturbances
5
Pervasive – Affects nearly all (>75%) of the envelope or AA.
4
Large – Affects most (>50-75%) of the envelope or AA.
3
Moderate – Affects much (>25-50%) of the envelope or AA.
2
Restricted – Affects some (>10-25%) of the envelope or AA.
1
Small – Affects a small (1-10%) portion of the envelope or AA.
0
Nil – Affects little to none (<1%) of the envelope or AA.
Impact of Disturbances
4
Extreme – likely to extremely modify, degrade, destroy, or eliminate the wetland.
3
Serious – likely to seriously modify, degrade or reduce wetland function or condition.
2
Moderate – likely to moderately modify, degrade or reduce wetland function or condition.
1
Slight – likely to only slightly modify, degrade, or reduce wetland function or condition.
- 24 -
Intensive Level 3 Disturbance Evaluation
Within the 200 m envelope around the AA perimeter, estimate the percent of the 200 m
envelope affected by disturbances listed on the field form. For linear features such as roads,
estimate the length in meters of each disturbance within the 200 m envelope.
Intensive Level 3 Disturbance Evaluation
Disturbances Observed and Expected to
Impact the Site
Meters within 200 m envelope
Field Indicator Observed
Transportation Disturbances
Paved surfaces (e.g., roads, parking lots)
Unpaved roads
Railroads
Disturbances Observed and Expected to
Percent of 200 m envelope
Impact the Site
affected
Land Use Disturbances-Development or Recreation
Domestic or commercial development
Intensively managed sports fields, golf courses
Recreation or human visitation
Filling or dumping of sediment or fill
Trash or refuse dumping
Land Use Disturbances-Agriculture
Dryland farming (e.g., wheat, barley, etc.)
Open range livestock grazing
Horse paddock
Feedlot
Irrigated cropland
Irrigated hay pasture
Irrigation ditches affecting wetland
Cropland treated with pesticides
Disturbed fallow lands dominated by exotic
species
Haying of native grassland
Fallow fields (no human use in past 10 years)
Fields with recent plowing or discing
Shelterbelts
Fences that impede wildlife
Permanent tree plantation
Land Use Disturbances-Resource Extraction
Gravel pits, open pit mining
Small scale mining activity or abandoned
mines
Abandoned oil/gas wells
Oil/gas pump jacks (active)
- 25 -
Field Indicator Observed
Disturbances Observed and Expected to
Impact the Site
Meters within 200 m envelope
Injection wells, tank batteries, collection
facilities, or other oil/gas-associated
infrastructure
Intensive logging (50-75% trees of >50 cm
diameter removed)
Selective logging (<50% of trees >50 cm
diameter removed)
Land Use Disturbances-Vegetation Removal
Chemical vegetation control
Evidence of intentional burning
Mechanical vegetation removal
Vegetation conversion (e.g., from shrubland
to grassland)
Natural or Environmental Disturbances
Beetle-killed conifers
Other diseased conifers
Evidence of recent fire (<5 years)
Beaver activity
Evidence of prolonged drought
Browsing of woody vegetation by native
ungulates
Hydrologic Disturbances
Upstream spring box
Impoundment of flowing water
Potential for agricultural runoff
Potential for urban runoff
Culvert
Upstream dam
Reservoir/stock pond
Weir or drop structure
Dredged inlet/outlet channel
Engineered channel (e.g., riprap)
Pumps, diversions, or ditches that move water
into wetland
Pumps, diversions, or ditches that move water
out of wetland
Berms/Dikes/Levees
- 26 -
Field Indicator Observed
Section 6. Soil Profile Descriptions
A. Placement of the Soil Pit: Dig two soil pits within the AA. Make every attempt to place each soil
pit in a different area of zonation. This will likely be evident from differences in vegetation.
Whenever possible, place the soil pits in or near the vegetation plot.
1. General soil pit information:
a. Record the Site ID, Soil Pit #, and GPS coordinates and their accuracy.
b. If standing surface water is present, record the depth of standing surface water.
c. After digging the soil pit and removing the soil sample, record the depth to soil
saturation in the pit.
d. After digging the soil pit and removing the soil profile, record the depth to free water in
the pit. If no water is present, record NP (not present).
2. Digging the soil pit:
a. Use the auger to dig a hole to a depth of 60 centimeters if possible; remove the soil and
auger and carefully lay the soil on the ground. For each soil layer, record the depth,
texture, matrix color and redoximorphic features on the field form. Be sure to use soil
from the inside of the sample to ensure that a clean sample is used. Check all hydric soil
indicators on the field form that apply. If an impenetrable layer is encountered at a
depth of < 60 cm (e.g., bedrock, large rock, cemented layer, log, etc.), excavate the pit as
deeply as possible, describe soils as the depth of the pit allows, and note the occurrence
and depth to bedrock or the cemented layer (i.e., depth of refusal).
3. Distinguishing among different soil layers: Changes in soil texture or soil matrix color are
indicators of distinct soil layers. See Appendix E for Soil Profile Description Procedures. For
each distinct soil layer, record the following:
a. Soil Layer: Record the layer (e.g., 1, 2, etc.).
b. Depth to the lower boundary of the layer in centimeters.
c. Soil Texture for Mineral Soils (refer to Appendix E)
d. Soil Texture Modifier (if appropriate)
e. Organic Layer: If an organic layer is present, indicate what type of organic material is
present:
i. Peat (P): fibric organic soil material.
ii. Muck (M): sapric organic soil material in which nearly all of the organic material is so
decomposed that identification of plant forms is not possible.
iii. Mucky Peat (MP): hemic organic material, which is characterized by decomposition
that is intermediate between that of fibric material and that of sapric material.
f. Percent visible plant fibers, if applicable.
g. Soil Matrix Color: This is the Hue/Value/Chroma for the soil matrix that matches most
closely from the Munsell Soil Color Chart. If soils are dry, slowly wet the sample until it
no longer changes color. Always have the sun at your back when comparing the soil to
the color chart to find the best match.
h. Redox concentration features: Redox concentrations are the result of iron oxidation as
groundwater levels fluctuate throughout the growing season. These concentrations are
orange/reddish-brown (because of iron) and dark reddish-brown/black (because of
manganese).
i. Redox Concentration Abundance (%): Estimate the percentage of redox
concentrations in each soil layer.
- 27 -
i.
j.
k.
l.
m.
n.
o.
p.
ii. Redox concentrations can occur as:
(1) nodules or concretions-firm irregularly shaped bodies with diffuse boundaries
(2) masses-other bodies occurring throughout the matrix (also known as mottles)
(3) pore linings-redox concentrations along root channels as a result of oxygen
diffusion from the roots of plants into the surrounding soil matrix reacting with
iron in the soil (also known as oxidized rhizospheres)
iii. Hue/Value/Chroma of Redox Concentrations
Redox Depletions: Redox depletions occur when soils are flooded and iron and
manganese are reduced to their soluble forms. These soluble forms of iron and
manganese can be leached out of the soil, leaving the natural color (gray or black) of the
parent sand, silt, or clay (i.e., the matrix) behind.
Hue/Value/Chroma of Redox Depletions
Redox Depletion Abundance (%): Estimate the percentage of redox depletions in each
soil layer.
Hydric Soil Indicators Observed-Check all that apply using the Hydric Soil Indicators
checklist (Table 7).
Depth to saturation/Depth to standing water: Allow approximately 30 minutes for
equilibration of the soil pit. Measure the depth to standing water in the pit or to where
water is seeping from the soil onto pit walls. If the pit contains standing water, measure
the depth to the water surface and record on the form. If no standing water is present,
record “NP” (not present) on the form. If soils at the margins of the pit are saturated
with water, record the depth to the saturated layer. Saturation is indicated by a sheen or
glistening of the soil. At or below the depth of soil saturation, water may also be oozing
from the soil into the pit. Identify that it is not free water, but that the soil is saturated.
Remarks: make any remarks or clarifications on the field form.
Soil Profile Photos: Take photos of the removed soil layers, identifying which layer they
correspond with. Take additional photos of soil features as appropriate.
Backfill the excavation: Return the soil to the pit.
Table 7. Hydric soil indicators.
Hydric Soil Indicators
Histosol (Organic layer greater than 40 cm)
Histic Epipedon (Organic layer at least 20 cm from surface)
Sulfidic (rotten eggs) odor
Organic streaking (dark vertical streaks in the subsurface layers)
Gleyed or Low Chroma Colors
Section 7. Adjacent Upland Vegetation Characterization
Use the aerial photo of the AA to determine if upland vegetation occurs within 200 meters of the
AA perimeter. If the AA is surrounded by wetland vegetation within 200 meters of the AA
perimeter, then record NO UPLAND VEGETATION WITHIN 200 M OF THE AA for each quadrat
on the field form. If upland vegetation does occur within 200 meters of the AA perimeter, then
walk in each of the four cardinal directions until you enter upland vegetation. Once you enter
upland vegetation, place a 1-m2 quadrat on the ground and record the stratum, height, and cover
of all dominant species. Record ALL NON-NATIVE plant species observed in the quadrat.
- 28 -
Section 8. Vegetation Measurements for Intensive Wetland Assessment
Intensive assessments involve the collection of plant species cover and composition data. The
vegetation plot is adapted from the flexible-plot method developed by Peet et al. (1998). The
entire plot measures 20 m x 50 m (1,000 m2 = 0.1 ha). The plot is comprised of ten 10 m x 10 m
modules (100 m2 = 0.01 ha). In general, an AA area consisting of a 0.5 ha circular plot will hold a
standard vegetation plot, consisting of a two by five array of ten 10 m x 10 m modules (Figure 2).
Vegetation is measured in four intensive modules.
XP2
#9
#8
#7
#6
0m
50 m
#1
#2
#3
#4
20 m
#10
#5
XP1
50 m
Figure 2. Schematic of the 20 m x 50 m vegetation plot with a two by five array of ten 10 m x 10 m
modules.
The location and layout of the vegetation plot within the AA is based on the AA size and site
characteristics. In most AAs, a single standard vegetation plot will be used to assess the
vegetation of the AA. For situations where AAs are not 0.5 hectare circular plots, alternate plot
configurations may be required, such as changing the shape of the plot array. Vegetation plots
should be placed within the AA to maximize abiotic/biotic heterogeneity within the AA.
Capturing heterogeneity of the AA ensures adequate representation of vegetation patterns and
local variations in environment such as directional gradients, microtopography, natural
disturbances such as flooding, and anthropogenic disturbances such as grazing. The following
guidelines should be used to determine plot locations within the AA:
1. The plot should be located in a representative area of the AA that incorporates as much
microtopographic variation as possible.
2. If the AA is homogeneous and there is no obvious direction or orientation for vegetation
plot placement, then the plot should be centered within the AA and laid out either N to S
or E to W. Use the second hand on a watch to determine the direction randomly (e.g., 0029 seconds = N to S orientation; 30-59 seconds = E to W orientation).
3. If the AA is not homogeneous, is oddly shaped, or is directional (i.e., follows a stream),
then the plot should be oriented to adequately represent the wetland features. In the
case of a riverine wetland, the plot may be placed along the stream bank or cut across the
stream.
4. If the wetland is an irregularly shaped polygon and the 20 m x 50 m plot does not fit
within the AA, the 2 x 5 array of modules can be restructured to accommodate the shape
of the AA. For example, a 1 x 5 array of 100 m2 modules can be used for narrow, linear
areas and a 2 x 2 array of 100 m2 modules can be used for small, circular sites.
5. The plot should attempt to capture the range of diversity within the AA but should avoid
crossing over into upland vegetation. No more than 10% of the plot should include
upland vegetation beyond the wetland. Modules that do include upland should not be
sampled as intensive modules.
- 29 -
6. If a small patch of another wetland type is present in the AA, then the plot should be
placed so that at least a portion of the patch is in the plot.
The symbols depicted in the legend below are used in all of the plot placement diagrams (Figure
3). Detailed examples of how to place the vegetation plot based on the above rules are provided
in Figures 4 through 9 to aid in decision making. These diagrams show examples of how to
locate standard or alternate plots within different kinds of AAs. Note: ALTERNATE PLOT
CONFIGURATIONS ARE ONLY USED WHEN THE STANDARD PLOT WILL NOT FIT INTO THE AA.
All diagrams and accompanying text courtesy of Teresa Magee, US EPA Office of Research and
Development, Corvallis, Oregon.
Figure 3. Legend for Figures 4 through 9.
Examples of Vegetation Plot Locations
Standard plot, centered in AA for homogeneous vegetation or mosaic. When the vegetation and
abiotic features are homogeneous or distributed in a uniform or random mosaic pattern, a
standard plot should be centered in the AA (Figure 4). For example, scrub-shrub, cattail marsh,
grass-sedge wetlands, wet prairie, fen, forest communities, etc.
Figure 4. Standard plot centered in AA in homogeneous or mosaic vegetation.
- 30 -
Standard plot, placed within AA to include as many vegetation or community patch types as
possible. When the vegetation is organized in distinct patches, lay out the plot so that it
proportionally represents patch types for the AA as much as possible (Figure 5). Example
situations include patches of scrub-shrub or trees in emergent wetlands, a variety of distinct
emergent or shrub plant communities interspersed in the AA, etc.
Figure 5. Standard plot placed in AA to include multiple vegetation or community patches.
- 31 -
A = Circular AA, B= Rectangular AA.
Standard plot, placed within AA so long axis parallels primary environmental gradient or is
perpendicular to vegetation zonation. If the AA occurs along an environmental gradient, like a
lake shore or the zones of a marsh, lay out the standard vegetation plot so the long axis follows
the gradient and cuts across multiple vegetation zones. In the examples below, the vegetation
plot is laid out so the long axis captures the gradient from close to the lake edge to farther from
the lake edge (Figure 6) or from high marsh to low marsh (Figure 7).
Figure 6. Standard plot placed in AA so long axis of plot parallels primary environmental gradient.
- 32 -
Figure 7. Standard plot placed in AA with long axis of plot perpendicular to vegetation zonation.
Placement of an alternate plot within the AA. If the AA has an irregular shape (e.g., long
narrow riparian strip, lake edge, wetland smaller than 0.1 ha) that is incompatible with the
standard plot configuration, an alternate plot configuration must be selected. For example,
modules may be placed individually or in groupings other than the 2 x 5 array of the standard
plot. Modules may be disarticulate to fit in a free-form shaped AA (Figure 8) or arranged as
one long row in a narrow riparian area (Figure 9). To facilitate comparisons among AAs, the
number of modules making up a standard plot or any alternate plot configuration should,
normally, be the same (four 100-m2 intensive modules and ten modules in total) so that equal
levels of sample effort are maintained across AAs.
- 33 -
Figure 8. Alternate plot placed in AA that is the boundary of wetland < 0.1 ha. The alternate plot
configuration is defined by arranging as many 100-m2 modules as will fit into the shape of AA.
Figure 9. Alternate Plot placed in rectangular AA in a narrow riparian wetland.
1. Establishing and Documenting the Vegetation Plot
a. Vegetation Plot Set Up: Pull a tape out 50 meters and use a flagged pin to stake the tape.
The tape functions as the centerline for the vegetation plot. If necessary, flag the centerline
at 10 m intervals, so that the centerline is visible throughout data collection.
- 34 -
b. Using ropes or multiple 10-m tapes, layout your first 10 x 10 meter modules. Starting at one
end of the 50-m tape, one crew member holds the end of the 10-m rope on the center line
while the other walks out perpendicular to the center line. Once at 10 meters, the second
crew member will place a pin flag or use flagging tape to mark the corner of the plot.
Repeat this at 10-m intervals along the center line, flagging the corners of each 10 x 10
meter module. After one side of the vegetation plot is established, the crew will walk back
to the beginning of the 50-m tape and repeat the previous steps on the opposite side of the
center line.
c. GPS Waypoints: Collect a GPS waypoint at both the 0 m (plot origin) and the 50-m end
point to capture the location of the beginning and the end of the plot. Take two additional
waypoints at two cross plot locations called XP1 and XP2.
d. Vegetation Plot Photos: Take a photo of the entire vegetation plot from the plot origin (0 m)
and from the 50-m end and record the photo number and bearing. Take two additional
photos at each cross plot location. Also, take photos of each module surveyed, standing at
the centerline.
e. Selecting Modules for Intensive Vegetation Sampling: If the vegetation is homogenous,
intensive modules will be modules 3, 7, 9, and either 1 or 5, giving the broadest spread of
modules across the vegetation plot. If the vegetation is heterogeneous, the crew can decide
which modules should be sampled to best capture the variability of the vegetation.
f.
Intensive Vegetation Module Photos: Take a photo of each intensive vegetation module
sampled.
g. Vegetation Plot Comments: Circle the location of the intensive modules and note any
changes made to the layout of the plot.
2. Vegetation Plot Ground Cover
Within each of the four intensive vegetation modules, record the following ground cover
information.
---1 m---
a. Cover of deep water >0.2 m/Cover of vegetated deep water: Using the cover classes
provided on the field form, estimate the cover of deep water within the module.
b. Cover of shallow standing water <0.2 m: Using the cover classes provided on the field form,
estimate the cover of shallow standing water within the module.
c. Depth of deep standing water: Take up to four measurements of deep standing water (in
centimeters) and record the average depth.
d. Depth of shallow standing water: Take up to four measurements of shallow standing water
depth (in centimeters) and record the average depth.
e. Cover of bare ground: Using the cover classes provided, estimate the cover of bare ground
within the module for three separate categories: 1) soil, sand, or sediment; 2) gravel or
cobble 2-250 mm; and 3) bedrock, rock, or boulders >250 mm in diameter.
f. Cover of litter: Using the cover classes provided on the field form, estimate the cover of
litter within the module. Include litter underneath vegetation.
g. Depth of litter: Take up to four measurements of litter depth (in centimeters) and record
the average depth. Do NOT include standing dead herbaceous vegetation. Do not compress
litter when taking depth measurements.
h. Coarse woody debris: Using the cover classes provided on the field form, estimate the cover
of coarse woody debris. Coarse woody debris consists of fallen trees and large branches ≥
7.6 cm in diameter. Do NOT include standing dead.
- 35 -
i.
Fine woody debris: Using the cover classes provided on the field form, estimate the cover of
fine woody debris. Fine woody debris consists of small branches and twigs ≤ 7.5 cm in
diameter. Do NOT including standing dead.
j. Cover of nonvascular species: Using the cover classes provided on the field form, estimate
the cover of nonvascular plant species, including beneath litter and vegetation.
k. Cover of algae: Using the cover classes provided on the field form, estimate the cover of
algae.
3. Vegetation Plot Species Measurements
a. Floristic measurements: Record the presence, stratum, and percent canopy cover of all
vascular plant species within each of the four intensive modules. Examples of canopy cover
percentages can be found in Figure 10. Within each of the four intensive vegetation
modules, denote the presence of each species that is encountered in the module with a
check (√) or a one (1) in the “Presence” column. All species will be recorded on the field
form by their complete scientific name (e.g., Carex utriculata).
b. Unknown Species: Any unknown species will be entered on the field form with a
descriptive name. If the genus of the species is known, the descriptive name should include
the genus name (e.g., Carex sp. or Aster sp.). The descriptive name should also include some
identifiable characteristics to distinguish multiple unknown species from the same genus
(Carex sp. elongate black head or Carex sp. clustered brown head). If the genus is not
known, the descriptive name should include any descriptors necessary (fuzzy round basal
leaves or purple tubular corolla). All unknown species will be collected by the field crew
when the species is encountered. All unknown species should be collected, even if the
species appears to be unidentifiable. The crew may find the same species further developed
at a later site and can compare the further developed specimen with the earlier voucher.
The only species the crew should not collect are those identified as or suspected to be listed as
threatened or endangered under the U.S Endangered Species Act. (Appendix F). All
crew members should be aware of the listed species in Montana and should document
occurrences with photographs.
For woody species, identify and estimate the cover of seedlings, saplings, and mature
individuals separately, if they occur in different strata. This helps determine the extent of
regeneration.
c. Identification of species: If the species is identified using a reference other than the Manual
of Montana Vascular Plants (Lesica 2012), then note any additional floras as secondary.
4. Plant Specimen Collection: see Appendix G for detailed Plant Collection Protocol.
5. Quality Assurance (QA) of Plant Specimens
a. Use a random number generator or a random number table to select one species
identified from each vegetation module. Do not include Unknown specimens.
b. Count the first known species listed on the field form for a particular module as number
1.
c. If a species has been selected as a QA specimen, it cannot be selected as a QA specimen
from another vegetation module in the same AA.
- 36 -
d. After Unknown Species have been identified, 10% of these should be submitted to the
botanist for QA.
- 37 -
Figure 10. Canopy cover estimate examples
38
References
Cowardin, L. M., V. Carter, F. C. Golet, and E. T. LaRoe. 1979. Classification of wetlands and
deepwater habitats of the United States. U.S. Fish and Wildlife Service, Washington, D.C.
FWS/OBS-79/31.
Peet, R. K., T. R. Wentworth, and P. S. White. 1998. A flexible, multipurpose method for recording
vegetation composition and structure. Castanea 63:262-274.
39
APPENDICES
Appendix A: Field Key to Wetland and Riparian Ecological Systems of Montana
Appendix B. Hydrogeomorphic (HGM) Classification of Wetlands in the Rocky Mountains
Appendix C. Key to the Cowardin Systems and Classes of the Rocky Mountains
Appendix D. Montana Noxious Weed List by County
Appendix E. Soil Texture Flowchart
Appendix F: Montana’s Threatened or Endangered Plant Species
Appendix G: Plant Collecting Protocol
Appendix H. First Aid Considerations and Common Field Ailments
40
Appendix A: Field Key to Wetland and Riparian Ecological Systems of
Montana
1a. Wetland defined by groundwater inflows and peat (organic soil) accumulation of at least 40 cm (unless
underlain by bedrock). Vegetation can be woody or herbaceous. If the wetland occurs within a mosaic of nonpeat forming wetland or riparian systems, then the patch must be at least 0.1 hectares (0.25 acres). If the
wetland occurs as an isolated patch surrounded by upland, then there is no minimum size criteria ........... .........
............................................................................................................... Rocky Mountain Subalpine-Montane Fen
1b. Wetland does not have at least 40 cm of peat (organic soil) accumulation or occupies an area less than 0.1
hectares (0.25 acres) within a mosaic of other non-peat forming wetland or riparian systems .................... ....... 2
2a. Total woody canopy cover generally 25% or more within the overall wetland/riparian area. Any purely
herbaceous patches are less than 0.5 hectares and occur within a mosaic of woody vegetation. Note: Relict
woody vegetation such as standing dead trees and shrubs are included here ............................................. . .........
...................................................................... GO TO KEY A: Woodland and Shrubland Ecological Systems
2b. Total woody canopy cover generally less than 25% within the overall wetland/riparian area. Any woody
vegetation patches are less than 0.5 hectares and occur within a mosaic of herbaceous wetland vegetation ......
........................................................................................................ GO TO KEY B: Herbaceous Ecological Systems
KEY A: Woodland and Shrubland Ecological Systems
1a. Woody wetland associated with any stream channel, including ephemeral, intermittent, or perennial
(Riverine HGM Class) ............................................................................................................................................... 2
1b. Woody wetland associated with the discharge of groundwater to the surface or fed by snowmelt or
precipitation. This system often occurs on slopes, lakeshores, or around ponds. Sites may experience overland
flow but no channel formation. (Slope, Flat, Lacustrine, or Depressional HGM Classes) ....................................... 8
2a. Riparian woodlands and shrublands of the montane or subalpine zone......................................................... 3
2b. Riparian woodlands and shrublands of the plains, foothills, or lower montane zone .................................... 4
3a. Montane or subalpine riparian woodlands (canopy dominated by trees), occurring as a narrow streamside
forest lining small, confined low- to mid-order streams. Common tree species include Abies lasiocarpa, Picea
engelmannii, Pseudotsuga menziesii, and Populus tremuloides ...............................................................................
..................................................................................... Rocky Mountain Subalpine-Montane Riparian Woodland
3b. Montane or subalpine riparian shrublands (canopy dominated by shrubs with sparse tree cover), occurring
as either a narrow band of shrubs lining the streambank of steep V-shaped canyons or as a wide, extensive
shrub stand (sometimes referred to as a shrub carr) on alluvial terraces in low-gradient valley bottoms. Beaver
activity is common within the wider occurrences. Species of Salix, Alnus, or Betula are typically dominant .........
......................................................................................Rocky Mountain Subalpine-Montane Riparian Shrubland
4a. Riparian woodlands and shrublands of the foothills or lower montane zones of the Northern and Middle
Rockies and the Wyoming Basin ............................................................................................................................. 5
4b. Riparian woodlands and shrublands of the Northwestern or Western Great Plains of eastern Montana ..... 6
41
5a. Foothill or lower montane riparian woodlands and shrublands associated with mountain ranges of the
Northern Rockies in northwestern Montana. This type excludes island mountain ranges east of the Continental
Divide in Montana. Populus balsamifera ssp. trichocarpa is typically the canopy dominant in woodlands. Other
common tree species include Populus tremuloides, Betula papyifera, Betula occidentalis, and Picea glauca.
Shrub understory species include Cornus sericea, Acer glabrum, Alnus incana, Oplopanax horridus, and
Symphoricarpos albus. Areas of riparian shrubland and open wet meadow are common .....................................
...................................................Northern Rocky Mountain Lower Montane Riparian Woodland and Shrubland
5b. Foothill or lower montane riparian woodlands and shrublands associated with mountain ranges of the
Middle Rockies and the Wyoming Basin. This type also includes island mountain ranges in central and eastern
Montana. Woodlands are dominated by Populus spp. including Populus angustifolia, Populus balsamifera ssp.
trichocarpa, Populus deltoides, and Populus fremontii. Common shrub species include Salix spp., Alnus incana,
Crataegus spp., Cornus sericea, and Betula occidentalis. .........................................................................................
..................................................... Rocky Mountain Lower Montane-Foothill Riparian Woodland and Shrubland
6a. Woodlands and shrublands of draws and ravines associated with permanent or ephemeral streams, steep
north-facing slopes, or canyon bottoms that do not experience flooding. Common tree species include Fraxinus
spp., Acer negundo, Populus tremuloides, and Ulmus spp. Important shrub species include Crataegus spp.,
Prunus virginiana, Rhus spp., Rosa woodsii, Symphoricarpos occidentalis, and Shepherdia argentea. ...................
.................................................................................................... Western Great Plains Wooded Draw and Ravine
6b. Woodlands and shrublands of small to large streams and rivers of the Northwestern or Western Great
Plains. Overall vegetation is lusher than above and includes more wetland indicator species. Dominant species
include Populus balsamifera ssp. trichocarpa, Populus deltoides, and Salix spp. .................................................. 7
7a. Woodlands and shrublands of riparian areas of medium and small rivers and streams with little or no
floodplain development and typically flashy hydrology ...........................................................................................
........................................................................................................ Northwestern/Western Great Plains Riparian
7b. Woodlands and shrublands of riparian areas along medium and large rivers with extensive floodplain
development and periodic flooding ............................................ Northwestern/Western Great Plains Floodplain
8a. Woody wetland associated with small, shallow ponds in northwestern Montana. Ponds are ringed by trees
including Populus balsamifera ssp. trichocarpa, Populus tremuloides, Betula papyrifera, Abies grandis, Abies
lasiocarpa, Picea engelmannii, Pinus contorta, and Pseudotsuga menziesii. Typical shrub species include Cornus
sericea, Amelanchier alnifolia, and Salix spp............................... Northern Rocky Mountain Wooded Vernal Pool
8b. Woody wetland associated with the discharge of groundwater to the surface, or sites with overland flow but
no channel formation. ............................................................................................................................................. 9
9a. Coniferous woodlands associated with poorly drained soils that are saturated year round or seasonally
flooded. Soils can be woody peat but tend toward mineral. Common tree species include Thuja plicata, Tsuga
heterophylla, and Picea engelmannii. Common species of the herbaceous understory include Mitella spp.,
Calamagrostis spp., and Equisetum arvense ........................................ Northern Rocky Mountain Conifer Swamp
9b. Woody wetlands dominated by shrubs.......................................................................................................... 10
10a. Subalpine to montane shrubby wetlands that occur around seeps, fens, and isolated springs on slopes
away from valley bottoms. This system can also occur within a mosaic of multiple shrub- and herb-dominated
communities within snowmelt-fed basins. This example of the system has the same species composition as the
riverine example of this system and is dominated by species of Salix, Alnus, or Betula. .............. Rocky Mountain
Subalpine-Montane Riparian Shrubland
42
10b. Lower foothills to valley bottom shrublands restricted to temporarily or intermittently flooded drainages or
flats and dominated by Sarcobatus vermiculatus ................................... Inter-Mountain Basins Greasewood Flat
KEY B: Herbaceous Wetland Ecological Systems
1a. Herbaceous wetlands of the Northwestern Glaciated Plains, Northwestern Great Plains, or Western Great
Plains regions of eastern Montana.......................................................................................................................... 2
1b. Herbaceous wetlands of other regions ............................................................................................................ 5
2a. Wetland occurs as a complex of depressional wetlands within the glaciated plains of northern Montana.
Typical species include Schoenoplectus spp. and Typha latifolia on wetter, semi-permanently flooded sites, and
Eleocharis spp., Pascopyrum smithii, and Hordeum jubatum on drier, temporarily flooded sites ...........................
......................................................................................................................................Great Plains Prairie Pothole
2b. Wetland does not occur as a complex of depressional wetlands within the glaciated plains of Montana ..... 3
3a. Depressional wetlands in the Western Great Plains with saline soils. Salt encrustations can occur on the
surface. Species are typically salt-tolerant such as Distichlis spicata, Puccinellia spp., Salicornia spp., and
Schoenoplectus maritimus.........................................................Western Great Plains Saline Depression Wetland
3b. Depressional wetlands in the Western Great Plains with obvious vegetation zonation dominated by
emergent herbaceous vegetation, including Eleocharis spp., Schoenoplectus spp., Phalaris arundinacea,
Calamagrostis canadensis, Hordeum jubatum, and Pascopyrum smithii ............................................................... 4
4a. Depressional wetlands in the Western Great Plains associated with open basins that have an obvious
connection to the groundwater table. This system can also occur along stream margins where it is linked to the
basin via groundwater flow. Typical plant species include species of Typha, Carex, Schoenoplectus, Eleocharis,
Juncus, and floating genera such as Potamogeton, Sagittaria, and Ceratophyllum.. ...............................................
................................................................................ Western Great Plains Open Freshwater Depression Wetland
4b. Depressional wetlands in the Western Great Plains primarily within upland basins having an impermeable
layer such as dense clay. Recharge is typically via precipitation and runoff, so this system typically lacks a
groundwater connection. Wetlands in this system tend to have standing water for a shorter duration than
Western Great Plains Open Freshwater Depression Wetlands. Common species include Eleocharis spp., Hordeum
jubatum, and Pascopyrum smithii ............................................Western Great Plains Closed Depression Wetland
5a. Depressional wetlands occurring in areas with alkaline to saline clay soils with hardpans. Salt encrustations
can occur on the surface. Species are typically salt-tolerant such as Distichlis spicata, Puccinellia spp., Leymus sp.,
Poa secunda, Salicornia spp., and Schoenoplectus maritimus. Communities within this system often occur in
alkaline basins and swales and along the drawdown zones of lakes and ponds. .....................................................
.................................................................................................Inter-Mountain Basins Alkaline Closed Depression
5b. Herbaceous wetlands not associated with alkaline to saline hardpan clay soils. ............................................ 6
6a. Wetlands with a permanent water source throughout all or most of the year. Water is at or above the
surface throughout the growing season, except in drought years. This system can occur around ponds, as fringes
around lakes and along slow-moving streams and rivers. The vegetation is dominated by common emergent and
floating leaved species including species of Scirpus, Schoenoplectus, Typha, Juncus, Carex, Potamogeton,
Polygonum, and Nuphar. ..................................................................... Western North American Emergent Marsh
43
6b. Herbaceous wetlands associated with a high water table or overland flow, but typically lacking standing
water. Sites with no channel formation are typically associated with snowmelt and not subjected to high
disturbance events such as flooding (Slope HGM Class). Sites associated with a stream channel are more tightly
connected to overbank flooding from the stream channel than with snowmelt and groundwater discharge and
may be subjected to high disturbance events such as flooding (Riverine HGM Class). Vegetation is dominated by
herbaceous species; typically graminoids have the highest canopy cover including Carex spp., Calamagrostis
spp., and Deschampsia cespitosa ............................................... Rocky Mountain Alpine-Montane Wet Meadow
44
Appendix B: Hydrogeomorphic (HGM) Classification of Wetlands in the Rocky Mountains
If the hydrologic criteria listed in each question do not apply to the entire wetland unit being rated, you
probably have a wetland with multiple HGM classes. In this case, identify which hydrologic criteria in
Questions 1-5 apply, and go to Question 6.
1a. Entire wetland unit is flat and precipitation is the primary source (>90%) of water. Groundwater and
surface water runoff are not significant sources of water to the unit ........................... Flats HGM Class
1b. Wetland does not meet the above criteria; primary water sources include groundwater and/or
surface water .......................................................................................................................................... 2
2a. Entire wetland unit meets all of the following criteria: a) the vegetated portion of the wetland is on
the shores of a permanent open water body at least 8 ha (20 acres) in size; b) at least 30% of the
open water area is deeper than 2 m (6.6 ft); c) vegetation in the wetland experiences bidirectional
flow as the result of vertical fluctuations of water levels due to rising and falling lake levels. ...............
................................................................................................................... Lacustrine Fringe HGM Class
2b. Wetland does not meet the above criteria; wetland is not found on the shore of a water body, water
body is either smaller or shallower, OR vegetation is not affected by lake water levels ...................... 3
3a. Entire wetland unit meets all of the following criteria: a) wetland unit is in a valley, floodplain, or
along a stream channel where it is inundated by overbank flooding from that stream or river; b)
overbank flooding occurs at least once every two years; and c) wetland does not receive significant
inputs from groundwater. NOTE: Riverine wetlands can contain depressions that are filled with
water when the river is not flooding such as oxbows and beaver ponds. ................ Riverine HGM Class
3b. Wetland does not meet the above criteria; if the wetland is located within a valley, floodplain, or
along a stream channel, it is outside of the influence of overbank flooding or receives significant
hydrologic inputs from groundwater. .................................................................................................... 4
4a. Entire wetland unit meets all of the following criteria: a) wetland is on a slope (slope can be very
gradual or nearly flat); b) groundwater is the primary hydrologic input; c) water, if present, flows
through the wetland in one direction and usually comes from seeps or springs; and d) water leaves
the wetland without being impounded. NOTE: Small channels can form within slope wetlands, but
are not subject to overbank flooding. Surface water does not pond in these types of wetlands, except
occasionally in very small and shallow depressions or behind hummocks (depressions are usually <
3ft diameter and less than 1 foot deep). ...................................................................... Slope HGM Class
4b. Wetland does not meet all of the above criteria. ................................................................................. 5
5a. Entire wetland unit is located in a topographic depression in which water ponds or is saturated to
the surface at some time during the year. NOTE: Any outlet, if present, is higher than the interior of
the wetland....................................................................................................... Depressional HGM Class
45
5b. Wetland does not meet the above criteria............................................................................................ 6
6. If the wetland is difficult to classify, then it probably contains multiple HGM classes. For example,
seeps at the base of a slope may grade into a riverine floodplain, or a small stream within a
depressional wetland may have a zone of flooding along its sides. GO BACK AND IDENTIFY WHICH OF
THE HYDROGEOMORPHIC CLASSES DESCRIBED IN QUESTIONS 1-5 APPLY TO DIFFERENT AREAS IN
THE UNIT (make a rough sketch to help you decide).
If you have two HGM classes present within your wetland, then identify the HGM class that
represents 10% or more of the assessment area using the following table.
HGM Classes observed within the wetland being assessed
HGM Class to use in
assessment (must represent
10% or more of the
assessment area)
Slope + Riverine
Riverine
Slope + Depressional
Depressional
Slope + Lacustrine Fringe
Lacustrine Fringe
Depressional + Riverine along stream within assessment area
boundary
Depressional
Depressional + Lacustrine Fringe
Depressional
NOTE: If the HGM class listed in column 2 represents less than 10% of the assessment area, then
classify the wetland using the HGM class that represents more than 90% of the total assessment
area. If you are still unable to determine which of the above criteria apply to your wetland, or if you
have more than 2 HGM classes within an assessment area, classify the wetland as Depressional for
the assessment and note reasoning.
Modified from: Hruby, Tom, (2004). Washington State Wetland Rating System for Eastern Washington Revised. Publication #04-06-15. Washington State Department of Ecology, Olympia, Washington.
46
Appendix C: Key to the Cowardin Systems and Classes of the Rocky Mountains
Key to the Cowardin Systems
1a. Persistent emergent herbaceous vegetation, trees, shrubs, or emergent mosses cover 30% or more
of the wetland. If the wetland occurs within a mosaic of systems, then the patch must be at least 0.1
hectares (0.25 acres). ..................................................................................................................PALUSTRINE
1b. Persistent emergents, trees, shrubs, or emergent mosses cover less than 30% of substrate, but
nonpersistent emergents may be widespread during some portions of the year ....................................... 2
2a. Situated in a channel; water, when present, usually flowing .................................................... RIVERINE
2b. Situated in a basin, catchment, or on level or sloping ground; water usually not flowing .................... 3
3a. Area 8 ha (20 acres) or greater .............................................................................................LACUSTRINE
3b. Area less than 8 ha ................................................................................................................................. 4
4a. Wave-formed or bedrock shoreline feature present or water depth 2 m (6.6 feet) or more. ................
....................................................................................................................................................LACUSTRINE
4b. No wave-formed or bedrock shoreline feature present and water less than 2 m deep ......PALUSTRINE
Key to the Cowardin Classes
1a. During the growing season of most years, areal cover by vegetation is less than 30%. ........................ 2
1b. During the growing season of most years, percentage of area covered by vegetation 30% or greater. .
...................................................................................................................................................................... 6
2a. Water regime permanently flooded, intermittently exposed, or semipermanently flooded. ............... 3
2b. Water regime irregularly exposed, regularly flooded, irregularly flooded, seasonally flooded,
temporarily flooded, intermittently flooded, saturated, or artificially flooded. .......................................... 4
3a. Substrate of bedrock, boulders, or stones occurring singly or in combination covers 75% or more of
the area .................................................................................................................................. ROCK BOTTOM
3b. Substrate of organic material, mud, sand, gravel, or cobbles with less than 75% areal cover of stones,
boulders, or bedrock ........................................................................................ UNCONSOLIDATED BOTTOM
4a. Contained within a channel that does not have permanent flowing water (i.e., Intermittent
Subsystem of Riverine System) ...................................................................................................STREAMBED
4b. Contained in a channel with perennial water or along the shore of a lake or pond .............................. 5
5a. Substrate of bedrock, boulders, or stones occurring singly or in combination covers 75% or more of
the area (RIVERINE OR LACUSTRINE ONLY). ............................................................................ ROCKY SHORE
5b. Substrate of organic material, mud, sand, gravel, or cobbles; with less than 75% of the cover
consisting of stones, boulders, or bedrock .......................................................... UNCONSOLIDATED SHORE
47
6a. Vegetation composed of pioneering annuals or seedling perennials, often not hydrophytes, occurring
only at time of substrate exposure ............................................................................................................... 7
6b. Vegetation composed of algae, bryophytes, lichens, or vascular plants that are usually hydrophytic
perennials ..................................................................................................................................................... 8
7a. Contained within a channel that does not have permanent flowing water. ............................................
.............................................................................................................................STREAMBED (VEGETATED)
7b. Contained within a channel with permanent water, or not contained in a channel ...............................
...................................................................................................... UNCONSOLIDATED SHORE (VEGETATED)
8a. Vegetation composed predominantly of nonvascular species ............................................................... 9
8b. Vegetation composed predominantly of vascular species ................................................................... 10
9a. Vegetation macrophytic algae, mosses, or lichens growing in water or the splash zone of shores. .......
................................................................................................................................................. AQUATIC BED
9b. Vegetation mosses or lichens usually growing on organic soils and always outside the splash zone of
shores ..................................................................................................................... MOSS-LICHEN WETLAND
10a. Vegetation herbaceous ....................................................................................................................... 11
10b. Vegetation trees or shrubs ................................................................................................................. 12
11a. Vegetation emergents ........................................................................................ EMERGENT WETLAND
11b. Vegetation submergent, floating-leaved, or floating ...................................................... AQUATIC BED
12a. Dominants less than 6 m (20 feet) tall ........................................................... SCRUB-SHRUB WETLAND
12b. Dominants 6 m tall or taller ................................................................................. FORESTED WETLAND
48
Appendix D. Montana Noxious Weed List by County
49
50
51
Appendix E. Soil Profile Description Procedures
52
53
54
55
56
57
58
59
60
61
62
63
Appendix F: Montana’s Threatened or Endangered Plant Species
Spiranthes diluvialis Ute Ladies’ Tresses-Listed Threatened
Distribution in Montana
Spiranthes diluvialis is known from only a handful of occurrences in southwest and south-central Montana in the
Missouri, Jefferson, Beaverhead, Ruby and Madison River drainages. S. diluvialis is restricted in area by specific
hydrologic requirements. Many populations have less than 100 individuals, though a couple have over 500 plants.
Sites are susceptible to hydrologic changes and weed invasion. Large areas of habitat have been converted to
agricultural uses. Livestock grazing is also a common use of these habitats. Two populations occur along highway
right-of-ways. Most populations occur on private lands and no occurrences are currently protected or managed for
their conservation value.
General Description
Ute Ladies' Tresses is a perennial orchid with usually 1 stem that is 20-50 cm tall and arising from tuberously
thickened roots. Its narrow leaves are 1 cm wide, can reach 28 cm long, are longest at their base, and persist during
flowering. The inflorescence consists of few to many white or ivory flowers clustered in a spike of 3-rank spirals at
the top of the stem. The sepals and petals are ascending or perpendicular to the stem. The lateral sepals often
spread abruptly from the base of the flower, and sepals are free or only slightly connate at the base. The lip petal is
somewhat constricted at the median.
Phenology
Flowering in August-early September. Species is often not in full flower until mid-August.
Diagnostic Characteristics
S. diluvialis is intermediate between its putative progenitors, S. romanzoffiana and S. magnicarporum; the latter is
not known from Montana. S. diluvialis is distinguished from S. romanzoffiana by its whitish, stout, ringent (gaping
at the mouth) flowers, by its lip petal being exposed in lateral view, and by its sepals being free or connate at the
base for a short distance rather than fused to form a hood above the lip. Additionally, the 2 species occupy different
habitats, S. romanzoffiana almost always in mesic montane and subalpine settings, only rarely occurring in lower
valley locations, whereas, S. diluvialis occurs in alkaline wetlands in the valley bottoms
64
Silene spaldingii Spalding’s Catchfly
Distribution in Montana
Silene spaldingii exists in only a few locations in the northwest corner of the state. Extant occurrences are known in
the following areas: Tobacco Plains area, Lost Trail National Wildlife Refuge, the Niarada area and on Wild Horse
Island. The majority of occurrences have less than 100 individuals, though the largest population range-wide
occurs in the state and is estimated to contain several thousand plants. One historical occurrence exists from the
Columbia Falls area. Several threats affect the long-term viability of the species in the state. Invasive weeds are the
most widespread threat and are negatively impacting the bunchgrass habitat occupied by S. spaldingii. Housing
development and subdivision are directly impacting one occurrence and has the potential to further isolate other
populations. Cattle grazing is affecting five populations and two other occurrences have apparently been extirpated
recently from the severe impacts associated with llama grazing. Fire exclusion and the successive build-up of litter
compared to historical conditions appears to be having negative impacts on survival and reproduction. Populations
are also at risk due to the small numbers of individuals and their isolated nature, which reduces the chances of
cross-pollination and gene flow between populations.
Long- and short-term trends are difficult to gauge due to the lack of survey and monitoring data. Estimates of
trends and population size are also compounded by S. spaldingii plants exhibiting summer dormancy at rates that
vary widely from year to year.
General Description
Spalding's Campion is a perennial with a simple or branched rootcrown. There are 4-7 pairs of sessile, broadly
lance-shaped leaves that are 6-7 cm long below and gradually reduced in size upward. Herbage is long-hairy and
very sticky. There are few to many flowers in a leafy, somewhat open inflorescence. The tubular calyx is ca. 15 mm
long, has 10 nerves on its surface, and is very sticky. The corolla has 5 separate, white petals, each composed of a
narrow claw that is ca. 15 mm long expanding into a broadened blade above. Only the entire or shallowly-lobed
blade with 4 tiny wings at the base protrudes beyond the mouth of the calyx. The fruit is a capsule that is 10-15
mm long and filled with numerous tiny seeds.
Phenology
Flowering in July and usually continuing through August. Dried flower/fruiting stalks are often visible into the Fall.
Diagnostic Characteristics
This species can be distinguished from other perennial Silene spp. by its very sticky foliage and by its petals that
are entire or only shallowly lobed.
65
Howellia aquatilis Water Howellia
Distribution in Montana
Water howellia is restricted in Montana to depressional wetlands in the Swan Valley, typically occupying small
basins where the water level recedes partially or completely by the Fall. Montana contains the largest number of
occupied ponds and wetlands though population numbers are generally small and the occupied habitat is clustered
in a very small portion of the state, making it vulnerable to localized events and management actions. Reed canary
grass (Phalaris arundinacea) has invaded into some wetlands in the Swan Valley and it has the potential to form
dense monocultures, thereby decreasing the amount of available habitat. Additionally, water howellia is an annual
species which is solely dependent on recruitment from seed and it has very narrow habitat and moisture
requirements which leaves it vulnerable to extirpation as a result of consecutive years of unfavorable growing
conditions.
General Description
Water Howellia is a glabrous, much-branched, annual, aquatic herb with fragile, submerged and floating stems that
are up to 100 cm tall. The simple, alternate or occasionally opposite or whorled stem leaves are narrowly linear, 15 cm long, and entire-margined. Beneath the surface of the water, small flowers that produce seeds without
opening are solitary in the leaf axils. Once the stems reach the surface, small, white flowers are borne in a narrow,
terminal, leafy-bracted inflorescence. The white corolla is 2-3 mm long. Flowering occurs on the surface of the
water. The fruit, which forms below the attachment of the petals, is a capsule that is 1-2 cm long containing
elongate seeds that are up to 2-4 mm long.
Phenology
A winter annual which germinates in the Fall, overwinters, and continues growing in the Spring when conditions
are favorable. Chasmogamous (flowers that open and allow for pollination) flowers bloom at the surface in late
July-early August; the submerged cleistogamous (flowers that do not open and are self-pollinated) flowers begin in
late June.
Diagnostic Characteristics
Vegetatively, this species resembles a small-leaved pondweed (Potamogeton) or a water starwort (Callitriche), but
the flowers in these two groups lack petals, and they have much smaller seeds.
66
Appendix G. Plant Collection Procedures
When selecting plants, collectors need to be sensitive to whether the plant to be collected is rare, and whether the
population will be adversely affected by having one or several individuals removed. A rule of thumb sometimes
given is the "1 to 20" rule---for every plant collected, there should be at least 20 others left in the population.
Ideally, the entire plant, including roots or other underground structures, should be collected or, in the case of
trees, shrubs, vines, or other large species, ample material representative of the plant should be obtained. The best
specimens have both flowers and fruits---while this may not always be possible, all specimens should have some
reproductive structures (e.g., spores, cones, flowers, or fruits). This is necessary for positive identification to
species. Because most taxonomic keys are based on reproductive characters, specimens consisting of vegetative
parts only are often of little use. For example, some plants may not be flowering in early summer. In this case, with
some effort, you may be able to locate specimens that may have remnant flowering stems or fruits from the
previous year still present.
Rare and Uncommon Species
It is best to document the occurrence of a Species of Concern (SOC), with a specimen if it meets the “1 to 20” rule
OR with several very high quality photographs.
The Manual of Montana Vascular Plants (Lesica 2012) has our most current plant species distribution to date. If an
identified specimen does not have an occurrence represented for the county in which you have identified it, then
collect the specimen (if it meets the “1 to 20” rule) or take several high quality photographs.
If a species has few occurrences documented in the Manual (< 6 counties), then collect the specimen (if it meets the
“1 to 20” rule) or take several high quality photographs.
Other Special Circumstances:
Aside from the common Botrychium spp. (B. multifidum or B. virginianum), any Botrychium encountered should be
collected (if it meets the “1 to 20” rule) or otherwise documented with several high quality photographs.
Label Data Form for Plant Specimens:
1. Assign each unknown specimen with a unique specimen number. For example, a combination of the Site ID
and the order the specimen was collected.
2. Assign each unknown specimen with a descriptive name that refers to identifying characteristics of the
specimen.
3. Scientific name of the specimen if known.
4. Collector’s name
5. Collection date.
6. Site ID
7. Plant habit (e.g., tree, shrub, perennial bunchgrass, etc.).
8. Any plant characteristics that may be lost upon drying (e.g., flower color, fragrance, etc.).
Collection Protocol:
1. For each specimen to be collected, select one or more healthy plants that are typical of its population within
the assessment area.
2. Collect at least enough plant material for species identification and to fill a standard herbarium sheet (11.5
x 16.5 inches). Each specimen should consist of a stem with attached leaves, flowers, fruits, and if possible,
roots.
3. Flowers and/or fruits are particularly important as they are generally needed to determine species
identity.
4. If the plant is small enough, collect the entire plant including the roots.
67
5. If the plant is too large to fit on a herbarium sheet, collect 1) sufficient leaves and stems to illustrate leaf
shape and size, opposite or alternate branching, and buds; 2) some of the root or rhizome; and 3) the
inflorescence (flowering stem).
6. For grasses and grass-like plants, try to include roots or rhizomes. Also place part of the mature
inflorescence in a small envelope to protect it from damage. Mature fruits are important for identification
of these species, especially for Carex (sedge) species.
7. In the case of trees, shrubs, or vines, material should be selected to illustrate the overall characteristics of
the plant and the range of variation in flowers, leaves, and other structures.
8. If the species has separate male plants and female plants or male and female flowers on the same plant,
collect specimens from both sexes whenever possible, e.g., Salix (willow) spp. and some Carex (sedge) spp.
9. If it is not possible to provide a complete specimen for an unknown species (e.g., the plant is immature or
senescent), collect a sample that illustrates as many key diagnostic parts of the plant as possible. In many
cases, this may be sufficient for a regional expert botanist to identify the species.
Transporting and Storage of Specimens:
1. Place each specimen in a separate Ziplock or plastic bag of appropriate size and label with appropriate
information referenced above
2. If a plant press is available and logistics and time permits, press the plants immediately before leaving the
Assessment Area and label newspaper with appropriate collection information. Otherwise, place the filled
Ziplock or plastic bags in a large cooler for transport. Plants should be pressed within one or two days of
collection.
Pressing Plant Specimens:
Standard Plant Press 12 X 18 inches:
1. A rigid, breathable wooden frame
2. Corrugated cardboard ventilators to allow air flow through the press
3. Blotter paper to absorb moisture
4. Folded newsprint to contain the plant material
5. Straps with buckles to tighten the press
Assembling the Press:
1. Each newspaper specimen folder with plant material is sandwiched between 2 moisture-absorbing
blotters.
2. The “blotter-newsprint sandwiches” are sandwiched between corrugated cardboard.
3. The corrugations of the cardboard should run parallel to the shorter dimension for best air circulation.
Pressing Plant Specimens:
1. On the bottom wooden frame of the press, place a piece of cardboard, blotter paper, folder newsprint on
top of the blotter paper.
2. Place plant material between the folded newsprint. Remove as much dirt as possible from the plant before
placing it in the newsprint folder.
3. For each plant specimen, write on the outside of the newsprint folder using waterproof ink (a “Sharpie”
marker works well). Record all of the specimen information (above).
4. Arrange the plant material on the bottom fold of the newsprint to display diagnostic features. Lay the
plants flat and avoid overlapping plant parts. Spread flowers, leaves, and fruits so they can be easily
observed from different perspectives. Show upper and lower surfaces of the leaves and flowers. If
possible, arrange pressed material to show some flowers with the blossom open, and some flowers and
fruits are pressed in longitudinal and transverse views.
5. Multiples of smaller plants should be pressed together.
6. For specimens that are larger than the page, bend stems sharply into a V, N, or W shape so they fit within
the press frame. Do not curve or twist the stems.
7. Thick stems or large fruits may require additional newspaper or blotter paper.
68
8. Small lose plant parts such as seeds should be placed in a small envelope inside of the newsprint with the
rest of the plant.
9. Once the specimen is arranged, close the newsprint, add another piece of blotter paper, then a piece of
cardboard.
10. To add another specimen, place blotter paper over the cardboard, add a folded piece of newsprint and
repeat steps 1-9 until all plants are collected or the press is full.
11. Use the two adjustable straps to firmly hold the plant press and its contents. The plant press must be kept
tight to prevent shrinkage and wrinkling of the plant material. It should not be possible to move the blotter
paper or cardboard from the side in a properly tightened press.
Essential to collect:
Reproductive Structures. All specimens must have reproductive structures (flowers and/or fruits on
flowering plants; or cones (conifers), or spores (ferns and their relatives). If fruits are not yet formed, then it is
essential to collect a specimen with flowers.
Fruits. Specimens of several families are difficult or impossible to identify unless fruits, or fruits and flowers,
are obtained. Fruits are required or strongly recommended for specimens of the following families:
Cyperaceae (sedge family), Juncaceae (rush) family, Salicaceae (Willow family), Ranunculaceae (Buttercup
family), Apiaceae (Carrot family), Poaceae (Grass Family).
Leaves and Stems. Leaves from the flowering stem as well as basal leaves are needed.
The plant specimen itself. The best specimens are whole plants, including roots, basal and cauline leaves, and
reproductive structures. All diagnostic morphological features should be observable without having to disturb the
mount. The best herbarium specimens have been pressed carefully, and then are neatly mounted with no material
hanging off the sheet. Both sides of structures like leaves should be visible.
69
Appendix H. First Aid Considerations and Common Field Ailments
First: If you have the time and resources take a Wilderness First Aid (1 day) or Wilderness First Responder (week)
course.
Second: In any accident scenario (injury or just a flat tire) remain calm and make sure the scene around you is
safe (before attempting to help someone make sure the bear is not going to get you too or the car will not fall on
top of you as you jack it up).
Third: Pay attention to how far you are from help or your vehicle, this can have a huge impact on an injury or
weather scenario. (Always take a GPS point of the location of your vehicle before heading out into the field.) Pay
attention to the weather, sun exposure etc.
First Aid/Safety List
In your Pack:
• Your car keys, ID, emergency contact info, insurance card
• Sun hat and sun screen
• Rain coat/pants
• Plenty of water and food for the time you’ll be out plus time you may be out given an injury or other change of
plans
• Map and Compass (GPS units run out of batteries and lose signals)
• Whistle or radio for signaling others in the group or nearby
• Lighter or matches
• Firestarter (e.g., cotton balls soaked in Vaseline stored in a film canister)
• Tape and Gauze (Quick-clot is a new super gauze)
• Mole skin and bandaids
• Needle and thread
• Tweezers
• Anti-biotic ointment
• Painkillers (make sure they do not dehydrate or compromise your ability to get out of your situation)
• Knife/leatherman type tool
• Salt and sugar packets (especially if low blood sugar is an issue)
• Other meds or allergy equipment (epi-pen) you may want or need
• Water purification (iodine one 8ppm tab per quart or filter)
• Headlamp
• Bandana (can double as triangular bandage)
• Reflective blanket or emergency bag
In the Vehicle:
• Full size spare tire
• Jack and all the parts to the jack (including knowledge of how to use the jack)
• Lug nut wrench
• More food, water, coffee etc.
• Sleeping bag, warm clothes
• More sun block
• More mole skin
• Cell phone or radio
70
Heat Exhaustion and Heatstroke
It can get hot in Montana, even at the higher elevations. Physical exertion at high temperatures can lead to heat
exhaustion - becoming dehydrated increases the chances of it. Insufficient water in your body inhibits sweating,
and you won't cool down to the degree that you would otherwise.
Symptoms of heat exhaustion include:
rapid breathing
high pulse rate
heavy sweating
paleness, fatigue
muscle cramps
dizziness
moderately elevated temperature
headache
nausea
More severe symptoms include vomiting and fainting.
Some of the less severe symptoms also commonly accompany heavy physical exertion. You have to listen to your
body. One good (usually early) sign that you are pushing yourself too hard is if you start feeling a little dizzy or
woozy. If so, take a break and let your body recoup before resuming physical activity.
If someone does appear to have heat exhaustion, have the person lay down in the shade (if possible), rest with
their feet raised a few inches and drink some water.
If heat exhaustion symptoms are ignored and the person keeps on with their physical exertion, the problem can
become more severe and lead to heatstroke. This is life-threatening. With heatstroke the ability of the brain to
regulate body temperature ceases -- the person's temperature can go up to 104 F or higher.
Heatstroke symptoms can include:
confusion
highly elevated temperature
strong rapid pulse
delirium
seizures
unconsciousness
If someone appears to have heatstroke you should do the following: remove some clothing and cool the person
with water and by fanning them. If there is a stream or pond nearby, put them in it to cool them down. After the
person appears to be getting better (with their temperature having dropped to about 101 F) have the person
assume the first aid recovery position. Get medical attention for the person as soon as possible even if they appear
to be recovering. Heatstroke involves a serious a disruption of normal body functions, and a victim can appear to
be recovering, and then go into a dangerous relapse.
Hypothermia ("exposure")
Hypothermia relates to drops in human body temperature to levels at which physical and mental abilities
deteriorate. The process is progressive and can lead to death. It is not the same thing as "freezing" -- many
instances of hypothermia in Montana occur at temperatures around 50 degrees Fahrenheit. Hypothermia is a
modern term for a condition that used to be referred to as "exposure".
The root cause of hypothermia is simple: loss of body heat at a higher rate then it is created. The loss of body heat
is caused by things like low surrounding temperatures, wet clothes that have lost their insulation properties, and
71
wind creating wind-chill affects on the body. Your clothes can get wet from rain or body perspiration. The inability
of the body to make up for heat loss is amplified by factors like fatigue, dehydration and lack of food.
Hypothermia goes through several stages defined by body temperature and symptoms. First, there is mild
hypothermia which occurs at body temperature ranging down to 96 F. Typical symptoms are involuntary
shivering and the loss of the ability to do complex motor functions. The person can still walk and converse.
Next comes moderate hypothermia, with body temperature ranging from 95 to 93 F. Symptoms include dazed
consciousness, loss of fine motor coordination (particularly in the hands), slurred speech, violent shivering
and strange behavior (including taking their clothes off).
Severe hypothermia occurs with body temperature in the 92 to 86 F range, and is life threatening. Symptoms
include waves of shivering, inability to walk, taking a fetal position to conserve heat, muscle rigidity and a
major drop in pulse rate.
Victims of advanced hypothermia can appear dead but in fact still be alive with imperceptibly slow rates of
breathing and pulse. The best way to deal with hypothermia is to get the victim into dry clothes, give them warm
drinks and food, and put them in a sleeping bag, possibly with another person to speed up their warming. Get
advanced hypothermia victims to a medical professional (MD or EMT) as fast as possible, even if they look like a
goner - they may be revivable with the right procedures.
Altitude adjustment and altitude sickness
Gaining altitude has physiological effects on everyone. However, the effects vary considerably among individuals
and do not seem to correlate very much with physical condition, sex or age. A young well conditioned athlete could
find himself more set back by a substantial rise in altitude than some inactive out of shape person.
Altitude affect is such that a fit person used to running several miles daily, who then comes up to a location 5,000
feet higher than they are used to, may become exhausted after a half-mile of their usual running workout. A week
to several weeks may have to pass at the new higher altitude before the usual level of performance ability exists
again.
What causes this change? Two physiological factors have been identified as resulting from altitude gain. The first
and most obvious effect is caused by a reduction in concentration of oxygen in the air breathed. Going from sea
level to 12,000 feet results in a reduction of oxygen concentration of about 40 percent. It takes time for the body to
adjust to this reduction. The other factor involves leakage of fluid from the capillaries into the lungs and brain.
These physiological effects result in two considerations: a reduction in physical stamina and the potential for
developing altitude sickness. Given time for adjustment, the body will compensate by such methods as producing
more red blood cells, increasing the pressure in pulmonary arteries, increasing the production of certain enzymes
and deeper breathing.
Loss of physical stamina with altitude gain is easily detected. The symptom is feeling tired after a relatively small
amount of physical exertion. The cure is to be at high-altitude until your body can make the necessary adjustments,
and to take it easy until then. In a practical way, this temporary loss of stamina can lead to bad results if you are on
a hike, and you are the only one suffering from altitude associated weakness. The best thing you can do is to be
honest with yourself and the others and slow down and take necessary rests before (not after) you drive yourself
to physical exhaustion. If you start feeling woozy - don't be ashamed to take a break. It's harder for the body to
regain strength after you drive yourself to near collapse.
Altitude sickness
The medical profession recognizes several types of altitude sickness. They go by the names of acute mountain
sickness, high altitude pulmonary edema and high-altitude cerebral edema. Mostly, they are due to fluid buildups
in the lungs or brain. It's not important for a hiker to be able to diagnose and differentiate between them. Some of
the symptoms associated with one or more of these altitude sicknesses are listed below. If you or a member of your
72
party have some of these after a gain of substantial altitude, the best first step is to come down and lose at least
1,000 to 2,000 feet of altitude. Return to town as soon as possible and get medical attention.
Some general altitude sickness symptoms:
headache
dizziness
fatigue
shortness of breath
respiratory symptoms worsening at night
loss of appetite
nausea
disturbed sleep
tightness in the chest
persistent productive cough bringing up white, watery, or frothy fluid
mental confusion
loss of coordination
disorientation
loss of memory
hallucinations
psychotic behavior
coma
(From http://www.hence-forth.com/Colorado_Hiking/1_Hiking_topics/safety.htm)
4x4 Driving Techniques
The Basics
Wear Seatbelts: Put on your seatbelt, and instruct passengers to put them on as well. A good belt will help restrain
you when driving difficult terrain, and can save your life in case of a rollover or other accident.
Lock the Hubs: the first thing to do when you get in the dirt is to put the transfer case in four-wheel drive and lock
the hubs—if your vehicle is so equipped. With all four wheels hooked together, your control is increased, braking is
improved, and you won’t get stuck as fast when you make a mistake. This also spreads the tractive force over four
tires instead of two, minimizing breakage of drivetrain parts. However, with practice, flipping back and forth
between 2WD and 4WD can be advantageous for turning, sliding, and other advanced maneuvers, but it’s best to
learn while in four-wheel drive.
Use 4 Low: Using low range in the transfer case is important. In low range the available power is greater, and the
speed with which you can drive is diminished. By driving slowly over obstacles rather than pretending you’re in a
SUV commercial and flying over them, you’re more likely to make it to the other side instead of breaking your rig or
yourself. Going downhill is also easier in low range, as compression braking from the engine is increased. This
allows you to stay off the brake more often for optimum control.
Hold the Wheel: While gripping the steering wheel, make sure that your thumbs aren’t wrapped around it. If the
wheel should suddenly whip around from a tire hitting a rock, your thumbs won’t get broken or mangled.
Listen to the car: Turn your stereo off, so you can hear what your vehicle is telling you. The sounds of slipping
tires, scraping metal, and engine rpm can all help you be a better driver, but not if you can’t hear them. Just like
drinking and driving, distractions from what is happening with your vehicle can distract you at the wrong time.
Know the car: Know your rig inside and out. This means being familiar with all of the controls in the cab, as well as
how to use them for what purpose. On the outside, make a mental note of what hangs down underneath, and what
side the front differential is on so you won’t bang the underside on obstacles.
73
Don’t ride the clutch: Staying off the clutch unless you need it is important in many situations. While automaticequipped 4x4s can have an easier time crawling over things, a manual transmission rig is capable of outdoing an
auto as long as the clutch isn’t always used. Try driving with your feet on the floor for practice, and see what your
rig can do. Once you push in the clutch you’ve unhooked the drivetrain, and only your brakes will be holding you
on a hill.
Lower tire pressure: Consider lowering your tire pressure according to the terrain and speed. Tire pressure
lower than the manufacturer’s recommendations can provide greater tire traction, flexibility, flotation, and
smoother ride. Because the tire will tend to spread out at lower pressures, a bigger footprint is formed, but the tire
is more susceptible to sidewall damage. Never air down farther than what you are comfortable with, and
remember to air them back up before you hit the pavement.
Get a spotter: If you’re unsure of what you’re doing while driving an obstacle, ask someone to spot you over the
tough areas. An experienced spotter can be your best ally and can make you look like a pro. Remember, though,
that you as the driver are the one in command, and it’s your decision to trust the spotter or not.
Study the area: Watch the driver in front of you and see how he makes it through. You can learn a lot on what to
do and what not to do. Get out and walk the trail or examine the obstacle before you drive through. This allows you
to get a mental picture of where you will place your tires before you go. Just as a golfer examines the green before
that game-winning putt, you need to know what’s ahead of you so you don’t get into trouble. Walk ahead and look
back; the view is different from the other direction, and other features of the terrain become apparent.
Hills and Dirt
Climbing hills and going back down them is older even than four-wheeling. Usually a steady speed with momentum
is adequate, depending on the surface. An occasional blip of the throttle can bump you over some ledges, but rarely
will a full-throttle attack do much more than break stuff.
When climbing or descending a hill, keep straight up or down, and don’t turn around on the side of a hill. The
propensity to roll is far greater, and any stored inertia can send the rig tumbling. Know when to quit and how to
back down in a straight line.
The steering seems much more sensitive (and backwards) when you are backing down a hill, and miscues and rolls
are common. If you traverse a side hill and are off camber, you need to go slowly to prevent sudden shift of vehicle
or cargo weight. A rock on the high side or a hole on the low side can tend to tip you in the wrong direction, as in
downhill.
Likewise, spinning the tires on a loose surface when on a side hill breaks traction, causing gravity to pull you off the
trail and possibly over the edge. Descending a hill is best done in the lowest gear, for maximum compression
braking. Even automatic transmissions will have some compression braking, and a light foot on the brakes is better
than locking them up and sliding.
The tires must be rolling to have control, so if you start to slide you need to give it a little gas and be easy on the
brake pedal. Easy movements of the steering wheel can help you keep directional control, while whipping the
wheel can cause the tires to slide sideways, right into what you are trying to avoid.
Rocks
Lowering the air pressure and going slowly is the best recommendation for rocky trails or hard-core rockcrawling.
Tires should be placed on top of the rocks, which allows the axle and undercarriage to avoid hitting the boulders.
On IFS rigs or Hummers, for example, the available clearance in the center of the undercarriage is sometimes
better, but straddling rocks can still get you stuck in any case.
Your lowest speed that keeps your momentum going is usually the best. If you go too fast you end up bashing and
crashing while hurting your rig and generally getting stuck. Rockcrawling is truly the home of elegant driving as
coined by the late great Granville King. By making this activity a true art form of fluid motion like a mechanical
ballet, a greater amount of obstacles can be scaled with less damage to yourself and the vehicle.
74
Likewise, raw power and speed can jet you over the boulders, but the hopping and flopping action of bashing and
crashing your way through a canyon of boulders is in no sense of the word elegant, and it’ll cost you more in the
long run. One way to stay in control with an automatic transmission is to use one foot on the brake and one on the
gas. On a stick-equipped rig the engine compression braking gives you greater control, but using the two-foot
method on an auto will mimic this action.
Sand
Higher gears are great for sand, as speed and momentum keeps you flying on top rather than sinking in. Depending
on the type of sand—from fine to coarse and from wet to dry—different speeds and gears may need to be used.
Usually, spinning the tires is needed since wheel speed is a factor to keep on top of the sand. Lowering air pressure
and running wide tires help in the flotation department as well.
Sand dunes can have steep drop-offs and other obstacles, so being alert is extremely important. If you’re climbing a
sand hill and realize you’ve run out of engine power, downshift quickly, and floor it without losing momentum.
This is where automatic transmissions excel—virtually instant downshifts with no loss of momentum. Shifting a
manual truck usually means the momentum is gone before the clutch is ever let back out. Side hilling in the sand or
running a bowl is great if you have enough speed and power, but turn downhill as soon as you start to bog down.
Point your ride straight down, and if the nose starts to go sideways give it a little gas to straighten it out.
Water Crossings
Driving through water can be as hazardous as any other terrain. The swift current, unknown bottom conditions,
and possibility of engine damage can ruin a nice 4x4 outing. Check the depth and bottom conditions before you
attempt to drive across a stream. Look to see where others have made it, and imagine what happens if your rig
floats or gets washed downstream.
Cross streams and rivers at an angle upstream to prevent the force of the water from pushing the vehicle
downstream. This helps you keep going in a more controlled manner without getting moved downstream. Know
where your engine air intake is, and be sure that it is not lower than the deepest part of the stream you are
crossing. Many new vehicles have the air intake lower than the front bumper or in the fender. If water gets into the
cylinders of a running engine it will hydrolock the engine, stopping it cold, and probably damaging the engine.
Avoid spinning tires when they are wet, as wet rubber cuts as easily on sharp rocks.
Mud
Different consistencies of mud call for different styles of driving. Some mud responds to fast driving with a lot of
wheelspin, while others may do better with a slower gate with just enough spin to clean out the tires.
Like in snow, skinny tires can dig down to the hard stuff, while wide flotation tires can keep you on top of the goo.
Regardless of what the mud is like, a steady forward progress is needed. In other words, keep your momentum up.
If you get off the gas, you can risk losing the momentum needed to traverse the slop. Be aware that spinning the
tires while stopped may get you going, but quite often you’ll simply dig down and get stuck to the gills.
It’s always easier to extricate your 4x4 from deep mud before it’s resting on the framerails. So if the rig’s not
moving forward as you spin tires, it’s probably going down. Don’t be afraid to back out of a sticky situation either;
the ruts are already there and you may escape without getting stuck.
Hiking during hunting season
During field work you should be aware of the potential for hunting on the lands in which you are working. The best
thing to do is to be aware of the hunting dates and to wear orange when necessary.
Working around wildlife
Black Bears
The following is from the Yosemite National Park Website, (http://www.nps.gov/yose/wilderness/bsafety.htm).
“Never approach a bear regardless of its size. If you encounter a bear, act immediately: throw small stones or sticks
toward the bear from a safe distance. Yell, clap hands, and/or bang pots together. If there is more than one person,
stand together to present a more intimidating figure, but do not surround the bear. Use caution if you see cubs, as a
75
mother may act aggressively to defend them. ”When done immediately, these actions have been successful in
scaring bears away. Never try and retrieve anything once a bear has it.”
The group Citizens for Responsible Wildlife Management has a good web page with tips for handling a bear
encounter. Check it out if you want more information.
(http://www.responsiblewildlifemanagement.org/bear_safety.htm)
Grizzly Bears
The following is a list of recommended responses to minimize the likelihood of attack or chances of human injury:
http://fwp.mt.gov/recreation/safety/wildlife/bears/bearEncounter.html
Make certain you have bear pepper spray at the ready and know how to use it.
Always maintain a safe distance from bears.
Stay calm.
Immediately pick up small children and stay in a group.
Behave in a non-threatening manner.
Speak softly.
Do NOT make eye contact.
Throw a backpack or other object (like a hat or gloves) on the ground as you move away to distract the
animal's attention.
Slowly back away, if possible. Keep a distance of at least 100 yards.
Do not run from a bear. Running may trigger a natural predator-prey attack response and a grizzly can easily
outrun the world's fastest human.
Don't climb a tree unless you are sure you can get at least 10' from the ground before the bear reaches you.
Many experts recommend against climbing trees in most situations.
Do not attempt to frighten away or haze a grizzly bear that is near or feeding on a carcass.
If a grizzly bear charges your first option is to remain standing and direct your pepper spray at the charging
bear. The bear may "bluff charge" or run past you. As a last resort, either curl up in a ball or lie face down (flat).
Leave your pack on to provide protection, cover your neck and head with your arms and hands. Do not attempt
to look at the bear until you are sure it's gone.
If a black or grizzly bear attacks, and if you have a firearm and know how to use it safely and effectively,
Montana law allows you to kill a bear to defend yourself, another person or a domestic dog. If you do kill a bear
in self defense you must report it to FWP within 72 hours.
If you are armed using a weapon on a grizzly bear does not guartantee your safety. Wounding a grizzly bear
will put you and others in danger.
If a grizzly bear attacks during the day, most experts recommend either curling up in a ball or laying face
down (flat). Use your hands and arms to protect the back of your neck and face, and keep your backpack on for
added protection. Do not move or make noise until you are sure the bear has left the area.
If a black or grizzly bear attacks at night while you're in a tent, fight back aggressively with whatever you have
available to use as a defensive weapon or deterrent. The bear may be seeking food rather than trying to
neutralize a threat, so fight back to show the bear you are dangerous.
Report all encounters to your local authorities. Your report can prevent someone else from being hurt.
Mountain Lions
The following is from the Yosemite National Park Website, (http://www.nps.gov/yose/wilderness/bsafety.htm).
Although lion sightings and attacks are rare in the area, they are possible, as is injury from any wild animal. We
offer the following recommendations to increase your safety: Avoid walking alone, especially around dawn and
dusk. Be aware of your surroundings and how you appear if you are being stalked.
“What should you do if you meet a mountain lion?”
Never approach a mountain lion, especially one that is feeding or with kittens. Most mountain lions will try to avoid
confrontation. Always give them a way to escape. Don't run. Stay calm. Hold your ground or back away slowly. Face
76
the lion and stand upright. Do all you can to appear larger. Grab a stick. Raise your arms. If the lion behaves
aggressively, wave your arms, shout and throw objects at it. The goal is to convince it that you are not prey and
may be dangerous yourself. If attacked, fight back! ”Generally, mountain lions are calm, quiet, and elusive. The
chance of being attacked by a mountain lion is quite low compared to many other natural hazards. There is, for
example, a far greater risk of being struck by lightning than being attacked by a mountain lion.”
Moose
The following is from the Alaska Department of Fish and Game website, (http://alaska.org/anchorage/advicemoose-courtesy.htm).
Moose Courtesy
• Never feed moose
• Give moose at least 50 feet. If it doesn't yield as you approach, give it the trail. (Either retreat or walk way
around.)
• If its ears lay back or its hackles (the hairs on its hump) rise, it's angry or afraid and may charge; back off pronto
• Moose kick with their front as well as hind feet
• Don't corner moose into fences or houses
• If a moose charges, get behind a tree. You can run around the trunk faster than the gangly creature.
• Never get between a cow and her calf
The following is from the Wrangell-St. Elias National Park and Preserve website,
(http://www.nps.gov/wrst/planyourvisit/moose-safety.htm).
Moose aren’t inherently aggressive, but will defend themselves if they perceive a threat. When people don’t see
moose as potentially dangerous, they may approach too closely and put themselves at risk.
Give Moose plenty of room! Enjoy viewing them from a distance. Cow moose are extremely defensive of their
young so use extra caution around cows with calves.
In the summer months, moose blend in well to their environment and can be surprisingly hard to see for such large
animals. They are likely to stand their ground even when they hear people approaching, so pay close attention to
your surroundings, especially in prime moose habitat such as willow thickets or around streams or ponds.
If you do find yourself close to a moose: If it hasn’t detected you yet, keep it that way. If it knows you’re there,
talk to it softly and move away slowly. Don’t be aggressive – you want to convince the moose that you aren’t a
threat. If you think the moose is going to charge you, take cover or run away.
Watch for signs that the moose is upset. If its ears are laid back and hackles are up it is likely to charge. Most of
the time, when a moose charges it is a ‘bluff’, or warning for you to get back – a warning you should take very
seriously! Once a moose bluff charges it is already agitated. If possible, get behind something solid (like a tree or a
car).
Unlike with bears, it is okay to run from a moose. They usually won’t chase you and if they do, it’s unlikely that
they’ll chase you very far. If a moose knocks you down, curl up in a ball and protect your head with your arms and
keep still. Fighting back will only convince the moose that you may still be a threat. Only move once the moose has
backed off to a safe distance or it may renew its attack.
Snakes
(From: http://lomalindahealth.org and http://www.hence-forth.com/Colorado_Hiking/ and
http://www.fs.fed.us/r8/boone/safety/critters/snakes.shtml)
Wear boots not sandals or running shoes when hiking - the higher the boot tops the better. Wear long trousers
instead of shorts. Bare legs increase the probability of a successful strike. Loose trousers might result in a strike to
the wrong spot, or a deflected strike.
77
Use a hiking stick. Often, the first thing to come close to a rattler will be your stick instead of your leg. When
stepping over a log or a fallen tree you can plant the stick first and perhaps stir up the snake before exposing your
leg. The snake's first strike may be at the stick versus your leg.
When you come across a rattlesnake that has been startled and is rattling, the first thing to do is stop and hold still,
visually locate the snake, let the snake calm down, then move away from it to at least ten feet. Next, take a look
around just to make sure there aren't any others nearby, but stay aware of the original snake's location and
movements. Then work out a safe route around it, and leave. Unless there is some overriding reason to do it, don't
mess around with the snake - that is actually how most bites occur.
Basic first-aid measures for rattlesnake bites:
If you are bitten by a snake, get away from it as fast as you can to avoid any further bites.
You should try not to panic and minimize activity if possible. However, if you are alone in the wilderness or far
from access to medical care, you may have to hike out to the nearest phone. Use a cell phone to call for help or send
somebody out, or hike out using a slow measured pace with a crutch if necessary. In some cases the most sensible
approach will be to notify a medical facility of what has happened (if you can) and to arrange for an EMT vehicle to
meet you at the trail head, perhaps with antivenin. The sooner the MD's know they will need antivenin the better not all medical facilities have it on hand. It is highly desirable to get medical attention within two hours of the bite.
Keep the injured body part motionless and just below heart level.
Remove jewelry and tight-fitting clothes in anticipation of severe swelling.
Do not cut across fang marks and do not try to suck out the venom with your mouth or a suction device.
This could lead to complications and infections. Cutting the bite wounds is NOT RECOMMENDED as this increases
damage to the tissue and has not been shown to be beneficial.
A tourniquet is not recommended because it could cut off circulation. However, an ace wrap and splint may delay
the time to death in the rare event of a fatal bite, but could risk further injury to an arm or leg. If the victim won't be
able to reach medical care within 30 minutes, as will normally be the case in a hiking situation, then slow the
venom movement from the bite area by applying a bandage wrap 2 to 4 inches above the bite. This is NOT a
tourniquet - it should not cut off the flow of blood - the band should be loose enough to slip a finger under it.
Do not take aspirin or ibuprofen after snakebite. Many snake venoms can thin the blood and these medicines may
compound this effect, leading to bleeding.
Other first aid that does not help or that is potentially more harmful than the snakebite includes applying electric
shock, drinking alcohol, and placing ice directly on the wound. Avoid further injury by staying away from the snake.
Mosquitoes and West Nile virus
(From: http://www.hence-forth.com/Colorado_Hiking/)
The West Nile virus problem is best dealt with by reducing the number of mosquito bites by wearing long sleeved
shirts and trousers. Spraying DEET on your clothes and skin works well in keeping mosquitoes and other bugs
away. You can also like to wear a baseball cap sprayed with DEET which seems to keep the mosquitoes away from
my face and neck. It should be applied to skin and clothing only -- keep it out of open wounds, scrapes, eyes,
nostrils or mouth.
If you use a water bladder and tube instead of water bottles - avoid spraying DEET on the end of your drinking tube.
The following info is taken from the CDC's rundown on West Nile virus.
Most people who are infected with the West Nile virus will not have any type of illness.
78
It is estimated that 20% of the people who become infected will develop West Nile fever with mild symptoms
including fever, headache, and body aches, occasionally with a skin rash on the trunk of the body and swollen
lymph glands.
It is estimated that about 0.67 percent (less than 1 out of 100) of persons infected with the West Nile virus will
develop the severe form of the disease. The symptoms of severe infection (West Nile encephalitis or meningitis)
include headache, high fever, neck stiffness, stupor, disorientation, coma, tremors, convulsions, muscle weakness,
and paralysis.
If you become ill after outdoor activities and bites, make certain that your physician knows this, and can therefore
factor this in when ordering tests and making diagnoses.
Ticks
(From: http://www.hence-forth.com/Colorado_Hiking/)
Ticks attach themselves to humans and other animals in order to feed on blood. They are small roundish dark
insects that can cause illness in humans due to viruses and bacteria that they may input to the host during feeding.
Using DEET cuts down on the odds of getting ticks on you. There are two types of tick caused illness in Montana
and both are rare.
Rocky Mountain Spotted Fever is a bacterial illness which can be life-threatening. The early symptoms are
headaches, fever, nausea, abdominal pain, lethargy and a rash which develops on the extremities and spreads to
the entire body. It is a rare disease with only a couple of cases reported yearly.
Colorado Tick Fever is a viral illness which is not life-threatening. It's symptoms are headaches, fever, nausea,
abdominal pain, and lethargy. These symptoms last four or five days, followed by an apparent recovery. Then the
symptoms return for a few more days. Total recovery usually takes several weeks. The disease is not lifethreatening and infection results in lifelong immunity. If you become ill after being outdoors, and especially if you
have had ticks on your body, let your physician know of the possibility of tick disease exposures so it can factored
in when ordering tests and making diagnoses.
As with the case for mosquitoes, the best defense is long sleeved shirts and trousers and DEET. Look over your
body for any ticks and remove them with tweezers by carefully grasping the tick's head as close to your skin as
possible. Pull the tick straight out, using firm, steady pressure. Another method is to use a credit card or knife blade
to carefully sweep down and force the tick's head out of your skin. The idea is to get the tick's head out of your
flesh without exposing the tick’s fluids to your blood. Don't prick, heat, smother or crush the tick. These methods
may cause the tick to regurgitate into the bite wound which increases the chance of infection.
79
Lightning
July and August can bring heavy afternoon rainstorms with lightning. See the NOLS lightning guide on the following
pages for in depth information on lightning.
80
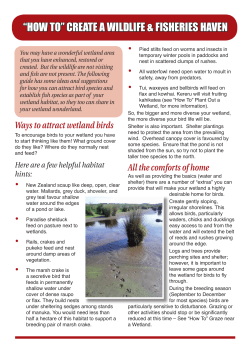


© Copyright 2026