
Events 2012 Manual
Events 2012 Manual This document is a compilation of articles found at http://Evancedsolutions.com/support. This is not a ‘true’ manual in the classic sense, but rather a reflection of the online knowledge base. Please contract [email protected] with any questions. Table of Contents Installations & Upgrades Events/Room Reserve Version 7 History Hosting Software Through Evanced Solutions Server Requirements Events-Facebook Feature V7.14 MySQL Performance Tuning Upgrading MySQL from 3 to 5 Server Move Events/Room Reserve V7 Upgrade Instructions Events-Self Install Instructions Before Transferring Your Evanced Site to Your New Server Patron / Public Home Page Understanding the Events Calendar (Patron View) Staff Home Page Understanding the Staff Home Page (Event System Maintenance Page) Event Maintenance Understanding the Add/Edit/Archive page How to Register a Patron for an Event How to Add an Event How to Events - Using Flickr Images Understanding Ongoing and Recurring Events How to Schedule Holiday Closings How To Events-Add images to events How To Events-Remove a single date from a recurring series How to Archive an Event Understanding Attendance Stats Understanding the Waiting List How To Events-Enable Residency Stipulation How to Bulk Publish Events How to Edit an Event Cheat Sheet: How to Add and Publish an Event Cheat Sheet: How to Add an Event (branch staff level) How to Copy an Event Understanding the View Archive Page Registration & Attendance How to Perform an Attendee Lookup Report How To Events - Remove a Subscriber from Automatic Upcoming Event Notification List Events Patron Records Understanding the Events Caldendar (In-House Registration Mode) Understanding List View How To Events-Add RSS feed to your homepage How to Manage Custom URL, XML and RSS Links Creating XML-RSS Feeds How To Events-Create a custom calendar view Is there Evanced Calendar for Mobile Access? How to Subscribe to an Evanced Calendar Using IPhone/IPad Events-Client Side XML Example How To Events-Include a link to a calendar on my website Understanding Event Attendance How to Export an Attendance Sheet Reports How to Create a Custom Event Report Understanding Detailed Event Report Understanding Event Statistics Report How to Create an Events and PR Report Understanding Subscriber Details How to Perform a Subscriber Lookup Settings How To Events-Change the list of locations How to Add Grade Levels How to Add a New Location How to Add a New Zip Code How to Add a New Presenter Understanding the Security Menu Understanding Library Information Maintenance How to Manage User Logins-Quick Start Guide Understanding Regional Settings Events and Room Reserve Scheduled Task Setup for Email Notifications Understanding Credit Card Processing Understanding Email Server Settings Understanding Email Settings Ecommerce Quick Start Guide Events-Credit Card Processing Understanding Email Templates Understanding the System Templates Settings Understanding the System Messages Maintenance Page Understanding Style Configuration Events Style Settings ILS Authentication in Events and Room Reserve Understanding System Settings (Individual Branch Mode) Understanding System Settings (All Branches Mode) Events/Room Reserve Version 7 History Version 7.00 This major version release occurred in July of 2010. Requirements for updating to this release are: MySQL 5.0.67 (upgrade as necessary) MyODBC 3.51.27 Events/Room Reserve version 5.xx Version 7.00 (Initial Release) Added the time of the reservation to the staff notification email Added a direct link to the reservation request in the staff notification email Added Deposit, Fee and Food selection to full list in Room Schedule Report Added (P) to private event types in reports Added capability for email addresses to contain unusual characters (for example, ') Added BCC option for staff emails Fix message for canceling a recurring series. All dates were not listed. Fix System Setting - Reservation Limits to not allow "0 in 0" Fix underlined events for staff only registration Added ^CONTACTNAME^, ^CONTACTEMAIL^ and ^CONTACTPHONE^ tags to Events/PR report template Added Age Group to Event Detail page Fix transition error from list to calendar view with date range selected Changed max size of location item name from 50 to 100 characters Changed wording on some help items to be more clear When clicking on room schedule button, it now shows the schedule of the day selected for the event instead of the current day A conflicted room selection doesn’t clear itself, even if remove was selected from the resolve conflict window Fix current day defaulting to yesterday when search tab is the default on room request page Fix to save PR information on the event record; even if its box gets unchecked Added SMTP port and enabling SSL to the email settings area Adding EVENTSDELETEBUTTONLEVEL = 3 to defines Increased max characters limit for "Reservation Purpose― to 1000 characters Added capability to use Order Weight to determine the display order of available equipment on the request form Turned off changing passwords from settings area (for simple logins), when advanced log on is enabled Added confirmation emails to email log Audit field updated when creating a reservation Hitting the back button from the Display Personal Schedule screen now takes the patron back to the calendar they were last browsing Fixed patron display status for an event that has in house spots = max number of attendees Fixed problem where ongoing events allowed a blank entry in the end date Fixed room usage report now limits to 12 months of data Added defines setting to hide language selection drop list Version 7.01 Changed the way EventsXML handles private/non-private event types so that it doesn't exclude "NONE" events. (common/eventsxml.inc) Changed all the System config "maint" pages to match in password verification methods, so that they can't be edited by inserting the URL and not logging in correctly. Changed the way dates were setup to optimize code (only setting them in 1 spot) and fixed a problem where date would be different between the 2 reports. (roomschedules.asp) Added the ability to structure costing to ignore the changeover from Standard pricing into Extended, or Vice Versa. ROOMSUSESTARTTIMECOSTS = 1 Enables this Set to 0 by default, works as it always has. When this is set to 1, a reservation that is going from 1 time to another ignores the new time costing and sticks with the original costing model for the extent of the reservation. Changed the way the locationlist maint page handles editing and deleteing when it is opened in a popup from rooms - functionality has been limited to only allowing name additions when it's in popup form (dbmaintsub.inc) Setup Auto Archive to always pull lib 0 values when checkong number of days to go back to archive (dbmaintsub.inc) fix for multiple dates displaying on a single date request (was pulling in rcid=0 dates on the display). (requestcancel.asp) TimeAdjust handles date or times, so you don't get the instance of displaying XX/XX/1899 when you convrt over to the next day. (timeadjust.inc) Fixed Logic that wasn't pulling in the Single Event ID over the Shared Attendance Link ID when it was calculating event dates on shared attendance. (getsignupstatus.inc) fix for calendar header title getting stuck when setting pagetitle or switching between multipe and single branch searches(eventcalendar.asp) Fix for address entry page not setting the right formaction (var wasn't getting set) (eventsignup.asp) Added GRAND_TOTAL_LANG for events to the erv7upgrade, for some systems it was missing.(erv7upgrade.asp) Changed value that "payment" variable was passing with credit cards, both options pass No with "check" getting put on payment waiting list and "credit" getting put on main once the payment goes through. (eventsignupdb.inc) Added totalfeeamount hidden tag on address entry page. (eventsignupdb.inc) Changed title from Costing Reports to Credit Card reports, as they don't include ALL costing, just credit card information. (navigation.inc, reports.inc) Moved the call location of SaveEventRegistrationCosts on RCID <> 0 so that it was specifically set for each Event ID beyond the original (dbmaintsub.inc) Updated the Attendance to show cost amount with reservations (erv6upgrade.asp, eventsignupdb.inc) Excel output updated to allow for costing with registration (eventsignupdb.inc) EventsXML setup with limiter for # of results coming back, with hooks put in for paging as well (eventsxml.inc) &limit=XXX - Returns XXX # of entries &startcount=YYY - Starts @ # YYY in the query (this is a paging hook) Version 7.02 Set the default factory settings for styles to the new "claudia 2.0" style. Changed language on event registration costs page (eventcostmaint.asp) Added Newstr to Event Type on Temp Table Population (reports.inc) When bulk archiving a set of reservations that are set to appear on the events calendar, events won't be left on the calendar under some circumstances now (pubarchrange.asp) Added Transaction Type (pre auth, capture, sale) and Reservation Date to the CC report. (reports.inc) Set lib 999 & lib 0 Session variables to blank out when logging out of a single branch system with advanced login enabled (maintenance.asp, roommaintenance.asp) Disabled main library login level from the mlibadmin account (usersmaint.asp) Set roomreserve roominfo column to max 1000 (erv7upgrade.asp) Set Room Schedule Report "Date" column default selections to the old (v6) standard report columns instead of detailed report columns, to match "room" column defaults (erv7upgrade.asp) Version 7.03 Fix for javascript error when the org name has an apostrophe (roommaint.inc) Reset Events attendees entered to allow Null (erv7upgrade.asp) Put in changes to check for Null before casting attendance data to a type, and converted code to save as a null instead of setting to zero (dbmaintsub.inc, eventsignupdb.inc, eventstats.asp, roomstats.asp) Fix for specialemailinfo tag not getting picked up in transfer emails (eventtransfer.asp) Setup default Temp table Type to be MYISAM (systemcfg.inc, roomrequest.inc, eventsxml.inc, dbmaintsub.inc, roommaint.inc, eventspr.inc, reports.inc) Reworked events CheckMaxReached method to check if max has been reached as well as check if you are no longer at max. This was a problem when payment was enabled and you reached the max, the MaxReached setting wasn't getting adjusted (eventsignupdb.inc). Reworked the way waiting list signups were handled when payment was enabled on an event so that you (eventsignupdb.inc) Fixed a maintenance.asp report link that would send you to detailed reports when you wanted to view a saved PR Report. (maintenance.asp) Added error handling for sponsorlist table not found issues on the event creation page (dbmaintsub.inc) Added default MYISAM to the rest of the rooms temp tables (roomrequest.inc) Revistsed the rooms search recurring edit dates function, where under certain circumstances a series of dates would get replaced with only the last one in saving. The change reservation pop-up has been reworked to not allow this. (roomrequest.asp, roomrequest.inc) Changed the way recurring emails and system messages are grouped, allowing you to set only a small amount of the message to be duplicated for multiple dates (roomrequestmessages.inc) Added Tags to the rooms system templates (erv7upgrade.asp) ^STARTREPEAT^ & ^ENDREPEAT^ Break out the section that gets duplicated. Room Reserve-Email template tag REPEAT Updated roomsched report to eliminate a problem with single quotes in categories (reports.inc) Version 7.04 Changed All Branches cc report title (navigation.inc) Events Payment changed to allow payment for waiting list access. You now have (ccProcessing.asp, eventsignupdb.inc, eventsignup.asp) Main List - Paid & Registered for a registration slot in the event Waiting List - Paid But waiting for a registration slot in the event Payment Waiting List - Not Paid. When Payment is recieved they will move to the main list if there is room, or the waiting list if it is full. Added Lang files: (erv7upgrade.asp) CONTINUE_WAITING_LIST_PAYMENT_LANG = "Continue to Waiting List Payment Options" - shows up on the payment button if you are paying to get put onto the waitlist WAITING_LIST_CC_PAYMENT_SCREEN_LANG = "You are making a payment to get onto the waiting list. This does not mean you are fully registered for the event." Added Several CC Report Columns for Events, so tracking signup can be easier (reports.inc) Added newstr wrapper on temp table data population (reports.inc) Version 7.05 Fixed Left string error for III when user name is only a single term [no first name] (patronauth.inc) Fix for old CC info replace when there is a null value (roomrequestmessages.inc) Fix for situation where javascript would set a form action to submit, then you would go back and select another room the formaction wouldn't get rest and it would submit you instead of select a new room. (roomrequest.asp) Configured multiple pages to load the correct advanced costing levels based on the library of the reservation, not the library you are logged in to.(roomresform.asp, roomreview.asp) Changed the way the deposit and fee amount are pulled in on the room confirmation link from the staff side, and the way the cost table pulls in stored costs, so that it properly reflects what was charged and the original confirmation message. (roomrequestmessages.inc, roomconfirmationpage.asp) Changed "Extended Cost" column header on the cost table to "Total" to properly reflect what the column was doing, which was displaying the total cost after with quantity applied (roomrequestmessages.inc) Fixed the string where equipment cost was getting pulled in on the View page to point to roomreserveid vs. reserveid (roomrequest.inc) Changed the way the attendance sheet Excel export was verifying payment methods so it wouldn't think in house payment was credit card and vice versa (eventsignupdb.inc) Fixed Room Schedule Report where, when sorting by rooms, it would not adhere to the date search range you set. (reports.inc) Changed the way that Rooms publishes Events to the calendar to eliminate the chances of duplication. (roomrequest.inc) Version 7.06 Added onsubmit: return false; to the reservation contact entry page so that it doesn't get submitted by chrome & safari's autosubmit keybindings [Enter in those browsers automatically submits a form] (roomrequest.inc) Added a check when editing a recurring reservation's single entity that it only changes that one reservation, and doesn't link it to the RCID [all occurences] (roomrequest.inc) Changed the table that ccauth was getting pulled from to reflect the fact that the transaction table now stores dates and authcodes (roomcommon.inc, roommainte.inc) Updated the default events payment method to reflect a difference between payment waiting list and actual waiting list. (eventregmessages.inc) Fix for card number getting converted to exponential in Attendance sheet excel output (eventsignupdb.inc) Fix that eliminates double quotes in event types. (dbmaintsub.inc, eventtypemaintlist.asp) Bugfix where recurflag was checking a str vs. int, type mismatch, changed int to a string (roomrequest.inc) Change to the way costs were being handled on a recurring reservation with different hours or missing a date in the series. Individual time lengths now used to calculate a total. (roomcommon.inc) Room listing on Patron Reservation Lookup heading changed to Room/Equipment (allroomequipmentview.asp, roomrequest.inc) Fix for systems with specialemailinfo enabled but nothing in the field, doesn't error when it tries to validate a null now (eventnotify.asp) Instructor terminology changed to Presenter in the report column listsing to reflect the change in that terminology in the software. (erv7upgrade.asp) MaxReached validated before automoves happen from the waitlist now - so if you're over max number, moving a patron off the main list doesn't trigger the automove function now. (eventsignupdb.inc) RCID set to 0 when Room tags replacement is called from the eventnotification functions - this stops the notify from including all related reservations (eventnotify.asp) Image check handles links with URL parameters in them now (dbmaintsub.inc, imagecheck.asp) Branch set to show up on all multibranch rooms contact entry pages (roomrequest.inc) Query to pull in library names changed from using EventNumBranches to a hardcoded 255, in case the library numbers are higher than the total # of branches. (dbsub.inc) Staff Room Reserve Notification emails which were recieving a text http: address have been switched over to a link. (roomreqestmessages.inc) Checkbox added to the patron reservation lookup to hide the archived reservations when individual patron's history is looked up. Sort order has been set to show active on top. (roomrequest.inc) Host file blanked out to stop overwriting the daylight savings settings [arizona, international customers] (hosted.inc) Bugfix to stop private=2 from failing to find events when specific event types were passed along with it (eventsxml.inc) Clearing the Audit log on the copy process now happens before the audit information for the copy gets put in, so the first entry is the initials and date of when the date got copied instead of being blank. (dbmaintsub.inc) Signupoffset and event start date check changed from hitting date and time seperately to combining them and comparing them. (eventsignupdb.inc) MaxReached is now called after patron moves have been made to eliminate waiting list status when main list spots are opened up this way. (attendance.asp, eventsignup.asp) Version 7.07 Change to fix 1 day showing on instances of the rooms full list schedule report (reports.inc) fix for classification type not showing up on the room schedules report (reports.inc) change for CC Reports that properly aligns column/title placement in Excel (reports.inc) fix for CC reports issue with "today" and "CC Process date" so they work in correlation again (reports.inc) fix for rooms CC Captures not saving "rooms" type, so both auth and capture show up on the rooms side of the report now (ccProcessing.asp) Newstr function added to more text field entries to eliminate character issues (roomrequest.inc) HIDEPATRONROOMSTATUS added to defines to allow control over whether "pending" or "payment pending" displays to the patron side (roomrequest.inc) HIDEPATRONROOMSTATUS = 1 enables this option for patron side. waitcount check was added back to the CheckMaxCount function, where it was previously removed. Now when spots are opened up but there are people on the waitlist, MaxCount won't get set to 0 (which opens registration) until the waitlist has been cleared. (eventsignupdb.inc) Patron Cancellation checking has been added to cancel attendee function. Before it was relying on not linking a patron in their email, but if they had the URL they could still process a cancellation. Now you have to be logged in to cancel if patron cancellation is restricted. (eventsignupdb.inc, regcancel.asp) Ongoing date range has been fixed to not include the first day of the next month on the Events PR Report (eventspr.inc) Response Flushing has been added to the Events PR report, because with the addition of extra data being available the report could get sunstantially bigger and Buffer Overflow was happening. (eventspr.inc) Archive Level has been added to the function that pulls the "other dates" part of a combined recurring series in list view. Selecting No Archived will now not bring in archived dates, as Only archived will only bring in archived dates (eventspr.inc) USERLEVELDELETEREPORTS added to defines to allow enabling the delete option next to reports on the maintenance pages when logged in at User Level (maintenance.asp, roommaintenance.asp) USERLEVELDELETEREPORTS = 1 enables this option. System Wide Event attendance (999) taken out of the event statistics report for single branch reports. (eventstats.asp) CANCEL_REG_PATRON_DISABLED was added (erv7upgrade.asp) cc_transaction table creation was updated to reflect "alter" statements that had been added (erv7upgrade.asp) Version 7.08 Test mode code added to configure processing for cctest.asp (ccProcessing.asp) Last Name javascript check only done if Last Name is required on authentication (eventsignupdb.inc) Added archive level requirements to equipment on the rooms list. (roomrequest.inc, roommaint.inc) Last Name field validation was removed from the patron self cancel page when it was not required (eventsignupdb.inc) Equipment Inventory transition function sets the note fields to variables before NewStr, and checks for existing column alterations before it creates a new one - able to resume better (equipmentinventorymaint.inc) Added erv7upgrade query to change RoomArchiveValue from tinyint to int to allow for bigger numbers to be saved there. (erv7upgrade.asp) Added code to handle multiple setups on the patronschedule page, and fix problems where phone/cardnumber were not being checked appropriately. (eventsignupdb.inc) Added a method to the detailed report to display the Optional Statistical Input information for the title header, and handled multiple library searches [as the questions are library specific]. (eventspr.inc) Department Calendar settings have been worked around so if they don't exist then they won't cause problems on new installs switching on multi branch enable (systemcfg.inc) Fixed a mispelling for tomorrow on the reports (eventspr.inc, reports.inc) Fixed a spot where the equipment string was not getting overwritten and duplicate equipment was showing up on the full schedule report.(reports.inc) Removed the recurring dates column option from the detailed events PR report because combining recurring events isn't available here. (eventspr.inc) Added functionality for remember me to work again with basic login (maintenance.asp, roommaintenance.asp, pwlogin.asp) Set a hidden variable so that if you save the advanced login multi-admin password with only 1 branch active, and then later change your system to multi branch, the mlibadmin login follows suit. (usersmaint.asp) Modified the Event Title column to match Organization column specifications, Where MySQL3 would truncate an entry MySQL5 throws an error so we needed these to match values (erv7upgrade.asp) Pin value was being forced to upper case for all auth types which was causing problem with SIP authentication Fixed a reference to a database value that was coming up null in MySQL5 (eventsignupdb.inc) Set a default value for libnum & eventsystemmessages when this value didn't get set on single branch systems (eventsignupdb.inc) Modified event save: Update only card number and only if card number was entered and not changed (removed saving address info) Added First, Last, and Phone update if not blank and changed and EVENTLOCKDOWN=1 and always requires library card authenticaiton option is enabled This allows for the ILS system to be the master control of the patron information Fixed an issue with zip code parsing for Patron API and custom API Added alphabetical sort to report listsings on the maintenance pages (roommaintenance.asp, maintenance.asp) Added logic to the recurring reservation javascript date pop-up to calculate reservation range based on day/month selection (roomrequest.asp) Single Branch Systems Print List template was saving lib 0 and displaying lib 999, changed to work off of 999 only like multi-branch (emailtemplate.asp) Added text to make the report numbers easier to decipher (roomusage.asp) Added new indexes on queries that were running slow (erv7upgrade.asp) Fixed a typo that appearred on the event email template (erv7upgrade.asp) Added another layer to exml report that bypasses adding information for reservations when roominfo=1 instead of just erroring out. (eventsxml.inc) Fixed an issue with ongoing dates on the XML feed that were not fitting the selected range (eventsxml.inc) Added maxlength to librarylistname (dbmaintsub.inc) Added newstr wrapper to the sponsorlink field (dbmaintsub.inc) Added URL Encoding to the field (dbmaintsub.inc) Enabled Group reg for Events with payment required and the system does not have credit cards enabled (eventsignupdb.inc) Version 7.09 Fix for Customs Question answers showing up out of sync with the table columns on room schedule report in date/room mode. (reports.inc) Newstr wrapper added to anything that could have non integer values in a section of the room scedule report full list mode (reports.inc) Set cardnumlength variable to the right value when length isn't specified so that it would pass javascript validation on the save (roomrequest.inc) stripped eventsxml.asp variables from the CDATA link we create on default when nothing is passed in viz "rsslink". It was adding eventsxml values to pass to eventcalendar, and when not causing a problem it would simply be non-functional (eventsxml.inc) set "all" value on eventcalendar to work without case sensitivity (eventcalendar.asp, eventcalendarshow.asp) Added CSV export option on attendance (attendace.asp, eventsignupdb.inc) Rooms vs. Events usage changed to only display 12 months instead of a 13 month cycle, like the other usage reports (reports.inc) Added validation to add/edit date range search when combine recurring was not selected and show ongoing was selected to check that a date < the end date entered was also not equal to 0000-00-00 - this stops ongoing events that were out of range from showing up (dbmaintsub.inc) Javascript validation was subtracting a month from what it needed to be when you were searching on recurring and res. range was set to months (roomrequest.asp) Logic added to disable checkboxes on roomrequest when you are viewing a date that is out of reservation range (roomrequest.inc) Rooms - pagetitle and windowtitle set up to pass amongst pages (roomrequest.asp) Added a defines switch which lets Organization name show up on the staff side of room request when you are looking at independently bookable equipment (roomrequest.inc) SHOWEQUIPMENTORGANIZATION = 1 Turns this on - not having it defined works as normal, and shows "RESERVED" in it's place Phone Extension is saved as a part of a room contact entry, however when the reservation limit was being checked extension was left out, causing there to be no entries and allow a reservation when it should be restricted. Thgis has been changed (roomrequest.inc) Typo on get Coordinates javascript where state & State where hitting different objects (dbmaintsub.inc, getcoordinates.asp) Changed javascript creation for events PR report popup so that it doesn't hog focus after the initial pop (eventspr.inc) Fixed an issue with locations not getting found (eventspr.inc) Reworked the Ongoing date check to use the same process that eventcalendar uses, so that dates don't get left out (eventspr.inc) created table for localsystem message info (erv7upgrade.asp) Holiday (lib=999) Events were not finding digg switches in the database, and erroring out - this has been fixed to work the same way system wide events have (calutils.inc) Version 7.10 Added a switch to disable the ability of the "private" URL switch for EventsXML. (eventsxml.inc) Adding DISABLEPRIVATEXMLFEED = 1 Turns this on. Reworked that switch to still work but just not show private events. (eventsxml.inc) Changed the way timeadjust was being called, now the date-time string is passed instead of just the time string (eventsignupdb.inc) Changed javascript location.href lines on Home Buttons to point to the top page, for when the site is inside frames it would only redirect to the frame instead of the top level (eventcalendar.asp, eventcalendarshow.asp, roomreqest.inc, patronauth.inc) Changed the location of the specialemilinfoflag lookup (dbmaintsub.inc) Changed a line in the resume function of enabling equipment inventory that checks if the process has been started and then resumes, it was getting hung up if ran a second time when trying to create the column that tracks progress (equipmentinventorymaint.inc) Changed Events costing to save recurring costs with shared attendance with each event ID instead of the AttendanceLinkId (dbmaintsub.inc) EventType conversion script was not working correctly after we switched the DSN declarations to Connection String, now it is setup to work correctly again (eventtypeconversion.asp) Location List Maintenance page changed to evaluate Unique Names by Branch instead of system wide - This was implemented in early v6, and has been rolled back to allow this function again. (locationlistmaint.asp) Added "locations" as an optional dm= (Display Mode) for both the raw list and the HTML checkbox list. Override Room Hours Option has been commented out until the ability to override room hours is implemented. (roommaint.inc) (Recurring) tag added to dates that are cancelled that are part of a bigger series (recurring shared attendance) when the date is displayed (regcancel.asp) Back button added to the page that pops up when you don't enter address information (eventsignupdb.inc) CCProcessing file updated to work with the cc testing page. (ccprocessing.asp) fixed an issue with registration start dates displaying with the time included, when it should've just been the date (eventsignupdb.inc) Added newstr wrapper in PR Report's joining of room reservations to the report at every instance that user inserted data is entered into a temp table to avoid quote issues (eventspr.inc) Custom Stipulation Notes requirement (in I.E. only) removed (stipedit.asp) Updated CC Processing Pathing added to the erv7upgrade.asp Event Signup and Roomreserve.asp have been configured to force SSL connections if CC Processing is enabled (forcessl.inc, roomrequest.asp, eventsignupdb.inc) Bypass this (Testing ONLY) with DISABLESSL = 1 Changed how eventlist was joined into the print list query, when evettype = 'NONE' the section that was checking private status didn't find none, so it wouldn't join it into the print view. (eventspr.inc) Added config links to the CCtest.asp page. (configsystem.asp, systemcfg.inc) Added logic and code to handle tests from the cctesting page. (ccprocessing.asp) Status change emails for recurring reservations that weren't getting triggered from the Main (attendancelinkid) event were only updating the single date instead of series of dates in the email, this has been changed to work no matter where they were triggered from (eventsignupdb.inc) set timeout to 20 minutes to help out slow server connections or problems with emails timing out before they all got sent (notify.asp) set the page up to work from either events or rooms, and pull in data from the specific branch you're at when you click on the test link (cctest.asp) Version 7.11 Changed Age Groups to look specifically for Age Groups when it tries to delete them from the system. This had been previously implemented in Event Types. (systemcfg.inc) Form Validation added to eliminate the ability to edit an event type then save it as blank (eventlistmaint.asp) Fixed a bug that has been savng eventtypes incorrectly when a reservation on the calendar is edited. (roomrequest.inc) CC Processing now handles ACH Direct payments (CCProcessing.asp, roommaint.asp, erv7upgrade.asp) Eventsignup page where Registration Ends now checks to see if registration is enabled & the date is set before it displays it on the page (eventsignupdb.inc) Added a status qualification to the eventnotify room reminder that doesn't send an email to reservations in pending (eventnotify.asp) change to the # of years displayed on the archive range dropdown lists (pubarchrange) Added Publish and UnPublish option in calendar search window for attendance calendar. Added res. status to the roomconfirmation.asp page that is pulled up from the staff side (roomconfirmationpage.asp). Added System Messages XML Feed to the login page (getmessages.inc, getmessages.asp, pwlogin) Set the SHOW URL code generation to properly assign commas and spaces when removing private event types for public links. Was Adding a blank entry if the first eventtype of a list was private and caused the links to not display correctly. (eventcalendar.asp) removed a line that was not allowing "EVENTSDELETEBUTTON" defines variable to properly work (dbmaintsub.inc) Set the function to get reservation status for the message upon an edit to properly take into account whether the previous status was being upgraded (accepted) or whether it was staying the same. (roomrequest.inc) Defines switches added to allow dropdown date's year to be manually configured. Some poeple want to save events from pre 2008 and some libraries book past 2014 (datelib.asp) DROPDOWNYEARBEGIN = numeral only, do not use quotes DROPDOWNYEAREND = numeral only, do not use quotes Changed the eventspr.inc date dropdown to use the month selected instead of the current month when populating the days field. (eventspr.inc) Setup Library Hour inheritance to apply to equipment as well as rooms. (dbmaintsub.inc) Fixed the URLs created from the "Show URL" button on the event calendar in the case of a staff and public links not getting setup correctly. (eventcalendar.asp) Reverted back to not saving rooms "notes" as other info in an event, when a reservation is published ot the calendar. (roomrequest.inc) Section of default factory config that was not working properly with some older department calendar code has been changed to verify if there are multiple department calendars and if not use the default before proceeding and erroring out (systemcfgsub.inc, erv7upgrade.asp) Added section to send more event registration information to cc.evanced.info for ACH payment gateway reciept generation (ccprocessing.asp) removed the line where otherinfo was getting passed to the notes field upon event creation, reset events that were rooms to otherinfo = "" (roomrequest.inc, erv7upgrade.asp) Event Decription info that was generated for the add/edit page is now setup to properly remove HTML when it is displayed, instead of getting cut off (dbmaintsub.inc) Internal Notes were added as a selectable column for reporting (eventspr.inc, erv7upgrade.asp) Server side email validation was setup for "email a friend" so that it had to at least be a validly formatted email address (emailevent.asp) Changes costing class for event to "price for event" Added a switch to allow for staff to mark an event registration as paid for upon signup (eventsignup.asp, eventsignupdb.inc) Added logic on event edit to use the library an event is created for instead of where you're logged when you click on the edit button off the event calendar (dbmaintsub.inc) Added "target URL" logic, changed timeouts to 5 Seconds instead of infinite when a XMLGET couldn't resolve (getmessages.inc) Added logic to display the Home link instead of javascript close link when a page isn't opened via javascript (requestcancel.inc, regcancel.inc) Version 7.12 Fixed the CC page where waiting list payment message would show up even if you were registering for the main list (ccprocessing.asp) Added REQUIRES_PAYMENT_LANG to erv7upgrade.asp (eventsignupdb.inc, erv7upgrade.asp) Fixed sections that were replacing ^PAYMENTINFO^ to properly check that CC processing was enabled on that branch and then use the appropriatte cash/cc message on system templates and email (systemcfg.inc, eventsignupdb.inc) added a line to javascript validation that notifies the user if they select a shorter time range than reservation length. added Date as a secondary sort to room reports when a non date sort by was selected [making it easier to read large timespans] (reports.inc) added logic to check non-inventory equipment booked for events (roomrequest.inc) Added organization to the default internal email template (roomrequestmessages.inc) added a line to ensure that ^SIGNUPSTARTTIME^ had the correct value when it gets replaced on the eventsignup page. (eventsignupdb.inc) Include Archive wasn't updating it's value when loaded from a saved report. (roomschedules.asp, reports.inc) response.flush added to the calendar in the event that there are enough events to overflow the buffer.(eventcalendarshow.asp) Moved the section where specialemailinfo gets processed up, so that regular tags can be added to the message (eventsignupdb.inc) added a default of 25 to server port value (emailsettings.asp) Patron Room cancel was restricted to only reservations which haven't yet occured - can't cancel reservations in the past (roommaint.inc, requestcancel.asp, erv7upgrade.asp) If Additional dates is greyed out in event edits, then the javascript funcitons which are associatted with adding and removing dates are also restricted. (dbmaintsub.inc) Costs displayed for CC charges on the attendance sheet are now pulled from cc_transactions (eventsignupdb.inc) Check Max Reached is now ran after automove happens (eventsignupdb.inc) Residency Checking now added for sirsi sip server. Only Polaris seems to work, and PTypes have to be associatted (eventsignupdb.inc) Turn on with - EVENTSRESIDENCYCHECKFORSIRSI = 1 pagetitle/windowtitle hidden variable now wrapped in quotes so html can be passed between them (roomrequest.asp) Added logic for saved reports pulling up events with 'NONE' as the eventtype (eventspr.inc) fixed an issue where cancelling patrons was opening up the main list for registration when there were still people on the wait list. (eventsignupdb.inc) Added "locations" as an optional dm= (Display Mode) for both the raw list and the HTML checkbox list (7.10) and Added LocationBranchNums as an addtional output. This was added for Firesign/Anode and their customers will require this version. Set RoomReserve email links to use SSL connections based on how the connection from the page they were sent from (roomrequestmessages.inc) Removed department calendar validations when the add/edit page was trying to pull in library names [resulted in defaulting to Lib 0 - Dept 0 instead of lib name] (dbmaintsub.inc) Added Notes to patron signup when set by the switch, also enabled group registration for events without payment even in cc enabled systems, redefined where cost was getting pulled from when displayed on the attendace sheet and CC was used (eventsignupdb.inc) Added Rooms keyword searchability [keys off org & purpose], Fixed invalid type error when including contact information on a PR report and rooms are included (eventspr.inc) Added a defines variable to stop a user logged into a single branch from seeing other branch reservations. FORCEBRANCHLOGINTOVIEW = 1 Fixed a fairly major bug related to automove and max waiting list that skipped people from the waitlist under certain conditions (eventsignupdb.inc) Added another variable for finding what room you are working with when making a reservation, so that the right libraryid can be found and brought in for system settings. (roomresform.asp) Made a change for Columbus with case on a DB table BCC value was being set to "" when the library didn't have Individual Branch email settings setup, but compared to an Int and throwing an Error. Fixed (roommaint.inc, eventsignupdb.inc) Added logic to make the scroll/no scroll button work on room reserve Staff Page (roommaint.inc) Made CC Submit button disable itself to eliminate the want to click it again if it's taking a while to process. (ccprocessing.asp) Added DateEntered to the list of things events saves when it's saving bookable equipment. (dbmaintsub.inc) fixed issues with credit cards not capturing from cloud. (ccprocessing.asp) Version 7.14 Created autoarchive.bat - a batch file we can setup in task scheduler to run daily and trigger the autoarchive function on each branch Added referring URL to the CC Acceptance. (ccprocessing.asp) LOCKWAITLISTOFF variable fixed to work with waitlist slots, still shuts out patrons from overriding a spot by opening the browser and then the event filles up. LOCKWAITLISTOFF = 1 Added URL encoding to User Name and Password values when passed in the URL for authentication (LDAP allows passwords with all types of characters - & and + are the biggest offenders in URLs) (patronauth.inc and roomrequest.inc) Runs double then round conversions on the cost value we send to ccprocessing, to handle the odd case of it extending to mroe than 2 decimal places (ccprocessing.asp)' 7/21 - Facebook Like added to the Event Registration page. (eventsignupdb.inc, facebook_meta.inc, defines.inc) DISABLEEVENTSFACBOOKLIKE = 1 Turns this off Version 7.15 - Added the ability to turn off state inputs (For New Zealand) DISABLESTATEENTRY = 1 Turns this On - Option to disable email a friend DISABLEEMAILAFRIEND = 1 - Attendance and individual event types were coming back skewed on the detailed events report. This has been fixed. (eventspr.inc) - Fixed error on room schedule report when "Book 2 Movie Discussion Group- "The Postman Always Rings Twice," by James Cain, 1949 version" (with double quotation marks) is used. - Fixed error on patron look up when All Patrons is selected and record count exceeds 32768 (changed type to CLng) - Added link to Credit Card Report in reports area in RR and EV (Was only showing up in drop down menu) - Fixed problem with Custom Questions in RR not saving when credit cards are turned on (answers to custom questions were not obtained and passed on from the ccprocessing page)[CASE16454] - Fixed issue with Javascript window error because of HTTPS vs HTTP when credit cards are turned on, user edits/copies reservation/request, and used the Change Reservation button to modify the time selection.[CASE16629] -Forced roomresform.asp to switch to HTTPS if credit cards enabled (same as roomrequest.asp) - Added Security link (same as User Logins link on main maintenance page) to on All Branches level System Configuration and Settings left menu in order to stay consistant with password level security links. This will provide a Security link when user name login is selected. - Changed credit card cost report to open in new window when submitting from searching filter page, allowing the user to maintain their search. - Changed some of the CInt types to CLng for Room Usage report after finding a problem on Plano site (reports.inc lines 3678 - 3689) - Added 2 new fields to RR Credit Card report (Status and Last Updated) - update for events xml, when roominfo = 1 is included, the time qualifier is excluded from the main where clause, resulting in any status reservation showing up. This has been fixed. Version 7.16 - Added section to LoadConfigSystem in systemcfgcub.inc to pull certain All Branch settings and load them into a newly created branch. - The problem was the some of those settings are accessed at the all branches level but were not following the rest of the branches when a new branch was added after the values were set. - Fixed problem in dbmaintsub.inc with Archiving recurring events that had a double quote in the event title. - Set all PW to factory password, added update statement for changing PW in login_specificuser for evanced user, and moved version update and login factory password update statements to array area instead of at the end. - Fixed issue in RR with very long template messages getting cut off in certain situations. I modified UpdateTagSection in roomrequrestmessages.inc to remove the fixed value of 1000 and replace it with Len(ModifyStr) - applied a patch to force SSL on every branch if credit cards are turned on for one. - Added Response.Flush and loop counter to ShowPatronSchedule function in eventsignupdb.inc Modified query in eventsignupdb.inc to prevent hanging when attempting to get NonCancelCnt for ShowPatronSchedule - Added "TimeAdjust()" to various report functions to account for time zone settings when display default date selections. Added "TimeAdjust()" to default date and time on roomrequest.asp page - Fixed Calendar display with Date Range (dr) option for reports and Print option on calendar (eventspr.inc) - Added UseSSL=True for Patron API access that uses HTTPS (patronauth.inc) - Fixed spelling error - guardian (eventsignupdb.inc) - Change to exclude Private branch location values in searchparts.asp - Fixed error message display when event type is added with a command followed by a space. - Added table of dates from Jan to Dec at the end of the regionalsettings.asp page for verifying that the timezones are calculated correctly. - Fixed the timeadjust.inc functions to correctly calculate the timezones - Removed timezone settings from loadvars.inc and replaced with a different method of getting the timezone - Changed the query and functionality in roomrequest.asp that checks for credit card enabled in order to redirect to HTTPS; removed looping - Fixed residency check timed out when used with authentication (eventsignupdb.inc) - Removed HTML commented code at the end of the page that also included VBScript code that was executing on the Cloud server. (roommaintenance.asp - Fixed problem with View Recurring reservation if there was only 1 reservation in the series. (roomcommon.inc) Version 7.17 - Added Trim function in roomrequest.inc to email address values when sending emails. Admin side is not checking for valid email addresses and allows for a single space to be entered which messes up email notifications. - Added KCLS custom modifications * Added ability to keep event Published when user with access below the publish level modifies and event Requires Defines Setting: EVENTS_KEEP_PUBLISHED_ON_EDIT = 1 * Event title shows in Room Reserve Request page for Unpublished events when accessed by staff; still shows RESERVED for patron side * Bigger "Back" button - Added an additional CSS Class that needs to be added using the Style Sheet Editor page: ** Log in as Admin or Super User and go to Style Sheet Editor page ** In the Global section, find the "input.maintbtn" style settings ** After the "input.maintbtn" style settings add the following (Actual style settings may change): input.backbtn { font-size:24px; } * Add support for tags in subject line of emails for Events ** SendRegistrationConfirmation - ^DATE^, ^TIME^, ^LIBRARY^, ^STATUS^ ** SendAttendanceStatusChange - ^DATE^, ^TIME^, ^LIBRARY^, ^STATUS^, ^OLDSTATUS^ * Add support for tags in subject line of emails for Room Reserve ** All body tags are supported - Added Evanced Message disable: DISABLE_EVANCED_MESSAGES = 1 - overhauled querystring inputs to eliminate spaces after a value is pulled in (and everything afterwards, huge security fix) Online URL: http://kb.evanced.info/article.php?id=86 Hosting Software Through Evanced Solutions What happens when I subscribe to the Evanced Solutions software? A copy of the software will be loaded on a server for your library. This is a server maintained by Evanced Solutions and provided to our customers for housing our applications (Events Calendar, Room Reservations, Summer Reader, Genealogy). How are the servers set up? The servers reside in a ‘cloud’. Cloud computing is Evanced Solution's current hosting hardware architecture. The cloud is basically a hardware environment where there is a distinct separation between the software and the hardware. The operating system is virtualized in this environment and managed by a virtual software manager. This allows for 2 major benefits: The virtual OS can be moved or copied easily allowing for complete snapshot backups which provide quick catastrophic recovery times. The hardware can be replaced or modified quickly with little impact on the running system. In reality, this type of architecture is no different than a standard server from a user's perspective, but it does have significant benefits to the administrators. Do Evanced servers use SSL? Yes. SSL is a protocol that allows for an encrypted connection between the client (end user) and the server (application). Using this protocol protects the data that is passed between the browser and the server and makes it more difficult to see that data that is passed. All Evanced Solutions servers have SSL built-in. To utilize this protocol simply change all of your starting links from "HTTP" to "HTTPS". What about downtime? While we always do our best to ensure the highest up-times possible, downtime is bound to occur on occasion. Evanced Solutions and our hosting provider, nFrame, routinely monitor (and receive automatic notifications of) situations that can potentially be a downtime situation. In the event of a downtime situation, our hosting provider will send email to a list of Evanced Solutions support staff. In addition, nFrame will run through a call rotation that includes the cell phones of several high technical level Evanced Solutions employees. We will work with nFrame to determine the cause. If the downtime situation is isolated, we will directly notify any customers whose sites were potentially involved. If the downtime situation affects more than a few sites, a description of the situation will be posted to our blog along with updates and resolutions as they become available. What about security? A Security Breach is a situation whereby a connection to the database or server has been made by a means outside of our normal expected operation. Evanced Solutions and nFrame routinely monitor (and receive automatic notifications of) situations that can potentially be a security breach. In the event of a breach nFrame will email a list of Evanced Solutions contacts. In addition, they will run through a call rotation that includes the cell phones of several high technical level Evanced Solutions employees. We will work with our hosting provider to determine the cause and evaluate the potential validity of the security breach. If valid, we will take steps necessary to isolate the method the breach used and we will directly notify any customers whose sites were potentially involved. As of 1/24/2011 (the creation date of this document) there has not been a security breach on our current hosting system. Where is the software housed? Evanced Solutions has chosen to partner with nFrame to support our servers. We chose nFrame because of their experience and support in their 99.999% uptime facility. nFrame provides proven and reliable cloud computing and virtualization services. These high-density, flexible computing solutions are ideal for organizations that want to reduce their capital expenditures in IT infrastructure equipment and human resources. nFrame has 15 years experiencemonitoring enterprise-level systems. In addition to proven processes and commercial-grade monitoring applications, nFrame features 24/7 on-site IT engineers to identify, diagnose and resolve system performance issues immediately. The systems monitoring services are provided from nFrame’s SAS 70 compliant, state-of-the-art data center in Indianapolis. Common system performance problems and events we monitor and mitigate include: ICMP Loss ICMP Latency Network Events Trouble Ticket Operating system events Data storage system events Hardware systems state More information on nFrame may be found here http://www.nframe.com/. . Online URL: http://kb.evanced.info/article.php?id=91 Server Requirements It is only important to understand the server requirements for a system that is installed on your server. For hosted systems, your interface to the software is entirely through a browser. Standard Library (less than 400 events/reservations per month or less than 10,000 reading registrants) Operating System: Windows Server 2003 or higher (Can be a shared server. However, performance will depend on resources used by other software installed on the server.) Processor: 2.0 GHz or higher RAM: 2 GB minimum (4 GB or above better) Hard Drive: 50MB of free space Microsoft IIS v6 or above installed Execute Permissions should be set to "Scripts Only― Web Server Extensions must have Active Server Pages set to "Allowed―. Port 80 must be open MySQL – Version 5.0.67 included with install package; Installed on the root of the largest available drive MyODBC – Version 3.51.12 included with install package Larger Libraries (over 400 events/reservations per month or over 10,000 reading registrants) Operating System: Windows Server 2003 or higher (Dedicated server) [Will work with Windows 2008 32 bit and 64 bit systems) Processor: 2.6 GHZ or higher RAM: 4 GB minimum (8 GB or above better) Hard Drive: 100 MB of free space (15K RPM Drive better) Microsoft IIS v6 or above installed Execute Permissions should be set to "Scripts Only― Web Server Extensions must have Active Server Pages set to "Allowed―. Port 80 must be open MySQL – Version 5.0.67 included with install package; Installed on the root of the largest available drive MyODBC – Version 3.51.12 included with install package . Online URL: http://kb.evanced.info/article.php?id=143 Events-Facebook Feature V7.14 Events - How to Setup Facebook Feature Evanced Solutions has added a new feature as of Events version 7.14, where the library is giving the patron access to like an Event from the Library Event Calendar to post on the patrons Facebook page. This feature gives the library the upper hand in advertising to all those Facebook users connected to that one patron. Free advertising! Setup Follow the following steps in proceeding with setup of your Facebook feature. 1. Open the Staff Side of the Events Program 2. From the Tool Bar Select "About" 3. Ensure the Version Number is equal to or greater than 7.14 4. Contact Evanced Customer Support and submit a request to enable the Facebook feature on your Events site as well as upgrade the Events site if needed. - [email protected] How It works Select an Event from the Calendar Select the "Facebook Like" icon IF the patron is signed into Facebook on their computer the status will auto post to the patrons Facebook Page If the patron is not Logged into their Facebook site then the system will prompt to Login before posting. Online URL: http://kb.evanced.info/article.php?id=81 MySQL Performance Tuning There are a couple of things that can be done to ensure that your MySQL database is running as fast as it can. Besides making sure that your server is in good shape and that it has the resources necessary for supplying data to your web site/server, you can fine tune it's performance a little by reviewing the following items. Customizing Antivirus Scanning Rules MySQL maintains the database data in a data folder It is possible that your antivirus software is scanning the data folders or the temp folders and slowing down the data transfer for the database. To make sure this isn't a problem you must first determine where your data and temp folders are located. MySQl often creates temporary tables to handle more complicated queries. These temp tables are normally created in the Windows temp folder by default. But to be sure you need to look through the "my.ini" file to determine where these folders are located. The "my.ini" file is usually located under the main installation file for MySQL. Typically "c:\MySQL5\". For older version of MySQL it could also be located in the "system" folder or on the root drive. This is also the order that MySQL looks for the "my.ini" file so try to locate the first "my.ini" file you can find in that order (Install Path first, System path next then the Root path). Open the "my.ini" file in Notepad or some other simple text editor. Now locate the "datadir=" value. This is the primary storage location path for the database files. Remember this path for later. Now locate the "tmpdir=" value. It may not exist. If it doesn't then your system is using one of the Windows temp folders. You can add it under the "datadir" value by adding the following line: tmpdir="C:/MySQL5/Data" You can add it anywhere, but it would make sense to add it to the same location as your database folders so that you need only specify a single directory when setting up the antivirus settings to bypass this folder. Now, using these 2 directories, edit your antivirus program to not include these folders in the normal real-time scan. This will cause your antivirus software to stop scanning these directories in real-time and should speed up the data transfer to your web site/server. Ensuring database default consistency The other item in the 'my.ini" file that is commonly configured improperly is the default temp table format. This is also found in the "my.ini" file that was mentioned above. Locate the "default-storage-engine=" value in the "my.ini" file. This should be set to: default-storage-engine=MYISAM It is common for it to be set to another value. This causes a slow temporary table creation because the format is different than the normal tables that are created with our applications. Changing this value to be consistent should have a significant impact on performance. Online URL: http://kb.evanced.info/article.php?id=132 Upgrading MySQL from 3 to 5 The Evanced Event Calendar, Room Reserve and Summer Reader software version 7 and up requires the use of MySQL5. If your system is upgraded you may need to upgrade MySQL as well. The following information contains detailed instructions on installing MySQL and upgrading your database from 3 to 5 for use with the newer versions of Events, Room Reserve and Summer Reader. These instructions do not remove the MySQL 3 installation. Rather it simply adds MySQL 5. Any existing applications using MySQL 3 will continue to operate. SPECIAL NOTE: If you have more than one version of MySQL already running on this server please contact support for special instructions. Required Evanced software versions for using MySQL 5 * Event Calendar version 6.5 or newer * Room Reserve version 6.5 or newer * Summer Reader version 7 or newer Upgrading to MySQL 5.0 Determining what version you are currently running To determine the version of MySQL being used by your system run the following command from the 'bin' folder under the 'MySQL' directory or contact [email protected]. c:\mysqladmin -V mysqladmin Ver 8.41 Distrib 5.0.67 for Win32on ia32 The version of MySQL is listed after the "Distrib". Installing MySQL 5.0.67 Please note that moving the database will involve minor interruption of the site, so it is recommended to make this change during the slowest traffic. Send an email to [email protected] requesting the download links and passwords for obtaining the MySQL 5 and ODBC 3.51 installation files. Download MySQL 5.0 and then run it selecting the "Complete installation option (take a note of port# used). And also download the MySQL 5.0 ODBC driver "3.51― and then run it. Ensure that MySQL 5.0 installed successfully and is running (check for the "MySQL5" service in the Services Panel). If not, use the uninstall functions to remove it. Be sure that all MySQL 5 files have been removed and the "MySQL5" service is no longer running before trying to reinstall. Moving your database 1. Disable the old ODBC connection by going to the "ODBC Data Source Administrator" usually under "Administrative Tools" and either removing the ODBC connection or renaming it. Make a note of the name of this connection as it will be needed later. 2. Copy the database folder ("autoemail" for Events and Room Reserve and "sr" for Summer Reader) from its MySQL 3 location (usually c:\MySQL\data) to its new MySQL 5 location (c:\MySQL5\data). Adding the new ODBC connection NOTE: To confirm the DSN name, go to your system’s web folder (usually in this location: c:\inetpub\wwwroot\evanced\lib), open the "common”• folder then open "defines.inc" file using Notepad. The DSN name should be listed there somewhere in the first part of that file (DSN="autoemail"). 1. Click the Add button 2. Select MySQL ODBC 3.51 driver from the list and hit finish. 3. On the Login tab: 1. Data source name (use the same previous name ie. DSN="autoemail"). 2. User: root 3. Password: "This is your MySQL master password. Create something memorable and write this down!" 4. On the Connect Options tab: 1. Port 3306 or 3307 according to your install. 5. On the Advanced tab: 1. Make sure the option to "Change BIGINT to Columns to Int” is checked. 6. Now go back to the Login tab, select the Database from the drop down list and save. 7. Go to your Events, Room Reserve or Summer Reader system link to make sure it is back up. 8. It is recommended to rename the old database folder (previously in c:\MySQL\data) to indicate that it is old or not used. Sometimes renaming will not be allowed until the connection to the old database has been completely terminated, which may take a few minutes. Upgrading your site If your site was not previously on a version that supported MySQL5 then you will need to complete the upgrade process before it will function properly. This include copying the upgrade files into the web folder and running the upgrade script. Once complete your site should come back up running on MySQL5. Online URL: http://kb.evanced.info/article.php?id=162 Server Move How do I transfer an existing Events, Room Reserve or Summer Reader system to a different server? Please review the information in this article to help plan for your site move. System Transfer Instructions Please remember that the Evanced Support Department is always willing to help or even perform the move for you (for a fee), so if you have any hesitations about performing the move yourself please contact us at [email protected] to schedule your move. If you intend on performing the move yourself, send us an email requesting the links for the installation programs or be sure to download the following versions: MySQL v5.0.67 MyODBC v3.51.12 (v3.51.27 for 64-bit) The "original• server is the server which currently houses the system. The "new• server is the server that the system is being moved to. It must run Windows 2003/2008 Server or newer, and be configured with the "Application Server• role. For Windows 2003 Server or newer, make sure the Internet Information Services (IIS) Manager’s Web Service Extensions are configured to allow Active Server Pages or Classic ASP, as they are prohibited by default. Note: Windows Server 2008 64 bit doesn't support MySQL 3. Events/Room Reserve needs to be on version 6 or higher to use MySQL 5, and Summer Reader needs to be on version 7 or higher. In other words, Evanced modules need to be on one of the latest versions to be installed and run on a 64-bit server operating system. When transferring the system(s) to another server: * The MySQL service and ODBC driver need to be installed on the new server. * The web files and MySQL database files need to be copied to the new server. * The Data Source Name (ODBC connections) need to be configured. The following describes how to accomplish the steps required in the transfer process. Please read through all of the steps before starting the transfer. Installation of MySQL and ODBC connector on new server: 1. Install MySQL. Download the MySQL installation files from the links provided by Evanced. IMPORTANT: If you download MySQL directly from the MySQL website, please ensure that it is version 5.0.67. Evanced products are designed for a specific version of MySQL and using a different version may cause unknown errors. Install MySQL to the drive that will be used for data storage. Our typical installation resides on C: or D: directly which is not the default destination. We recommend you change it to "C:\MySQL5" when installing. Note the port number used when installing this will be needed later. Typically 3306 or 3307. If the installation is unsuccessful, uninstall and be sure to remove any directories it created. Then try the installation again. If you continue to have trouble please contact our support department at [email protected]. 2. Install ODBC Connector. Download the ODBC Connector installation files from the links provided by Evanced. IMPORTANT: If you download the ODBC Connector directly from the MySQL website, please ensure that it is version 3.51.12 (v3.51.27 for 64-bit). Evanced products are designed for a specific version of ODBC Connector and using a different version may cause unknown errors. Run the installation program and select the Full Installation. Archiving the old web site and data. 1. Disabling the old database connection. Open the ODBC connection manager on the Original server. Typically this can be found under 'Start-->Administrative Programs-->Data Sources (ODBC)'. Select the System DSN tab. Make note of the DSN name and the database name it connects to, you will need this later. Delete the ODBC connection for the Evanced products. This will vary depending on which Evanced products you have installed. For Summer Reader customers there will be an 'SR' connection. For Events and/or Rooms there will be an 'Autoemail' connection. For Genealogy it may be called either 'Obit' or 'Genealogy'. You can also disable the connection by just renaming the connection (ie. 'SR_old'). 2. Backing up Database files. The database can be stored on any drive and in one of several locations. Again the databases are determined by which Evanced products are installed and how they were named. Typical folder names are: 'SR', 'Autoemail' and 'Obit' or 'Genealogy'. Locate the database files by looking for the product folders in one of these possible locations. o "C:\MySQL\Data\" or "D:\MySQL\Data" o "C:\MySQL5\Data\" or "D:\MySQL5\Data" o "C:\Program Files\MySQL Server\MySQL5\Data\" or "D:\Program Files\MySQL Server\MySQL5\Data" Once located, evaluate the files under the product folder to determine if they have been recently modified to be sure you are looking at the current database folders. Any database that are in use should have some files that have a current modified date. If the file dates are all in the past then this is probably a backup folder. Once you have located all of the current folders copy them by right-clicking on them and choosing copy then clicking in the white space of the same folder area and right-clicking and choosing paste. This should create a "Copy of ..." folder for each folder. This is done so that the original database files can be left intact in case of a mistake later on. Prepare to copy these folders to the new server. You can compress (zip) them before moving if desired. 3. Backing up Web files. The web files are typically located in the root web path under an 'Evanced' folder. Events and Rooms both exist under the same folder, typically 'lib', Summer Reader is typically under 'SR' and Genealogy is under 'Obit' or Genealogy'. So a standard installation would have the product folders located in "C:\inetpub\wwwroot\evanced". Check with your IT group if they are not in this default location. Copy the entire "evanced' folder by right-clicking on it and choosing 'copy'. Then paste it in the same location by right-clicking on the white space and choosing 'paste'. This should create a "copy of..." folder for the evanced folder. Prepare to copy this folder to the new server. You can compress (zip) it before moving if desired. Restoring the data on the new server. 1. Restoring the Web files. Paste the web files that were copied earlier under the "C:\inetpub\wwwroot\" folder on the New server or where your IT department determines the 'Evanced' folder should be located. Rename the folders to their original names. ie. "Copy of lib" should be just "lib". 2. Restoring the Database files. Paste the database files that were copied earlier under the "data\" folder on the New server where MySQL was installed earlier. Rename the folders to their original names. ie. "Copy of autoemail" should be just "autoemail". 3. Restoring the database connections. Open the ODBC connection manager on the New server. Typically this can be found under 'Start-->Administrative Programs-->Data Sources (ODBC)'. Select the System DSN tab. Using the DSN names and database folder names recorded earlier rebuild the ODBC connections. Events and Rooms use the same ODBC connection. Summer Reader and Genealogy each have their own ODBC connection. The necessary items in an ODBC connection are: o DSN Name --> Same as on old server o Username --> Created during MySQL install o Password --> Created during MySQL install o Database --> Same as old server o Port --> Determined during MySQL install (Under Connect Options tab) o "Change BIGINT Columns to INT" --> Must be checked (Under Advanced, Flags 1 tab) NOTE: You will not be able to select the database until all other options are defined, so select it last. Note: Remember to go under Email Settings and edit the two fields referring to system's URL to the new one. Those should be Server Name and Folder Path. Configure the scheduled task on the new server: 1. Edit the Scheduled Task Batch file. Use My Computer to browse to the evanced\lib folder created earlier. Right-click on the "notify.bat" file and select Edit or Open With and select a simple text editor. The batch file should contain the following line: HttpRequester.vbs http://localhost/evanced/lib/eventnotify.asp?opmode=all Edit this line to point to your installation. Mainly replace the "localhost" with the path to your web site. 2. Build the Scheduled Task. Open the Scheduled Task Wizard on the server. Typically this can be found under 'Start-->Control Panel-->Scheduled Tasks-->Add Scheduled Task'. Select Next when the wizard starts. Click on Browse and find the "notify.bat" file under the lib directory created earlier and select it. Change the name of the task to something like "Evanced Notify", click Daily then click Next. Select the time you want the notification script to run then click Next. Typically this is during a slow traffic time like 11:00 PM. Enter a user name and password for an account that does not change or remember to change this password whenever your security policy requires you to change passwords. Click Next then click Finish. 3. Test the Scheduled Task Right click on the scheduled task you just created and select Run. If it runs with no more user interaction then it is installed correctly. If it requires ANY user interaction then this must be addressed or it will not run automatically. NOTE: One common issues is a popup that requires user interaction to click on OK to continue running. If this window is displayed, be sure check the box for "Do Not Display This Warning Again". Failure to check this box will cause the task to fail. Now you can test your system. Again please contact [email protected] if you have any questions, problems or just would like us to perform the move for you. Posted - Wed, Sep 28, 2011 at 3:06 PM. This article has been viewed 118 times. Online URL: http://kb.evanced.info/article.php?id=142 Events/Room Reserve V7 Upgrade Instructions Please remember that the Evanced Support Department is always willing to help or even perform the update for you, so if you have any hesitations about performing the update yourself please contact us at [email protected] to schedule your update. If you intend on performing the update yourself, send us an email requesting the download links and passwords. Only attempt the steps in this article if you have applied similar updates before. Important: Events/Room Reserve version 7 requires MySQL version 5.0, other versions are not supported with it. If your system is currently using a different version, it has to be moved to MySQL 5.0 database before starting the upgrade process. If you are not sure of MySQL version you are using, please contact support at the email address below. Instructions to upgrade MySQL are available here. Please also email support if you are trying to update an Events/Room Reserve system that is older than version 5. Direct upgrade in those cases will cause issues. To check your system’s version, select "About― from maintenance home page’s menu bar. To update Events/Room Reserve version 5, 6, or early 7 to the latest version 7, please follow the steps below. System's web and database files need to be backed up before we start the update process: Create a location. Create a location. copy the system's web folder (usually located at "c:\inetpub\wwwroot\evanced\lib") and keep the copied folder saved in the same This will create a backup of the web files. copy the system's database folder (usually located at "c:\MySQL\Data\autoemail") and keep the copied folder saved in the same This will create a backup of the database files. ***Please note that folders’ path mentioned here are the suggested (default) ones, but they could be different. If you need assistance in determining where the active files are located, please contact us at the information below. 1. From your internet browser, now go to the link provided by Evanced support, then save "Upgrade_v7.zip― to the ..\evanced folder, or its equivalent folder. 2. Unzip this compressed folder into the ..\evanced\lib folder. This will overwrite some/most of its contents to replace them with the 3. 4. 5. 6. 7. updated files. Open Internet Explorer or Firefox. Browse to your Events/Rooms site (may not be working yet) changing the page name to 'erv7upgrade.asp' at the end of the URL, instead of "eventcalendar.asp• or "maintenance.asp•. Click "Yes• to upgrade, when prompted. When complete, click "OK•. Now, test your Events/Room Reserve system by accessing it normally using the public and the staff links, browse to make sure everything looks ok and verify the new version number is reflected on the "About• page (You may have to refresh it). If you see any errors or problems, please contact support immediately. Posted - Fri, Feb 3, 2012 at 10:24 AM. This article has been viewed 113 times. Online URL: http://kb.evanced.info/article.php?id=365 Events-Self Install Instructions Events: Self-Install Instructions Please remember that the Evanced Support Department is always willing to help or even perform the installation for you, so if you have any hesitations about performing the installation yourself please contact us at [email protected] to schedule your installation. If you intend on performing the installation yourself, send us an email requesting the links for the installation programs. Applies to version 7 and newer of the Event Calendar software The installation server is the server that the system is being installed on. It must run Windows 2003/2008 Server or newer, and be configured with the "Application Server• role. For Windows 2003 Server or newer, make sure the Internet Information Services (IIS) Manager’s Web Service Extensions are configured to allow Active Server Pages or Classic ASP, as they are prohibited by default. The installation process includes the following steps: The MySQL service and ODBC driver need to be installed on the server. The installation web files and default MySQL database files need to be copied to the new server. The Data Source Name (ODBC connections) needs to be configured. The following describes how to accomplish the steps required in the installation process. Please read through all of the steps before starting the installation. Installation of MySQL and ODBC connector on server: 1. Install MySQL. o Download the MySQL installation files from the links provided by Evanced. IMPORTANT: Do not download MySQL directly from the MySQL website. Evanced products are designed for a specific version of MySQL and using a different version may cause unknown errors. o Install MySQL to the drive that will be used for data storage. Our typical installation resides on C: or D: directly (ie. "c:\MySQL5"). o Note the port number used when installing this will be needed later. Typically 3306 or 3307. o If the installation is unsuccessful, uninstall and be sure to remove any directories it created and the MySQL5 service. Then try the installation again. If you continue to have trouble please contact our support department at [email protected]. 2. Install ODBC Connector. o Download the ODBC Connector installation files from the links provided by Evanced. IMPORTANT: Do not download the ODBC Connector directly from the MySQL website. Evanced products are designed for a specific version of ODBC Connector and using a different version may cause unknown errors. o Run the installation program and select the Full Installation. Installation of the web files and default database: 1. Locate the default web site location on the server. o The standard default is: "C:\Inetpub\wwwroot\" o Verify the default web site location by going to "Start-->Programs-->Administrative Tools-->Internet Services Manager", click on the computer name, right-click on the default web site, select Properties, click on the Home Directory Tab. o The local path setting displays the physical location of where the web site starts. Make a note of this path. 2. Create the Evanced folder. o Use My Computer to navigate to the default web site location noted above. o Create a folder in this location called evanced. o Navigate into the evanced folder and create a folder called lib. 3. Install the web pages. o Use the links sent from Evanced and save the calendarsystem_vXX.zip file (where XX is the product version) to the evanced folder created above. o Unzip the calendarsystem_vXX.zip file into the evanced\lib folder created above. 4. Install the database files. o Use the links sent from Evanced and save the vXX_install_db.zip file to the evanced folder created above. o Unzip the vXX_install_db.zip file into the database data folder folder created above. (typically "c:\MySQL5\Data") Configuration of the database connector (ODBC/DSN): 1. 2. 3. 4. 5. 6. Open the ODBC connection manager on the server. Typically this can be found under 'Start-->Administrative Programs-->Data Sources (ODBC)'. Select the System DSN tab and click add. Click on the 'MySQL ODBC 3.51 Driver' and click finish. Click on the Advanced tab and check the box next to 'Change BIGINT Columns to Int'. Click on the Connect Options tab and enter the port number used during the installation for the port value. Click on the Login tab and enter the following values: DSN Name --> autoemail Username --> root Password --> evanced 7. Click on the Test button. You should receive a "Connection was made" message. If not, review the previous steps and ensure that all settings are correct. 8. Select the autoemail database from the database droplist. NOTE: You will not be able to select the database until all other options are defined and are correct, so select it last. Verify the installation: 1. Open Internet Explorer/Firefox/Google Chrome and enter "localhost/evanced/lib/about.asp" in the address bar. If the About window does not appear then there are problems with the webfile installation or IIS configuration. Please review the previous steps and/or contact [email protected]. 2. If the previous test passed then enter "localhost/evanced/lib/maintenance.asp" in the address bar. If login screen does not appear then there are problems with the database installation or ODBC configuration. Please review the previous steps and/or contact [email protected]. Update to the newest minor revision: 1. Use the links sent from Evanced and save the "Upgrade vXX.zip" file (where XX is the product version) to the evanced folder created above. 2. Unzip the "Upgrade vXX.zip" file to the evanced\lib folder. Be sure to check the box for "Use folder names and select Yes for "Overwrite all files." 3. Open Internet Explorer/Firefox/Google Chrome and enter "localhost/evanced/lib/ervXupgrade.asp" in the address bar (X is the product version) and click on Yes to run the upgrade script. When complete click OK. 4. Test the site by entering "localhost/evanced/lib/maintenance.asp" in the address bar. If login screen does not appear then there were problems with the update. Please review the previous steps and/or contact [email protected]. Now you can test your system. Again please contact [email protected] if you have any questions, problems or just would like us to perform the installation for you. Posted - Tue, Sep 27, 2011 at 3:20 PM. This article has been viewed 71 times. Online URL: http://kb.evanced.info/article.php?id=84 Before Transferring Your Evanced Site to Your New Server Here is what you need to know and plan for, before you transfer your Evanced site to a new server: 1. Determine any IP restrictive options and ensure they apply to the new server. a. If you are using email notifications in the Evanced system, make sure your new server is allowed to relay email through the SMTP server you are currently using. Contact your email admin for more details. There is a detailed article on email setup: http://kb.evanced.info/article.php?id=72 b. If you are authenticating your patrons' library cards against your ILS system, also make sure that the new server is allowed to connect to your ILS system. Contact your ILS admin for more details. c. If you currently have a custom header on your Evanced calendar/room request page or using your own images on the Summer Reader page, make sure to either move the images as well or locate where they are referenced in the source code to make any necessary link changes. 2. If Evanced is doing the transfer for you, please ensure that we (Evanced) have a good remote connection to both old and new servers (and database server if it is on a different machine) 3. Notify staff when the move will be taking place so that no editing is going on during the transfer. Make sure that they account for up to 30 minutes of downtime. 4. Determine all links that point to the existing application and be prepared to change them after the move over time. If needed, we can also setup redirects on your original server so that all traffic from your links will be rerouted immediately. Make sure to request that, if interested. Here is the article with actual transfer instructions: http://kb.evanced.info/article.php?id=142 Posted - Fri, Apr 20, 2012 at 9:27 AM. This article has been viewed 27 times. Online URL: http://kb.evanced.info/article.php?id=416 Understanding the Events Calendar (Patron View) The Events Calendar has two basic views. In House Registration Mode and Patron Mode. They are similar in most ways. The URL for the Patron Calendar is similar to the staff home page. http://Yourlibrary/lib/maintenance.asp is the staff page http://Yourlibrary/lib/eventcalendar.asp is the patron view. This article focuses on the differences between the two modes. Patron mode does not contain a filter for unpublished events in the search slider. Patron mode does not display events marked as private. Patron mode does have a Print View button, which enables a printer-friendly version of the page. The RSS feed in Patron mode is different. It shows the specific RSS for the calendar they are viewing. If they have created a custom filter, it will give them an RSS feed for their specific wishes. To link it to your website, read this article In most other respects, Patron View is indistinguishable from In House Registration Mode. Posted - Mon, Sep 19, 2011 at 8:26 AM. This article has been viewed 91 times. Online URL: http://kb.evanced.info/article.php?id=62 Understanding the Staff Home Page (Event System Maintenance Page) This article will teach you about the Staff Home Page (aka Event System Maintenance Page) by explaining the purpose of each of the tabs and links. Note #1: This picture is for the branch view only. Note #2: If you have multiple branches enabled, in the upper right corner of the screen you'll see the Branch Select Dropdown. If your system has Room Request, you'll also find a hotlink to that system as well. From the home page (above), you can access all the features of the Events Program. Reading left to right from the top of the screen, you can see the following tabs (click on links for more details): Home The Home tab takes you back to the Event System Maintenance page from any other page in the program. Event Maintenance The Event Maintenance tab allows you to access the Add/Edit/Archive menu or the View Archive menu. If you mouse over Event Maintenance, both options appear. If you click on Event Maintenance, it will take you to the Add/Edit Archive menu automatically. Event Maintenance options allow you create, edit, or view events for your library. Registration & Attendance The Registration & Attendance tab allows you to access the Event Attendance, Calendar/Registration, or Attendee Lookup pages. The pages give you quick and easy access to a wealth of information about who is planning to attend future events or has already attended recent events. Mouse over the tab to reveal the options. Reports The Reports tab is your gateway to the Event Statistics Report, Detailed Event Report, Events and PR Report, Subscriber Lookup, and Subscriber Details. These tools aid in creating a variety of useful reports related to attendance and payment, as well as data about individual subscribers. Mouse over the tab to reveal the options. Settings The Settings Tab grants access to the System Configuration and Settings page, the Event Type List, and the Age Group List pages. There are also some branch specific options. Via the Settings pages, you can change the look and feel of Events. Mouse over the tab for options. About The About tab reveals the version information for your copy of Events. It also provides links back to Evanced.com as well as support information. Logoff The Logoff tab logs you out of Events and sends you back to the Logon Screen As your eye moves down from the menu tabs, locate the box labeled Event Maintenance on the left. Under Event Maintenance, there are two options: The Add/Edit/Archive function allows staff to search a list of current events, view event information, add, edit, and archive events, determine an Add/Edit/Archive event’s publication status (i.e., whether the event appears on the patron’s calendar view), and publish events. View Archive The View Archive function allows staff to search events that have been archived and no longer appear on the active Events Calendar. Staff may also permanently delete events from the archive Below the Event Maintenance box is the Registration & Attendance box. Event Attendance The Event Attendance function provides access to an event’s attendance sheet. The Event Attendance Sheet displays the event schedule, registration requirements (if any), and attendance statistics. This function supports the exporting of Event Attendance information to Excel. It also provides opening of the event in Edit mode. The Calendar/Registration function allows staff access to the Event Registration Form, which includes information about the event (i.e., Calendar/Registration schedule, per-requisites, etc.), registration status (i.e., total openings, total registered, etc.), and a registration form. It also provides opening of the event in Edit mode. Attendee Lookup This Attendee Lookup function allows users to: • Search the database for anyone who has ever registered for an event, • View and edit contact information, • View and reset no show information, • Delete attendees from the database, and • Register attendees for events. • Cancel attendees from events. Attendee Lookup streamlines event registration by automatically completing the contact information section of the Event Registration Form. In the center of the page, locate the Calendar Search page link, just above three text entry fields. Fields marked with an * are only available in individual branch mode. Calendar Search The Calendar Search Page is a filter allowing users to search the Event Calendar. Search fields include date, location, event type, age group, Page presenter, zip code, published events and unpublished events. Registration & Attendance The Registration and Attendance function is a keyword search field that displays in calendar format all events and occurrences containing the keyword(s). Click on any event occurrence to display the Event Registration page. Attendee Lookup The Attendee Lookup allows users to search for a registered patron by first name, last name, phone number, library card number, email address, or event confirmation number. This quick search field performs the same function as the Attendee Lookup function listed under Registration and Attendance. Event Maintenance Event Maintenance is a key word search of the current month’s Event Calendar. The system displays search results on the Event Maintenance page in list format. Along the right edge of the page, locate the Reports box. Event Statistics Report The Event Statistics Report summarizes statistics for all events and event types within a specified date range. The report is exportable to Word or Excel. Detailed Event Report The Detailed Events Report allows to users generate a customized report based upon criteria selected from the Event Information Report Filter. The available criteria include keyword, date range, age group, branches/libraries, and event types. Users can display reports in HTML format and export to Word or Excel. Events and PR Report Events Credit Card Processing Report* Subscriber Lookup Subscriber Details The Events and PR Report provides users with a detailed report about events scheduled within a specified time frame, including the schedule, description, and public relations needs of scheduled events. The amount of detail in the report depends upon the report’s format (i.e., list, table or calendar). Users may export reports to Word or Excel. Events Credit Card Processing Report allows you to create reports showing which credit cards have been processed. Subscriber Lookup allows users to: • Search the database of patrons who subscribe to Notify Me or Remind Me, • View and edit subscriber contact information (name and email address only), and • Delete subscribers from the database. Subscriber Details displays a list of all patrons subscribed to Notify Me or Remind Me along with their email information, the type of event they subscribed to and their library branch. It includes an option to export this list to Excel Just below the Reports box is the Settings box. *These options are only available in the Branch View. System Configuration and Settings System Configuration and Settings allows you to manipulate the aesthetic of the calendars and lists, as well as customize branch information, system messages, templates, email settings, security and regional settings, and other system settings. Location List* Location List allows you to add a new location or room in which an event can be held. Grade List* Grade List allows you to customize which school grades are available to set. Zip Code List* Zip Code List allows you to add zip codes which can be used to screen or direct patrons. Presenter List* Presenter List allows you to add presenters. Event Type List Event Type List allows you to customize event classifications which allow for easy sorting. Age Group List Age Group List allows you to customize age ranges which can be applied to events. Registration Cost Classifications Sets Cost classifications to allow different groups to be charged different amounts. NOTE: Credit Card payments must be enabled for this menu to appear. Note: When working in All Branches, only System Configuration and Settings, Event Type List and Age Group List appear. To access the option options, please select an individual branch. Posted - Tue, Sep 6, 2011 at 2:33 PM. This article has been viewed 256 times. Online URL: http://kb.evanced.info/article.php?id=16 Understanding the Add/Edit/Archive page The Add/Edit/Archive page can be accessed from the Event System Maintenance Page. The Add/Edit/Archive page gives you access to the events that you've created, while also allowing you to create new events and archive old events. Starting on the left hand side, you can see the Search/Filter Tool. This tool allows you to quickly find events that have already been entered in to the system. The following filters are available: Event Type Event Types are predefined classifications for events. They allow you to group similar events together using a common descriptor such as Children's Events, Adult Education Events, Teen Events, ect. Date This allows you to find all events that begin after a specific date. TO This allows you to find all events that begin before a specific date. Published Events This allows you to find events that have been made public within the system. Unpublished Events This allows you to find events that have not been only partially entered into the system or that have not been approved to be made public within the system. Show Ongoing Events Some events do not require registration and are largely for informational purposes. An example would be "Black History Month". This filter allows you to include them in your search. Combine Recurring Events This allows you to combine all meetings of a single event into one record. For example, a weekly poetry reading that lasts 16 weeks would appear as a single event, rather than 16 separate ones. Keyword Search for events based on a specific word or phrase. Moving to the right, you see the following buttons (click on the link for more information): Archived Checked Event Archiving is a way to remove events from the active system without permanently deleting them from your records. This can help your system operate more efficiently. Add New Event Add a new event to the system. Bulk Publish Approve multiple events to be made public within the system. Bulk Archive Archive multiple events at once to save time. Below the buttons, you'll see a series of boxes with existing events. Each box contains the record of an existing of an existing event. Within each box, you have a variety of options, as well as information about each event. Note: the order of the buttons is slightly different depending on whether an event is a Single Occurrence or a Recurring Event. Refer to photo above to see the difference. Click the links below for more information. Archive (check box) Checking this box prepares the event to be Archived. Edit Single or Edit Recurring This allows you to change the event information. Copy Single or Copy Recurring This allows you copy the information from a current event and use it to create a new event with the same or similar information. Delete Deletes the event. Note that reoccurring events cannot be directly deleted. They must be archived and deleted from the View Archive page. Attendance Stats This allows you view or change information about how many and who attended the event. Register This allows you to enter registration information for patrons or staff. For recurring events, there is a list of dates on which each individual session will take place. Clicking on those dates gives you the ability to edit the information for specific sessions of a recurring event. Posted - Wed, Sep 7, 2011 at 9:32 AM. This article has been viewed 143 times. Online URL: http://kb.evanced.info/article.php?id=17 How to Register a Patron for an Event Some events require patrons and/or staff to per-register in order to attend. While in some cases, patrons can self-register (depending on the requirements of the event), staff members often have to help patrons with the sign-up process. Event Registration can be accessed in two ways. First, from the Event System Maintenance page, select Calendar/Registration under the Registration & Attendance heading. This method first displays the Event Calendar. The desired event name should be clicked, leading to the Event Registration page. Second, you can access the Event Registration page, via the Add/Edit/Archive page. This method method bypasses the Calendar step below and proceeds directly to registration. The Event Registration page opens to the event information box with all the pertinent information about the event. Below that box is the Event Status Information and the Registration Dialogue Box. Event Status information gives you the maximum number of allowed registrants, how many people have registered, how many are on the waiting list, and how many spaces are still available to fill. More choices may appear in this box depending on the event details. For more information on how to customize these please see How to Add an Event. The Registration Dialogue is the next item down. These fields are highly customizable. Questions can be added, removed, or made required. For more information on available fields, please see How to Add an Event. Because each registration form is custom made for the event, it is impossible to define every possible field here. If you have questions as to the meaning of a specific field please contact the event contact person (often noted in the event information box). At the bottom of the page there are four buttons: Complete Registration Completes the Registration and takes you to a confirmation page. Attendance Opens the Attendance sheet for the Event. Edit Event Takes you to the Event EDIT page. Back Takes you back to the previous page. Upon completing registration, you are taken to a confirmation page. Here you are presented with the registration information for the patron along with four boxes. Back to Maintenance Page Returns you the Event System Maintenance page. New Event Registration Returns to the Event Calendar to allow for selection of a different event for a different patron Another Event Registration Returns to the Event Calendar to allow for selection a different event for the same patron whose registration just completed. Same Event Registration Returns to the Event Registration page to complete registration for the same event by a new patron. Note: in order to edit registration information, do not select back. Use the event attendance sheet to fix any errors that might have been made. Posted - Fri, Sep 9, 2011 at 10:29 AM. This article has been viewed 177 times. Online URL: http://kb.evanced.info/article.php?id=25 How to Add an Event To add a new event, access the Add an Event page by clicking the Add New Event button on the Add/Edit/Archive Page. Starting from the top, first complete the section entitled Date/Time Information. Definitions follow the picture. Ongoing Event (check box) An ongoing event is an event that lasts all day or continuously for a number of days. These events do not allow for registration, and are often for informational purposes. An example would be 'Black History Month'. Event Date (required Enter the date of the event (or of the first session of a recurring event). field) Recurring Options If the event is more than a single session, select how often the event will occur. If the event occurs at irregular intervals, select 'Additional Dates'. Finally, select an end date for the recurring event. Event Time (Required Field) What time the events begins. You can also calculate the total amount of time an event will occupy a room, beyond the time the patrons will be present. It is possible to factor in both setup and take down time. Below the Date/Time Information, you can edit Event Information. Definitions follow the picture. *Note that custom options may expand your default list of fields for this section. Location Choose the location in the library or grounds where the event will take place. Event Type Event Types are optional categories you can create which help classify an event. Adding an event type can make it easier for patrons to find events that interest them. They can also help provide useful statistical data. Age Group (Required Field) Allows you to chose from predefined age groups in order to tailor the event for patrons of the appropriate age. Event Title (Required Field) Name your Event Event Description (Required Field) Describe the event to the patrons. Tell them what the event is and what purpose it serves. Feature Event This allows you tag certain events as 'featured'. Custom RSS feeds can then be created that highlight only 'featured' events. Other Info Allows you to enter an additional information that might be required. Presenter Who will be presenting information at the event? Chose a presenter from a drop down list or input a new presenter. Internal Email Supply email addresses for staff who should receive emails about this event. Contact Name Who should be contacted by phone or email about the event? Link Text Supply the visible words to a hyperlink with more information about the event. Link Address Enter an address to a webpage with more information about the event, the subject, the presenter, or any other subject related to the event. PR Request Check the box if necessary and enter any relevant details that should be included in a press release. Optional Image Display Path Enter the web address of a photo you want to use to draw attention to the event listing. For advice on using Flicker, read this article. For more information about photos, read this. Internal Notes Internal notes are any other information that you want to share with staff. Internal notes will not be visible to patrons. Moving down the page, you'll see Registration information. If you chose to have Patrons register for the event, the menu below will appear. Registration (Required Field) This option allows you to chose who can register patrons for the event. You can chose between No Registration, Patron & Staff Registration, or Staff Only Registration. If you choose No Registration, the rest of this menu will disappear. Maximum Attendees (Required Field) What is the maximum number of people who can register for the event? Maximum In-House Spots What is the maximum number of staff members who can register for the event? Patron Status Disp (Available only for If you chose to only allow staff members to register patrons for the event, what message or instructions do you want Staff Only Registration) patrons to see? For example, "See library staff to register". Waiting List Options Check the box to add a waiting list in the event of capped registration. You can also choose to limit the size of the waiting list. Attendance Sheet Operation Do you want to require separate registration sheet for each session of a recurring event, or simply share one registration across all sessions. Starting Registration Choose a fixed date, or a number of days before the event, to open registration. Starting Registration Time Choose the time of day to open registration. Ending Registration Time Choose a fixed date, or a number of days before the event, to open registration. Must be Between the Ages Select an appropriate age range for patrons who are attending the event. Must be Between the Birthdates Select a range of birthdates to limit patrons who are attending the event. Must be Between The Grades Select a range of school grades in which patrons must fall to attend the event. Must Give Cancellation Notice This enables attendance tracking on the attendance sheet. If selected, patrons who do not show up for an event without giving prior notice will be Must Enter Parent/Guardian Name Check this box to require a parent or guardian name to be supplied along with the name of the applying patron. Payment Required Check this box if the event has a fee associated with it. Your previously established prices will appear for you to select if you have enabled pricing for your branch. If you've enabled credit card processing, more options will appear. The final box is Administrative Information. Status If you are not ready to publish your event, select Do Not Publish. This will save your event information, without making it available to the public. You can later go back and edit or publish the event. Save Save your progress. With administrator privilege, this button will also publish the event. Save & Preview Saves your progress and executes a pop-up window showing how the event entry will appear. Note: Events can be edited after creation. For more information see the article How to Edit an Event. Online URL: http://kb.evanced.info/article.php?id=20 How to Events - Using Flickr Images Using Flickr® images with Events The Flickr® service makes it possible to post your images hosted on Flickr® to outside web sites. However, pages on other web sites that display images hosted on flickr.com must provide a link from each photo back to its photo page on Flickr®. To accomplish this you should include a link and notice in the description or some other noticeable field for the event. To get the link from Flickr® do this: Browse to the Flickr® image you wish to use. Click on the "Share This" button for the image. Select "Grab the HTML/BBCode" and find the URL in the code for the image. There will be a few lines of HTML code here but you only need the link. It will look something like this: <a href="http://www.flickr.com/photos/32055464@N05/3128569426/" title="Building Front by Rob Cullin, on Flickr"><img src="http://farm4.static.flickr.com/3209/3128569426_4c1e776b9e.jpg" width="500" height="375" alt="Building Front" /></a> Look for "<img src=" and copy the URL that is after this. In this case it is: http://farm4.static.flickr.com/3209/3128569426_4c1e776b9e.jpg Paste this URL in the "Optional image display path" for your event. Now find the height and width in the code and add those to the event. You can use the "Check Image" button to test the URL now to see if you got it right. Now you need to add a link and notice to your description. On the Flickr® image click on "Share This-->Grab the Link". Now copy that link. You could generate the Short URL and copy it. Either one will work. Now paste that link along with a notice about Flickr® in your event description. Something like: Photo courtesy of Flickr ®; link: http://flic.kr/p/5LsJGb NOTE: The ® was added by entering "®". Following this method allows you to use images that you own from Flickr®. Online URL: http://kb.evanced.info/article.php?id=100 Understanding Ongoing and Recurring Events Q: What is the difference between an Ongoing and a Recurring Event? Ongoing and Recurring events are very different. You assign them when you add a new event. Ongoing Events aren't really events in the normal way that we typically conceive of them. They are more like 'official designations'. Ongoing Events: Are Library wide Have no room designation Last all day Have no actual meeting An Ongoing Event can be a specific day (The Library's 100th Anniversary), a week (Librarian Appreciation Week), or a month (Black History Month). While the library may plan specific activities during an ongoing event, each one of those activities is actually classified differently. For example, July might be Shakespeare month at the library. Shakespeare Month is the Ongoing Event. Having a poetry reading of Shakespeare's sonnets would be a separate event scheduled concurrent with the Ongoing Event. Ongoing Events don't show up on the Events Calendar unless specifically enabled by the patron. Recurring Events are completely different. A recurring event is any event that meets in multiple sessions. Events can reoccur at regular intervals (daily, weekly, monthly) or irregular intervals (Monday, Wednesday, Friday, Sunday, Tuesday, for example). Recurring events make it possible to avoid entering each specific meeting or session individually. Recurring Events can be registered for and tracked individually (each session) or as a whole (all sessions combined). For information on deleting a single occurrence of a recurring event, read this article. A three day lecture series on William Faulkner that meets each night at 8 PM would be a Recurring Event. A three day designation celebrating William Faulkner's birthday would be an Ongoing Event. . Online URL: http://kb.evanced.info/article.php?id=44 How to Schedule Holiday Closings Depending on which software you have, there are multiple ways to schedule a holiday closing. Please note the setups carefully: 1. I have Events only OR Events and Rooms and a MULTIBRANCH library. If you have both Events and Rooms and a Multibranch library, then schedule holiday closings in EVENTS. Go to Add/Edit/Archive and Add a new Event. Make it System Wide. Apply it to All Locations. Call the Event: Holiday Closing (or whatever meets your needs). You may wish to create an Event Type called Holiday Closing. You do not need to do anything in the Rooms side. By choosing all locations and branches, you've effectively closed all the rooms as well. 2. I have ONLY Rooms in a MULTIBRANCH library. You'll have to schedule a room booking to close each individual room. There is no other way to close the rooms for a holiday. 3. I have only Events or Events and Rooms in a SINGLE BRANCH library. Go to Add/Edit/Archive. Along the top of the page, you'll see a button labeled Holiday Closing. Click it and set up your holiday. Doing this on the Events side will also close the Rooms side as well. 4. I have only Rooms in a SINGLE BRANCH library. Go to Room Request/Reservations. At the top of the page, you'll see a Holiday Closing button. Use it to set up your holiday. NOTE: The holiday closing button is ONLY available in single branch systems. If you used to have the button, but have added a new branch, you will no longer have the option of using it. Online URL: http://kb.evanced.info/article.php?id=375 How To Events-Add images to events To add an image to an event you first have to make that image available on the internet. A good place to store images is in an image folder on your web server. You can also store them on public sites but they need to be directly accessible (hot-linkable). To be sure your image is going to work, you should first test it by putting the direct link to the image in your browser's address bar. If the image is displayed, it should work in events. Create a new event and scroll down to the "Optional Image Display Path:" item. Enter the direct link to your image in the first text box. This should be a full URL path, including the "http://". Enter the alternate text (optional) that you want displayed while the image is loading or if it fails to load. Enter the Height and Width of the image. To determine the Height and Width right click on the image (or filename) and choose properties. The "Advanced Summary" or "Image Properties" will usually display the image Height and Width. After completing the rest of the Event information, save the event. Now the detailed view or list view of the event will include the image. NOTE: If your Event Calendar site is hosted and you do not have another option for storing your images, Evanced support will be glad to store a limited amount of images under your site on our servers. However, updating these image files will require sending the files Evanced Support and waiting for them to upload the files to your site. Evanced Support will always try to complete this in a timely manner but some delay is unavoidable. If you have direct control of the storage location you will not have to wait on us to update the files for you. Posted - Tue, Sep 27, 2011 at 3:55 PM. This article has been viewed 136 times. Online URL: http://kb.evanced.info/article.php?id=93 How To Events-Remove a single date from a recurring series After creating a recurring event, you can remove a single date by following these steps. On the "Add/Edit/Archive" screen, select your filter so this event is the only one that is displayed. Use a keyword that is specific to this event if you have trouble isolating this event. In order to see all of the individual events you will need to include a date range that encompasses all of the individual events. Then uncheck the "Combine Recurring Events" check box and search again. This should display all of the individual events. Now you can delete or edit any of the individual events. IMPORTANT: Once you edit an individual event, you do not want to edit the main event again. If you do, all of the individual events will be recreated and your edits on the individual events will be lost/overwritten. Online URL: http://kb.evanced.info/article.php?id=99 How to Archive an Event Archiving Events is an important way to keep your system running smoothly. You can Archive Events through the Add/Edit/Archive page. Why Archive Events? Archiving an event: Removes the event from the Event Calendar (staff and patron views), Moves the event from the Add/Edit/Archive list to the Archive, Deletes all attendance sheets associated with the event, unless otherwise configured by the Administrator. Deleting an attendance list does not affect statistical reporting. The Reports function retains access to event statistics as long as the event resides in the Archive. Archiving an event clears it from your Events Calendar and allows it to load more quickly. It also makes it easier for patrons and staff to search present and future events as their results won't be bogged down by dated entries that have long passed. How do I Archive An Event? Events can be archived individually or by bulk. To individually Archive an event, check the Archive box. See the highlighted area on the photo below. You can check as many events as you wish to archive. Click the Archived Checked Event button. The Event is now archived. You can view the archived event by using the "View Archive" option. To Bulk Archive several events, Click the Bulk Archive button. You will be prompted to enter a date range. All events that occur between the beginning and end dates selected will be archived. If you wish to include ongoing events that occur all day over the span of multiple days, check that option. To recover an event that has been previously archived, please consult the View Archive page. Online URL: http://kb.evanced.info/article.php?id=18 Understanding Attendance Stats The Event Attendance Sheet is accessible through the Add/Edit/Archive Page. It is a more limited version of what you can find under Event Attendance. It provides a quick and easy way to update numeric attendance figures. Simply enter the attendance numbers in the available fields. For definitions and instructions on all other functions on this page, please refer to the article "How to Understand Event Attendance" Online URL: http://kb.evanced.info/article.php?id=24 Understanding the Waiting List The Waiting List can be a powerful tool for managing event registration. When creating a new event, you may wish to limit the number of people who can register. If you so chose, you can instruct the system to leave the registration option open to a waiting list. The system will then track everyone who signs up after registration is full. You may also chose to limit waiting list spots. To view the Waiting List for an event, enter registration mode and click Attendance at the bottom of the screen. In the Event Attendance sheet, you can find the waiting list. Simply scroll to the bottom of the page and select the tab that says "Waiting". There you'll find all the data about registrants who are on the waiting list. You can either manually manage waiting lists, or instruct the system to automatically move the first person on the waiting list to the registered side whenever someone drops off the list. Enable the Auto Waiting list in System Settings (in branch mode) under Attendance Settings. Online URL: http://kb.evanced.info/article.php?id=46 How To Events-Enable Residency Stipulation How To: How To Enable Residency Stipulation For A Customer In Events Below you will find the steps as to how to set up residency requirement on an event in the Events system. When this is set up, the patron will be prompted to answer a question about his/her residency status right on the event's registration form. If registrants answer "Yes", they will be allowed to complete their registration and if they answer "No", they are placed on the waiting list (or can be configured to just block their registration, upon request). If you have authentication against your ILS system enabled, turning the residency stipulation on for an event, will automatically check the provided card number for residency status, instead of just asking the question. Please note that, depending on the authentication method used, one or more steps might be required for this process to work properly. For example, for SIP2 users, a list is built with the different PTYPE codes to define which indicates a resident and which indicates a non-resident. Please consult with Evanced Support for more information. Multi-Branch Note: For Multi-Branch systems, this is configured at the branch level. Here are the steps: 1. Log on to the Staff Side of Events using the assigned administrator password. 2. Select System Configuration and Settings from the maintenance home page. 3. Select Library Information. 4. Populate the Residency/Other Term field with applicable information - Such as "...City Resident" or "...County Resident". (Hover over the setting to see examples.) 5. Select "Save". 6. From the Event Maintenance menu> Add/Edit/Archive page, Select "Add New Event" 7. Populate the required information to create an event. 8. Enable registration, within the "Registration Information" section. 9. Locate the Residency Stipulation created in step 4 and place a check mark next to it. It should start with something like "Must be resident of ..." Note: The time-out setting is optional; when used, the residency stipulation will expire (after the number of hours you set) allowing non-residents to register. 10. Once you have completed the required information for your Event - Select "Save". Online URL: http://kb.evanced.info/article.php?id=96 How to Bulk Publish Events You can access the Bulk Publish Button from the Add/Edit/Archive Page. Publishing makes an Event entry viewable by the public. An event entry may be unpublished because it was entered by a user lacking the clearance to publish events to the calendar. An administrator can quickly publish multiple events using the Bulk Publish Button. In the photo below, it is circled in red. To Bulk Publish multiple events, press the button A pop-up box should appear with multiple options. First, select a date range during which you wish to publish events. You are choosing to publish events based on the date they occur between. Second, decide whether or not to include on-going events. On-going events are Library-wide events that last multiple days and are largely for informational purposes. Finally, click Publish Events. Events will then appear on the Calendar for Patrons to see. . Online URL: http://kb.evanced.info/article.php?id=21 How to Edit an Event Often it is necessary to change the information for an event that you have created. Whether or not an event has been published, you can edit it. You can find the Event EDIT screen by way of the Add/Edit/Archive Page. To edit an event, select Edit Single or Edit Recurring (highlighted in yellow in the photo below). Edit Single changes the information for an event that occurs one time. Edit Recurring changes the information for all instances of an event that occurs multiple times. If you want to change information for a single occurrence of a repeated event, simply click on the specific date that the event occurs beneath the words "Edit Single Occurrence" (highlighted in yellow above). The information will change only for that specific session without changing the information for the other sessions of the event. The Event EDIT mode is identical to the Create New Event mode with one exception. The bottom of the Event EDIT page contains data about the last time an event was modified and what date it was created. For a refresher on how modify the fields on the Event Edit page, please refer to the article How to Create a New Event. . Online URL: http://kb.evanced.info/article.php?id=22 Cheat Sheet: How to Add and Publish an Event Adding an Event 1. Select your library. [Note: Modify steps 1 and 2 as per your library’s procedures] 2. Type in your password. _______________________________ 3. Under "event maintenance• click "Add/edit/archive―. 45. Click "Add new event• and fill in the form. a. Starred fields are required b. Don’t forget to fill in your initials in the last box before the registration information. 5. Click "Save• Because you are logged in as the Branch Manager, the event is saved AND automatically published to the public view of the calendar. Publishing Events Added by Other Branch Staff 1. Follow steps 1 to 4 above. 2. Check "unpublished events only•, then click "search•. You will see a list of unpublished events. You may review each for accuracy and spelling by clicking "edit• in the event listing. Then publish by ONE of the following methods: 3. Publish single events by clicking "edit• in the listing for an event. a. Review for accuracy and spelling. b. Add your initials in the box just before the registration information. c. Click "Save• at the bottom of the form. The event is published. 4. Bulk-publish multiple events by clicking "bulk publish•. a. Select the beginning and ending dates in the pop- up calendar. b. Click "Publish•. The events are published. Posted - Mon, Oct 10, 2011 at 11:09 AM. This article has been viewed 68 times. Online URL: http://kb.evanced.info/article.php?id=215 Cheat Sheet: How to Add an Event (branch staff level) Adding Calendar Events (Branch Staff) 1. Log in 2. Select your library. [Note: Modify steps 1 and 2 as per your library’s procedures] 3. Type in your password. _______________________________ 4. Under "event maintenance• click "Add/edit/archive•. 5. Click "Add new event• and fill in the form. a. Starred fields are required b. Don’t forget to fill in your initials in the last box before the registration information. 6. Click "Save•. Your event is saved, but NOT published. Inform the branch manager that there are events that need to be published. Only a branch manager can publish events to the public view of the calendar. Posted - Mon, Oct 10, 2011 at 11:12 AM. This article has been viewed 64 times. Online URL: http://kb.evanced.info/article.php?id=216 How to Copy an Event It is not necessary to manually reenter data for each new instance of past events. Using the Copy Single or Copy Recurring Mode in the Add/Edit/Archive Page, you can copy the information from an existing event to a new event, which can then be edited to meet your specific needs. To copy the data from an event, just click Copy Single or Copy Recurring (depending on the type of event you chose). Note the circled areas in the photo below. Both Copy Single and Copy Recurring follow the same process as the Add an Event mode. The only difference is that the information from the original event is preloaded. All you need to do is edit the information you want to change (date, time, location, ect). Note that Copy Single and Copy Recurring also provide Administrative Information that is not available in Add an Event mode. This provides you information as to when the original event was created and last modified. Online URL: http://kb.evanced.info/article.php?id=23 Understanding the View Archive Page The View Archive Page can be accessed from the Event System Maintenance page. For more information on archiving, please see the How to Archive an Event page. Archiving is an important way to keep your system running smoothly. Starting on the left hand side, you can see the Search/Filter Tool. This tool allows you to quickly find events that have already been entered in to the system. The following filters are available: Event Type Event Types are predefined classifications for events. They allow you to group similar events together using a common descriptor such as Children's Events, Adult Education Events, Teen Events, ect. Date This allows you to find all events that begin after a specific date. TO This allows you to find all events that begin before a specific date. Published Events This allows you to find events that have been made public within the system. Unpublished Events This allows you to find events that have not been only partially entered into the system or that have not been approved to be made public within the system. Show Ongoing Events Some events last all day or several days. This filter allows you to include them in your search. Combine Recurring Events This allows you to combine all meetings of a single event into one record. For example, a weekly poetry reading that lasts 16 weeks would appear as a single event, rather than 16 separate ones. Keyword Search for events based on a specific word or phrase. Moving to the middle of the page you can see the Delete History and Delete Checked Events buttons Delete History Delete History opens a dialogue that lets you permanently purge events from the system. Just select a date and all events older than that date will be deleted. Delete Checked Event By checking the delete check box on individual events, you can permanently purge events from the system Within the individual event records, you have the following boxes/buttons: Delete (check box) Restore Checking this box prepares the archive to be permanently purged from the system. Clicking this button restores the archived event to the active calendar and the Add/Edit/Archive database. Copy to active Event List This copies the information from the archived event into a template to create a new event with the same or similar information. Attendance Stats This allows you view or update the attendance at an archived event. Online URL: http://kb.evanced.info/article.php?id=19 How to Perform an Attendee Lookup Report When you need to find a specific registered attendee by name, use the Attendee Lookup tool. You can find the Attendee Lookup tool on the Events System Maintenance Page. Attendee Lookup allows you to search for a specific user using a variety of fields: First Name Search by first name Last Name Search by last name Phone Number Search by attendee's phone number (can produce multiple results) Library Card Number Search by Library Card number Email Search by email address Confirmation Number Search by the confirmation number issued to a registrant Show All Names (check box) Use this to show all the results from a search, for instance, all the names associated with a specific phone number The result of this search will be the Attendee Lookup Report. This report shows all the attendees who fit the criteria of the search. The report can be exported to a CSV file. Online URL: http://kb.evanced.info/article.php?id=29 How To Events - Remove a Subscriber from Automatic Upcoming Event Notification List How To Events - Remove a Subscriber from Automatic Upcoming Event Notification List This document will define the process on how to stop automatic event emails from going out to a patron. Note: Subscriber Lookup in Reports from Event Maintenance will be used in this process. 1- Search for the patron using name or email address fields. 2- When their record comes up, click on Notification Signups in View Signups column. 3- Place a check mark next to the event type(s) they have selected to be notified about, then hit the Delete Previous Entries button. Note: The bottom section of this page is for adding more event types to the list they wish to be notified about. 4- If a record no longer has any signups associated with it, you can remove it from the Subscribers list by going back (hit the back button on this page). Place a check mark in the Remove column and then hit the Remove button. Online URL: http://kb.evanced.info/article.php?id=98 Events-Patron Records Events Patron Records Patron (Attendee) records are created in events when someone registers for an event. These records are maintained in Events until they are manually deleted by a staff member. A patron record will be attached to an event until the event is deleted or until the event is archived if "Remove Attendee Information when Archiving:" is enabled. Once a patron record is no longer attached to an event it can be deleted by staff. Identification of Patron Records Patron records are uniquely identified by 2 possible methods; a combination of First Name, Last Name and Primary Phone Number or by library card number. By Default, Events uses the First Name, Last Name Primary Phone number method. Library card number is used only when the system is configured to require authentication with an ILS system and "All Events Requiring Registration" is enabled and "LOCKDOWN" is enabled. NOTE: "LOCKDOWN" is a factory setting that can be enabled by Evanced support staff for your installation. Method 1 (First Name, Last Name and Primary Phone Number): This is the default state of Events. When this method is used, a patron is identified by a combination of these fields. This means that when a patron registers, if they spell their name differently or enter a different primary phone number, a new record will be created. For example; This record exists in Events: First Name: Richard Last Name: Chambers Primary Phone: 111-222-3333 If this patron registers with the following information, First Name: Rick Last Name: Chambers Primary Phone: 111-222-3333 then a new record will be created and he will be in the system twice. Once with the first name of "Rick" and once with the first name of "Richard". If this patron then registers with the following information, First Name: Rick Last Name: Chambers Primary Phone: 111-222-3334 a new record will be created and he will be in the system 3 times. This can cause confusion because doing an attendee look-up can generate different results. Doing a look-up for "Rick" will generate 2 records and not include the 3rd record. Method 1 with Authentication: Enabling authentication against an ILS system (per event) will cause Events to validate a patron before allowing them to register for an event. If the ILS system authenticates the patron, their information is pulled from the ILS and they are allowed to continue registering for the event. When they complete the registration the system will store/update their record according to the following rules: If a patron record does not exist in Events, it will be created with the information on the registration form. If a patron record already exists in Events (based on First Name, Last Name and Primary Phone Number), then the following fields will be updated if they are not blank on the registration form: Email Address Library Card number Address Fields NOTE: These fields are pulled from the ILS system and can be updated by the patron before completing the registration process. This method is a good choice if your registration process requires a library card but allows for the same library card number to be used for multiple registrations (as with a mom and her children). Method 2 (Card Number): This method is enabled by using authentication with an ILS system, requiring library cards for all event registrations and enabling "LOCKDOWN". NOTE: "LOCKDOWN" is a factory setting that can be enabled by Evanced support staff for your installation. Once this method is enabled the Events system no longer identifies patrons by First Name, Last Name and Primary Phone Number. It uses the library card number as the primary identification for patrons. A registration with a new library card number will cause the system to create a new record based on the information pulled from the ILS system. A registration with an existing library card number will update the patron record in Events with data pulled from the ILS system (Name, Phone, Email address and Address fields). This method should be used when the ILS system is considered the "Master" database containing current data and every registrant is required to have a unique library card number. This will NOT work for a mother trying to use her card number to register her children. In that case, she would have to use each child’s library card number in order to register them individually. Online URL: http://kb.evanced.info/article.php?id=83 Understanding the Events Calendar (In-House Registration Mode) The Events Calendar is the first step toward registering a patron or staff member for an event. The Events Calendar can be accessed from the Events System Maintenance page. Note: there are subtle differences between the Calendar in Patron View and In-House Registration Mode. See this article for a list of those differences. There are a variety of tools on the Events Calendar. Starting on the upper right, you can choose to expand the Search Slider. This tool will enable you to focus in on just the events you want. The following chart explains the Search options: Keyword Show only events with a certain key word Display Format Show events either in calendar mode or list mode Publishing Filter Filter events by whether or not they have been published Locations Filter events by branch, or enable all branches Event Types Filter events by your predetermined types Age Groups: Filter events by predetermined age groupings Presenter/Instructor Filter events by a specific speaker Postal Code Filter events using the appropriate postal code of the library where they occur. To the right of the Search Slider is the option to Display Personal Schedule. This allows you to show all the events an individual has previously registered for by using his or her last name and the confirmation number they were given when they registered for an event. To the right of Display Personal Schedule is the View option, which allows you toggle between Calendar View and List View. To the right of the View option is the Show URL option. The Show URL option opens a pop-up window that allows you access various customizable pathways which you can alter to tailor calendars to meet your specific needs. Please view the How to Manage URL article for more information. To the right of the Show URL option is the RSS Feed. A RSS feed is a special way of viewing web information that updates users when it is changed. Your RSS feed can be customized to create calendars that are dynamic and also specific to your needs. Please view the How To Manage the RSS feed article for more information. Below the options above is a Date Bar. This allows you to view the specific month and year that you wish. The default is always the current month. Below the date bar you have the option to Click to View Ongoing Events. Ongoing events are events that take place library wide (or even over multiple branches) and are not tied to a specific location or time. An example would be "Black History Month". These events don't normally appear on the calender unless the Click to View Ongoing Events option is selected. On the Calendar itself, events are color coded according to preset characteristics. Events that are underlined require registration. Clicking on an event takes you to the Event Information or Event Registration page. Mousing over the event reveals more event information. If you have enabled Special Email Info, you can add special event specific information to the email reminders that go out for that event. The email template accepts HTML and graphic tags. Information within the ^^ is supplied by the system according to the codes used. Online URL: http://kb.evanced.info/article.php?id=28 Understanding List View Published events appear both on the Events Calendar and in List View. List view displays events in chronological order, presenting relevant information to the viewer. On the left is a search filter identical the one in the Events Calendar. Each event box contains options to maximize the user's experience. More Info/Register Displays additional information about the event and if enabled allows the user to register for the event. Show More Shows any additional information on the event Email a Friend Opens a dialogue box that enables the patron to send an email notifying a friend of the event details. Notify me Allows patrons to register for email updates for similar event types. Print Allows the event details to be printed Download to Calendar Allows the patron to download event information to an independent virtual calendar such as Google Calendar, Outlook, or Apple iCal. The result is an .ics file the use can save to their computer and open with the program of their choice. Remind Me Allows the user to sign up for an email reminder about the event. Online URL: http://kb.evanced.info/article.php?id=47 How To Events-Add RSS feed to your homepage How to: Add an RSS Feed to your library's homepage There are several ways to add dynamic content to your homepage. One of the simplest is to use an RSS Feed Reader that is pulling data from your Event Calendar or Room Reserve system. Below is a description of the process. What is an RSS Feed? An RSS feed is simply a dynamic list of data. In the case of your Event Calendar it is a list of events. The most obvious reason for using an RSS feed is that it will provide dynamic content without the need to changing the link periodically. So the link: http://host.evanced.info/lib/eventsxml.asp?dm=rss2 will always give you today's training sessions no matter what day it is when you click on it. How do I use an RSS Feed? There are several ways to make use of the data that is obtained from an RSS feed. Advanced web programmers may want to obtain the data and then manipulate it in lots of crazy ways (an XML feed would be best for this since it is just the raw data and it is generated by a similar link), but most of us just want it to display on our homepage. So how do we do that? RSS Feed Readers An RSS Feed Reader is a piece of code that can be included on your site that will pull an RSS feed (the data from it) and display it in a coherent fashion. A feed reader can be created (by an advanced programmer) or obtained from one of many free resources. To find a feed reader you can do a web search for "RSS to HTML conversion". Here is a link that lists many feed reader sites and their costs (many are free!): RSS Feed Reader Sites You may have to register on their site to use their code and there are some paid services with many more features but even the free ones work well in most cases. There are 2 methods of generating the feed reader code most of these sites. Method 1: You use their site to configure the feed reader and they generate the source code that you copy and paste to your homepage. In this case your site contains all of the code necessary to display the RSS feed. Method 2: You use their site to configure the feed reader and they generate the widget code that you copy and paste to your homepage. In this case their site is still doing some of the work and your site is using a smaller piece of code (like a JavaScript function) to pull what it needs from their site. In either case the RSS feed is displayed on your homepage with very little code work needed by you. Online URL: http://kb.evanced.info/article.php?id=92 How to Manage Custom URL, XML and RSS Links Events allows you to create custom calendars, lists, and feeds that update your patrons and staff automatically to new events and publicize specific events that you want to highlight on the schedule. In the Events Calendar (In-House Registration Mode), you will see two boxes that allow you access to two different, but similar kinds of codes. In Show URL Mode, you are giving the core code to six different URL codes. Staff Only URL This allows you to create a custom calendar for Staff members. The core code contains a switch that makes private and internal events visible. Embed The embed code lets you place the calendar on staff only webpages. Public Fixed URL This is the URL you link to in order to show the calendar to the public. Anyone who clicks this url will be taken to the Patron view of the calendar. Embed Embed your public calendar in a web page or blog. Public Dynamic URL Create a link to a specific calendar dated according to your choosing. For example, you can create a custom link that will create a December only calendar to promote holiday events. This calendar can then be linked to any time of the year you wish. Embed Embed the dynamic calendar in a website or blog. Below the core code is a list of "switches" you can use to change the core code to customize it to your needs. To customize your url, it is often easiest to copy and paste the URL into a text editor like notepad or Word. Then, using the code list provided, alter the existing code to meet your needs. For example: http://fake.evanced.test/test/libfake/eventcalendar.asp?ag=&et=&dt=mo&mo=9/1/2011&df=calendar&cn=0&private=0&ln=ALL is a basic URL, colorized to help you understand it*. The code in red above will be structurally similar to your own. Everything before the ? never changes. Do not edit it in any way. The & markers connect the various switches. The remaining letters ag= et= dt=mo ect, are the switches. *When you make your own custom codes, colors are not necessary. It's just a visual tool for your understanding. Using the code list provided, alter the switches to create your own custom calendar. Remember to always separate new switches with an & sign. More custom calendar ideas can be found here. A client side XML example can be found here. For more information about embeddable calendars and other widgets, read here. This same process will be used to create a Custom RSS feed as well. Next to the Show URL box on the Schedule of Events, you can see the RSS Feed box. RSS feeds are special pages that automatically update alerting patrons and staff when new information has been added. To customize your RSS feed, follow the process as with the dynamic URL. Note that the RSS feed has additional code options, so please follow the code list provided below the basic link provided. Finally, to change the type of XML feed you produce, locate the dm= tag. Using the provided codes, alter the tag to meet your specific needs. To add an RSS feed to your home page, read this article. For more XML options, read this article. Online URL: http://kb.evanced.info/article.php?id=48 Creating XML-RSS Feeds Creating XML/RSS feeds: This is an example of the path to the XML feed file: http://demo.evanced.info/events/lib/eventsxml.asp "eventsxml.asp" is the standard name of that file. To show events that will take place in a specific branch, on the thirtieth day from today, we do this: http://demo.evanced.info/events/lib/eventsxml.asp?lib=1&do=30 where "lib=1" stands for the library, "do=30" stands for date offset. And if you want it in RSS mode rather than XML, do this: http://demo.evanced.info/events/lib/eventsxml.asp?lib=1&do=30&dm=rss2 where "dm" stands for Data Mode. Look at how the following library incorporated RSS feeds: Johnson County Library The switches (everything after "?") tell the system what to display and how to display it. The table below provides a reference for deciphering the switches. lib = This is used to control the events for a given library/branch or events for all branches [Default is 0]. Use the library number (lib=x) or "ALL• (lib=ALL) to specify the library’s events that are to be displayed. Note that ALL needs to be in all capital letters. [Path to event calendar]/eventsxml.asp?lib=1 IncludeDateHtml = 1 loc = This works in HTML mode only and returns a date, so you can plug this into the widget for multi-day stuff. This allows you to put in a location and display all events occurring at locations with that phrase in the name. If you do not specify branch, this will return all locations with a name that matches what you enter. [Path to event calendar]/eventsxml.asp?loc=meeting room A&lib=1 do = This is the date offset used to return events held X number of days away from today’s date [Default is 0; today’s date] [Path to event calendar]/eventsxml.asp?lib=all&do=1 This URL will bring the events of tomorrow. alltime = This is used to display all event times, even events that have already occurred earlier in the day. Use alltime=1 to override the default setting. [Path to event calendar]/eventsxml.asp?lib=1&alltime=1 Shows the events for the next XX number of days. [Default is 1]. [Path to event calendar]/eventsxml.asp?lib=all&nd=7 nd = This URL shows events for the next 7 days starting TODAY. Those are used to specify a date range to pull events from. Date should be in this format: MM/DD/YYYY. startdate= & enddate= [Path event calendar]/eventsxml.asp?lib=all&startdate=03/07/2010&enddate=03/20/2010 et = This is used to limit the output to only certain event types. The default is to show all event types. You can specify multiple event types by separating them with a comma and a plus sign (et=Adult+Program,+Book+Discussion). Event types need to be alphabetically in order to work. [Path event calendar]/eventsxml.asp?lib=all&nd=14&et=Adult+Programs fe = Refers to Featured Events. Use fe=1 to show only featured events. ag = This is used to limit the output to only events for certain age groups. Similar to "et" above, you can specify multiple age groups by separating them with a comma and a plus sign (ag=children,+adult). kw = This is used to limit output to only events which contain a given keyword in their title, description, other information, or instructor fields. The default is to show all events. [Path event calendar]/eventsxml.asp?lib=all&nd=30&kw=knitting primarygroup = dm = Determines whether only the primary event type and age group are searched (primarygroup=1), or search secondary/tertiary event types and age groups for each event as well [Default]. This is used to output using a different XML format. Valid values are "xml" to use the XML format described above, "exml" provides detailed information beyond typical XML mode, "rss2" to output a RSS 2.0 feed, "atom1" to output an ATOM 1.0 feed, and "ical" for iCalendar formatted output for use in other calendar programs like Google calendar. And "html" for HTML page output. [Default value is "xml"]. [Path to event calendar]/eventsxml.asp?lib=all&nd=7&dm=rss2 roominfo = 1 = shows room reservations information in the rss feed 0 = [Default] Doesn't show ongoing events 1 = shows ongoing events ongoing = 2 = shows only ongoing events Ongoing events will be listed first, if any. pub = 0 = [Default] Only shows events published to the public. 1 = shows both published & unpublished 2 = shows only unpublished 0 = [Default] Only shows public events. 1 = shows both public & private events. 2 = shows only private events. private = A private event is an event that is either created on a private branch or has a private event type. Title that shows at the top of the feed. Used with RSS only. [Default] Upcoming library events. feedtitle = Advanced Encoding Switches (World Language Compatability) noencode = 1 = This prevents the system encoding extended characters into their equivalent hex values. This setting works with ISO-88591 type of encoding. Testing with UTF-8 type of encoding generated XML errors. encodetype = This allows for setting the encoding type in the XML header: return = This sets the return path that will be used by the "Back" button on the event detail page. This parameter should be the last in line and needs all "&" characters encoded in hex (%26). This is especially useful when setting up an RSS Feed Reader. To setup an iGoogle RSS feed to display only 'Adult Programs' events from lib=2 but to return to lib=All with all event types when they hit the "Back" button use: [Path event calendar]/eventsxml.asp?lib=2&nd=5&et=Adult+Programs&return=[Path event calendar]/eventcalendar.asp?et=ALL%26Lib=ALL This is used when you need to pre-set the number (xxx) of events returned by the feed. Example: limit=xxx [Path event calendar]/eventsxml.asp?nd=5&et=Adult+Programs&Lib=ALL&limit=10 rsslink= This is used to set the link associated with the RSS feed title. This feature is only applicable using RSS and only in some browsers. Example: [Path event calendar]/eventsxml.asp?dm=rss2&rsslink=http://google.com Note: There are common switches between these and Calendar view switches, such as: ag, et, and kw. Online URL: http://kb.evanced.info/article.php?id=77 How To Events-Create a custom calendar view Create a custom calendar view: This is an example of the path to your calendar as seen by patrons: http://demo.evanced.info/events/lib/eventcalendar.asp To show only children's programs, the path becomes: http://demo.evanced.info/events/lib/eventcalendar.asp?et=children's+program where "et" stands for Event Type, and "Children's Program" is one of your library's defined event types. To show children programs for the next 60 days, the path becomes: http://demo.evanced.info/events/lib/eventcalendar.asp?et=children's+program&nd=60 where "nd" stands for the next number of days. The "libnum" switch and others, listed in the table below, can be used to show specific events offered at each location: http://demo.evanced.info/events/lib/eventcalendar.asp?et=children's+program&nd=60&libnum=2 The switches (everything after "?") tell the system what to display and how to display it. The table below provides a reference for deciphering the switches. df= Tells the system what format to use when displaying the calendar – "list" or "calendar". Example: df=list dt=dr and ds, de These can be used to specify a date range. dt=dr designates date range then "ds" is date start and "de" is date end. Example: dt=dr&ds=2007-5-1&de=2007-5-7 nd= et= ag= ln= libnum= ln= versus libnum= pagetitle= Shows the events for the next XX number of days. [Default is 1]. [Path to event calendar]/eventcalendar.asp?nd=7 This is used to limit the output to only certain event types. The default is to show all event types. You can specify multiple event types by separating them with a comma and a plus sign (et=Adult+Program,+Book+Discussion). Event types need to be alphabetically in order to work. This is used to limit the output to only events for certain age groups. Similar to "et" above, you can specify multiple age groups by separating them with a comma and a plus sign (ag=children,+adult). This is used to control the events for a given library/branch or events for all branches [Default is 0]. Use the library number (ln=x) or "ALL" (ln=ALL) to specify which branches’ events that are to be displayed or all. "ALL• needs to be in all capital letters. Tells the system which library or branch number is the "Home" branch for this view. Setting the Home branch in this case determines which style configuration (Branch 1, Branch 2, etc.) is shown, in addition to listing the events of that branch. "libnum=999" tells the system to use the All Branches style configuration. "ln" tells the system which branch, in a multi-branch system, to display. "libnum" tells the system which branch is your Home (default) branch and applies the associated configuration of that branch. This is used to change the title of the page at the top. Example: pagetitle=Available Events, default is "Programs and Events". kw= This is used to limit output to only events which contain a given keyword in their title, description, other information, or instructor fields. The default is to show all events. Example: kw=class libnameintitle= This is used to override the system setting of whether the Library Name is displayed at the top of the page or not. =1(Displayed) =0(Hidden) "%2C" and "%2C+" The browser inserts codes such as "%20" and "%2C" to represent special characters, such as spaces or commas. Note: There are common switches between these and XML-RSS Switches, such as: ag, et, and kw. Posted - Tue, Sep 27, 2011 at 4:00 PM. This article has been viewed 301 times. Online URL: http://kb.evanced.info/article.php?id=95 Is there Evanced Calendar for Mobile Access? Q: I am wondering if there is a mobile version of the Evanced Calendar. Our staff told me there was a version for Summer Reader. Am I missing something here? A: The mobile capability was added to the 2011 version of Summer Reader. Events and Room Reserve haven't had that feature added yet, but it is in the works. Our .NET version of Events and Room Reserve is expected to be available in 2012 and is expected to have this feature if not in the first release then in an early update. There are some things we can do to existing sites to make them more compatible in their present form. Since it requires a manual modification by our staff, just send an email to support requesting the modification and we'll add it to your site. It doesn't affect the standard web product. It simply makes the existing pages more compatible with the size of mobile browsers. For customers who have the application installed on their own servers, they can make the changes on their own, if desired. It is just an addition of a line in code to the defines.inc file, that is part of the calendar's system files. Please back up the file before making any changes and only attempt this if you have at least basic experience with code. This is the line you will need to add: <meta name = "viewport" content = " width=device-width , initial-scale=1.0 , user-scalable=yes " > Please add between opening and closing head tag in the patron page section, as such (see line in bold): <head> <!--#include FILE="facebook_meta.inc"--> <title><%=TitleText%></title> <% If WRITESTYLES = "1" Then %> <link rel="stylesheet" type="text/css" href="niftyCorners.css"> <link rel="stylesheet" type="text/css" href="niftyPrint.css" media="print"> <script type="text/javascript" src="nifty.js"></script> <style type="text/css"> <% ShowStyle "public" %> </style> <% Else %> <link rel="stylesheet" type="text/css" href="dynamicsheet.asp?st=public"> <% End If %> <meta name="viewport" content="width=device-width, initial-scale=1.0, user-scalable=yes"> </head> Online URL: http://kb.evanced.info/article.php?id=196 How to Subscribe to an Evanced Calendar Using IPhone/IPad Events allows for the creation of custom RSS feeds and for those feeds to published in ICal compatible format. To subscribe to an Events Calendar, first build the RSS feed you wish to follow. Make sure to change the tag dm= to dm=ical Once you have the complete URL for your feed, go to your Apple device. Select: Settings Mail, Contacts, Calendars Add Account Other Add Subscribed Calendar Then enter the URL. Posted - Wed, Oct 26, 2011 at 8:52 AM. This article has been viewed 195 times. Online URL: http://kb.evanced.info/article.php?id=241 Events-Client Side XML Example The following code is for example only. It is up to the web developer to determine how he/she wants to handle the XML data. This software is provided "as is", without warranty of any kind, express or implied. In no event shall Evanced Solutions be held liable for any direct, indirect, incidental, special or consequential damages arising out of the use of or inability to use this software. Evanced Solutions is not obligated to support the code due to the various ways XML is handled between browsers. Events - Client Side XML example This example shows how JavaScript can be used to display a window of events on your library's homepage, using the XML feed from the calendar software. To run this example you will need to copy the 3 included files into a web accessible folder on your web server. eventsxml.html --> Example Web page used to display a window of events. eventsxml.xsl --> Style Sheet formatting file for XML data. getxml.asp --> Server-side page for obtaining the XML data and sending it to the HTML page. Editing the XSL file is beyond the scope of this example, but many resources can be found on the internet by doing a search on the tags "XSL XML tutorial". Editing the JavaScript in the HTML file is beyond the scope of this example, but many resources can be found on the internet by doing a search on the tags "JavaScript tutorial". Editing the ASP file is beyond the scope of this example. If your server is not running ASP you may need to translate this page into server-side script that performs a similar function. To make this example work properly you will need to edit 4 path variables. The first 3 are in the HTML file. Do a search on the word "REPLACE" to find the 3 locations. The first location looks like this: <script type="text/javascript" src="http://host.evanced.info/lib/common/zxml.js"></script> This is a reference to a file included with all Event Calendar installations. If your installation is hosted your path will look something like this: http://host.evanced.info/YOURLIBRARYNAME/lib/common/zxml.js The 2nd location looks like this: var xmlcalendarURL="getxml.asp" This file should reside on the same server as the "eventsxml.html" page. A hard-coded path is not necessary if this file resides in the same folder as the HTML file. The 3rd location looks like this: var xslcalendarURL="eventsxml.xsl" This is your XSL formatting file. A default version of this file is included with this example. Your path to this file will probably be something like: www.YOURLIBRARYWEBSITE.org/WEBFOLDER/eventsxml.xsl Unless it is located in the same folder as the HTML file and will not need a path. The 4th location is in the getxml.asp file. xmlpath="http://host.evanced.info/lib/eventsxml.asp?dm=xml&lib=all&alltime=1&nd=14" This is a link to the XML feed from your calendar system. The example is a link to our training site. If your installation is hosted your path will look something like this: http://host.evanced.info/YOURLIBRARYNAME/lib/eventsxml.asp URL switches can be added to this link to specify the data you want returned from this link. In this example are: dm=xml - Format of the returned data lib=all - Use data from all branches alltime=1 - Use data from all day nd=14 - Use 14 days worth of data The ASP file is used to perform a server side request for the XML data. if your server does not support ASP you will need to translate the ASP code into a server-side script that is support by your server. The basic concept is: the client HTML page cannot obtain the XML data directly from a different domain (causes an Access Denied error). This server-side ASP file can obtain the data and pass it to the HTML file as a string. You will need to remove the comments from the beginning of the getxml.asp file. Since the result of this file should be XML, having a comment at the beginning will cause it to not look like XML data. Remove everything down to, but not including the "<%@ LANGUAGE="VBScript"%>" Once the HTML and ASP file are edited with your path information, you will be able to open the HTML file in a web browser and see how the XML feed can be displayed in a simple table. Double-clicking the file may open the file but it will also generate an ActiveX error in your browser. To properly test you should enter the URL to the HTML file in a browser window. This will eliminate the error and display the page properly. To incorporate this into your site you will need to: 1. Modify the 'eventsxml.xsl' file to use the styles of your website. 2. Copy the javascript code from the example and include it on your website. 3. Use the "displayEvents()" function to do the work. Download the example files here: http://storage.evanced.info/files/Events_Client_side_XML.zip Online URL: http://kb.evanced.info/article.php?id=78 How To Events-Include a link to a calendar on my website The link to your Event Calender can be included on your website by simply linking to the patron-side of your calendar. The default patron-side link for your calendar is: YOUR DOMAIN/evanced/lib/eventcalendar.asp example: http://statewidelibrary.org/evanced/lib/eventcalendar.asp If your system is installed on your server, the domain path and folders can be different. If you are hosted on one of the Evanced servers your link will follow this format: STATE.evanced.info/LIBRARY PATH/lib/eventcalendar.asp example: https://tx.evanced.info/texasstatelibrary/lib/eventcalendar.asp Online URL: http://kb.evanced.info/article.php?id=97 Understanding Event Attendance The Event Attendance sheet is an important tool for tracking and contacting patrons. Event Attendance can be accessed from the Event System Maintenance page. Accessing the page from there will first send you to the Event Calendar where you can select the appropriate event session you wish to view. Event Attendance can also be accessed via the Event Registration page. Along the top of the sheet, there are five boxes. Back to Maintenance Page Return to the Event System Maintenance page. Edit Event Edit the selected event. View Another Attendance Sheet Choose another event to view in this mode. Export to Excel This option takes the data on the page and sends it to an Excel document Export to CSV This option takes the data on the page and sends it to a "Comma Separated Values" document. Below the buttons at the top, you can see the event information Below that level is the Statistics Entry box. Depending on your preset criteria, this will allow you to enter numeric data about the number of attendees. Again, depending on preset fields, you can enter how many people attended the event as a whole, as well as breakdowns by any designation you decided when adding the event. Remember to click the Save Attendance button after entering data. If anyone has registered for the event, their data will appear below. The system will alert you if there are no registered attenders. Below is a photo of what you will see if anyone has registered for the event. Along the top, there are four classifications under which those who are registered can fall. Main The main list of registered attenders Waiting The waiting list for those who registered after the event was filled Payment Waiting Registered attenders who have not paid for the event Cancelled Those who have canceled their registration. You have the following options for dealing with those who have registered: Move Move the person to the waiting or payment lists View/Edit View or edit the registered person's information Email Send an email to all registered people Cancel (with check box) Cancel all checked registrations. Transfer Transfer a registration from one event to another. This will move the user out of the current event and register him or her for a different event. Copy All Copy all the registration information for all those registered to a different event. This does not remove them from the current event. Update Notes Save any notes written in the corresponding text boxes. Along the bottom, there are six buttons. These are the same as the buttons on the top of the page with one exception. The Register button takes you to the Registration page for the event. Online URL: http://kb.evanced.info/article.php?id=26 How to Export an Attendance Sheet Sometimes you want to export data from an attendance report into a different program. Events allows you export data into either Excel or Comma Separated Value (CSV) format. Excel is a popular Microsoft spreadsheet program. CSV format creates a text based file that can be read by any number of standard text readers or word processing programs. These formats allow you to view the data in a program of your choosing and manipulate it according to your needs. Exporting an attendance report is simple. Simply click the Export to Excel or Export to CSV button. Your computer will likely prompt you to save or open the file, according to your desire. Saving the file will allow you to later open it with whatever external software you choose. Online URL: http://kb.evanced.info/article.php?id=27 How to Create a Custom Event Report Report creation can be tricky. Before attempting to create your own report, be sure to have read the article on Understanding a Detailed Event Report. Before to creating a custom report is to have a clear understanding of what you want to use the report for. This may sound obvious, but it is an important step toward building a tool you can use. Ask yourself the following questions before you begin. What time range do I want the report to cover? Is this a report about the past, present or future? Do I want to know about specific events or types of events? Am I primarily concerned with patron information (how many attended and their demographic information) or am I more concerned with the programs themselves (when they started, who led them, ect.)? What do I really need to know from this report? There are obviously, an infinite number of defining questions you can ask yourself, but writing a few down ahead of time can help you focus as you begin report creation. The Event Information Report Filter is a powerful tool, but it can be cumbersome. Clear thinking can help you master it. As we move through the report filter from top to bottom, ask yourself the following questions to help you create the report you want: 1. What time frame do you want the report to cover? Are you looking for data about the past year? The coming week? Yesterday? Next year? You can compile information about events as far back or far ahead as you have entered in the system. Remember that reports on current and future events won't have attendance data associated with them, but you can find out if people are registered for the events. Knowing what time frame you want to research is indispensable for building your report. 2. What internal classifications do you want to consider? Internal classifications are invaluable for creating a well-rounded event calendar, but they can be confusing when it comes time to create reports. Make sure you have a clear understanding of the terms "Ongoing", "Archived", "Unpublished", "Featured", and "Shared Attendance" before attacking this section. 3. Are you concerned with the age statistics? If you want to analyze attendance or registration numbers broken down by age, simply chose the age categories relevant to your needs. If you aren't interested in that data, just leave the field blank. 4. Are you in all branch mode? If so, choose which branch or branches you want to see data from. 5. Are you concerned with analyzing data by event type? Event types are classifications that you set to help group similar events together. Running reports by event type can be a great way to analyze what kinds of events are popular with your patrons. Perhaps you want to compare the popularity of toddler events versus the popularity of preschool events. Creating appropriate event types then allows you to track the two categories. The data can then be used to decide what kind of events to offer more of in the future, or how to classify and market events in a way that will attract the most patrons. Using this filter allows you to sharpen the focus of your reports. 6. How do you want to view the report? There are many ways to see the data the report generates. HTML form lets you look at the page in a web browser. Word is a word processing program that makes the report easy to print, edit, and include in other documents. Excel is a spreadsheet program that allows you to sort data, add up data, and create a wide variety of wonderful tables and charts. CSV, or Comma Separated Value, is a format that can be easily read by a wide variety of text readers if you don't have access to Word or Excel. 7. How much data do you want in the report? The final field has many options and can appear daunting, but don't be intimidated. The myriad of fields are there to help you get the information you need. Some of the boxes may be checked by default, but remember that you don't HAVE to include them in your report. Ask yourself: what do I really need to know? For example, do you want to know about the set up and take down time for the events? If not, then don't check that box. The more boxes you check, the more information your report will contain, but the more complicated it will be as well. As you read through the boxes, if there is an option don't understand, simply leave it unchecked. If you don't understand what the field refers to, you likely don't need the data it offers. 8. Will you want to run this report again in the future? If you think you'll want to run your custom report again, click save as. Give the report a name and you'll be easily able to access it again for future use. Congratulations, you've prepared your custom report! Click "Submit" and you're done! Online URL: http://kb.evanced.info/article.php?id=32 Understanding Detailed Event Report When you want to run a more customized report about your events than what is available in the Event Statistic Report, use the Detailed Event Report. You can access the Detailed Event Report from the Event System Maintenance page. Begin your custom report by filing out the Event Information Report Filter. This document merely explains the fields available in the Event Filter. For walk-through of how to reason out a custom report, read this article. As you can see above, the filter allows you to access reports for specific date ranges, as well as by publication and archive status. Ongoing and Standard Do you want to include ongoing events? Remember that these often lack much of the data that standard events have. Archived/Unarchived Archived events are older events that have moved off the calendar. Their data is retained, but they are no longer active in the system. Including them gives a full picture and more data, but may not be desirable if you only want data on present events, rather than on past versions of a present event. Published/Unpublished Do you want to to know about events that have been made public, or events that are still awaiting completion or approval? Featured Events Only If you only want to know about the most emphasized events, this might be a good choice Shared Attendance Do you want to consider each session of a recurring event individually or as one single event? For example, do you want to know how many people came each time your branch had Faulkner Book Club night, or do you want to know how many people came to all the sessions of the club put together? Moving down the filter, you can further limit your search to include only specific age groups according to your preset categories. You can also chose what branch to include in the report. The next level filters by your preset event types. You can then chose how to display the generated report. HTML View in your browser as a web page Word Exports your file to a word document Excel Exports your file to an excel document CSV Exports your file to a Comma Separated Value file, which can be easily read by a wide variety of text readers. As you can see above, the final phase of building a report is to select the columns you want displayed in the report. There are scores of options, including several which can be custom set. Used correctly, this is a powerful tool that can help you attain and organize the specific data that you want. Finally, you can choose to save your report so that you'll be able to run it again in the future. Previously saved reports will be shown as available on the Event System Maintenance page. Online URL: http://kb.evanced.info/article.php?id=31 Understanding Event Statistics Report Events allows you to analyze a variety of statistics about past, present and future events. The Event Statistics Report can be accessed from the Event System Maintenance page. This report provides standard data on all events as a whole, as well as by type. The report can be filtered by date, but other than that it is not customizable. It can be exported to both Word and Excel formats. For a discussion of exporting reports, click here. The first report is for all events. As you move down the page, you can find reports for each event type, in alphabetical order. The report distinguishes between Total Attendance and Total Registered Attendance. It can tell you how many have been on waiting lists, and how many cancellations occurred. There is a variety useful demographic data available as well. Online URL: http://kb.evanced.info/article.php?id=30 How to Create an Events and PR Report The Events and PR Report is a great tool for generating public relations information that you can send out about your library. You can access this tool via the Event System Maintenance page. Many of the options for the Events and PR Report are the same as the Detailed Events report. You may want to read the article How To Create a Custom Report if you are unfamiliar with the process of report creation. The Events and PR Report won't contain attendance information like the detailed report does. Instead, it focuses on compiling a list with useful information the public needs to know about current and future events. Where the Events and PR report information filter differs greatly from the Detailed Events Report is in the display options. Display format allows you configure the way the final report appears visually. A list report looks like this: A table report has customizable columns and looks like this: A calendar report looks like this: Display options allows you to chose the output for the report. HTML form lets you look at the page in a web browser. Word is a word processing program that makes the report easy to print, edit, and include in other documents. Excel is a spreadsheet program that allows you to sort data, add up data, and create a wide variety of wonderful tables and charts. CSV, or Comma Separated Value, is a format that can be easily read by a wide variety of text readers if you don't have access to Word or Excel. You can choose how to order events in the report based on a variety of fields. Additionally, you can choose to combine recurring events. This prevents the report from showing ever session of a recurring event individually. A weekly children's reading hour would show up once on the report instead of four times, for example. If you plan on rerunning the PR report regularly, be sure to save it in your system for quick recall later. Online URL: http://kb.evanced.info/article.php?id=33 Understanding Subscriber Details Patrons can choose to receive emails about specific event types that appeal to their interests. You can track those users by using the Subscriber Details tool. You can access this feature from the Events System Maintenance page. To remove them from the auto-update list, read this article. By clicking on this option, you generate a simple report containing the first and last names, email addresses, and event types for every user who has chosen to subscribe to an event feed. If you run the report from All Branch mode, you'll also be notified as to which library the user has subscribed to. This report can be exported to either Word or Excel. If you export the report to Excel, you'll have the capability of sorting the data according to your needs. Online URL: http://kb.evanced.info/article.php?id=35 How to Perform a Suscriber Lookup Patrons can choose to receive emails about specific event types that appeal to their interests. To unsubscribe a subscriber, read this. You can track those users by using the Subscriber Lookup Report. You can access this feature from the Events System Maintenance page. The tool is simple to use. Merely enter the first and/or last name of the patron in question. You can also search by email address. If you check "Show All Names", all subscribed uses will appear. The resulting list allows you to view or edit the subscriber information, as well as see all the feeds that user is subscribed to. Online URL: http://kb.evanced.info/article.php?id=34 How To Events-Change the list of locations The list of locations in your Event Calender can be edited by going to "Location List" from the main maintenance page for a specific branch. The Location List is a complete list of locations for this particular branch. The list for each branch can be different. If you have the Room Reserve module this list can include both locations and rooms. Locations are places where events can be scheduled but are not necessarily rooms. For example, Meeting Room A <--Room Meeting Room B <--Room North Display Case <--Location for events but not a room Patio <--Location for events but not a room In this case the Room Reserve module would not have rooms named "North Display Case" and "Patio". Posted - Tue, Sep 27, 2011 at 3:57 PM. This article has been viewed 113 times. Online URL: http://kb.evanced.info/article.php?id=94 How to Add Grade Levels Adding a new grade level in events is easy. From the Events Systems Maintenance page, go to Grade list. Then name the grade. Finally, select the 'weight' you want the grade to have in a list. The lower the weight, the higher the grade will rank. Weights function in factors of 10, with the number 10 going to the first item in the list. In the example of a K-5th grade setup, the list would look like this: Grade Weight K 10 1st 20 2nd 30 3rd 40 4th 50 5th 60 To edit a grade name or weight, double click the name in the list of current grades. Online URL: http://kb.evanced.info/article.php?id=39 How to Add a New Location If you want to add a new location (or room) to your Branch, make sure you are logged into a specific branch. Then from the Event System Settings menu you can access the Location List. To add a location, simply type the location name in the box. To edit the name of a location, click the name from the list on the right and make your changes. Note: If you are trying to configure a room, please see the Room Reserve program. Online URL: http://kb.evanced.info/article.php?id=38 How to Add a New Zip Code To add a new zip (also called a postal code), access the Zip Code List Maintenance menu from the Events System Maintenance menu. Simply type the zip code into the box and assign it a weight. Weights help the system keep the zip codes in order. A weight of 10 makes the new zip code appear first on the list to the right. A higher weight moves it down the list. Double click an existing zip code to edit it. Online URL: http://kb.evanced.info/article.php?id=40 How to Add a New Presenter To add a new presenter, access the Presenter List Maintenance tool from the Events System Menu. Simply input the presenter's name and click save. To edit a name, click on it in the list on the right. Online URL: http://kb.evanced.info/article.php?id=41 Understanding the Security Menu The Security Menu under System Configuration and Settings allows you to set passwords for four levels of branch security. The four basic levels of security are: Administrator - Will give the staff user access to the following: Add, Edit, Copy, Delete, Read, Register, Publish, Reports, Archive, System Configuration, Branch List, System Wide List General Staff - Will give the staff user access to the following: Add, Edit, Copy, Delete, Read, Register, Publish, Reports, Archive Create Only - Will give the staff user access to the following: Add, Edit, Copy, Read, Register, Publish, Reports, Bulk Archive Read Only - Will give the staff user access to the following: Read, Register, Reports Using the security menu, you can set the passwords for each level. Defining the privileges of each level is something you can do through System Settings. For information about setting individual user names and passwords, please see this document. For a video on how to change passwords, click here. Online URL: http://kb.evanced.info/article.php?id=57 Understanding Library Information Maintenace Library Information Maintenance is where you control basic information for your branch like its name, address, phone number, ect. You can access this menu from the System Configuration and Settings link. NOTE: Library Information Maintenance options are DIFFERENT in branch mode than in All Branches mode.Checking what mode you are logged into can save much confusion! In single branch mode, Library Information Maintenance allows you specify the following for your single branch: name, address, phone number, homepage, map information, and if the library is private. You can also set your standard and alternate library hours. Residency/Other Term allows you to create residency restrictions. For information on how to include your interactive map settings, please follow the instructions in this article. In All Branches mode, there are three options that are NOT available to a single branch that is part of a branch system. Mouse over the menu link to reveal them. Add Branch Set up a new branch to your library system. Follow the same process as listed for single branch mode. Edit Branch Alter the same information as above for previously existing branches. Edit Master Set the name and home page for the library system as a whole. Edit Branch mode also gives you the option to change the display order of the libraries in the system, or to delete a branch entirely. Online URL: http://kb.evanced.info/article.php?id=50 How to Manage User Logins-Quick Start Guide Turning on User Logins works the same from both Events and Rooms. Quick Configuration 1. Login at the All Branches (or main branch in single branch systems). Under System Configuration & Settings -+ System Settings: o Select "Yes― on Enable Username Login, then Save. Close your browser completely, all tabs and all instances. This is important, because we are changing the way the system sees you as being "logged in― and as long as the browser is still open, it keeps the old way active. Restart the browser and go to the maintenance page. o The page should look somewhat like the login screen below : The first time you login at this screen, your administrator username and password is mlibadmin . When you login for the first time, you will be taken to a screen to change the admin password, and then back to the login screen to actually login. This is the same process for assigning unique passwords that all users will go through upon first logging in, or through PW Reset (more below). 2. Once you’ve logged in as mlibadmin, you’ll be at All Branches (or main branch in single branch systems). Now you can add new users and security settings: Settings -+ User Login -+ Add New Clicking "Add New― provides the following fields: o Username can be anything. o Email is not currently used, but as this feature is further implemented it could be a bigger part of the system. o Initials are used for auditing – you don’t have to type them in every time changes are made, and it maintains consistency and can’t be forged. o Primary Library is hardcoded for single branch systems, and a dropdown for multibranch. This is the library that a user logs into when they first access the system, and they can have different access level rights at this library. Selecting All Branches from the dropdown gives the rights you chose to All Branches. o Secondary Library is only enabled on multibranch systems. This is where you set rights for libraries that a user can access but may have different levels than the primary. Example: • Primary set to branch 3, Admin access given. • Secondary set to Read Only access. • All Branches checkbox is not checked. • This user logs in, and is immediately put into branch 3, with admin access. They can change to any other branch and have read only access, but cannot access All Branches. Once users are created, you can "Edit― them. Everything works the same as above except: o PW Reset can be checked in the case of a lost/forgotten password. The next time that user logs in, they will go through the initial password update page, and then the system will remove the flag on them for password reset. You can also Delete users from the system. Mlibadmin cannot be deleted. 3. Some helpful tips: Usernames are not case sensitive. Passwords are case sensitive. Creating a user and setting their rights to none simply gives them no access. When a user logs in, their rights are set for all modules at all branches they are configured for. You can change between Rooms and Events, and between Branches, and not have to login again. Online URL: http://kb.evanced.info/article.php?id=222 Understanding Regional Settings Regional Settings control the date and time and region for the system. It can be accessed as part of the System Configuration and Settings for Events as well as for Rooms. NOTE: This is ONLY available in All Branches mode. If you cannot find this setting, check to make sure you are logged into the correct mode. Select Region Choose the region you are located. Date Format Choose between Day/Month/Year and Month/Day/Year format Use Time Settings on Server If you choose not to use server settings, you can customize your time settings including day light savings time and time zone. Online URL: http://kb.evanced.info/article.php?id=53 Events and Room Reserve Scheduled Task Setup for Email Notifications To allow your Events system to send automatic upcoming event notification and reminder emails to subscribers and registrants, and allow your Room Reserve system to send automatic reservation reminder emails to bookers, you need to set up a scheduled task on the server where it is hosted. Please note that this step is the last of four others required to make email configuration work. For your reference, please review these articles: Core configuration: Email Server Settings Other configuration: Email Settings Review: Email Templates (Events), Email Templates (Rooms) Enable Email Setting: System Settings (Events), System Settings (Rooms) Configure the scheduled task on the new server: 1. Edit the Scheduled Task Batch file. Use My Computer to browse to the evanced\lib folder created earlier. Right-click on the "notify.bat" file and select Edit or Open With and select a simple text editor. The batch file should contain the following line: HttpRequester.vbs http://localhost/evanced/lib/eventnotify.asp?opmode=all Edit this line to point to your installation. Mainly replace the "localhost" with the path to your web site. 2. Build the Scheduled Task. Open the Scheduled Task Wizard on the server. Typically this can be found under 'Start-->Control Panel-->Scheduled Tasks-->Add Scheduled Task'. Select Next when the wizard starts. Click on Browse and find the "notify.bat" file under the lib directory created earlier and select it. Change the name of the task to something like "Evanced Notify", click Daily then click Next. Select the time you want the notification script to run then click Next. Typically this is during a slow traffic time like 11:00 PM. Enter a user name and password for an administrator account that does not change or remember to change this password whenever your security policy requires you to change passwords. Click Next then click Finish. Please note that the steps mentioned above for #2 will work for Windows Operating Systems like 2003 or older, however, newer Windows Server 2008 has a slight variation: When you get to the step where you need to specify the file that needs to be run by this task; instead of browsing for the file on the server, do the following in the respective fields: Action: Select "Start a program" from the drop list. Program/Script: Type "cmd.exe" Add arguments: Type "/c notify.bat" Start in: Type here the full path to the containing folder of the notify.bat file on your server. For example, it could be this "c:\inetpub\wwwroot\evanced\lib\" for the instance on hand. Do not forget about the back slash at the end. 3. Test the Scheduled Task Right click on the scheduled task you just created and select Run. If it runs with no more user interaction then it is installed correctly. If it requires ANY user interaction then this must be addressed or it will not run automatically. NOTE: One common issues is a popup that requires user interaction to click on OK to continue running. If this window is displayed, be sure check the box for "Do Not Display This Warning Again". Failure to check this box will cause the task to fail. Posted - Tue, Nov 8, 2011 at 12:19 PM. This article has been viewed 280 times. Online URL: http://kb.evanced.info/article.php?id=268 Understanding Credit Card Processing Credit Card Processing can only be enabled in Events version 7 or newer, so if you are using an older version, our first step would be bringing your system to the latest version. Also, there is an additional charge for this feature from Evanced and charges will apply from your selected merchant account, processor and/or gateway. Below is an explanation of what each of those elements is needed for: The components necessary for on-line credit card transactions are: Bank (Merchant Account): Banks/Merchant Accounts are used to accept the credit card payments. They generally do not process or transmit the charges they just accept them for you. Processor: A Processor handles the electronic credit card transaction. Many banks resell the Processor service. Gateway: A Gateway is the interface from the web site to the Processor. Common Gateways we support are ACH Direct, BizGate, Authorize.net, Payflow Pro (A Paypal Company), Virginia PP and Sage. Some of these services may be combined. For example, Sage is a Gateway, Processor and Merchant account all rolled into one. Some banks will bundle these services together as well. If you are already accepting online credit card transactions then you already have access to these necessary components. To determine what will be needed for your system review the questions below. 1. Do you already offer on-line credit transactions? (If No, see question 2) Chances are, you already have the necessary components to add credit card processing to your system. Email [email protected] with your Gateway connection information and we will help you to determine what is necessary. We are always adding new Gateways to our software so if yours is not supported it may require a little work on our part. 2. Do you offer credit card transactions in person? (If No, see question 3) Contact your bank to determine what processor and gateway they support. They may already offer the components needed for your existing account. Then contact support with the gateway information and we will help you setup your RR system. 3. Are you new to credit card transactions? Contact our support department and let us know. We can provide you with a quote to provide these services for you. A good description of the process can be found on Authorize.net's website. The Credit Card Processing menu can be accessed via the Systems Configuration and Settings menu. If we have enabled your credit card processing capability, use the menu to configure Events. If the menu does not appear, contact customer support about enabling processing. Select Enable Processing (yes) Then list your processing company, merchant ID and password and select which cards you accept. Once this step is complete, you will be able to create custom cost classifications that can be applied to events. For common credit card questions click here. Online URL: http://kb.evanced.info/article.php?id=60 Understanding Email Server Settings Events allows you to configure the outgoing emails the system sends. The Email Server Settings menu is located on the System Configuration and Settings menu for Events and for Rooms as well. NOTE: This menu is ONLY available in All Branches mode. If you can't find it, check to make sure you are logged into the correct mode. For information about configuring GMail with Evanced, read this article. First, have your IT person configure the outgoing emails according to your current mail system. If you are unsure of what value to enter in a field or what a field title refers to, you may not be the right person to configure the email settings. Make sure you are authorized to change these settings. SMTP Address (URL or IP): [localhost] Refers to the localhost reference or the specific server address. Windows servers require the SMTP address. Authentication Type: • No Authentication eliminates the user name/password requirement for access to the system. • Basic Authentication requires a user to enter a user name and password. • NTLM refers to NT LAN Manager authentication. Outgoing SMTP Server Port: Sets the outgoing port and determines if SSL is used. User Name: Required for Basic Authentication. Password: Required for Basic Authentication The second half of the menu allows you to customize when emails are sent, and how they appear. Event Notification Offset How long before an event do you want notification emails sent to patrons who asked to be notified of coming events? Event Reminder Offset How long before an event do you want registered patrons to be reminded? Room Reminder Offset How long before a room has been reserved do you want reminders sent? Web Server URL or IP Indicates the URL or IP address where Events has been installed. Include "http://― when entering the address (i.e., http://[serveraddress].com). Folder Path Indicates the system subfolder where Events is installed. Type the path without the server address and starting or ending forward slash (i.e., Evanced/lib) "From" Name When patrons receive an email from the system, what is the sender name? "From" Email Address What email account sends the emails? Nightly Status "To" Email Name Nightly Status "To― Email Name refers to the name of the internal recipient of nightly status emails. This field is restricted to one name only. The Nightly Status and From name fields may contain the same name. Nightly Status "To" Email Address Nightly Status "To― Email Address refers to the email address of the internal recipient of nightly status emails. This field is restricted to one address only. The Nightly Status and From Email Address fields may contain the same email address. Email Sending Options Do patrons who have subscribed to multiple events receive multiple emails, or one condensed email? Enable Special Email info If you want to add event specific information to the general emails that are sent regarding an event, enable this feature. The special email text can then be manipulated through the Event Calendar. Enable Logging Enable a status log of the outgoing emails. To configure email for gmail, read this article. For trouble shooting and a more detailed explanation, read this article. Online URL: http://kb.evanced.info/article.php?id=54 Understanding Email Settings The system will automatically send emails to patrons if enabled. These settings control the way those emails are return addressed. You can access these settings via the System Configuration and Settings menu in Events as well as in Rooms. Note: these options are ONLY available to individual branches. Some of these tasks can completed in All Branch mode, via the Email Server Settings. "From" Name What name appears as the sender of the email "From" Email Address What address appears as the sender Default "To" Internal Name: What name are internal emails sent to? Default "To" Internal Email Address(es) What email addresses receive internal emails? Use BCC when copying internal Email Address Blind Carbon Copy hides each recipient of an email from all other recipients. Be sure to save and test settings. Online URL: http://kb.evanced.info/article.php?id=56 Ecommerce Quick Start Guide Ecommerce Quick Start Guide Once Evanced has enabled your ability to process credit cards online, this guide is meant to help you setup your system and take advantage of the features offered. Payflow Pro Quick Configuration Settings → System Configuration & Settings → Credit Card Settings 1. Enable Processing is the switch that turns on credit card processing. If for some reason you want to disable this temporarily, you can switch it to "No― and the system will work as it always has. 2. Processing URL will be filled out by Evanced, but basically this points to the files in a secure location which actually handle the transactions. 3. Processing Company is payflow pro, for this example. 4. Partner, Merchant Login, User and Password is where you setup the processor login information, just like you would log into http://manager.paypal.com . 5. Processing Mode is so you can test credit card process to make sure that the process works before you set it to live. 6. Comment is for passing extra information through with the process, for example "South Branch Room Reservation. This information is displayed on payflow pro’s credit report system, and can make for easier understanding of transactions. 7. Card Processing Choices are if for some reason you want to disable the use of a certain card brand. Now that your system is configured “ how do you process transactions? This page is the payment details page which comes up after you click Continue to Payment Options from the room request summary page. 1. Grand Total shows you what the total charge for your reservation is, including food and equipment, and any deposits. 2. How would you like to pay? Lets you select check, and the system works like it used to, or credit card, and the screen changes to let you put in your credit card information. The rest of the page is like any other online credit card form, it requires you to use the card’s billing address & put in the CCV located on the back. So you’ve gone through the process and the system tells you you’ve reserved your room Now What? 1. Staff Reservations which don’t need to be accepted by an Admin user get automatically processed as a Sale. The transaction goes through immediately, and the reservation goes to Accepted Reservations. 2. Patron Reservations go through the usual process of being placed in Pending Requests. The credit card transaction is run as an authorization, checking that they have enough funds in the account to make this a sale. When the Reservation is Accepted, the previous authorization is "captured• which means that funds are sent form the patron to the library and the sale is complete. Credit Card Authorizations need to be "captured• (meaning you need to accept the reservation) within 7 days, otherwise the process needs to be started over. Between authorization happening and funds being captured, the funds are on hold. Upon denial of the reservation they get released back into the patron’s account. Due to the fees associated with crediting back charges, the system does not handle refunding credit cards. This will need to be processed by the library. Posted - Fri, Oct 7, 2011 at 2:50 PM. This article has been viewed 94 times. Online URL: http://kb.evanced.info/article.php?id=209 Events-Credit Card Processing Credit Card Processing can only be enabled in Events version 7 or newer, so if you are using an older version, our first step would be bringing your system to the latest version. Also, there is an additional charge for this feature from Evanced and charges will apply from your selected merchant account, processor and/or gateway. Below is an explanation of what each of those elements is needed for: The components necessary for on-line credit card transactions are: Bank (Merchant Account): Banks/Merchant Accounts are used to accept the credit card payments. They generally do not process or transmit the charges they just accept them for you. Processor: A Processor handles the electronic credit card transaction. Many banks resell the Processor service. Gateway: A Gateway is the interface from the web site to the Processor. Common Gateways we support are Authorize.net, Payflow Pro (A Paypal Company), and Sage. Some of these services may be combined. For example, Sage is a Gateway, Processor and Merchant account all rolled into one. Some banks will bundle these services together as well. If you are already accepting online credit card transactions then you already have access to these necessary components. To determine what will be needed for your system review the questions below. 1. Do you already offer on-line credit transactions? (No see question 2) Chances are, you already have the necessary components to add credit card processing to your system. Email [email protected] with your Gateway connection information and we will help you to determine what is necessary. We are always adding new Gateways to our software so if yours is not supported it may require a little work on our part. 2. Do you offer credit card transactions in person? (No see question 3) Contact your bank to determine what processor and gateway they support. They may already offer the components needed for your existing account. Then contact support with the gateway information and we will help you setup your RR system. 3. Are you new to credit card transactions? Contact our support department and let us know. We can provide you with a quote to provide these services for you. A good description of the process can be found on Authorize.net's website here: http://www.authorize.net/resources/howitworksdiagram/ Note: For installed solutions you will also need to ensure that SSL certificates are installed and functioning on your server. All servers involved in credit card transactions must have SSL. Online URL: http://kb.evanced.info/article.php?id=79 Understanding Email Templates Email Templates control the text of the emails the system sends to patrons. You can find this menu via System Configuration and Settings. Note: Email Templates are ONLY available to the individual branch level. If you cannot find the option on your menu, make sure you are logged into an individual branch. There are five templates that can be customized. Upcoming Event The email that goes out to patrons who have subscribed to a specific event type Registration Reminder The email that goes out to patrons who have registered for an event Event Reminder The email that goes out to patrons who have clicked "Remind me" for a non-registration required event. Confirmation The email that confirms a patron's registration Status Change The email that notifies a patron if they've had a chance in their registration status (canceled, moved from waiting list, ect) Fields can accept HTML and graphic codes. If you change default text located between the ^^ marks, you will lose the code that enables each message to be customized by the system. You can save the template for the specific branch you are logged into, or save it across all branches, overwriting their settings. Online URL: http://kb.evanced.info/article.php?id=55 Understanding the System Templates Settings When a patron or staff member attempts to register for an event, the system will notify them if the operation was successful or not. These system messages can be customized using the System Templates manager. This can be found under System Configurations and Settings. NOTE: There are different options for All Branches than there are for the individual branch. Before using this setting, check to see which mode you are logged into. If you can't find the options you want, switch modes. For individual branches System Templates contains the following messages to configure: Registration Successful This is the message users see when they successfully register for an event Registration Probation If the "Enforce 24HR Notice" option is checked under System Settings Maintenance, users who register for events, but don't show will be put on probation. Three missed registered events in 6 months will place the user on waiting lists for events instead of registering them. This message controls what the system tells them in that eventuality. Already Registered This is the message a user sees if he or she registers for the same event twice. Registration Residency Failed This message appears if a patron fails to meet the residency requirement for an event. Registration If payment is required, this message appears to the patron instructing them how to proceed with payment. Payment Required Messages can be configured using HTML tags. Please note that default codes within the ^^ marks are available on the right hand side. These enable the system to replace the 'code' with data specific to the user and event. You can also enter Spanish messages on a separate tab. If you want to enable multilingual messaging, please contact customer support. In All Branches mode: None of the menu options are the same in this mode. Event/PR Report Configures the format of the Event/PR Report so that you can be sure to include precisely the information you want in the format you want. Print List Print List controls the information that appears when a patron prints the calendar from List View. Online URL: http://kb.evanced.info/article.php?id=52 Understanding the System Messages Maintenance Page The System Messages Maintenance mode is located on the System Configuration and Settings menu. NOTE: This is only available in individual branch mode. If you can't find this menu option, you are likely logged in to All Branches mode! This page controls the text of the messages the system gives to patrons as they interact with the system. There are options for both English and Spanish messages if desired. The following messages are customized on this page: Event Calendar Instructions This message appears at the top of the Event Calendar on the patron side Event List View Instructions This message appears at the top of the List View on the patron side. Event Registration Instructions This message appears when patrons register for an event. Payment Information This instructs patrons how and where to pay for an event they've registered for. Contact Information Who and how patrons can contact about events in general (Note: this is not the event contact for specific events). Cancellation Notice Cancellation restrictions and notes. Notify Me Instructions The message patrons see when they click 'notify me' in list mode. Email a friend Instructions Instructions the patron sees when they click "Email a friend" in list mode. Fields can accept HTML and graphic codes. If you change default text located within the ^ ^ markers, you will lose the message customization. Those carrot markers tell the system to insert the information specific to the event, date, or patron in question into the message. Please save changes. Online URL: http://kb.evanced.info/article.php?id=51 Understanding Style Configuration Note: this article covers both Events and Room Reserve. If you have both programs, the settings in Events are considered the dominant settings. Style Configuration allows you to set the colors and fonts that your system displays. Coloring is important to building and aesthetically pleasing and easy to understand site. Access Style Configuration from the System Configuration & Settling link on the Event System Maintenance page. Style Configuration contains the following menu options that can be expanded: General Display Properties What are the basic text colors for the site? Event Title Properties On the Events Calendar, how do event titles appear? List Display Properties How is the List View colored? Calendar Display Properties How is the Events Calendar colored? In Rooms, these settings cover the Rooms Calendar You can find the precise color you are looking for using hexadecimal code. You can also click 'pick' to bring up a color menu. On the General Display Properties menu, you can also change the body font the system uses. If you alter a color setting, be sure to click Save before moving down to the other menus within Style Configuration Maintenance. A good strategy for changing colors schemes is as follows: 1. Determine if your branch already has official colors used on the website. If possible, determine the hexadecimal values for those colors. If that's not possible, use the color picker to approximate the current look of the site. 2. In a separate browser or tab, open the patron view of your Events Calendar or Events List. Each time you change a color or font, click save. Then refresh the calendar or list in the other browser. Take note of how the appearance changes. Always check your color choices against what the public will see. Poor color choices can undo the hard work you put into designing your calendar. If the patrons can't read the event information clearly, they are less likely to use the calendar as a tool to help them take full advantage of your libraries. If you want photo diagrams of what each line refers to, please read this article. Online URL: http://kb.evanced.info/article.php?id=49 Events Style Settings Style Configuration General Display Properties Definition Picture The General Display Properties allows you to define the look of your event general properties by modifying colors and font. Defining Picture (Click to enlarge) List Display Properties Group Defining Picture (Click to enlarge) List Group The group that begins with "List" defines the colors within the Event System Maintenance side of the system under anyone of the following areas: Location List Grade List Zip Code List Presenter List Event Type List Age Group List Event Registration Costs List The group that begins with "Entry Form" defines the colors found when adding a new Event to the system. Entry Form The group that begins with "Maintenance" defines the colors found when viewing the Event System Maintenance Maintenance Group Homepage. Calendar Display Properties Group Defining Picture (click to enlarge) Month Text Color - Weekday Background Color Tiny Calendar Weekday Background Color - Current Day Background Color Background Color for Popups - Text Color for Popup Headings Online URL: http://kb.evanced.info/article.php?id=85 ILS Authentication in Events and Room Reserve Authentication is the means by which the application connects to your ILS system and confirms that a patron record exists for the library card number used. The 3 supported methods "III (Patron API)" , "SIP2", and "Custom API". Configuring Events and/or Room Reserve to use authentication is a matter of configuring the connection and opening the path to the ILS server. Similar to what would be done when adding a self-checkout station. Configuring the connection is done through the Events/Room Reserve software from 'Authentication Settings' . This is a page that can only be accessed by system administrators. Evanced support will have to send you the link for it, please email [email protected]; as it is not published. Opening the path to the ILS server can consist of many devices and configurations. Opening the path to the ILS system You will probably need to enlist the help of your IT staff and/or ILS company to open the path from Events/Room Reserve and the ILS system. Because the equipment used can be considerably different for each application we cannot cover the actual configuration changes needed. Instead, here is a list of the most common devices and what should be done. Firewall - The Firewall in front of the ILS server will need an exception added to allow the Events/Room Reserve through. The IP used will be the IP of the server Events/Room Reserve sits on (For sites hosted by Evanced, that IP address is 216.239.248.18) and the port is determined by the ILS system. There are some standard ports used (like 4500 for Patron API) but the ILS system should be checked for this value. Note: If your Events/Room Reserve application is hosted on your own server, then your IT folks will most likely be able to provide you with its IP address. Router/Port Forwarding - A router or other device that handles port forwarding will need a new rule that forwards requests from the Events/Room Reserve site to the ILS server. These rules can usually be added with an originating IP (again the newest Evanced hosted server is 216.239.248.18) and port (specified by the ILS system). If the server housing the ILS system is directly accessible then this step is unnecessary. ILS Configuration - In most cases the ILS system needs to have a rule added that is similar to the port forwarding rule to allow the connection from the Events/Room Reserve server. This is usually done in the ILS configuration and is very specific to the system you have. Some ILS vendors require an additional license to enable this connection. Authentication Settings Again, configuring authentication is done through the Events/Room Reserve software from 'Authentication Settings' . This is a page that can only be accessed by system administrators. Evanced support will have to send you the link for it, please email [email protected]; as it is not published. Below are the major components of this page (Please make sure your settings are filled out according to your ILS system requirements for the connection to work. Evanced staff will not be able to advise on the proper settings here as they differ from one system to another): First, you will see the settings to enable/disable authentication per module. You can leave enabling this until the end after you have tested and confirmed that the connection to your ILS system actually works. Continue to next item to be able to do this. Note: * For Events, you can select to require authentication for certain events by simply enabling the per Event option from here, and then enabling the library card field when creating the event, or choose to require it for every event in the system that requires registration. * For Room Reserve, you can select to just validate the provided card number against your ILS system by selecting Enable or also validate residency status. See residency section below for more information. Authentication Type - Select the type of authentication used by the ILS system. The 3 supported methods "III (Patron API)" , "SIP2", and "Custom API". Authentication Path - IP or URL address of the ILS authentication server. The syntax (including backslashes) for this field is important. Be sure to review the examples. o Example SIP path - 192.168.1.201:7304/ or subdom.domain.org:7304/ o Example III path - 192.168.1.201:4500/PATRONAPI/ Overdue Fee Level - Set the overdue fee level for not allowing program registration. Enter a dollar amount between 1 and 100. Enter 0 to ignore overdue fees. Patron-Side Last Name/Pin Entry - Set patron-side pin/last name entry option. This setting only applies to authentication requested from the patron-side of the application. ILS sip server settings ultimately controls what is required. Staff-Side Last Name/Pin Entry - Set staff-side pin/last name entry option. This setting only applies to authentication requested from the staff-side of the application. ILS sip server settings ultimately controls what is required. Residency Checking If 'Residency Checking' is enabled in your system then the system must be told how to determine if a patron is a resident. There are 2 methods possible; using the "P TYPE[p47]" value from the patron information record (usually used with III Patron API) and using the first few numbers of the patron barcode (usually used with SIP2). To use the "P TYPE[p47]" value with a III Patron API system you will need to enable 'Residency Checking' and configure the values on the Patron Type Maintenance page (See sample link at the bottom of this section). On this screen you will enter all of the values that represent a resident and nonresident that are used in the "P TYPE[p47]" field in the ILS system. Events/Room Reserve will then pull the "P TYPE[p47]" value and compare it to this list to determine who is a resident. To use the first few digits of the barcode value with SIP2, you will need to enable 'Residency Checking' and configure the values on the Patron Type Maintenance page (See sample link at the bottom of this section). On this screen you will enter all of the values that represent a resident and nonresident that are made up of the first few digits of the patron barcode. Events/Room Reserve will then pull the barcode value and compare it to this list to determine who is a resident. Please also email [email protected] in this case to have Evanced staff set the number of digits used for residency checking in your case (For example first 4 or 5 characters, etc), as this setting is not currently published on the user's web interface. [Your Evanced system unique path]/ptypemaint.asp Testing and Troubleshooting The 'Test' or 'Save and Test' buttons will allow you to not only test the connection but also will display some of the message level text to help you determine the cause of any problems you may be having. When you run a test it will ask you to enter the barcode and last name or just the barcode (depending on your configuration) for a patron. A screen will then display the results of this test. The test result screen consists of 3 areas; the 'Communication Result', the 'Error Result' and the 'Data Result'. Communication Result - This area will typically give you the connection string (the URL used to grab the patron information) and the returned values. The returned values can be quite long depending on the amount of information that is stored for each patron in your ILS system. Error Result - The error result will be blank if the connection was successful and the patron would be allowed to register. If there is a problem communicating or the patron information indicates that there is a reason to not allow them to register, then it will display the information it can gather about the error. If 'Residency Checking' is enabled then a non-resident will generate an error and it will be displayed here. Data Result - The data result area displays information the Events/Room Reserve application was able to gather from the response to the request for patron information. This is where their name and address will appear. So basically, if you were able to retrieve data from your ILS system associated with a real card number, then your configuration was successful. But if you were not, then the connection was not successful. Please research received error code/text. Alternatively, if you test with an invalid card and get a message that the record was not found, then most likely the connection was successful, as it is an enough indication that the system at least searched the ILS database. But always confirm by testing with a real card. Once the connection is confirmed to be successful, you can enable authentication. Please make sure you test again either by submitting a test registration or a reservation to make sure it is working as expected. Online URL: http://kb.evanced.info/article.php?id=255 Understanding System Settings (Individual Branch Mode) The Systems Settings page for individual branches is different than the System Settings in All Branches mode. This article is for individual branches ONLY. You can access this menu by logging into an individual branch and clicking on the Systems Configuration and Settings menu. For more detail on any of these settings, read this article. There are four sections to this menu. The first is Registration Settings. Enable Staff Side Group Registration Allows staff to register multiple people for an event as a group under one single name. Enable Staff Editing of Allows staff to edit internal notes on the attendance page. Internal notes on Attendance Page Enable Staff Viewing of Internal Notes on Registration Page Allows staff to see the internal notes on a registration page. Enable Notes Entry for Patron Registration Allows a custom text field to be added to registration forms that staff can edit. Maximum Number of Patron Set the maximum number of times the 'recall information' button can be used for a single patron. This would prevent a patron Recalls from mass registering for too many events in one sitting. Enforce 24 HR Notice Registered Patrons must cancel their reservation 24 hours in advance. Failure to do so 3 times in 6 months will result in a probation period during which they are automatically sent to a waiting list. Enabling this option also automatically moves patrons from the waiting list to the registered list upon another patron's cancellation. Enable 24 HR Message Determines whether the 24-hour advanced notice cancellation reminder appears at the bottom of the Event Registration Form Enable Registration Limit Allows staff with appropriate password level to by-pass preset registration limits. Unlimited Registration Password Level Sets the level of staff password necessary to by-pass registration limits. The next level down is Event Entry Settings. Default Time The default time that events begin Default Setup Time Default amount of time to schedule for setup before an event. Default Takedown Time Default amount of time to schedule for takedown after an event Maximum Recurring Occurrences How many times can one single event recur? Require Location Selection Does every event have to have a fixed location in the library? Enable Card Number Stipulation Do registrants need a library card number to register? Set "No Waiting List" default to checked Registration will default to no waiting list. Enable Auditing Creates a trail showing who created and edited events Enable Address Stipulation Allows you to control when and how a particular address requirement is applied to registration. Enable Custom Stipulation You can create up to 6 custom requirements for registration. (up to 6) Enable Publish Features Determines if events are able to be published. Publishing Password Level What security level is allowed to publish events. Auto Archive Option Controls when and how events are automatically moved to the Event Archive Always Show Registration Settings Hides or shows registration options within the Add Event page depending on whether registration is required for an event. Outside of standard hours Allows the system to determine whether and event’s start and end time are outside of the library’s normal operating hours. The drop down list displays options based on a 24-hour clock (military time). This is primarily used for checking checking time entry mistakes (i.e., 1:00a.m. v. 1:00p.m) The next level down is Attendance Settings. Enable AutoWaiting List Move w/Email The system will automatically move a member of the waiting list to the active list in the event of a cancellation. The newly registered patron will also receive a system email notifying them of their change in status. The event’s contact or the Default Internal Contact also receives the status change e-mail for information and follow-up purposes in the event the attendee does not provide and e-mail address. Enable Auto Status Whenever a patron has their status change in regards to their registration, they'll receive a system email. Here are the instructions for Change Emails customizing that email. Optional Statistical Creates a place on the Attendance sheet to record specific demographic/assorted information. Inputs The final area is Calendar Settings Enable Multi-branch Determines whether the system is a single branch or multi-branch system. Note: Single branch systems wanting to create a private staff calendar should set this field to Yes. Calendar Title What is the title of your Events Calendar? Use Library Name Determines whether the library’s name appears at the top of the public calendar view. Use Digg Links Enables the patron to use the Digg service. Use Delicious Links Enables the patron to use the delicious service. Settings can be saved or saved and then applied to all branches. This will override the previous settings for each individual branch. Online URL: http://kb.evanced.info/article.php?id=58 Understanding System Settings (All Branches Mode) The System Settings page is different for the All Branches mode than the System Settings page in individual branch mode. This article is for All Branches only. You can access this menu via the System Configuration and Settings menu. All changes made in this menu will apply across all branches. There are three areas to this menu. The first two are Registration Settings and Attendance Settings. Enable Patron Self Cancellation Determines whether patrons can self-cancel their registration in an event. "Yes― enables a "Registration Cancel― link in the Registration Confirmation email. The patron will then receive a status change email. Enable Registration Confirmation Emails The system will automatically email the patron a confirmation when he or she registers for an event. Enable Registration Limit Prevents staff from overriding registration limits and restrictions. Unlimited Registration Password Level Sets the security clearance to override registration limits. Remove Attendee Information When Archiving When an event is moved to the archive, specific attendance information is removed. The overall event totals remain, but the individual registration lists are discarded. Finally, there are Calendar Settings. Enable Multi-Branch Sets the system up to recognize more than one branch. Enable Username Login Sets the system to advanced security with usernames for all staff. For more information, please read these instructions. Enable Event Type Searching Determines whether patrons can filter or search for events by Event Type. This setting impacts the public view only. Enable All Branches Publish Features Enables events to be created in All Branch mode and published throughout all the individual branches. All Branches Publishing Password Level Sets the security level to publish events at the All Branch level. Enable Multiple Library Searching Enables staff and patrons to search multiple libraries from the search slider. Enable Calendar Search Window Enables the Search Slider and SEARCH button in the public view of the Events Calendar Search Window Default State Determines whether the Search Slider appears open or closed when staff or the public initially logs into Events. Enable "Display Personal Schedule" link Enables or disables the DISPLAY YOUR PERSONAL SCHEDULE button on the Event Calendar. This setting impacts both the staff and public views. "Display Personal Schedule" validation options Determines the information used to validate access to a user’s personal calendar. The system requests validation when a user’s clicks on the DISPLAY YOUR PERSONAL SCHEDULE link. • Selecting "Confirmation• requires an event confirmation number and a patron’s last name to access a personal calendar. • Selecting "First/Last/Phone• requires a patron’s first name, last name and phone number Enable Event Time Display in combination with Event Title Enables an event start time display next to an event title on the calendar page. Default Patron View Do Patrons see the calendar page or list page first? Default Staff View Do staff see the calendar page or list page first? Show Registration Numbers in Patron Views Allows Patrons to see how many people have registered for an event. Combined Calendar Title Names the calendar that is seen when multiple branches are combined into one calendar. Calendar Title Sets the default title for the calendar. Use Library Name Selects whether or not the calendar uses specific individual branch names above the title Be sure to save changes! Online URL: http://kb.evanced.info/article.php?id=59

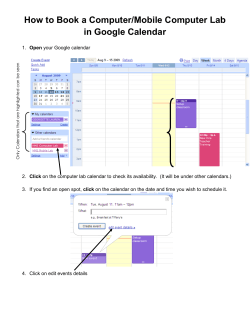

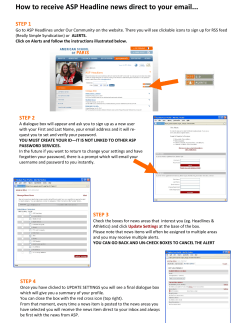

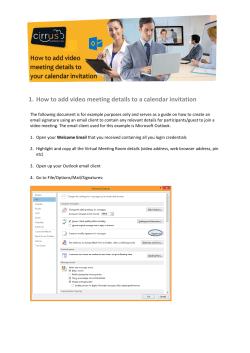


© Copyright 2026