
Installation & Licensing Guide Ocularis
Ocularis Installation & Licensing Guide © 2014 On-Net Surveillance Systems Inc. On-Net Surveillance Systems, Inc. One Blue Hill Plaza, 7th Floor, PO Box 1555 Pearl River, NY 10965 Phone: (845) 732-7900 | Fax: (845) 732-7999 Web: www.onssi.com Ocularis 4.1 00007242014-1013-4.1-.4.1.0.165 Legal Notice This product manual is intended for general information purposes only, and due care has been taken in its preparation. Any risk arising from the use of this information rests with the recipient, and nothing herein should be construed as constituting any kind of warranty. © 2002-2014 On-Net Surveillance Systems, Inc. All rights reserved. OnSSI and the ‘Eye’ logo are registered trademarks of On-Net Surveillance Systems, Inc. Ocularis, Ocularis Client, Ocularis Client Lite, Ocularis Video Synopsis, NetEVS, NetDVMS, NetDVR, ProSight, NetGuard, NetGuard-EVS, NetSwitcher, NetMatrix, NetCentral, NetTransact, NetPDA and NetCell are trademarks of On-Net Surveillance Systems, Inc. All other trademarks are property of their respective owners. On-Net Surveillance Systems, Inc. reserves the right to change product specifications without prior notice. US patent # 8,390.684 B2 for Ocularis Client Patents Applied For in the U.S. and Abroad Ocularis Installation & Licensing Guide Contents Table of Contents INTRODUCTION............................................................................................................................................................2 OCULARIS FEATURES SETS ............................................................................................................................................2 GETTING STARTED WITH OCULARIS........................................................................................................................3 MINIMUM SYSTEM REQUIREMENTS..................................................................................................................................3 INSTALLING OCULARIS ON A NEW SYSTEM .......................................................................................................................3 UPGRADING TO OCULARIS VERSION 4.1 ..........................................................................................................................4 OCULARIS INSTALLATION & CONFIGURATION.......................................................................................................5 DOWNLOAD THE OCULARIS INSTALLATION FILES................................................................................................6 EXTRACT OCULARIS INSTALLATION FILES ............................................................................................................7 INSTALLING OCULARIS BASE .................................................................................................................................10 LICENSING OCULARIS BASE ...................................................................................................................................14 INSTALLING OCULARIS COMPONENTS .................................................................................................................18 OCULARIS COMPONENT LOCATION................................................................................................................................18 INSTALLING OCULARIS ADMINISTRATOR .............................................................................................................22 INSTALLING OCULARIS CLIENT ..............................................................................................................................23 OCULARIS RECORDING COMPONENTS .................................................................................................................24 OCULARIS PS, OCULARIS IS, AND OCULARIS CS ...........................................................................................................25 OCULARIS LS AND OCULARIS ES .................................................................................................................................27 Synchronize Time on Servers.................................................................................................................................36 OCULARIS CAMERA LICENSE REGISTRATION......................................................................................................37 SUPPORTED RECORDERS ............................................................................................................................................37 CAMERA REGISTRATION PROCESS ................................................................................................................................37 REGISTER CAMERA LICENSES ......................................................................................................................................37 Online Camera Licensing using Ocularis PS, Ocularis IS, and Ocularis CS...........................................................38 Online Camera Licensing using Ocularis LS and Ocularis ES................................................................................39 Offline Camera Licensing using Ocularis PS, Ocularis IS, and Ocularis CS...........................................................40 Offline Camera Licensing using Ocularis LS and ES..............................................................................................41 OCULARIS EVENT PROXIES.....................................................................................................................................42 RC-C / RC-I EVENT PROXY .........................................................................................................................................42 Configuring the RC-C / RC-I Event Proxy...............................................................................................................43 RC-E RC-L EVENT PROXY ..........................................................................................................................................46 APPENDIX A OCULARIS PORTS.........................................................................................................................50 CONTACT INFORMATION .........................................................................................................................................51 On-Net Surveillance Systems, Inc. i Introduction Ocularis Installation & Licensing Guide Introduction Ocularis version 4.1 is the latest version of OnSSI’s flagship IP-video and security platform. Ocularis represents the latest evolution in IP-video surveillance and security. As an integrated video and event management platform, it includes a full-fledged video management system for streaming, recording and managing an unlimited number of cameras at multiple sites. Ocularis Features Sets Ocularis version 4.1 is offered in five feature sets, designed to meet the needs of organizations of all sizes and structures, from single-location retail outlets or schools, to multiple-site, complex municipal and campus installations. Ocularis PS – For organizations with limited active live monitoring and alerting. Ocularis IS – Competitively priced for organizations operating at multiple locations. Ocularis CS – For large distributed organizations with extended command and control needs. Ocularis LS – Ideal for buses, trains and mobile law enforcement applications. Ocularis ES – Brings a higher level of efficiency to recording system maintenance. The Ocularis™ Platform, regardless of feature set, consists of the following components: Ocularis Base – server software application which regulates and manages the flow of data between video client users, recording servers, video wall management and an integrated alerting application. Ocularis Administrator - The front end software application used to manage Ocularis Base. Ocularis Recorder - An application is required to supply camera configuration and recording. Ocularis Client – OnSSI’s award winning video client application. Optional Add-On Applications – these include Remote Video Wall, Ocularis Media Server, and Ocularis OpenSight. Add-ons are made available as they are introduced. See our website www.onssi.com or call OnSSI Sales for information on Ocularis Add-Ons. This manual provides detailed instructions for installing Ocularis and its components. For a more concise installation guide, see the Ocularis Quick Install Guide. 2 On-Net Surveillance Systems, Inc. Ocularis Installation & Licensing Guide Getting Started with Ocularis Getting Started with Ocularis Minimum System Requirements Requirements for individual components may be found at: http://www.onssi.com/hardware-recommendations. Installing Ocularis on a New System Regardless of feature set, a recommended process flow to prepare the video management environment with Ocularis on a new system is as follows: 1. Download and extract the Ocularis feature set installation file(s) from http://www.onssi.com/support/downloads. 2. Install the Ocularis Base software component. 3. In large environments or if using Ocularis LS or ES, the Base component should be installed on a dedicated server. In some cases, a dedicated server is not necessary. For Ocularis PS, IS and CS, Ocularis Base may be installed on the same PC as the other Ocularis components. As the system grows, additional recording components may be added. System requirements may be found on the http://www.onssi.com/hardware-recommendations website for detailed hardware and operating system specifications. Refer to Installing Ocularis Base on page 6 for details on the software installation. Anti-Virus software must be disabled during the installation of the Ocularis Base component. License Ocularis. 4. 5. Prior to using Ocularis components, you must license your copy of Ocularis Base. See Licensing Ocularis Base on page 14 for more details on how to activate the software. Install the Ocularis Administrator application. This component must be installed on a workstation with network connectivity to the Ocularis Base component. It may reside on the same PC as the Base provided that graphic card requirements are met. Refer to Installing Ocularis Administrator on page 22 for details on the software installation. Install the Ocularis recording component software. For Ocularis PS, IS and CS, installation of the recording component includes the installation of the RC-P, RC-I and RC-C recorders respectively, as well as the event proxy for IS and CS installations. The corresponding event proxy will, by default, be installed on the same machine as the RC-C or RC-I software. For Ocularis LS or Ocularis ES, the recording component contains several other components. Install these in the following order: 1.) Management Server 2.) Recording Server (includes RC-L / RC-E Event Proxy) 3.) Management Client 4.) Failover Server(s) [Optional-available only with Ocularis ES] 6. If using Ocularis PS, IS or CS, use the Management Application to create at least one administrative account on the recording component with full access rights. This account will be used to import the recorder into Ocularis. If using Ocularis LS or Ocularis ES, use the Administrator account credentials on the Management Client computer. 7. Add and configure the IP video cameras and devices on the recording component. Use the Management Application for Ocularis PS, IS or CS Use the Management Client for Ocularis LS or ES On-Net Surveillance Systems, Inc. 3 Getting Started with Ocularis 8. Install the Ocularis Client on at least one workstation. 9. Ocularis Installation & Licensing Guide See Installing Ocularis Client on page 23 for additional instructions on installation. Configure Ocularis Base using Ocularis Administrator. Refer to the Ocularis Administrator User Manual for further instructions. 10. Test connectivity of cameras by logging into Ocularis Base with Ocularis Client. 11. Install any remaining workstations with Ocularis Client. 12. For Ocularis ES, Ocularis LS, Ocularis CS or Ocularis IS configure the event proxy to forward events to the Ocularis Base Server. Installation and configuration of Event Proxies can be found at the end of this document. 13. Within 30 days of installing cameras on the recording component(s), you must register the camera licenses. See Ocularis Camera License Registration on page 37 for further instructions. Upgrading to Ocularis Version 4.1 Refer to the document Upgrading to Ocularis 4.1 for full details on upgrading an Ocularis system. 4 On-Net Surveillance Systems, Inc. Ocularis Installation & Licensing Guide Ocularis Installation & Configuration Ocularis Installation & Configuration Items to consider prior to installation: Once all components are installed, synchronize the date and time between the server and workstations. Note: The time and date tolerance for all PCs using Ocularis is a maximum of five (5) minutes. If the time is off by more than 5 minutes between the Ocularis Base machine and Ocularis Client workstations, log in attempts will fail. The Ocularis Base component should be installed or upgraded first. After that, the order of installing or upgrading each component does not matter. You must either be logged in as the Windows account ‘Administrator’ when licensing Ocularis Base or be a user with administrative privileges and select ‘Run as Administrator’ when launching the licensing application. Depending on your current Windows configuration, you may be asked to insert your original Windows installation CD in order to install additional Windows components. You will need to have your Ocularis Software License Code (SLC) on hand when you license the application. The following components are outlined in this document: Download the Ocularis Installation File Extract the Ocularis Installation Files Installing Ocularis Base Licensing Ocularis Base Installing Ocularis Components Installing Ocularis Administrator Installing Ocularis Client Ocularis Recording Components Ocularis Camera License Registration Ocularis Event Proxies On-Net Surveillance Systems, Inc. 5 Ocularis Installation & Configuration Ocularis Installation & Licensing Guide Download the Ocularis Installation Files If necessary, Ocularis software may be obtained from the OnSSI website. Follow these instructions to download the installation file. 1. Open a browser and go to the Downloads page at: http://www.onssi.com/support/downloads. 2. Review the SLC requirements and other instructions on the page. 3. Click the link for the Ocularis feature set you wish to download (e.g. Ocularis CS v4.1 Download) 4. A short web form appears. Fill out the form and click Submit. You will receive an email containing the link to the download file as well as other documentation. 5. Click the link to download the Ocularis 4.1 installation file. 6. You will be prompted to save the file. Select the desired file location and click Save. The file download may take several minutes depending on your connection speed. Be sure to remember the path to the directory where the file was saved. 6 On-Net Surveillance Systems, Inc. Ocularis Installation & Licensing Guide Extract Ocularis Installation Files Extract Ocularis Installation Files These steps outline the extraction of the Ocularis installation files and may be used for all Ocularis feature sets and for new or existing installations. 1. Locate the Ocularis installation file. This file may have been downloaded from the OnSSI website or obtained through other means. The file will have one of the following formats depending on the feature set: Ocularis Feature Set Filename Ocularis PS Ocularis_ PS-IS-CS_4.1.exe Ocularis IS Ocularis_ PS-IS-CS_4.1.exe Ocularis CS Ocularis_ PS-IS-CS_4.1.exe Ocularis LS Ocularis_LS-ES_4.1.exe Ocularis ES Ocularis_LS-ES_4.1.exe -Executable files are shared across Ocularis models. The SLC determines the model once it is applied. WARNING: THIS PROCESS SHOULD BE PERFORMED ON THE SYSTEM WHERE OCULARIS BASE EXISTS (IF AN UPGRADE) OR WHERE IT WILL BE INSTALLED (NEW). 2. If it is not already there, copy the installation file from step 1 above to the Ocularis Base machine. 3. Double-click the file from step 1 above to launch and begin the file extraction. You’ll see messages regarding the installation validation which may take several minutes. The following sample screens are shown for Ocularis CS IS PS but corresponding screens are displayed for the other Ocularis feature sets. The Welcome to the Ocularis Installer Extraction Wizard screen appears. Figure 1 Ocularis Installer Extraction Wizard 4. Click Next. On the Destination Folder screen, you may modify the path for the installation files to be placed. On-Net Surveillance Systems, Inc. 7 Extract Ocularis Installation Files Ocularis Installation & Licensing Guide Figure 2 Select Destination Folder Click Next. 5. The Ready to Extract summary screen is next. Click Back to make changes or click Next to proceed. Figure 3 Installation Summary Files are extracted and copied to the location specified. This may take several minutes. When all files are extracted, a Setup Wizard Complete screen appears. The installation files have been downloaded and unpacked. No applications or components have been installed. Figure 4 Extraction Setup Wizard Complete 8 On-Net Surveillance Systems, Inc. Ocularis Installation & Licensing Guide 6. Extract Ocularis Installation Files If you choose to: a. Install Ocularis Base now: make sure the corresponding checkbox is selected and click Finish. Proceed to Installing Ocularis Base below. b. If you choose to install Ocularis Base later: uncheck the Install Ocularis Base checkbox and click Finish. Proceed to Installing Ocularis Base below. You have completed the extraction of the Ocularis installation files. On-Net Surveillance Systems, Inc. 9 Installing Ocularis Base Ocularis Installation & Licensing Guide Installing Ocularis Base Reminder: Anti-Virus software must be disabled during the installation of the Ocularis Base component. Follow this procedure when installing a new system or upgrading an existing Ocularis Base component. Ocularis Base uses SQL Server to store configuration data. By default, SQL Server Express 2008 will be used unless otherwise specified. Alternate instances of SQL Server may be used for advanced users. TO INSTALL OCULARIS BASE Use these steps for all feature sets of Ocularis. WARNING: THIS PROCESS SHOULD BE PERFORMED ON THE SYSTEM WHERE OCULARIS BASE EXISTS (IF AN UPGRADE) OR WHERE IT WILL BE INSTALLED (NEW). 1. To install Ocularis Base after extracting the installer files (from Extract Ocularis Installation Files on page 7), go to the directory where the Ocularis files were extracted. These installation files should be located on the Ocularis Base machine. If they are not, copy them to the Ocularis Base system. For Ocularis CS, the default location is: C:\Ocularis CS IS PS Installer. Launch (double-click) the shortcut: Install Ocularis Base. 2. The next step differs depending on the installation: a. For new installations, a notice appears recommending that you activate Ocularis now before continuing with the installation. This is recommended Figure 5 Activate Now? You will need your Ocularis SLC to activate. Activation will be required at the end of the Base installation if you do not do it now. 1. Click Yes to activate Ocularis now. The Ocularis License Activation screen appears as shown in Figure 9 on page 14. b. 10 2. Enter the Ocularis SLC and click Activate License. 3. Click OK on the License Activate pop-up. 4. Click Close on the Ocularis License Activation screen. 5. Proceed to step 3 below. If upgrading Ocularis, a message that a previous installation of this software has been detected. Click Yes to proceed with the installation. Be sure to have your new SLC in hand. Click Yes when ready On-Net Surveillance Systems, Inc. Ocularis Installation & Licensing Guide 3. Installing Ocularis Base The Ocularis Base Setup Wizard screen appears. Figure 6 Ocularis Base Setup Wizard Click Next. 4. The License Agreement appears. Please read, click the “I accept..” radio button and then click Next. 5. Select the type of installation: Typical or Custom. Typical will install all new files using default settings for file locations and database instance. Custom allows you to change these settings. The vast majority of installations should choose ‘Typical’. Typical: a. Select the Typical radio button and click Next. Ocularis Base is installed using these default settings: Base installation files are placed in c:\Program Files\OnSSI\Ocularis Base Bookmark location is designated as: c:\inetpub\wwwroot\OcularisService\Bookmarks Windows IIS is installed SQL Server 2008 Express is installed with a Server Name of OCULARISSERVER, SA User Name of sa and an encrypted SA password. This installation may take several minutes. Note: You may see a warning message if you are installing Ocularis Base on Windows 7 or other non-server level operating system. For demos and small applications, click ‘Yes’ to continue with the installation. For most standard production systems we recommend installing Ocularis Base on a server class operating system. Note: You may also see a message about dependencies required such as .Net Framework 4.0, SQL Server 2008, VC++ Redistributable 2010 and DirectX9c. Click ‘OK’ to install these (any missing components will be access from the OnSSI website). Custom: a. Select the Custom radio button and click Next. b. On the SQL Server instance page, most users will use the default selection. SQL Server Options Defined: Use Ocularis default SQL Server instance – this default option will install SQL Server 2008 Express for use with Ocularis. On-Net Surveillance Systems, Inc. 11 Installing Ocularis Base Ocularis Installation & Licensing Guide Edit System Administrator login - If you wish to modify the administrator login for the SQL Server instance, click the Edit System Administrator login checkbox. The corresponding fields will open to allow entry of the required criteria. Use another SQL Server 2008 instance - If you have an existing SQL Server database that you wish to use, you may select this option. You will be required to enter login credentials for this SQL Server instance.. c. When ready, click Next. d. On the Select Bookmarks Folder screen, you have the option to specify the location for the storage of Ocularis Bookmarks. Change the default location if necessary. When ready, click Next. e. On the Select Destination Folder for Ocularis Base you may modify the directory path for the Ocularis Base files. We recommend using the default but you may modify the path here. Click Next. f. Figure 7 SQL Server Instance The next screen summarizes the installation folders and size. Click Back to make changes or click Next. Note: Note: You may see a warning message if you are installing Ocularis Base on Windows 7 or other non-server level operating system. For demos and small applications, click ‘Yes’ to continue with the installation. For most standard production systems we recommend installing Ocularis Base on a server class operating system. You may also see a message about dependencies required such as .Net Framework 4.0, SQL Server 2008, VC++ Redistributable 2010 and DirectX9c. Click ‘OK’ to install these (any missing components will be access from the OnSSI website). The Ocularis Base files are installed to the specified directory and may take several minutes. A new installer website is also created. 6. When installation is completed, the Setup Wizard Complete for Ocularis Base screen appears. Figure 8 Ocularis Base Setup Wizard Complete 7. If you licensed Ocularis at the beginning of this procedure, you are done. If you chose not to license Ocularis earlier, you are given the option to activate the Ocularis license upon completion of the wizard. It is recommended (but not mandatory) to do this at this time if you haven’t already done so. Ocularis must be licensed before use. a. 12 If you choose to license Ocularis now, verify that the Activate License checkbox is checked and click Finish. The Ocularis License Activation application is automatically launched. Proceed to Licensing Ocularis Base below. On-Net Surveillance Systems, Inc. Ocularis Installation & Licensing Guide b. Installing Ocularis Base If you choose to activate the Ocularis license later, uncheck the Activate License checkbox and click Finish. When you are ready to license Ocularis, launch the Ocularis License Activation application from the desktop icon. Proceed to Licensing Ocularis Base below. 8. If you want to launch the Ocularis component download page, click the link above the Finish button. If you are finished installing on this computer, click Finish. The installation of Ocularis Base will create the following icon on the desktop: On-Net Surveillance Systems, Inc. 13 Licensing Ocularis Base Ocularis Installation & Licensing Guide Licensing Ocularis Base Once the Ocularis Base component software is installed, an additional licensing step is required. All new installations require the Ocularis Base to be licensed with the Ocularis 4.1 SLC. You may license Ocularis automatically, any time of the day or night, 24/7/365! Licensing may be done online or offline. Activating or refreshing the Ocularis license is sometimes necessary when upgrading from earlier versions of Ocularis or when installing a new system. This applies to demo, trial or retail systems. The steps differ slightly depending on whether the computer where Ocularis Base resides has internet connectivity. The actions related to Ocularis licenses include: Activating the Ocularis SLC– Use when licensing Ocularis for the first time or with certain upgrades. Refreshing the Ocularis SLC– Use when the license status of Ocularis changes. Deactivating the Ocularis SLC– Use when you need to move Ocularis Base from one computer to another. Note: To use the license activation application, you must be logged into the computer using an account with Windows Administrator privileges. Activating the Ocularis SLC Activating an Ocularis SLC is done the first time Ocularis is installed. This applies when the installation is on a brand new system or if you are upgrading from Ocularis versions 3.5 or earlier. The steps to activate are different based on whether the Ocularis Base computer is connected to the internet or not. To Activate an Ocularis license with Internet Connectivity To Activate an Ocularis license without Internet Connectivity To Activate an Ocularis license with Internet Connectivity 1. Launch the Ocularis License Activation application. 2. The first time you license Ocularis, you need to enter your new SLC. You receive this SLC when you purchase the product. Figure 9 Unlicensed Ocularis Base 14 On-Net Surveillance Systems, Inc. Ocularis Installation & Licensing Guide 3. Licensing Ocularis Base Click Activate License. The licensing application will collect relevant data including the SLC and send this information over the internet to OnSSI’s licensing server. OnSSI’s licensing server validates the information and sends back the activation required to license the software. This process is nearly instantaneous. If there is no internet connectivity, a message appears indicating as such. You may try again if you think you should have connectivity or click OK to proceed with offline activation. See To Activate an Ocularis license without Internet Connectivity below. Once activation is complete, a confirmation pop-up appears. Click OK. You are done! The License Status area of the Ocularis License Activation screen displays updated camera counts and other information based on your SLC. Figure 10 Sample Licensed Ocularis 4. Proceed with Installing Ocularis Components below. To Activate an Ocularis license without Internet Connectivity 1. Launch the Ocularis License Activation application. 2. The first time you license Ocularis, you need to enter your new SLC in the field labeled: Step 1: Enter SLC. (see Figure 9 above). 3. Click the Activate License button. You will receive a pop-up with the message reminding you that there is no internet connectivity and you should use offline activation. Click OK to close this dialog. The screen updates with additional steps: Figure 11 Additional Steps for Offline Licensing 4. Click the link in Step 2: Click here to retrieve offline html file. An html file is created named OcularisActivationRequest.html and stored in: c:\Program Files (x86)\OnSSI\Ocularis Licensing Activation\OfflineActivation 5. Copy this file to portable media and bring to a computer that has internet connectivity. On-Net Surveillance Systems, Inc. 15 Licensing Ocularis Base Ocularis Installation & Licensing Guide 6. Launch the OcularisActivationRequest.html file (double-click it). 7. The default web browser should launch and load a page with a Download button. Click the Download button. 8. The browser may ask you if you want to save a file called response.xml from licensing.onssi.com. Choose Save As and save it to portable media. 9. Bring the response.xml file back to the Ocularis Base computer. 10. On the Ocularis License Activation screen (see Figure 11), click the link in Step 3: Click here and browse to the response file. 11. In the resulting Windows’ Open dialog, browse to the response.xml file you just brought from the internet connected machine. Select the file and click Open. 12. You should see a ‘License Activation Successful’ pop-up. Click OK. You are done! The License Status area of the Ocularis License Activation screen displays updated camera counts and other information based on your SLC. The ‘Activate License’ changes to ‘Refresh’ to accommodate future updates. Proceed with Installing Ocularis Components below. Refreshing the Ocularis SLC Refreshing your Ocularis SLC is done when a change is made to your Ocularis License. For instance, you add additional camera licenses to Ocularis or you upgrade from a demo version to a retail version. Refreshing is simple but the process differs, depending on the Ocularis Base computer having internet connectivity. To Refresh an Ocularis license with Internet Connectivity 1. Launch the Ocularis License Activation application. 2. Click the Refresh button. The licensing application will collect relevant data including the SLC and send this over the internet to OnSSI’s licensing server. OnSSI’s licensing server validates the information and sends back the activation required to license the software. This process is nearly instantaneous. Once activation is complete, a confirmation pop-up appears. Click OK. You are done! The License Status area of the Ocularis License Activation screen displays updated license information based on your SLC. To Refresh an Ocularis license without Internet Connectivity 1. Launch the Ocularis License Activation application. 2. Click the Refresh button. You will receive a pop-up with the message reminding you to check internet connectivity or refresh offline. Click OK to close this dialog. The screen updates with additional steps. 3. Click the link in Step 2: Click here to retrieve offline html file. An html file is created named OcularisActivationRequest.html and stored in: c:\Program Files (x86)\OnSSI\Ocularis Licensing Activation\OfflineActivation 16 4. Copy this file to portable media and bring to a computer that has internet connectivity. 5. Launch the OcularisActivationRequest.html file (double-click it). 6. The default web browser should launch and load a page with a Download button. Click the Download button. 7. The browser may ask you if you want to save a file called response.xml from licensing.onssi.com. Choose Save As and save it to portable media. For subsequent licensing. the file may have the format ‘response(x).xml’ where the ‘x’ is 1, 2, etc. based on the number of response files created. 8. Bring the response.xml file back to the Ocularis Base computer. On-Net Surveillance Systems, Inc. Ocularis Installation & Licensing Guide 9. Licensing Ocularis Base On the Ocularis License Activation screen, click the link in Step 3: Click here and browse to the response file. 10. In the resulting Windows’ Open dialog, browse to the response.xml file you just brought from the internet connected machine. Select the file and click Open. 11. You should see a ‘License Successfully Refreshed’ pop-up. Click OK. You are done! The License Status area of the Ocularis License Activation screen displays updated information based on your SLC. Deactivating the Ocularis SLC Deactivating your Ocularis SLC is done when you want to move the Ocularis Base software from one computer to another computer. Before you begin, consider that when you move Ocularis Base from one computer to another, the database which stores Ocularis settings, as well as existing Bookmarks, must be moved manually from the source computer to the destination computer. There is also a limit to the number of deactivations for each license. Typically, you may deactivate an Ocularis SLC up to five times. Beyond that, you need to contact OnSSI Technical Support for further assistance. To Deactivate an Ocularis license 1. Launch the Ocularis License Activation application. 2. Notice the Deactivate License icon. Click the Deactivate License icon. You will receive a pop-up with a warning message reminding you that license deactivation stopped the Base from functioning. 3. If you are sure you want to proceed, click Yes to deactivate the Ocularis SLC. On the destination computer, install Ocularis Base (see Installing Ocularis Base on page 10) and activate the same SLC on this computer (see Activating the Ocularis SLC on page 14). Restore the Ocularis SQL Database and bookmarks (see the document Ocularis Base Database Backup). If you had events configured on the original Ocularis Base computer, the event proxies will need to be updated to direct events to this new Ocularis Base IP address. On-Net Surveillance Systems, Inc. 17 Installing Ocularis Components Ocularis Installation & Licensing Guide Installing Ocularis Components Certain components of Ocularis, namely: Ocularis Client, Ocularis Administrator and Ocularis recording components, are downloaded and installed from a central webpage located on the Ocularis Base machine. This makes installation easy as system administrators need not obtain separate installation files and move them from computer to computer. Since computers running Ocularis components need to have network connectivity to the Ocularis Base system anyway, the installation files for Ocularis components may be accessed from the Base machine. A local webpage must be launched in order to download Ocularis components. Ocularis Component Location Ocularis components may be installed in various locations on a network. The configuration chosen depends on many factors including (but not limited to): the number of cameras licensed, the recording component used and the availability of computer hardware for the system. Basic System In most cases, a single server system (also called ‘Basic System’) will suffice. In a Basic System layout, a central server is used as the primary location for the following components: o Ocularis Base o Recording Component o and perhaps even the Ocularis Administrator (depending on the graphics card) The ‘Basic System’ is a good system to start with when first implementing Ocularis, especially on smaller systems (those with less than 30 cameras). In an Ocularis PS environment, it is even acceptable to run the components on a Windows 7 or 8 PC, rather than a server class machine, provided the camera count is low. Networked workstations will have the Ocularis Client installed on them. You may install the Ocularis Client component on an unlimited number of workstations. As the system grows and cameras are added or upgraded, the capacity of the recording component computer will be reached. The expansion process would be to then simply add an additional server on the network to house an additional instance of the recording component and install the new cameras on the new recorder. With Ocularis, the location of the camera is seamless to the operator. Distributed System In cases where the systems are larger or with Ocularis LS or Ocularis ES, a multiple server system (also called ‘Distributed System’) is recommended. In a Distributed System, separate dedicated servers are used with single components installed on each. The Ocularis Base may reside on one server (with or without a recording component), recording components each on their own servers, and the Ocularis Administrator and Ocularis Client on one or more networked workstations. Which system is best for me? It is important to determine the general layout of where you want components to be installed on new Ocularis installations. In general, it is safe for most users to select the Basic System and grow into the Distributed System. If you have hundreds of cameras (or more) or you use Ocularis LS or Ocularis ES, use the Distributed System as a model. Otherwise, most installations will be fine with the Basic System layout. There is no set formula to determine the layout for each installation, as each organization is unique. The system layouts described here are simply for use as a general guideline. 18 On-Net Surveillance Systems, Inc. Ocularis Installation & Licensing Guide Installing Ocularis Components TO ACCESS THE OCULARIS COMPONENT INSTALLATION PAGE Note: Be sure to turn off any Firewalls running on the Ocularis Base machine. 1. Determine the layout of the Ocularis system and go to the machine where you want to install the component. 2. Access the download webpage through a browser using the following URL: http://[NAME]:[port]/OcularisService where [NAME] is either the IP Address or computer name of the Ocularis Base machine and port is the IIS port number. In most cases, the default port 80 is used and it is not necessary to enter it here. This URL will redirect to a longer one, which may also be used: http://[NAME]:[port]/OcularisService/InstallerWebsite/index.html The following web page appears: Figure 12 Install Ocularis Components Web Page 3. Select the system layout (Basic or Distributed) you intend to follow. On-Net Surveillance Systems, Inc. 19 Installing Ocularis Components Ocularis Installation & Licensing Guide For Basic Systems: 1. Click on ‘Basic System’. This option should be used by most Ocularis PS, IS and CS installations. (Use the ’Distributed System’ diagram for Ocularis LS or ES.) Figure 13 Basic Installation Web Page The ‘Basic Installation’ page provides a sample layout that may be followed to assist with determining where Ocularis components should be installed. When you move the mouse over a component, a balloon assistant pops up. Note: 20 Be sure to configure your browser settings to allow for pop-ups. You will be prompted in case you forget to do this. On-Net Surveillance Systems, Inc. Ocularis Installation & Licensing Guide Installing Ocularis Components Figure 14 Balloon assistant for Ocularis Client The balloon assistant provides direction on where we recommend installing the component. There are three options displayed: o Click here to review hardware specifications for this component o Click here to download the component o Click here to view the user manual. 2. Select the component you wish to download and install. 3. Select the ‘Click here to download component’ link when you are ready to download the corresponding component to the local machine. 4. Follow the on-screen prompts. 5. You will be asked whether the component is an Upgrade or New installation. o Choose Upgrade if you have an existing version of the component o Choose New if you do not have the component installed on the local machine 6. You will be asked whether to run or save the installation file for the component. You may save the file locally and run it later or simply run it now. 7. The installation for each component will continue. See the instructions below specific to each component. For Distributed Systems: The Distributed model may be used for any installation of Ocularis but should be used for Ocularis LS or Ocularis ES. The download procedure is the same as the Basic System above. Advanced users or for systems without Flash installed can use an alternate webpage: http://[NAME]:[port]/OcularisService/InstallerWebsite/sysadmin.html where [NAME] is either the IP Address or computer name of the Ocularis Base machine and port is the IIS port number. In most cases, the default port 80 is used and it is not necessary to enter it here. Each component may be downloaded and installed from the specified links. On-Net Surveillance Systems, Inc. 21 Installing Ocularis Administrator Ocularis Installation & Licensing Guide Installing Ocularis Administrator Refer to the system requirements defined on the OnSSI website for hardware specifications. The Ocularis Administrator must have network connectivity to the machine where the Ocularis Base software is installed. Prior to using Ocularis Administrator on a new system, you must license your copy of Ocularis Base. See Licensing Ocularis Base on page 14 for more details. Follow this procedure when installing a new system or upgrading an older version of Ocularis Administrator. TO INSTALL OCULARIS ADMINISTRATOR These instructions assume that you have installed Ocularis Base and are located at the system on which you wish to install Ocularis Administrator. Use these steps for all feature sets of Ocularis. 1. From the ‘Install Ocularis Components’ web page, select either the ‘Basic System’ model or ‘Distributed System’. (see Figure 12). 2. From the Basic or Distributed Installation webpage, click either: o the Ocularis Administrator component DVD symbol at the bottom of the screen o the ‘Click here to download component’ link within the corresponding pop-up assistant. 3. When you are asked if you want to continue, click Yes. 4. You may be prompted to run or save the file; you may choose to either run it now or save it and run the installation later. In a new installation, an extraction wizard screen will appear. Follow the prompts to extract the files and then you’ll see the Welcome to Ocularis Admin Setup Wizard screen. 5. Launch file to run. Once Run has been selected, the Welcome to Ocularis Admin Setup Wizard appears. Click Next. 6. The License Agreement appears. Please read, click the “I accept..” radio button, and then click Next. 7. If a previous version of the Ocularis Administrator is detected, a notice will appear asking for your confirmation to uninstall the older version and install the new version. Click Yes. 8. a. An “Are you sure you want to remove Ocularis Admin…?” screen appears. Click Yes. b. When the uninstall is complete, click OK. The Select Destination Folder screen appears. You may leave the default directory path as is or change it if necessary according to your organization. If installing a version to be used as a demo, keeping the default path is recommended. Click Next. 9. The next screen, Ready to Install the Program, will confirm the file path and disk space requirements. Click Next if OK. Click Back to make changes to the directory path or the folder. The Ocularis Administrator software is installed. 10. When completed, the Setup Wizard Complete for Ocularis Administrator screen appears. 11. Click Finish. The installation of Ocularis Administrator will create the following icon on the desktop: 22 On-Net Surveillance Systems, Inc. Ocularis Installation & Licensing Guide Installing Ocularis Client Installing Ocularis Client The Ocularis Client may be installed on as many systems as desired. Refer to the system requirements defined on the OnSSI website for hardware specifications. Follow this procedure when installing a new system or upgrading existing copies of Ocularis Client. TO INSTALL OCULARIS CLIENT These instructions assume that you have installed Ocularis Base and are located at the system on which you wish to install Ocularis Client. Use these steps for all feature sets of Ocularis. 1. From the ‘Install Ocularis Components’ web page, select either the ‘Basic System’ model or ‘Distributed System’. (see Figure 12). 2. From the Basic or Distributed Installation webpage, click either: o the Ocularis Client component DVD symbol at the bottom of the screen o the ‘Click here to download component’ link within the corresponding pop-up assistant. 3. When you are asked if you want to continue, click Yes. 4. When you are prompted to run or save the file, you may choose to either run it now or save it and run the installation later. In a new installation, an extraction wizard screen will appear. Follow the prompts to extract the files and then you’ll see the Welcome to Ocularis Client Setup Wizard screen. 5. Once Run has been selected, if a previous version of the Ocularis Client is detected, a notice will appear asking for your confirmation to uninstall the older version and install the new version. Click Yes. a. An “Are you sure you want to remove Ocularis Client…?” screen appears. Click Yes. b. When the uninstall is complete, click OK. 6. The Welcome to Ocularis Client Setup Wizard appears. Click Next. 7. The License Agreement appears. Please read, click the “I accept..” radio button and then click Next. 8. The Select Destination Folder screen appears. You may leave the default directory path as is or change it if necessary according to your organization. If installing a version to be used as a demo, keeping the default path is recommended. Click Next. 9. The Select Language screen appears. Select the desired language for Ocularis Client from the drop-down menu. The language may be changed again after the software has been installed. Click Next. 10. The next screen, Ready to Install the Program, will confirm the file path and disk space requirements. Click Next if OK. Click Back to make changes to the directory path or the folder. The Ocularis Client software is installed. 11. When the Ocularis Client Setup is completed, the Setup Wizard Complete for Ocularis Client screen appears. Click Finish. The software installation will result in the display of the following desktop icons: On-Net Surveillance Systems, Inc. 23 Ocularis Recording Components Ocularis Installation & Licensing Guide Ocularis Recording Components The Ocularis Feature set file downloaded from the OnSSI website (see Download the Ocularis Installation Files on page 6) determines which recording component is packaged with the installation. Ocularis recorders must be installed for new installations. For upgrade installations, see the document Upgrading to Ocularis 4.1. For upgrades, you will also need to reinstall the recorder’s event proxy. (see Ocularis Event Proxies on page 42.) The versions of recording components included with Ocularis 4.1 include: Ocularis PS Ocularis IS Ocularis CS Ocularis LS Ocularis ES RC-P v8.6 RC-I v8.6 RC-C v8.6 RC-L v7.0 RC-E v7.0 Requirements: The recording components included with Ocularis 4.1 all require a corresponding recorder license file as part of the installation process. This file (with filename extension .lic) contains the licensing counts for camera licenses that were purchased with Ocularis. Microsoft .NET 4.0 is required on the machine with the recording component. Please install this software in order to successfully install the Ocularis recorder. The operating system used for Ocularis recording components must be a 64-bit operating system. See the link http://www.onssi.com/hardware-recommendations to review all recommended specifications. Be sure to have the recorder license file on hand when you install the recording component included with Ocularis The installation process differs slightly between recorders: 24 For instructions on the installation of Ocularis PS, Ocularis IS, and Ocularis CS see page 25 For instructions on the installation of Ocularis LS and Ocularis ES see page 27 On-Net Surveillance Systems, Inc. Ocularis Installation & Licensing Guide Ocularis Recording Components Ocularis PS, Ocularis IS, and Ocularis CS TO INSTALL THE RECORDING COMPONENT FOR OCULARIS PS, OCULARIS IS OR OCULARIS CS These instructions assume that you have installed Ocularis Base and are located at the system on which you wish to install the RC-P, RC-I or RC-C recorder. References to the event proxy listed below should be ignored with Ocularis PS. For upgrades, it is recommended to back up existing data. See the document Upgrading to Ocularis 4.1 for detailed instructions. Reminder: the operating system on which you install this component must be 64-bit. The examples listed here are for Ocularis CS. 1. From the ‘Install Ocularis Components’ web page, select either the ‘Basic System’ model or ‘Distributed System’. (see Figure 12). 2. From the Basic or Distributed Installation webpage, click either: o the Recording Component DVD symbol at the bottom of the screen o the ‘Click here to download component’ link within the corresponding pop-up assistant. 3. When you are asked if you want to continue, click Yes. 4. When you are prompted to run or save the file, you may choose to either run it now or save it and run the installation later. 5. Once Run has been selected, a Select Destination Folder screen appears. This destination will contain the recording component’s installation files. You may leave the default directory path as is or change it if necessary according to your needs. Keeping the default settings is recommended. Click Next. 6. Files are unpacked and downloaded to the specified directory. The Extraction Complete screen appears. You have the option to install the recording component and corresponding event proxy (if applicable) now or at a later time. a. If you choose to install these components on the current computer, verify that the corresponding checkboxes are checked and click Finish. Proceed to step 7 below. b. If you choose to install the recorder (and its event proxy) later or on a different computer, deselect the checkboxes and click Finish. These installations may be triggered manually by launching their corresponding executable file in the directory specified in step 5 above. For example: with Ocularis CS, if the default destination folder was used, the location of the files are: C:\RC-P RC-I RC-C Installation Wrapper\Software The recorder file is: OnSSI_RC-P_RC-I_RC-C_Installer.exe The event proxy file is: RC-C RC-I Event Proxy.exe 7. Once the recorder installation file is launched (either from the extraction wizard in step 6 above or from manually launching the executable file), the installation will begin for its corresponding event proxy (if applicable). The recorder installation will follow. The system will check for an existing instance of the event proxy on the local machine. If one is detected, a notice will appear asking for your confirmation to uninstall the older version and install the new version. Click Yes. a. b. An “Are you sure you want to remove …?” screen appears. Click Yes. When the uninstall process is complete, click OK. 8. A Welcome to the RC-C RC-I Event Proxy Setup Wizard appears. Click Next. 9. The Select Destination Folder screen appears. On-Net Surveillance Systems, Inc. 25 Installing Recording Components for PS, IS and CS Ocularis Installation & Licensing Guide This folder will contain the application files for the event proxy. You may leave the default directory path as is or change it if necessary according to your organization. In most cases, keeping default settings is recommended. You may install the event proxy software on any computer with connectivity to both the event source (typically a recorder) and destination (typically, Ocularis Base). Click Next. 10. The next screen, Ready to Install the Program, will confirm the file path and disk space requirements. Click Next if OK. Click Back to make changes to the directory path or the folder. The event proxy software is installed. 11. When completed, the Setup Wizard Complete screen appears. Click Finish. 12. You may see an informational message to have your SLC ready during installation. Click Yes to proceed. 13. The recorder installation begins. You are asked to select the language to use for the installation screens. Choices are: English, Chinese, French, Portuguese and Spanish. Choose a language and click Continue. 14. You are then asked which version to install. You may click Install Trial to install a trial version or click Browse to locate the license file (.lic) for the demo or retail version you purchased. Click Open once you have selected the .lic file and then click Continue. 15. A License Agreement appears. Please read, click the “I accept..” checkbox and then click Continue. 16. You are given the option to choose a Typical or Custom installation. Most installations use typical. Click Typical. 17. The installation proceeds. The recorder software is installed. This may take several minutes. Note: The recorder software application used for Ocularis PS, Ocularis IS and Ocularis CS are one in the same. The functionality difference is determined by the SLC used (based on what is purchased). If you install the Trial version, the software displays the full label of products (RC-P RC-I RC-C). Once the license file is imported, the recorder model is activated and the interface will reflect the proper name (e.g. RC-C). 18. When done, a screen stating that the installation is complete appears. Click Close. The recording component is installed. The installation of the Ocularis IS and Ocularis CS recorder and event proxy will create the following icons on the desktop. Ocularis PS will create only the Management Application icon. 26 On-Net Surveillance Systems, Inc. Ocularis Installation & Licensing Guide Installing Ocularis LS or ES Recording Components Ocularis LS and Ocularis ES TO INSTALL THE OCULARIS RECORDING COMPONENT FOR LS OR ES The architecture for Ocularis LS and Ocularis ES varies significantly from the other Ocularis feature sets. Common components for all Ocularis feature sets include the Ocularis Base, Ocularis Administrator and Ocularis Client. In addition to these, the Ocularis LS and Ocularis ES recording components contains a number of other components: Ocularis LS or Ocularis ES Component Description Management Server Typically installed on a dedicated server, this service manages the recorder’s configuration in a relational database. The database (SQL Server) may reside on the same PC or another on the network. Accessible via the Management Client application, this is the component used to manage the recorders. Management Client The Management Client application is used to manage the day to day configuration of the Management Server and camera configurations. SQL Server This is the relational database used by the Management Server. It can reside on the same or different PC as the Management Server. Recorder or Recording Server Typically installed on a dedicated server, this service manages the recording of video and communication with devices including cameras. There will likely be multiple recording servers in an enterprise environment. Download Manager The Download Manager is used to configure what is available on the download webpage. Components are also installed via a local webpage, similar to the Ocularis Component Installation web page, called the ‘Recorder Downloads’ page. Failover Server A failover server is a spare recording server which can take over in case a regular recording server becomes unavailable. A failover server is therefore always installed on a separate computer. There may be multiple failover servers. If you are upgrading an existing RC-E or NetEVS installation, please refer to the Upgrading to Ocularis 4.1 document for detailed upgrade instructions. More details on the Ocularis ES and LS architecture and system layout are discussed in OnSSI’s Ocularis Basic Certification Training (“Boot Camp”) course, which is required if you are working with these feature sets. Training course schedules and details may be found at: http://www.onssi.com/training/certification-training. Note: The software used for Ocularis LS and Ocularis ES are one in the same. The functionality difference is determined by the SLC used (based on what is purchased). . On-Net Surveillance Systems, Inc. 27 Installing Ocularis LS or ES Recording Components Ocularis Installation & Licensing Guide TO INSTALL THE MANAGEMENT SERVER (AND OTHER COMPONENTS) The following steps assume you have determined the layout/architecture of your Ocularis LS or Ocularis ES environment. Follow these steps after you’ve completed the installation of Ocularis Base, Ocularis Administrator and Ocularis Client. Reminder: the operating system on which you install this component must be 64-bit. 1. On the machine you wish to install the Ocularis LS or Ocularis ES recording component Management Server, open a browser and enter the following URL: http://[NAME]/OcularisService/InstallerWebsite/sysadmin.html where [NAME] is either the IP Address or computer name of the Ocularis Base machine. 2. The webpage displayed is a simple list of links to Ocularis LS and Ocularis ES components. Click the link for RC-E RC-L Event Proxy and Management Server bundle. 3. You are prompted to run or save the file. You may save the file locally and then run it or simply run it now. 4. When the file is run, a Select Destination Folder screen appears. This destination is for the RC-E Installer files. You may leave the default directory path as is or change it if necessary according to your organization. If installing the Demo version, keeping the default path is recommended. Click Next. 5. The Extraction Complete screen appears. You have the option to install the recording component and corresponding event proxy (if applicable) now or at a later time. a. If you choose to install these components now (recommended), verify that the corresponding checkboxes are checked and click Finish. Proceed to step 6 below. b. If you choose to install the recorder (and its event proxy) later, uncheck checkboxes and click Finish. These installations may be triggered manually by launching their corresponding executable file in the directory specified in step 4 above. For example: if the default destination folder was used, the location of the files are: C:\Ocularis LS ES Installer\Installers The installation file is: OnSSI_RC-E_RC-L_Proxy_And_Recorder.exe 6. Once the installation begins, the event proxy is installed first. The system will check for an existing instance of the event proxy on the local machine. If one is detected, a notice will appear asking for your confirmation to uninstall the older version and install the new version. Click Yes. a. An “Are you sure you want to remove …?” screen appears. Click Yes. b. When the uninstall is complete, click OK. 7. A Welcome to the RC-E RC-L Event Proxy Setup Wizard appears. Click Next. 8. A Select Destination Folder screen appears. This folder will contain the files for the event proxy. You may leave the default directory path as is or change it if necessary according to your organization. If installing the Demo version, keeping the default path is recommended. Click Next. 9. The next screen, Ready to Install the Program, will confirm the file path and disk space requirements. Click Next if OK. Click Back to make changes to the directory path or the folder. The event proxy software is installed. 10. When completed, the Setup Wizard Complete screen appears. Click Finish. 11. Additional files are extracted as the Management Server Installation proceeds. You may see a warning message about having a new SLC ready if you are upgrading. Click Yes to continue. 28 On-Net Surveillance Systems, Inc. Ocularis Installation & Licensing Guide Installing Ocularis LS or ES Recording Components 12. Select the language to use during the installation. Click Continue. 13. Specify a license file by either typing in the directory path to the .lic file you were provided with upon purchase or click Browse to browse to that file. When ready, click Continue. 14. Read the OnSSI license agreement, click the ‘I accept the terms in the license agreement’ checkbox and then click Continue. 15. An installation option dialog appears next. Figure 15 Select an option for installation of recording components Each option is defined as: Single Server This is the easiest installation option and will install all component software on the current computer. Distributed This option installs all management server components on the current computer. You must install the Recording Server on a separate computer. Custom This option allows you to select which components to install on the current computer. Click your desired option. 16. A screen confirming your selection is presented. You may click Previous to go back and change your selection or, if you chose Custom, you may select or deselect the component to install on the current machine. On-Net Surveillance Systems, Inc. 29 Installing Ocularis LS or ES Recording Components Ocularis Installation & Licensing Guide Figure 16 Components for Installation The installation process will evaluate the operating system and dynamically install either 32-bit or 64-bit versions of each component. When ready click Continue. The installation may take several minutes as it installs IIS and Microsoft SQL Server Express 2008. 17. When complete, you’ll be prompted to restart the computer. Click Restart Computer. 18. After the reboot, if necessary, the installation process should continue. This applies, for instance, if you selected the Single Server option This may take several minutes. 19. When complete, have the option to start the Management Client upon exit. Figure 17 Installation Complete If you chose the Custom or Distributed installation option, you can install additional components from a remote computer by using a web page located on the Management Server computer. See To Access the Recorder Downloads Web Page on page 31. 30 On-Net Surveillance Systems, Inc. Ocularis Installation & Licensing Guide Installing Ocularis LS or ES Recording Components TO ACCESS THE RECORDER DOWNLOADS WEB PAGE Use this procedure to access the Management Server and open the recorder downloads page. When you use the Distributed or Custom installation option, you can use this webpage to easily install additional components on remote computers. 1. Open a browser. 2. Enter the following URL: http://[Management Server address]:[port]/installation/admin For instance: http://192.168.7.192/installation/admin Figure 18 Download Manager This downloads page provides links to download and install: Recording Server Installer – This is the recording component which actually records camera video. There may be more than one RC-E or RC-L recorder in a corresponding enterprise layout. This option is also used to install a Failover server. You may choose from the 32-bit or 64-bit version. Management Client – This is the administration software used to configure and manage cameras and settings on the Management Server. You may choose from the 32-bit or 64-bit version. Log Server Installer – This component is used to manage systems logs for the recorders. You may choose from the 32-bit or 64-bit version. Video Device Drivers – These drivers must be installed on each recorder. The most up-to-date pack of device drivers can be found on the www.onssi.com website. Axis One-Click Connection Component – this optional component is needed only if implementing Axis One-Click throughout the camera environment. On-Net Surveillance Systems, Inc. 31 Installing Ocularis LS or ES Recording Components Ocularis Installation & Licensing Guide TO INSTALL THE RECORDING SERVER (RECORDER) The Recorder, or Recording Server, typically installed on a separate server, is used for recording video and for communicating with cameras and other devices. There may be more than one recording server in a large Ocularis LS or Ocularis ES installation. If you chose the Single Server or Custom installation option, you may have already installed the recording server on the same computer as the Management Server. Use this procedure if you chose the Distributed installation option, if you are installing an additional recording server or if you are installing a failover server. Reminder: the operating system on which you install this component must be 64-bit. 1. On the machine you wish to install the Recording Server, open a browser. 2. Launch the Recorder Downloads page by typing in the following URL. http://[Management Server address]:[port]/installation/admin 3. Under the section Recording Server Installer, click the link English next to either the 32-bit or 64-bit subtitle. 4. You will be asked “Do you want to save this file?” Click Save File. 5. Instruct the PC where you would like to save the file. 6. After the file is downloaded, run the executable. 7. If you receive a Security Warning, click Run. The InstallShield Wizard will start and begin preparations to install. 8. Select the language to use for the installation. Click Continue. 9. When you see the screen to Select an installation option, you have the following choices: Figure 19 Recording Server Options 32 Typical Use when installing a recording server with standard settings. Failover Use when installing a failover server. Failover servers take over for a failed recording server. Custom This option allows you to modify default values for the recording server On-Net Surveillance Systems, Inc. Ocularis Installation & Licensing Guide Installing Ocularis LS or ES Recording Components Choosing Custom provides the system administrator who is installing the software more flexibility on the configuration. 10. You are asked to specify the recording server settings: Recording Server Name Name of the Recording Server. This is the name that will appear in the Management Client. It can be changed later if necessary. Management Server address IP address of the Management Server Media Database Recordings for cameras on this server will be stored in this folder. Make changes as needed and click Continue. 11. On the next screen, you may specify additional instances of the recording server for the current computer and corresponding IP addresses. Do not update the Ipv6 field as this is not use. When ready, click Continue. 12. At the Service Account screen, enter an account that the Recording Server may use to start the Service. If video databases are located on a network, this account must have access to the corresponding network drives. If in doubt, use the default predefined value of Network Service. Click Continue. 13. Select the location to start the installation files and click Install. The Recording Server software component is installed along with the video device driver pack Note: We always recommend checking the OnSSI website for the most up-to-date driver pack. 14. When the wizard complete screen appears, click Close. On-Net Surveillance Systems, Inc. 33 Installing Ocularis LS or ES Recording Components Ocularis Installation & Licensing Guide Recorder Post-Installation Configuration The Recorder for Ocularis LS and Ocularis ES is hostname driven. This can pose an issue if the surveillance network is not set up or capable of resolving computer hostnames. Therefore, since this recorder relies on hostnames to resolve addresses (rather than IP addresses), a simple edit needs to be done on a configuration file so that Ocularis is able to view video by direct IP address. Follow the procedure below to complete the Post-Installation Configuration. TO CONFIGURE AN RC-L/RC-E RECORDER FOR IP ADDRESS RESOLUTION 1. Make a backup copy of the RecorderConfig.xml file which is located in the directory: C:\ProgramData\OnSSI\RC-L_RC-E Recording Server Note: the ProgramData folder may be hidden on some machines. 2. Use a text editor to open the RecorderConfig.xml file and make the following change: (Tip: if using Notepad, use CTRL-F to initiate the find feature to locate the text quickly) Change the section from (see highlights below): <webserver> <!-It is optional to specify a host name / IP. If no host is specified, then the recorder will automatically resolve a host name that will be used for generating the LiveFeedUri that is published to clients. Examples of valid host values are: 127.0.0.1 1 ServerName www.domain.com --> <host /> <port>7563</port> To: <webserver> <!-It is optional to specify a host name / IP. If no host is specified, then the recorder will automatically resolve a host name that will be used for generating the LiveFeedUri that is published to clients. Examples 1of valid host values are: 127.0.0.1 ServerName www.domain.com --> <host>192.168.11.244</host> Use the Recording Server IP Address <port>7563</port> 3. Save the configuration file and restart the Management Server and Recorder. 1 Disregard this IP Address, despite its use in this example. This would not be a valid IP address if components are installed on multiple servers as they are in real world installations. 34 On-Net Surveillance Systems, Inc. Ocularis Installation & Licensing Guide Installing Ocularis LS or ES Recording Components TO INSTALL THE MANAGEMENT CLIENT The Management Client is administration software which allows administrators the ability to configure parameters on the Management Server. These parameters include: installing and configuring devices, configuring servers, scheduling and setting up rules, controlling user rights and much more. The Management Client software may be installed on any pc with connectivity to the Management Server. If you chose the Single Server or Custom installation option, you may have already installed the Management Client on the same computer as the Management Server. Use this procedure if you chose the Distributed or Custom installation option or if you are installing an additional instance of the software. Reminder: the operating system on which you install this component must be 64-bit. 1. On the machine you wish to install the Management Client, open a browser. 2. Launch the Recorder Downloads page by typing in following URL. http://[Management Server address]:[port]/installation/admin 3. Under the section Management Client Installer, click the link English next to either the 32-bit or 64-bit subtitle. 4. You will be asked “Do you want to save this file?” Click Save File. 5. Instruct the PC where you would like to save the file. 6. After the file is downloaded, run the executable. 7. If you receive a Security Warning, click Run. The InstallShield Wizard will start and prepare for the install. 8. Click Next through the wizard. You’ll have the option to change the location where the software is installed. 9. When the wizard is complete, click Close. TO INSTALL THE LOG SERVER The Log Server provides the necessary functionality for logging information from the Recording Server. It typically resides on the same server as the Management Server and runs as a service. If you chose the Single Server or Custom installation option, you may have already installed the Log Server on the same computer as the Management Server. Use this procedure if you chose the Distributed or Custom installation option. 1. On the machine you wish to install the Log server, open a browser. 2. Launch the Recorder Downloads page by typing in the following URL. http://[Management Server address]:[port]/installation/admin 3. Under the section Log Server Installer, click the link English next to either the 32-bit or 64-bit subtitle. 4. If you receive a Security Warning, click Run. 5. Go through the wizard prompts to select the language and accept the EULA. 6. Select the type of SQL Server that you want to use and click Continue. 7. Select the SQL database to be used. If you are upgrading, you may choose to Keep or Overwrite existing data. Then click Continue. 8. Select a user account under which the Log Server service will run. The user is automatically granted administrator rights in the Management Server. Click Continue. You are able to select either a particular user account (in which case the service will use the specified user account to log in to the computer acting as management server) or Network Service (in which case the service will run whenever the computer acting as management server is running). On-Net Surveillance Systems, Inc. 35 Installing Ocularis LS or ES Recording Components Ocularis Installation & Licensing Guide How to Select the Predefined Account Network Service The Network Service account is selected by default. Click OK. The Network Service account must be added as a Windows user on the relevant recording server computers in your surveillance system in order to retrieve status information from these recording servers. a.) Click the This account radio button. b.) Click the Browse button. This will open the Select User window. c.) In the Select User window, verify that the required domain is specified in the From this location field. If not, click the Locations button to browse for the required domain. d.) In the Enter the object names to select box, type the required user name. Typing part of a name is usually all that is necessary. Use the Check Names feature to verify that the name you have entered is recognized. e.) Click OK. f.) 9. Specify the password for the user account in the Password field, and confirm the password in the Confirm password field. (The password field must not be left blank.) Click OK. Specify the URL to the Management Server and click Continue. 10. Select the location to install the files. Click Install. 11. Click Close when done. TO INSTALL VIDEO DEVICE DRIVERS You may use the link from the download page to install the package of device drivers that shipped with your version of Ocularis. It is always recommended, to check the www.onssi.com website to obtain and install the most recent driver pack. TO INSTALL A FAILOVER SERVER (OPTIONAL) A failover server is a spare recording server which can take over in case the primary recording server becomes unavailable. A failover server is always installed on a separate computer. You may set up multiple failover servers to ensure redundancy. A ‘Hot Standby’ failover server may also be configured for mission critical recorders. Follow the steps in To Install the Recording Server (Recorder) on page 32. When you reach step 9, select Failover as the installation option. Continue with the installation by following the screen prompts. Reminder: the operating system on which you install this component must be 64-bit. Synchronize Time on Servers It is critical that the time on the Management Server and all Recording Servers be synchronized (by minute and second). If the servers are not already time synchronized, they must be synchronized manually. The following resources may be helpful in describing time synchronization methods: For Windows Server 2003: http://support.microsoft.com/kb/816042/en-us For Windows XP: http://support.microsoft.com/kb/307897/en-us Registry Entries for W32Time Service: http://support.microsoft.com/kb/223184/en-us Or search the internet for “time server”, “time service”, “synchronize servers”, etc. 36 On-Net Surveillance Systems, Inc. Ocularis Installation & Licensing Guide Ocularis Camera License Registration Ocularis Camera License Registration Supported Recorders Ocularis recording components include the ability to register camera licenses through an automated process, either online or offline. This process is supported in the following recorder versions: RC-P 2.0 or later (PS), RC-I 8.0 or later (IS), RC-C 8.0 or later (CS), RC-L 6.0 or later (LS), and RC-E 5.0 or later (ES). If you have an older version recorder, you must license the cameras using the method corresponding with those versions. For RC-C 7.0, for instance, you must go to www.onssi.com and supply the MAC addresses for each camera to obtain a .DLK file. Camera Registration Process The configuration software used for the recording component has the ability to gather the necessary data from the system to send to OnSSI and automatically license the installed cameras. For Ocularis PS, Ocularis IS and Ocularis CS, this tool is the Management Application. For Ocularis LS and Ocularis ES, it is the Management Client. Once the recorder software is installed, add new cameras to the recorders using either the Management Application or Management Client. As soon as a camera is installed, it is fully functional. You may configure its settings and start to use it. A timestamp of when the camera was installed will be recorded and the camera will be fully functional during a 30 day grace period. You have 30 days to register the camera licenses. Register Camera Licenses For the supported recorders, all cameras have a 30 day grace period from the time of installation or upgrade until they must be licensed. This means that cameras are fully functional after you install them. You do not have to wait in the field for a .DLK file from OnSSI in order to use a camera with the supported recorders. The camera is immediately operational. The timestamp of the installation is noted in the recorder and a countdown begins, giving you 30 days to register the camera license. Licensing cameras must be done when installing new cameras. If you upgrade from an older, non-supported recorder to a newer supported recorder, you will have to re-register all cameras. Online or Offline? The registration process associates the camera license you purchased to a particular device. This automated process may be done online or offline. If the computer designated below has internet connectivity, you may perform licensing online: For this recorder: The computer that needs to have internet access: Ocularis PS Ocularis IS Ocularis CS The recorder computer (RC-P) The recorder computer (RC-I) The recorder computer (RC-C) Ocularis LS Ocularis ES The computer where the Management Client is located Keep in mind that if there are multiple recorders in the Ocularis system, cameras on each recorder must go through this process. See: To Perform Automated Camera Licensing Online on page 38 To Perform Automated Camera Licensing Offline on page 40 On-Net Surveillance Systems, Inc. 37 Ocularis Camera License Registration Ocularis Installation & Licensing Guide To Perform Automated Camera Licensing Online Online Camera Licensing using Ocularis PS, Ocularis IS, and Ocularis CS Online Camera Licensing using Ocularis LS and Ocularis ES Online Camera Licensing using Ocularis PS, Ocularis IS, and Ocularis CS 1. On each recorder computer, from the Management Application, select File…Activate License Online. (Figure 21) A Specify Device License Counts pop-up appears. (Figure 22) Figure 20 Activate License Online with the Management Application 2. Verify the amount of licenses you wish to request in the Request Licenses column. If you need to make any changes, select the Requested Licenses drop-down. Remember that encoders with multiple channels or cameras with special lenses may require more than 1 license per device in older versions. In RC-P 2.6, RC-I 8.6 or RC-C 8.6 only 1 license is required (per IP address) for these devices. 3. Click OK. For some prior version recorders, An Online License Retrieval pop-up appears. (Figure 23). For newer recorders, the licenses will be activated and you are done. 4. Figure 21 Specify Number of Licenses per Device If this is the first time you are using automated online licensing, click the Create new user link and proceed to step 4a.) below. For subsequent times, simply enter your email address in the user name field and corresponding OnSSI License Portal password and proceed to step 5 below. a.) For first time use only: After clicking the Create new user link, a web browser is opened to the OnSSI License Registration portal page (Figure 24). This page is located at: https://rclicensing.onssi.com/CustomerRegistration Enter your email address. This will become your user name for the OnSSI Licensing Portal. Figure 22 Online License Retrieval b.) Enter the SLC for the recorder. This is the alphanumeric value found on the license file. For instance, the code should have 11 characters and be in the form similar to: 6AX-XXXX-XXXX. c.) Click Submit. d.) You will receive an email with your OnSSI Licensing Portal user name and password. Figure 23 OnSSI License Registration Portal page 38 On-Net Surveillance Systems, Inc. Ocularis Installation & Licensing Guide Ocularis Camera License Registration e.) Go back to the Online License Retrieval screen in the Management Application (the screen should still be open but if not, choose File…Activate License Online). f.) 5. Enter your email address and the password you received by email. Click Activate. Licensing is complete! Once your credentials have been validated, you will see the message: “Successfully updated license” and your camera license status will change from “30 day(s) grace” to “Licensed”. If at any point in this license registration process you have questions or receive an error message, please contact OnSSI Sales. Online Camera Licensing using Ocularis LS and Ocularis ES Create an Account on the Licensing Portal This procedure is used only for versions RC-L 6.0, RC-E 5.0 and RC-E 6.0. For later versions, skip to ‘Register Camera Licenses’ below. 1. The first time you perform online licensing, you must register with the OnSSI Licensing Portal and create an account. This process need only be done once. Either: a.) Open a browser and go to the following URL: https://rclicensing.onssi.com/CustomerRegistration b.) From the Management Client, right-click the License Information node and then select Activate License Online. Click the Create New User link. (see Figure 25) Figure 24 OnSSI License Registration Portal page 2. Enter your email address. This will become your user name for the OnSSI Licensing Portal. 3. Enter the SLC for the recorder. This is the alphanumeric value found on the license file. For instance, the code should have 11 characters and be in the form similar to: 760-XXXX-XXXX. 4. Click Submit. 5. You will receive an email with your OnSSI Licensing Portal user name and password. Register Camera Licenses 1. From the Management Client, right-click the License Information node and select Activate License Online. An Activate Online pop-up appears. (Figure 26) 2. Enter the user name (email address) and password that was provided to you when you registered on the OnSSI Licensing Portal (see Create an Account on the Licensing Portal above). 3. Click Next. Once camera licenses have been validated, the camera license count will go from Temporary to Activated in the License Information screen. If at any point in this license registration process you have questions or receive an error message, please contact OnSSI Sales. On-Net Surveillance Systems, Inc. Figure 25 Online Activation 39 Ocularis Camera License Registration Ocularis Installation & Licensing Guide To Perform Automated Camera Licensing Offline Offline Camera Licensing using Ocularis PS, Ocularis IS, and Ocularis CS Offline Camera Licensing using Ocularis LS and ES Offline Camera Licensing using Ocularis PS, Ocularis IS, and Ocularis CS Use this procedure when the recorder computers do not have internet connectivity. 1. On each recorder computer, from the Management Application, select File…Activate License Offline. Figure 26 Exporting Offline License with the Management Application A License pop-up appears. The software needs to gather the necessary system data and package in a license request file with a .lrq filename extension. 2. Click the Export button. 3. A file is specified with a .lrq extension. Save this file to an accessible location Click Save. 4. Copy the .lrq file to portable media. 5. On any computer with internet connectivity, email the .lrq file as an attachment and send to [email protected]. 6. OnSSI will process the file and return to you an email with a new license file (.lic) as an attachment. 7. Detach this file to portable media and bring to the recorder computer. 8. On each recorder computer, from the Management Application, select File…Activate License Offline. 9. Click Browse next to step 3. 40 On-Net Surveillance Systems, Inc. Ocularis Installation & Licensing Guide Ocularis Camera License Registration 10. Locate the file you received from OnSSI. 11. Click Open. 12. Licensing is complete! Your camera license status will change from “30 day(s) grace” to “Licensed”. If at any point in this license registration process you have questions or receive an error message, please contact OnSSI Sales. Offline Camera Licensing using Ocularis LS and ES Use this procedure when the Management Client computer does not have internet connectivity. 1. From the Management Client, right-click License Information and select Activate License Offline > Export License For Activation. (Figure 29) A Save Request File pop-up appears. The software will gather the necessary system data and package in a license request file with a .lrq filename extension. The default name for the file is the SLC. Use this default name and store the file in an accessible location. 2. Click Save. 3. Copy the .lrq file to portable media. 4. On any computer with internet connectivity, email the .lrq file as an attachment and send to [email protected]. 5. OnSSI will process the file and return to you an email with a new license file (.lic) as an attachment. 6. Detach this file to portable media and bring to management client computer. 7. From the Management Client, right-click License Information and select Activate License Offline > Import Activated License. (Figure 30) 8. Locate and select the new .lic file. 9. Click Open. Figure 27 Exporting Offline License with RC-E Manager Once camera licenses have been validated, the camera license count will go from Temporary to Activated in the License Information screen. If at any point in this license registration process you have questions or receive an error message, please contact OnSSI Sales. On-Net Surveillance Systems, Inc. Figure 28 Importing Offline License with RC-E Manager 41 Installing Ocularis Event Proxies Ocularis Installation & Licensing Guide Ocularis Event Proxies Event Proxies are typically used to route events and other information from a server or recording component to the Ocularis Base. The Ocularis feature sets that use recorder event proxies are: Ocularis ES, Ocularis LS, Ocularis CS and Ocularis IS. Ocularis CS and Ocularis IS share the same event proxy. Ocularis LS and ES is also combined. RC-C / RC-I Event Proxy (used with Ocularis CS and Ocularis IS) RC-E Event Proxy (used with Ocularis LS and Ocularis ES) RC-C / RC-I Event Proxy The RC-C / RC-I Event Proxy is used for routing events generated by the recording component from Ocularis CS and Ocularis IS respectively to the Ocularis Base ‘Event Coordinator’ or ‘EC’. The EC service controls events in Ocularis. The RC-C / RC-I Event Proxy may be installed on any computer with connectivity to an RC-C or RC-I recorder. The RC-C / RC-I Event Proxy may be installed when the corresponding recording component is installed or it can be installed separately. If, during an upgrade, the recording component software has not changed but you still would like to update the event proxy, follow the instructions below. TO UPDATE THE RC-C / RC-I EVENT PROXY These instructions assume that you have updated Ocularis Base and are located at the system on which you wish to install the RC-C / RC-I Event Proxy. If you have already installed the event proxy as part of the initial new installation, these steps may be skipped. Proceed to the Configuring the RC-C / RC-I Event Proxy steps below. 1. From the ‘Install Ocularis Components’ web page, select either the ‘Basic System’ model or ‘Distributed System’. (see Figure 12). 2. From the component download Basic Installation page, click the Recording Component icon. 3. Select the ‘Click here to download component’ link when you are ready. The component downloaded will be both the event proxy and the recorder software. 4. Run the executable file and follow the wizard prompts. Once the wrapper is extracted you will see an Extraction Complete page at the end of the wizard. There are two checkboxes: one for the Event Proxy and one for the Recorder. Uncheck the recorder checkbox, leaving only the event proxy box checked. 5. Click Finish. 6. The previous version of the event proxy should be detected. A notice will appear asking for your confirmation to uninstall the older version and install the new version. Click Yes. a. b. An “Are you sure you want to remove the RC-C / RC-I Event Proxy…?” screen appears. Click Yes. When the uninstall is complete, click OK. 7. The Welcome to the RC-C RC-I Event Proxy Setup Wizard appears. Click Next. 8. The Select Destination Folder screen appears. You may leave the default directory path or change it if necessary according to your organization. If installing the Demo version, keeping the default path is recommended. Click Next. 9. The next screen will confirm the file path and disk space requirements. Click Next if OK. Click Back to make changes to the directory path or the folder. The RC-C / RC-I Event Proxy software is installed. 10. When the Event Proxy Setup is completed, the Setup Wizard Complete screen appears. Click Finish. The Ocularis version number is displayed in the proxy setup screen. Note: A required field, Recorder IP, has been included in this version of the event proxy. This field identifies where the events are coming from. Since prior versions of the event proxy required that it be installed on the recorder computer, this field will have a default value of 127.0.0.1. As long as the event proxy remains on the recorder computer, you may leave this value as is or you may modify it to the actual IP Address. If you install the event proxy software on a computer that does not house the event proxy, you must change the IP address. 42 On-Net Surveillance Systems, Inc. Ocularis Installation & Licensing Guide Installing Ocularis Event Proxies Configuring the RC-C / RC-I Event Proxy Ocularis CS and Ocularis IS recorder events, set up in each corresponding Management Application, are sent to Ocularis Base via the NetCentral port on the recorder. Configuring the RC-C / RC-I Event Proxy includes configuring NetCentral settings in the corresponding Management Application and configuring settings within the RC-C / RC-I Event Proxy screen. Two steps are involved: Configure event forwarding in the Management Application for RC-C or RC-I Configure parameters in the RC-C / RC-I Event Proxy TO CONFIGURE EVENT FORWARDING IN THE MANAGEMENT APPLICATION FOR RC-C OR RC-I 1. On the RC-I or RC-C recorder computer, open the Management Application. 2. Expand the Advanced Configuration branch. 3. Right-click the NetCentral node and select Properties. 4. In the NetCentral settings, check the Enable NetCentral connections checkbox. 5. Fill in the following: Login name Enter a login name for use with NetCentral. NetCentral is used to communicate between the recorder and the event proxy. The corresponding settings in both must be the same. Password Enter a password for the login account entered above. Port This is the port that will be used to communicate events between the recorder and the RC-C / RC-I Event Proxy. You may keep the default of 1237 in most cases. 6. When done, click OK to close the NetCentral Settings pop-up. 7. Exit to the Management Application, save changes and restart services. On-Net Surveillance Systems, Inc. 43 Installing Ocularis Event Proxies Ocularis Installation & Licensing Guide TO CONFIGURE PARAMETERS IN THE RC-C / RC-I EVENT PROXY 1. Open the RC-C / RC-I Event Proxy from the desktop icon or from the Windows menu: Start All Programs OnSSI RC-C / RC-I Event Proxy Figure 29 RC-C / RC-I Event Proxy 2. The Name field is automatically generated. You may modify this field as this name is displayed in the Ocularis Administrator application. The ‘Name’ will be listed as the event source. Therefore, it is common to label it so that it is easy to identify the NVR for which it is routing. 3. Enter the following as configured by the administrator: Recorder IP The IP Address for the recorder generating the source of events. Server IPs (comma delimited) This is the IP Address of the server where Ocularis Base is installed. The event proxy will forward events from the designated Recorder IP to the Server IP(s) in this list. To forward to multiple IPs, separate each with a comma. If you are working with an OpenSight™ customer, the Host would configure this field with their own Ocularis Base IP Address as well as the Remote Monitor’s Ocularis Base IP Address. 44 NetCentral Port This port must match the NetCentral port as defined in the NetCentral settings of the NVR’s Management Application. In most cases, you will use the default of 1237. NetCentral Username This is the NetCentral login name defined in the NetCentral settings of the NVR’s Management Application. NetCentral Password This is the password for the NetCentral Username and should match the one defined in the NetCentral settings of the NVR’s Management Application. 4. Click the event type for the events you would like forwarded under Event Types. At least one event type must be checked. 5. In the Settings section, you have two new options: On-Net Surveillance Systems, Inc. Ocularis Installation & Licensing Guide Save Advanced Installing Ocularis Event Proxies Click the Save button to save any changes made to the proxy configuration. In order to apply changes, the event proxy service must be restarted. You will be prompted to restart the service. If you choose Yes, the proxy service will be stopped and restarted with momentary disruption of service. If you choose No, your settings will not be applied but they will be saved in the proxy configuration screen. The settings will not be applied until the next time the proxy service is restarted. For Advanced Users. Use this option ONLY when using Ocularis with 3rd party event sources. Advanced The Advanced Settings configuration is used only when Ocularis is used with 3rd party systems. If you use events with Ocularis only, do not modify these settings. Figure 30 RC-C / RC-I Event Proxy Advanced Settings Minutes to wait before stopping events with no EC Connection 2 or more minutes (60 max) <disabled> 6. Use without Event Coordinator Explanation With this combination, events are forwarded to Ocularis Base but they may also be forwarded to an additional 3rd party server(s). The RC-C/RC-I Event proxy provides a heart beat check to determine if the Ocularis Event Coordinator service is running on the Base computer. In the event that the Ocularis Event Coordinator service is not running, this setting provides a timer to allow time for the Event Coordinator to resume before the Event Proxy stops forwarding events. The Event Proxy will retain the last 20 minutes of events in the situation where the Ocularis Event Coordinator service stops running. These events will be re-forwarded once the Ocularis Event Coordinator service is restarted and the connection with the proxy is resumed. Two minutes is the default value. With this combination, events are not forwarded to Ocularis Base. Events are ported to a 3rd party server. Identify this server IP in the Server IPs field on the proxy’s primary configuration page. Events do not go to the Oculairs Event Coordinator and therefore are not monitored in Ocularis, In the Service section, you have the option to Start and Stop the Event Proxy service manually. On-Net Surveillance Systems, Inc. 45 Installing Ocularis Event Proxies Ocularis Installation & Licensing Guide 7. Lastly, the View Log button launches a pop-up displaying the log entries for the Event Proxy. 8. When done, click OK. If you made any changes, a pop-up appears stating that settings are saved and asks if you would like to restart proxy services for the changes to take effect. Click Yes to use the changes and restart the service or click No to restart the service at a later time Once the RC-C / RC-I Event Proxy is configured and the services have been restarted, the selected events will appear in the Ocularis Administrator. This enables the events to be monitored with Ocularis. RC-E RC-L Event Proxy The RC-E RC-L Event Proxy is used to route events generated by Ocularis ES’ RC-E recorders or Ocularis LS’ RC-L recorders to the OnSSI Event Coordinator via the Management Server. This Event Proxy may be installed on any machine with network connectivity to the Management Server and the Ocularis Base Server. Typically, it is installed on the same machine as the Management Server, since all recorders have network access to this device. If you have already installed the event proxy as part of the initial new installation, these steps may be skipped. Proceed to To Configure Parameters in the RC-E RC-L Event Proxy below. TO UPDATE THE RC-E RC-L EVENT PROXY These instructions assume that you have installed Ocularis Base and are located at the system on which you wish to install the RC-E Event Proxy. 1. Access an alternate webpage on the Ocularis Base machine: http://[NAME]:[port]/OcularisService/InstallerWebsite/sysadmin.html where [NAME] is either the IP Address or computer name of the Ocularis Base machine and port is the IIS port number. In most cases, the default port 80 is used and it is not necessary to enter it here. 2. From the webpage, click the link for RC-E RC-L Event Proxy in the Plugins section. 3. When you are prompted to run or save the file, you may choose to either run it now or save it and run the installation later. 4. The previous version of the event proxy should be detected. A notice will appear asking for your confirmation to uninstall the older version and install the new version. Click Yes. a. An “Are you sure you want to remove the RC-E Event Proxy…?” screen appears. Click Yes. b. When the uninstall is complete, click OK. 5. The Welcome to the RC-E RC-L Event Proxy Setup Wizard appears. Click Next. 6. The Select Destination Folder screen appears. You may leave the default directory path or change it if necessary according to your organization. If installing the Demo version, keeping the default path is recommended. Click Next. 7. The next screen, Ready to Install the Program, will confirm the file path and disk space requirements. Click Next if OK. Click Back to make changes to the directory path or the folder. The RC-E RC-L Event Proxy software is installed. 8. 46 When the Event Proxy Setup is completed, the Setup Wizard Complete screen appears. Click Finish. On-Net Surveillance Systems, Inc. Ocularis Installation & Licensing Guide Installing Ocularis Event Proxies TO CONFIGURE PARAMETERS IN THE RC-E RC-L EVENT PROXY 1. Open the RC-E Event Proxy from the desktop icon or from the Windows menu: Start All Programs OnSSI RC-E RC-L Event Proxy Figure 31 RC-E RC-L Event Proxy 2. Configure the settings on the Event Proxy Setup screen according to the following: Base Server IP Enter the IP Address for the destination server for events (which typically contains the Ocularis Base component and thereby the OnSSI Event Coordinator). To forward to multiple IPs, separate each with a comma. If you are working with an OpenSight™ customer, the Host would configure this field with their own Ocularis Base IP Address as well as the Remote Monitor’s Ocularis Base IP Address. 3. 4. Management Server IP Enter the IP Address for the server which contains the Management Server. This is the machine that you log in to with the Management Client. Management Server User Name Enter a username for an account with full administrative rights to the Management Server Management Server Password Enter the corresponding password for the account listed above Once the four data items above are entered, click the Get/Update Event Types button. This will retrieve events from the Management Server and allow you to select those you wish to monitor in Ocularis. Select the events that you wish to monitor in Ocularis. You may select as many as you like or check Subscribe To All Event Types to select the entire list. On-Net Surveillance Systems, Inc. 47 Installing Ocularis Event Proxies Ocularis Installation & Licensing Guide Figure 32 RC-E Event Proxy Events (Sample) 5. Click the Save button in the Settings section. You are asked if you would like to restart the proxy services in order to apply the change. If you choose Yes, the proxy service will be stopped and restarted with momentary disruption of service. If you choose No, your settings will not be applied but they will be saved in the proxy configuration screen. The settings will not be applied until the next time the proxy service is restarted. Service In the Service section, you are able to Start and Stop the event proxy Windows’ service by clicking the corresponding buttons. This saves you the step of doing so via Windows when necessary. Settings In the Settings section, you have two options: Save Advanced Click the Save button to save any changes made to the proxy configuration. In order to apply changes, the event proxy service must be restarted. You will be prompted to restart the service. If you choose Yes, the proxy service will be stopped and restarted with momentary disruption of service. If you choose No, your settings will not be applied but they will be saved in the proxy configuration screen. The settings will not be applied until the next time the proxy service is restarted. For Advanced Users. Use this option ONLY when using Ocularis with 3rd party event sources. Advanced The Advanced Settings configuration is used only when Ocularis is used with 3rd party systems. If you use events with Ocularis only, do not modify these settings. 48 On-Net Surveillance Systems, Inc. Ocularis Installation & Licensing Guide Installing Ocularis Event Proxies Figure 33 RC-E RC-L Event Proxy Advanced Settings Minutes to wait before stopping events with no EC Connection 2 or more minutes (60 max) <disabled> Use without Event Coordinator Explanation With this combination, events are forwarded to Ocularis Base but they may also be forwarded to an additional 3rd party server(s). The Event proxy provides a heart beat check to determine if the Ocularis Event Coordinator service is running on the Base computer. In the event that the Ocularis Event Coordinator service is not running, this setting provides a timer to allow time for the Event Coordinator to resume before the Event Proxy stops forwarding events. The Event Proxy will retain the last 20 minutes of events in the situation where the Ocularis Event Coordinator service stops running. These events will be re-forwarded once the Ocularis Event Coordinator service is restarted and the connection with the proxy is resumed. Two minutes is the default value. With this combination, events are not forwarded to Ocularis Base. Events are ported to a 3rd party server. Identify this server IP in the Base Server IP field on the proxy’s primary configuration page. Events do not go to the Oculairs Event Coordinator and therefore are not monitored in Ocularis, The View Log button launches a pop-up displaying the log entries for the Event Proxy. When done, click OK. If you made any changes, a pop-up appears stating that settings are saved and asks if you would like to restart proxy services for the changes to take effect. Click Yes to use the changes and restart the service or click No to restart the service at a later time Once the Event Proxy is configured and the services have been restarted, the selected events will appear in the Ocularis Administrator. This enables the events to be monitored with Ocularis. On-Net Surveillance Systems, Inc. 49 Appendix A Ocularis Installation & Licensing Guide Appendix A Ocularis Ports Please note the following ports should be open for data traffic on the network when using Ocularis. Port Number (inbound and outbound) 20 and 21 Used when recording servers listen for FTP information; some devices use FTP for sending event messages. FTP (File Transfer Protocol) is a standard for exchanging files across networks. 25 Used when recording servers listen for SMTP information. Also, some devices use SMTP (e-mail) for sending event messages and /or for sending images to the surveillance system server via e-mail. SMTP (Simple Mail Transfer Protocol) is a standard for sending e-mail messages between servers. 80 Port 80 is typically used by the IIS (Internet Information Services) Default Web Site for running the RC-E / RC-L Management Server service. It is also used by the image server of Ocularis PS, IS and CS. 554 1024 and above (outbound only) Used by some camera manufacturers. (Except ports listed below): Used for HTTP traffic between cameras and servers. 1234 This is the default port used in RC-I and RC-C for receiving ASCII strings for generic events. This port may be modified by the user in the Management Application. 1237 Used for communication between NetCentral and event proxies with RC-C and RC-I. This is the default port number and may be modified by the user in the Management Application. 1801 Used for Message Queuing. 5432 Used when recording servers listen for alert socket/TCP information; some devices use TCP for sending event messages. 7008 Used by Ocularis.net (communication with video walls and push video) 7563 Used for handling PTZ camera control commands and for communication with Ocularis Client. 8844 Used for communication between failover servers (Ocularis ES). 9993 Used for communication between recording servers and the RC-E / RC-L Management Server. 11000 Used by failover servers for polling (i.e. regularly checking) the state of recording servers (Ocularis ES). 12345 Used for communication between RC-E and NetMatrix recipients. Any other port numbers you may have selected to use 50 Description Examples: If you have changed the IIS Default Web Site port from its default port number (80) to another port number, or if you have integrated RC-C servers into your RC-E solution, in which case a port must be allocated for use by RC-C’s Image Server service. On-Net Surveillance Systems, Inc. Ocularis Installation & Licensing Guide Contact Information Contact Information On-Net Surveillance Systems (OnSSI) One Blue Plaza 7th Floor P.O. Box 1555 Pearl River, NY 10965 Website: www.onssi.com General: [email protected] Fax: 845.732.7900 845.732.7999 Sales Support: [email protected] 845.732.7900 x 1 PreSales Support [email protected] 845.732.7900 x 2 Technical Support: [email protected] 845.732.7900 x 3 Training: [email protected] 845.732.7900 x 4 Marketing: [email protected] 845.732.7900 x 5 On-Net Surveillance Systems, Inc. 51


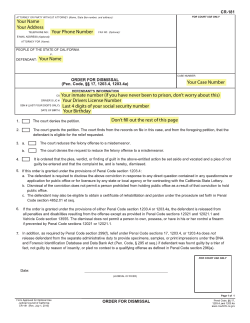


© Copyright 2026