
Laboratory Safety Manual
Laboratory Safety Manual Revised August, 2014 by JoAnn Fenn, M.S., MT(ASCP) and Kris Pierce, MLS(ASCP)CM Original Author: Karen A. Brown, M.S, MLS(ASCP)CM Medical Laboratory Science Program Department of Pathology University of Utah 1 TABLE OF CONTENTS Page MLS Teaching Lab Fire Evacuation Plan .......................................................................................................................... Introduction ............................................................................................................................................................................ l 3 Section I: General Principles of Infection Control A. Disease Transmission ............................................................................................................................................. B. Blood-borne Pathogens .......................................................................................................................................... C. Blood-borne Pathogens Standard and Universal (Standard) Precautions ..................................................... D. Limiting Exposure to Infectious Agents .............................................................................................................. E. Decontamination Procedures ................................................................................................................................ 4 4 6 6 9 Section II: Chemical Safety A. Introduction ............................................................................................................................................................. B. Hazardous Chemicals ............................................................................................................................................ C. Chemicals in the Clinical Laboratory ................................................................................................................... D. Product Warning Labels ........................................................................................................................................ E. Material Safety Data Sheets ................................................................................................................................... F. Handling of Chemicals........................................................................................................................................... G. Storage of Chemicals .............................................................................................................................................. H. Spills and Exposures .............................................................................................................................................. I. Disposal .............. …. ................................................................................................................................ 11 11 13 14 17 20 21 23 26 Section III: Fire Safety A. Introduction ............................................................................................................................................................. B. Sources of Fire ......................................................................................................................................................... C. Fire Prevention ........................................................................................................................................................ D. Fire Safety Equipment ............................................................................................................................................ E. Fire Protocol ............................................................................................................................................................. F. Summary of Fire Safety .......................................................................................................................................... 27 27 30 31 31 32 Section IV: Electrical Safety A. Causes of Electrical Hazards ................................................................................................................................. B. Precautions ............................................................................................................................................................... C. Electrical Emergency .............................................................................................................................................. 34 34 35 Section V: Mechanical Safety A. Introduction ............................................................................................................................................................. B. Equipment/Instruments ........................................................................................................................................ C. Glassware and Sharps ............................................................................................................................................ 35 35 36 Section VI: General Laboratory Safety A. Introduction ............................................................................................................................................................. B. Laboratory Dress Code Policy…………………………………………………………………………………. C. Good Personal Habits ............................................................................................................................................. D. Good Housekeeping Practices .............................................................................................................................. E. Good Laboratory Technique ................................................................................................................................. 36 36 37 38 38 Section VII: Accidental Exposure ....................................................................................................................................... 39 Section VIII: Disaster Preparedness .................................................................................................................... 41 Bibliography and References ............................................................................................................................... 43 Appendix I: Pathogen Data Sheets………………………………………………………………………………………. 45 Appendix II. MLS Incident Report Form, EHS Incident Report Form, EHS Workman Comp Form, Contact Information for Medical Evaluation…………………………………………………………………………….. 49-52 Laboratory Safety Manual 2 Introduction The modern clinical laboratory is a workplace where many hazardous chemicals, complex instrumentation, and potential pathogens are encountered on a daily basis. However, the laboratory can be a safe place to work and learn if possible hazards are identified and safety and infection control protocols are followed. Very specific work practice controls, engineering controls, and personal protective equipment are available to help provide safeguards against hazardous materials and pathogens. This safety manual has been prepared as an educational resource for students, staff, and faculty. This manual is intended to: 1. Outline general principles of infection control. 2. Describe potential laboratory safety hazards and protective mechanisms associated with each of the following categories: a. biological (including blood-borne pathogens) b. chemical c. fire and explosion d. electrical e. equipment or mechanical 3. Define safety rules for the clinical laboratory, including good personal habits, housekeeping practices, and laboratory techniques. 4. Describe accidental biohazards or other physical and chemical hazards that might occur in the Teaching Laboratory, and proper protocols for prevention and follow-up. 5. Discuss factors associated with disaster preparedness as it pertains to the Teaching Laboratory. 3 Section I -- General Principles of Infection Control A. Disease Transmission Infectious organisms travel by very specific routes of transmission. The four major pathways are contact, airborne, vehicle, and vector. However, the contact and airborne routes are the main methods of transmission in the health care environment, as vehicle and vector routes are rarely encountered. 1. Contact This type of organism transmission is the most significant and frequent of the four routes. It may involve: 2. B. a. Direct contact in which a physical transfer of an infectious agent occurs between an infected individual and a susceptible host. b. Invasive contact in which moist body substances containing infectious organisms (like blood) touch non-intact skin or mucous membranes. For example, inoculation of contaminated materials, as in fecal-oral transmission via poor hand hygiene or touching the face or mouth with contaminated hands in the laboratory; or percutaneous injection via mishandled needles or sharp objects. c. Indirect contact in which a susceptible individual contacts a contaminated object, such as contaminated instruments and equipment. Airborne and droplet a. Airborne transmission occurs when the moisture in respiratory droplets evaporates and leaves pathogens suspended in the air. Infectious organisms can travel on air currents and through ventilation systems before being inhaled by a susceptible individual. Tuberculosis, chickenpox, and measles are transmitted via this route. b. Droplet transmission is usually thought of as a splashing or splattering that can cause aerosol formation producing large particles that pass three feet or less. It can be of particular concern in the laboratory when handling potentially infectious liquids. Blood-borne Pathogens 1. Definition Blood-borne pathogens are disease-causing infectious agents that may be present in human blood. The pathogens of significance for clinical laboratories are the Hepatitis B Virus (HBV) and the Human Immunodeficiency Virus (HIV), although several other diseases, such as Hepatitis C, Hepatitis D, and syphilis are also transmitted in blood. 2. Transmission 4 Infectious blood-borne pathogens are transmitted when blood or “other potentially infectious materials” (OPIM) contact mucous membranes, non-intact skin, or when contaminated surfaces or items are touched. OPIM are substances such as body fluids, visibly contaminated with blood, any unfixed human tissue or organ (other than intact skin), HBV- or HIV-containing cell or tissue cultures, and organs or tissues from experimental animals infected with HBV or HIV. Non-intact skin may include, but is not limited to, abrasions, burns, cuts, hangnails, paper cuts, and rashes. Puncture wounds or cuts from contaminated sharps may also transmit blood-borne pathogens. Table 1 summarizes possible routes of exposure. Table 1: Possible Routes of Exposure to Infectious Agents in the Clinical Laboratory* Route Situation Ingestion Mouth pipetting Splashed infectious material Contaminated clothing, devices, fingers, or gloves Contaminated pens or pencils inserted into the mouth Consumed food Inoculation Needle stick accident Cuts from sharp objects Skin and mucous membrane contamination Splashes into eyes, mouth, nose Spills or splashes on intact or non-intact skin Inhaled infectious aerosol Streaking media Flaming or cooling inoculating loop Mixing microbial suspensions by pipette Expelling air from a syringe Withdrawing needle from rubber stopper Separating needle from syringe Centrifuging specimens Mixing instruments such as blenders or shakers Pouring or decanting fluids Opening culture containers or blood tubes Spilling infectious material *Adapted from Sewell, D.L. C. Blood-borne Pathogens Standard and Universal Precautions Blood-borne pathogens are organisms that may be present in human blood and can cause disease in humans. The Blood-borne Pathogens Standard was enacted to protect any individual who might reasonably contact blood or other possible infectious material in the normal course of performing their job or laboratory procedure. Universal Precautions refers to a standard method of infection control in which ALL human blood and certain human body fluid specimens are treated as if known to be 5 infectious for HBV, HIV, and other pathogens. Universal Precautions apply to the following potentially infectious fluids: • • • • • • • • • Amniotic Blood Cerebrospinal Pericardial Peritoneal Pleural Saliva (from dental procedures) Semen Vaginal Secretions Universal Precautions do not apply to the following body fluids unless they are visibly contaminated with blood: • • • • • • • D. Feces Nasal Secretions Sputum Sweat Tears Urine Vomitus Standard Precautions: This is the guideline to which the Teaching Laboratory adheres. In 1996, the CDC published new guidelines which synthesized the major features of Universal Precautions and Body Substance Isolation to prevent transmission of a variety of organisms. Standard Precautions represent minimum infection prevention measures that apply to all patient care. Standard Precautions include guidelines on hand hygiene, use of personal protective equipment, respiratory hygiene and cough etiquette, safe injection practices, and safe handling of potentially contaminated equipment or surfaces. Standard Precautions imply that “all blood and body fluids are potentially infectious and should be treated accordingly. E. Limiting Exposure to Infectious Agents 1. Engineering Controls Engineering controls are structural or mechanical devices designed to provide safety for the equipment and workspace organization. Examples encountered in the Teaching Laboratory include: a. b. c. d. 2. Hand washing facilities Eyewash stations Sharps containers Orange biohazard signs, labels, and bags Work Practice Controls Work practice controls are the behaviors required to use engineering controls effectively. Work practice controls ensure: 6 3. a. Timely hand washing (before beginning laboratory procedures, after removing gloves, when visibly contaminated, before leaving laboratory, and after using restroom facilities). b. The proper use and removal of personal protective equipment (including not wearing exposed or dirty lab coats outside the laboratory). c. Proper needle and sharps disposal. d. No eating, drinking, chewing gum, smoking, applying cosmetics or lip balm, or handling contact lenses occur in the laboratory. e. No mouth pipetting, splashing, or aerosolization occur in the laboratory. f. Proper storage of food or drink in areas away from blood or OPIM. Personal Protective Equipment Exposure to infectious agents may exist even when engineering and work practice controls are implemented. Personal protective equipment is used as an additional safeguard from contamination of clothing, skin, mucous membranes, or puncture wounds. Personal protective equipment is specialized clothing or equipment worn or used for protection against hazards. The types of personal protective equipment available for use in the Teaching Laboratory are: a. Gloves 1. Provide an effective barrier, but disinfecting or washing may enhance penetration of liquids 2. Do not wash and re-use 3. Discard when visibly contaminated or torn b. Laboratory coats 1. Lab coats must be knee-length, buttoned and worn at all times in the teaching and clinical laboratories. 2. Ideally, lab coats should consist of non-permeable material and have tight-fitting cuffs on the sleeves. (The coats available from the UUHSC usually do not have these features, but they are adequate for procedures performed in the Teaching Laboratory.) 3. Students are responsible for cleaning lab coats whenever they appear soiled. (Instructors will provide information on cleaning.) c. Gowns/aprons 1. These may provide additional protection if spraying or splashing is anticipated. 2. Disposable aprons are usually used. d. Masks/eye protection 1. Eye protection (safety glasses or goggles) is provided for students and should be worn any time that body fluids (including blood and blood serum) are handled in the Teaching Laboratory. (Eye 7 2. 3. 4. 5. e. protection is also required during use of chemicals, as described in Section II, Chemical Safety.) Personal prescription safety glasses must have side shields and be decontaminated with a freshly made 1:10 dilution household bleach solution before leaving the lab. (Usual prescription glasses are not a substitute for safety glasses, but can be worn under many of the goggles and safety glasses available in the Teaching Laboratory.) Standard surgical masks are also available. (Surgical masks provide minimal protection from aerosols and air-borne contaminants. Respirator masks can be obtained for students with severe respiratory conditions and on recommendation of a physician, but must be specially fitted and tested.) Masks and eye protection must be worn together. Masks should not be reused. Face shields 1. Provide an alternative to separate masks and eye wear. 2. Clean appropriately if contaminated. Gloves, mask, eye protection, or face shields are provided at no additional charge to the student. Latex-free nitrile gloves are the standard for Teaching Laboratory use. If blood or OPIM contaminates clothing, the clothing must be removed and placed in an appropriately designated area or container. Notify a faculty member immediately. If a laboratory coat, gown, or apron becomes contaminated, it is important to remove the garment in such a way as to avoid contacting the outer surface. If the contamination penetrates the inner surface of the coat, gown, or apron, use extreme caution when removing. Any contaminated clothing must also be removed. Students are advised to have an extra set of clothes in their laboratory lockers in the event of contamination to their personal clothing. All personal protective equipment must be removed before leaving the laboratory. If equipment has become contaminated, check for exposure of nonintact skin and wash appropriately, if necessary; also notify a faculty member. The equipment (for example, goggles or face shields) must also be appropriately cleaned before storing. NOTE: Faculty or staff can require specific PPE at anytime. E. Decontamination Procedures 1. Cleaning a spill of blood, body fluids, or cultured organisms a. Always wear gloves (puncture-resistant utility gloves are best) and a lab coat, gown or apron. b. Contain the spill: cover an area that extends beyond all visible material and liquid with disposable, absorbent material (gauze pads or paper towels) absorb the spill with a disposable (gauze pad or tissue paper towel). 8 c. Saturate the absorbent material with a freshly made 1:10 dilution of household bleach. Start pouring or squirting at the outer edge of the absorbent material and work toward the center, generously saturating all of the material. A 15-20 minute contact time is recommended, but it also depends on the spill. d. Wait (freshly made 1:10 dilution of household bleach) 10 minutes is sufficient; for other disinfectants, carefully follow the manufacturer’s instructions). Keep the material moist. Add more disinfectant if necessary. e. Discard everything into the appropriate container by using the biohazard- designated dustpan and brush. If there is no broken glass or other “sharps” in the spill, it can be discarded into a biohazard bag. If the spill contains broken glass, everything, including all of the absorbent material, should be discarded into a large sharps container. Do not remove broken glass from the debris. 2. Decontaminating and cleaning pipettes and glassware a. All serological pipets (1ml, 5ml, 10ml etc.), either glass or disposable plastic, whether or not used to manipulate blood, blood products or other potentially infectious materials (OPIM’s) CANNOT be disposed in any plastic bags. All disposable pipets used for handling potentially infectious materials are considered to be contaminated sharps and must either be decontaminated prior to disposal in a broken glass container OR must be disposed in a rigid, closable, constructed to contain all contents and prevent leakage, appropriately labeled sharps container. Because of the their potential to puncture, all serological pipets or pipet tips, can no longer be disposed of in plastic bags. b. Pipettes and glassware that have not been exposed to biological specimens, but have transferred or stored reagents and chemicals, must be placed in appropriate containers for cleaning. 3. 4. Decontaminating and cleaning instruments or equipment a. Instruments or equipment that have contacted infectious materials must be handled carefully. b. Wearing gloves and a labcoat, clean with soap and bleach solution until no blood or contaminants are visible. c. Autoclave any parts of an instrument or equipment that can be placed in the autoclave. d. Dispose of cleaning towels in appropriate biohazard containers. Routine Decontamination 9 All equipment and working surfaces, including bench tops, are to be cleaned and decontaminated with an appropriate disinfectant (freshly made 1:10 dilution of household bleach solution) routinely before and after completing laboratory sessions. In addition, surfaces must be disinfected immediately after becoming contaminated. 5. Disposal of Contaminated Materials All materials and specimens used in the Teaching Laboratory must be appropriately disposed of in biohazard bags or sharps containers that will be autoclaved. Such materials and samples include, but are not limited to, petri dishes with organisms, agar and broth tubes with organisms, EDTA and citrated blood tubes, blood culture bottles, and tubes containing serum. Note that paper towels used to decontaminate work surfaces should be discarded in a biohazard container whereas towels used for drying hands should be tossed in a regular trash receptacle. Also, any item that has a pointed end or can poke through a biohazard bag should be disposed of in a sharps container; this includes wooden applicator sticks, glass pipettes, glass microscope slides and cover glasses, and broken glass tubes. Intact glass tubes should be gently placed in biohazard bags to prevent breakage. Figure 1 illustrates an Occupational Safety and Health Administration (OSHA) approved biohazard label that identifies acceptable biohazard disposal receptacles. This symbol should be found on all sharps containers and biohazard bags in the Teaching Laboratory. Figure 1: Approved Biohazard Label (Note: the background for biohazard is RED) Section II -- Chemical Safety A. Introduction 10 Certain chemical substances used in the Teaching Laboratory are potentially hazardous. These hazards depend on the physical and chemical properties of the materials. Knowing how to properly move and store chemicals, as well as what to do in case of an accident, will minimize danger from exposure. B. Hazardous Chemicals Hazardous chemicals are those substances that pose a risk of damage to the lungs, skin, eyes, or mucous membranes following short or long-term exposure. Hazardous chemicals may be categorized as follows: 1. Organic Solvents In general, solvents are liquids capable of dissolving or dispersing other substances. In the laboratory, they are generally light hydrocarbons used for solubilizing lipids or extracting desired substances from a non-miscible aqueous solution. They are usually volatile and can often penetrate the skin. Work in a well-ventilated area when using solvents. 2. Corrosives (Caustics) The major classes of corrosive chemicals are strong acids (pH < 2.1), highly alkaline bases (pH > 12.5), dehydrating agents, and oxidizing agents. Mixing should always be performed by adding the chemical to water to avoid a possibly violent reaction and subsequent spattering. Corrosives, if inhaled or ingested, cause severe damage to the gastrointestinal and respiratory tracts. Some substances, like sulfuric acid, penetrate deep into tissues and cause serious burns. Other corrosives may be extremely damaging to the eyes. Immediately irrigating the exposed tissue with water is critical. Continued flushing with water for a minimum of 15 minutes is essential in minimizing tissue damage. If the eyes have been affected, they must be rinsed thoroughly while the eyelids are held open. 3. Irritants These substances cause reversible inflammatory effects on living tissue by chemical action at the site of contact. Formaldehyde is both an irritant and a potential carcinogen. OSHA has issued a specific formaldehyde standard that recognizes the hazards associated with the use of formaldehyde in the laboratory. An aqueous solution of formaldehyde is called “formalin.” It is used to preserve fecal parasites for laboratory examination. 4. Carcinogens Carcinogens are actual or potential cancer-causing agents. Widely recognized carcinogens are benzene and toluene. Small amounts of the weak carcinogen alpha naphthol are used to develop the Voges-Proskauer reaction in the microbiology section. Ethidium bromide, a powerful mutagen, is used to visualize DNA in the molecular diagnostics section. Students must carefully follow instructions for the use and disposal of these reagents. 5. Toxins (Poisons) 11 Many chemicals are toxic or poisonous, and cause illness or death, when relatively small amounts are inhaled, swallowed, or absorbed through the skin. Toxic effects may be either local or systemic. Metallic mercury and its compounds are toxic. OSHA standards specify permissible exposure limits (PELs) to OSHA-regulated toxic chemicals. A PEL identifies the level and duration of allowable exposure to a particular toxic chemical. Check warning labels and other available information to determine if a chemical is toxic. 6. Ignitables These chemicals can catch fire and burn in air and include both combustible and flammable liquids, as defined by their flash points. The flash point is the lowest temperature at which a liquid emits vapors in such quantities that, when combined with air near the surface of the liquid, forms an ignitable mixture. Flammable liquids have a flash point below 100°F. OSHA defines combustible liquids as those substances with a flash point at or above 100°F but below 200°F. Acetone and ethanol are flammable liquids while acetic acid is a combustible liquid. Avoid open flames and sparks and ensure proper ventilation when handling or storing flammables. 7. Explosives (Reactives) Explosive chemicals are reactive and unstable substances that explode easily and sustain a violent chemical change, often at normal temperatures and pressures. Store and handle explosives properly. C. Chemicals in the Clinical Laboratory Common hazardous chemicals found in clinical laboratories include: • • • • • • • • • • • acetone acetic acid any common concentrated acid (hydrochloric, nitric, sulfuric) any common concentrated base (sodium hydroxide, ammonium hydroxide) ethanol formaldehyde glutaraldehyde isopropanol methanol toluene xylene 12 Table 2 lists OSHA permissible exposure limits for some of these common chemicals as well as additional substances. Students will not exceed the PEL for any substance while in their laboratory sessions. Because the list is not comprehensive, the student must take the time to read procedures carefully before performing any laboratory test. Table 2: OSHA Permissible Exposure Limits (PEL) Chemical PEL Acetic Acid Acetone Ammonium hydroxide Chloroform Ethanol Diethyl ether Formaldehyde Hydrochloric acid Iodine Isopropanol Methanol Nitric acid Phenol Toluene Xylene 10 ppm TWA 1000 ppm TWA 25 ppm ammonia gas SEL 50 ppm CL 1000 ppm TWA 400 ppm TWA 0.75 ppm TWA 5 ppm CL hydrogen chloride gas 0.1 ppm CL 400 ppm TWA 200 ppm TWA 2 ppm TWA 5 ppm TWA 50 ppm TWA 100 ppm TWA CL: Ceiling limit (maximal permissible exposure during any part of a shift) SEL: Short-term exposure limit (highest permissible exposure for any 15 minute period) TWA: Time-weighted average (average exposure over an 8 hour period) D. Product Warning Labels 1. NFPA System Labels warning of a hazard should be affixed to a chemical or product. The National Fire Protection Association (NFPA) has developed the Hazard Identification System (HIS) used by many laboratories. The basic HIS symbol consists of four small diamonds, grouped into a larger diamond. The individual squares are color-coded to indicate a specific hazard. The severity of the hazard presented is denoted by use of a numerical rating ranging from 0 to 4. This number is superimposed on the colored areas of each square. Figure 2 illustrates the HIS symbol and explains the hazard symbol descriptions. 13 Figure 2: National Fire Protection Rating System (NFPR) The NFPA hazard sign is most often displayed on commercial product labels. However, when a chemical is transferred from its original container, the new container must be labeled to indicate the chemical identity of the contents and provide appropriate hazard 14 warnings. This labeling is not required if the contents of the secondary container are completely used, during the same shift or laboratory session, by the same individual who originally transferred the chemical. Also note that when reagents are prepared in addition to the NFPA label, the reagent must be properly identified with the following information: • • • • • • Name of reagent Reagent concentration Initials of person who prepared the reagent Date of preparation Expiration date Special storage requirements. 2. HMIS System The National Paint and Coatings Association has developed the Hazardous Materials Information System (HMIS) that also uses a color-coded, numerical rating system to indicate the potential degree of hazard associated with a chemical material. Like the NFPA method, the HMIS classification uses colors to designate categories of hazards. Figure 3 illustrates the HMIS classification system and a description of its components. The HMIS method specifies the PPE that should be used when handling a chemical with a letter-coding system and representative pictographs Figure 3: HAZARDOUS MATERIALS INFORMATION SYSTEM (HMIS) 15 E. Material Safety Data Sheets (MSDS) OSHA requires manufacturers of hazardous chemicals to develop and distribute MSDS. The MSDS provides information so that the chemical may be handled properly. MSDS must be on file and available for review for all hazardous chemicals. The MSDS should include the following information: 1. Identification of the hazard (proper chemical name plus trade and common names) 2. Composition and ingredients information 3. Hazards identification 4. First-aid procedures 5. Fire fighting procedures 6. Accidental release measures 7. Exposure control (personal protective equipment) 8. Handling and storage 9. Physical and chemical properties 10. Stability and reactivity information 11. Toxicological information 12. Ecological information 13. Disposal guidelines 14. Transport information 16 15. Regulatory information and considerations 16. Other information (such as name, address, and telephone number of the manufacturer) Household chemicals that can be purchased by the consumer for personal use in the same concentration as what is used in the clinical laboratory (substances like bleach or sink cleaners) do not have to be listed in the chemical inventory, nor do they require an MSDS. Table 3 provides an example of an MSDS. Table 3: Sample Material Data Safety Sheet (MSDS) MATERIAL SAFETY DATA SHEET ACME Chemical Company 1000 Main Street Omaha, Nebraska 91876 HAZARDOUS INGREDIENTS Formaldehyde* Methanol 10% neutral buffered formalin Date issued: 5-16-94 Replaces: 7-22-92 Telephone: (199) 123-4567 PEL 8 hr TWA 0.75 ppm 200 ppm 250 STEL Agency 2 ppm OSHA, ACGIH OSHA, ACGIH *Listed as probable carcinogen by NTP and IARC PHYSICAL AND CHEMICAL DATA Appearance and Clear, colorless liquid, pungent odor odor Boiling point 95.6o-99.4oC (204o-211oF) Evaporation rate 0.43 (butyl acetate = l) Percent volatile by 98% volume Solubility in water Complete Specific gravity 1.109 @ 21oC (water = 1) Vapor density 1.1 (air = 1) Vapor pressure 19 mm H FIRE AND EXPLOSION HAZARD DATA Flammability class 111A None observed below 82oC (180oF) Closed cup method 85oC (185oF) Autoignition 430oC (806oF) Flammable limits in air: % by volume LOWER 7 UPPER 73 Reactions: Reaction of formaldehyde with nitrogen dioxide, nitromethane, perchloric acid, and aniline or peroxyformic acid yields explosive compounds. Extinguishing media: Alcohol foam, dry chemicals, carbon dioxide, water in flooding amounts as fog. Solid streams may not be effective. Cool fire-exposed containers with water from side until well after fire is out. Use of waterspray to flush spills should also dilute the spill to produce nonflammable mixtures. Water runoff, however, should be contained for treatment. Special firefighting procedures: Withdraw immediately in case of rising sound from venting safety device or any discoloration of storage tank due to fire. REACTIVITY DATA 17 Stability: No known hazardous instability. May self-polymerize to form paraformaldehyde, which precipitates, and trioxane. Incompatibility: Reaction with phenol, strong acids, or alkalis may be violent. Formaldehyde and hydrochloric acid may form the potent carcinogenic bischloromethylether. Formaldehyde reacts with nitrogen dioxide, nitromethane, and perchloric acid to yield explosive compounds. A violent reaction occurs when formaldehyde is mixed with strong oxidizers. Hazardous decomposition: Occurs slowly at elevated temp., releasing formaldehyde gas HEALTH HAZARD DATA Skin effects: Avoid contact. Solution is a severe skin irritant and a sensitizer. Contact with formaldehyde causes white discoloration, smarting, drying, cracking, and scaling. Previously exposed persons may react to future exposures with an allergic eczematous dermatitis or hives. Eye effects: Solution sprayed in eye can cause injuries ranging from transient discomfort to severe, permanent corneal clouding and loss of vision. The severity of the effect depends on the concentration of the formaldehyde in the solution and whether or not the eyes were flushed with water immediately after the accident. Blindness may occur if the solution is swallowed. Vapors may cause discomfort and tearing of the eyes. SYSTEMIC EFFECTS Ingestion: Liquids containing formaldehyde may cause severe irritation to mucosal surfaces of the mouth, throat, and gastrointestinal tract, which may result in nausea and vomiting. Severe stomach pain may follow ingestion, with possible loss of consciousness and death. Inhalation: Formaldehyde is highly irritating to the upper respiratory tract and eyes. Concentrations of 0.52.0 ppm may irritate the eyes, nose, and throat of some individuals. Concentrations of 3-5 ppm also cause tearing of the eyes and are intolerable in some people. EMERGENCY AND FIRST AID PROCEDURES Skin contact: Remove contaminated clothing immediately. Wash affected area with soap or mild detergent and large amounts of water until no evidence of the chemical remains-- at least 15-20 minutes. If there are burns, get first aid to cover the area with sterile, dry dressings and bandages. Eye contact: Immediately flush eye with plenty of water for at least 15 minutes, occasionally lifting upper and lower eyelid. Call a physician. If there is appreciable irritation, see an ophthalmologist. Inhalation: If affected by vapors, move patient to fresh air immediately. Where formaldehyde concentration may be very high, rescuers must wear self-contained breathing apparatus before attempting to remove victim. If not breathing, give artificial respiration. Qualified medical personnel should administer oxygen, if available. Ingestion: If victim is unconscious: dilute, inactivate, or absorb the ingested formaldehyde by giving milk, activated charcoal, or water. Keep affected person warm. Get medical attention immediately. F. Handling of Chemicals 1. Know how to identify hazardous chemicals and know what special warning labels mean. 2. Use the MSDS to learn specific hazards of a chemical as well as any special handling requirements and emergency and first aid requirements. 3. Ensure ventilation is adequate for the chemical being handled. a. Wear approved respirators when the air may be contaminated with harmful fumes, mists, gases, or vapors. b. Use a fume hood for any procedure which might result in the release of toxic chemical vapors. Generally, a hood or local ventilation device 18 should be used when working with any perceived volatile substance. Leave the hood on when not in active use if toxic substances are also stored within the hood. Work toward the center of the hood and avoid using the first six inches behind the opening. Also, while working in the hood, notify the instructor immediately if fumes are smelled. c. 4. The student should be able to explain the difference between a fume hood and a biosafety cabinet. Because of the delicate nature of the filters in a biosafety cabinet, caustic and volatile chemicals should never be used there. Conversely, the strong exhaust pressure and lack of filters make a fume hood an inappropriate area to handle cultures, body fluids and other biohazardous materials. Wear personal protective equipment and clothing appropriate for the tasks being performed. a. Eye protection: Safety glasses with side shields, chemical goggles or face shields must be worn when pouring chemicals and cleaning up spills (or whenever there is a possibility of splashing). Do not wear contact lenses when handling chemicals that could splash or emit dangerous vapors. (Vapors can seep under lenses and get trapped.) b. Gloves: Nitrile gloves (not latex) must be worn when the potential for contact with toxic or infectious materials exists. Inspect the gloves before each use and replace them frequently to avoid contaminating other objects or yourself. Wash hands and other exposed skin after removing gloves. Do not wash and reuse gloves. c. Lab coats, gowns, aprons: Protective clothing must be worn properly to keep clothes and skin free of chemicals. Carefully remove any clothing that has been contaminated (or is suspected of being contaminated) with toxic chemicals, dusts, fumes, or liquids. d. Flush the outside of acid bottles with water before opening them. e. Pour acid into water. f. Keep acid and other bottles containing corrosive chemicals tightly stoppered. Flush with water and dry them before storing or replacing on a shelf. g. Do not lay stoppers down on any surface where persons may contact them and/or the residual reagent on the bench. h. Carry beakers, reagents, and flasks with fingers around the body of the container. Do not grasp or carry containers by holding the edge of the lip. i. Do not stopper bottles of alkaline solutions, or solutions containing significant quantities of soluble salts, with glass stoppers. There is a high probability that the stopper will stick in the neck of the bottle. This tightness results because of etching of the glass at the stopper or by evaporation of the solution. Clean, washed rubber stoppers or teflonlined screw caps should be used. 19 G. j. When heating liquids on a hot plate, use beaker covers, if available, to prevent spattering. k. Always wipe bench tops clean. Drops of acid or other corrosive chemicals may cause severe burns. l. Always use a suction filler or bulb when pipetting chemicals. Storage of Chemicals The storage of hazardous chemicals is partly controlled by standards set by governmental agencies as well as other factors, such as the environmental controls of the building. Efforts have been made to maintain the storage of hazardous chemicals used in the Teaching Laboratory in the most acceptable manner. The following are general guidelines for the storage of chemical hazards regardless of the setting. 1. Every chemical should have a specific storage place and should be returned to the location after use. 2. Approved storage containers should be used. 3. Breakage protection for large glass bottles should be available. It is recommended that rubber bottle carriers be used for containers of concentrated reagents containing more than 500 ml. 4. Large containers should be stored near the floor to minimize the danger of falling. 5. Shelves should have lips or raised edges to reduce the possibility of a container falling off and to minimize leaks or spills should they occur. Storage on bench tops and in hoods is not recommended. 6. The amounts of chemicals stored should be as small as practical. 7. Chemicals that are no longer used, that show signs of deterioration, or whose container is old, leaking, or corroded should be replaced. 8. Water-reactive chemicals must not be stored where contact with water might occur; likewise, exposure to heat or direct sunlight is not recommended. 9. Chemicals that are potentially incompatible and that might react with one another to produce an explosive, toxic, or flammable product should be separated. For example, acids are housed in an acid cabinet and flammable chemicals are housed in a flame cabinet. 10. Toxic chemicals should be isolated from other substances and stored in an identified area that is cool, well-ventilated, and away from moisture, light, heat, acids, and oxidizing agents. 11. Cylinders of compressed gases should be secured to a wall or counter and stored in well-ventilated, dry areas and away from corrosive chemicals, vapors, or sources of ignition. 20 12. H. The storage of flammable liquids requires special procedures: a. Store containers of one gallon or less in a solvent storage cabinet. b. Bottles used at the bench should not exceed one pint (500 ml). c. Ethyl ether should be stored either in a storage room or in an explosionproof refrigerator. d. Flammable organic extracts should be placed in an explosion-proof refrigerator or freezer. e. All aisles and exits near flammable storage cabinets should be open and not blocked. f. Ensure that accidental exposure to strong oxidizing agents is not possible. g. Store flammables away from any possible source of ignition. Spills and Exposures All spills should be cleaned up using appropriate biosafety procedures, described below. If there is any question what to do, call the Biosafety Officer: 1-6590 or the University’s internal emergency number: 5-2677. 1. Cleaning a. Spills greater than 100 ml 1. 2. 3. 4. 5. 6. 7. 8. 9. b. Notify the laboratory instructor. Consult the appropriate MSDS or product label for information regarding spills and leaks, cleanup techniques, and personal protective equipment to be worn during a cleanup. Avoid breathing vapors. Remove all sources of ignition. Evacuate the area immediately. Warn others of the hazard. Notify emergency personnel, if necessary. Arrange for the safe cleanup of the chemical using a commercially available spill kit or by notifying the institutional spill control team by calling University Police Dispatch at 801-585-2677 (801585-COPS). If biohazard spill, spray spill with freshly made freshly made 1:10 dilution household bleach solution and let stand 20 minutes. Wipe up spill and dispose in biohazard bag. Wipe spill area with 1:10 bleach. Wash hands. Spills less than 100 ml 1. 2. Report the incident to the laboratory instructor. Wear nitrile gloves and other appropriate protective clothing. 21 3. 4. 2. 3. Absorb the spill with paper towels. If biohazard spill, spray spill with freshly made 1:10 bleach solution and let stand 20 minutes. Wipe up spill and dispose in biohazard bag. Wipe spill area with 1:10 bleach. Wash hands. Call the Environmental Health and Safety Office for the proper disposal of wastes generated from spills (1-6590). Contact Exposure a. Notify the laboratory instructor. b. Flush copiously with water and wash with soap and water. c. Remove any contaminated clothing. d. If the eye is involved, flush with water for at least two (2) minutes by using a sink eyewash and immediately seek medical attention. NOTE: Eyewash stations are located at sinks in the Teaching Laboratory and their location should be noted by each student. e. If severe burns are involved, apply cold wet cloths, gauze, or paper towels, and immediately seek medical attention. f. If there is a liquid nitrogen contact, treat it as frostbite; apply cold water and seek medical attention. Post-Exposure Procedures A. Immediately notify the faculty member or supervisor. B. Perform appropriate first-aid procedures to include washing the skin or wound with soap and water or flood the affected mucous membranes with water. C. If the exposure involves potential blood-borne pathogen contact to nonintact skin or mucous membranes (such as a needle stick or splashing in the eyes), or a chemical exposure or other serious injury: In the student teaching laboratory - the student should go immediately the University of Utah Hospital Emergency Room. In a clinical rotation – the student is considered a “student intern” and is covered by Workers Compensation for medical expenses only. • A 122 for Workers Compensation form must be completed. • The student should go to the Occupational Medicine Clinic Occupational Medicine Clinic 1525 West 2100 South Salt Lake City, UT 84119 Phone: (801) 213-9777 Hours: M-F 8:00AM – 5:00pm 22 If the Occupational Medicine Clinic is not convenient, the student can go where they choose and let the facility know that it is a worker’s compensation injury. The student should NOT go to the ARUP employee clinic (Information obtained from Tammy Herrmann, Absence Management,UofU 801-‐‑581-‐‑6206. August 1, 2014) The student will assume responsibility for all costs. REMINDER: On admission to the Medical Laboratory Science program, all students are required to provide proof of health insurance or sign a waiver releasing the MLS Program from financial responsibility. Redwood Health Center Occupational Medicine Clinic 1525 West 2100 South Salt Lake City, UT 84119 Phone: (801) 213-9777 Hours: M-F 8:00AM – 5:00PM After Hours Redwood Urgent Care 1525 West 2100 South Salt Lake City, UT 84119 M-F 5:00PM – 8:00PM Sat.-Sun.: 9:00AM – 8:00PM (801) 213-9700 Emergency Department at University Hospital (main floor northeast side of the hospital) 50 N. Medical Drive Salt Lake city, UT 84132 (801) 581-2292 23 Figure 4: Chemical Spill Protocol CHEMICAL SPILL ↓ Notify instructor ↓ Alert other students ↓ Assist any contaminated students ↓ Flammable Spill? ↓ Turn off heat source ↓ ↓ Identify Chemical and Volume ↓ ↓ ↓ ↓ >100 ml < 100 ml ↓ ↓ Avoid breathing vapors Perform safe clean-up ↓ ↓ Evacuate area Properly dispose of contaminated materials ↓ Notify emergency personnel, if necessary ↓ Arrange for safe clean-up I. Disposal The exact procedures in which chemical wastes are discarded varies from substance to substance. The following are guidelines to be used: 24 a. Spent solvent wastes This type of waste must be deposited in a separate container labeled as “solvent waste” and discarded according to University policy. b. Concentrated acids or bases These chemicals are not to be poured down the sewer. If properly diluted with copious amounts of running water, they may be discarded down a chemical sink. c. Formalin, methanol, and ethanol These chemicals may be discharged into the sewer system. d. Malodorous, lachrymatory (chemical that causes tears, pain and blindness), highly toxic substances, and flammable chemicals Such substances must never be discarded into the sewer system. Consult the instructor and the MSDS for the proper disposal methods. NOTE: The University of Utah has a detailed system for hazardous waste management which can be found on the website for the University’s Department of Environmental Health and Safety at http://www.ehs.utah.edu/. All chemicals used in the MLS Teaching Laboratory are listed with the Department of Environmental Health and Safety’s Laboratory Management System. That list is available on request. Section III -- Fire Safety A. Introduction Many potential fire hazards exist in the Teaching Laboratory. However, knowing basic concepts associated with flammable substances, guidelines for fire prevention, and specific procedures for fire protection can ensure that the Teaching Laboratory is a safe place to work and learn. B. Sources of Fire Three factors must exist simultaneously for a fire to occur: fuel, oxygen, and an ignition source. The most practical methods for fire control involve restricting contact between flammable substances and an ignition source. 1. Flammable Substances Flammable materials readily catch fire and liquids may emit vapors that can burn or explode. a. Liquids 1. Common liquids in the clinical laboratory are solvents which 25 release vapors that burn. 2. Liquids with low flash points (the flash point is the lowest temperature at which a liquid emits vapors in such quantities that, when combined with air near the surface of the liquid, forms an ignitable mixture), high vapor pressures, and a wide flammability range have the greatest potential for catching on fire; ethyl ether and carbon disulfide are two chemicals that fit these criteria; other common flammable liquids used in the clinical laboratory and their flash points are listed below: Chemical Acetic acid Acetic anhydride Acetone Benzene N-butyl alcohol Carbon disulfide Cyclohexane Dioxane Ethyl alcohol Ethyl ether Isopropyl alcohol Methanol Methyl ethyl ketone Petroleum ethers Toluene Xylene 3. b. c. Flash Point (°F) 109 129 0 12 84 -22 -4 54 54 -49 53 52 20 -70 40 81 Consider the following when storing flammable liquids: a. Quantities greater than one liter should be stored in metal containers, preferably safety cans. b. Small quantities in use at the bench should be stored in well-ventilated areas. c. Store away from areas exposed to direct sunlight. Gases 1. Compressed and liquefied gases are dangerous. 2. Be aware that during a fire, heat will raise enough pressure to rupture the cylinder. Solids 1. Most combustible solids are fire safe unless ground into powder form. 26 2. a. Magnesium and zinc dust may explode on contact with air. b. Use exhaust hoods with these chemicals. 2. Metal solids like sodium react on contact with air and their moisture causes rapid oxidation that can result in ignition; handle with extreme caution. 3. Peroxide-forming compounds (including ethyl ether, isopropyl ether, dioxene, tetrahydrofuran) are very sensitive to heat, friction, impact, light, oxidizing agents and reducing compounds. Peroxides should be handled as follows: a. Use minimal quantities. b. Use ceramic or wooden spatulas (instead of metal) to avoid metal contamination and possible explosive decomposition. c. Clean up spills with vermiculite. d. When disposing, dilute with water and then with a liquidreducing agent such as ferrous sulfate or sodium bisulfate. Ignition Sources a. b. c. Common ignition sources are open flames, electrical equipment, hot surfaces, spontaneous heating, sparks, static charges, friction, and overheating of flammable liquids. Flammable substances and ignition sources should not come into contact. Ignition sources that demand special awareness are as follows: 1. Refrigerators Vapors released by low flash point flammable liquids have been ignited when non-explosion-proof refrigerators have been used for their storage (the light bulb or switch provided the ignition source). 2. 3. Static Electricity a. It is recommended that 100% cotton be used in laboratory coats. b. Lab coats made of synthetic fabrics may accumulate static electricity that will discharge with a spark near metallic objects. Electrical Equipment 27 C. a. Motor-driven electrical equipment should have a nonsparking induction motor instead of a series-wound motor with carbon brushes. b. Nonsparking motors in vacuum pumps, mechanical shakers, stirring motors, magnetic stirrers and rotary evaporators ensure that flammable liquids will not ignite. Fire Prevention Any fire may be prevented by implementing safe laboratory practices as follows: D. 1. Do not use refrigerators for storage of flammables unless properly modified and labeled. 2. Avoid storing flammables in direct sunlight. 3. Ventilate areas where flammables are to be used. 4. Avoid filling low boiling point liquids to the top of a closed container. 5. Store flammable acids and bases separately. 6. Use proper disposal methods for flammables. 7. Do not use gasoline, alcohol, or other highly flammable volatile liquids for cleaning. 8. Empty containers should be rinsed three times with distilled water and disposed of with caps or stoppers removed. 9. Do not use a hot plate, gas, or flame to heat flammable solvents. 10. Any spilled liquid should be cleaned up immediately; sand or commercial absorbent will prevent spread and reduce the fire hazard. 11. Safety shielding should be worn during procedures with explosion risk. 12. Keep work areas obstruction-free. 13. Transfer flammable solvents by pouring through a stainless steel funnel to which ground leads have been attached. Fire Safety Equipment 1. Fire extinguishers a. Types Several types of fire extinguishers are available depending on the nature of the fire. The multipurpose (or ABC) extinguisher is often used in 28 healthcare institutions because it reduces the confusion associated with operating and maintaining various types of extinguishers. Each student has the responsibility to know the location of all fire extinguishers in the laboratory. Table 4: Types of fires and appropriate extinguishers. Type of Fire Type of Extinguisher Wood, paper, cloth, trash, plastics Water, CO2, dry chemical Flammable liquid, gases, grease Dry chemical, CO2, foam Electrical CO2 or vaporizing liquid nonconductor Combustible metals (magnesium, Dry chemical sodium, potassium) Class of Fire A B C D b. E. Operation (the PASS procedure) 1. Pull pin. 2. Aim nozzle on horn at the base of the fire. 3. Squeeze the lever or handle. 4. Sweep the base of the fire. Fire Protocol 1. Evaluate the Fire a. Is it manageable, not spreading and not too smoky? b. Is it small enough to manage with appropriate means or a fire extinguisher (trash can size or smaller)? NOTE: Only consider fighting a small, manageable fire like a wastebasket fire, non-spreading liquid fire, or an electrical fire where the plug can be safely pulled. 2. 3. Sound the Alarm a. Pull the nearest alarm box. Each student is responsible for knowing the location of fire alarms available to the laboratory. b. If access to the alarm is blocked, call 911 and report the fire, but the alarm box should always be activated first if possible. c. Remove anyone from immediate danger. d. Close all doors and windows in the area. Alert Others 29 4. F. a. Alert others in the area. b. Do not shout, “Fire”, or incite panic. Evacuate a. Immediately evacuate the laboratory and the building. The evacuation routes are posted in the Teaching Laboratory. The evacuation routes can also be found inside the front cover of this manual. b. Walk -- DO NOT RUN -- to the nearest exit. c. Do not use the elevators. d. Assemble together outside and wait for directions from the instructor; assist in identifying missing persons, if necessary. Summary of Fire Safety 1. 2. Precautions a. Know where the fire evacuation plan is located. b. Know where fire extinguishers and fire alarms are located. c. Maintain marked, unobstructed exits. d. Store flammables in explosion-proof cabinets and in safety cans. e. Keep sources of ignition away from flammables. f. Only use equipment approved by Underwriter’s Laboratories (UL). g. Avoid using extension cords. h. Prohibit smoking in the laboratory. i. Dispose of flammables properly. Do’s and Don’ts a. Pull the alarm nearest the area of the fire. b. Report the fire. c. If the fire is small, attempt extinguishing it by using the proper extinguisher. d. If evacuation becomes necessary, use only stairwells for exiting. e. Close all windows and doors before leaving an area. 30 3. f. STOP, DROP and ROLL: If clothing catches fire, drop to the floor and roll. g. If trapped in a fire, crawl to the exit; smoke rises, so breathing is easier at floor level; also, breathing through a wet towel helps. h. Do not block exits and do not re-enter a building. i. Do not panic. j. Do not run. The acronym “RACE” is another useful method in remembering the proper response to a fire: R = rescue - Rescue anyone in immediate danger; alert others to assist. A = Alarm - If the fire alarms have not sounded, pull the nearest fire pulls. C = Contain - Make sure all doors are closed. Turn off all fans, hoods or other air-moving systems. Place saturated blankets or towels under doors to contain smoke. Turn off all oxygen sources. E = Extinguish (or evacuate) - Extinguish the fire if your safety can be assured by smothering it with a fire blanket or with a fire extinguisher. Evacuate to the nearest “safe zone.” Section IV -- Electrical Safety Electrical equipment may be a source of fire, burns, or electrical shocks. Care must be taken to minimize electrical hazards in the laboratory, especially since so much electrical equipment is used. A. B. Causes of Electrical Hazards 1. Spilled liquids in contact with instrument circuit boards. 2. Broken or damaged instrument components. 3. Faulty cords or wires (especially ground wires). 4. Improper repairs to electrical equipment. Precautions 1. All electrical equipment should be periodically inspected for current leakage, faulty cords, or damaged components. 2. Restrict the use of extension cords to only temporary or emergency use. Note that longer cords leak more current. Heavier gauge cords leak less. 3. All electrical equipment should be grounded and have three-pronged Underwriter Laboratory (UL) or Canadian Standards Association (CSA) approved plugs. 31 C. 4. Immediately repair faulty cords or broken connectors. 5. Never overload electrical outlets or circuits. 6. Unplug electrical equipment before servicing (even if the service is as minor as replacing the light bulb in a microscope). 7. Use electrical equipment according to the manufacturer’s directions. 8. Use a surge protector on sensitive electronic equipment (and computers) to allow for unexpected spikes in electrical power. 9. Signs and labels should be used to warn of the presence of high voltage equipment or other electrical hazards. 10. Report all shocks to the instructor, including minor tingles. a. Small tingles may indicate a potentially more major problem. b. Shut off the current or unplug the instrument. c. Do not use an instrument that is causing shocks. Electrical Emergency 1. Immediately call 9-911 if someone is experiencing electrical shock. 2. Call plant operations dispatch at 801-581-7221 (or call 585-COPS) to report an electrical emergency and get the power turned off. 3. Use a Class C fire extinguisher to control an electrical fire. 4. Do not attempt to turn off or unplug malfunctioning instruments or equipment because of the considerable danger of further injury. 5. Do not touch an individual who is receiving live current as the current can pass through the individual. 6. If the person is still in contact with the electrical source, only attempt to rescue the shocked individual by using a non-conductive material such as a wooden chair to move the individual away from the electrical source. Even this should be done extremely carefully, making sure the rescuer is not wet or standing in water, and is not wearing any conductive material such as necklaces, etc. 7. If the electrical source is a high voltage source, no one should approach closer than 20 feet. In all reality, the safest course is to get the experts on the scene as quickly as possible and let them handle it. 32 Section V -- Mechanical Safety A. Introduction Research and clinical laboratories utilize a variety of equipment and instruments. Mechanical hazards may result from improper use, storage, or disposal of glassware, sharps, or equipment. Some general guidelines follow: B. Equipment/Instruments 1. 2. C. Cover or pull long hair, including beards, to avoid them being caught in moving parts of equipment or instruments. Never stop a centrifuge with the hands, but wait until it stops on its own. 3. Do not operate new or unfamiliar equipment or instruments without proper training and authorization. 4. Follow preventive maintenance schedules established by the instructor for equipment and instruments. Glassware and Sharps 1. Handle glassware carefully to avoid breakage that could cause injury or infection. 2. Do not expose hot glassware to cold water. (Allow hot glassware to cool before washing or placing in a sink.) 3. Dispose of contaminated glass and sharp objects (microcapillary pipettes, Pasteur pipettes, needles) in puncture-resistance containers. 4. Store sharp objects carefully to avoid skin puncture or cuts. 5. Wear safety goggles when using glassware on a burner. Section VI -- General Laboratory Safety A. Introduction We all have the responsibility to maintain a constant concern for safety in the laboratory. Good personal habits, housekeeping practices, and laboratory technique can all help ensure that the laboratory is a safe place to learn and work. B. Laboratory Dress Code Policy Medical Laboratory Science students, staff, and faculty are required to dress according to the standards established in the policy when in the Health Science Education Building (HSEB) Teaching Laboratory. This dress code policy addresses issues affecting both safety and professional attire. 33 • Laboratory coats must be worn when in the laboratory and must be fully buttoned. They must be clean and in good repair. Laboratory coats must not be worn outside of the laboratory. • Revealing or excessively tight clothing is not allowed. Visible cleavage, hips, stomachs, or lower backs are not allowed. Spaghetti strap shirts, belly shirts, tank tops, tube tops, bare midriffs, and deep U or V necks are not allowed. Undergarments, including bra straps and underwear, should not be visible. • Legs must be covered to avoid skin contamination or injury from pathogens, chemicals, or reagents. Shorts and capri pants are not allowed. Skirts and dresses must be long enough to cover the entire leg. Leggings and hosiery (nylons) are not recommended because chemicals or specimens, if spilled, can ‘wick” and be held against the skin for prolonged periods of time causing extensive exposure and/or injury. • Scrubs are acceptable, but a laboratory coat must still be worn when in the laboratory. • Shoes should be comfortable, water-repellant, and must enclose the entire foot. No open-toed, open-heeled, perforated, mesh, or canvas shoes are allowed to avoid injury to the feet from items dropped or spilled. Nonskid, flat-soled shoes should be worn to prevent possible serious injuries from falls. • Baseball hats and any hat with a brim are not allowed. Other headgear including beanies, scarves, headbands, etc., may be worn as long as they do not pose a danger of being caught in equipment, contaminating or being contaminated with specimens/reagents, and are not distractions. • Hair must be clean and groomed. Beards must be trimmed. Long hair and beards must be tied back in such a way as to avoid contamination and interference with laboratory equipment and specimens. • Sunglasses and other darkly tinted eyewear are not allowed. Students may keep laboratory-appropriate clothing or shoes in their assigned laboratory lockers to change into as necessary. Students are encouraged to have spare, clean laboratory-appropriate clothing in their lockers in the event of a spill or an emergency. C. Good Personal Habit Reminders 1. Wear proper attire and protective clothing. Laboratory coats, jackets, or aprons must be worn when performing lab tests. Keep lab coats buttoned while in the laboratory. Do not wear exposed or “dirty” protective clothing outside the laboratory. 2. Never eat, smoke, drink, chew gum, apply cosmetics, or adjust contact lenses while in the laboratory. 34 D. E. 3. Tie back long hair and trim beards to avoid possible entanglement in equipment or instruments. In addition to personal injury, contamination of specimens, work areas, or reagents may occur from shedding of long hair and beards. 4. Never pipette by mouth, rather, use pipetting bulbs. 5. Develop the habit of keeping hands away from the mouth, nose, and eyes to prevent self-inoculation with infectious agents. 6. Do not put objects in mouth (like pens, pencils, or pipettes). 7. Wear gloves when working with biologic specimens or hazardous chemicals. Change gloves when contaminated. 8. Wear goggles and masks or face shields when splashing or spattering of chemicals or specimens may occur. Carefully dispose of contaminated glassware and other objects to avoid “back-splatter”. 9. Never store food or beverages in refrigerators containing chemicals, microorganisms, or clinical specimens. 10. Develop the habit of frequent hand washing, especially after removing gloves and other protective wear, before leaving the laboratory, before eating or drinking, after using the lavatory, and when hands are visibly contaminated with blood, body fluids, or tissues. Good Housekeeping Practices 1. Keep work areas free of chemicals, dirty glassware, and contaminated articles such as paper towels or lint-free tissues. 2. Decontaminate equipment and counters before leaving the work area with freshly made 1:10 dilution household bleach solution. 3. Clean up spills immediately and properly. 4. Store chemicals properly. 5. Do not submit worksheets that have become contaminated; transfer results and data to new worksheets before submission. NOTE: this is not an acceptable practice in the immunohematology laboratory. All recorded results must be indelible Good Laboratory Technique 1. Label reagents and solutions. 2. Read all labels and instructions carefully. 3. Learn the properties and hazards of chemicals for their safe handling and disposal. 35 4. Be careful when transferring chemicals from container to container and always add acid to water slowly. 5. Do not operate new or unfamiliar equipment until proper training and authorization have been given. 6. In preparing specimens, prevent aerosols and the resultant possible spread of infectious agents by: a. Never opening the lids of centrifuges until the centrifuge has come to a complete stop. b. Only opening specimen tubes by gently twisting the stoppers and lifting them out (sometimes, holding a lint-free tissue over the stopper also prevents aerosolization). c. Capping all tubes to be centrifuged prior to centrifugation (except blood bank tubes). 7. Use the personal protective equipment that is provided. 8. Know where the Material Safety Data Sheets are located. 8. Learn emergency procedures and become familiar with the location of fire exits, fire extinguishers, eyewash stations, fire alarms, and showers. Section VII -- Accidental Exposure Students should be completely familiar with the safety precautions and other material detailed in this manual. The clinical laboratory can be a safe place to learn and work when appropriate procedures and proper equipment are utilized. However, in the event of accident, injury, or exposure to a biohazard or chemical hazard, the following protocol should be implemented: A. Immediately notify the faculty member or supervisor. B. Perform appropriate first-aid procedures to include washing the skin or wound with soap and water or flood the affected mucous membranes with water. C. If the exposure involves potential blood-borne pathogen contact to non-intact skin or mucous membranes (such as a needle stick or splashing in the eyes), or a chemical exposure or other serious injury: In the student teaching laboratory - the student should go immediately the University of Utah Hospital Emergency Room. In a clinical rotation – the student is considered a “student intern” and is covered by Workers Compensation for medical expenses only. 36 • • A 122 for Workers Compensation form must be completed. The student should go to the Occupational Medicine Clinic Occupational Medicine Clinic 1525 West 2100 South Salt Lake City, UT 84119 Phone: (801) 213-9777 Hours: M-F 8:00AM – 5:00pm If the Occupational Medicine Clinic is not convenient, the student can go where they choose and let the facility know that it is a worker’s compensation injury. The student should NOT go to the ARUP employee clinic. (Information obtained from Tammy Herrmann, Absence Management,UofU 801-‐‑581-‐‑6206. August 1, 2014) The student will assume responsibility for all costs. REMINDER: On admission to the Medical Laboratory Science program, all students are required to provide proof of health insurance or sign a waiver releasing the MLS Program from financial responsibility. D. Assist the Teaching Laboratory coordinator or faculty in completing two incident reports for ALL injuries: 1. Detailed description of incident on the MLS Program Incident Report Form. 2. Environmental Health and Safety (EHS) Incident/Accident Report Form. 3. NOTE: Environmental Health and Safety Risk Management may be contacted at 801-581-5590 to obtain a copy of the report. The laboratory staff may not release the report to the student. G. The student is responsible for any follow-up care based on the advice of the attending physician. If follow-up care impacts the student’s future performance in the laboratory, written instruction must be obtained from the attending physician and given to each of the impacted faculty members. H. What to expect if exposed to blood or body fluids via puncture (needle stick) or mucous membrane exposure: 1. The student will be counseled by health care professionals about HIV risk and the possibility of prophylactic treatment. 2. A baseline blood sample will be drawn as soon as possible for HIV and Hepatitis C as well as to confirm Hepatitis B immune status and to determine the need for additional Hepatitis B vaccination. 3. A blood sample will be drawn for HIV testing at one week, 6 weeks, 3 months 37 and 6 months post-exposure. 4. A blood sample will be drawn for Hepatitis C testing at 6 months post-exposure Section VIII – Disaster Preparedness An integral component of safety in the laboratory is disaster preparedness. The University of Utah is committed to providing guidance to all employees and students in this regard and has produced an outstanding disaster preparedness website that all employees and students are required to review (http://www.emergencymanagement.utah.edu/node/25). Be sure to click on “Videos: A Tale of Disaster and Preparedness” on this page for further information about being prepared for any emergency. 1. Preparation a. As part of our preparation, the MLS Program will institute a “buddy system” so that each person will be accounted for in case of any disaster. b. The three central themes for individual disaster preparedness are as follows: 1. Have an emergency kit. It is recommended that all staff and students in the Teaching Laboratory have an emergency kit. At minimum, kits should contain: • • • • • • • • • • • Drinking water (one gallon per day per person) Food Flashlight with fresh batteries Important documents including phone numbers and descriptions of medical conditions Medicine Complete change of clothing, including shoes Whistle or tapping device (so that potential rescuers can hear you) Blanket Personal hygiene goods Plastic bags NOAA all-hazards radio with fresh batteries 2. Make a plan. Know your facility’s evacuation plan (evacuation plan for the Teaching Laboratory can be found in the inside cover of this manual) and potential exit sites. The emergency point of assembly for the Health Sciences Building is parking lot #69, which is at the bottom of South Campus Drive across the street from the Guest House. 3. Stay informed. If you have not done so, go to CIS and sign up for Campus Alerts. Also sign up for text alerts. Text messages have proven to be the best mode of electronic communication during a disaster. Be aware of the potential threats in your environment and make sure you are prepared for them. Review the University’s disaster preparedness website to learn about disaster potential in Utah. 38 Earthquakes In Utah, earthquakes are not a matter of “if,” but “when,” and preparedness is critical. In the event of an earthquake: a. If Indoors: DROP to the ground and take COVER by getting under a sturdy table or other piece of furniture; and HOLD ON until the shaking stops. If there is not a table or desk near you, cover your face and head with your arms and crouch in an inside corner of the building. Stay away from glass, windows, outside doors and walls, and anything that could fall, such as lighting fixtures or furniture. Stay in bed if you are there when the earthquake strikes. Hold on and protect your head with a pillow, unless you are under a heavy light fixture that could fall. In that case, move to the nearest safe place. Do not use a doorway except if you know it is a strongly supported, loadbearing doorway and it is close to you. Many inside doorways are lightly constructed and do not offer protection. Stay inside until the shaking stops and it is safe to go outside. Do not exit a building during the shaking. Research has shown that most injuries occur when people inside buildings attempt to move to a different location inside the building or try to leave. DO NOT use the elevators. Be aware that the electricity may go out or the sprinkler systems or fire alarms may turn on. b. If Outdoors: Stay there. Move away from buildings, streetlights, and utility wires. Once in the open, stay there until the shaking stops. The greatest danger exists directly outside buildings, at exits and alongside exterior walls. Many of the 120 fatalities from the 1933 Long Beach earthquake occurred when people ran outside of buildings only to be killed by falling debris from collapsing walls. Ground movement during an earthquake is seldom the direct cause of death or injury. Most earthquake-related casualties result from collapsing walls, flying glass, and falling objects. c. If in a Moving Vehicle: Stop as quickly as safety permits and stay in the vehicle. Avoid stopping near or under buildings, trees, overpasses, and utility wires. 39 Proceed cautiously once the earthquake has stopped. Avoid roads, bridges, or ramps that might have been damaged by the earthquake. d. If Trapped Under Debris: Do not light a match. Do not move about or kick up dust. Cover your mouth with a handkerchief or clothing. Tap on a pipe or wall so rescuers can locate you. Use a whistle if one is available. Shout only as a last resort. Shouting can cause you to inhale dangerous amounts of dust. (Excerpted from http://www.ready.gov/earthquakes) Further information about earthquakes and preparations can be found at “Putting Down Roots in Earthquake Country,” http://ussc.utah.gov/publications/roots_earthquake_low.pdf References 1. ARUP Laboratory Safety Manual. 2. Bishop, Michael L., Fody, Edwuard P., Schoeff, Larry E. Clinical Chemistry, 7th Ed. Laboratory Safety and Regulations, pp 36-51. Lippincott Williams and Wilkins, 2013. 3. Bloodborne Pathogens, National Safety Council, 1993, pp 9-13, 21-23, 39. 4. Burtis, Carl A., Ashwood, Edwuard R., Bruns, David E. TIETZ – Fundamentals of Clinical Chemistry, 6th Edition, pp 34-41. Saunders Elsevier, 2008. 5. Clinical Laboratory Standards Institute (CLSI). Clinical Laboratory Safety (Approved Guideline, GP17-42). Wayne, PA: CLSI; 2004. 6. Clinical Laboratory Standards Institute (CLSI). Protection of Laboratory Workers from Occupationally Acquired Infection (Approved Guideline, M29-A3). Wayne, PA: CLSI; 2005. 7. Clinical Laboratory Standards Institute (CLSI). Clinical Laboratory Waste Management (Approved Guideline, GP05-A3). Wayne, PA: CLSI; 2011. 8. Duetsch, C., Malley, C. Safety Standards and Laboratory Procedures for Exposure to Chemicals. Laboratory Medicine, July 1992, Vol. 23, No. 7, pp 482-484. 9. J.J. Keller & Associates, Inc. Handling and Storing Hazardous Chemicals in the Healthcare Workplace. 1990, pp 4-14. 10. Little, L., Murad, J. Guide to Safety in the Workplace: Occupational Exposures to Hazardous Chemicals in Laboratories. Clinical Laboratory Science, Mar./Apr. 1993, Vol. 6, No. 2, pp 79-81. 40 11. Lubbert, P. Containing Chemical Spills. Advance for Laboratory Administrators, May 1997. pp. 20-25. 12. Luebberrt, pp. Caution: Flammable. Advance for Lab Administrations, January 1997. pp. 41-44. 13. Merrick, Thomas A., et al. Clinical Laboratory Safety; Approved Guidelines, 2nd ed. Wayne, PA: Clinical and Laboratory Standards Institute, 2004. 14. Miller, S. Chemical Safety: Dangers and Risk Control. Clinical Laboratory Science, Nov./Dec. 1992, Vol. 5, No. 6, pp 338-342. 15. MMWR Weekly Report. Guideline for Hand Hygiene in Health-Care Settings, October 25, 2002, Vol. 51. 16. Occupational exposure to bloodborne pathogens: needlesticks and other sharps injuries: final rule. Occupational Safety and Health Administration (OSHA); Fed Reg 2001; 66:531825. 17. Parrott-Boyle, M. Hazardous Chemical Waste Management. Clinical Laboratory Science, Nov./Dec. 1992, Vol. 5 No. 6, pp 346-348. 18. Rudman, S., Jarus, C., Ward, K., et al. Safety in the Student Laboratory: A National Survey of University-Based Programs. Laboratory Medicine, May 1993, Vol. 24 No. 5, pp 281-285. 19. Sewell, David L., et al. Protection of Laboratory Workers from Occupationally Acquired Infections; Approved Guidelines, 3rd ed. Wayne, PA: Clinical and Laboratory Standards Institute, 2005 20. Sewell, DL. Laboratorians at Risk the threat of Exposure to Infectious Agents and the Role of the Biosafety Program. Laboratory Medicine. October 1996, Vol. 27. No. 10, pp. 673-678. 21. Stern, A., Ries, H., Flynn, D., et al. Fire Safety in the Laboratory: Part 1. Laboratory Medicine. May 1993, Vol. 24, No. 5. 22. Stern, A., Ries, H., Flynn, D., et ql. Fire Safety in the Laboratory: Part II. Laboratory Medicine. 1993; Vol. 2, No.6. 23. University of Utah Environmental Health and Safety, http://www.ehs.utah.edu , 2013. 24. U.S. Department of Health and Human Services. Biosafety in Microbiological and Biomedical Laboratories, 5th Edition. HHS Publication No. (CDC)21-1112. APPENDIX I Below is a list of biological agents students work with in the Medical Laboratory Science Program. The Pathogen Data Sheets( from the Canadian Public Health Agency) for each 41 biological agent can be accessed by going to the link: http://www.phac-aspc.gc.ca/labbio/res/psds-ftss/index-eng.php Bacteria and Parasites: • Aeromonas hydrophila • Acinetobacter baumanii • Ancylostoma duodenale • Ascaris lumbricoides • Bacillus cereus • Bacteroides fragilis. • Balantidium coli • Bordetella pertussis • Burkholderia cepacia • Citrobacter spp. • Clonorchis sinensis • Clostridium difficile • Clostridium perfringens • Cryptosporidium parvum • Diphtheroids • Edwardsiella tarda • Endolimax nana • Entamoeba histolytica • Entamoeba coli • Enterobacter spp. • Enterobius vermicularis • Enterococcus • Epstein-Barr virus • E. coli • Fasciola hepatica 42 • Fusobacterium nucleatum • Giardia lamblia • Haemophilus influenzae (group b) • Haemophilus parainfluenzae • Hymenolopis spp. • Iodamoeba butschlii • Klebsiella spp. • Legionella pneumophila • Listeria monocytogenes • Micrococcus spp. • Moraxella catarrhalis • Morganella morganii • Necator americanus • Neisseria gonorrhoeae • Neisseria lactamica • Neisseria sicca • Pasteurella multocida • Peptostroptococcus anaerobius • Plesiomonas shigelloides • Prevotella melanogenica • Propionibacterium acnes • Proteus spp. • Providencia stuartii • Pseudomonas aeruginosa • Salmonella Group B - typhimurium • Schistosoma spp. • Serratia spp. • Shewanella putrifaciens 43 • Shigella sonnei • Staphylococcus aureus • Staphylococcus saprophyticus • Coagulase negative Staphylococcus • Stenotrophomonas maltophilia • Streptobacillus moniliformis • Streptococcus agalactiae • Streptococcus pneumoniae • Streptococcus pyogenes • Streptococcus, beta hemolytic groups C,F,G • Streptococcus species, Group D • Streptococcus, Viridans group • Taenia spp. • Trichomonas vaginalis • Trichuris trichiura • Vibrio alginolyticus • Vibrio parahaemolyticus Parasitology: We use purchased, formalin-preserved material), with the exception of Trichomonas vaginalis (live culture) Mycology: Candida albicans Candida glabrata Geotrichum Cryptococcus neoformans Rhodotorula Candida parapsilosis Candida lipolytica Scopulariopsis Aspergillus Penicillium Mucor Rhizopus Epicoccum 44 Curvularia Alternaria Fusarium Paecilomyces Tricoderma Syncephalastrum 45 MLS PROGRAM INCIDENT/ACCIDENT REPORT FORM Student Name: _______________________________________________ Instructor Name: _____________________________________________ Description of the incident/accident (include all names of persons involved): If the injury involves sharps complete details in the following table. Date Type of Device (e.g. syringe, suture needle, razor, scissors) Brand Name of Device Work Area where injury occurred (e.g. benchtop, biosafety cabinet, etc) Brief description of how incident occurred (i.e., procedure being done, action being performed (disposal, injection, etc.), body part injured) Follow-up course of action (attach copies of any hospital/university forms, if appropriate): ____________________________ Signature of Student ____________________________ Date ___________________________ Signature of Faculty/Staff ____________________________ Date 46 47 48 Redwood Health Center Occupational Medicine Clinic 1525 West 2100 South Salt Lake City, UT 84119 Phone: (801) 213-9777 Hours: M-F 8:00AM – 5:00PM After Hours Redwood Urgent Care 1525 West 2100 South Salt Lake City, UT 84119 M-F 5:00PM – 8:00PM Sat.-Sun.: 9:00AM – 8:00PM (801) 213-9700 Emergency Department at University Hospital (main floor northeast side of the hospital) 50 N. Medical Drive Salt Lake city, UT 84132 (801) 581-2292 49

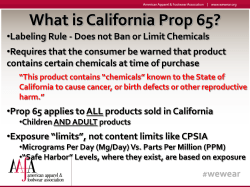
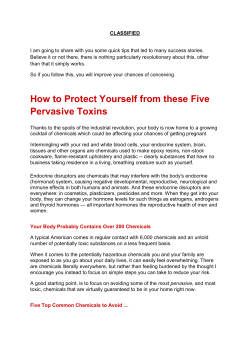


© Copyright 2026