
Six-Axis Force/Torque Sensor System Controller (CTL / CTLJ / CON)
F/T Controller (CTL / CTLJ / CON) Six-Axis Force/Torque Sensor System Installation and Operation Manual Manual #: 9620-05-CTL January 2014 Engineered Products for Robotic Productivity Pinnacle Park 1031 Goodworth Drive Apex, NC 27539 USA Tel: +1-919.772.0115 +1-919-772-8259 www.ati-ia.com Email: [email protected] F/T Controller Installation and Operation Manual Document #9620-05-ctl-11 Foreword Information contained in this document is the property of ATI Industrial Automation, Inc. and shall not be reproduced in whole or in part without prior written approval of ATI Industrial Automation, Inc. The information herein is subject to change without notice and should not be construed as a commitment on ATI Industrial Automation, Inc. This manual is periodically revised to reflect and incorporate changes made to the F/T system. ATI Industrial Automation, Inc. assumes no responsibility for any errors or omissions in this document. Users' critical evaluation is welcome to assist in the preparation of future documentation. Copyright © by ATI Industrial Automation, Inc., Apex, North Carolina USA. All Rights Reserved. Published in the USA. In consideration that ATI Industrial Automation, Inc. (ATI) products are intended for use with robotic and/or automated machines, ATI does not recommend the use of its products for applications wherein failure or malfunction of an ATI component or system threatens life or makes injury probable. Anyone who uses or incorporates ATI components within any potentially life threatening system must obtain ATI‘s prior consent based upon assurance to ATI that a malfunction of ATI‘s component does not pose direct or indirect threat of injury or death, and (even if such consent is given) shall indemnify ATI from any claim, loss, liability, and related expenses arising from any injury or death resulting from use of ATI components. All trademarks belong to their respective owners. Windows is a registered trademark of Microsoft Corporation. FCC Compliance - Class A This device complies with Part 15 of the FCC Rules. Operation is subject to the following two conditions: (1) this device may not cause harmful interference, and (2) this device must accept any interference received, including interference that may cause undesired operation. CE Conformity This device complies with EMC Directive 89/336/EEC and conforms to the following standards: EN50081-1:1992, EN500821:1992, CISPR 22:1993 (EN55022:1994), IEC 1000-4-2:1995, IEC 1000-4-3:1995, IEC 1000-4-4:1995 Pinnacle Park 1031 Goodworth Drive Apex, NC 27539 USA Tel: +1-919.772.0115 +1-919-772-8259 www.ati-ia.com Email: [email protected] B-2 F/T Controller Installation and Operation Manual Document #9620-05-ctl-11 Aside Please read the manual before calling customer service. Before calling, have the following information available: Serial number (e.g.; FT01234) Transducer model (e.g.; Nano17, Gamma, Theta, etc.) Calibration (e.g.; US-15-50/S, SI-65-6/S, etc.) An accurate and complete description of the question or problem Computer and software information. Operating system, PC type, drivers, application software and other relevant information about your configuration. If possible have access to the F/T system when calling. CAUTION: : Each transducer has a maximum measurement range and a maximum overload capacity. Exceeding the transducer’s overload capacity can cause permanent damage. Smaller transducers have lower overload capacities. Torque in X and Y are usually the easiest axes to accidentally overload. Strain gage saturation is the first indication that you are approaching a mechanical overload condition, and saturation always causes inaccurate F/T data, so it is critical that you monitor the F/T system for strain gage saturation. How to Reach Us Sales, Service and Information about ATI products: ATI Industrial Automation 1031 Goodworth Drive Apex, NC 27539 USA www.ati-ia.com Tel: +1.919.772.0115 Fax: +1.919.772.8259 E-mail: [email protected] Technical support and questions: Application Engineering Tel: +1.919.772.0115, Option 2, Option 2 Fax: +1.919.772.8259 E-mail: [email protected] Pinnacle Park 1031 Goodworth Drive Apex, NC 27539 USA Tel: +1-919.772.0115 +1-919-772-8259 www.ati-ia.com Email: [email protected] B-3 F/T Controller Installation and Operation Manual Document #9620-05-ctl-11 Pinnacle Park 1031 Goodworth Drive Apex, NC 27539 USA Tel: +1-919.772.0115 +1-919-772-8259 www.ati-ia.com Email: [email protected] B-4 F/T Controller Installation and Operation Manual Document #9620-05-ctl-11 Pinnacle Park 1031 Goodworth Drive Apex, NC 27539 USA Tel: +1-919.772.0115 +1-919-772-8259 www.ati-ia.com Email: [email protected] B-5 F/T Controller Installation and Operation Manual Document #9620-05-ctl-11 Table of Contents 1. Safety............................................................................................................................................... 10 1.1 General ................................................................................................................................... 10 1.2 Explanation of Warnings ........................................................................................................ 10 1.3 Precautions............................................................................................................................. 11 Getting Started ...................................................................................................................................... 12 1.4 Introduction ............................................................................................................................. 12 1.5 Unpacking............................................................................................................................... 12 1.6 System Components Description ........................................................................................... 12 1.6.1 Transducer............................................................................................................... 12 1.6.2 F/T Controller ........................................................................................................... 14 1.6.3 F/T Commands ........................................................................................................ 15 1.6.4 Interface Plates ........................................................................................................ 15 1.7 Connecting the System Components ..................................................................................... 15 1.7.1 Transducer Cable Interfacing .................................................................................. 15 1.7.2 Serial Port Interfacing .............................................................................................. 16 1.7.3 Using HyperTerminal in Windows 9X/NT/2000/XP for Serial Communications ...... 17 1.7.4 Power Cord Connection ........................................................................................... 18 1.8 Testing the F/T System .......................................................................................................... 19 1.8.1 Turning on the F/T Controller................................................................................... 19 1.8.2 Output ASCII Force Vector (Serial Port) and Biasing .............................................. 19 1.8.3 Using the Zip Macro Start-up, ZC ............................................................................ 20 1.8.4 Using the ATIFTSADemo Program ......................................................................... 20 2. Installation ...................................................................................................................................... 21 2.1 Introduction ............................................................................................................................. 21 2.2 Transducer and Cable Installation .......................................................................................... 21 2.3 F/T Controller Installation ....................................................................................................... 21 3. How It Works .................................................................................................................................. 22 3.1 Introduction ............................................................................................................................. 22 3.2 Electronic Hardware ............................................................................................................... 22 3.3 Software Outline ..................................................................................................................... 22 3.4 Mechanical Description .......................................................................................................... 23 4. Commands ...................................................................................................................................... 24 4.1 Command Overview and Protocol .......................................................................................... 24 4.2 Communication Setup Commands ........................................................................................ 27 4.2.1 Error Flag ................................................................................................................. 27 4.2.2 Communication Data Mode (CD A, CD B) .............................................................. 28 4.2.3 Communication Data Checksum (CD E, CD U) ...................................................... 28 4.2.4 Communicate Data Type (CD D, CD H, CD R) ....................................................... 29 4.2.5 Other Communication Setup Commands (CB d, CF d, CL b, CV h) ....................... 30 4.3 Query Commands .................................................................................................................. 34 4.3.1 Query Data Request Commands (QR, ^T, QS, QT) ............................................... 34 4.4 Sensor Commands................................................................................................................. 35 4.4.1 Sensor Biasing (SB, SU, SZ) ................................................................................... 35 Pinnacle Park 1031 Goodworth Drive Apex, NC 27539 USA Tel: +1-919.772.0115 +1-919-772-8259 www.ati-ia.com Email: [email protected] B-6 F/T Controller Installation and Operation Manual Document #9620-05-ctl-11 5. 6. 7. 8. 4.4.2 Sensor Peaks (SP b, SC) ........................................................................................ 36 4.4.3 Other Sensor Commands ........................................................................................ 37 4.5 Discrete I/O Commands ......................................................................................................... 39 4.5.1 I/O Verification (ID, OD h) ........................................................................................ 39 4.5.2 Force Monitoring Commands (MC s, MD d, ML, MH b, MV h) ................................ 40 4.6 Tool Frame Commands ......................................................................................................... 44 4.6.1 Tool Frame Selection, Listing and Deleting (TF d, TL, TD d) .................................. 45 4.6.2 Tool Frame Construction (TC d, s, x, y, z, R, P, Y) ................................................. 46 4.6.3 Tool Frame Transducer (TT) ................................................................................... 47 4.7 Other F/T Commands ............................................................................................................ 47 4.7.1 Zip Macro Create Start-up Buffer (ZC 0, "s") ........................................................... 47 4.7.2 Warm Start (^W) ...................................................................................................... 47 4.7.3 <XON> and <XOFF> (^Q, ^S) ................................................................................. 48 4.7.4 Store and Reload Run Memory (RS, RL) ................................................................ 48 4.7.5 Comment Command (%) ......................................................................................... 48 4.7.6 Help Command ........................................................................................................ 49 Serial and Discrete I/O ................................................................................................................... 50 5.1 Serial and Discrete I/O Pin Assignments ............................................................................... 50 5.1.1 Serial I/O Pin-out...................................................................................................... 50 5.1.2 Discrete I/O Pin-out ................................................................................................. 51 5.2 Serial I/O Description.............................................................................................................. 52 5.3 Discrete I/O Description ......................................................................................................... 52 5.3.1 Typical Input and Output Connections ..................................................................... 52 5.3.2 Monitor Conditions ................................................................................................... 52 5.3.3 Discrete I/O Timing Diagram ................................................................................... 53 5.3.4 Health Line ............................................................................................................... 54 5.3.5 Bias Line .................................................................................................................. 54 5.4 Serial and Discrete I/O Electrical Characteristics ................................................................... 55 5.4.1 Serial I/O Electrical Characteristics ......................................................................... 55 5.4.2 Discrete I/O Electrical Characteristics ..................................................................... 55 Analog Output ................................................................................................................................ 56 6.1 Introduction ............................................................................................................................. 56 6.2 Analog Output Description...................................................................................................... 56 6.2.1 Analog Port Pin Assignments .................................................................................. 56 6.2.2 Legacy Analog Port Pin Assignments ...................................................................... 57 6.2.3 Analog Output Function ........................................................................................... 58 6.2.4 Analog Output Filtering ............................................................................................ 58 6.2.5 Analog Output Drive Capability ................................................................................ 58 Troubleshooting Guide.................................................................................................................. 59 7.1 Introduction ............................................................................................................................. 59 7.2 Questions and Answers.......................................................................................................... 60 7.2.1 Communications ...................................................................................................... 60 7.2.2 Errors with force and torque readings ...................................................................... 61 7.3 Error Messages ...................................................................................................................... 62 Advanced Topics............................................................................................................................ 66 Pinnacle Park 1031 Goodworth Drive Apex, NC 27539 USA Tel: +1-919.772.0115 +1-919-772-8259 www.ati-ia.com Email: [email protected] B-7 F/T Controller Installation and Operation Manual Document #9620-05-ctl-11 8.1 9. 10. 11. 12. Detecting Failures (Diagnostics) ............................................................................................ 66 8.1.1 Error Detection Features ......................................................................................... 66 8.1.2 Detecting Sensitivity Changes ................................................................................. 66 8.2 Scheduled Maintenance ......................................................................................................... 66 8.2.1 Periodic Inspection .................................................................................................. 66 8.2.2 Periodic Calibration .................................................................................................. 67 8.3 A Word about Resolution ....................................................................................................... 67 8.4 Achieving the Highest Serial Communication Throughput ..................................................... 67 8.4.1 Binary Mode Throughputs........................................................................................ 68 8.4.2 ASCII Mode Throughputs ........................................................................................ 68 8.4.3 Receipt Delays ......................................................................................................... 69 8.5 Analog Output Delays ............................................................................................................. 69 Appendix A—General Specifications ........................................................................................... 70 9.1 Environmental......................................................................................................................... 70 9.2 General Specifications............................................................................................................ 70 9.2.1 Electrical Requirements ........................................................................................... 70 9.2.2 Storage and Operating Temperatures ..................................................................... 70 9.3 Mux Box Mechanical Drawing ................................................................................................ 71 9.4 F/T Controller Mechanical Drawing ........................................................................................ 72 9.5 9105-CA-U-xxx Analog Cable Drawing .................................................................................. 73 Appendix B—Dual-Gain Calibration Instructions ....................................................................... 74 10.1 F/T Sensors having a Controller with Dual-Gain Calibration .................................................. 74 Appendix C—Comparison to Legacy F/T Controller .................................................................. 75 11.1 Part numbers .......................................................................................................................... 75 11.2 Physical Differences ............................................................................................................... 75 11.3 I/O Differences ....................................................................................................................... 75 Terms and Conditions of Sale ...................................................................................................... 77 Pinnacle Park 1031 Goodworth Drive Apex, NC 27539 USA Tel: +1-919.772.0115 +1-919-772-8259 www.ati-ia.com Email: [email protected] B-8 F/T Controller Installation and Operation Manual Document #9620-05-ctl-11 Glossary of Terms Terms Conditions Accuracy See Measurement Uncertainty. Compound Loading Any load that is not purely in one axis. Coordinate Frame See Point of Origin. FS Full-Scale. F/T Force and Torque. Fxy The resultant force vector comprised of components Fx and Fy. Hysteresis A source of measurement error caused by the residual effects of previously applied loads. Maximum Single-Axis Overload The largest amount of pure load (not compound loading) that the transducer can withstand without damage. MAP The Mounting Adapter Plate (MAP) is the transducer plate that attaches to the fixed surface or robot arm. Measurement Uncertainty The maximum expected error in measurements, as specified on the calibration certificate. Mux Box The component that contains transducer electronics for transducers that are too small to house them. Overload The condition where more load is applied to the transducer than it can measure. This will result in saturation. Point of Origin The point on the transducer from which all forces and torques are measured. Also known as the Coordinate Frame. Quantization The process of converting a continuously variable transducer signal into discrete digital values. Usually used when describing the change from one digital value to the next. Resolution The smallest change in load that can be measured. This is usually much smaller than accuracy. Saturation The condition where the transducer has a load outside of its sensing range. Sensor System The entire assembly consisting of parts from transducer to controller. TAP The Tool Adapter Plate (TAP) is the transducer surface that attaches to the load to be measured. Tool Transformation A method of mathematically shifting the measurement coordinate system resulting in a translated origin and/or rotated axes. Transducer The component that converts the sensed load into electrical signals. Txy The resultant torque vector comprised of components Tx and Ty. Pinnacle Park 1031 Goodworth Drive Apex, NC 27539 USA Tel: +1-919.772.0115 +1-919-772-8259 www.ati-ia.com Email: [email protected] B-9 F/T Controller Installation and Operation Manual Document #9620-05-ctl-11 1. Safety 1.1 General The customer should verify that the transducer selected is rated for the maximum loads and moments expected during operation. Refer to transducer specifications in F/T Transducer Manual (9620-05-Transducer Section, F/T Transducer Installation, Operation, and Specification Manual) or contact ATI for assistance. Particular attention should be paid to dynamic loads caused by robot acceleration and deceleration. These forces can be many times the value of static forces in high acceleration or deceleration situations. 1.2 Explanation of Warnings The warnings included here are specific to the product(s) covered by this manual. It is expected that the user heed all warnings from the robot manufacturer and/or the manufacturers of other components used in the installation. or DANGER: Notification of information or instructions that if not followed will result in death or serious injury. The notification provides information about the nature of the hazardous situation, the consequences of not avoiding the hazard, and the method for avoiding the situation. WARNING: Notification of information or instructions that if not followed could result in death or serious injury. The notification provides information about the nature of the hazardous situation, the consequences of not avoiding the hazard, and the method for avoiding the situation. CAUTION: Notification of information or instructions that if not followed could result in moderate injury or will cause damage to equipment. The notification provides information about the nature of the hazardous situation, the consequences of not avoiding the hazard, and the method for avoiding the situation. ATTENTION, NOTE, or NOTICE: Notification of specific information or instructions about maintaining, operating, installation, or setup of the product that if not followed could result in damage to equipment. The notification can emphasize but is not limited to specific grease types, good operating practices, or maintenance tips. Pinnacle Park 1031 Goodworth Drive Apex, NC 27539 USA Tel: +1-919.772.0115 +1-919-772-8259 www.ati-ia.com Email: [email protected] B - 10 F/T Controller Installation and Operation Manual Document #9620-05-ctl-11 1.3 Precautions DANGER: Do not attempt to disassemble the transducer. This will damage the instrumentation. DANGER: Do not probe any openings in the transducer. This will damage the instrumentation. DANGER: Take care to prevent excessive forces or moments from being applied to the transducer during handling or installation. The small Nano series is easily overloaded during rough handling and may be damaged. Pinnacle Park 1031 Goodworth Drive Apex, NC 27539 USA Tel: +1-919.772.0115 +1-919-772-8259 www.ati-ia.com Email: [email protected] B - 11 F/T Controller Installation and Operation Manual Document #9620-05-ctl-11 Getting Started 1.4 Introduction This section gives instructions for setting up the F/T system. Final installation is covered in Section 2—Installation. After setting up the system, a test is performed to verify proper operation. (Details about the commands used may be found in Section 4—Commands.) CAUTION: The Force/Torque transducer, the calibration matrix loaded into the Controller, and the mux box, if applicable, have been assigned matching serial numbers when the system was calibrated. If the serial numbers assigned to your F/T system do not match, the Force/Torque data will be incorrect. Please do not mix system components. 1.5 1.6 Unpacking Check the shipping container and components for damage during shipping. Any damage should be reported to ATI Industrial Automation. Check the packing list for omissions. Standard components of an F/T system are: - Transducer - Transducer cable (for 9105-T transducers) - Mux box (9105-TW transducers only) - Mux cable (for 9105-TW transducers only) - F/T Controller - Power cord - ATI CD containing software, calibration documents and manuals Optional components: - Mux box and Mux cable (for transducers requiring external electronics, such as 9105-TW transducers) - Analog output cable System Components Description 1.6.1 Transducer The transducer is a compact, rugged, monolithic structure that converts force and torque into analog strain gage signals for the F/T Controller. The transducer is commonly used as a wrist sensor mounted between a robot and a robot end-effector. Figure 2.1 shows the transducer with a standard tool adapter. - If your system has the Dual Gain Calibration Option, see Appendix B—Dual-Gain Calibration Instructions for instructions on selecting the individual calibrations. For further information not in this section see: - Appendix A—General Specifications (e.g., resolution, weight) for mechanical drawings. Appendix B—Dual-Gain Calibration Instructions. Appendix C—Comparison to Legacy F/T Controller Section 2—Installation for mounting and cable routing. Pinnacle Park 1031 Goodworth Drive Apex, NC 27539 USA Tel: +1-919.772.0115 +1-919-772-8259 www.ati-ia.com Email: [email protected] B - 12 F/T Controller Installation and Operation Manual Document #9620-05-ctl-11 Figure 2.1—Transducer NOTE: The transducer is designed to withstand extremely high overloading because of its construction using strong materials and quality silicon strain gages. The high-flex life transducer cable is electrically shielded to maintain signal integrity between the transducer (or mux box) and the F/T Controller. The transducer or mux box connector is molded to one end of the cable, and a 15-pin D-subminiature connector on the other end connects to the F/T Controller [See Figure 2.2a and 2.2b]. For further information not in this section see Section 2—Installation for cable routing. F/T Controller Connector Transducer Connector Figure 2.2a—Transducer Cable MUX Box Connector Figure 2.2b—Integral Transducer Cable Pinnacle Park 1031 Goodworth Drive Apex, NC 27539 USA Tel: +1-919.772.0115 +1-919-772-8259 www.ati-ia.com Email: [email protected] B - 13 F/T Controller Installation and Operation Manual Document #9620-05-ctl-11 1.6.2 F/T Controller The primary function of the F/T Controller is to convert strain gage data to Cartesian force/torque components. Communication can be done through the serial I/O, the discrete I/O, or the optional analog output. The F/T Controller should be mounted in an area so that it is not exposed to temperatures outside of its working range (see Appendix A—General Specifications). It is designed to be used indoors in a non-dynamic, non-vibratory environment and may be mounted in any orientation. It is designed to be used in environments without condensing humidity. The F/T Controller receives power through its IEC-320 power entry socket. ATI Industrial Automation-supplied electrical cords meet Underwriter‘s Laboratory and CE requirements. Any user-supplied cord must meet these requirements. The F/T Controller requires that the cord‘s Protective Earth connection must be properly connected. AC Power Entry Socket Controller A Mux box is added between the transducer and the F/T Controller for Nano and Mini models. Legacy Analog Output RS-232 Communication Discrete I/O Analog Output Transducer Transducer Cable Figure 2.3—F/T Controller AC Power Input—Power is delivered to the controller via this industry-standard IEC-320 connector (see Section 9.2.1—Electrical Requirements for ratings). RS-232—This is the RS-232 serial I/O connection to the controller (see Section 1.7.2— Serial Port Interfacing and Section 5—Serial and Discrete I/O for details). Discrete I/O—These optically-isolated connections communicate with industrial equipment (see Section 5—Serial and Discrete I/O for details). Transducer—This connects to the ATI Industrial Automation transducer or mux box via a cable. Analog Output—Outputs analog voltage representation of transducer loads (see Section 6—Analog Output for details). Legacy Analog Output—Outputs analog voltage representation of transducer loads on a connector compatible with older F/T Controller models. Do not use for new designs. For further information not in this section see: Pinnacle Park 1031 Goodworth Drive Apex, NC 27539 USA Tel: +1-919.772.0115 +1-919-772-8259 www.ati-ia.com Email: [email protected] B - 14 F/T Controller Installation and Operation Manual Document #9620-05-ctl-11 - 1.6.3 Section 3—How It Works for the hardware flow chart. Section 5—Serial and Discrete I/O and Section 6—Analog Outputfor the electrical specifications and the connector pin-outs. Appendix A—General Specifications shows the mechanical dimensions of the Controller chassis and mux box. F/T Commands The F/T Controller allows the user to issue commands to control the F/T system. F/T commands are entered through the serial port. For further information not in this section see: - 1.6.4 Section 3—How It Worksfor flowchart. Section 4—Commands for descriptions of the F/T Controller commands. Interface Plates The transducer comes with a standard mounting adapter to mechanically attach the transducer. The transducer also has a standard tool adapter with an ISO 9409-1 ( for Gamma, Delta, and Theta models) interface for attaching your tool. The mounting adapter consists of: - Mounting adapter plate Mounting screws For further information not in this section see: - 1.7 Section 2—Installation Appendix A—General Specifications. Connecting the System Components 1.7.1 Transducer Cable Interfacing The F/T normally uses either a custom 12-pin push and lock transducer connector [see Figure 2.4] or a 16-pin twist-to-lock connector [see Figure 2.5], except for the Nano and Mini F/Ts which have their cables permanently attached. Push and Lock Connector: Connect the Push and Lock transducer connector as follows: - - Lightly place the connector into port on the transducer. Do not push. Line up the groove on the connector to the key in the port by rotating the connector while lightly forcing the connector into the port. When the groove lines up the connector will go noticeably deeper into the port. Push the connector‘s black rubber boot until it seats into the port with a click. Pinnacle Park 1031 Goodworth Drive Apex, NC 27539 USA Tel: +1-919.772.0115 +1-919-772-8259 www.ati-ia.com Email: [email protected] B - 15 F/T Controller Installation and Operation Manual Document #9620-05-ctl-11 Figure 2.4—Push-to-Lock Transducer Connector Styles 38mm Figure 2.5—Optional 9105-CT Connector Disconnect the Push-to-Lock transducer connector from the transducer port as follows: - Pull the silver metal sleeve on the transducer connector until the connector releases. Twist-to-Lock Connector: Connect the Twist-to-Lock transducer connector as follows: - Line up the keying features of the mating connectors. Gently mate the connectors together and twist the cable connector‘s shell clockwise until firmly seated. Do not use excessive force. Disconnect the Twist-to-Lock transducer connector as follows: - Twist the cable connector‘s shell counterclockwise until it is disengaged. Pull the cable connector‘s shell from the transducer to remove. Transducer to Controller Cable: Connect the 15-pin D-subminiature connector [see Figure 2.2a] to the transducer port on the F/T Controller. Tighten the screws on the connector for positive locking if needed. NOTE: Cables that mate with our transducers lock positively to the transducer to ensure that they stay mated even through the most rigorous of movements. The Push-to-Lock cable connector has four spring latches that lock into a groove in the transducer connector. 1.7.2 Serial Port Interfacing The following instructions are for connecting a serial device (i.e. personal computer, Pinnacle Park 1031 Goodworth Drive Apex, NC 27539 USA Tel: +1-919.772.0115 +1-919-772-8259 www.ati-ia.com Email: [email protected] B - 16 F/T Controller Installation and Operation Manual Document #9620-05-ctl-11 HyperTerminal in Windows, RS-232 terminal, etc.) to communicate with the F/T Controller. The F/T Controller is factory-configured in one of two possible serial port configurations. The F/T Controller model number determines its configuration. - The user must provide the serial device. The user must provide a serial port cable with a male 9-pin D-subminiature connector on one end for connecting to the F/T Controller and a connector to mount to the serial device. See Section 5—Serial and Discrete I/O for the F/T Controller's serial port pin-out [see Tables 2.1 for connection information]. Note that 9105-CON variants of the F/T Controller (available by special order only) place the Transmit Signal on pin 3 and the Receive Signal on pin 2. Equipment Connector Mating Cable Connector Standard F/T Controller (9105-CTL) User Computer, Robot or RS-232 Terminal Male 9-pin D-subminiature Male 9-pin D-Subminiature Female 9-pin D-subminiature Female 9-pin D-Subminiature Ground Signal pin 5 pin 5 F/T Transmit Signal pin 2 pin 2 F/T Receive Signal pin 3 pin 3 Table 2.1—Standard RS-232 serial port connections - 1.7.3 Select the serial device attributes: 8-bit transmission with no parity and one stop bit. Select baud rate on F/T Controller to match the baud rate of the Serial Device using the CB command. The baud rate is factory preset to 9600 (see the CS command in Section 4— Commands for details on reading current baud rate). Using HyperTerminal in Windows 9X/NT/2000/XP for Serial Communications HyperTerminal can be found in the Start menu under Programs / Accessories / Communications. Note: If the program is not present you will need to install it from Windows setup. HyperTerminal is located as a communications options. Start Hypertrm.exe to create a new connection and select the Com port you are using. Example: Connect using: COM1 (or Direct to Com 1 for some versions). Set the Port Settings to the following values to communicate with the factory Controller setup: - Bits per second : 9600 Data bits : 8 Parity : None Stop bits : 1 Flow control : Xon/Xoff Pinnacle Park 1031 Goodworth Drive Apex, NC 27539 USA Tel: +1-919.772.0115 +1-919-772-8259 www.ati-ia.com Email: [email protected] B - 17 F/T Controller Installation and Operation Manual Document #9620-05-ctl-11 HyperTerminal Properties HyperTerminal Properties/Configure... ® Figure 2.6—Microsoft HyperTerminal Sample Configuration 1.7.4 Power Cord Connection Verify that the input voltage setting is correct for your facility (this does not apply to model 9105CTLJ, which can only be used with 100VAC power). To change the input voltage setting: - Turn the power switch to the off position. - Unplug the power cord from the F/T controller. - Use a small screwdriver to open power input module door and pull out voltage select module (see Figure 2.7). When correctly configured the desired input voltage will be facing up, the fuse will be inserted in the right side and the shorting clip will be at the rear of the left side (see Figure 2.7). Fuse on right side Desired voltage facing up (does not apply to 9105-CTLJ). Shorting clip on left side. Note orientation of shorting clip and its tangs. Figure 2.7—Fuse Module Voltage Selection Pinnacle Park 1031 Goodworth Drive Apex, NC 27539 USA Tel: +1-919.772.0115 +1-919-772-8259 www.ati-ia.com Email: [email protected] B - 18 F/T Controller Installation and Operation Manual Document #9620-05-ctl-11 1.8 Testing the F/T System 1.8.1 Turning on the F/T Controller - With the F/T system connected as described in Section 1.7— Connecting the System Components, turn the power switch on. The power LED will turn on and glow green. The system LED will flash green. One of the eight input or output LEDs will temporarily flash to indicate the selected baud rate (see the CS command in Section 4—Commands for more information). A header message will appear on the serial device [See Figure 2.8]. A ―>‖ prompt will appear after the header message. - Controller Firmware version F/T Force and Torque Sensor System, Version X.x ATI Industrial Automation, Inc., www.ati-ia.com Copyright 2004. All Rights Reserved. Tool Frame 0 (FT0000) loaded: FT0000 GAMMA/US-15-50 (1.000e-2 in/unit) > Tool Frame Name Transducer Serial Number and Information Current Tool Frame System prompt Figure 2.8— Header Message and Prompt NOTE: 1. <CR> indicates a carriage return (enter) character. 2. Commands entered by the user are displayed as bold. 3. If you experience problems, check your electrical connections (see Section 7—Troubleshooting Guide) and commands (see Section 4— Commands). 4. Commands are not case sensitive, so they may be entered in upper- or lower-case. - 1.8.2 At the prompt type enter the <control-W> character (hold down the <ctrl> key while typing W). The F/T system is reset and the screen displays the header message and prompt. Output ASCII Force Vector (Serial Port) and Biasing - - At the prompt type CD A<CR>. This selects the ASCII format output. At the prompt type CD R<CR>. This selects the resolved force/torque data for output instead of the strain gage data. At the prompt type QS<CR>. Continuous output of the resolved data will begin scrolling across the screen. Touch the transducer front plate and note how the force/torque values change. See the transducer drawing in the F/T Transducer Manual, 9620-05-Transducer Section, F/T Transducer Installation, Operation, and Specification Manual, for the sensor frame to locate the X, Y, and Z orientation on the transducer. Type SB<CR>. The data will stop and the prompt will return. The resolved data has been biased. Repeat the command QS<CR>. The resolved force/torque data will read close to Pinnacle Park 1031 Goodworth Drive Apex, NC 27539 USA Tel: +1-919.772.0115 +1-919-772-8259 www.ati-ia.com Email: [email protected] B - 19 F/T Controller Installation and Operation Manual Document #9620-05-ctl-11 - 1.8.3 Using the Zip Macro Start-up, ZC - 1.8.4 zero. Type <CR>. The data will stop and the prompt will return. Type ZC 0, "CD R; QS"<CR>. This stores the commands within the double quote into the start-up macro. Reset the system by Control-W or power cycle. The commands execute at the end of the header message. Type <CR> to halt the output. The prompt will return to the screen. Type ZC 0, ""<CR>. This will clear the start-up macro. Reset the F/T system. The header message will appear with the prompt and without any commands being executed. Using the ATIFTSADemo Program - - - The CD that came with your system contains a demonstration program that displays and can collect data. The demonstration program uses the same RS232 serial connection you just set up. The program will not work if the computer‘s COM port is still being used by another program like HyperTerminal. Before running the demonstration program be sure that any other program is no longer running or is disconnected from the COM port. The demonstration program CD will automatically run an introductory screen when you put the CD in your computer. Follow the instructions to install the program and to run the program. Periodically ATI Industrial Automation will place product information and updates on its website at http://www.ati-ia.com. You can also download the demonstration program from the website in the Software Download section of the Multi-Axis Force/Torque Sensor product line. Pinnacle Park 1031 Goodworth Drive Apex, NC 27539 USA Tel: +1-919.772.0115 +1-919-772-8259 www.ati-ia.com Email: [email protected] B - 20 F/T Controller Installation and Operation Manual Document #9620-05-ctl-11 2. Installation 2.1 Introduction Proper installation of your transducer, its cabling, F/T Controller, and Mux box (if needed) is essential to ensure proper operation. 2.2 Transducer and Cable Installation For installation information see ATI Industrial Automation F/T Transducer Manual, 9620-05Transducer Section, F/T Transducer Installation, Operation, and Specification Manual. 2.3 F/T Controller Installation See Section 2.3—F/T Controller Installation for F/T Controller installation information. Pinnacle Park 1031 Goodworth Drive Apex, NC 27539 USA Tel: +1-919.772.0115 +1-919-772-8259 www.ati-ia.com Email: [email protected] B - 21 F/T Controller Installation and Operation Manual Document #9620-05-ctl-11 3. How It Works 3.1 Introduction This section provides a functional outline of the F/T system. The F/T system is broken into three areas: electrical, controlling software, and mechanical. Section 3.2—Electronic Hardware contains a brief description of the electronic hardware. A controlling software flow chart is shown in Section 3.3—Software Outline. A mechanical description is shown in Section 3.4— Mechanical Description. 3.2 Electronic Hardware The F/T Controller provides power and signals to the transducer electronics and reads the transducer outputs. These outputs are then processed into resolved force and torque readings. 3.3 Software Outline Loop Start Apply Calibration to Create Resolved Data Receive Strain Gauge Readings Check for New Peak Levels (SP command) Check for Saturation Update Analog Output Voltages Sensor Averaging (SA command) CDR data Legacy Software Temperature Compensation (ST command) Check Monitor Conditions (MC command) Loop Finish Subtract User Bias (SB command) CDD and CDH data Figure 4.1—F/T Controller Data flowchart Pinnacle Park 1031 Goodworth Drive Apex, NC 27539 USA Tel: +1-919.772.0115 +1-919-772-8259 www.ati-ia.com Email: [email protected] B - 22 F/T Controller Installation and Operation Manual Document #9620-05-ctl-11 3.4 Mechanical Description The property of forces was first stated by Newton in his third law of motion: ―To every action there is always an equal and opposite reaction‖ or ―The mutual action of two bodies upon each other are always equal, and directed to contrary parts.‖ The transducer reacts to applied forces and torques using Newton‘s third law. Figure 4.2—Applied force and torque vector on transducer The force applied to the transducer flexes three symmetrically-placed beams using Hooke‘s law: E· Stress applied to the beam ( is proportional to force) Elasticity modulus of the beam Strain applied to the beam NOTE: The transducer is a monolithic structure. The beams are machined from a solid piece of metal. This decreases hysteresis and increases the strength and repeatability of the structure. Semiconductor strain gages are attached to the beams and are considered strain-sensitive resistors. The resistance of the strain gage changes as a function of the applied strain as follows: R = Sa·Ro· R Sa = = Changein resistance of strain gage Gage factor of strain gage Ro = Resistance of strain gage unstrained = Strain applied to strain gage The electronic hardware, described in Section 3.2—Electronic Hardware measures the change in resistance and the software, described in Section 3.3—Software Outline, converts this change to force and torque components. Pinnacle Park 1031 Goodworth Drive Apex, NC 27539 USA Tel: +1-919.772.0115 +1-919-772-8259 www.ati-ia.com Email: [email protected] B - 23 F/T Controller Installation and Operation Manual Document #9620-05-ctl-11 4. Commands 4.1 Command Overview and Protocol The majority of commands consist of one to three ASCII characters. All commands can be in either upper or lower-case. Power-up or reset returns the F/T system to the default settings. Table 5.1 gives a brief review of all commands described in this manual. Table 5.2 reviews the nomenclature used in Table 5.1 and throughout this section. COMMUNICATION SETUP COMMANDS Communication Data Mode CD A Setup communication for ASCII output mode (Default). CD B Setup communication for Binary output mode. Communication Checksum CD E Enable a checksum at the end of binary communication. CD U Unable sending checksum at end of binary communication (Default). Communication Data Type CD D Setup communication for Decimal strain gage data output. CD H Setup communication for Hexadecimal strain gage data output. CD R Setup communication for Resolved force/torque data output (Default). Other Communication Setup Commands CB d Changes RS-232 serial baud rate (d = new baud rate) CE b Enables error display on front panel during error condition (b=1; Default). CS b Enables display of baud rate on front panel during power on (b=1; Default). CL b Enables Linefeed <LF> with <CR> (b=1; Default) or disable <LF> output (b=0). CV h Selects components of F/T values to be processed (Fr,Fx,Fy,Fz,Tr,Tx,Ty,Tz). CR d Sets the analog output voltage range to either ±5V or ±10V (d=5; Default) QUERY DATA REQUESTS Query F/T and Strain Gage Data QR Query output of one Record of data in pre-selected communication setup. ^T Single record output with minimized handshaking; similar to QR. QS Query output of a Stream of data in pre-selected type and mode. QT Query output of one record of resultant axes Fr and Tr. Pinnacle Park 1031 Goodworth Drive Apex, NC 27539 USA Tel: +1-919.772.0115 +1-919-772-8259 www.ati-ia.com Email: [email protected] B - 24 F/T Controller Installation and Operation Manual Document #9620-05-ctl-11 SENSOR COMMANDS Sensor Bias SB Performs a Sensor Bias. Stores bias reading in a 3-level buffer. SU Performs a Sensor Unbias. Removes last bias command from buffer. SZ Removes all previously stored biases from buffer. Sensor Peaks (see QP command) QP Query Peaks: show the maximum and minimum F/T values collected (see SP). SP b Collects the max. and min. F/T values: start (b=1) or stop (b=0; Default). SC Clear max. and min. F/T values by loading high minimum and maximum values. Other Sensor Commands CF d Controls automatic SF optimization for RS-232 output. (d=0; Default). SA d Performs a moving average of d sensor data samples (d=0; Default). SF d Sensor sampling Frequency allows optimizing for faster output when using CF. SM b Sensor Monitoring: disables (b=0) error message due to sensor error (saturation, disconnected transducer etc.) or enables error message (b=1; Default). SR b Sets sensor power protection error (b=1; Default) DISCRETE I/O COMMANDS ID OD h I/O Verification Reads and displays the state of all discrete input lines. Sets the state of all discrete outputs as specified by hexadecimal number h. MC s MD d MH b ML MV h Force Monitor Commands Creates a force Monitor statement s. Deletes a force Monitor statement d. Sets monitor handshake mode to b (b=0; Default – require handshaking) List all stored Force Monitor statements. Selects axes for resultants Fr and Tr. TOOL FRAME COMMANDS TD d Delete tool frame (d=1, 2 or 3). TC d,s, Constructs a new tool frame by changing the coordinate system (d=0..3; x,y,z, s=name; x, y, and z = translation along X, Y and Z axes; R, P, and Y = rotation R,P,Y about X, Y and Z axes). TF d Selects a calibration matrix from tool frame list (d=0, 1, 2 or 3). TL List available tool frames. TT d Reports transducer serial number for tool frame d. TU Reports torque distance unit scaling. Pinnacle Park 1031 Goodworth Drive Apex, NC 27539 USA Tel: +1-919.772.0115 +1-919-772-8259 www.ati-ia.com Email: [email protected] B - 25 F/T Controller Installation and Operation Manual Document #9620-05-ctl-11 MISCELLANEOUS COMMANDS ^W Warm start. Performs a system reset and is identical to pressing the reset button. ^Q, ^S XON and XOFF. ZC 0, "s" Creates a buffer of commands, s, that are executed at system power-up or reset. RS Save values from run memory into permanent memory. RL Reload values from permanent memory into run memory. %s Comment command. The s entry is ignored. HELP Lists a summary of available commands Table 5.1—Command overview Format Decimal ASCII code Description <CR> 13 Carriage Return <LF> 10 Line Feed <SP> 32 SPace <ACK> 6 ACKnowledge ^Q 17 X-on ^S 19 X-off ^T 20 QR command shortcut <NAK> 21 Negative AcKnowledgement ^W 23 Warm start <error> — Error flag, see Section 4.2 d — Represents decimal number h — Represents hexadecimal digit (0 to F) b — Represents binary digit (0 or 1) s — Represents an alphanumeric string a — Represents an alphabetic character ^ — control character prefix Table 5.2—Nomenclature table When a command is received, the F/T Controller will respond with an <ACK> (decimal 6) control character if the command is valid or a <NAK> (decimal 21) control character if the command is not valid. If a <NAK> is sent, then an error message follows with two <CR><LF>‘s and the system prompt ―>‖. If a valid command results in data being transmitted by the Controller, the data is sent next. An <ACK><CR><LF>―>‖ (system prompt) is sent showing that the command is complete. The control characters are normally not visible on a standard RS-232 terminal. Transmission of the <LF> may be suppressed by using the CL command described at the end of Section 4.2— Communication Setup Commands. Pinnacle Park 1031 Goodworth Drive Apex, NC 27539 USA Tel: +1-919.772.0115 +1-919-772-8259 www.ati-ia.com Email: [email protected] B - 26 F/T Controller Installation and Operation Manual Document #9620-05-ctl-11 Commands are not case sensitive and any spaces between parameters are ignored by the F/T Controller. Characters sent by the serial port are echoed back. Commands sent to the F/T system must be terminated by a <CR>. A <LF> should not be sent. Example — valid command: user: CD D<CR> response: CD D<CR><LF> <ACK><ACK><CR><LF> (First <ACK> says command is valid and second > <ACK> says the command has been implemented) Example — invalid command: user: XYZ<CR> response: XYZ<CR><LF> <NAK>E114 Illegal command<CR><LF> <CR><LF> > 4.2 Communication Setup Commands The F/T Controller outputs three types of data through the RS-232 serial port: raw strain gage data in hexadecimal format, raw strain gage data in decimal integer format, and resolved force/torque data in decimal integer unit format. Data is available in either ASCII or binary format output mode. The length (in bytes) of an output record depends upon the type of data and the output mode. One record of data refers to a single set of strain gage readings or the resolved forces/torques. Also, SG0 represents strain gage bridge 0, SG1 represents strain gage bridge 1, etc. Low and high refer to low and high bytes of data. Resolved force/torque data is transmitted in decimal integer unit format. The value of one unit force or one unit torque varies depending upon the model and the calibration, see command CD R in Section 4.2.4—Communicate Data Type (CD D, CD H, CD R) for further information. The Communication Data (CD) commands control the output data mode and type. The default at power-up or reset is ASCII output format and resolved force data output type. The mode or type of data may be changed by issuing the appropriate command. The new mode or type remains in effect until a different mode or type is selected or the system is reset. 4.2.1 Error Flag In the following command descriptions, <error> represents the sensor error flat output by the F/T Controller. The <error> flag can be 0 through 16, representing the numeric sum of the following error codes (a code of 0 indicates none of these errors is occurring): 1: Strain gage saturation has occurred. Unlike error codes E100 through E105, this code cannot be masked by the SM command. 2: Transducer error has occurred. This error is created when incorrect amount of strain gage is being pulled from the transducer port, a sign of a disconnected transducer, or broken transducer cable. Unlike error code E150, this code cannot be masked by the SM command. 4: Cable protection error has occurred. This error is created when too much power supply is being pulled from the transducer port, a sign of a damaged transducer, or its cable. This code cannot be masked by the SR command. Pinnacle Park 1031 Goodworth Drive Apex, NC 27539 USA Tel: +1-919.772.0115 +1-919-772-8259 www.ati-ia.com Email: [email protected] B - 27 F/T Controller Installation and Operation Manual Document #9620-05-ctl-11 8: DC power error has occurred. This error is created when external equipment is drawing too much power from the F/T Controller or if the F/T Controller has an internal problem. When a sensor error occurs the following will occur: a. b. c. d. e. The health output line on the discrete I/O is turned off. The System LED on the Controller front is changed to red. Unless disabled, the data output through the serial port produces an error message that will continue to repeat until error is stopped. The error flag, <error>, is set to the appropriate non-zero value. If CE is enabled (default) the error code will be displayed on the front panel unless it is preempted by the baud rate display. The <error> flag is transmitted in ASCII or as a binary byte depending on the data mode selected. 4.2.2 Communication Data Mode (CD A, CD B) Output can be in ASCII mode or binary mode. ASCII mode has the benefit of providing data in readable characters, but has a slower output rate due to the larger number of bytes in each record. Binary output has the benefit of faster output due to the smaller number of bytes needed to carry information, but cannot be read without further computation. The following commands select the data mode: - CD A Communicate Data ASCII Selects ASCII output mode; default. All data transmitted in response to data query commands will be in ASCII format. XON/XOFF software handshaking is supported. CD A command format: user: CD A<CR> response: CD A<CR><LF> <ACK><ACK><CR><LF> > - CD B Communicate Data Binary Selects binary output mode. All data transmitted in response to data query commands will be in binary format. XON/XOFF software handshaking is not supported. CD B command format: user: CD B<CR> response: CD B<CR><LF> <ACK><ACK><CR><LF> > CAUTION: When the Controller is in binary mode (CD B), all numerical output will be in binary. This includes not only output data, but error messages as well. In ASCII mode (CD A), all numeric output will be readable. 4.2.3 Communication Data Checksum (CD E, CD U) You can append a checksum to the end of force/torque data or strain gage data being sent in binary mode (see commands CD B, CD D, CD H, and CD R). A checksum will allow you to check the data for transmission errors. Appending the checksum will slow data transmission slightly. - CD E Communicate Data checksum Enabled Appends checksum to end of strain gage or F/T binary record. The checksum is eight bits for serial output. It is calculated by adding each value being sent, including the error byte (which is zero when no saturation or error is present), and dropping the most significant Pinnacle Park 1031 Goodworth Drive Apex, NC 27539 USA Tel: +1-919.772.0115 +1-919-772-8259 www.ati-ia.com Email: [email protected] B - 28 F/T Controller Installation and Operation Manual Document #9620-05-ctl-11 byte for the serial output; see the example below. The ASCII decimal data for the example is 1, 9771, 72584, -38574, 13334, 251, -27493 where the error flag shows that the sensor is saturated. The prefix 0x indicates a hexadecimal number. Serial outputs are converted to most and least significant bytes as follows: Number 72584 0x011B88 251 0x0000FB -27493 0xFF949B Byte 3 1 0x01 0 0x00 255 0x55 = = = Byte 2 27 0x1B 0 0x00 148 0x94 Byte 1 136 0x88 251 0xFB 155 0x9B Table 5.3—Serial Output Conversion Chart - 4.2.4 Serial F/T binary output with checksum for ASCII 1, 9771, 72584, -38574, 13334, 251, 27493: <0> <0><38><43> <1><27><136> <255><105><82> <0><52><22> <0><0><251> <255><148><155> <35> 1+0+38+43+1+27+136+255+105+82+0+52+22+0+0+251+255+148+155 = 1571 = 0x0623 drop the most significant byte of 0x0623 leaving 2316= 3510 CD U Communicate Data checksum Disabled (Un-enable) Stop sending the checksum. This command is the default. Communicate Data Type (CD D, CD H, CD R) Strain gage data or resolved force data can be selected for output over the serial port. (Note: The analog port always outputs resolved data.) The following commands select the type of output: - CD D Communicate Data Decimal gage Selects raw decimal strain gage data for output. Six strain gage readings are output each having a value from -32768 to 32767. CD D command format: user: CD D<CR> response: CD D<CR><LF> <ACK><ACK><CR><LF> > In ASCII mode one data record consists of 45 bytes for six strain gages with linefeeds enabled. The first byte is the error flag (0, 1, etc.) followed by a comma and the strain gage data, which is right-justified in six fields of six bytes each separated by commas. The final bytes are <CR><LF>. The <LF> is not transmitted if it has been disabled by the CL command. In binary mode each record consists of 13 bytes for six strain gages and the checksum turned off (see CD U and CD E commands). The first byte is the error flag, followed by the six strain gage data values, which consist of two bytes with the high byte transmitted first. Data format of one raw strain gage record in ASCII and binary mode: ASCII: Binary: X,XXXXXX,XXXXXX,XXXXXX,XXXXXX,XXXXXX,XXXXXX<CR><LF> <error><SG0 high><SG0 low><SG1 high><SG1 low><SG2 high><SG2 low><SG3 high><SG3 low><SG4 high><SG4 low><SG5 high><SG5 low> Pinnacle Park 1031 Goodworth Drive Apex, NC 27539 USA Tel: +1-919.772.0115 +1-919-772-8259 www.ati-ia.com Email: [email protected] B - 29 F/T Controller Installation and Operation Manual Document #9620-05-ctl-11 - CD H Communicate Data Hex gage Selects raw hexadecimal strain gage data for output. Six strain gage readings are output. CD H command format: user: CD H<CR> response: CD H<CR><LF> <ACK><ACK><CR><LF> > - Data format is similar to that of CD D except there on four bytes for each field instead of six. CD R Communicate Data Resolved Selects resolved force data for output; default. Force/torque output is in counts. Each count measurement value is shown in Appendix A—General Specifications. CD R command format: user: CD R<CR> response: CD R<CR><LF> <ACK><ACK><CR><LF> > NOTE: Force and torque values are reported in counts. Counts are integer values set so one count is near the ideal resolution of the F/T system. The use of integers, instead of real numbers, produces faster output. For example, a US-30-100 sensor has 40 counts per pound. A force output of 128 counts would indicate a load of 3.20 pounds 3.20 pounds = 128 counts ÷ 40 counts/pound In ASCII mode one data record consists of 57 bytes if the output consists of six force/torque components; see CV h command in Section 4.2.5—Other Communication Setup Commands (CB d, CF d, CL b, CV h). The first byte is the error flag followed by a comma and the force/torque data in the order of Fx, Fy, Fz, Tx, Ty, Tz. The final bytes are <CR><LF>. The <LF> is not transmitted if transmission has been disabled using the CL command. In binary mode each record consists of 19 bytes if checksum is disabled and the output consists of six force/torque components; see CV h command. The first byte is the error flag, followed by the six force/torque data values. Each value is three bytes with the high byte transmitted first. Data format of one resolved force record in ASCII and binary mode: ASCII: Binary: 4.2.5 X,XXXXXXXX,XXXXXXXX,XXXXXXXX,XXXXXXXX,XXXXXXXX, XXXXXXXX<CR><LF> <error><Fx high><Fx middle><Fx low><Fy high><Fy middle><Fy low><Fz high><Fz middle><Fz low><Tx high><Tx middle><Tx low><Ty high><Ty middle><Ty low><Tz high><Tz middle><Tz low> Other Communication Setup Commands (CB d, CF d, CL b, CV h) - CB d Change Baud Rate Allows the setting of a new RS-232 baud rate. Note that this command takes affect immediately and requires your connected equipment to have its baud rate changed to continue communications. Valid baud rate settings are: 1200, 2400, 4800, 9600, 19200, 38400, 57600, and 115200. To make this change permanent, an RS command needs to be issued following the change in baud rate (be sure your equipment is communicating with the F/T Controller before issuing the RS command). d = new baud rate Pinnacle Park 1031 Goodworth Drive Apex, NC 27539 USA Tel: +1-919.772.0115 +1-919-772-8259 www.ati-ia.com Email: [email protected] B - 30 F/T Controller Installation and Operation Manual Document #9620-05-ctl-11 CB d command format user: response: CB 19200 CB 19200<CR><LF> <ACK>Setting baud rate to 19200<CR><LF> <ACK><CR><LF> (Baud rate has been changed temporarily) > At this point the connected equipment needs to have its baud rate changed to the new baud rate (19.2K baud in this example) to continue communications. To make the new F/T Controller baud rate change permanent the user should execute an RS command as follows: RS<CR> user: RS<CR><LF> response: (New settings are now saved permanently) <ACK> ACK><CR><LF> > If a value for d is omitted, the system will indicate the current value of d. CB command format user: CB<CR> response: CB<CR><LF> <ACK>Baud rate = 19200<CR><LF> <ACK><CR><LF> > - CS b Communicate baud rate Setup • The CS command setting can be saved in permanent memory with the RS command. Enables or disables display of the current baud rate on the F/T Controller‘s front panel during power up. When enabled the baud rate will be displayed on the front panel for a few seconds when the unit is powered on or executes a reset command. The baud rate display uses a blinking green light. See Table 5.4 for decoding information. When the baud rate display is complete the front panel lights will display the current Discrete I/O input and output bits. If this feature is disabled, the front panel will display the current Discrete input and output bits during power up. The baud rate display has a higher priority than an error code display or display of the Discrete I/O input and output bits. The following table graphically represents the front panel‘s error green lights as boxes. The trailing two dots represent the Status/Health/ Monitor/Bias lights that are unused in the error display. Display Baudrate Display Baudrate ▀─── ∙∙ 9600 ▄─── ∙∙ 115.2K ─▀── ∙∙ 19.2K ─▄── ∙∙ 4800 ──▀─ ∙∙ 38.4K ──▄─ ∙∙ 2400 ───▀ ∙∙ 57.6K ───▄ ∙∙ Special Table 5.4—Baud Rate Display Decoding Pinnacle Park 1031 Goodworth Drive Apex, NC 27539 USA Tel: +1-919.772.0115 +1-919-772-8259 www.ati-ia.com Email: [email protected] B - 31 F/T Controller Installation and Operation Manual Document #9620-05-ctl-11 = 9600 Baud Figure 5.1—Example Baud Rate Display b = 0 disable power up baud rate display b = 1 enable power up baud rate display; default CS b command format: user: CS 1<CR> response: CS 1<CR><LF> <ACK><ACK><CR><LF> (Baud rate display is now enabled) > If a value for b is omitted, the system will indicate the current value of b. CS command format: user: CS<CR> response: CS<CR><LF> <ACK>Startup Baud Rate Display Enabled<CR><LF> <ACK><CR><LF> > - CE b Communicate Error code display • The CE command setting can be saved in permanent memory with the RS command. Enables or disables display of error codes on the front panel in the Discrete I/O input and output bit display. Error codes are shown in red and the display will occur for a few seconds even if the error exists for a shorter period of time. The error code display has a lower priority than the baud rate display but a higher priority than the display of the Discrete I/O input and output bits. See Tables 8.1 and 8.2 for information on decoding the display. b = 0 disable front panel error code display b = 1 enable front panel error code display; default CE b command format: user: CE 1<CR> response: CE 1<CR><LF> <ACK><ACK><CR><LF> (Front panel error display is now enabled) > If a value for b is omitted, the system will indicate the current value of b. CE command format: user: CE<CR> response: CE<CR><LF> <ACK>Startup Error Code Display on LEDs Enabled<CR><LF> <ACK><CR><LF> > - CL b Communicate Linefeed Enables or disables transmission of a linefeed, <LF>, character following every carriage return, <CR>, transmitted by the Controller. Some serial devices output a <LF> for each <CR> received and it is suggested that the <LF> from the F/T Controller be disabled to prevent two <LF> from appearing on the screen. b = 0 disable linefeed transmission Pinnacle Park 1031 Goodworth Drive Apex, NC 27539 USA Tel: +1-919.772.0115 +1-919-772-8259 www.ati-ia.com Email: [email protected] B - 32 F/T Controller Installation and Operation Manual Document #9620-05-ctl-11 b = 1 enable linefeed transmission; default CL b command format: user: CL 1<CR> response: CL 1<CR><LF> <ACK><ACK><CR><LF> (Line feed is now enabled) > If a value for b is omitted, the system will indicate the current value of b. CL command format: user: CL<CR> response: CL<CR><LF> <ACK>Line feed enabled<CR><LF> <ACK><CR><LF> > - CR d Change Range of Analog Output Voltage • The CR command setting can be saved in permanent memory with the RS command. The CR command sets the voltage range of the analog output port. This command must be followed by an RS command to make the setting permanent. d = 5 Analog output range is set to ±5V d = 10 Analog output range is set to ±10V. CR d command format: user: CR 5<CR> response: CR 5<CR><LF> <ACK><ACK><CR><LF> (analog output voltage set to ±5V) > If a value for d is omitted, the system will indicate the current setting. user: CR<CR> response: CR<CR><LF> <ACK>Analog output range ±5V<CR><LF> <ACK><CR><LF> > - CV h Communicate Vector This command selects force/torque components for processing, allowing you to simplify or speed up output. The value h is a hexadecimal number where each bit represents a force or torque component. The value of h is determined as follows: (bits): 7 6 5 4 3 2 1 0 Component enabled: Tr Fr Tz Ty Tx Fz Fy Fx Example: CV 14<CR> (Enables Ty and Fz) 14 hex = 00010100 binary CV h command format: user: CV 14<CR> response: CV 14<CR><LF> <ACK><ACK><CR><LF> (Enables only Ty and Fz) > If a value for h is omitted, the system will indicate the current value of h. CV command format: user: CV<CR> response: CV<CR><LF> <ACK>14<CR><LF> <ACK><CR><LF> > Pinnacle Park 1031 Goodworth Drive Apex, NC 27539 USA Tel: +1-919.772.0115 +1-919-772-8259 www.ati-ia.com Email: [email protected] B - 33 F/T Controller Installation and Operation Manual Document #9620-05-ctl-11 4.3 Query Commands DANGER: Always monitor the error flag and disregard force and torque values when the error flag is set. The error flag will be set during saturation. Saturation can result in wildly-inaccurate force and torque values. Connected equipment that relies on this data can behave erratically or dangerously if saturation is not monitored and handled. 4.3.1 Query Data Request Commands (QR, ^T, QS, QT) When you read F/T records, it is critical that you monitor the error code at the beginning of the record for indicators of strain gage saturation or transducer damage. - QR Query data Record Request output of one record of data in the preselected type and mode. See Section 4.2— Communication Setup Commands. QR command format: user: QR<CR> response: <ACK><record><CR><LF> (<record> depends on <ACK><CR><LF> > - - communication setup; see Section 4.2) ^T Query data record Same as QR except only the record is echoed back. Used for fast data output. ^T command format: user: ^T response: <record> QS Query record Stream Request output of a stream of data records in the previously selected type and mode. See Section 4.2—Communication Setup Commands. The stream may be interrupted by issuing any command or a <CR>. Output Format: user: QS<CR> response: <ACK><record 1> <record 2> ··· <record n> user: response: <CR> <ACK><CR><LF> (any input stops output) > (system prompt due to QS being terminated) <CR><LF> > - (system prompt due to <CR> typed in by user) QT Query Total Request output of one record of resultant axes Fr and Tr in the preselected type and mode. See Section 4.2—Communication Setup Commands. QT command format: user: QT<CR> response: <ACK><record><CR><LF> (<record> depends on <ACK><CR><LF> > communication setup; see Section 4.2) NOTE: QT outputs are only valid up to 65535 counts due to internal mathematical limitations. Pinnacle Park 1031 Goodworth Drive Apex, NC 27539 USA Tel: +1-919.772.0115 +1-919-772-8259 www.ati-ia.com Email: [email protected] B - 34 F/T Controller Installation and Operation Manual Document #9620-05-ctl-11 System and user communications Comments >CD A Select ASCII output. >CD R Select resolved force output. >QR 0, Request a single record. 89, 34, 76, -23, 98, -78 >CD D Select raw strain gage values. >QR 0, ASCII resolved force output. Request a single record. 12, 56, 1000, 345, 0, -678 ASCII strain gage records. >CD R Select resolved force output. >QS Request a single record. 0, 89, 34, 76, -23, 98, -78 ASCII resolved force output. 0, 89, 34, 76, -23, 98, -78 (user enters <CR> to halt output) > System halts output, processes <CR>. >QT Request a single resultant record. 122, 127 ASCII resultant axes Fr and Tr. > Figure 5.2—Communication setup and query examples 4.4 Sensor Commands 4.4.1 Sensor Biasing (SB, SU, SZ) The F/T Controller has the capability of storing three different bias (zero) readings. Biasing is useful for eliminating the effects of gravity (tool weight) or other forces acting on the end-effector. When a sensor bias is performed, the Controller will read the forces and torques currently acting on the sensor and use these readings as a reference for future readings. Future readings will have this reference subtracted from them before they are transmitted. NOTE: When biasing, ensure the force and torque readings are steady-state. Biasing while the transducer is vibrating, accelerating, or decelerating can provide a poor reference for your application. - SB Sensor Bias Performs a sensor bias. Bias readings are stored in a LIFO (last-in-first-out) buffer. If an SB command is issued, the present bias reading (if any) is stored in the buffer. If an SU (Sensor Unbias) command is then issued, the previous bias reading is removed from the buffer and used as the current bias reading. Up to three levels of bias readings may be stored in this manner. If an SB command is issued when the bias buffer is full, the bias replaces the most recent bias. This leaves the first two biases undisturbed. SB command format: user: SB<CR> response: SB<CR><LF> <ACK><ACK><CR><LF> > Pinnacle Park 1031 Goodworth Drive Apex, NC 27539 USA Tel: +1-919.772.0115 +1-919-772-8259 www.ati-ia.com Email: [email protected] B - 35 F/T Controller Installation and Operation Manual Document #9620-05-ctl-11 - SU Sensor Unbias Removes the last bias from the LIFO buffer and the previous bias, if any, is used as the current bias reading. SU command format: user: SU<CR> response: SU<CR><LF> <ACK><ACK><CR><LF> > - SZ Sensor Zero bias Removes all previously stored biases. This command is executed on power-up or reset. SZ command format: user: SZ<CR> response: SZ<CR><LF> <ACK><ACK><CR><LF> > 4.4.2 Sensor Peaks (SP b, SC) The commands below work with collecting and clearing the maximum and minimum F/T values. - QP Query Peaks Request output of maximum and minimum values of resolved force/torque data collected from SP command. The maximum values are preloaded with -9999 and the minimum values are preloaded with 9999. These preloaded values will be seen if the SP command was never enabled, after a hardware or software reset or after the SC command was issued. The QP command will not affect the collection of the maximum or minimum values while the SP command is enabled. QP command format: user: QP<CR> response: <ACK><Fxmax>, <Fymax>, <Fzmax>, <Txmax>, <Tymax>, <Tzmax><CR><LF> <Fxmin>, <Fymin>, <Fzmin>, <Txmin>, <Tymin>, <Tzmin><CR><LF> <ACK><CR><LF> > - SP b Sensor Peaks b=1: Enable collection of force/torque maximum and minimum values. b=0: Disable collection of force/torque maximum and minimum values; default. When enabled maximum and minimum F/T values are collected until reset or the command is disabled. The maximum and minimum values collected are kept in a buffer until they are cleared by the SC command or a system reset occurs. Use the QP command to read the values stored in this buffer. You can examine this buffer with SP enabled or disabled. SP b command format: user: SP 1<CR> response: SP 1<CR><LF> <ACK><ACK><CR><LF> > The current state of SP command will be transmitted when the value b is omitted. SP command format: user: SP<CR> response: SP<CR><LF> <ACK>Peak monitoring enabled<CR><LF> <ACK><CR><LF> > Pinnacle Park 1031 Goodworth Drive Apex, NC 27539 USA Tel: +1-919.772.0115 +1-919-772-8259 www.ati-ia.com Email: [email protected] B - 36 F/T Controller Installation and Operation Manual Document #9620-05-ctl-11 - SC Sensor peaks Cleared Loads -9999 in the maximum values and 9999 in the minimum values. This command is executed on system reset. If the sensor peak monitoring is enabled and the SC command is issued, then the buffer will be cleared and new minimum and maximum values will be collected (issuing the SC command does not disable peak monitoring). SC command format: user: SC<CR> response: SC<CR><LF> <ACK><ACK><CR><LF> > 4.4.3 Other Sensor Commands - CF d Communicate Fast d=0: Automatic SF optimization is disabled; default d=1: Automatic SF optimization is enabled and SF is changed as needed d=2: Same as d=1, provided for backwards compatibility with previous F/T Controllers. d=3: Same as d=1, provided for backwards compatibility with previous F/T Controllers. The Communicate Fast mode will automatically adjust the F/T Controller‘s internal sampling frequency (SF command) to maximize the RS-232 serial data output rate. The adjustments are based on the current settings of the baud rate (CB command), the number output vectors (CV command), and the CD A or CD B mode selection. CF d command format: user: CF 1<CR> response: CF 1<CR><LF> <ACK><ACK><CR><LF> > If a value for d is omitted, the system will indicate the current state of the SM command. CF command format: user: CF<CR> response: CF<CR><LF> <ACK>Fast mode 1 enabled<CR><LF> <ACK><CR><LF> > - SM b Sensor Monitoring b=1: Enable sending error message if sensor error is occurring; default. b=0: Disable sending error message if sensor error is occurring. The sensor monitoring command only affects the transmission of an error message being sent due to a sensor error. The error flag health line and health LED are not affected by this command; see Section 4.2—Communication Setup Commands. The sensor error could occur due to saturation, disconnected transducer cable, or broken transducer. This command is enabled by default. While the SM command is enabled and a sensor error is occurring, an error message will repeat continuously until the error is corrected or disabled. SM b command format: user: SM 0<CR> response: SM 0<CR><LF> <ACK><ACK><CR><LF> > If a value for b is omitted, the system will indicate the current state of the SM command. SM command format: user: SM<CR> response: SM<CR><LF> <ACK>Sensor monitoring disabled<CR><LF> <ACK><CR><LF> > Pinnacle Park 1031 Goodworth Drive Apex, NC 27539 USA Tel: +1-919.772.0115 +1-919-772-8259 www.ati-ia.com Email: [email protected] B - 37 F/T Controller Installation and Operation Manual Document #9620-05-ctl-11 - SF d Sensor sampling Frequency The sampling frequency sets the internal update rate of the F/T Controller . The F/T Controller is factory-set to the highest value. Setting the sampling frequency to a lower value should only be done by advanced users. The parameter d can range from 6 to 3336. SF d command format: user: SF 950<CR> response: SF 950<CR><LF> (Sampling frequency changed to 950 Hz) <ACK><ACK><CR><LF> > If a value for d is omitted, the system will indicate the current state of the SF command. SF command format: user: SF<CR> response: SF<CR><LF> <ACK>2500<CR><LF> <ACK><CR><LF> > - SA d Sensor Averaging Performs a moving average of the last d samples of sensor data. This can be useful to reduce the effects of mechanical vibrations and inertia. The parameter d must be 0, 2, 4, 8, 16, 32, 64, or 128. A value of 0 disables the averaging function. SA d command format: user: SA 4<CR> response: SA 4<CR><LF> <ACK><ACK><CR><LF> > If a value for d is omitted, the system will indicate the current state of the SM command. SA command format: user: SA<CR> response: SA<CR><LF> <ACK>Averaging filtering on <ACK><CR><LF> Filter = 4<CR><LF> > NOTE: A moving average is performed as follows: 1. Collect the number or records requested (2, 4, 8, 16, 32, 64, or 128) 2. Calculate the mean value of the collected records 3. Output the calculated mean value 4. Remove the oldest value collected and replace it with a new value 5. Go to step 2 and continue. Pinnacle Park 1031 Goodworth Drive Apex, NC 27539 USA Tel: +1-919.772.0115 +1-919-772-8259 www.ati-ia.com Email: [email protected] B - 38 F/T Controller Installation and Operation Manual Document #9620-05-ctl-11 - SR b Sensor power protection Reset • The SR command setting can be saved in permanent memory with the RS command. The SR command controls the E161 sensor cable error message that is generated when too much current draw is sensed on the transducer port. When too much current is sensed, the F/T Controller will automatically disable power to the transducer port and then periodically reapply power to see if the fault has cleared. If the fault still exists, the power is disabled again. SR b command format: user: SR 1<CR> response: SR 1<CR><LF> <ACK><ACK><CR><LF> > If a value for b is omitted, the system will indicate the current state of the SM command. SA command format: user: SR<CR> response: SR<CR><LF> <ACK>Sensor cable monitor: enabled<CR><LF> <ACK><CR><LF> > 4.5 Discrete I/O Commands See Section 5—Serial and Discrete I/O for a complete description of the discrete I/O. The commands shown in this section are issued through the serial port and involve the use of the discrete I/O. 4.5.1 I/O Verification (ID, OD h) The following commands are useful for verifying proper discrete I/O connection. See Section 5—Serial and Discrete I/O for pin-out and electrical specifications. - ID Input Discrete Reads and displays the state of all discrete input lines. When the ID command is issued, seven characters representing the status of the input lines are transmitted. ID command format: user: ID<CR> response: ID<CR><LF> <ACK><I3><I2><I1><I0><sp><M><B><CR><LF> <ACK><CR><LF> > <I3> <I2> <I1> <I0> <M> <B> = = = = = = Input bit 3, where 1 is on and 0 is off Input bit 2 Input bit 1 Input bit 0 Monitor input Bias input System and user communications Comments >ID 0100 10 > Request discrete inputs Input bits 3, 1, and 0 are off; monitor line is on, bias line is off Figure 5.3—Example of ID command Pinnacle Park 1031 Goodworth Drive Apex, NC 27539 USA Tel: +1-919.772.0115 +1-919-772-8259 www.ati-ia.com Email: [email protected] B - 39 F/T Controller Installation and Operation Manual Document #9620-05-ctl-11 - OD h Output Discrete Sets the state of all discrete outputs and F/T Controller front panel error LED as specified by the hexadecimal number h where the value of h is determined by: bit function 0 Discrete I/O Output bit 0 1 Discrete I/O Output bit 1 2 Discrete I/O Output bit 2 3 Discrete I/O Output bit 3 4 Discrete I/O Status line 5 System LED on Controller front (0 = green, 1 = red) 6 Discrete I/O health line OD h command format: user: OD 4A<CR> response: OD 4A<CR><LF> (4A = 01001010 binary which turns on <ACK><ACK><CR><LF> > discrete I/O output bit 1, 3 and the discrete I/O health line) If a value for h is omitted, the system will indicate the current state of the OD bits. OD command format: user: OD<CR> response: OD<CR><LF> <ACK>011 0010<CR><LF> <ACK><CR><LF> CAUTION: The monitor conditions and tool frames are stored in run-time memory, which is volatile. Run-time memory is reloaded from permanent memory after system reset or power up. Use the RS (Run Save) command to store any monitor condition or tool frame changes in permanent memory. Changes will be lost if not stored in permanent memory. Keep a written copy of monitor conditions and tool frames in case of accidental erasure or system failure. NOTE: If the discrete I/O health line is off (not conducting), an error is occurring. Example errors are blown fuse, gage saturation, disconnected transducer, powereddown system, etc. The health line is on (conducting) when there is no error. CAUTION: If the OD (Output Discrete) command is used to turn off the health line, be sure to turn it back on before using the health line to check for system errors. 4.5.2 Force Monitoring Commands (MC s, MD d, ML, MH b, MV h) DANGER: Always monitor the health output and disregard monitor condition outputs when there is an error. An error condition will be caused by saturation. Saturation can result in wildly-inaccurate force and torque values. Connected equipment that relies on this data can behave erratically or dangerously if saturation is not monitored and handled. You can program the F/T Controller to monitor force and torque thresholds. The Pinnacle Park 1031 Goodworth Drive Apex, NC 27539 USA Tel: +1-919.772.0115 +1-919-772-8259 www.ati-ia.com Email: [email protected] B - 40 F/T Controller Installation and Operation Manual Document #9620-05-ctl-11 thresholds are programmed in statements called monitor conditions, using the MC command, and stored in non-volatile memory. The MD and ML commands are used to delete and list the stored monitor condition(s), respectively. The discrete I/O is used to select the monitor condition(s) to be scanned and to output the programmed thresholds that have become valid, see Section 5—Serial and Discrete I/O. The F/T Controller can store a total of 32 monitor conditions. - MC s Monitor Create • The MC command setting can be saved in permanent memory with the RS command. Creates a monitor condition, s. The monitor condition consists of: Input code/Threshold condition/Output code Input and output codes consist of a four-bit binary code (e.g. 0101) and work with the input and output discrete I/O lines; see Section 5—Serial and Discrete I/O. Leading zeros are not required with the output or input codes (i.e. 0101 is the same as 101). The input code identifies the monitor condition for scanning. The output code is used to identify which monitor conditions became true during scanning. The threshold is a statement consisting of three components: a) Force or torque component: Fr, Fx, Fy, Fz, Tr, Tx, Ty, Tz (see MV command for information on Fr and Tr.) b) Greater or less than sign: >, < c) Threshold value in counts; see Appendix B—Dual-Gain Calibration Instructions. A condition is considered true if the condition has been selected for scanning and the threshold condition is satisfied by the measured forces and torques. MC s command format: user: MC 1001/FZ>123/0101<CR> response: MC 1001/FZ>123/0101<CR><LF> <ACK><ACK><CR><LF> > where: MC is the command name typed at the prompt. 1001 is the input code (send this code to the discrete I/O to turn this condition on). FZ>123 is the threshold condition (if Fz is greater than 123 this statement is true). 0101 is the output code (sent to the discrete I/O if threshold condition is true). As you can see, it is easy to use the monitor condition to look for a force or torque above or below a preset value. You can combine monitor conditions to check for a variety of complex conditions. An example follows: Example: The force sensor is to check for Fz (force along the Z-axis) greater than 575 counts, but less than 775 counts. The following monitor conditions should be written to implement this: MC 1101/FZ<775/1000 MC 1101/FZ>575/0001 The graph in Figure 5.3 shows the output code based on the value of Fz. You can determine when Fz is between 775 and 575 counts by sending an input code of 1101 and waiting for an output code of 1001. An output code of 1000 indicates that Fz is below the lower limit, while an output code of 0001 indicates that Fz is above the upper limit. Pinnacle Park 1031 Goodworth Drive Apex, NC 27539 USA Tel: +1-919.772.0115 +1-919-772-8259 www.ati-ia.com Email: [email protected] B - 41 F/T Controller Installation and Operation Manual Document #9620-05-ctl-11 900 Output Code = 0001 850 800 Upper Limit (775 counts) Fz Counts 750 700 Output Code = 1001 650 600 Lower Limit (575 counts) 550 500 Output Code = 1000 450 400 Time Figure 5.4—Correlation of output code vs. counts for the monitor condition example After each monitor condition is created, a statement number is assigned to it. You can view these statement numbers when using the ML command. If an invalid monitor condition is entered, then an error is displayed and the monitor condition is not assigned a statement number. You must use the RS command to permanently store any changes to the monitor conditions. CAUTION Do not forget to use the RS (Run Save) command to store new monitor conditions into permanent memory. - MD d Monitor Delete • The MD command setting can be saved in permanent memory with the RS command. Deletes monitor condition where d is the statement number 1–32. Use the ML command to find the statement number assigned to the monitor condition you wish to delete. MD * deletes all stored statements. If MD * is used then a confirmation statement is given to ensure that all monitor statements are to be deleted. MD d command format: user: MD 3<CR> (deletes monitor condition # 3) response: MD 3<CR><LF> <ACK><ACK><CR><LF> > Pinnacle Park 1031 Goodworth Drive Apex, NC 27539 USA Tel: +1-919.772.0115 +1-919-772-8259 www.ati-ia.com Email: [email protected] B - 42 F/T Controller Installation and Operation Manual Document #9620-05-ctl-11 System and user communications Comments >MC 0001/Fy>245/0101 A new monitor Condition >mc 1/Fy>245/101 This monitor condition. is the same as the first statement >Mc 0111/Tx<789/1111 Third monitor condition. Note commands are not case sensitive >ML 1) 0001/Fy>245/0101 3) 0111/Tx<789/1111 List all monitor conditions 2) 0001/Fy>245/0101 >RS Permanently save monitor conditions >MD * Delete all monitor conditions (Y/N)? Y Delete all monitor conditions >ml E129 No monitor conditions(s) List all monitor conditions Confirmation of command Response to no conditions > Figure 5.5—Example of constructing, deleting, and listing monitor conditions - ML Monitor List Lists all stored Monitor conditions (1 to 32), including their respective statement numbers. If no monitor conditions are stored then an error message is given informing that no monitor conditions exist. ML command format: user: ML<CR> response: ML<CR><LF> <ACK>1)<monitor condition><sp>..<sp>2)<monitor condition> (the list continues until all the monitor conditions are shown) <ACK><CR><LF> > - MH b Monitor Handshake mode b=0: Require Monitor discrete input handshaking; default. b=1: Enable handshakeless Monitor Condition functioning. By default the Monitor Conditions function requires the Monitor discrete input line to indicate the input condition is ready. Once this occurs the Monitor Conditions processing can begin. When the handshakeless Monitor Condition mode is enabled, then the discrete I/O input code is processed immediately without regards to the state of the Monitor input line. MH 1 command format: user: MH 1<CR> response: MH 1<CR><LF> <ACK><ACK><CR><LF> > If a value for b is omitted, the system will indicate the current state of the MH command. MH command format: user: MH<CR> response: MH<CR><LF> <ACK>Handshake-less Monitor Enabled<CR><LF> <ACK><CR><LF> > Pinnacle Park 1031 Goodworth Drive Apex, NC 27539 USA Tel: +1-919.772.0115 +1-919-772-8259 www.ati-ia.com Email: [email protected] B - 43 F/T Controller Installation and Operation Manual Document #9620-05-ctl-11 - MV h Monitor Vectors Selects the individual axes used in calculating resultant vectors Fr and Tr. The resultant vector is the square root of the sum of the squares of the selected vectors. Vector Fr is calculated from the enabled force axes. Vector Tr is calculated from the enabled torque axes. (The QT command reports the current Fr and Tr values.) The value h is a hexadecimal number where each bit represents a force or torque component. The value of h is determined as follows: (bits): 7 6 5 4 3 2 1 0 Component enabled: 0 0 Tz Ty Tx Fz Fy Fx Example : MV h command format: user: MV 37<CR> (Enables Tz, Ty and Fz, Fy, Fx) response: 37 hex = 00110111 binary If a value for h is omitted, the system will indicate the current value of h. MV h command format: user: MV <CR> response: MV <CR><LF> <ACK>37<CR><LF> <ACK><CR><LF> 4.6 Tool Frame Commands The default calibration matrix resolves forces and torque with respect to the transducer origin. By using a tool transformation, it is possible to directly measure the forces and torques acting at some point other than the origin of the transducer. Tool transformations are particularly useful when this point is chosen as the point of contact between the robotic end-effector (tool) and the object being worked. The tool transformation may also rotate the coordinate frame to align resolved force/torque components with the natural axes of the task geometry. It is possible to have four calibration matrices stored in your F/T Controller. The factory installs the original calibration matrix which represents the calibration with the X, Y, and Z orientation shown on the transducer drawings in the F/T Transducer Manual , 9620-05-Transducer Section, F/T Transducer Installation, Operation, and Specification Manual. This factory calibration matrix is stored as tool frame 0. You can change this calibrated orientation (rotation or translation) by changing the calibration matrix with the TC command. It is possible to delete one of the tool frames by using the TD command. You must use the RS command to store any tool frame changes into permanent memory or they will be lost with a software or hardware reset. NOTE: Multiple transducers can be used with one F/T Controller. In some special cases, more than one factory calibration matrix can be placed into one F/T Controller. With this capability, one to four transducers can be used with one F/T Controller, although not simultaneously. This allows you to switch from one matrix to another with the TF (Tool Frame) command. Call ATI Industrial Automation for more information. NOTE: All transducer working specifications pertain to the factory point-or-origin only. This includes the transducer’s range, resolution, and accuracy. The transducer working specifications at a customer-applied point-of-origin will differ from those at the factory point-of-origin. Pinnacle Park 1031 Goodworth Drive Apex, NC 27539 USA Tel: +1-919.772.0115 +1-919-772-8259 www.ati-ia.com Email: [email protected] B - 44 F/T Controller Installation and Operation Manual Document #9620-05-ctl-11 4.6.1 Tool Frame Selection, Listing and Deleting (TF d, TL, TD d) - TF d Tool Frame selection • The TF command setting can be saved in permanent memory with the RS command. Select a tool frame in run memory, d = 0, 1, 2 or 3. The original calibration matrix is stored in position 0. If you want the tool frame selected to start up after software or hardware reset send an RS command after selecting the tool frame. Issuing the TF command with no other value returns the current state. TF d command format: user: TF 1<CR> response: TF 1<CR><LF> <ACK><ACK><CR><LF> (tool frame 1 selected) > If a value for d is omitted, the system will indicate the current state of the TF command. TF command format: user: TF<CR> response: TF<CR><LF> <ACK>1) TEST1 , 0, 100, 0, 0, 0, 900<CR><LF> <ACK><CR><LF> > Where the tool frame number, ―1‖, is displayed first, name of the tool frame second, and the translational and rotational numbers last; see the TD command. NOTE: When a new tool frame is selected, any bias points will be changed. This can make the output data seem inaccurate if the output data is expected to be relative to a bias taken before the tool frame selection. - TL Tool frame Listing Lists the four available tool frames. The listing consists of a six-character name and six integers representing rotational and translational codes that change the original calibration matrix. TL command format: user: TL<CR> response: TL<CR><LF> (Example values shown) <ACK>0) FT0000 , 1) TEST1 , 2) 3) <ACK><CR><LF> > - 0, 0, 0, 0, 100, 0, 0, 0, 0, 0, 0, 0, 0, 0, 0, 0, 0, 0, 0, 0, 0<CR><LF> 900<CR><LF> 0<CR><LF> 0<CR><LF> TD d Tool frame Delete • The TD command setting can be saved in permanent memory with the RS command. Deletes a tool frame from run memory, d = 1, 2 or 3. Use the RS command to store running memory into permanent memory. You can also use d = * (asterisk character) to delete all tool frames except the calibration matrix stored in 0 tool frame. If you use the ―TD *‖ then you will be asked ―Delete all tool frames (Y/N)?‖ You cannot delete the 0 tool frame and you cannot delete the tool frame you are currently using. TD d command format: user: TD 1<CR> response: TD 1<CR><LF> (delete tool frame 1) <ACK><ACK><CR><LF> > Pinnacle Park 1031 Goodworth Drive Apex, NC 27539 USA Tel: +1-919.772.0115 +1-919-772-8259 www.ati-ia.com Email: [email protected] B - 45 F/T Controller Installation and Operation Manual Document #9620-05-ctl-11 4.6.2 Tool Frame Construction (TC d, s, x, y, z, R, P, Y) - TC d, s, x, y, z, R, P, Y) Tool frame Construction • The TC command setting can be saved in permanent memory with the RS command. Allows you to shift and/or rotate the sensor reference frame by specifying offsets from the currently selected frame. The parameter d (1, 2 or 3) represents the tool frame location in which to store the newly-constructed calibration matrix (in run memory use RS command to store into permanent memory). You cannot store into tool frame position 0, since this holds the factory calibration and can only be changed at the factory. If you attempt to store a newly-constructed matrix in the tool frame position 0 you will receive an error message. You also cannot construct a new tool frame in the currently selected tool frame (i.e., if you want to construct a new calibration matrix for tool frame 1, your current tool frame cannot be 1, but should be 0, 2, or 3, if defined). The newly-constructed tool frame is built from the currently selected tool frame. The string s is a one-to-six character name that is assigned to this tool frame. The integers x, y, and z represent the translation distances along each of these axes. To derive values for these numbers, divide the actual distance by the Tool Transform Factor. The Tool Transform Factor for your sensor calibration can be found in the F/T Transducer Manual, 9620-05-Transducer Section, F/T Transducer Installation, Operation, and Specification Manual, in the CON Calibration Specifications table for the transducer model or by this formula: ToolTransformFactor ForceCountValue 100 TorqueCountValue For example, to translate a metric Nano17‘s coordinate system by 0.8mm, the value would be: 0.8mm 16units 0.05mm / unit The integers R, P, and Y (roll, pitch and yaw) represent 1/10 of a degree for rotation about X-, Y- and Z-axis respectively (for example, if P = 100, then the coordinate system is rotated 10° about the Y-axis). In a tool transformation, the order of the rotations matters. The X-rotation occurs first, followed by rotation about Y (in its new orientation), then Z. Therefore, you MUST express your rotations in this order. Use the right hand rule to find the positive and negative rotation. Example of right hand rule: point your thumb along the positive axis you are interested in rotating about and your fingers will roll about the positive rotation direction. Pinnacle Park 1031 Goodworth Drive Apex, NC 27539 USA Tel: +1-919.772.0115 +1-919-772-8259 www.ati-ia.com Email: [email protected] B - 46 F/T Controller Installation and Operation Manual Document #9620-05-ctl-11 Suppose we want to move the origin of our Gamma sensor (US units) -1 inch in the X direction and 6 inches in the Z direction. We also want to rotate -90° about the X-axis, then 5.3° about the Z-axis. We will store this in tool frame 2 and name it STORE2. TC d, s, x, y, z, R, P, Y command format: User: TC 2, STORE2, -100, 0, 600, -900, 0, 53<CR> response: TC 2, STORE2, -100, 0, 600, -900, 0, 53<CR><LF> <ACK><ACK><CR><LF> > CAUTION Do not forget to use the RS (Run Save) command to store new monitor conditions into permanent memory. 4.6.3 Tool Frame Transducer (TT) - TT Tool frame Transducer Displays the transducer serial number on which the currently select tool frame is based. This is useful for keeping track of the origin of a given tool frame. TT command format: user: TT<CR> response: TT<CR><LF> <ACK>FT1234<CR><LF> <ACK><CR><LF> (tool frame is for transducer FT1234) > 4.7 Other F/T Commands 4.7.1 Zip Macro Create Start-up Buffer (ZC 0, "s") - ZC 0, "s" Zip macro Create Creates a buffer of commands, s, which are sequentially executed at system power-up or reset. Commands must be separated by a semicolon. The buffer is stored in permanent memory (you do not need to use the RS command). ZC 0,"s" command format: user: ZC 0, "SA4;SB"<CR> response: ZC 0, "SA4;SB"<CR><LF> <ACK><ACK><CR><LF> > If the ZC command is used without any parameters, the start-up buffer is displayed. ZC command format: user: ZC<CR> response: ZC<CR><LF> <ACK> SA 4;SB;<CR><LF> <ACK><CR><LF> > To clear the buffer, simply enter an empty command string: ZC 0,""<CR> 4.7.2 Warm Start (^W) - ^W (Control-W) Warm start Performs a system reset and is identical to pressing the reset button. A header message will appear on start-up which consist of: a. The currently selected tool frame and its name. b. The transducer serial number of the tool frame. c. The transducer model, calibration, and tool frame distance units. d. F/T Controller firmware version. e. Copyright notice. Example: Tool Frame 1 is loaded and is based on a Gamma transducer calibrated as a US- Pinnacle Park 1031 Goodworth Drive Apex, NC 27539 USA Tel: +1-919.772.0115 +1-919-772-8259 www.ati-ia.com Email: [email protected] B - 47 F/T Controller Installation and Operation Manual Document #9620-05-ctl-11 15-50, serial number FT1234. Tool Frame 1 is named ―JOB012‖. The F/T Controller firmware version is 7.3 and was copyrighted in 2004. user enters: ^W <CR><LF> <XON><CR><LF> F/T Force and Torque Sensor System, Version 7.3 ATI Industrial Automation, Inc., www.ati-ia.com Copyright 2004. All Rights Reserved. Tool Frame 1 (JOB012) loaded: FT1234 GAMMA/US-15-50 (1.000e-2 in/unit)<CR><LF> <CR><LF> > 4.7.3 <XON> and <XOFF> (^Q, ^S) Software handshaking (<XON>/<XOFF>) is implemented for all ASCII communications except binary communications. - 4.7.4 ^Q <XON> ^S <XOFF> Upon power-up or system reset the F/T Controller ignores any previously received <XOFF> and begins to transmit data. Also, the F/T Controller transmits an <XON> to clear any previously transmitted <XOFF> so data can be received. Store and Reload Run Memory (RS, RL) The RS command will store any changes that were made in run memory (also known as working memory) into permanent memory. If you do not perform an RS command after changing the tool frame, and a software or hardware reset occurs, the change will be lost. - RS Store Run memory into permanent memory The RS command will store any deletions or additions that were done in run memory (working memory) into permanent memory. If you do not perform an RS command after changing the tool frame, and a software or hardware reset occurs, the change will be lost. RS command format: user: RS<CR> response: RS<CR><LF> (run memory stored into permanent memory) <ACK><ACK><CR><LF> > CAUTION: New monitor conditions and tool frames are stored in run-time memory, which is volatile. Run-time memory is reloaded from permanent memory after system reset or power up. Use the RS (Run Save) command to store any monitor condition or tool frame changes in permanent memory. Changes will be lost if not stored in permanent memory. Keep a written copy of monitor conditions and tool frames in case of accidental erasure or system failure. 4.7.5 Comment Command (%) Any input line that starts with a percent sign (―%‖) will be ignored. This command is useful for annotating files of commands. % command format: user: response: % This is a comment<CR> % This is a comment<CR><LF> (ignored) <ACK><ACK><CR><LF> > Pinnacle Park 1031 Goodworth Drive Apex, NC 27539 USA Tel: +1-919.772.0115 +1-919-772-8259 www.ati-ia.com Email: [email protected] B - 48 F/T Controller Installation and Operation Manual Document #9620-05-ctl-11 4.7.6 Help Command The help command lists a summary of available comments. The listing periodically pauses for input to continue or stop the listing. The help listing is available with the ―HELP‖, ―H‖ and ―?‖ commands. HELP command format: user: HELP<CR> response: HELP<CR><LF><ACK> [x] – Optional Argument; x|y – x or y are valid arguments<CR><LF> Communication Data Mode Commands<CR><LF> CD A CD ASCII: Express data in human-readable numbers<CR><LF> CD B CD Binary: Express data in machine-readable numbers<CR><LF> . . . . . . Hit ENTER, the space bar, or C to continue, anything else to stop: Pinnacle Park 1031 Goodworth Drive Apex, NC 27539 USA Tel: +1-919.772.0115 +1-919-772-8259 www.ati-ia.com Email: [email protected] B - 49 F/T Controller Installation and Operation Manual Document #9620-05-ctl-11 5. Serial and Discrete I/O 5.1 Serial and Discrete I/O Pin Assignments 5.1.1 Serial I/O Pin-out The RS-232 serial port is a female 9-pin D-subminiature connector using a 3-wire communication. Pin Signal 1 N/C 2 Transmit 3 Receive 4 Reserved 5 Ground 6 N/C 7 N/C 8 N/C 9 N/C N/C = Not Connected Table 6.1—RS-232 serial I/O connector pin assignments 5 4 9 3 8 2 7 1 6 Figure 6.1—Serial I/O port as viewed from rear of F/T Controller Pinnacle Park 1031 Goodworth Drive Apex, NC 27539 USA Tel: +1-919.772.0115 +1-919-772-8259 www.ati-ia.com Email: [email protected] B - 50 F/T Controller Installation and Operation Manual Document #9620-05-ctl-11 5.1.2 Discrete I/O Pin-out The Discrete I/O port is a male 25-pin D-subminiature connector. PIN 1 14 2 15 3 16 4 17 5 18 6 19 7 20 8 21 9 22 10 23 11 24 12 25 13 SIGNAL + Input bit 0 - Input bit 0 + Input bit 1 - Input bit 1 + Input bit 2 - Input bit 2 + Input bit 3 - Input bit 3 + Output bit 0 - Output bit 0 + Output bit 1 - Output bit 1 + Output bit 2 - Output bit 2 + Output bit 3 - Output bit 3 + Monitor - Monitor + Status - Status + Bias - Bias + Health - Health Reserved DESCRIPTION Input lines are read as a nybble indicating which monitor condition(s) should be scanned. The Input lines are only read when the Monitor line is toggled from low to high. Output lines represent a nybble, indicating which monitor condition(s) have been triggered. The Output lines are only valid when the Status line is high. Indicates that Input lines are set up and starts monitor condition scanning. Indicates that Output lines are set up and monitor condition(s) have been triggered. When a rising edge (transition from low to high) occurs a bias command is executed. Error line. Line is high normally and goes low if an error occurs. Works the opposite of Health LED. Table 6.2—Discrete I/O connector pin assignments 1 2 14 3 15 4 16 5 17 6 18 7 19 8 20 9 21 10 22 11 23 12 24 13 25 Figure 6.2—Discrete I/O port as viewed from rear of F/T Controller Pinnacle Park 1031 Goodworth Drive Apex, NC 27539 USA Tel: +1-919.772.0115 +1-919-772-8259 www.ati-ia.com Email: [email protected] B - 51 F/T Controller Installation and Operation Manual Document #9620-05-ctl-11 5.2 Serial I/O Description The Serial I/O port uses the RS-232 format with 8-bit transmission, no parity, one stop bit, and selectable baud rate (1200, 2400, 4800, 9600, 19200, 38400, 57600 and 115200). See Section 1.7—Connecting the System Components for examples of serial port interfacing. 5.3 Discrete I/O Description The Discrete I/O signals are optically isolated and require an external power supply. Output signals are internally protected by transient suppression diodes. Typical input and output connections are shown along with a timing diagram. The Discrete I/O port has three major functions: monitor conditions, health line, and bias line. Each of these functions is described in this section. 5.3.1 Typical Input and Output Connections +Input 1.50K F/T Controller processing +Output 4.7V 511 -Output -Input Equivalent Input Circuit Equivalent Output Circuit Figure 6.3—Discrete I/O Circuitry 5.3.2 Monitor Conditions The discrete I/O works with the monitor conditions, described in Section 4.5.2—Force Monitoring Commands (MC s, MD d, ML, MH b, MV h), to indicate force/torque thresholds, greatly simplifying the programming task. The user must handshake with the Input, Output, Status, and Monitor discrete I/O lines to use the monitor conditions. The user should also monitor the health output (Section 5.3.2—Monitor Conditions) at all times, as the health output going low indicates that an error is occurring, and the transducer may be at risk of damage. The Input lines allow you to select monitor conditions to be scanned. The Output lines indicate which monitor conditions have been triggered. The Monitor line instructs the F/T Controller to scan the monitor conditions whose input code matches the Input lines. The Status line indicates that one or more monitor conditions have been triggered. When the status line is asserted, a valid output code is on the output lines. To use the discrete I/O to scan for triggered monitor conditions, do the following: Pinnacle Park 1031 Goodworth Drive Apex, NC 27539 USA Tel: +1-919.772.0115 +1-919-772-8259 www.ati-ia.com Email: [email protected] B - 52 F/T Controller Installation and Operation Manual Document #9620-05-ctl-11 a. b. c. d. e. f. g. Enter monitor conditions using the software commands shown in Section 4.5—Discrete I/O Commands. Place the Input code of the monitor condition(s) you would like to have scanned onto the Input lines. See pin assignment shown in Table 6.2. Bring the Monitor line low if it is high. Wait for the Status line to go low if it is high. Bring the Monitor line high to indicate a valid input code is present. The Input lines are read after the rising edge of the Monitor line is seen. See the timing diagram in Figure 6.4. While the Monitor line is high the selected monitor condition(s) are scanned for true conditions. If a true condition occurs, then the output code of that monitor condition is presented to the Output lines of the discrete I/O. If more than one output code is triggered, then the F/T system outputs the logical OR of the triggered output codes. Example: Three Output codes are triggered: 0010, 1000, 1100 0010 1000 1100 1110 (―‖ is the mathematical symbol for logical OR.) The code 1110 is sent to the discrete Output lines. h. i. j. k. 5.3.3 Once the output code is presented, the system will assert the Status line. Monitor conditions are no longer scanned as long as the Status line is asserted. The Monitor line should be lowered after the output code is read. When the F/T system detects the Monitor line lowered, it will remove the output code from the discrete I/O port and lower the Status line. Repeat steps b through j as often as necessary. Discrete I/O Timing Diagram Discrete Input tipw tdis t dih Monitor Input t mr tdos t doh Discrete Output t sr t sa t ma Status Output t dsa Sensor Data Figure 6.4—Discrete I/O timing diagram Pinnacle Park 1031 Goodworth Drive Apex, NC 27539 USA Tel: +1-919.772.0115 +1-919-772-8259 www.ati-ia.com Email: [email protected] B - 53 F/T Controller Installation and Operation Manual Document #9620-05-ctl-11 Symbol t t t t t t t t t Parameter Notes Min Max Units dis Discrete input setup Unaffected by Commands 0.00 sa Monitor assert to status assert 1 monitor condition 0.03 1/SF+0.09 ms 32 monitor conditions 0.10 1/SF+0.09 ms Sensor data to status assert 1 monitor condition 0.40 1/SF+0.5 ms 32 monitor conditions 0.46 1/SF+0.5 ms dos Discrete output setup Unaffected by Commands 0.00 0.01 ms mr Status assert to monitor release Unaffected by Commands 0.00 ms dih Discrete input hold Unaffected by Commands 0.00 ms sr Monitor release to status release 1 monitor condition 0.03 0.08 ms 32 monitor conditions 0.03 0.13 ms doh Discrete output hold Unaffected by Commands 0.00 1/SF ms ma Status release to monitor assert Unaffected by Commands 0.00 dsa t ms Ignored pulse width Unaffected by Commands 0.00 1/SFx0.9+0.08 ipw Notes: • Signals are measured at the discrete I/O connector. • 1/SF is the reciprocal of the current sampling frequency (see SF command) Table 6.3—Discrete I/O timing characteristics 5.3.4 ms ms Health Line This line is used in conjunction with the health LED on the front of the F/T Controller. During F/T system normal operating state, the Health line is closed and front panel System LED is blinking green. If an error occurs in the F/T system, such as saturation, the Health line is opened and the front panel System LED blinks red. The speed of the System LED blinking is only an indication of system processing load. 5.3.5 Bias Line This line is used to bias the F/T system and works the same as sending the command SB. A bias is taken on a low-to-high transition. There is no provision for unbiasing through the discrete I/O. A common application would be to bias the resolved force vector just prior to examining the forces and torques. Biasing eliminates drift and gives an accurate reading of force and torque data. Pinnacle Park 1031 Goodworth Drive Apex, NC 27539 USA Tel: +1-919.772.0115 +1-919-772-8259 www.ati-ia.com Email: [email protected] B - 54 F/T Controller Installation and Operation Manual Document #9620-05-ctl-11 5.4 Serial and Discrete I/O Electrical Characteristics 5.4.1 Serial I/O Electrical Characteristics Absolute Maximum Ratings Input lines (receive) Vin = ±30V Output lines short circuit duration (transmit) t= Parameter Output Voltage Swing Output Short Circuit Current Input Voltage Range Conditions 3k load Input Voltage Threshold Low T = 25C A T = 25C A Min. ±5 Typ. ±9 ±10 Max. ±60 +30 -30 Input Voltage Threshold High Input Hysteresis Input Resistance 0.6 0.2 3 Units V mA V 1.5 V 1.7 2.4 V 0.5 5 1.0 7 V k Table 6.4—Serial I/O electrical characteristics 5.4.2 Discrete I/O Electrical Characteristics Absolute Maximum Ratings Input lines (Input bits 0, 1, 2, 3, Monitor, and Bias) Vin = -24.0V to 26.5V Iin = -85.0mA to 65.0mA Output lines (Output bits 0, 1, 2, 3, Status, and Health) Vce = -7.0V to 55.0V Ic = 50.0mA CAUTION: Do not exceed Absolute Maximum Ratings— permanent damage may occur to the F/T Controller. Parameter Input Voltage Operating Range Input Voltage Threshold Low Input Voltage Threshold High Conditions User Supply Voltage I 1.1mA in I 1.1mA in Output Voltage Operating Range Output Current Leakage Output Collector Current Min. 10.0 Typ. Units V 1.6 V 1.7 V 10.0 V=10V, R =1.0k L V=24V, R =1.0k L Max. 24.0 24.0 V 11.2 mA 20.9 mA Table 6.5—Discrete I/O electrical characteristics Pinnacle Park 1031 Goodworth Drive Apex, NC 27539 USA Tel: +1-919.772.0115 +1-919-772-8259 www.ati-ia.com Email: [email protected] B - 55 F/T Controller Installation and Operation Manual Document #9620-05-ctl-11 6. Analog Output 6.1 Introduction The Analog Output allows the user to output F/T data from the F/T Controller at faster speeds than the standard RS-232 serial port. The six outputs of the analog interface always represent resolved F/T values; raw strain gage data cannot be sent over the analog output. 6.2 Analog Output Description The analog output port provides analog voltages representing sensor data. The analog outputs are a voltage representation of resolved data streamed similarly to the QS command. The 26-pin high-density female D-sub connector provides either a ±5V or ±10V range depending on the setting of the CR command. To reduce potential analog noise, we recommend using twisted-pair cable in your analog port connections. If you use the analog outputs to read the force and torque values, it is also recommended that you monitor the Discrete I/O health line (see Section 5.3.4—Health Line), at a minimum, in order to detect errors in the F/T system. DANGER: Always monitor the health output and analog outputs when there is an error. An error condition will be caused by saturation. Saturation can result in wildly-inaccurate force and torque values. Connected equipment that relies on this data can behave erratically or dangerously if saturation is not monitored and handled. 6.2.1 Analog Port Pin Assignments The Analog Output port is a high-density, D-subminiature female 26-pin connector with female #4-40 screwlocks. To mate to this connector a high-density, D-subminiature male 26-pin connector with male #4-40 screwlocks is required. See Section 9.5—9105-CA-Uxxx Analog Cable Drawing for information on the optional 9105-CA-U cable. PIN DESCRIPTION 1 No connection 2 Reserved 3 Reserved 4 Tz signal 5 Ty signal 6 Tx signal 7 Fz signal 8 Fy signal 9 Fx signal PIN DESCRIPTION 10 No connection 11 Reserved 12 Reserved 13 Tz reference 14 Ty reference 15 Tx reference 16 Fz reference 17 Fy reference 18 Fx reference PIN DESCRIPTION 19 No Connection 20 No connection 21 Reserved 22 Reserved 23 Reserved 24 No connection 25 No connection 26 No connection Table 7.1—Analog Port Pin Assignments Pinnacle Park 1031 Goodworth Drive Apex, NC 27539 USA Tel: +1-919.772.0115 +1-919-772-8259 www.ati-ia.com Email: [email protected] B - 56 F/T Controller Installation and Operation Manual Document #9620-05-ctl-11 shielding (connected to connector shells) Ch0+ Ch0- 26 25 24 23 22 21 20 19 9 18 8 17 7 16 6 15 5 14 4 13 3 12 2 11 1 10 Ch1+ Ch1- Fx_Signal Fx_Ref erence Fy _Signal Fy _Ref erence Fz_Signal Fz_Ref erence Tx_Signal Tx_Ref erence Ty _Signal Ty _Ref erence Tz_Signal Tz_Ref erence Ch2+ Ch2Ch3+ Ch3Ch4+ Ch4Ch5+ Ch5Ch6+ Ch6twisted pairs F/T Controller Analog Output Ch7+ Ch7Analog Input Ground Optional Ground Connection (Required by some DAQ cards to minimize noise.) User DAQ Sy stem Inputs Figure 7.1—Differential Connections to a Data Acquisition System shielding (connected to connector shells) Ch0+ 26 25 24 23 22 21 20 19 9 18 8 17 7 16 6 15 5 14 4 13 3 12 2 11 1 10 Ch1+ Fx_Signal Fx_Ref erence Fy _Signal Fy _Ref erence Fz_Signal Fz_Ref erence Tx_Signal Tx_Ref erence Ty _Signal Ty _Ref erence Tz_Signal Tz_Ref erence Ch2+ Ch3+ Ch4+ Ch5+ Ch6+ Ch7+ F/T Controller Analog Output Analog Input Sense User DAQ Sy stem Inputs Figure 7.2—Single-Ended Connections to a Data Acquisition System 6.2.2 Legacy Analog Port Pin Assignments The Legacy Analog port is provided so users of older F/T Controllers can easily connect to this model F/T Controller. It is strongly recommended that connections should be made to the Analog Output connector instead of the Legacy Analog connector to ensure compatibility for future products. Pinnacle Park 1031 Goodworth Drive Apex, NC 27539 USA Tel: +1-919.772.0115 +1-919-772-8259 www.ati-ia.com Email: [email protected] B - 57 F/T Controller Installation and Operation Manual Document #9620-05-ctl-11 PIN 1 3 5 7 9 11 13 15 17 19 DESCRIPTION Reserved No connection Reserved Reserved Tz reference Ty reference Tx reference Fz reference Fy reference Fx reference PIN 2 4 6 8 10 12 14 16 18 20 DESCRIPTION Reserved No connection Reserved Reserved Tz signal Ty signal Tx signal Fz signal Fy signal Fx signal Table 7.2—Legacy Analog Port Pin Assignments 6.2.3 Analog Output Function The analog port outputs the same data as the query commands (QS, QR and ^T) as voltages, but always outputs resolved (CD R) data. Outputs are scaled so full-scale sensor data is output as a full-scale analog voltage (±5V for CR 5, ±10V for CR 10). For example, if the F/T is set up with CD R (communicate data resolved) command and the rated load is applied to the Fx axis, then the analog output Fx will be at full-scale voltage. 6.2.4 Analog Output Filtering As with any digital-to-analog conversion, the analog output signals may need to be filtered to remove unwanted high-frequency steps (discontinuities) that occur when the output is updated. To ensure the fastest output possible, the F/T controller does not filter its analog outputs. Some users may want to add their own output filtering if their system has special needs. 6.2.5 Analog Output Drive Capability The analog output of the F/T Controller has no special features for driving highcapacitance loads such as very-long cables. Load capacitances over 300 pF will exhibit overshooting. Loads significantly larger will cause output oscillations. Pinnacle Park 1031 Goodworth Drive Apex, NC 27539 USA Tel: +1-919.772.0115 +1-919-772-8259 www.ati-ia.com Email: [email protected] B - 58 F/T Controller Installation and Operation Manual Document #9620-05-ctl-11 7. Troubleshooting Guide 7.1 Introduction This section includes answers to some issues that might arise when setting up and using the F/T system. The question or problem is listed followed by the probable answer or solution and are categorized for easy reference. The information in this section should answer many questions that might arise in the field. Customer service is available to users who have problems or questions addressed in the manuals: ATI Industrial Automation Customer Service Pinnacle Park 1031 Goodworth Drive Apex, NC 27539 USA Phone: +1.919.772.0115 Fax: +1.919.772.8259 E-mail: [email protected] NOTE: Please read the F/T manuals before calling customer service. When calling, have the following information available: 1. Serial number(s) 2. Transducer type (e.g., Nano17, Gamma, Theta) 3. Calibration (e.g., US-15-50, SI-130-10) 4. An accurate and complete description of the question or problem. 5. Controller revision. This is output in the initialization header message of the Controller. If possible, the F/T system should be accessible when talking with the ATI Industrial Automation customer service representative. Pinnacle Park 1031 Goodworth Drive Apex, NC 27539 USA Tel: +1-919.772.0115 +1-919-772-8259 www.ati-ia.com Email: [email protected] B - 59 F/T Controller Installation and Operation Manual Document #9620-05-ctl-11 7.2 Questions and Answers 7.2.1 Communications Question/Problem: Random characters appear on the screen while trying to communicate with the F/T Controller using a serial device. Answer/Solution: The baud rate may not be set correctly. Go into your terminal’s setup mode and set the baud rate to 9600. This is the default setting. If problems still occur check baud rate setting, see Section 1.7—Connecting the System Components. The serial device attributes may not be correct. The serial attributes should be 8-bit transmission with No Parity and One Stop Bit. Cannot communicate with the F/T system. Make sure the serial, transducer, and power cables are securely connected at both ends. Make sure the serial cable configuration is correct. See Section 5.1—Serial and Discrete I/O Pin Assignments and Section 1.7— Connecting the System Components. Check the power LED to see that the F/T Controller is getting power. Cannot get the Discrete I/O lines to communicate. See Section 5—Serial and Discrete I/O. Check handshaking and electrical connections. Use the ID and OD commands to check the Discrete I/O connections. Pinnacle Park 1031 Goodworth Drive Apex, NC 27539 USA Tel: +1-919.772.0115 +1-919-772-8259 www.ati-ia.com Email: [email protected] B - 60 F/T Controller Installation and Operation Manual Document #9620-05-ctl-11 7.2.2 Errors with force and torque readings Bad data from the transducer‘s strain gages can cause errors in force/torque readings. These errors can result in problems with threshold monitoring, sensor biasing and accuracy. Listed below are the basic conditions of bad data. Use this to troubleshoot your problem. In most cases, problems can be seen better while transmitting raw strain gage data (command CD D) to a terminal. Question/Problem: Saturation Answer/Solution: When the data from a raw decimal strain gage reads the positive or negative maximums (nominally -32768 or +32767 plus a correction factor), that gage is saturated. This generates a saturation error message and causes the System LED to turn red when sensor monitor is enabled, sets the health line low on the discrete I/O, and sets the overload bit high. Saturation occurs if the sensor is loaded beyond its rated maximum or in the event of an electrical failure within the system. The error message will repeat until the saturation error stops. If the ―SM 0‖ command was sent, then an error message will not occur, but the LED, health line, and overload byte will continue to function normally. Saturation can result in wildly-inaccurate data. Note: With optional legacy temperature compensation enabled (TC 1), it is possible to have strain gage values reported outside of the normal range. Noise Jumps in raw strain gage readings (with sensor unloaded) greater than 80 counts is considered abnormal. Noise can be caused by mechanical vibrations and electrical disturbances, possibly from a poor ground. It can also indicate component failure within the system. Drift After a load is removed or applied, the raw gage reading does not stabilize but continues to increase or decrease. This may be observed more easily in resolved data mode using the bias command, SB. Drift is caused by temperature change, mechanical coupling, or internal failure. Mechanical coupling is caused when a physical connection is made between the tool plate and the sensor body (i.e., plastic filings between the tool adapter plate and the transducer body). Some mechanical coupling is common, such as hoses and wires attached to a tool. Hysteresis When the sensor is loaded and then unloaded, gage readings do not return quickly and completely to their original readings. Hysteresis is caused by mechanical coupling (explained in drift section) or internal failure. Pinnacle Park 1031 Goodworth Drive Apex, NC 27539 USA Tel: +1-919.772.0115 +1-919-772-8259 www.ati-ia.com Email: [email protected] B - 61 F/T Controller Installation and Operation Manual Document #9620-05-ctl-11 7.3 Error Messages When an error occurs a message is sent over the serial port. The error message is comprised of the following items: a) <NAK> as the first byte. b) A capital “E” follows. c) An error number follows which consists of a three number sequence in ASCII mode or one byte in Binary mode. d) An error description no longer than 80 bytes follows the error number. e) A carriage return and line feed follows the error description and marks the end of the error message. A line feed will not be sent if it has been disabled with the CL command. f) Another carriage return and line feed follow. g) The prompt is the last item shown. At the same time, any serious error will cause the front panel of the F/T Controller to display the error as red lights in the Error grouping if this feature is enabled (see Section 4.2.1—Error Flag). System and user communications Comments >L E114 Illegal command ‗L‘ is entered by mistake Error message is displayed. The <NAK> is not displayed. <CR><LF> > are sent followed by ‗>‘ prompt. Figure 8.1—Error message example The following tables graphically represent the front panel‘s error red lights as boxes. The trailing two dots represent the Status/Health/Monitor/Bias lights that are unused in the error display. = E100 Figure 8.2—Example Error Display (see Table 8.2 for quick decoding) Pinnacle Park 1031 Goodworth Drive Apex, NC 27539 USA Tel: +1-919.772.0115 +1-919-772-8259 www.ati-ia.com Email: [email protected] B - 62 F/T Controller Installation and Operation Manual Document #9620-05-ctl-11 Display Error # ─█▀─ ∙∙ E100 E101 E102 E103 E104 E105 E106 E107 E108 E109 E110 E111 E112 E113 E114 E115 E116 E117 E118 E119 E120 E121 E122 E123 E124 E125 E126 E127 E128 E129 E130 E131 E132 E133 E134 E135 E136 ─█▀▄ ∙∙ ─██─ ∙∙ ─██▄ ∙∙ ▄▀▀─ ∙∙ ▄▀▀▄ ∙∙ ▄▀█─ ∙∙ ▄▀█▄ ∙∙ ▄█▀─ ∙∙ ▄█▀▄ ∙∙ ▄██─ ∙∙ ▄██▄ ∙∙ ─▀▀▀ ∙∙ ─▀▀█ ∙∙ ─▀█▀ ∙∙ ─▀██ ∙∙ ─█▀▀ ∙∙ ─█▀█ ∙∙ ─██▀ ∙∙ ─███ ∙∙ ▄▀▀▀ ∙∙ ▄▀▀█ ∙∙ ▄▀█▀ ∙∙ ▄▀██ ∙∙ ▄█▀▀ ∙∙ ▄█▀█ ∙∙ ▄██▀ ∙∙ ▄███ ∙∙ ▀─── ∙∙ ▀──▄ ∙∙ ▀─▄─ ∙∙ ▀─▄▄ ∙∙ ▀▄── ∙∙ ▀▄─▄ ∙∙ ▀▄▄─ ∙∙ ▀▄▄▄ ∙∙ █─── ∙∙ Error description Comment Gage 0 saturation Gage 1 saturation Gage 2 saturation Transducer is overloaded or damaged Gage 3 saturation Gage 4 saturation Gage 5 saturation Gage 6 saturation Thermistor reading in legacy systems Gage 7 saturation unused Input buffer overrun User is sending data too quickly Output buffer overrun Command too long Output buffer failure Internal error to Controller Illegal input port Internal error to Controller Illegal output port Internal error to Controller Illegal command User input was invalid X-axis force saturation Y-axis force saturation The rated load is exceeded in the axis shown Z-axis force saturation XYZ-axes torque saturation Illegal monitor condition operand Illegal output format Illegal output type A/D not converting Internal error to Controller A/D still converting Internal error to Controller Illegal filtering Illegal resolved data Output buffer full Illegal format Check format of command Value out of range Commands that use a value No monitor condition(s) Deleting a monitor condition Buffer is full Command aborted Corrupted memory Internal error to Controller Illegal vector Incorrect response received Illegal baud rate Internal error to Controller Serial port overrun Pinnacle Park 1031 Goodworth Drive Apex, NC 27539 USA Tel: +1-919.772.0115 +1-919-772-8259 www.ati-ia.com Email: [email protected] B - 63 F/T Controller Installation and Operation Manual Document #9620-05-ctl-11 Display █──▄ ∙∙ █─▄─ ∙∙ █─▄▄ ∙∙ █▄── ∙∙ █▄─▄ ∙∙ █▄▄─ ∙∙ █▄▄▄ ∙∙ ▀──▀ ∙∙ ▀──█ ∙∙ ▀─▄▀ ∙∙ ▀─▄█ ∙∙ ▀▄─▀ ∙∙ ▀▄─█ ∙∙ ▀▄▄▀ ∙∙ ▀▄▄█ ∙∙ █──▀ ∙∙ █──█ ∙∙ █─▄▀ ∙∙ █─▄█ ∙∙ █▄─▀ ∙∙ █▄─█ ∙∙ █▄▄▀ ∙∙ █▄▄█ ∙∙ ▀─▀─ ∙∙ ▀─▀▄ ∙∙ ▀─█─ ∙∙ ▀─█▄ ∙∙ ▀▄▀─ ∙∙ Error # E137 E138 E139 E140 E141 E142 E143 E144 E145 E146 E147 E148 E149 E150 E151 E152 E153 E154 E155 E156 E157 E158 E159 E160 E161 E162 E163 E164 Error description Comment Serial port framing error No response received Option is not installed Illegal average filtering value String too long Commands requiring a string Monitor condition(s) full Loading in a new monitor condition Unable to send Xoff Unable to send Xon DMA not ready Internal error to Controller DMA did not read Internal error to Controller DMA not empty Internal error to Controller Zero tool frame Selected tool frame has not been defined Illegal tool frame index Sensor Error Transducer is disconnected or damaged. Analog output range error System clock error Internal error to Controller Supervisory ADC error Internal error to Controller Check analog ground noise Internal error to Controller DC power error Internal error to Controller Analog output ±10V range error Internal error to Controller Analog output ±5V range error Internal error to Controller Analog output error Internal error to Controller Sensor cable error Damaged transducer or transducer cable Transducer ID corrupted Internal error to Controller Illegal operation on data or stack Internal error to Controller Watchdog Timer Code xx, Times fired without clearing: x Internal error to Controller Table 8.1—Error message overview Pinnacle Park 1031 Goodworth Drive Apex, NC 27539 USA Tel: +1-919.772.0115 +1-919-772-8259 www.ati-ia.com Email: [email protected] B - 64 F/T Controller Installation and Operation Manual Document #9620-05-ctl-11 Display Error # Display Error # Display ─▀▀▀ ∙∙ ─▀▀█ ∙∙ ─▀█▀ ∙∙ ─▀██ ∙∙ ─█▀─ ∙∙ ─█▀▀ ∙∙ ─█▀▄ ∙∙ ─█▀█ ∙∙ ─██─ ∙∙ ─██▀ ∙∙ ─██▄ ∙∙ ─███ ∙∙ E112 E113 E114 E115 E100 E116 E101 E117 E102 E118 E103 E119 ▀─── ∙∙ ▀──▀ ∙∙ ▀──▄ ∙∙ ▀──█ ∙∙ ▀─▀─ ∙∙ ▀─▀▄ ∙∙ ▀─▄─ ∙∙ ▀─▄▀ ∙∙ ▀─▄▄ ∙∙ ▀─▄█ ∙∙ ▀─█─ ∙∙ ▀─█▄ ∙∙ ▀▄── ∙∙ ▀▄─▀ ∙∙ ▀▄─▄ ∙∙ ▀▄─█ ∙∙ ▀▄▀─ ∙∙ ▀▄▄─ ∙∙ ▀▄▄▀ ∙∙ ▀▄▄▄ ∙∙ ▀▄▄█ ∙∙ E128 E144 E129 E145 E160 E161 E130 E146 E131 E147 E162 E163 E132 E148 E133 E149 E164 E134 E150 E135 E151 ▄▀▀─ ∙∙ ▄▀▀▀ ∙∙ ▄▀▀▄ ∙∙ ▄▀▀█ ∙∙ ▄▀█─ ∙∙ ▄▀█▀ ∙∙ ▄▀█▄ ∙∙ ▄▀██ ∙∙ ▄█▀─ ∙∙ ▄█▀▀ ∙∙ ▄█▀▄ ∙∙ ▄█▀█ ∙∙ ▄██─ ∙∙ ▄██▀ ∙∙ ▄██▄ ∙∙ ▄███ ∙∙ Error # E104 E120 E105 E121 E106 E122 E107 E123 E108 E124 E109 E125 E110 E126 E111 E127 Display Error # █─── ∙∙ █──▀ ∙∙ █──▄ ∙∙ █──█ ∙∙ █─▄─ ∙∙ █─▄▀ ∙∙ █─▄▄ ∙∙ █─▄█ ∙∙ █▄── ∙∙ █▄─▀ ∙∙ █▄─▄ ∙∙ █▄─█ ∙∙ █▄▄─ ∙∙ █▄▄▀ ∙∙ █▄▄▄ ∙∙ █▄▄█ ∙∙ E136 E152 E137 E153 E138 E154 E139 E155 E140 E156 E141 E157 E142 E158 E143 E159 Table 8.2—Front Panel Error Display Decoding (sorted from the leftmost column of display lights) Note: Not all error codes are displayed Pinnacle Park 1031 Goodworth Drive Apex, NC 27539 USA Tel: +1-919.772.0115 +1-919-772-8259 www.ati-ia.com Email: [email protected] B - 65 F/T Controller Installation and Operation Manual Document #9620-05-ctl-11 8. Advanced Topics 8.1 Detecting Failures (Diagnostics) 8.1.1 Error Detection Features The F/T Controller has error-detection features that report major issues over the serial port, health port, and front panel System light. The user‘s application needs to monitor these. See Section 7—Troubleshooting Guide for more information. CAUTION When any strain gage output is saturated or otherwise inoperable, all transducer F/T readings are invalid. Therefore, it is vitally important to monitor for these conditions. 8.1.2 Detecting Sensitivity Changes 1. Sensitivity checking of the transducer can also be used to measure the transducer system‘s health. This is done by applying known loads to the transducer and verifying the system output matches the known loads. For example, a transducer mounted to a robot arm may have an end-effector attached to it. 2. If the end-effector has moving parts, they must be moved in a known position. Place the robot arm in an orientation that allows the gravity load from the end-effector to exert load on many transducer output axes. 3. Record the output readings. 4. Position the robot arm to apply another load, this time causing the outputs to move far from the earlier readings. 5. Record the second set of output readings. 6. Find the differences from the first and second set of readings and use it as your sensitivity value. Even if the values vary somewhat from sample set to sample set, they can be used to detect gross errors. Either the resolved outputs or the raw transducer voltages may be used (the same must be used for all steps of this process). 8.2 Scheduled Maintenance 8.2.1 Periodic Inspection For most applications there are no parts that need to be replaced during normal operation. With industrial-type applications that continuously or frequently move the system‘s cabling, you should periodically check the cable jacket for signs of wear. These applications should implement the procedures discussed in Section 8.1—Detecting Failures (Diagnostics) to detect any failures. The transducer must be kept free of excessive dust, debris, or moisture. Applications with metallic debris (i.e., electrically-conductive) must protect the transducer from this debris. Transducers without specific factory-installed protection are to be considered unprotected. The internal structure of the transducers can become clogged with particles and will become uncalibrated or even damaged. Pinnacle Park 1031 Goodworth Drive Apex, NC 27539 USA Tel: +1-919.772.0115 +1-919-772-8259 www.ati-ia.com Email: [email protected] B - 66 F/T Controller Installation and Operation Manual Document #9620-05-ctl-11 8.2.2 Periodic Calibration Periodic calibration of the transducer and F/T Controller is required to maintain traceability to national standards. Follow any applicable ISO-9000-type standards for calibration. ATI Industrial Automation recommends annual recalibrations, especially for applications that frequently cycle the loads applied to the transducer. It will be necessary to load a new calibration file in the controller after your sensor has been recalibrated or you purchase another sensor to be used with your existing controller. You must load this new FT0xxxx.dat calibration file in your controller for accurate force and torque readings. You may either install the ATI SA Demo program from the CD to load the new calibration file or load the new calibration file using the ATI SA Demo program you already have installed on your PC. The new calibration matrix is on the CD in the Calibration Folder that is included with your returned sensor. To load the calibration file, start the ATI SA Demo, select File, choose Load Calibration, locate and select the new cal file on the CD in the Calibration folder. This will load the file in your computer. 8.3 A Word about Resolution ATI‘s transducers have a three sensing beam configuration where the three beams are equally spaced around a central hub and attached to the outside wall of the transducer. This design transfers applied loads to multiple sensing beams and allows the transducer to increase its sensing range in a given axis if a counterpart axis has reduced. (See F/T Transducer Manual for compound load information.) The resolution of each transducer axis depends on how the applied load is spread among the sensing beams. The best resolution occurs in the scenario when the quantization of the gages is evenly distributed as load is applied. In the worst case scenario, the discrete value of all involved gages increases at the same time. The typical scenario will be somewhere between these two. F/T resolutions are specified as typical resolution, defined as the average of the worst and best case scenarios. Because both multi-gage effects can be modeled as a normal distribution, this value represents the most commonly perceived, average resolution. Although this misrepresents the actual performance of the transducers, it results in a close (and always conservative) estimate. 8.4 Achieving the Highest Serial Communication Throughput Although the F/T Controller is capable of sampling and computing transducer readings at thousands of Hertz, RS-232 serial communications does not have sufficient bandwidth to transmit such a large amount of data. The following tables show the maximum throughput possible over the RS-232 serial communications ports at a given baud rate and with a given number of force and torque axes being output. To set the baud rate use the CB command, to set the sampling frequency use the SF command and to set the axes to output use the CV command. Note that in most cases a sampling frequency lower than that shown in the table may be used as long as the sampling frequency is higher than the desired throughput rate. Using a lower sampling frequency will allow the F/T Controller time to perform limited amounts of processing for tasks like Monitor Conditions with minimal impact to the overall throughput. Pinnacle Park 1031 Goodworth Drive Apex, NC 27539 USA Tel: +1-919.772.0115 +1-919-772-8259 www.ati-ia.com Email: [email protected] B - 67 F/T Controller Installation and Operation Manual Document #9620-05-ctl-11 8.4.1 Binary Mode Throughputs Number of Axes Output Baud Rate 6 5 4 3 2 1 1200 6.3 Hz 7.5 Hz 9.1 Hz 12.0 Hz 17.0 Hz 30.0 Hz 9600 50.5 Hz 60.0 Hz 73.5 Hz 96.0 Hz 137.0 Hz 240.0 Hz 19200 100 Hz 119 Hz 147 Hz 188 Hz 270 Hz 470 Hz 38400 196 Hz 231 Hz 285 Hz 372 Hz 535 Hz 680 Hz 57600 295 Hz 350 Hz 430 Hz 650 Hz 645 Hz 675 Hz 115200 560 Hz 585 Hz 605 Hz 635 Hz 660 Hz 690 Hz Table 9.1a—Maximum Serial Throughputs for CD B; CD U mode (see Table 9.1b) Number of Axes Output Baud Rate 6 5 4 3 2 1 1200 SF 2500 SF 2500 SF 2500 SF 2500 SF 2500 SF 2500 9600 SF 2500 SF 2500 SF 2500 SF 2500 SF 2500 SF 2250 19200 SF 2500 SF 2500 SF 2500 SF 2500 SF 2500 SF 1800 38400 SF 2500 SF 2500 SF 2500 SF 2300 SF 1400 SF 700 57600 SF 2350 SF 2200 SF 1750 SF 1050 SF 700 SF 700 115200 SF 600 SF 600 SF 650 SF 650 SF 700 SF 700 Table 9.1b—Sampling Frequencies Required to Achieve Table 9.1a Rates 8.4.2 ASCII Mode Throughputs Number of Axes Output Baud Rate 6 5 4 3 2 1 1200 2.1 Hz 2.5 Hz 3.1 Hz 4.1 Hz 5.8 Hz 10.0 Hz 9600 16.5 Hz 20.0 Hz 24.5 Hz 32.0 Hz 45.5 Hz 80.0 Hz 19200 33 Hz 40 Hz 49 Hz 64 Hz 91 Hz 160 Hz 38400 67 Hz 80 Hz 98 Hz 127 Hz 178 Hz 310 Hz 57600 100 Hz 120 Hz 145 Hz 185 Hz 265 Hz 470 Hz 115200 200 Hz 235 Hz 290 Hz 375 Hz 475 Hz 565 Hz Table 9.2a—Maximum Serial Throughputs for CD A; CL 1 mode (see Table 9.2b) Number of Axes Output Baud Rate 1200 6 SF 2500 5 SF 2500 4 SF 2500 3 SF 2500 2 SF 2500 1 SF 2500 9600 SF 2500 SF 2500 SF 2500 SF 2500 SF 2500 SF 2500 19200 SF 2500 SF 2500 SF 2500 SF 2500 SF 2500 SF 2500 38400 SF 2500 SF 2500 SF 2500 SF 2500 SF 2500 SF 2350 57600 SF 2500 SF 2500 SF 2500 SF 2500 SF 2300 SF 1250 115200 SF 1650 SF 1500 SF 1200 SF 800 SF 500 SF 600 Table 9.2b—Sampling Frequencies Required to Achieve Table 9.2a Rates Pinnacle Park 1031 Goodworth Drive Apex, NC 27539 USA Tel: +1-919.772.0115 +1-919-772-8259 www.ati-ia.com Email: [email protected] B - 68 F/T Controller Installation and Operation Manual Document #9620-05-ctl-11 8.4.3 Receipt Delays Transducer loading data is placed into the F/T Controller‘s serial output buffers within two sampling periods. However it takes significant transmission time to send and receive this data. The transmission time depends on the selected baud rate and output format (binary or ASCII). MaximumTransmissionDelay 2 1 1 SamplingFr equency ThroughputRate The fastest RS-232 transmission time can be had if the F/T Controller is set for a sampling rate of 600 Hz, CD B mode, CD U mode and a baud rate of 115.2 KBaud (SF 600; CD B; CD U; CB 115200) which results in data sets being received at 560Hz. The total maximum delay would be MaximumTransmissionDelay 2 8.5 1 1 5.12 ms 600 Hz 560 Hz Analog Output Delays The baud rate setting does not affect the output rate or presentation delay of the analog output. Only the sampling frequency (SF command) affects this. Data will appear on the analog outputs within two sampling periods. Ana log Pr esentation Delay 2 1 SamplingFr equency At the default sampling rate of 2500 Hz the maximum analog port presentation delay is 800µs. Ana log Pr esentation Delay 2 1 800µs 2500 Hz Pinnacle Park 1031 Goodworth Drive Apex, NC 27539 USA Tel: +1-919.772.0115 +1-919-772-8259 www.ati-ia.com Email: [email protected] B - 69 F/T Controller Installation and Operation Manual Document #9620-05-ctl-11 9. Appendix A—General Specifications 9.1 Environmental The standard F/T system is designed to be used in standard laboratory or light-manufacturing conditions. Transducers with an IP60 designation are able to withstand dusty environments. Transducers with an IP65 designation can be washed down with fresh water. Transducers with an IP68 designation can be submerged in up to 10m of fresh water. System electronics like the F/T controller and Mux box are only rated to IP60. 9.2 General Specifications 9.2.1 Electrical Requirements AC Supply 100V Input† Min Max Units 90 110 VAC 0.3 A 132 VAC 0.26 A 264 VAC 0.13 A 63 Hz 30 W 108 115V Input‡ 216 230V Input‡ Frequency 47 Power Consumption † 100V input is available only on 9105-CTLJ. ‡115V and 230V inputs are not available on 9105-CTLJ. Table 10.1—Electrical Requirements 9.2.2 Storage and Operating Temperatures The transducer, mux box, and Controller can be stored and used at humidity up to 95% relative humidity, non-condensing: Storage Temperature Operating Temperature Units Mux box -65 to 150 0 to 70 °C Controller -40 to 100 0 to 55 °C Note: These temperature ranges specify the storage and operation ranges in which the system can survive without damage. They do not take accuracy into account. See ATI Industrial Automation manual 9620-05Transducer Section—Installation, Operation, and Specification Manual for transducer environmental information. Table 10.2—Storage and operating temperatures Pinnacle Park 1031 Goodworth Drive Apex, NC 27539 USA Tel: +1-919.772.0115 +1-919-772-8259 www.ati-ia.com Email: [email protected] B - 70 F/T Controller Installation and Operation Manual Document #9620-05-ctl-11 9.3 Mux Box Mechanical Drawing Pinnacle Park 1031 Goodworth Drive Apex, NC 27539 USA Tel: +1-919.772.0115 +1-919-772-8259 www.ati-ia.com Email: [email protected] B - 71 F/T Controller Installation and Operation Manual Document #9620-05-ctl-11 9.4 F/T Controller Mechanical Drawing Pinnacle Park 1031 Goodworth Drive Apex, NC 27539 USA Tel: +1-919.772.0115 +1-919-772-8259 www.ati-ia.com Email: [email protected] B - 72 F/T Controller Installation and Operation Manual Document #9620-05-ctl-11 9.5 9105-CA-U-xxx Analog Cable Drawing Pinnacle Park 1031 Goodworth Drive Apex, NC 27539 USA Tel: +1-919.772.0115 +1-919-772-8259 www.ati-ia.com Email: [email protected] B - 73 F/T Controller Installation and Operation Manual Document #9620-05-ctl-11 10. Appendix B—Dual-Gain Calibration Instructions 10.1 F/T Sensors having a Controller with Dual-Gain Calibration The dual-gain calibration option offers two calibrations with one F/T sensor system. The same F/T sensor system can be used with a low-payload, high-resolution calibration, then switched to a higher-payload calibration with a lower resolution. This is done by selecting the desired calibration matrix in the Controller, then changing the manually operated switch on the mux box to the corresponding calibration. First, set up communication with the Controller as described Section 1.7—Connecting the System Components. The Controller will be set up at the factory with both calibrations loaded into the Controller. Normally, the factory default lower payload/higher resolution calibration will be in Tool Frame 0 and the higher payload/lower resolution calibration will be in Tool Frame 1. See Section 4.6—Tool Frame Commands for help with selecting the Tool Frame. For this Dual Gain example let‘s imagine we have a Theta model sensor having both a FT1122 US-200-1000 calibration in Tool Frame 0 and a FT2211 US-600-3600 calibration in Tool Frame 1. This example starts with the lower payload FT1122 calibration currently selected and with the header message shown. You will enter the commands shown in bold to select the higher calibration. System and user communications Comments F/T Force and Torque Sensor System, Version X.x ATI Industrial Automation, Inc., www.ati-ia.com Copyright 2004. All Rights Reserved. Tool Frame 0 (FT1122) loaded: FT1122 >TL 0) FT1122, 0, 0, 0, 0, 0, 1) FT2211, 0, 0, 0, 0, 0, 2) , 0, 0, 0, 0, 0, 3) , 0, 0, 0, 0, 0, 0 0 0 0 Selects Tool Frame 1, the larger calibration Saves TF1 in permanent memory Reset system to see selected tool frame >TF1 >RS ><ctrl-W> F/T Force and Torque Sensor System, Version X.x ATI Industrial Automation, Inc., www.ati-ia.com Copyright 2004. All Rights Reserved. Tool Frame 0 (FT2211) loaded: FT2211 > Now change the manually-operated switch located on the mux box to match the current calibration serial number loaded into the Controller. This can be done with the Controller‘s power on and no damage will occur. Use this procedure to switch between the calibration and the F/T sensor will give accurate data. CAUTION: If the serial numbers do not match, the Force and Torque data will be incorrect. Pinnacle Park 1031 Goodworth Drive Apex, NC 27539 USA Tel: +1-919.772.0115 +1-919-772-8259 www.ati-ia.com Email: [email protected] B - 74 F/T Controller Installation and Operation Manual Document #9620-05-ctl-11 11. Appendix C—Comparison to Legacy F/T Controller 11.1 Part numbers This F/T Controller replaces the legacy version of the F/T Controller and is fully compatible with any ATI Industrial Automation transducer made since the early 1990s. The first column of Table 12.1 lists the obsolete F/T Controller part number, the middle column lists the replacement part number and the last column lists a ―Compatibility Mode‖ replacement part number. The replacement part number has a higher-resolution output than the compatibility mode part number and an industry standard RS-232 connection (does not require a null modem). The compatibility mode product should only be used in existing applications that demand the lower resolution of the legacy F/T Controller. Old Part Number 9105-CTRLR 9105-CTRLR-CRS Superseded By 9105-CTL 9105-CTL-CRS New Compatibility Model* 9105-CON 9105-CON-CRS Table 12.1—Replacement Part Numbers for Obsolete Versions 11.2 Physical Differences - The F/T Controller box is compatible in size and mounting with the previous version. The box is 1mm longer in length from front to back. The mounting holes and feet have been improved. The new mounting holes allow removal of the F/T Controller without requiring the complete removal of the mounting screws. The mounting feet are made of a non-conductive material to electrically insulate the F/T Controller from the mounting surface. The mounting feet thickness has been increased to 4.8mm (0.189"). The power switch is now located on the rear of the F/T Controller. The input voltage select switch and fuse are now user-accessible above the power cord entry. The locations of the connectors on the rear have shifted a small amount. 11.3 I/O Differences - - - The new 9105-CTL version does not require a null-modem on the serial port. This means that pins 2 and 3 of the connector are swapped as compared to the legacy unit. 9015-CON units maintain the previous configuration. The RS-232 baud rate is now set by a user command rather than the internal switches. The CB command sets the baud rate. A high-density D-sub 26-pin female connector is used for the analog output port. It is easier to connect to and can accept screw locks. For compatibility with the previous model a 20-pin legacy connector is provided. This second connector is electrically connected to the 26-pin connector. Only one of these two connectors should be used at a time. The analog output port is always active and only outputs resolved data. (The CA command setting is ignored.) Additional indicator lights have been added to the front of the unit: 1. The Receive and Transmit lights illuminate when communication is occurring over the RS232 port. These can be used for troubleshooting RS-232 connections. 2. The rectangular light in the upper left corner of the front panel (labeled Status) replaces the Health light on the legacy model. This light flashes green while the F/T Controller operates to indicate the system is healthy. An error condition will cause this light to turn red. The blink rate only indicates the amount of processing being done in the unit and does not need to be Pinnacle Park 1031 Goodworth Drive Apex, NC 27539 USA Tel: +1-919.772.0115 +1-919-772-8259 www.ati-ia.com Email: [email protected] B - 75 F/T Controller Installation and Operation Manual Document #9620-05-ctl-11 monitored. The twelve lights on the front panel area labeled Discrete I/O / Error Code show which Discrete I/O lines are in a high state. This display is very useful for checking connections to the Discrete I/O port. All outputs that represent either resolved data or strain gage information have differences in how the data is represented unless the transducer data has been loaded in 12-bit (compatibility) mode. The transducer data is loaded at the factory or by using the ATI FT DEMO program. Calibrations that are factory-ordered in compatibility mode will have a suffix ―:C‖ on the purchasing information. This suffix may not be directly indicated in the F/T Controller outputs. The following new commands are available in both normal and in compatibility modes (see chapter 4 for details on each command): 3. - - CB – Change Baud rate CR – Change analog output Range CS – Change baud rate front panel display Setup CE – Change front panel Error display CF – Communicate Fast now only supports modes 0 and 1. Modes 2 and 3 are accepted and automatically translated into mode 1. 6. SR – Sensor cable power error monitoring 7. MH – Monitor Handshake setting 8. TT – Tool frame serial number 9. HELP – Displays the available list of commands 10. % - Comment line that will be ignored. 1. 2. 3. 4. 5. Pinnacle Park 1031 Goodworth Drive Apex, NC 27539 USA Tel: +1-919.772.0115 +1-919-772-8259 www.ati-ia.com Email: [email protected] B - 76 F/T Controller Installation and Operation Manual Document #9620-05-ctl-11 12. Terms and Conditions of Sale The following Terms and Conditions are a supplement to and include a portion of ATI‘s Standard Terms and Conditions, which are on file at ATI and available upon request. ATI warrants to Purchaser that Force/Torque sensor products purchased hereunder will be free from defects in material and workmanship under normal use for a period of one year from the date of shipment. This warranty does not cover components subject to wear and tear under normal usage or those requiring periodic replacement. ATI will have no liability under this warranty unless: (a) ATI is given written notice of the claimed defect and a description thereof within thirty (30) days after Purchaser discovers the defect and in any event not later than the last day of the warranty period; and (b) the defective item is received by ATI not later ten (10) days after the last day of the warranty period. ATI‘s entire liability and Purchaser‘s sole remedy under this warranty is limited to repair or replacement, at ATI‘s election, of the defective part or item or, at ATI‘s election, refund of the price paid for the item. The foregoing warranty does not apply to any defect or failure resulting from improper installation, operation, maintenance or repair by anyone other than ATI. ATI will in no event be liable for incidental, consequential or special damages of any kind, even if ATI has been advised of the possibility of such damages. ATI‘s aggregate liability will in no event exceed the amount paid by purchaser for the item which is the subject of claim or dispute. ATI will have no liability of any kind for failure of any equipment or other items not supplied by ATI. No action against ATI, regardless of form, arising out of or in any way connected with products or services supplied hereunder may be brought more than one year after the cause of action accrued. No representation or agreement varying or extending the warranty and limitation of remedy provisions contained herein is authorized by ATI, and may not be relied upon as having been authorized by ATI, unless in writing and signed by an executive officer of ATI. Unless otherwise agreed in writing by ATI, all designs, drawings, data, inventions, software and other technology made or developed by ATI in the course of providing products and services hereunder, and all rights therein under any patent, copyright or other law protecting intellectual property, shall be and remain ATI‘s property. The sale of products or services hereunder does not convey any express or implied license under any patent, copyright or other intellectual property right owned or controlled by ATI, whether relating to the products sold or any other matter, except for the license expressly granted below. In the course of supplying products and services hereunder, ATI may provide or disclose to Purchaser confidential and proprietary information of ATI relating to the design, operation or other aspects of ATI‘s products. As between ATI and Purchaser, ownership of such information, including without limitation any computer software provided to Purchaser by ATI, shall remain in ATI and such information is licensed to Purchaser only for Purchaser‘s use in operating the products supplied by ATI hereunder in Purchaser‘s internal business operations. Without ATI‘s prior written permission, Purchaser will not use such information for any other purpose or provide or otherwise make such information available to any third party. Purchaser agrees to take all reasonable precautions to prevent any unauthorized use or disclosure of such information. Purchaser will not be liable hereunder with respect to disclosure or use of information which: (a) is in the public domain when received from ATI; (b) is thereafter published or otherwise enters the public domain through no fault of Purchaser; (c) is in Purchaser‘s possession prior to receipt from ATI; (d) is lawfully obtained by Purchaser from a third party entitled to disclose it; or (f) is required to be disclosed by judicial order or other governmental authority, provided that, with respect to such required disclosures, Purchaser gives ATI prior notice thereof and uses all legally available means to maintain the confidentiality of such information. Pinnacle Park 1031 Goodworth Drive Apex, NC 27539 USA Tel: +1-919.772.0115 +1-919-772-8259 www.ati-ia.com Email: [email protected] B - 77


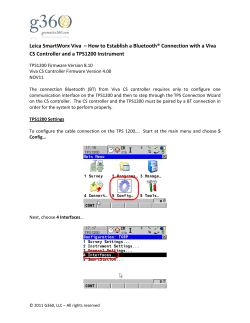


© Copyright 2026