
AMC Controller 4 Admin User Guide for AMC Controller 4.2 amcc-4_ug_en_2014-04
AMC Controller 4
Admin User Guide for
AMC Controller 4.2
amcc-4_ug_en_2014-04
April 2, 2014
Table of Contents
1
2
3
4
The Aastra AMC Controller . . . . . . . . . . . . . . . . . .
1.1
Introduction . . . . . . . . . . . . . . . . . . . . . . .
1.2
How to read this Manual . . . . . . . . . . . . . . . .
Basic Configuration . . . . . . . . . . . . . . . . . . . . . .
2.1
Preparations . . . . . . . . . . . . . . . . . . . . . .
2.2
Default Port Assignment . . . . . . . . . . . . . . . .
2.3
Establish a connection to the Aastra AMC Controller
2.3.1
GUI Mode Basic and Advanced . . . . . . .
2.3.2
Architecture of the WebGUI . . . . . . . . .
2.3.3
GUI Considerations . . . . . . . . . . . . .
System . . . . . . . . . . . . . . . . . . . . . . . . . . . . .
3.1
Basic Settings . . . . . . . . . . . . . . . . . . . . .
3.2
Password . . . . . . . . . . . . . . . . . . . . . . . .
3.3
Update . . . . . . . . . . . . . . . . . . . . . . . . .
3.4
Installed Hotfixes . . . . . . . . . . . . . . . . . . . .
3.5
License Report . . . . . . . . . . . . . . . . . . . . .
3.6
Backup . . . . . . . . . . . . . . . . . . . . . . . . .
3.7
Rollback . . . . . . . . . . . . . . . . . . . . . . . . .
3.8
Remote Bak. . . . . . . . . . . . . . . . . . . . . . .
3.9
XML-RPC Configuration Interface . . . . . . . . . .
3.10 Ports . . . . . . . . . . . . . . . . . . . . . . . . . . .
3.11 DB . . . . . . . . . . . . . . . . . . . . . . . . . . . .
3.12 DB Sync. . . . . . . . . . . . . . . . . . . . . . . . .
3.12.1 General Information . . . . . . . . . . . . .
3.12.2 Operating Mode . . . . . . . . . . . . . . .
3.12.3 Failover Operation . . . . . . . . . . . . . .
3.13 Factory Def. . . . . . . . . . . . . . . . . . . . . . . .
3.14 Licenses . . . . . . . . . . . . . . . . . . . . . . . .
3.15 Restart . . . . . . . . . . . . . . . . . . . . . . . . .
Network . . . . . . . . . . . . . . . . . . . . . . . . . . . . .
4.1
LAN Int 1 . . . . . . . . . . . . . . . . . . . . . . . .
4.2
WAN Interface . . . . . . . . . . . . . . . . . . . . .
4.3
VLAN . . . . . . . . . . . . . . . . . . . . . . . . . .
4.4
Routing . . . . . . . . . . . . . . . . . . . . . . . . .
4.5
NTP . . . . . . . . . . . . . . . . . . . . . . . . . . .
4.6
VRRP . . . . . . . . . . . . . . . . . . . . . . . . . .
.
.
.
.
.
.
.
.
.
.
.
.
.
.
.
.
.
.
.
.
.
.
.
.
.
.
.
.
.
.
.
.
.
.
.
.
.
.
.
.
.
.
.
.
.
.
.
.
.
.
.
.
.
.
.
.
.
.
.
.
.
.
.
.
.
.
.
.
.
.
.
.
.
.
.
.
.
.
.
.
.
.
.
.
.
.
.
.
.
.
.
.
.
.
.
.
.
.
.
.
.
.
.
.
.
.
.
.
.
.
.
.
.
.
.
.
.
.
.
.
.
.
.
.
.
.
.
.
.
.
.
.
.
.
.
.
.
.
.
.
.
.
.
.
.
.
.
.
.
.
.
.
.
.
.
.
.
.
.
.
.
.
.
.
.
.
.
.
.
.
.
.
.
.
.
.
.
.
.
.
.
.
.
.
.
.
.
.
.
.
.
.
.
.
.
.
.
.
.
.
.
.
.
.
.
.
.
.
.
.
.
.
.
.
.
.
.
.
.
.
.
.
.
.
.
.
.
.
.
.
.
.
.
.
.
.
.
.
.
.
.
.
.
.
.
.
.
.
.
.
.
.
.
.
.
.
.
.
.
.
.
.
.
.
.
.
.
.
.
.
.
.
.
.
.
.
.
.
.
.
.
.
.
.
.
.
.
.
.
.
.
.
.
.
.
.
.
.
.
.
.
.
.
.
.
.
.
.
.
.
.
.
.
.
.
.
.
.
.
.
.
.
.
.
.
.
.
.
.
.
.
.
.
.
.
.
.
.
.
.
.
.
.
.
.
.
.
.
.
.
.
.
.
.
.
.
.
.
.
.
.
.
.
.
.
.
.
.
.
.
.
.
.
.
.
.
.
.
.
.
.
.
.
.
.
.
.
.
.
.
.
.
.
.
.
.
7
7
8
9
9
10
11
12
12
14
16
16
18
19
21
21
21
24
26
29
29
30
31
31
32
33
35
37
37
38
38
42
44
45
47
48
2
Table of Contents
5
6
4.7
QoS . . . . . . . . . . . . . . . . . . . . . . . .
4.8
Auto-Prov. . . . . . . . . . . . . . . . . . . . . .
Security . . . . . . . . . . . . . . . . . . . . . . . . . .
5.1
Security Level . . . . . . . . . . . . . . . . . . .
5.2
Firewall . . . . . . . . . . . . . . . . . . . . . .
5.3
Port Forwarding . . . . . . . . . . . . . . . . .
5.4
TLS Certificate Configuration . . . . . . . . . .
5.4.1
Upload Private Key and Certificate . .
5.4.2
Create Private Key and Certificates . .
5.4.3
Installed Primary Key and Certificates
5.5
Certificate Security . . . . . . . . . . . . . . . .
5.6
Database Security Key . . . . . . . . . . . . . .
5.7
SBC User Agents . . . . . . . . . . . . . . . .
Telephony . . . . . . . . . . . . . . . . . . . . . . . . .
6.1
Aastra MC Solution Basics . . . . . . . . . . .
6.2
Accessing PBX Features . . . . . . . . . . . .
6.3
Settings . . . . . . . . . . . . . . . . . . . . . .
6.3.1
Global Settings . . . . . . . . . . . . .
6.3.2
SIP Options . . . . . . . . . . . . . . .
6.3.3
RTP Options . . . . . . . . . . . . . .
6.3.4
Load Limit Configuration . . . . . . . .
6.4
Ports . . . . . . . . . . . . . . . . . . . . . . . .
6.5
SBC Int. net. . . . . . . . . . . . . . . . . . . .
6.6
Nr. Profiles . . . . . . . . . . . . . . . . . . . .
6.7
Endpoints . . . . . . . . . . . . . . . . . . . . .
6.8
PBX . . . . . . . . . . . . . . . . . . . . . . . .
6.9
Trunk . . . . . . . . . . . . . . . . . . . . . . .
6.10 FMC Numbers . . . . . . . . . . . . . . . . . .
6.10.1 Number . . . . . . . . . . . . . . . . .
6.10.2 Active . . . . . . . . . . . . . . . . . .
6.10.3 Type . . . . . . . . . . . . . . . . . . .
6.10.3.1 Call-Through . . . . . . . . .
6.10.3.2 Callback Number . . . . . . .
6.10.3.3 SIM Switch . . . . . . . . . .
6.10.3.4 MTC Number . . . . . . . . .
6.10.3.5 Voicemail Number . . . . . .
6.10.3.6 Remote Control . . . . . . .
6.10.3.7 IMS: to WLAN Number . . .
6.10.3.8 IMS: to Cellular Number . . .
6.10.4 Active Registration . . . . . . . . . . .
6.10.5 Endpoint . . . . . . . . . . . . . . . . .
6.10.6 Registration Name . . . . . . . . . . .
6.10.7 Registration Password . . . . . . . . .
amcc-4_ug_en_2013-06
.
.
.
.
.
.
.
.
.
.
.
.
.
.
.
.
.
.
.
.
.
.
.
.
.
.
.
.
.
.
.
.
.
.
.
.
.
.
.
.
.
.
.
.
.
.
.
.
.
.
.
.
.
.
.
.
.
.
.
.
.
.
.
.
.
.
.
.
.
.
.
.
.
.
.
.
.
.
.
.
.
.
.
.
.
.
.
.
.
.
.
.
.
.
.
.
.
.
.
.
.
.
.
.
.
.
.
.
.
.
.
.
.
.
.
.
.
.
.
.
.
.
.
.
.
.
.
.
.
.
.
.
.
.
.
.
.
.
.
.
.
.
.
.
.
.
.
.
.
.
.
.
.
.
.
.
.
.
.
.
.
.
.
.
.
.
.
.
.
.
.
.
.
.
.
.
.
.
.
.
.
.
.
.
.
.
.
.
.
.
.
.
.
.
.
.
.
.
.
.
.
.
.
.
.
.
.
.
.
.
.
.
.
.
.
.
.
.
.
.
.
.
.
.
.
.
.
.
.
.
.
.
.
.
.
.
.
.
.
.
.
.
.
.
.
.
.
.
.
.
.
.
.
.
.
.
.
.
.
.
.
.
.
.
.
.
.
.
.
.
.
.
.
.
.
.
.
.
.
.
.
.
.
.
.
.
.
.
.
.
.
.
.
.
.
.
.
.
.
.
.
.
.
.
.
.
.
.
.
.
.
.
.
.
.
.
.
.
.
.
.
.
.
.
.
.
.
.
.
.
.
.
.
.
.
.
.
.
.
.
.
.
.
.
.
.
.
.
.
.
.
.
.
.
.
.
.
.
.
.
.
.
.
.
.
.
.
.
.
.
.
.
.
.
.
.
.
.
.
.
.
.
.
.
.
.
.
.
.
.
.
.
.
.
.
.
.
.
.
.
.
.
.
.
.
.
.
.
.
.
.
.
.
.
.
.
.
.
.
.
.
.
.
.
.
.
.
.
.
.
.
.
.
.
.
.
.
.
.
.
.
.
.
.
.
.
.
.
.
.
.
.
.
.
.
.
.
.
.
.
.
.
.
.
.
.
.
.
.
.
.
.
.
.
.
.
.
.
.
.
.
.
.
.
.
.
.
.
.
.
.
.
.
.
.
.
.
.
.
.
.
.
.
.
.
.
.
.
.
.
.
.
.
.
.
.
.
.
.
.
.
.
.
.
.
.
.
.
.
.
.
.
.
.
.
.
.
.
.
.
.
.
.
.
.
.
.
.
.
.
.
.
.
.
.
.
.
.
.
.
.
.
.
.
.
.
.
.
.
.
.
.
.
.
.
.
.
.
.
.
.
.
.
.
.
.
.
.
.
.
.
.
.
.
.
.
.
.
.
.
.
.
53
55
56
56
57
58
60
61
62
62
63
63
64
65
65
66
70
70
77
80
82
82
83
83
91
94
100
103
104
104
104
104
105
106
107
107
107
108
108
108
109
109
109
3
Table of Contents
6.11
6.12
6.13
6.14
6.15
6.10.8 Deployment Number . . . . . . . . . . . . . . .
User Profiles . . . . . . . . . . . . . . . . . . . . . . . .
6.11.1 Name . . . . . . . . . . . . . . . . . . . . . . .
6.11.2 PBX . . . . . . . . . . . . . . . . . . . . . . . .
6.11.3 Security . . . . . . . . . . . . . . . . . . . . . .
6.11.4 VoIP/WLAN . . . . . . . . . . . . . . . . . . . .
6.11.5 Method Home . . . . . . . . . . . . . . . . . . .
6.11.6 Method Roaming . . . . . . . . . . . . . . . . .
6.11.7 LCR File . . . . . . . . . . . . . . . . . . . . . .
6.11.8 Controller Address . . . . . . . . . . . . . . . .
6.11.9 Controller Port . . . . . . . . . . . . . . . . . .
6.11.10 Callthrough Nr. . . . . . . . . . . . . . . . . . .
6.11.11 MTC Nr. . . . . . . . . . . . . . . . . . . . . . .
6.11.12 Voicemail Nr. . . . . . . . . . . . . . . . . . . .
User Profiles (advanced) . . . . . . . . . . . . . . . . .
6.12.1 Name . . . . . . . . . . . . . . . . . . . . . . .
6.12.2 Cellular DMC . . . . . . . . . . . . . . . . . . .
6.12.3 Callwaiting . . . . . . . . . . . . . . . . . . . .
6.12.4 OSD . . . . . . . . . . . . . . . . . . . . . . . .
6.12.5 Codec . . . . . . . . . . . . . . . . . . . . . . .
6.12.6 Jitter Buffer . . . . . . . . . . . . . . . . . . . .
6.12.7 Handover . . . . . . . . . . . . . . . . . . . . .
6.12.8 Allow new Cellular Number . . . . . . . . . . .
6.12.9 Feature File . . . . . . . . . . . . . . . . . . . .
6.12.10 SIM-Switch Nr. . . . . . . . . . . . . . . . . . .
User Accounts . . . . . . . . . . . . . . . . . . . . . . .
6.13.1 Lastname, Givenname, and Department . . . .
6.13.2 User Profile . . . . . . . . . . . . . . . . . . . .
6.13.3 PBX Number . . . . . . . . . . . . . . . . . . .
6.13.4 PBX Username . . . . . . . . . . . . . . . . . .
6.13.5 PBX Password . . . . . . . . . . . . . . . . . .
6.13.6 Display Name . . . . . . . . . . . . . . . . . . .
6.13.7 Cellular Number . . . . . . . . . . . . . . . . .
6.13.8 Fast-Forwarding Number . . . . . . . . . . . .
6.13.9 Email Address . . . . . . . . . . . . . . . . . .
User Accounts (advanced) . . . . . . . . . . . . . . . .
6.14.1 Lastname, Givenname, Department, and User
6.14.2 SIP Number . . . . . . . . . . . . . . . . . . . .
6.14.3 Password . . . . . . . . . . . . . . . . . . . . .
6.14.4 Activate User . . . . . . . . . . . . . . . . . . .
6.14.5 DnD . . . . . . . . . . . . . . . . . . . . . . . .
Cellular . . . . . . . . . . . . . . . . . . . . . . . . . . .
amcc-4_ug_en_2013-06
.
.
.
.
.
.
.
.
.
.
.
.
.
.
.
.
.
.
.
.
.
.
.
.
.
.
.
.
.
.
.
.
.
.
.
.
.
.
.
.
.
.
.
.
.
.
.
.
.
.
.
.
.
.
.
.
.
.
.
.
.
.
.
.
.
.
.
.
.
.
.
.
.
.
.
.
.
.
.
.
.
.
.
.
.
.
.
.
.
.
.
.
.
.
.
.
.
.
.
.
.
.
.
.
.
.
.
.
.
.
.
.
.
.
.
.
.
.
.
.
.
.
.
.
.
.
.
.
.
.
.
.
.
.
.
.
.
.
.
.
.
.
.
.
.
.
.
.
.
.
.
.
.
.
.
.
.
.
.
.
.
.
.
.
.
.
.
.
.
.
.
.
.
.
.
.
.
.
.
.
.
.
.
.
.
.
.
.
.
.
.
.
.
.
.
.
.
.
.
.
.
.
.
.
.
.
.
.
.
.
.
.
.
.
.
.
.
.
.
.
.
.
.
.
.
.
.
.
.
.
.
.
.
.
.
.
.
.
.
.
.
.
.
.
.
.
.
.
.
.
.
.
.
.
.
.
.
.
.
.
.
.
.
.
.
.
.
.
.
.
.
.
.
.
.
.
.
.
.
.
.
.
.
.
.
.
.
.
.
.
.
.
.
.
.
.
.
.
.
.
.
.
.
.
.
.
.
.
.
.
.
.
.
.
.
.
.
.
.
.
.
.
.
.
.
.
.
.
.
.
.
.
.
.
.
.
.
.
.
.
.
.
.
.
.
.
.
.
.
.
.
.
.
.
.
.
.
.
.
.
.
.
.
.
.
.
.
.
.
.
.
.
.
.
.
.
.
.
109
111
111
111
112
112
112
112
112
113
113
113
113
113
114
114
114
115
115
115
115
116
116
116
116
116
118
118
118
118
118
119
119
119
119
119
119
120
120
120
120
122
4
Table of Contents
7
Features . . . . . . . . . . . . . . . . . . . . . . . . . . . . . . . .
7.1
Number Conversions . . . . . . . . . . . . . . . . . . . . . .
7.2
PBX Access Codes . . . . . . . . . . . . . . . . . . . . . .
7.2.1
Configuration Steps . . . . . . . . . . . . . . . . .
7.2.2
Predefined Feature Codes on the Aastra MC Client
7.3
FMC Domains . . . . . . . . . . . . . . . . . . . . . . . . .
7.4
User List . . . . . . . . . . . . . . . . . . . . . . . . . . . .
7.5
Additional Country Tones Configuration . . . . . . . . . . .
7.6
Custom Scripts . . . . . . . . . . . . . . . . . . . . . . . . .
8 UC . . . . . . . . . . . . . . . . . . . . . . . . . . . . . . . . . . . .
8.1
Client Features . . . . . . . . . . . . . . . . . . . . . . . . .
8.2
Corporate Phonebook Settings . . . . . . . . . . . . . . . .
8.2.1
Groups . . . . . . . . . . . . . . . . . . . . . . . .
8.2.2
VCard Format . . . . . . . . . . . . . . . . . . . . .
8.2.3
Phonebook LDAP . . . . . . . . . . . . . . . . . .
8.3
XMPP Endpoints . . . . . . . . . . . . . . . . . . . . . . . .
8.4
XMPP Users . . . . . . . . . . . . . . . . . . . . . . . . . .
8.5
SIMPLE Users . . . . . . . . . . . . . . . . . . . . . . . . .
8.6
BluStar-Server . . . . . . . . . . . . . . . . . . . . . . . . .
8.6.1
SIMPLE BluStar Server . . . . . . . . . . . . . . .
8.6.2
BluStar Web URL . . . . . . . . . . . . . . . . . . .
8.7
Groupware . . . . . . . . . . . . . . . . . . . . . . . . . . .
9 Deployment . . . . . . . . . . . . . . . . . . . . . . . . . . . . . . .
9.1
Feature/LCR Profile Upload . . . . . . . . . . . . . . . . . .
9.2
Feature/LCR Profile Reader . . . . . . . . . . . . . . . . . .
9.3
LCR Profile Lists . . . . . . . . . . . . . . . . . . . . . . . .
9.4
LCR Profiles . . . . . . . . . . . . . . . . . . . . . . . . . .
9.5
OTA Profiles . . . . . . . . . . . . . . . . . . . . . . . . . .
9.6
Client Deployment . . . . . . . . . . . . . . . . . . . . . . .
10 Diagnostics . . . . . . . . . . . . . . . . . . . . . . . . . . . . . . .
10.1 FMC Status . . . . . . . . . . . . . . . . . . . . . . . . . . .
10.2 IM . . . . . . . . . . . . . . . . . . . . . . . . . . . . . . . .
10.3 Statistic . . . . . . . . . . . . . . . . . . . . . . . . . . . . .
10.4 Call Status . . . . . . . . . . . . . . . . . . . . . . . . . . .
10.5 LDAP . . . . . . . . . . . . . . . . . . . . . . . . . . . . . .
10.6 System . . . . . . . . . . . . . . . . . . . . . . . . . . . . .
10.7 Remote Control . . . . . . . . . . . . . . . . . . . . . . . . .
10.8 Deployment Status . . . . . . . . . . . . . . . . . . . . . . .
10.9 Syslog-File . . . . . . . . . . . . . . . . . . . . . . . . . . .
10.10 Logging . . . . . . . . . . . . . . . . . . . . . . . . . . . . .
10.11 Tools . . . . . . . . . . . . . . . . . . . . . . . . . . . . . . .
10.11.1 Ping . . . . . . . . . . . . . . . . . . . . . . . . . .
10.11.2 Traceroute . . . . . . . . . . . . . . . . . . . . . . .
amcc-4_ug_en_2013-06
.
.
.
.
.
.
.
.
.
.
.
.
.
.
.
.
.
.
.
.
.
.
.
.
.
.
.
.
.
.
.
.
.
.
.
.
.
.
.
.
.
.
.
.
.
.
.
.
.
.
.
.
.
.
.
.
.
.
.
.
.
.
.
.
.
.
.
.
.
.
.
.
.
.
.
.
.
.
.
.
.
.
.
.
.
.
.
.
.
.
.
.
.
.
.
.
.
.
.
.
.
.
.
.
.
.
.
.
.
.
.
.
.
.
.
.
.
.
.
.
.
.
.
.
.
.
.
.
.
.
.
.
.
.
.
.
.
.
.
.
.
.
.
.
.
.
.
.
.
.
.
.
.
.
.
.
.
.
.
.
.
.
.
.
.
.
.
.
.
.
.
.
.
.
.
.
.
.
.
.
.
.
.
.
.
.
.
.
.
.
.
.
.
.
.
.
.
.
.
.
.
.
.
.
.
.
.
.
.
.
.
.
.
.
.
.
.
.
.
.
.
.
.
.
.
.
.
.
.
.
.
.
.
.
.
.
.
.
.
.
.
.
.
.
.
.
.
.
.
.
.
.
.
.
.
.
.
.
.
.
.
.
.
.
.
.
.
.
.
.
.
.
.
.
.
.
.
.
.
.
.
.
.
.
.
.
.
.
.
.
.
.
.
.
.
.
.
.
.
.
.
124
124
128
128
129
131
131
134
134
135
135
136
136
136
137
140
142
144
145
145
146
147
148
148
149
149
150
152
154
155
155
157
158
159
160
161
162
163
164
165
167
167
167
5
Table of Contents
10.12 SNMP . . . . . . . . . . . . . . . . .
10.13 Firewall Report . . . . . . . . . . . .
10.14 Net. Trace . . . . . . . . . . . . . . .
10.15 Sup. Trace . . . . . . . . . . . . . .
11 Initial Setup via the Console . . . . . . . .
12 Factory and Password Reset (via console)
12.1 Password Reset via RS232 . . . . .
12.2 Factory reset via RS232 . . . . . . .
13 Accounting Table via SNMP . . . . . . . . .
Index . . . . . . . . . . . . . . . . . . . . . . .
amcc-4_ug_en_2013-06
.
.
.
.
.
.
.
.
.
.
.
.
.
.
.
.
.
.
.
.
.
.
.
.
.
.
.
.
.
.
.
.
.
.
.
.
.
.
.
.
.
.
.
.
.
.
.
.
.
.
.
.
.
.
.
.
.
.
.
.
.
.
.
.
.
.
.
.
.
.
.
.
.
.
.
.
.
.
.
.
.
.
.
.
.
.
.
.
.
.
.
.
.
.
.
.
.
.
.
.
.
.
.
.
.
.
.
.
.
.
.
.
.
.
.
.
.
.
.
.
.
.
.
.
.
.
.
.
.
.
.
.
.
.
.
.
.
.
.
.
.
.
.
.
.
.
.
.
.
.
.
.
.
.
.
.
.
.
.
.
.
.
.
.
.
.
.
.
.
.
.
.
.
.
.
.
.
.
.
.
.
.
.
.
.
.
.
.
.
.
.
.
.
.
.
.
.
.
.
.
169
172
173
176
177
179
179
179
181
183
6
1 The Aastra AMC Controller
1.1
Introduction
Thank you for using our Aastra MC Solution. The Aastra MC Solution provides unified
communications to its users and consists generally of the following components: the
Aastra AMC Controller as a server component and Aastra MC Clients which replace
and enhance the functionality and services of a desk phone. With the Aastra MC Solution users are able to take advantage of all the services rendered by their corporate
PBX(s) by using the Aastra MC Client from WLAN and cellular networks on their cellular
phone all while being available via their company extension.
The Aastra MC Solution is also available as a software-only version. In order to request
the required VM-Ware image file and/or the license key for activating the VM-Ware
Aastra AMC Controller, please contact your local Aastra office or send us a request via
[email protected].
The Aastra MC Solution transforms mobile phones into full-fledged equivalents
of desk phones, and can have an enormous cost-saving potential.
The Aastra MC Solution provides a variety of features and PBX access:
• Key Features: Single Number Solution via via cellular, SIP Trunking and SIP
Subscriber Integration with the PBX for providing leading edge feature integration...
• In-Call Features: such as Hold, Toggle, Consultation, Conference etc.
• Out-Call Features: like Call Forwarding, Call Pickup and Call Retrieve
While this unified communications solution is the core of your Aastra AMC Controller, it
also provides numerous other services at the same time:
• Firewall and SBC functionality: Stateful inspection Firewall, Layer 7 Filtering
with Syntax Checking ...
7
1 The Aastra AMC Controller
• Routing: OSPF/BGP dynamic routing, RIPv2, Static routes...
• and more...
1.2
How to read this Manual
The structure of this manual largely reflects the structure of the web interface of your
Aastra MC Solution (henceforth "the Aastra AMC Controller") . We assume that this
manual is not read from beginning to end, but that it is used as a reference while configuring the Aastra AMC Controller.
This introductory part concludes with the following scope of delivery for the different
Aastra AMC Controller models. The delivery overview is followed by the technical introduction to the Aastra AMC Controller which provides all necessary information for a
quick initial setup. The following chapters all correspond to the different tabs in the web
interface and the following sections are listed in the order of their appearance in the
menus of the respective tab.
If you are viewing this document in its original PDF format, check the bookmarks view because of the structure of this document, it might prove very helpful to use it for navigation. As a PDF file this document contains hyperlinks, internal links are displayed in
blue, external ones are highlighted in green.
O NLINE H ELP
The graphical user interface of your Aastra AMC Controller provides tool tips for
many settings and options, as well as a general help text for each page. Hover
your mouse over the question mark in the upper right-hand corner of a page, and
the help text will appear.
amcc-4_ug_en_2013-06
8
2 Basic Configuration
2.1
Preparations
The Aastra AMC Controller is a browser-based application. You can access it via any
common browser. Therefore, the Aastra AMC Controller configuration is independent
of the operating system.
For checking your input, on some pages JavaScript support is also required. Please
make sure this is enabled in your web browser.
When accessing the web interface for the first time, you have to accept a (self-signed)
security certificate. Some browsers may restrict access for this reason.
The LAN1 interface of the Aastra AMC Controller is configured to the following parameters by default.
LAN1 Properties
Details
Network protocol
TCP/IP
IP-Address
10.0.0.205
Subnetmask
255.255.255.0
Therefore, in order to be able to communicate with the Aastra AMC Controller, you need
to configure your PC to an address in the same subnet, as for example 10.0.0.206.
9
2 Basic Configuration
2.2
Default Port Assignment
The following ports are open by default, or opened if a certain service is activated and/or
configured:
Port
open...
53
123
161
if active
if active
if active
179
199
if active
if active
389
if active
443
by default
Yes
448
by default
Yes
500
by default
521
if active
1900
2342
by default
by default
2604
if active
4500
5000
to
50xx
5060
by default
if configured
5061
5062
LAN Int. 1 (listen only)
if active
if active
5222
if active
Firewall open*
Assignment
Domain Name Service (DNS)
Network Time Protocol (NTP) Server
Secure Network Management Protocol
Daemon (SNMPD (UDP))
Border Gateway Protocol (BGP)
Secure Network Management Protocol
Daemon (SNMPD (TCP))
TCP: Leightweight Directory Access Protocol (LDAP; for Corporate Phonebook)
Hypertext Transfer Protocol Secure
(HTTPS) management on all interfaces,
unless modified
HTTPS Interface towards the MC Client,
unless modified
Internet Security Association and Key
Management Protocol (ISAKMP), here:
Internet Protocol Security (IPsec)
Routing Information Protocol (RIP or
RIPv2)
UPNP
SecureSHell (SSH) management on all
interfaces, unless modified
Open Shortest Path First (OSPF), a dynamic routing protocol
IPsec and Network Address Translation
Transport Layer Security (TLS)
SIP Dualmode Server (UDP)
Yes
Yes
SIP TLS
SIP default port for the Aastra MC Client
and SBC
TCP XMPP Port (instant messaging)
*Ports that must be open on the firewall between Internet and the Aastra AMC Controller.
amcc-4_ug_en_2013-06
10
2 Basic Configuration
Port
open...
35000 by default
to
35XXX
5432
11000
to
11999
12000
to
12999
16384
to
32786
by default
if active
Firewall open*
Assignment
Yes
These are the RTP ports for the Session
Border Controller if the SBC is enabled.
At least four ports per call are opened dynamically.
PostgreSQL (database)
Used for SIP Trunks
by default
Ports used by the Aastra AMC Controller
towards the PBX
by default
Real-Time Transport Protocol (RTP)
*Ports that must be open on the firewall between Internet and the Aastra AMC Controller.
2.3
Establish a connection to the Aastra
AMC Controller
1. To enter the graphical user interface (GUI) of the Aastra AMC Controller and to
begin the configuration, enter https://10.0.0.205 in your browser’s address
field. For some products, the correct protocol is HTTP, so you have to enter
http://10.0.0.205 to connect correctly.
Check the Quick Reference Sheet for your Aastra AMC Controller for more
information about this.
In order for this to work, the IP address of your PC has to be set up to be in
this subnet. Please consult the documentation of your operating system for more
information on how to accomplish this.
Your browser will ask you to accept a certificate and warn you that it is self-signed.
To continue you will have to accept this certificate for establishing an encrypted
connection to the Aastra AMC Controller .
2. Enter the username and password. The default values are as follows:
Username: admin
Password: sesam
amcc-4_ug_en_2013-06
11
2 Basic Configuration
Please note that you’ll have to accept the EULA before proceeding.
I MMEDIATE PASSWORD C HANGE
From the latest version on an immediate password change is required to
proceed. The password strength must at least be ”good” or ”strong”, ”weak”
or ”medium” are insufficient. Use the Change Password page, described in
3.2, to change the password another time later on.
3. Select your language.
After having logged in successfully, you should see the HTML frontend of your
Aastra AMC Controller. You can change the language anytime in the top menu
bar.
2.3.1
GUI Mode Basic and Advanced
The Aastra AMC Controller offers a slimmed GUI version for "every day" use. You can
switch between these displays in the right-hand corner of the top-menu-bar, where you
can also change the GUI language. A separate documentation for the basic version
with only those settings visible in that GUI mode is available.
2.3.2
Architecture of the WebGUI
The WebGUI of the Aastra AMC Controller consist of different parts. These are
• Page Header
• Top Menu Bar
• Top Navigation
• Main Frame
Page Header
The page header gives you information about the Aastra AMC Controller mode.
Top Menu Bar
The Top Menu Bar is the top level navigation. This navigation gives you three major
options to select:
amcc-4_ug_en_2013-06
12
2 Basic Configuration
1. Home: this page displays the status of all the network components of the Aastra
AMC Controller in alphabetical order. There are three possible status which are
shown by LEDs (compare figure 2.1):
- active
- inactive
- disabled
It also offers the possibility to start, stop or restart individual services of the Aastra
AMC Controller by clicking
,
or
, respectively. The latter (restart)
is an alternative to Apply Configuration which leads to a complete restart of all
services(see below).
2. Apply Configuration: whenever you click on Apply Configuration the entered
content will be written into the base configuration of the Aastra AMC Controller. At
this point, all running services (including calls!) will be interrupted due to a restart
of the Aastra AMC Controller. If you do not want to interrupt the operations of the
Aastra AMC Controller, the Status Page offers you a way to apply configuration
changes for individual services only.
3. Language: The currently not selected language will be displayed here. Select it
by clicking on it. If a menu is opened at that time you might have to reopen it to
apply the new language setting.
W HEN TO A PPLY C ONFIGURATION
Note that changing users and other options which are stored in the database does
usually not require clicking Apply Configuration. However, if it is necessary, the
Apply Configuration option will visually indicate this.
amcc-4_ug_en_2013-06
13
2 Basic Configuration
Figure 2.1: Service Status
Main Navigation (left)
The main navigation is a two level navigation. This manual is structured according to
this navigation. Select any of the top (main) menu points (SYSTEM, NETWORK etc.).
When you do that, the list of available submenus for this main menu will open in the
main frame. By clicking on the menu titles of this list, the configuration view for the
selected menu item will open.
Main Frame
The main frame will always contain the currently selected configuration screen. Use the
Main Navigation to select what part of the Aastra AMC Controller you want to configure.
Bottom Menu Bar
You can find important product and software information on the bottom right hand side.
Of this information, the most important is the software version which is a four digit
number. This number can be followed by a dot which is followed by more digits. The
digits after this dot indicate the patch set number which the product contains.
2.3.3
GUI Considerations
The following explains a few points that you need to consider.
Default Values
There are both explicit as well as implicit default values. The explicit ones are set
by default in the WebGUI. Implicit ones are fields that can simply be left empty. The
system will select an appropriate default value for you. You can leave all fields except
the mandatory ones empty.
amcc-4_ug_en_2013-06
14
2 Basic Configuration
Mandatory Values
Mandatory values have to be configured to use a certain feature. In the GUI, you can
identify them by the * symbol behind the title. If left empty, you will receive an error
message asking you to set the value.
Erroneous Values
The Aastra AMC Controller checks the entered values for consistency and will not accept values failing this check. An error message will be displayed. This, however,
cannot avoid erroneous configurations since only basic sanity and syntax checks of the
entered values are performed. These checks include type checks (string or number,
etc.), range checks ("do entered numbers make sense?"), and basic sanity checks ("do
certain parameters exclude each other?", etc.).
amcc-4_ug_en_2013-06
15
3 System
3.1
Basic Settings
This menu contains all of the basic settings which are needed for the configuration of
the system of your Aastra AMC Controller.
This comprises:
• Date and time (any NTP settings have precedence over date and time configured
here, refer to 4.5),
• Specification of a domain name server (DNS server),
• Host name for the Aastra AMC Controller (the system name should be set for administrative purposes, but it is not a crucial setting).
Figure 3.1: Basic settings
16
3 System
Date and Time:
Date and time will be applied immediately after pressing the button Save . To save new
values all other SYSTEM settings Apply configuration has to be selected. The system
date and time are important for using, among other services, the logging facilities. The
settings applied here will also be saved in the hardware clock of the system and thus
not be lost with a reboot
Especially for logging, however, the configuration of a reliable NTP server is recommended (refer to 4.5).
Time zone:
Usually NTP servers utilize GMT (Greenwich Mean Time). Therefore, to get the correct
time zone on your device, you need to set the time zone where the device is located
relative to GMT. Please note that this setting does not account for Daylight Savings
Time.
Domain Name Server:
In order to use debugging tools like ping, traceroute and telnet with domain names
instead of addresses, a DNS server has to be specified.
The same holds true of course for all other services where the specification of host
names is possible (e.g. VoIP). If you do not specify a DNS server here, you can only
use IP addresses for all services configured on the Aastra AMC Controller.
The second domain name server specified here, will be used as a fallback if the first
server is down or otherwise not reachable.
System name:
The entered name must not contain any whitespace or special characters. This system
name should be unique and has to correspond to the domain name that has been
assigned to the Aastra AMC Controller towards the DNS server. Non-matching forwards
and reverse look-ups, as well as differing host names will cause problems with various
services.
The settings will be applied when you click the button Save .
amcc-4_ug_en_2013-06
17
3 System
3.2
Password
With this menu item, the access password for the Aastra AMC Controller can be changed
and a separate password for access via console can be activated (set and reset it via
console). To (re)set the CLI password, please refer to 11.
The password has to have at least 5, but not more than 20 characters, and to save a
new password the password strength must at least be measured as ”good” or ”strong”.
Excess characters (more than 20) will be ignored without an error message. Alphanumeric characters and the following special characters are legal:
+*/=~_@#()<>[]!?.-
Whitespaces and $ are not supported!
The new password will be applied immediately. This means that right after changing the password in the WebGUI, you will be prompted for it in order to continue
with the configuration.
Figure 3.2: Change the password
The new password will be applied immediately after clicking the button Save , and the
new password must be re-entered to continue.
amcc-4_ug_en_2013-06
18
3 System
3.3
Update
With this menu item, a local file on your PC can be selected to start the update process.
Depending on the network connection, this upload might take several minutes. The
update can even fail if done over a low bandwidth WAN link. It is not recommended to
perform the update with a connection of less than 128 kbit/s. However, aborted updates
do not harm the Aastra AMC Controller or influence it in any way. A timeout can occur
while uploading an update. The Aastra AMC Controller has a fixed timeout of 2 hours.
This means that any upload, if not completed, will be aborted after this time. Note that
your browser might interrupt the upload sooner than that.
There is no automatic reboot or restart of services after a successful update; the Aastra
AMC Controller has to be rebooted manually. However, this can be performed at a later
time. The update is simply installed into the flash memory which means that it has no
effect on the running system.
R ELEASE N OTES
Please refer to the Release Notes before performing an update/upgrade. These
might contain special instructions to be considered before upgrading to a certain
version.
Figure 3.3: Install an update
Installing an update
1. Download the update and readme file (if applicable) for the desired version and
save it on your PC. The current version of the Aastra AMC Controller is always
indicated in the right bottom corner of the web interface.
2. Browse for the update via the Install Update menu and open it.
3. Click the button Upload .
amcc-4_ug_en_2013-06
19
3 System
4. If necessary, do additional configuration steps as recommended in the enclosed readme file. If there is no such file, no special considerations have to be
taken.
5. Reboot the system in order for the update to take effect. If you are uploading
a hotfix, a simple Apply Configuration is enough.
Downgrade to version XXX
There are two ways to downgrade the Aastra AMC Controller:
1. Downgrade button: click the "Downgrade to [version]" button to basically revert
the latest update.
This option lets you return from a newer version (A) to the previously installed
Aastra AMC Controller version (B) and the previous configuration. All changes
made to the newer version A will be lost, and version A (and its configuration)
can’t be restored!
2. Select an update older than your current version and upload it to the Aastra AMC
Controller.
This option requires extensive preparation to ensure system functionality!
Please note as well that possibly not all services will run properly after a reboot.
This can only be ensured by selecting "Apply Configuration". Only configurations
compatible with older versions should be used. This can be accomplished by reverting to a saved configuration or by doing a factory reset.
O LD C ONFIGURATIONS
You should not import old configurations into more recent versions of the Aastra
AMC Controller system. The configuration should be on the Aastra AMC Controller prior to the update. During the update process, this configuration will be
converted.
When installing an update that contains new configuration options, these must be
checked and set after the installation since this is not done automatically.
amcc-4_ug_en_2013-06
20
3 System
3.4
Installed Hotfixes
This page shows all currently installed hotfixes. Please note that installed hotfixes are
deleted with every software update and this page will be empty.
3.5
License Report
A current license report will be sent to your customer account in the License Portal
where you can view it at your convenience. You can specify individual email addresses
for each Aastra AMC Controller in the License Portal to which the license reports will
also be sent.
Select the interval in which you would like to receive licensing reports (choose between
daily, weekly, monthly, and yearly). Reports can also be sent on demand by clicking the
button "Send Report now".
3.6
Backup
In this section you can save or restore the configuration of the complete Aastra AMC
Controller. By clicking the button Save , the most important configuration files will be
saved into an archive file configuration-<date>.cpio.gz which will be offered
for download.
Restoring configuration
1. Select the location of the backup file stored on your PC
2. Click the button Send to upload it
3. then click on Apply Configuration
Figure 3.4: Configuration backup
amcc-4_ug_en_2013-06
21
3 System
Note that this backup applies to all necessary parameters. This includes all FMC
data like users and configured host registrations. It will hence include the complete snapshot of the configuration data at the time the backup is done (does not
include e.g. APN Certificates, private certificates and the like).
forceconfiguration
If the version of the backup and of the currently installed software are far apart, the
Aastra AMC Controller will inform you that this might lead to inconsistencies and/or
failures and the restore will not take place. However, you have the possibility to force
the Aastra AMC Controller to except the backup configuration by changing its file name
from
configuration-xxxxxx.cpio.gz to
forceconfiguration-xxxxxx.cpio.gz.
amcc-4_ug_en_2013-06
22
3 System
I NCONSISTENCIES
By using "force" the possibility of inconsistencies and failures is not eliminated!
This merely forces the Aastra AMC Controller to restore the contained data.
L ANGUAGE
Another point here is that the localization of the web interface is also stored in
the configuration archive (it is part of its configuration), i. e. if you restore a
configuration later, the language might change. If this is the case, simply click on
the language button in the top menu bar.
N OT FOR P ROVISIONING
This mechanism is intended for backing up and restoring configurations on the
same device(s). Please do not use this for provisioning purposes by creating a
default configuration and then replicating this to multiple devices. Please note that
device-specific files which should not be replicated to arbitrary devices, will also
be included in this archive. However, this does enable you to make a one-to-one
restoration of a failed device. Saved configurations exclusively work on identical
restoration devices. Do not use a saved configuration from one device on a different device type unless this procedure has been approved by the manufacturer!
amcc-4_ug_en_2013-06
23
3 System
3.7
Rollback
The Configuration Rollback enables you to revert the configuration of your Aastra AMC
Controller to an earlier status. The configuration available for a roll back depends on
when you last saved your configuration.
Figure 3.5: Restore a previous configuration in this menu.
After performing a rollback, you will always have to press Apply Configuration to activate it. This will also provide a chance to look at the restored configuration first, before
activating it.
P REPARATION FOR C HANGES
Before making bigger changes to your configuration, it is always wise to go to
the Rollback page and save the current configuration. This will enable you to roll
back to this configuration at a later point in time. Every time you use the Apply
Configuration the current configuration will be stored.
AUTOMATIC D ELETION
Please note that older Rollbacks will be deleted automatically if there isn’t enough
storage available for backing up the current configuration.
The naming convention of the stored configurations is as follows: DATE-TIME. The
date will be formatted as yymmdd (two digits for the year, month and day), followed by
a minus and the time in 24-hours format (hhmm). Screenshot 3.5 shows an example file
name of a backup, ( 080311-1423) done on March 11th 2008 at 14:23.
Number of Configurations
This field defines how many configurations should be stored on the system. You have a
choice between ’5’, ’15’ or ’25’ stored configurations. Saving a configuration will either
amcc-4_ug_en_2013-06
24
3 System
delete an old configuration or it will fail if there is no space available on the system.
The system has been designed to provide enough space for all of the above mentioned
settings.
Previous Configuration
Select the configuration you would like to restore by using the drop-down box. To activate this configuration, please click Apply Configuration in the top menu bar.
Configuration Save now
By Pressing Save you can trigger an immediate backup of the configuration. Note
that such a backup can take several seconds. After the backup has completed you can
refresh the page and see the backup in the Previous Configuration selection list.
A PPLY C ONFIGURATION
A restored configuration will not automatically be active after a reboot. The correct procedure it to always press Apply Configuration after performing a restore.
A reboot is not necessary.
The Backup will include all FMC settings, you should therefore be careful, because, for example, newly created users accounts will be lost.
amcc-4_ug_en_2013-06
25
3 System
3.8
Remote Bak.
The Aastra AMC Controller also offers a feature for providing an automated configuration backup to a remote system. The backup can be done through FTP or SCP
protocols in scheduled intervals. By default this functionality is disabled, i. e. you need
to configure it first in order to use it.
For SCP: Please download the Superuser Public Key on the Security Keys page and
uploaded to your remote backup server!Refer to 5.6.
Figure 3.6: Remote Backup Configuration
Specify the How, Where and When of your Remote Backup
1. Active: You need to check this in order to enable the functionality.
2. Type: You can choose between FTP and SCP. Note that you should use secure copy (SCP) whenever possible, because the backed up configuration also
includes passwords. However, using SCP needs some manual setup which is
described below.
3. Servername: Specifiy the server for your backup by entering either an IP
address such as 192.168.1.1 or a hostname for example ftp.foo.bar here. If you
amcc-4_ug_en_2013-06
26
3 System
are using host names, please make sure that a DNS server has been set on the
Basic Settings page.
4. Path: Please specify the path on the server where the files should be stored.
This path is usually identical to the default login directory of the specified user.
This field needs to reflect the path only relative to the server root directory. This
means if you specify no path, the backup will be made to the root directory of
the server. If you do specify a path, it has to be an existing path under the root
directory the FTP server, for example /backup/test. The first slash is optional.
5. Username: Please specify a user name here. Even if the FTP server in question does not require authentication, i. e. is public, you should still specify a
random name here e.g. anonymous.
6. Password: Specify the password of the defined user on the server. If this
setting is incorrect, the backup will fail. If this occurs you should check your
server logs to see if there is an authentication mismatch. This setting does not
apply to SCP !
7. Interval: You have a choice of different backup intervals. The following settings
are possible:
•Daily: This will back up the configuration everyday. Set the hour in the
Time/Day of Week field. Legal Values are integers between 1 and 24.
•On Change: This will create a backup after every material change (this does
not include changes to the FMC configuration)
•Hourly: This will create a backup every hour. There is no need for additional
settings.
•Weekly: saves backups every week. Select the day via the Time/Day of
Week field. Legal values are integers from 1 to 7; 1 for Monday, 7 for Sunday.
8. Time/Day of Week: The setting in this field always has to be an integer. It only
has to be set if the Interval field is set to either Daily or Weekly.
D IRECTORIES
Note that directories have to be specified with / slashes in the Aastra AMC Controller web interface.
A RCHIVE F ORMAT
The archive format used for the automatic backup and the manual Configuration
Backup are identical. In order to restore a backed-up configuration, you should
use the Configuration Backup page.
amcc-4_ug_en_2013-06
27
3 System
See 3.6 for more information.
SCP C ONFIGURATION
To configure SCP, some manual setup is needed. First, you need to download the
superuser public key (refer to 5.6) and copy it to the backup server.
Set up a key-based login to your backup account on the backup host. Log onto
the backup server:
ssh backupuser@backupserver
and create a directory:
/root/.ssh
Add the public key to the end of an "authorized_keys" file in the recently created
.ssh directory:
cat /root_public.key » /root/.ssh/authorized_keys.
If the file does not exist, it will be created.
Once this is done, SCP is available for remote backups.
amcc-4_ug_en_2013-06
28
3 System
3.9
XML-RPC Configuration Interface
Deactivate the Aastra AMC Controller’s XML-RPC interface with the option on this
page.
By default, XML-RPC can be used to configure the main components of the Aastra
AMC Controller with an external tool. Call data retrieval, such as call statuses etc., is
also possible.
If this interface is not used, it maybe advisable for security reasons to deactivate this
interface.
3.10
Ports
On this page it is possible to define the HTTP(S) and the SSH port used for administration.
The Default values are 2342 for SSH, 443 for HTTPS (or port 80 for HTTP on systems
that do not use HTTPS), as recommended by the IANA (Internet Assigned Numbers
Authority). However, this menu gives you the possibility to set a different port. With the
latest version of the product (summer 2013), SSH is by default deactivated. If activated
(for e.g. support reasons), it will be deactivated again in the evening.
WAN I NTERFACE ENABLED ?
Please note that usually you do not need to change these values. Changing them
is mostly done for security purposes if the administration through the WAN interface is enabled. Using non-standard ports makes it harder for scan programs to
find these open ports.
Figure 3.7: Port Numbers
amcc-4_ug_en_2013-06
29
3 System
3.11
DB
With these Database Settings database access can be given to an external device
(this may also be a second Aastra AMC Controller) within a range of permitted IP addresses.
Figure 3.8: Configure the Database Password and allowed IP addresses in this menu.
• Password: Specify a password for database access in this menu.
• Permitted IP Addresses: grant access from a specific IP network by entering an
IP address and Subnetmask here. The screenshot shows an example where only
devices in the "10.10." IP-address range are allowed to access the database of
the Aastra AMC Controller (a correct password is also necessary).
The default database password is and has been 18273645 for all versions.
amcc-4_ug_en_2013-06
30
3 System
3.12
DB Sync.
The synchronization of the user data between two Aastra AMC Controllers is commonly
used in a redundancy configuration. In such a configuration, we would have two appliances, one serving as a master, the other serving as a slave. The slave will obtain its
configuration from the master server. Therefore, this is not a real synchronisation but
rather having a master containing the configuration. However, the slave will keep a copy
of the configuration ready to fill in if the master fails.
This applies only to the FMC part of the configuration, and includes all information
necessary for FMC, i.e. Users, Endpoints, and Numbering Profiles, etc. The synchronization is done by directly accessing the configuration database of the master server.
All changes to Users and Endpoints will become effective immediately and will therefore also be scheduled for synchronization right after pressing "Save" in the WebGUI. In
order to lower the network load, several changes are collected and then synchronized
in one step.
D URATION
It can take up to 3 minutes until all changes have been properly synchronized to
the Slave device.
C ONFIGURATION
The Aastra AMC Controller will display a "Database is currently not available"
message on the pages TELEPHONY and FEATURES if it is run in slave-mode.
The Database will not be available for changes and new data if database synchronization takes place and the Aastra AMC Controller is used in slave mode.
All FMC services will be rendered by the master. Therefore, changes of User
Profiles, User Accounts, etc. can only be done on the master-Aastra AMC Controller. If the master-Aastra AMC Controller fails, the slave-Aastra AMC Controller
will take over. Only then can data modifications be done on the (former) slave.
3.12.1
General Information
Preparation
To configure both Master and Slave a network connection has to be set up. In theory a
standard routed connection is enough, but since this feature is used in conjunction with
VRRP, you need to have a connection supporting multicast requests, usually a switched
connection.
amcc-4_ug_en_2013-06
31
3 System
Updates
To update the Aastra AMC Controller, it is very important to switch a master Aastra AMC
Controller into Standalone mode first, then update its systems. For the slave, no special
considerations have to be taken. You can simply update it. After both systems have the
same software version, the master can be switched into Master mode again. This
procedure is only necessary if the database has changed between the two versions.
When in doubt, please adhere to this approach nevertheless.
3.12.2
Operating Mode
The Synchronize database page is used to configure the Aastra AMC Controller in
Master, Slave or in Standalone operating mode. It will also configure the database
synchronization. Master IP is the IP of the interface which acts as a master and the
Slave IP is for the interface acting as slave.
Figure 3.9: Synchronize database
Standalone mode
In the Standalone mode the Aastra AMC Controller uses the database without a network connection to other databases. The IP addresses under the Operating mode
item will be ignored. This is the default operation mode. At any time you can turn a
Standalone Aastra AMC Controller into the master of a cluster. You have to be careful
turning it into a slave because your configuration will be lost.
Master Mode
The Master mode initializes the local database as master and the database of the Aastra AMC Controller with the Slave IP as slave. The connection daemon starts on the
amcc-4_ug_en_2013-06
32
3 System
master Aastra AMC Controller after the initializing process. You need to configure the
Master IP and Slave IP.
Slave mode
This puts the Aastra AMC Controller into slave mode. All configuration data will be
fetched from the master. To start the Aastra AMC Controller in Slave mode you need
the Master IP and Slave IP. The Slave IP naturally is the IP address of the unit you are
currently configuring and you need to specify the appropriate interface-IP address that
should be used for synchronization.
After applying this configuration, the unit will start to synchronize the data from the master server.
S ECURITY K EYS
The Security Keys (see 5.6) of the Master must be present on the slave. Otherwise the unit will not be able to synchronize the configuration.
P OSSILBE DATA L OSS !
All FMC-configuration data present on this device will be overwritten by data
fetched from the master. This means that the configuration present on this device will be lost.
You can switch a Slave back into Standalone mode, but the synchronized data will
be kept.
3.12.3
Failover Operation
Two appliances can be deployed in a failover fashion. In such a configuration, the
secondary server can take over the functionality of the primary one. To enable this the
VRRP protocol is used to provide a dynamic failover mechanism. The properties of this
failover mechanism are as follows:
• The secondary appliance will be idle when the primary appliance is active.
• VRRP is used to switch the IP address between the master and the slave, so
the Aastra AMC Controller appliances do not have to be in the same multicast
domain. The master and the slave will share one virtual-IP address. In addition,
a management / physical address for each of them is required in order to enable
communication among each other. All three addresses should be in the same
subnet.
• Once the master fails, the secondary appliance will take over.
amcc-4_ug_en_2013-06
33
3 System
• All active calls will be lost in a failover scenario.
• Right after a failure, the call can be re-established via the secondary appliance.
• The secondary appliance does not have to be maintained, since the configuration will always be taken from the primary appliance (only pertaining to the FMC
configuration).
The configuration of the solution is as follows:
The primary server will contain the complete FMC configuration. The slave server is
normally configured for networking, firewalling etc. The FMC configuration is only done
by pointing to the master server via database synchronization, as described in 3.12.
This will lead to a mirroring of the configuration. The VRRP portion has to be setup
separately. Please refer to 4.6 for more information.
amcc-4_ug_en_2013-06
34
3 System
3.13
Factory Def.
The ’Restore the basic configurations’ page allows you to restore the basic configuration
and / or reset the ’Dualmode’ database (only FMC products) to factory settings. Refer
to figure 3.10 on page 36 for more information.
• Reset Basic Configuration
With the exception of the ’Dualmode database’ settings, all configured settings will
be deleted from the Aastra AMC Controller by restoring the basic configuration.
To execute a restore click the first Reset button on the right side of the page,
and reboot the Aastra AMC Controller.
• Reset ’Dualmode’ database
This action will empty the database. The database includes all ’Dualmode’ settings. To Reset the database click the second Reset button on the right side of
the page, and reboot the Aastra AMC Controller.
• Restore Factory Defaults
This function executes a full factory reset. This can also be done via the command
line, and is described in section 12. Then reboot the Aastra AMC Controller.
R EBOOT
Your system has to be rebooted after a Restore Basic Configuration or Restore
Factory Defaults is done! Since the default IP address is 10.0.0.205 and subnet
mask is 255.255.255.0 you will have to enter this information once more!
amcc-4_ug_en_2013-06
35
3 System
Figure 3.10: Reset basic configurations
amcc-4_ug_en_2013-06
36
3 System
3.14
Licenses
This product contains Open Source Software. Most Open Source Software demands
that the license of the package be included with the product containing the software.
Therefore, this page displays the Aastra AMC Controller’s EULA license and lists all
licenses of Open Source packages used in this Aastra AMC Controller. A mouse click
on the package name shows the complete license text.
3.15
Restart
By clicking the button Restart , the Aastra AMC Controller will be rebooted.
Figure 3.11: Restarting the System
It may take up to two minutes until the Aastra AMC Controller is fully available and
operating again.
Generally there are two options: the Aastra AMC Controller can be restarted instantly
or, with the second option, the Aastra AMC Controller can postpone its restart until
there are no ongoing calls.
amcc-4_ug_en_2013-06
37
4 Network
4.1
LAN Int 1
The primary LAN interface and its netmask have to be configured; this is one of the
mandatory settings for your Aastra MC Solution.
Configure LAN1 as DHCP Server
The Aastra AMC Controller can act as a DHCP server (on both LAN Interfaces) and
assign IP addresses via dynamic host configuration protocol (DHCP) to computers connected to its primary LAN interface . The following explains the setup of this feature.
N O OTHER DHCP S ERVER
If you would like to make use of this functionality, please make sure that there is
no other DHCP server running in your network since this can have very adverse
effects.
1. DHCP IP Range from and to: If the Aastra AMC Controller is intended to be
used as DHCP server, you have to define the range of IP addresses which the
Aastra AMC Controller is allowed to assign to clients.
Both addresses have to be in the same subnet as the Aastra AMC Controller’s IP
address. Naturally, the beginning and the end of the range of course also have to
be in the same subnet.
Please note that this address range must not contain IP addresses of any other
configured computer with a static IP address within this LAN.
2. Domain Name: Give a unique Domain Name to the Aastra AMC Controller’s
DHCP-server component. This name will serve for the configured IP range as a
whole.
3. Standard Gateway IP: By default, the Aastra AMC Controller itself acts as a
standard gateway. Another standard gateway for the DHCP functionality can be
set here by simply entering an IP address in this field.
38
4 Network
Figure 4.1: Configuration and DHCP functionality of the primary LAN interface
amcc-4_ug_en_2013-06
39
4 Network
4. Primary and Secondary DNS Server: You may specify up to two DNS server
IPs to obtain domain names. The DHCP component will then obtain domain
names of network devices and forward them to its DHCP-clients. Of course configuring two is safer than relying on a single one.
5. NTP Settings: It is recommended to configure at least two NTP servers for
the DHCP component of the Aastra AMC Controller. These addresses will be
transmitted as time sources to the DHCP clients of the Aastra AMC Controller.
6. DHCP Fixed Addresses:
This option lets you assign fixed IP addresses to certain network devices. Choose
an appropriate Hostname for the device, configure it to the MAC address of said
device, and choose the IP address (which has to be within the configured DHCP
IP Range) for it.
amcc-4_ug_en_2013-06
40
4 Network
D EFAULT G ATEWAY
You cannot specify the default gateway for the system here. In order to specify
a default gateway for the Aastra AMC Controller as a whole, please configure it
with the WAN interface. If you do not want to configure a WAN interface, but still
have to have a default gateway, please configure a routing entry. Please refer to
the Routing section 4.4 for more information.
amcc-4_ug_en_2013-06
41
4 Network
4.2
WAN Interface
The internet (WAN) connection can be configured with the menu item WAN interface.
Figure 4.2: Configuration of the WAN interface
Configuring WAN Interface
Enter the IP and netmask of your Internet router. Please ask your provider or consult
your DSL modem/router manual about the IP settings of your router. A common IP
address for routers is 10.0.0.138.
For the field Gateway you should enter the address of your router (default gateway) for
the WAN connection.
1. Select the connection type: IP, PPPoE, PPTP or choose Deactivated if you
do not want to use WAN interface.
2. Provide configuration details for the selected section as described above.
3. Save changes by clicking on Save . Your changes will be applied after selecting Apply configuration.
Connection via IP
If the Aastra AMC Controller is connected to the internet via a leased line or an internet
router (xDSL router, ISDN router, etc.), you have to choose IP and enter the information
for your network.
For the field Gateway you should enter the address of your router (default gateway) for
the WAN connection.
amcc-4_ug_en_2013-06
42
4 Network
Connection via PPPoE / PPTP
If the Aastra AMC Controller is directly connected to the internet via a DSL modem, you
will have to select PPPoE or PPTP (depending on your provider) and enter the connection information given to you by your provider. Please also refer to your internet service
provider (ISP) about additional configurations necessary to set with DSL routers. Note
that some providers do not want you to connect a router to connect multiple PCs. They
will often insist you install special software on the PCs in order to access their network.
If you experience problems with the WAN configuration, please make sure your ISP
does not have such restrictions.
If the connection uses PPPoE, you only have to enter the user name and password.
Additional information is needed if the connection uses PPTP:
The internal IP address of your DSL modem, the related netmask (both pieces of information sould be retrievable from your provider) and a matching IP address for your
Aastra AMC Controller are required. The IP of the Aastra AMC Controller has to be in
the same network as the IP address of the modem. Please ask your provider or consult
your DSL modem/router manual about the IP settings of your modem.
A common IP address is 10.0.0.138.
amcc-4_ug_en_2013-06
43
4 Network
4.3
VLAN
This menu serves for the configuration of virtual interfaces. Every virtual interface needs
its separate Number (ID), IP address and netmask.
Figure 4.3: Define virtual interfaces
Configure a Virtual Interface
1. Local Interface: Choose to which interface of the Aastra AMC Controller you
would like to add another virtual interface. Further Virtual Interfaces can be assigned to all configured physical interfaces.
2. Number: This will be the ID of your virtual interface. It is arbitrary. If 802.1q
is activated, this Number will be your VLAN ID. If you configure several virtual
interfaces, each of them needs a unique ID or Number.
3. IP Address and Subnetmask: The IP address of your virtual interface is also
arbitrary.
4. 802.1Q: The standard IEEE 802.1q is used to tag control information to the
IP packet headers. In our case the VLAN ID, i.e. the configured Number will be
displayed there. It will then be clear for all network devices that they are dealing
with a virtual local area network and not with a physical one. Enabling this does
not do any harm, even if your PBX does not support VLANs.
amcc-4_ug_en_2013-06
44
4 Network
Ports for virtual interfaces have to be opened manually on the firewall! Use Custom Rules (refer to 10.13) to open ports.
4.4
Routing
With this menu item you can configure additional routing entries. Standard routes like
the default route (only on the WAN interface) and routing between the different configured interfaces are generated automatically. Hence, this menu only has to be used
if any additional routes are desired. Note that you only set the routes for outgoing IP
packets here. In order to make the network behind the Aastra AMC Controller accessible from your network, you have to make sure that the network towards the Aastra AMC
Controller is handled correctly.
Use
to edit, or
to delete an existing entry.
Figure 4.4: Routing
Adding a new routing entry
1. Click Add to create a new entry and specify configuration parameters as
follows.
2. Destination: The destination network for the desired route. This can also be
a single host.
amcc-4_ug_en_2013-06
45
4 Network
3. Netmask: The netmask of the destination network. Note that 255.255.255.255
will signify a host route.
4. Gateway: The address of the gateway router that connects the destination
network with the local network. This address must be accessible via a local
interface. The gateway must hence represent the next hop that can be used for
routing.
5. Interface: The interface to which the gateway is connected (directly or indirectly via one or more switches).
6. Click Save to save the changes. Your changes will be applied after selecting
Apply Configuration .
7. Please restart the system after editing/adding routing entries.
amcc-4_ug_en_2013-06
46
4 Network
D EFAULT R OUTE
Please be careful when setting a default route here. Usually, the default route
is set automatically when the WAN interface is configured. In that case, the default route points to the gateway specified in the WAN interface configuration. If
an ADSL connection is established, the default gateway is usually assigned via
DHCP. If no WAN interface is configured, you should specify a default gateway
here. Specifying a default gateway works by using destination 0.0.0.0 with netmask 0.0.0.0.
4.5
NTP
The table on this site contains one or more NTP servers that the Aastra AMC Controller
should consult in order to set the system time.
Figure 4.5: Configuration of NTP Server
Setting up NTP
1. Checkbox: mark this box to activate NTP and click on Save .
amcc-4_ug_en_2013-06
47
4 Network
2. Add one or more NTP servers which the Aastra AMC Controller should
use. You have to provide its IP address. Optionally you can check the box "Preferred" to grant priority to time information received from this NTP server. This
means that an answer received from such server won’t be dropped if its answers
differ significantly from others. Please note that only very reliable and stable NTP
servers should be given a preference. Use
to edit, or
to delete an
existing entry.
3. Your changes will be applied after selecting Apply Configuration .
W INDOWS S ERVER 2003
The Aastra AMC Controller uses full NTP4 which can cause problems when trying
to use the NTP service running on Windows Server 2003 (w32time) as a clock
source. The w32time service has a few known issues which can lead to incorrect
synchronization with the NTP server of the Aastra AMC Controller while SNTP
clients can often successfully get their time from the Windows Server 2003. The
problem is that SNTP as used in some SIP phones and Windows clients is a
stripped-down version of NTP which is less reliable and less accurate. However,
this makes it seem like the Windows Server 2003 is running correctly while it is in
fact not set up correctly to serve as a reliable NTP clock source.
It is essential that the Windows Server 2003 itself is correctly synchronized with
a reliable clock source. The internal system clock is not sufficient. For more
information about configuring w32time see the MicroSoft knowledge base entry
816042.
4.6
VRRP
This menu gives you the possibility to configure two Aastra AMC Controllers for a
failover scenario and possibly other individual VRRP scenarios (this depends on your
specific implementation). The following description focuses on the failover operation.
Failover Scenario Description
When the master-Aastra AMC Controller is down, the slave-Aastra AMC Controller will
take over. This can have different reasons for which the recovery is done in different
ways:
amcc-4_ug_en_2013-06
48
4 Network
• A cable was unplugged (e.g. ethernet): the slave takes over when the master is
detected as "offline". All calls are dropped and the slave starts (re-)registering all
users towards the PBX. When the master goes online again, after the cable has
been plugged, all calls are dropped and re-registration takes place another time.
• The master is down and must be restarted. During the restart, the master checks
the slave for ongoing calls and will wait up to two hours (until all calls have ended)
before it takes over again.
Figure 4.6: VRRP Configuration
VRRP Configuration
1. Go to General to activate the feature.
2. Click the Add-button to add a virtual server. Use
delete an existing entry.
to edit, or
to
3. Specify the Interface that this VRRP virtual address should be assigned to.
Currently, the following is supported:
•VRRP on local interface LAN 1
•VRRP on local interface LAN 1 and WAN Interface
4. Set the VSID for the virtual service identification.
Background: VRRP allows you to define groups of virtual servers / routers that
can provide redundancy for each other. This must be a number, and this number
must be unique for the group of routers you want to provide redundancy for.
amcc-4_ug_en_2013-06
49
4 Network
5. Specify the Priority field, which specifies the sending VRRP router’s priority
for the virtual router. If you choose the Priority "Master", the priority is set automatically to 255, the Priority "Slave" will automatically assume the value 100.
Older Versions: On older versions of the Aastra AMC Controller, the Priority
value(s) had to be set manually. If you are still using an older Aastra AMC Controller version, please set the values for "Master" and "Slave" as they are assumed
automatically on the newer versions, i.e. 255 and 100.
6. Enter the IP address for your virtual router. Please note that you have to
set this exact IP address on all devices with the same VSID in the same network
segment.
7. Click Save to save your changes. Your changes will be applied after selecting Apply Configuration.
8. Additionally: To set up a full failover scenario with two Aastra AMC Controllers, several other menues have to be configured:
•SSH must be activated on LAN Interface 1 (refer to 5.1)
•Database Synchronization has to be configured (refer to 3.12)
•Database Security Keys have to be exchanged (refer to 5.6)
amcc-4_ug_en_2013-06
50
4 Network
S WITCHBACK
To reactivate the master-Aastra AMC Controller, execute a reboot of the device.
A mere reconnection of the ethernet cable does not suffice.
amcc-4_ug_en_2013-06
51
4 Network
B EHAVIOR WHEN APPLYING THE CONFIGURATION
After "Apply Configuration" the master-Aastra AMC Controller goes down (due to
the restart of all services) and becomes active again if the slave-Aastra AMC Controller has no active calls running. An "Apply Configuration" on the slave-Aastra
AMC Controller will not affect the operation on the primary server.
Additional Background Information
Virtual Router Redundancy Protocol as described in RFC 2338 is used to advertise a
"virtual" network device. This virtual network device represents a group of other network
devices. This group consists of one acting master device and at least one or more slave
devices.
If the currently active Aastra AMC Controller fails, an arrangement is made for the other
Aastra AMC Controller to automatically replace it. The Aastra AMC Controller currently
forwarding data on behalf of the virtual one is called master.
VRRP is primarily intended to provide redundancy between two Aastra AMC Controllers, but it can also be used in conjunction with any router providing this functionality
such as Cisco, Huawei, Juniper and others.
VRRP specifies an election protocol to provide the virtual router function described
before. All protocol messaging is performed using IP-multicast datagrams, thus the
protocol can operate over a variety of multi-access LAN technologies supporting IP
multicast. Each VRRP virtual router has a single well-known MAC address allocated to
it. This document currently only details the mapping to networks using the IEEE 802 48bit MAC address. The virtual router MAC address is used as the source in all periodic
VRRP messages sent by the master router to enable bridge learning in an extended
LAN.
A virtual router is defined by its virtual router identifier (VSID) and a set of IP addresses.
It may associate a virtual router with its real addresses on an interface, and may also
be configured with additional virtual router mappings and priority for virtual routers it is
willing to backup. The mapping between VSID and IP addresses must be coordinated
among all VRRP routers on a LAN.
To minimize network traffic, only the master of each virtual router sends periodic VRRPadvertisement messages. A backup router will not attempt to pre-empt the master unless it has higher priority. This eliminates service disruption unless a more preferred
path becomes available. It’s also possible to administratively prohibit all preemption
attempts. The only exception is that a VRRP router always becomes master of any
virtual router associated with addresses belonging to it. If the master becomes unavailable the highest priority backup router will transform into the master after a short delay,
amcc-4_ug_en_2013-06
52
4 Network
providing a controlled transition of the virtual router responsibility with minimal service
interruption.
The VRRP protocol design provides rapid transition from backup to master to minimize service interruption, and incorporates optimizations reducing protocol complexity
while guaranteeing controlled master transition for typical operational scenarios. The
optimizations result in an election protocol with minimal runtime state requirements,
minimal active protocol states, and a single message type and sender. The expected
duration of master election (from the pool of backup routers) if a failure occurs is quite
shorts ( less than one second ).
4.7
QoS
This page allows you to configure layer-3 QoS (Quality of Service) tagging by using
DSCP/ToS byte in the IP header. This tagging is supported both towards the Aastra
MC Client side as well as towards the PBX side. Simply configure the correct interfaces
here. Note that this tagging only makes sense for outbound traffic.
Figure 4.7: Quality of Service Configuration
There are three different ways to specify the traffic you want to mark:
• Interface
• IP and Application Protocol
• TCP / UDP Ports
Quality of Service Configuration
There are several configuration options for each criteria:
1. Protocol: Select a Protocol, either UDP, TCP, ICMP or ANY. ANY will match
all packets.
amcc-4_ug_en_2013-06
53
4 Network
2. Received on Interface: This will match packets arriving on a specified interface. This option only applies if the traffic is simply forwarded and the Aastra
AMC Controller hence acts as a router. This rule or traffic terminated on the
Aastra AMC Controller.
3. Sent over Interface: Will match all packets sent out over the given interface.
It does not matter if the packets were forwarded or generated by the Aastra AMC
Controller.
4. Destination Port: Matches all packets addressed to the given destination
port.
5. L7 Protocol: Stands for Layer-7 Protocol and will actually analyze the payload
of each packet to match a certain protocol. Only a subset of the supported protocols is given as a choice here, namely ANY, SIP, RTP, TLS.
H IGH DATA R ATES WITH L AYER -7 F ILTERING
The use of Layer-7 Filtering is discouraged for Aastra AMC Controllers needing
to handle high data rates (in excess of 5MBit constant load), because analyzing
each packet can become quite resource consuming.
Traffic tagging methods:
• DSCP: Stands for Differentiated Services Code Point and is specified in the RFCs
2474 and 2475. It signals the priority of a package with 6 bits, where The DSCP or
DiffServ standard supersedes the original specification for defining packet priority
described in RFC 791.
• TOS: Type of Service as described in RFC 791
Both set a QoS tag into the same byte field in the IP header. If this byte field is interpreted as DSCP or TOS, depends on network infrastructure settings. A value can be
entered in decimal (e.g."38") or hexadecimal (e.g."0x26").
Note that it is only possible to specify one tagging method (i.e. DSCP or TOS) for
any given tagging rule.
amcc-4_ug_en_2013-06
54
4 Network
4.8
Auto-Prov.
Use this page to disable Aastra Auto-Provisioning. Auto-Provisioning is by default active. During the boot process, the Aastra AMC Controller starts a couple of DHCP requests and tries to download configurations. This is currently only supported by Aastra
400 PBXs.
Use the first check box to deactivate the service. The other options (Settings) are not
needed. They can be used to deactivate updating the server IP specified below via
DHCP.
amcc-4_ug_en_2013-06
55
5 Security
5.1
Security Level
The configuration matrix "’Open administration ports via"’ enables the exact definition of the allowed locations from which configuration access shall be enabled. The
opening of the administrative ports can be done on a per-interface basis.
"For HTTPS" allows and denies configuration via web browser; "for SSH" allows and
denies access using the SSH protocol which may be required for support purposes.
I NTERFACES
LAN1
The Administration through LAN1 interface is enabled by default. It is recommended that this access is kept open, because you might lock yourself out of the
WebGUI by disabling this.
WAN
Administration on the WAN interface should only be enabled if it is absolutely
necessary. In conjunction with an insecure password, this could put the device in
jeopardy for attacks. In order to increase security, only the SSH connection could
be opened. It is possible to tunnel HTTPS access through SSH.
56
5 Security
5.2
Firewall
Besides the rules available by default, it is also possible to configure your own, very detailed rules. This way of configuration is recommended to be used only by experienced
administrators. Faulty firewall rules can cause network applications to stop working.
Customizing rules hence requires a lot of background knowledge and experience.
The custom rules of the firewall are executed according to their hierarchy. By clicking
on the arrow-buttons (
and
) you can rearrange the firewall rules. Registered
rules can be edited by clicking on
or can be deleted by clicking on
.
Figure 5.1: Add a new custom firewall rule
Creating a new custom firewall rule
1. Click Create rule at the appropriate position shown in figure 5.1.
2. Define the rule. Then specify Protocol (TCP, UDP, ICMP, other), Interfaces
and IP details that this rule shall match.
3. Choose the rule target (Filter policy) in order to specify what should happen
to the traffic that applies to this rule.
4. Click Create rule to save your changes. Your changes will be applied after
selecting Apply configuration.
amcc-4_ug_en_2013-06
57
5 Security
5.3
Port Forwarding
Port forwarding allows you to forward incoming data packets arriving at the Aastra AMC
Controller to a computer within the local network. It is used in conjunction with NAT and
is the only way to access a computer connected to the private LAN directly from the
Internet. Port forwarding is also often described as virtual server functionality.
Figure 5.2: Port forwarding
To reach several computers within the private LAN via the same protocol it is also
possible to change the ports.
Example:
You would like to let three computers within the LAN be accessed via SSH. SSH normally uses port 22, but it’s impossible to reach all three computers via port 22 of the
Aastra AMC Controller.
With Port Forwarding you can now define that e.g. port 2022 of the Aastra AMC
Controller is forwarded to port 22 of the first computer, port 2023 is forwarded to port 22
of the second computer and so on. An SSH client connecting to port 2022 of the Aastra
AMC Controller would then actually be connected to port 22 of the first computer in the
LAN.
Setting a new port forwarding rule
1. Click Add in order to define a new port forwarding rule and specify Local
port, Destination IP, Destination port (compare figure 5.2 on page 58).
2. Local port is the port that will be provided by the Aastra AMC Controller.
amcc-4_ug_en_2013-06
58
5 Security
3. Destination IP is the IP address of the internal computer to which the data is
to be forwarded.
4. Destination port is the port of the internal computer to which the data is to be
forwarded.
5. Click Save to save your changes. Your changes will be applied after selecting
Apply configuration.
amcc-4_ug_en_2013-06
59
5 Security
5.4
TLS Certificate Configuration
The TLS certificate configuration page is a simple tool to upload a TLS-private keys and
a TLS certificates onto the Aastra AMC Controller used to communicate with the client
in TLS mode. If you upload your own key here you have to upload a matching certificate
on the Aastra MC Client. The other possibility you have here is to have the Aastra AMC
Controller Generate these files automatically by clicking on Generate . By doing so
previously uploaded files will be overwritten.
Naturally, this is only relevant if you have a client that is able to support SIP in TLS
mode. Otherwise you can ignore this section.
Figure 5.3: TLS certificate configuration before certificates are uploaded/ generated
U PDATE OF A ASTRA MC C LIENT C ERTIFICATES
If the IP configuration of the Aastra AMC Controller is modified (WAN Interface if
configured, LAN Interface 1 if WAN interface is not configured), your Aastra MC
Clients might refuse the connection to the Aastra AMC Controller or display an
error message. Some modifications have to be made on the hand-held devices in
order to troubleshoot this issue. This procedure is explained in the user guide for
your Aastra MC Client.
amcc-4_ug_en_2013-06
60
5 Security
W HERE WILL THESE CERTIFICATES BE USED ?
Your uploaded certificates will be used automatically for the following:
Web Interface
You will be asked to admit this certificate the first time you open the WebGUI as
soon as certificates are present on the Aastra AMC Controller.
Towards the Aastra MC Client
These certificates will be used if security is enabled for an Aastra MC Client in the
User Account Settings.
U PDATES
If you update your Aastra AMC Controller, it will keep the existing certificates they will not be lost! However, they will be overwritten as soon as you generate
certificates another time. You will then have to verify the certificates again as soon
as you re-enter the WebGUI for the first time.
5.4.1
Upload Private Key and Certificate
To upload a new TLS-Private Key and overwrite any existing private key, press the
Browse button and select the new private key from your file system (Figure: 5.3). If
you would like to return to the private key and certifate which the Aastra AMC Controller
generates by default, simply go to Create Private Key and Certificates (see below).
In the next step press the Upload button and the new TLS private key will be saved
onto the Aastra AMC Controller. The procedure for the TLS certificate is essentially the
same (Figure: 5.3).
M UST M ATCH
The TLS certificate must match the TLS private key, otherwise no TLS communication will be possible.
amcc-4_ug_en_2013-06
61
5 Security
5.4.2
Create Private Key and Certificates
If you do not have any keys ready to use for TLS communication, you can also use
the Aastra AMC Controller to create a key set. Simply press Generate and the Aastra
AMC Controller generates a new default TLS private key and TLS certificate. These will
be stored on the Aastra AMC Controller and activated after pressing Apply Configuration .
The menu items described in the following will not be visible in the web interface until
certificates are uploaded or generated!
5.4.3
Installed Primary Key and Certificates
This part of the page displays the essential information about the certificates used (validity, subject and issuer).
The color of the field to the left of the floppy-disk symbol indicates if the certificate is
valid for another 3 months and if the key pair matches (green, yellow for less than 3
months or no match).
You can download the primary key and certificate for the current server by clicking on
the floppy-disk symbol.
To ensure that certificates are excepted it is very important that the time in the
SYSTEM/Basic Settings is set correctly. A reliable NTP Server is probably the
best solution. NTP Servers can be configured at NETWORK/NTP Configuration.
amcc-4_ug_en_2013-06
62
5 Security
5.5
Certificate Security
Figure 5.4: Certificate Security page
This page enables you to force the Aastra MC Clients to verify the controller certificate
when downloading the configuration.
This cannot be used and must therefore stay deactivated if the used certificates are
self-signed. This is the case in the screenshot above and a message highlighted in
yellow is displayed. To successfully use this option, certificates must be signed by an
issuer that is considered a trusted entity by the operating system the Aastra MC Clients
run on. If the certificate is not self-signed the message will be "greenlighted", but since
the Aastra AMC Controller cannot know if the used operating system(s) trust the issuer,
verification attempts might still lead to failures.
5.6
Database Security Key
Security keys are only needed for Remote Backups via SCP and for Master/Slave
configurations:
• Remote Backup via SCP: Download the Superuser Public Key and upload it to
the remote backup server. For more information about remote backups, please
refer to 3.8.
• Master/Slave: For Master/Slave operation, the Database Public Key has to be
downloaded from the Master and uploaded to the Slave device. Please refer to
3.12 for more information about database synchronization with the Aastra AMC
Controller.
amcc-4_ug_en_2013-06
63
5 Security
Figure 5.5: The database security key in the web interface
5.7
SBC User Agents
It is neccessary to list additional user agents that are directed towards the Aastra AMC
Controller’s SBC on this page. This concerns softphones like "Twinkle" that can be configured to work with the Aastra AMC Controller. Save the user-agent string to this table
to enable telephony via the Aastra AMC Controller using the user agent in question.
amcc-4_ug_en_2013-06
64
6 Telephony
6.1
Aastra MC Solution Basics
All menus described from this point to the beginning of the Diagnostics chapter (10)
have direct relevance for the Aastra MC Solution.
Find below the most crucial settings briefly noted. All menu items will be described in
thorough detail in the following sections.
There are several SIP-and RTP-related options to configure in the Global Settings
(refer to 6.3). The next important step is the configuration of one or more Numbering
Profiles. For more information refer to 6.6.
Please configure at least one Endpoint and one PBX profile in the menus Endpoints
6.7 and PBX 6.8. Besides the Endpoint and PBX profile, a separate host for inbound
Call-through 1 calls. This second host will be used for handling the Call-through calls
which are first connected to the Enterprise network. After this connection the actual
destination number is dialed. All PBX profiles will receive associated User Profiles
(6.11) and User Accounts (6.13).
Another crucial menu is FMC Numbers, where at least one Call-Through number has
to be configured. All other numbers are used by the Aastra MC Client to request specific
services on the Aastra AMC Controller-side.
In the next menu User Profiles are configured. Then associate these (PBX) User
Profiles with the users of this solution in the User Accounts menu (6.13). There is also
the menu User Accounts (advanced) where further important (but optional) settings
can be made.
The last step to complete the core of the Aastra MC Solution is the menu Cellular Numbers (6.15). This is where User Accounts (and consequently their PBX registrations)
are associated with Cellular Numbers.
1a
Call-Through call is a call from the cellular network that is routed through the Aastra AMC Controller.
The Call-Through functionality enables the single number service and makes extension dialing from
outside of your corporate network possible
65
6 Telephony
Your changes will be applied after selecting Apply configuration. Please note that
simple User Configurations etc. at a later time will not require pressing Apply configuration. Apply configuration will also only be possible if it is necessary ; otherwise the
system will disable it.
6.2
Accessing PBX Features
Besides the basic call functionality with the single-number service, the Aastra AMC
Controller extends a wide range of the standard enterprise PBX features to the Aastra
MC Clients. These features are signaled across a data channel (with SIP INFO) or in
pure cellular mode (via DTMF). It will be possible to access the features completely
transparently from the handset and will keep working from one network to the other
through handoffs in both directions. The features described here equal the features
usually provided in a SIP phone. In order to make them usable through handoffs, their
implementation has been changed and distributed between the Aastra AMC Controller
and the Aastra MC Client. It should be noted that combinations of these features are
also usable. In addition to the typical SIP phone features, the PBX-based SIP features
are also available as described below. To avoid possible conflicts with systems provided
by many operators such as VoiceMail systems, accessing some features requires using more complex DTMF signals than just a single digit. The following features are
provided:
• Hold
• Toggle
• Consultation
• Conferencing (3pty)
• Transfer
• Combinations of the above
AVAILABLE F EATURE S ET
Please note that the selectable features can vary depending on the Aastra MC
Client, its version, as well as the used PBX. Feature combinations that are not
supported will not be offered by the Aastra MC Client.
amcc-4_ug_en_2013-06
66
6 Telephony
T RANSFER
The transfer feature requires the PBX to support the SIP REFER message as
defined in RFC 3515. The implemented transfer mechanism is an unattended
transfer with a fallback function in case the transfer is declined by the PBX. In that
fallback case, the previous call is resumed.
In addition to the emulated SIP phone features, the server side features of the PBX can
be used. The number and type of features are very dependent on the connected PBX,
but there are some rules to tell which features are available. Many features in SIP PBXs
are enabled / disabled by using access codes. All of these features can usually be fully
used in conjunction with full fmc-operation. In addition to features enabled by access
codes, some group features are also usable via the handset. The following is a list of
features that are typically supported by the Aastra AMC Controller if the PBX supports
them:
• Pickup
• Call Back
• Call Forwarding
• Hunting
• Simultaneous Ringing
• Call Groups
• Boss Secretary
• ...
Depending on the implementation, keyset operation is also supported to a limited degree. The great exceptions here are any features including indicator lamps, which are
not supported on the device. The reason for this is that the necessary keys and indicator lamps are simply not present on a typical mobile handset. However, depending
on the used PBX, indicator lamps are supported passively; that is: if said mobile device
shares a keyset line with an enterprise phone, and a call is present on the mobile device, the enterprise phone shows the mentioned indication that the other line is indeed
busy.
amcc-4_ug_en_2013-06
67
6 Telephony
FMC Interface and Port Handling
The Aastra AMC Controller has multiple network interfaces which, in principle, can all
be used for the Aastra MC Solution. The main interface that handles the connection
towards the PBX is the LAN1 interface. The default SIP port for any client registration
is 5062. For registrations towards the PBX, the Aastra AMC Controller will select a
dynamic port for each registered user. The port range for this is 12000 and higher,
depending on the number of configured users.
S IGNALING
Ports:
If the option Disable Separate Profiles is selected as Mode for a PBX (6.8), port
12000 will be used for all users.
The Aastra AMC Controller only accepts SIP signaling on port 5060 from Endpoints, other Aastra AMC Controllers, and from the localhost. If you use a different
interface, you will need to make use of the above described SBC functionality.
SBC - Session Border Controller
The Aastra AMC Controller has an integrated Session Border Controller (SBC). This
component enables you to exert control over how the signaling and/or the media streams
pass from one network component to another. It will provide security and enable NAT
handling. The SBC will also ensure that all networks configured on the Aastra AMC
Controller are cleanly separated. In the context of the Aastra MC Solution the most
frequent use will be to enable far-end NAT traversal for using Aastra MC Clients behind
firewalls of hotspots, or for GPRS/UMTS scenarios.
Details about the Services offered by the SBC Component
• NAT and Topology Hiding
If clients are to be used in different networks, or behind NAT routers, or if you
would like to make use of Topology Hiding, the SBC component is required. The
SBC listens (by default, no activation is needed) on port 5062 for TCP/UDP of all
of your configured interfaces (WAN, LAN Interface 1 etc.).
amcc-4_ug_en_2013-06
68
6 Telephony
FMC Enterprise Configuration Introduction
On the following pages you will find the detailed instruction of the setup of your FMC solution. The configuration settings are divided into several different groups and should be
configured in order of their appearance in the GUI, from "Global Settings", to"Numbering
Profiles", "Endpoints", "PBX", "FMC Numbers", "User Profiles" and finally "User Accounts". For the single-number functionality, "Cellular Numbers" have to be configured
as well.
O RDER OF C ONFIGURATION
Please note that the order of configuration does matter, since menu items fetch
entered pieces of information from items configured before hand, e. g. for drop
down boxes etc. For instance: User Profiles are needed in order to configure a
User Account.
amcc-4_ug_en_2013-06
69
6 Telephony
6.3
Settings
The following section contains the Global Settings necessary for the Aastra MC Solution. Please note that various fields have to be filled in for the system to work properly.
6.3.1
Global Settings
Figure 6.1: Global Settings
This part of configuration contains the concerning general settings the used PBX, SIP
related features and media stream settings. These settings are essential for operating
your Aastra AMC Controller properly.
Enable Call-Through Progress Indication
This feature supports the playback of a progress indication tone for the call-through
functionality. When an Enterprise call is initiated and routed through the Aastra AMC
amcc-4_ug_en_2013-06
70
6 Telephony
Controller, the Aastra MC Client will first dial the Call-through number (configured in the
Service Access Numbers menu, refer to 6.10). The Aastra AMC Controller will accept
the call, then process and dial the destination number (any digits or inband signaled
DTMF digits after the Call-through sequence). While the Aastra AMC Controller calls
the destination, it can play back a progress indication to the Aastra MC Client user
until the DTMF dialing has finished. This playback is what we call Call-through Early
Media. If this is not enabled the user will only hear silence until the other side is actually
ringing. The ringback tone for the other side is of course completely independent from
this feature’s activation.
Enable Client Early Media
This will prompt the Aastra AMC Controller to respond to all requests from the Aastra
MC Client by replaying all ringback tones, busy signals, etc., inband. Note that these
tones will only be played back to the user of the Aastra MC Client, this has no effects on
the other party. It is something that is solely negotiated between Aastra MC Client and
Aastra AMC Controller. Therefore, we recommend to put this setting to On, because it
enables the most consistent user experience in all call situations.
Enable busy sound in WLAN
If this box is checked the Aastra AMC Controller will replay a busy tone (for three times)
if the called party is already in a conversation or if the called party rejects the call. This
should in any case be sufficient since most users are likely to hang up actively after the
first busy-tone interval. In the case of a call rejection, the ring-back tone will be followed
by this busy tone. After these three busy-tone intervals, the call will be terminated.
Disable Inband DTMF detection
The Aastra AMC Controller supports three different mechanisms of DTMF detection
coming from the Aastra MC Client as well as from the gateway or PBX via the Callthrough trunk connection. The Aastra AMC Controller listens for DTMF automatically
and supports the following mechanisms for DTMF detection:
• Inband signaling
• Signaling according to RFC2833
• Signaling via SIP INFO
→ The Aastra AMC Controller executes the automatic detection as follows:
• It will automatically try to detect the DTMF mode the peers are using after the
connection has been initialized and it has seen the first DTMF coming from the
peer
amcc-4_ug_en_2013-06
71
6 Telephony
• Once it has identified the used mode, it will continue to use it. A re-detection is
triggered by restarting the dual-mode server.
Some gateways and PBXs support a RFC 2833 fallback, which means that they will
send DTMFs both inband and via RFC2833. This will lead to double detections on the
Aastra AMC Controller-side. If the peers do this, you have to check this box to suppress
inband DTMF detection, which is recommended if your equipment supports it, because
it avoids wasting resources on the inband DTMF detection.
The correct detection of the used DTMF mode is not always possible. It can furthermore consume quite a lot of resources especially if the Aastra AMC Controller
concluded that inband DTMF was being used. In order to avoid these issues, it
is recommended to always disable inband DTMF if anything else is supported by
the peers.
Disable Number Converter
The Aastra AMC Controller supports a three stage number converting process:
• Source pattern to target pattern mappings defined by explicit rules (this is set in
the Number Conversions menu; section 7.1)
• Considering numbers as internal depending on their length (refer to Numbering
Profiles in section 6.6)
• Automatic conversions based on the Numbering Profile settings performed here
(see 6.6)
By checking this option the number conversion process will be completely switched off.
This means that any dialed number will be passed through straight to the PBX without
any modification.
DTMF Duration
With this setting you can configure the duration of (RFC 2833) DTMF towards your
PBX. The value the Aastra AMC Controller uses by default for this DTMF signaling, if
this field is left blank, is 100 milliseconds. For some PBXs, however, a lower or even
higher value might be more favorable. Legal are values between 10 and 8000 ms.
RTP payload-type for DTMF
In this field you may enter values from 96 to 127 to specify the payload type (PT) for
all DTMF signaling between Aastra AMC Controller and your PBX. This can be used to
have both peers use the same PT.
amcc-4_ug_en_2013-06
72
6 Telephony
Unavailable Timeout
This determines the amount of time until a user is regarded as "unavailable". If Call
forwarding is enabled for the user in question, it will become active after this interval. If
left blank, the default value is 30 (seconds).
Of course the total amount of time before a call’s establishment is regarded as "failed"
and how the call attempt is treated after this set interval might also depend on your
PBX’s configuration.
Force Ringing on Early Media
If your gateway sends an "Early Media" request when a call comes in from the cellular
network (i. e. a Static Roaming call), but your PBX does not support this, you can
check this box to have the Aastra AMC Controller send a "Ringing" with a following
"Early Media".
This option is only of use in certain network constellations.
Use P-Asserted Identity2
This check box enables you to use the P-Asserted-Identity header instead of the "SIP
FROM" header for SIP trunk calls (Static Roaming).
E XAMPLE
l Using "P-Asserted Identity" (box checked): instead of the "SIP FROM" header
of the first invite, the Aastra AMC Controller will use the "P-Asserted Identity"
when it send the INVITE message to the gateway.
Using "SIP FROM" (box not checked): an incoming call for a user reaches the
Aastra AMC Controller as a SIP INVITE message, the Aastra AMC Controller forwards an INVITE to the cellular gateway (which then forwards it to the Aastra MC
Client/user). The Aastra AMC Controller will use the "SIP FROM" header of the
first INVITE in its INVITE to the gateway.
Process Rinstance tag
Some SIP clients add a rinstance parameter to the contact header. If you enable this
Global Setting, this information (if available) will be kept and forwarded by the Aastra
AMC Controller.
2 The
P-Asserted-Identity header is used among trusted SIP entities (typically intermediaries) to carry the
identity of the user sending a SIP message as it was verified by authentication.
amcc-4_ug_en_2013-06
73
6 Telephony
Number of Cellular-digts to match
Specify here how many digits of Cellular Numbers shall be matched for authentication
(to make use of Call-through etc.). The default value here is 10 (digits).
Don’t send P-asserted Identity
This option and the next two options can be used to modify the information used in
headers towards the PBX(s) or Trunk(s). Check this option if sending the P-asserted
Identity header is not supported by your PBX or Trunk.
Don’t send P-preferred Identity
Check this option if sending the P-preferred Identity header is not supported by your
PBX or Trunk. Please note that the P-Preferred Identity is only sent in the case of Static
Roaming calls.
Don’t send Remote-Party ID
Check this option if sending the Remote-Party ID header is not supported by your PBX
or Trunk.
Disable automatic Redirect-Server Push
By default, this and the following option are not checked. This means that in the default
case, an initial or new configuration deployment is triggered automatically a) to new
users, or b) if something essential (like the Registrar setting) has changed. If this option
is checked, configurations will not be deployed automatically.
Disable automatic Force-Config Download
By default, this and the previous option are not checked. This means that in the default
case, configurations will be re-deployed from the Aastra AMC Controller if a setting
that has to be stored on the Aastra MC Client has changed. If this option is checked,
configurations will not be deployed automatically.
Don’t Send Diversion for SR over reg.
If no SIP Trunk is in use, the Aastra AMC Controller sends a Diversion Header for StaticRoaming calls. You can deactivate the sending of Diversion Headers for Static-Roaming
calls by checking this option.
Enable noise suppression
Enabling this option increases audio quality, but has more impact on the CPU.
amcc-4_ug_en_2013-06
74
6 Telephony
Use only one PCM Codec
Enable this option to restrict the PCM codec use to only one PCM codec. This will be
the PCM codec selected for an Endpoint (refer to 6.7). The other PCM codec will then
not be offered. Uniform usage of one PCM codec (per Endpoint) was applied until the
latest version of the Aastra AMC Controller, hence enabling this equals reverting this
behavior to the behavior of the prior version
Disallow dynamic codec change
With the latest version of the Aastra AMC Controller, it will automatically and dynamically use the codec offered by the other endpoint.
Check this option to prohibit dynamic codec changes. Please note that the prior setting
"Use only one PCM Codec" already affects this behavior to an extent.
Pre-audio in cellular mode for NAT
If checked, this option enables "dummy" audio packets for incoming and outgoing cellular calls in the early-media stage. These audio packets are required to open the pinhole
of VoIP trunks that use NAT behind a PBX.
Ignore Early Media SDP for Trunk Calls
Activate this option if problems occur with parallel ringing on the deskphone. All SDP
will be ignored for trunk calls, and only plain "180 Ringing" without any SDP will be
forwarded.
Always answer callthrough call
Enable this to have the Aastra AMC Controller "answer" a Callthrough call immediately,
i.e. even before the callee has answered the call. If this is used, even unanswered
calls will be billed to the calling party, and early-media announcements generated by
the telephony system will be received.
Dynamic Call Limits
Activate this setting to dynamically cap the number of ongoing calls. If the current
system load is too high to ensure consistent audio quality, the Aastra AMC Controller
will not permit new calls. Quality of performance of this setting is among other factors
dependent upon the used PBX.
Available values for this setting are:
• Strict: the Aastra AMC Controller declines new calls ideally before audio quality
is affected.
amcc-4_ug_en_2013-06
75
6 Telephony
• Lazy: the Aastra AMC Controller declines calls after audio quality has been affected.
• Balanced: the Aastra AMC Controller sets the limit in between Strict and Lazy.
• Reliable: the Aastra AMC Controller does not decline calls, but instead attempts
load reduction by deactivating audio compression.
amcc-4_ug_en_2013-06
76
6 Telephony
6.3.2
SIP Options
Options to be configured in this section affect the general behavior of the SIP-related
features. This is especially relevant for the registration behavior as well as the NAT
handling in conjunction with the SBC component.
Figure 6.2: Global Settings, SIP and RTP Options
Registration Timeout Interval
You can specify the default amount of seconds for all outbound registrations (this timeout will also be used for Subscribes to Pickup Groups and for Message Waiting Indications). Please note that this setting has absolutely no effect on the client side. It
only specifies the registration interval towards the PBX. Re-registrations will be performed after the first half of the interval specified here. Please note that the PBX can
always override the registration timeout by returning an "expire parameter" in the contact header or a separate expiry parameter in the OK response to the sent registration.
amcc-4_ug_en_2013-06
77
6 Telephony
Some PBXs also reject registrations with expiration timeouts that are too brief. If this is
the case, you should increase the Registration Timeout Interval.
If registrations fail, please perform a Network Trace (10.14). If you see registrations rejected with the error request interval too brief, the timeout set here has to
be higher. By default, many PBXs expect expiration timeouts between 1800 and
3600 seconds.
Registration Retry Interval
This setting defines the interval between a failed REGISTER (towards the PBX) and
the next retry for regular registrations and MWI subscriptions. The default value is 30
(seconds); the minimum value is 10 (seconds). This setting does not apply to XMPP
and SIMPLE registrations!
External IP for NAT
The External IP specifies the source IP address which will be used for all SIP messages
when NAT handling is done. It does not matter whether the interface for the IP address
specified here is a LAN, WAN, or DMZ interface. For all messages arriving through this
interface on port 5062 (or port 5061 for TLS), NAT handling will be performed.
The Aastra AMC Controller can easily verify whether a NAT is involved. This can be
done by checking for private IP-address ranges and seeing if the source of the message
matches the source indicated in the SIP signaling. If addresses differ, NAT handling has
to be performed. This means that all messages must be returned through the firewall
pinhole that the message came from. The same holds true for the media stream. The
addresses in the SIP header and the SDP body will then in part not be considered.
There is no need for the configuration of any special handling on the client side.
To exclude certain networks from this, configure them as SBC Internal Networks; refer
to 6.5.
Attempt Near-End NAT Pinhole
Attempt Near-End NAT Pinhole can sometimes solve "no speech" (RTP issues) due to
a false IP address given in the SDP body. If activated, the RTP is directed to the foreign
address included in the SIP packet (box checked) instead of the IP address given in the
SDP body (box not checked). This option has no effect if the External IP for NAT is not
set!
amcc-4_ug_en_2013-06
78
6 Telephony
Please note that this option can only work as intended if the near-end firewall honors the port range, i.e., if it does not alter the ports.
TCP Keepalive Interval
Specify when the first keepalive shall be sent. The interval is specified in seconds
passed after the last TCP packet. To disable keepalives, set this value to zero. The
default value is 0s.
SBC call admission control
This setting lets you specify the maximum number (>0) of parallel WLAN calls permitted
via the SBC if there’s a) NAT involved, or b) if they are done via the WAN interface. If
this number is exceeded, calls will be established via Static Roaming (i.e., they will be
forwarded to the cellular network).
Set the number to the maximum number of parallel calls that can be established with
sufficient voice quality in your network.
B UILT- IN S ESSION B ORDER C ONTROLLER
The Aastra AMC Controller will utilize a built-in Session Border Controller for handling clients behind NATs. In those cases, the client needs to be registered via
port 5062. For TLS, where NAT detection will always be done by default, there
is no such distinction (so port 5061 can always be used). This distinction is in
partly due to security concerns. Explicitly not performing NAT detection makes
the communication over insecure links a little safer.
The mechanisms needed to do the NAT handling can increase the likelihood of
attacks such as session hijacking. When using TLS as signaling protocol, you do
not run this risk, because the signaling is done through a secure channel.
E XTERNAL S ESSION B ORDER C ONTROLLER
It is also possible to make use of an external Session Border Controller: simply
configure the Aastra AMC Controller as a SIP server in the used Session Border
Controller and have the SBC forward the SIP messages to port 5060 of the Aastra
AMC Controller. Then the external SBC will perform the NAT handling.
Time interval for registrations
This setting is to be used in combination with the following setting. They determine
the number of maximum number of users that can register within the amount of time
(seconds) specified in this field. The default values are 200 users within 10 seconds.
amcc-4_ug_en_2013-06
79
6 Telephony
Max value of simultaneous registrations
This setting is to be used in combination with the previous setting. They determine the
number of maximum number of users that can register within the specified amount of
time (seconds). The default values are 200 users within 10 seconds.
6.3.3
RTP Options
The RTP Options are used to set system-wide behavior of RTP-media streams such as
timeouts and sending RTP-keepalive packets.
These settings apply only to the SBC component of the Aastra AMC Controller,
and hence only apply to the media streams originating from it. For general QoS
settings please refer to 4.7.
amcc-4_ug_en_2013-06
80
6 Telephony
TOS for outgoing media
Specify the TOS (Types Of Service) byte that is to be set in the IP header for all voicepayload traffic leaving the Aastra AMC Controller. It has been originally defined in RFC
791. The following 8 bits were allocated to the TOS field in the IP header (bitmask):
• bits 0-2: precedence
• bit 3: 0 = Normal Delay, 1 = Low Delay
• bit 4: 0 = Normal Throughput, 1 = High Throughput
• bit 5: 0 = Normal Reliability, 1 = High Reliability
• bits 6-7: Reserved for future use
This field is now used for DiffServ and Explicit Congestion Notification (ECN). The original intention was to enable a sending host to specify a preference for how the datagram
would be handled as it made its way through a network. For instance, one host could
set its IPv4 datagrams’ TOS field value to prefer low delay, while another might prefer
high reliability.
These bits have been redefined, most recently through the DiffServ working group in
the IETF and the Explicit Congestion Notification codepoints (see RFC 3168). In order
to set the field, use a decimal number between 0 and 255. The value will be taken as 8
bits with the bitmask’s meaning explained above.
RTP Session Timeout
The default value for the RTP session timeout is 30 seconds.This setting specifies
the maximum time an RTP session will be kept open (after media transmission has
stopped). If this setting is too high, too many RTP sessions could be open at the same
time which may lead to lack of speech transmission or even failed calls in times of high
load (many active calls). A sensible value range is [10;1800].
As just mentioned, the Aastra AMC Controller will drop any call if no RTP media
has been received for 30 seconds. This RTP timeout is used for hanging up dead
calls. Note that this timeout does not come into effect when there is a call on Hold.
If that is the case, there is a timeout of 300 seconds. As a result a call that has
been on Hold for 300 seconds is simply hung up because it is assumed that the
party was forgotten or lost (e.g. when the Aastra MC Client user who put the other
party on hold dropped out of the call).
amcc-4_ug_en_2013-06
81
6 Telephony
6.3.4
Load Limit Configuration
This setting is only available on virtual Aastra AMC Controllers(this inlcudes the SuSEbased Aastra MC Solution), and specifies how many concurrent calls are allowed on
the system.
6.4
Ports
This menu item allows you to configure custom ports if necessary for your individual
FMC solution. The default values, if left blank, are as follows:
• For SBC:
Name
Number
Receiving SIP Port
5062
Receiving TLS Port
5061
RTP Start Port
35000
RTP End Port
65000
• For B2BUA:
RTP Start Port
16000
R ECEIVING SIP P ORT TO 5060
It is possible to set the Receiving SIP Port of the Session Border Controller to
5060. However, this will never affect LAN Interface 1. On LAN Interface 1 the
B2BUA will always listen for messages. So by setting the Receiving SIP Port of
the SBC to 5060, DMC will be possible on LAN Interface 1 (please refer to User
Account Settings), but the SBC will be listening on the WAN Interface (to enable
NAT for example).
amcc-4_ug_en_2013-06
82
6 Telephony
6.5
SBC Int. net.
This menu lets you list networks which are to be treated as "internal networks" if the
Global Setting (SIP Options) "External IP for NAT" is active. If a call originates from one
of these networks, the media stream (RTP) will be routed locally.
Figure 6.3: Set IP networks or hosts as SBC internal networks.
6.6
Nr. Profiles
The Aastra AMC Controller provides several features for the formatting of numbers.
Formatting is necessary to ensure the following principle:
For calls towards the Aastra MC Client, the goal is to send as much information as
possible to ensure the correct identification of the caller (unless it is an internal call, the
displayed number will always be a number reachable via cellular networks (full E164
format), including all codes, prefixes etc.). Whereas for calls entering your Enterprise
network from outside as many matching digits as possible are to be stripped.
Some PBXs support this feature, but if your PBX does not format numbers appropriately,
the Aastra AMC Controller is able to take over this job.
There are two features available in the Aastra AMC Controller for formatting numbers,
which can be found under the menu items Numbering Profiles and Number Conversions. Conversion rules have priority over Numbering Profiles, although only the configuration of one Numbering Profile is mandatory. Please refer to 7.1 on page 124 for
more information about Number Conversions.
If no Number Conversions are configured or if no match is found there, the Aastra AMC
Controller will compare each call with your configured Numbering Profile(s).
amcc-4_ug_en_2013-06
83
6 Telephony
Every PBX is associated with a unique Numbering Profile in this menu. The Aastra AMC
Controller then compares all outbound and inbound calls with the configured profile(s),
completes numbers calling an Aastra MC Client and strips numbers coming from an
Aastra MC Client in accordance with these profiles. Please note that it is possible to
define alternative mappings through the Number Conversions page.
The Aastra AMC Controller performs number formatting in 3 stages (if the concerned
menu items are configured):
1. Source pattern to target pattern mappings defined by explicit rules (refer to Number Conversions in 7.1)
2. Considering numbers as internal depending on their length (see column title Internal Length under Numbering Profiles. This means that besides adding the Fixed
Prefix, no reformatting is done, because it is assumed that internal numbers are
dialable on the PBX without further modification.
3. Automatic conversions based on the Numbering Profile.
Number Formatting Overview
The graphics starting on the next page will make the process of number formatting more
clear.
amcc-4_ug_en_2013-06
84
6 Telephony
Figure 6.4: To-Number Conversion
amcc-4_ug_en_2013-06
85
6 Telephony
Figure 6.5: From-Number Conversion
amcc-4_ug_en_2013-06
86
6 Telephony
Once a match is found in a specific stage, all following stages are skipped. There
is no exception to this rule, not even the Number Conversion (7.1). The Aastra AMC
Controller will always perform a one step conversion to avoid unnecessary complexity.
Select the Numbering Profiles menu entry, and you will see the this mask: 6.6 on page
87 (the content as always will vary depending on your configuration).
R EQUIRED S ETTINGS
There are no default numbering profiles configured. However, you need to configure at least one to proceed. This step is crucial since it determines how numbers
are sent to your PBX. If you make mistakes here, it will lead to no connections or
wrong connections at a later point in time.
E164 F ORMAT
The fields Country Code, Country Prefix, Area Code, Area Prefix have to be set
if you want to have the Aastra AMC Controller operate correctly. Please note that
numbers on the cell phone are typically dialed in E164 format and therefore need
to be reformatted by the Aastra AMC Controller.
Figure 6.6: Numbering Profiles Configuration
You can add as many Numbering Profiles as you like. Each PBX must later on be associated with a Numbering Profile. You can also define multiple Endpoints referencing
the same PBX but using different Numbering Profiles, but this will be considered later.
First a general Numbering Profile has to be configured.
Depending on how the Numbering Profile is associated with a PBX (To or From Converter Profile), the mappings are applied to the To or the From headers. When applied
to the To headers, the direction of the mapping is always applied towards the PBX. From
always means from the PBX.
amcc-4_ug_en_2013-06
87
6 Telephony
• Name
This is a name identifying the Numbering Profile in the other masks. You will need
to use this name whenever you are referencing to the Numbering Profile defined
here.
• Country Code
The country code is the international prefix number of the country the PBX is
located in. This paramter is used in conjunction with the City Code to correctly
compose numbers for outgoing calls.
You have to specify it here without leading and without plus sign, e. g. 49. On the
client, or on the cellular side if we are dealing with a callthrough case, the + sign
will be handled automatically.
This setting only applies to numbers dialed from your mobile device. Whenever
you dial a number starting with your own country code, the Aastra AMC Controller
will strip away this country code before extending the call to the PBX.
• Country Prefix
Prefix to denote that a country code will follow, e.g. 00. This is required for
properly converting E164 numbers. As briefly mentioned before it will be 00 for
most countries, but not for all, for the US it is for example 011.
• Area Code
The Area Code is used in conjunction with the Country Code to correctly compose
the numbers for outgoing calls. Please note that this only applies to numbers
dialed from the mobile device. Whenever you dial a number that starts with your
own city code (relative to where the Aastra AMC Controller is positioned), the
Aastra AMC Controller would strip away its own Area Code before sending it to
the PBX. The area code also has to be specified without any leading zeroes.
• Area Prefix
Enter the number you have to dial on your phone before making a long distance
call. In the US this is a 1, in most European countries a 0.
• Outgoing Prefix
This is the number that has to be dialed from inside of your Enterprise to call an
outside line with your PBX. In most cases this will simply be a single digit. This
digit will always be prefixed, unless it is an internal call.
amcc-4_ug_en_2013-06
88
6 Telephony
• Fixed Prefix
A fixed prefix can be added to all numbers sent to the PBX. This can be used for
a variety of reasons, e. g. if you want to singalize to the PBX that it is actually an
FMC call. This could be used for doing a special treatment in the billing or a least
cost routing implementation. If you set a parameter here, it will always be applied.
• Internal Length
Numbers that do not exceed this length will always be considered as internal
numbers. Sometimes there is no real pattern to internal numbers, but, however,
they do have a maximum length (since there are few real numbers with three
digits). If all numbers should be treated by your configured Numbering Profiles,
set the Internal Length to 0.
• Minimal Outgoing Format
For numbers (outbound calls) exceeding the specified Internal Length the Minimal
Outgoing Format can be set to International (full E164 format with Country Prefix
and Country Code), National (without the Country Prefix and Country Code), or
Subscriber (without Area Prefix and Area Code).
Number Conversion Stage 1
As briefly mentioned above, these parameters will be used to do a conversion in three
steps. The first step is an explicit specification as described in 7.1. If nothing matches,
an automatic fortmatting follwing the next two stages described here will be executed.
Number Conversion Stage 2
This stage is meant to enable special treatment for short numbers, meaning Never
touch numbers that do not exceed length X, even if they start with e. g. the outbound
prefix. Numbers which do not exceed the set Internal Length will only be formatted
by adding the Fixed Prefix. Numbers exceeding this length will be formatted along the
rules described in Stage 3.
If you do not want these exceptions, just set the Internal Length value to 0. Then
Stage 2 is completely disabled and all numbers undergo automatic conversions
as described below.
Note that there must be a valid Numbering Profile before you can define an Endpoint.
amcc-4_ug_en_2013-06
89
6 Telephony
Number Conversion Stage 3
1. A leading + character is replaced by the country prefix as configured.
2. The number is checked to see whether it starts with the country prefix followed
by the country code and area code, as specified. If so, the number is flagged as
outgoing and the country prefix together with the country code and the area code
are removed.
3. If the previous does not apply the number is examined whether it starts with the
country prefix followed by the country code (without area code) if so, the number
is flagged as outgoing and the country prefix together with the country code are
replaced by the area prefix.
4. If the previous does not apply, the number is checked to see whether it begins
with the area prefix and the area code as configured. If so, the number is flagged
as outgoing and area prefix together with area code are removed.
5. If the previous does not apply, the number is checked to see whether it begins
with a 0 if so, it is flagged as outgoing.
6. All numbers that are flagged as outgoing are prepended by the dial-out prefix as
specified.
7. The fixed prefix (if configured) is prepended to all numbers.
amcc-4_ug_en_2013-06
90
6 Telephony
6.7
Endpoints
In order to be able to configure users, you must first configure the SIP Endpoint(s)
that the Aastra AMC Controller should integrate. An Endpoint will be some sort of SIP
Server, typically a SIP-capable PBX, but it can also be one of the following:
• B2BUA or Softswitch
• SIP Proxy
• Gateway able to handle registrations.
At least one Endpoint has to be configured before you will be able to do any further configuration.
Figure 6.7: Endpoint (PBX) Configuration menu
Common name
The common name of an Endpoint (SIP Host) uniquely identifies it. This name will
be used throughout all further configuration. It is used for internal purposes only and
should be descriptive, because it is used in other configuration pages. It can be identical
to the Hostname (if domain names are used), but it does not have to be. Please note
that if the Endpoint is an Aastra BluStar-Server, it has to be named "BSS" or "bss", or
its name has to contain "BSS" or "bss" if the BluStar-Server is to be used for Presence,
refer to 8.5 and 8.6.
Hostname/IP
This setting enables you to specify the address for a SIP host either with its IP address
or as a fully qualified domain name (FQDN). If you are going to use the FQDN you
have to make sure that an appropriate DNS Server is configured on the Aastra AMC
Controller.
amcc-4_ug_en_2013-06
91
6 Telephony
Local Interface
Specify the interface to be used for sending and receiving the SIP messages. It will be
the IP address of the configured interface from which the PBX will receive all messages.
It also has to be able to return messages to this IP; as a consequence all routing and
security settings of involved firewalls have to be set accordingly. Different SIP endpoints
can be configured to use separate network interfaces. This enables a clean network
separation as is sometimes required for security purposes.
Foreign Port
In some configurations it is necessary to specify the port where the destination host
listens for incoming SIP connections. The default port is 5060, which is the standard
SIP port. To select this port you can simply leave this field blank. 5060 should be
appropriate for most configurations.
The recommended range for this port is between 11000 and 11499. The following ports
must not be chosen:
• Must be equal or greater than 1025
• Must not be the same as the Receiving SIP/TLS Port (by default 5061 and 5062,
respectively; refer to Port Settings, 6.4)
• The default port 5060 is only supported on LAN Interface 1
• Must not be set to the following ports which are reserved for certain services/protocols: 5222 (XMPP), 5432 (Postgres), 1234/1235 (Worker/Boss, Blade Server
scenario), 8021 (Event Socket), 12000 - 16000 (Subscription and SIMPLE Presence).
The most frequent reason for using a non-standard port are security considerations
to make an attack more difficult. This approach can make denial of service or other
attacks more difficult by obscuring that the Aastra AMC Controller is actually a SIPaware device. A lot of the scanning bots used for detecting vulnerable systems on the
Internet only check for these standard ports. However, obscuring this port cannot and
must not replace real security mechanisms such as digest authentication.
Realm
The realm parameter specifies the authentication realm used when connecting and
authenticating to the Endpoint. If the host is behaving completely compliant to the SIP
specifications, it should reject any attempt to register with the wrong realm. All devices
connected to the Aastra AMC Controller must hence belong to the same authentication
realm to work together. Although the notion of a realm is clearly specified in RFC 2543,
many UAs fail to implement it and simply ignore the parameter. Therefore, the likelihood
of registrations working even without setting this parameter is very high.
amcc-4_ug_en_2013-06
92
6 Telephony
Preferred Codec
Please select the preferred codec towards this Endpoint. This codec setting will become effective whenever a call is terminated on the Endpoint, or on an IP phone/Gateway connected by it. The codec set here will always represent the first codec offered in
the signaling between the Aastra AMC Controller and the Endpoint.
A BOUT C ODECS
The Aastra AMC Controller supports the G.711 alaw and ulaw, iLBC, G.722 and
GSM as well as G.729. The G.711 alaw and ulaw are also supported with a play
time of 30 ms . All codecs are always offered, so the Endpoint is completely free
to determine the used codec by selecting its preference. However, the specified
Preferred Codec will be offered first. If a compressed codec is used between
the Endpoint and the Aastra AMC Controller as well as between the Aastra AMC
Controller and the Aastra MC Client, it has to be the same compressed codec.
Sometimes it is recommended to use a compressed codec (such as ILBC or
GSM) towards the Aastra MC Client, because it is less straining for the WLAN
network. Especially ILBC is very resilient in bad network conditions and could
even lead to better voice quality under certain conditions. When using the Aastra
MC Client across a WAN connection, the use of a compressed codec is highly
recommended.
amcc-4_ug_en_2013-06
93
6 Telephony
Outbound Proxy
Specify an outbound proxy by entering its IP address here.
Specifying an outbound proxy enables you to statically set the next hop for all SIP
messages towards an Endpoint. SIP Proxies or Session Border Controllers are often
configured as outbound proxies to locate them at the network edge which protects the
Aastra AMC Controller and / or the PBX. This option will not really change the routing
of the messages except for adding this static routing entry. If this is configured, the
Aastra AMC Controller will add a static route header to accommodate this next hop.
Other than that everything will remain the same. For more information about outbound
proxies, please refer to RFC 3261.
6.8
PBX
Configure PBX profiles by combining an Endpoint and a Numbering Profile in this
menu.
Figure 6.8: PBX Profiles associated with certain Endpoints.
Common Name
The common name of a PBX profile uniquely identifies it. This name will be used
throughout all further configuration. It is used for internal purposes only and should be
descriptive, because it is used in other configuration pages. It can be identical to the
Endpoint name, but it does not have to be.
Endpoint
Select the Endpoint on which this PBX is running. Only already configured Endpoints
will be available in this drop-down box.
amcc-4_ug_en_2013-06
94
6 Telephony
Use inactive for Hold
In SIP, there are two ways of signaling the Hold feature. Both are implemented through
the SDP protocol, where you can either signal a sendonly, or an inactive. By
default the Aastra AMC Controller uses the former. However, most PBXs support Hold
as a native feature, therefore it might be more appropriate to use inactive to signal Hold.
In those cases, the PBX will play back the Hold music. As mentioned, most PBXs do
support this, therefore it should be save to deactivate this feature on the Aastra AMC
Controller’s side.
From Numbering Converter Profile
The From-Number Mapping has been introduced to create a uniform number experience on the mobile phone. As mentioned above, the goal is to be able to dial any
number that you would also be able to dial from your mobile phone without the Aastra
MC Solution. Since most companies have different number policies (e.g. you have to
dial a 0 to call out etc.), some mappings are recommendable.
The From-Number Converter Profile is only needed if the Caller ID of incoming calls
is incorrect, e. g. if the leading 0 for an outside call is attached by the PBX. In those
cases it is usually enough to specify the same Number Mapping that you have specified
before in the To-Numbering Profiles to revert the changes when receiving calls. For
more information also refer to 6.6.
To Number Converter Profile
Selecting a valid Numbering Profile for each PBX is mandatory. Not doing so, will lead
to a failing PBX. To configure a profile, please refer to 6.6 for more information. The
Numbering Profile set here will convert the number going to the PBX. These profiles
have been introduced to enable a uniform user experience on the Aastra MC Client:
the number of a party calling a client should always be displayed in full E164 format.
This ensures that a call log entry (missed and received calls) can always be redialed
even from the cellular network.
amcc-4_ug_en_2013-06
95
6 Telephony
F ROM -N UMBER P ROFILE IS O PTIONAL
Specifying a From-Number Profile is optional. You should only do so, if the numbers you receive as a Caller ID for inbound a calls (to the Aastra MC Clients)
cannot be dialed from the cellular network.
S ETTING A N UMBERING P ROFILE IS M ANDATORY
At least one Numbering Profile needs to be selected for a PBX. It is not possible to
configure a PBX without a Numbering Profile. Before forwarding a call to the PBX,
the Aastra AMC Controller will enforce the configured Numbering Profile against
the dialed number. This is one of the key concepts of the Aastra MC Solution.
While the cellular phone is now an enterprise phone, numbers are assumed to
be dialed in E164 or abbreviated E164 format. This is done to provide a uniform
behavior between plain cellular mode and enterprise mode. It would be very inconvenient if the stored contact only worked in one of the two modes. The Aastra
AMC Controller will do the number formatting to make sure that the SIP endpoints
will only get proper enterprise numbers.
SIP Trunk
This setting concerns the handling of statically roamed calls. They can either be forwarded to the cellular side of the Aastra MC Client through the user registration, or
through a separate SIP-Trunk interface. The usual problem with signaling through the
user registration is either the display of the correct caller ID of the original caller, or
incorrect billing information by matching up the record with the Aastra MC Client. If you
are experiencing any of these two problems, you should consider configuring a separate SIP Trunk for handling these calls. After a SIP Trunk has been set up in 6.9, you
can assign the SIP Trunk to a PBX with this menu option. This assignment means that
all static-roaming calls for the users of this PBX will be handled through the selected
SIP Trunk.
This setting is optional and only applies to the handling of static roaming calls.
If no SIP Trunk is selected, all static roaming calls will be handled through the
existing user registration.
Country
This setting is mandatory. In some situations, the Aastra AMC Controller will create
tones (ringback and others). One example for this is the two stage dialing during an
amcc-4_ug_en_2013-06
96
6 Telephony
FMC-Call-through operation. Since every country has different tones, the Aastra AMC
Controller supports a certain set of countries by default.
Select the country profile you wish to apply. This should match the country profile of
your PBX to create a uniform user experience, since in most situations the tones will
come from PBX.
The page Country Tone now enables you to upload sound files (wav 16 bit - 8000
hz - mono/1 channel). All sound files uploaded on said page, will be offered in the
Country column of the PBX profiles.
DTMF Type
In older versions DTMF was always sent according to RFC 2833. Now you have the
possibility to choose between RFC 2833, SIP INFO and SIP INFO (Cisco) (as specified
by Cisco and the most appropriate for a Cisco PBX). Depending on your PBX a certain
DTMF Type might be the better standard to select. You can therefore specify different
DTMF Types for different PBXs.
Mode
You have the possibility to assign a different Mode for each PBX profile. There is Disable
Separate Profiles, SIP Registration, and Trunking.
Disable Separate Profiles and SIP Registration The major difference between Disable Separate Profiles and SIP Registration is that with Disable Separate Profiles, the
Aastra AMC Controller will use the same port for all user registrations, whereas with
SIP Registration a separate port for each user will be used.
SIP Registration is the right choice if your PBX cannot handle all features correctly if
the Aastra AMC Controller uses the same port for every user it registers to the PBX.
Disable Separate Profiles is the better choice if your PBX supports user differentiation
by their SIP identity and does not require the differentiation via port. Disabling the separate profiles improves performance and security since fewer ports are open. However,
as already mentioned, there are PBXs which do not support this and the resulting
problems might not be immediately obvious since they can only occur during feature
signaling. As a conclusion, you should only use the Disable Separate Profiles option
if you are absolutely sure that your PBX and the respective software version support
this.
Trunking With the mode Trunking, calls will be transferred statically between the PBX
and the Aastra AMC Controller. This way, PBXs which support SIP Trunks only can be
integrated with the Aastra MC Solution. The PBX must send calls to the IP:Port combination of the Aastra AMC Controller, and the Port must be set in the PBX profile if the
amcc-4_ug_en_2013-06
97
6 Telephony
Trunking mode is chosen. Please note that the Port 5060 is not available for Trunking
unless the selected endpoint is configured on a virtual interface for this purpose. Only
ports which are not yet assigned, can be used for this mode. In combination with a
SIP-to-ISDN gateway, this mode enables the integration of the Aastra AMC Controller
with a legacy PBX (i.e. that supports ISDN only).
D ISABLE S EPARATE P ROFILES FOR +500 U SERS
If more than 500 users are configured, you should use the Disable Separate Profiles option! It will improve the overall performance and reduce the number of
required network ports. Please note that with SIP Registration, a separate port is
required for each single user.
Please note that if you do not select this option with more than 500 users, the
firewall on the unit has to be deactivated, because the packet filter on all those
ports will consume too much performance.
Port
The Port has to be set if the PBX Mode Trunking is selected for a PBX profile. This
is the port the B2BUA listens on to receive calls from the Trunking-PBX. If left blank,
the default port is 12000 for the Trunking Mode, for other modes the Start Port for user
registration is assumed.
Please note that the Port 5060 is not available for Trunking unless the selected Endpoint is configured on a virtual interface for this purpose. Only ports which are not
yet assigned can be used for this mode. In combination with a SIP-to-ISDN gateway,
this mode enables the integration of the Aastra AMC Controller with a legacy PBX (i.e.
which supports ISDN only).
Call Forwarding (CFW) Type
Generally, there are three Call Forwarding types:
• Standard
With the Standard option, the Aastra AMC Controller will use a SIP Notify when
forwarding calls.
• Via CSTA (PBX-based Call Forwarding with CSTA)
This enables you to make call forwarding a PBX-based feature by using the abstraction layer called Computer-Supported-Communications-Applications(CSTA).
This will only work if your PBX supports CSTA (please refer to the documentation
of your PBX).
amcc-4_ug_en_2013-06
98
6 Telephony
The Aastra AMC Controller will fetch the status of Call Forwarding (CFW) Rules
and it will update rules if a user-request comes in via the Aastra MC Client. However, as soon as PBX-based Call Forwarding is active, there is no possibility to
update CFW rules via the web interface of the Aastra AMC Controller.
• Via Trunk
This option can be used if a PBX does not support CFW via SIP Notify or CSTA.
For further routing a call can also be forwarded to the SIP Trunk that is associated
with a PBX Profile. Please note that the Aastra AMC Controller will forward the
caller ID to the SIP Trunk exactly how it was received in the first place.
Corporate Phonebook
Assign a Corporate Phonebook to your PBX profile. Corporate Phonebooks will only be
available in this drop-down box if they have been configured under Features/Corporate
Phonebook Settings (refer to 8.2).
PBX-Platform
Choose your platform here to automatically activate/deactivate certain settings that are
suitable for your used PBX.
amcc-4_ug_en_2013-06
99
6 Telephony
6.9
Trunk
The Aastra AMC Controller has two ways of signaling statically roamed calls towards
the PBX, via a SIP Trunk or a separate media gateway. The standard approach is to
make use of the user registration in order to forward an incoming call towards the cellular side of the FMC user. However, this causes problems with several PBXs since
special SIP Headers are required to signal the correct A-Number Caller ID to the PBX
in those scenarios. The alternative approach involves using a separate SIP Trunk connection without user registrations to signal those calls. An incoming call from the PBX
will then be first signaled through the user registrations. The Aastra AMC Controller
then has control over the call and will try to reach the user through a SIP connection
first. If the user is not registered, the Aastra AMC Controller will signal the outbound
cellular call towards the user through the SIP Trunk. The following should give a brief
overview of the configuration options for the SIP Trunk connection.
If Active Registration is used for a SIP Trunk, the combination "Number@Endpoint"
must be unique across the system!
The SIP Trunk can point to any SIP Server or SIP gateway, and can be different
from the PBX where the users are registered. Note that some PBXs also use a
different port for this SIP Trunk connection. With some other systems however,
the host and the port for the user registrations and the SIP Trunks are identical.
Figure 6.9: SIP Trunk Configuration
Name
The common name of a SIP Trunk uniquely identifies it. This name will be used throughout all further configuration, as for example with the PBX configuration. It is used for
amcc-4_ug_en_2013-06
100
6 Telephony
internal purposes only and should be descriptive because it is used in other configuration pages. It can be identical to the host name, but it does not have to be.
Endpoint
Select the Endpoint for this trunking connection here. Only Endpoints configured in the
Endpoint menu (6.7) will be available here!
Port
The recommended range for this port is between 11000 and 11499. The following ports
must not be chosen:
• Must be equal or greater than 1025
• Must not be the same as the Receiving SIP/TLS Port (by default 5062 and 5061,
respectively; refer to Port Settings, 6.4)
• The default port 5060 is only supported on LAN Interface 1
• Must not be set to the following ports which are reserved for certain services/protocols: 5222 (XMPP), 5432 (Postgres), 1234/1235 (Worker/Boss, Blade Server
scenario), 8021 (Event Socket), 12000 - 16000 (Subscription and SIMPLE Presence).
Diversion Prefix
It is possible (not mandatory) to complete the Diversion Header with the Diversion Prefix. Setting the Diversion Prefix might be necessary if there are network devices (gateways etc.) within your network which require phone numbers to be in complete E.164
format. You may use leading zeros or a + in this field.
MTC Prefix
This can only be applied if no ISDN-screening indicator is in use!
This prefix will be added to a call from the Aastra AMC Controller to the Aastra MC
Client via a SIP Trunk. This highly depends on how numbers are processed in your
network!
amcc-4_ug_en_2013-06
101
6 Telephony
Active Registration
This option enables the active registration of this SIP Trunk on the selected Endpoint.
Values behind the item Active Registration in the menu are only read if Active Registration is enabled. Of these values only the "Registration Name" must not be empty
(hence marked with an asterisk*).
Number
The phone number that is required for the Active Registration of a SIP Trunk on your
PBX.
Registration Name*
Give a Registration Name to a SIP Trunk if your Endpoint requires this as the Request
URI (instead of the configured Number) for authentication.
Registration Password
If Active Registration is enabled, the configured number or, alternatively, the Registration Name (if set) will be used as Request URI and user name for registering with the
PBX. This password is used for digest authentication.
Convert Headers
If required, choose headers that should be converted according to the From Converter
profile (see 6.6). It’s possible to select:
• "From": converts the From-header and the Remote-Party ID;
• "PAI": converts the P-Asserted Identity;
• "PPI": converts the P-Preferred Identity.
amcc-4_ug_en_2013-06
102
6 Telephony
6.10
FMC Numbers
Beyond being a dual-mode solution, the Aastra AMC Controller will help you facilitate
your mobile telephony experience.
When the Aastra MC Client dials one of the configured FMC Numbers, a certain behavior is invoked on the Aastra AMC Controller/PBX side which then handles the incoming
call accordingly to the specified Type of the FMC Numbers.
As you can see in the WebGUI, these Numbers are configured, activated and specified
in the form of a table. For better understanding, however, we will at first explain the
Types available in the pull-down box and afterwards the other columns of this table.
N UMBERS HAVE TO BE UNIQUE PER PBX
All numbers that you configure here - no matter which Type you choose - have to
be unique per PBX. This means that the same FMC Numbers can be configured
(once!) on several PBX. However, identical FMC Numbers (on different PBXs)
must always be used for the same purpose.
WATCH OUT FOR P REFIXES /S UFFIXES
If a Number does not work or if a call is rejected you should check if that number
has any undesired prefixes / suffixes:
– P REFIXES MIGHT BE STRIPPED BY THE PBX OR THE MEDIA GATEWAY
Configured Numbers must be specified exactly as the Aastra AMC Controller
receives the call from the media gateway or the PBX. This means that the
numbers configured in the WebGUI should not contain any prefixes that are
stripped by the PBX. You can check in a trace to see if the SIP INVITE
message sent by the PBX or media gateway contains exactly the number
specified here.
– AUTHENTICATION P ROBLEMS
A call will be rejected if the user cannot be authenticated. This could also
have to do with the Caller ID. The Aastra AMC Controller will check up to 10
digits. If less digits are coming in across the gateway, these need to exactly
match the configured number. This is necessaryfor security purposes, because otherwise the number cannot be guaranteed to be unique. If you have
a number with less digits, the prefix in the Caller ID of the in-coming call also
has to match the configured number. To verify if that is the reason, you can
conduct a trace of the call coming in across your PBX. Check if the Request
URI and the To exactly match the specified number.
amcc-4_ug_en_2013-06
103
6 Telephony
Figure 6.10: FMC Numbers
6.10.1
Number
This field should contain the number exactly as it is called from your PBX or media
gateway. Make sure to not have any additional prefixes or suffixes in here and keep in
mind that all of these numbers have to be unique per PBX. The Aastra AMC Controller
supports the following characters: + ,# , - and *.
6.10.2
Active
This field activates/deactivates the configured Number for the chosen Type. If the number is not activated, the call to it will be rejected.
6.10.3
6.10.3.1
Type
Call-Through
All configured Call-Through numbers (on some Aastra MC Client versions this is called
"MOC number") will prompt the Aastra AMC Controller to route in-coming cellular calls
through the enterprise PBX to keep all supplementary services working. In addition to
that, this enables a true single number service: the callee will always see the enterprise
number. When dialing a number in a cellular connection, the Call-Through number
configured on the Aastra MC Client will be dialed automatically and will be followed by
the callee’s telephone number. The sequence of events is that the Aastra MC Client
first sets up a call to the Aastra AMC Controller which will then be forwarded to the right
destination through the PBX. The Aastra AMC Controller usually does not have "to pick
up" the call before forwarding it (one-step-dialing).
Sometimes however, one-step dialing might not work, because PSTN providers will cut
the resulting phone number after a fixed amount of digits. Numbers up to 18 digits are
amcc-4_ug_en_2013-06
104
6 Telephony
supported by most providers. These 18 digits must suffice for both the Call-Through
number, as well as the dialed number.
If the number exceeds 18 digits, your Aastra MC Client will make use of DTMF dialing
(check the Aastra MC Client documentation for more information). Then the Aastra
AMC Controller will accept, or "pick up" the call and listen for a DTMF sequence. The
Aastra MC Client will signal the callee’s number via DTMF which will subsequently be
translated to SIP and dialed through the PBX (two-step dialing).
It is possible to specify multiple Call-Through numbers. The assumed setup is a large
organization with PSTN break-in / break-out in several countries and or locations. In
those cases it is advisable to always use the closest Call-Through Number. If you are
travelling abroad for example, it is most of the times cheaper to use a dial-in number at
your current location rather than always calling home.
6.10.3.2
Callback Number
This functionality can be invoked via an HTTP(S) request, if a data channel is available
for the Aastra MC Client in question, or by dialing one of the numbers configured here.
Just like the Call-Through Type these numbers must have the same format as the number arriving from the PBX when a callback is invoked. This feature reverts the direction
of a call to save costs for outbound calls from mobile networks. It is not used in WLAN.
The following section explains its basic functionality:
• The User dials a number in cellular mode and selects the call type Callback (this
varies a bit depending on the used mobile platform, please refer to the available
Aastra MC Client documentation).
• The Aastra MC Client will initiate a call to the configured number or make an
HTTP(S) request if a data channel is available.
• The Aastra AMC Controller rejects the call, or processes the HTTP(S) request,
and initiates a call back to the Aastra MC Client → the direction of the call is
reversed.
• The Aastra MC Client picks up the incoming call and transmits the number of the
callee via DTMF (the Aastra AMC Controller will play back ringtones etc.).
• The call legs are joinded by the Aastra AMC Controller as soon as the the other
party picks up.
amcc-4_ug_en_2013-06
105
6 Telephony
The benefit of this feature: Use Callback instead of the call type Call-Through when
traveling abroad. Using Call-through abroad, you have to pay long-distance call rates,
because the Aastra AMC Controller is located in the home country. The call type Callback enables you to take advantage of cheaper rates abroad, especially if you use a
national SIM card (e.g. prepaid card).
Further Configuration: HTTPS and regular Callback
• HTTPS is enabled automatically on the Aastra AMC Controller. If HTTP or nondefault ports are to be used, change the settings on the on the page Additional
Client Features under the UC tab (refer to 8.1).
Caution: the settings for protocol and port on both the Aastra AMC Controller and
the Aastra MC Clients must match! Refer to the Aastra MC Client documentation
for the settings in concern.
• The Callback Number must be set on the Aastra MC Clients in international format.
C ODE M APPING
It is very important to map the correct ISDN rejection code to the SIP rejection
generated by the Aastra AMC Controller because otherwise the user will see a
rejection message on the cell phone and might think that the callback has actually
failed. Our recommendation is to map the SIP Error Code 488 to ISDN error code
6 to ensure the correct termination of the call. On a gateway this is frequently
called SIP to ISDN Error Mapping.
6.10.3.3
SIM Switch
In order to lower roaming costs and to accommodate the communication needs, many
people use more than one SIM card and hence have more than one number. These
multiple SIM cards can be administered using the Aastra AMC Controller. They can
be activated from anywhere by dialing one of the SIM-Switch numbers you configure
here. This ensures that calls are always forwarded to the currently used and activated
number.
In order to support this feature, it is possible to configure multiple Cellular Numbers
for each user account. In our context multiple numbers means at least two, potentially
up to ten numbers, although experience shows that 5 is the practical limit. Switching between those different SIM cards has to be possible without any data connection
because availability cannot be guaranteed when needing to do the switch. Therefore
amcc-4_ug_en_2013-06
106
6 Telephony
activating a different SIM card should be possible simply by making a call to the assigned SIM-Switch number.
C ALL - THROUGH SUPPORTED FROM ALL C ELLULAR N UMBERS
Please note that for mere Call-through calls a SIM-Switch is not necessary. This
feature has been implemented to enable the use of SIM Cards with several numbers (e.g. an extra one for the "home zone"). It is sufficient to specify the homezone number as an Cellular Number (refer to 6.15).
6.10.3.4
MTC Number
MTC stands for Mobile Terminated Call. The MTC Number will be associated as Caller
ID for your corporate system (Aastra AMC Controller). You could say that this is the
identification the Aastra AMC Controller uses towards the Aastra MC Client. If the MTC
Number is set in the Aastra MC Client, all Enterprise calls must come with this Caller ID
otherwise they will not be handled by the Aastra MC Client. In order to make sure that
the number is positively matched, you have to enter your PBX number in international
format.
6.10.3.5
Voicemail Number
This number is a corporate voice mail number (in contrast to a voice mail number that
is given to a user by a cellular network provider). When a user calls this number he may
be asked for a user name and/ or password.
6.10.3.6
Remote Control
A remote control number can be used to access the Aastra AMC Controller from remote
for support purposes (Aastra AMC Controller customer support only). For more system
security, trusted remote control numbers can be configured on the page "Remote Control"; refer to 10.7.
IMS (Handover) Numbers
The Aastra AMC Controller supports IMS3 for handovers. A handover in this context
means a switch from one network type (for example WLAN) to another (cellular). With
3 IMS
stands for IP Multimedia Subsystem and is a technology mostly driven by mobile operators to
provide an operator-centric approach to Fixed-Mobile Convergence (FMC). This standard defines a
handover mechanism implemented by all compatible handsets.
amcc-4_ug_en_2013-06
107
6 Telephony
IMS, the Aastra MC Client calls the predefined IMS number (Cellular to WLAN, or WLAN
to Cellular as described below) to signal that another call leg has to be added within
the new network.4 The IMS VCC (voice call continuity) handover will work with all VCC
compliant handsets and Aastra MC Clients.
The network switch is normally done in the background by the Aastra MC Client, unless
it is triggered manually by the user. In the case of the WLAN to cellular handover,
a cellular call will be made to the number you configure here. The treatment of this
number should be similar to the Call-through number, i.e. it has to be registered for the
Aastra AMC Controller.
Please note that the IMS: to WLAN Number has been deprecated.
6.10.3.7
IMS: to WLAN Number
This setting has been deprecated and doesn’t have to be configured.
This is a number that must be reachable over Wireless LAN. Since in WLAN, we are
only dealing with a pure Client / Server connection and hence this can be a truly arbitrary number. However, to avoid any conflicts, it should still be unique per PBX.
6.10.3.8
IMS: to Cellular Number
If this is left blank, the Aastra AMC Controller will automatically use a Callthrough
Number for IMS: to Cellular.
This number must be a proper fixed line phone number. The routing on the PBX must be
configured to have this number registered for the Aastra AMC Controller. This number
is used similarly to the Call-through number and can be identical, but it is only used for
handover purposes.
6.10.4
Active Registration
Enables the registration of this Number on your PBX. With some PBXs it is easier to let
endpoints register dynamically (even if this is a trunk connection) rather than doing a
static configuration. This is required for some SIP Trunks. If there is a firewall between
the Aastra AMC Controller and the Endpoint, this option will keep the firewall open. With
the registration information, a suitable PBX can even do NAT handling and it would be
possible for the Aastra AMC Controller and the PBX to be in two completely separate
networks. All of the columns behind Active Registration only have to be configured if
4
This is contrary to the standard approach, because the Aastra MC Client initiates the second call which
makes it much less suitable for Enterprise use (some of the control over the billing is lost).
amcc-4_ug_en_2013-06
108
6 Telephony
you enable Active Registration.
Please note that if Active Registration is not enabled, FMC Numbers may only be
registrered over LAN Interface 1.
6.10.5
Endpoint
If Active Registration is enabled, you have to specify where this number should be
registered.
6.10.6
Registration Name
Give a Registration Name to a Special FMC Number if your Endpoint requires this as
the Request URI (instead of the configured Number) for authentication.
6.10.7
Registration Password
If Active Registration is enabled the configured number or alternatively the Registration
Name (if set) will be used as Request URI and user name for registering with the PBX.
This password is used for digest authentication.
6.10.8
Deployment Number
The deployment number is the number how it has to be dialed from a cellular network.
In most cases this will be the Service Access Number in E.164 (international) format.
In contrast to the Deployment Number, the Number are the digits as dialed internally:
Number equals Deployment Number minus (prefix numbers stripped by the PBX, or
other network devices like gateways etc.). If the number in question is an MTC Number,
you can enter several Deployment Numbers separated by a dash (-) in this field.
M INIMUM C ELLULAR N UMBER L ENGTH
If Active Registration is selected for any FMC Numbers, the Maximum Cellular
Number Length setting on the Aastra MC Clients has to be set to 0!
amcc-4_ug_en_2013-06
109
6 Telephony
FMC S TATUS FOR ACTIVE R EGISTRATIONS
The status of FMC Numbers with Active Registrations will be displayed on the
FMC Status page.
N UMBER M ATCHING
The Aastra AMC Controller matches the first ten digits by default (maximum).
However, there will not be any problems if the number configured here is shorter.
amcc-4_ug_en_2013-06
110
6 Telephony
6.11
User Profiles
Figure 6.11: User Profiles
This is one of the major changes with the latest version of the Aastra AMC Controller. Settings that could formerly be found under Registrations and User Accounts have been restructured and rearranged into User Profiles and User Accounts, both of which have associated pages that are only available in Advanced
Mode.
A User Profile is a number of settings (see descriptions below) bundled under a User
Profile Name and generally associated to a selected PBX. The actual association to a
specific PBX Number is done in the User Accounts menu (refer to 6.13).
6.11.1
Name
The name of a User Profile must be unique. It serves descriptive purposes, but is also
used for differentiating User Profiles on the system
6.11.2
PBX
Select the PBX (refer to 6.8) with which the User Profile should be associated. PBXs
have to be configured beforehand, otherwise nothing can be selected here.
amcc-4_ug_en_2013-06
111
6 Telephony
6.11.3
Security
Enable secure connections (TLS for SIP packets or SRTP for speech data) between
Aastra MC Client and Aastra AMC Controller. Restrictions may apply depending on the
used client platforms and/or versions. Please see client documentation for more information.
Activating TLS/SRTP when connected to a MX-ONE System might require additional licenses on the MX-ONE side!
6.11.4
VoIP/WLAN
This option allows or denies Voice over WLAN calls.
6.11.5
Method Home
Choose the default call method (call type) for the SIM card’s home network. Depending
on the (pre)configured Service Access Numbers, the values available here may differ.
To configure Service Access Numbers, such as Callthrough, refer to 6.10.
6.11.6
Method Roaming
Choose the default call method (call type) while in roaming, i.e. while outside of the
SIM card’s home network. Depending on the (pre)configured Service Access Numbers,
the values available here may differ. To configure Service Access Numbers, such as
Callthrough, refer to 6.10.
6.11.7
LCR File
Choose an LCR File that determines when and how mobile least-cost routing (LCR)
should be done for this User Profile. Please note that selecting an LCR File here, will
override the settings in Method Home and Method Roaming. LCR Files have to be
uploaded to the Aastra AMC Controller to be available here (refer to 9.1).
amcc-4_ug_en_2013-06
112
6 Telephony
6.11.8
Controller Address
Choose the Aastra AMC Controller’s internet address or one of the configured interfaces
for client registrations. In most cases the address should be reachable via the Internet.
Other possible values are an FMC Domain or the External IP for NAT.
6.11.9
Controller Port
Set the port to be used for client registrations. In most cases this should be set to SBC
or TLS (if the User Profile uses TLS).
6.11.10
Callthrough Nr.
Select the Callthrough Nr. for this User Profile. This is not a mandatory setting, but it
enables many of the features of the Aastra MC Solution. The Callthrough Number has
to be preconfigured on the Service Access Numbers page. For more information about
configuration and functionality, refer to 6.10.
6.11.11
MTC Nr.
The MTC Number is the number sequence that has to be added to internal extensions
to be dialable in the public network (full number minus extension = MTC Number). The
MTC Nr. has to be preconfigured on the Service Access Numbers page. For more
information about configuration and functionality, refer to 6.10.
6.11.12
Voicemail Nr.
This is the internal extension a user has to dial to access his/her voice mail. The
Voicemail Number has to be preconfigured on the Service Access Numbers page. For
more information about configuration and functionality, refer to 6.10.
amcc-4_ug_en_2013-06
113
6 Telephony
6.12
User Profiles (advanced)
These are the settings and options for User Profiles which are only available in "GUI
MODE ADVANCED". None of these settings are mandatory for basic functionality, and
default values may be active for some.
Figure 6.12: User Profiles (advanced)
6.12.1
Name
This is the User Profile Name as entered in the previous menu. This value cannot be
changed on the "advanced" page. It serves only for identification.
6.12.2
Cellular DMC
DMC can be activated on a per profile basis and is turned off by default.
DMC stands for Direct Media Connect. This is a mechanism for letting payload pass
directly between two communication endpoints. In the FMC case this would typically
be the Aastra MC Client communicating with a phone, or a second Aastra MC Client,
connected through a PBX. DMC becomes active after a call is established (via Callthrough). When it is active, the Aastra AMC Controller will not be participating in the
media stream, and audio will flow directly between the two endpoints.
P OSSIBLE L OSS OF I N -C ALL F EATURES WITH DMC
Please note that once the Aastra AMC Controller is out of the media stream, the
Aastra MC Client relies on the data channel for invoking in-call features from the
PBX. If that data channel is lost, the fallback signalization, i.e. DTMF signalization,
via the Aastra AMC Controller is not available. In-call features will then only be
available if the used gateway takes over the DTMF-to-SIP-Info translation.
amcc-4_ug_en_2013-06
114
6 Telephony
C ODECS
DMC will only work correctly if the proper codecs are set. The Aastra MC Client
needs to utilize a codec that is also supported by the endpoints directly connected
to the PBX. iLBC is typically not supported by gateways or IP phones.
6.12.3
Callwaiting
Enable call waiting for incoming calls while an active call is still ongoing.
6.12.4
OSD
Enable Operator-Supported Dialing (OSD) if the Callthrough Number is automatically
dialed by the used operator. Outbound cellular calls are still dialed via the Callthrough
Number if
• It has been detected that the respective Aastra MC Client is in a roaming state;
and/or
• a SIM card other than the first SIM card recognized by the application is inserted
in the device.
6.12.5
Codec
Select the audio codec that should be used between Aastra AMC Controller and Aastra
MC Client. Available codecs differ depending on the used Aastra MC Client platform,
but the following categories are generally available:
• G711: G.711 A-law and U-law,
• robust: iLBC, AMR.
6.12.6
Jitter Buffer
This defines the size of the Jitter Buffer. Default value is "Medium", but should be
increased if the audio is choppy and decreased if the audio is delayed.
amcc-4_ug_en_2013-06
115
6 Telephony
6.12.7
Handover
Enable automatic handovers to and from WLAN. If access point quality decreases or
increases, or if an access point becomes available for VoIP, the handover will be initiated
without user interaction. Please note that automatic handovers to cellular networks is
not possible on iOS due to platform restrictions!
6.12.8
Allow new Cellular Number
This enables the user to add a new Cellular Number to his/her account (via an HTTPS
request). A number then doesn’t have to be added beforehand (i.e. before a SIM
Switch) on the page "Cellular Numbers" (refer to 6.15). Use with caution, as this may
open up the system to unapproved third-party use!
If this is activated for a User Profile, or if a user has several GSM Numbers, the SIMSwitch feature becomes available, unless the OTA setting (9.5) "Sim-Switch-Active" has
been set to "False" by the system administrator.
6.12.9
Feature File
Select a Feature File which enables the available in-call and out-of call features. A
default file may be available, but Feature Files generally have to be added beforehand
on the respective page (refer to 9.1).
6.12.10
SIM-Switch Nr.
Select the SIM-Switch Number that should be used for SIM switches by this user. The
SIM-Switch Number has to be preconfigured on the Service Access Numbers page.
For more information about configuration and functionality, refer to 6.10.
6.13
User Accounts
Each of the User Accounts represents an FMC subscriber. User Accounts are now a
combination of what used to be SIP Users and Registrations (up until this latest version
of the Aastra AMC Controller). The SIP User and Password are generated automatically
by the Aastra AMC Controller and are forwared to the Aastra MC Client via the Redirect
Service.
amcc-4_ug_en_2013-06
116
6 Telephony
In order to associate a User Account with the PBX, a User Profile has to be assigned to
each User Account. Assigning several User Profiles to a User Account is not supported,
but a User Profile can have several assigned User Accounts.
Figure 6.13: User accounts General Configuration
amcc-4_ug_en_2013-06
117
6 Telephony
6.13.1
Lastname, Givenname, and Department
These settings are for descriptive purposes only.
6.13.2
User Profile
Choose one of the pre-configured User Profiles (refer to 6.11). This generally associates the User Account with a PBX.
6.13.3
PBX Number
The PBX Number is the number or name the Aastra MC Client uses to register with
the PBX for this User Account. This number or name has to be unique across all users
configured in the Aastra AMC Controller.
6.13.4
PBX Username
Enter the user name of this account on the PBX for authentication purposes. If this field
is left empty, the PBX Number will be used.
6.13.5
PBX Password
The password setting is mandatory! This password is solely used for Aastra MC Client
authentication towards the PBX and has to be entered properly into the client.
S ECURITY
If you want to ensure security, it is strongly recommended to use safe passwords
here, containing at least 6 characters including special characters. You should
also make sure not to use dictionary words in this case.
AUTHENTICATION P ROCESS AND I SSUES
Whenever the Aastra MC Client registers with the Aastra AMC Controller, you will
see a SIP 401 response challenging the client. This will prompt the Aastra MC
Client to re-send the original request with the correct digest information. If this is
again rejected, there is probably a password mismatch. This is the most common
reason to check.
amcc-4_ug_en_2013-06
118
6 Telephony
6.13.6
Display Name
If a display name is added here, it will replace the display name forwarded by the PBX.
6.13.7
Cellular Number
When first entering the data for a user, you can add a cellular number in this field.
Please note that - on this page - this is the only time it is possible to add a cellular
number. Cellular numbers cannot be added in edit-mode. This number will then be
saved to the Cellular Numbers page (refer to 6.15) where you can add all further cellular
numbers to a user account.
Although it is possible to assign multiple Cellular Numbers to a user, his table will only
reflect the currently active number for the user in question. In edit-mode, you can select
a number from a drop-down box.
You can also leave this field blank. Doing so will result in the user being unable to use
the system in cellular mode. If a cellular number for a user is configured after the user
has been created with a blank number, the newly configured number will automatically
become active.
6.13.8
Fast-Forwarding Number
The desk-phone number for this User Account. It is used for the the Fast-Forwarding
feature.
6.13.9
Email Address
Add an email address to a User Account.
6.14
6.14.1
User Accounts (advanced)
Lastname, Givenname, Department, and User
These three values are fetched from the previous menu and cannot be altered on this
page.
amcc-4_ug_en_2013-06
119
6 Telephony
6.14.2
SIP Number
SIP Numbers are generated automatically (PBX Number plus increment). The SIP
Number is used by the Aastra MC Client to register at the Aastra AMC Controller, and is
forwarded (along with the Password) to the Aastra MC Client via the Redirect Service.
6.14.3
Password
This password is used by the Aastra MC Client for authentication towards the product
and is also generated automatically and forwarded (along with the SIP Number) to the
Aastra MC Client via the Redirect Service.
6.14.4
Activate User
This item has to be checked for a user to be able to use his account. If not checked,
the user is disabled. The user will not be able to register, not be able to make calls. If
disabled, the number of this user will also not be available in cellular operation.
6.14.5
DnD
DnD stands for "do not disturb", which can be used to deactivate a Aastra MC Client for
inbound calls. The user will then not receive enterprise calls via the Aastra MC Client,
but he will still be able to use it for outbound calls. DnD can be enabled here or on the
Aastra MC Client itself. This table will display the currently set DnD status.
amcc-4_ug_en_2013-06
120
6 Telephony
U SER M ODIFICATIONS
Please note that all user changes will take effect immediately after saving even
without pressing Apply Configuration. This behavior has changed compared to
older versions. When deleting a user, this deletion will cascade to all data associated with this user. Please make sure that this is what you want before confirming
the deletion.
amcc-4_ug_en_2013-06
121
6 Telephony
6.15
Cellular
In order to provide a true FMC solution, the Aastra MC Client also needs to be integrated when in the cell-phone network. The Cellular Number(s) of the handset is used
for static roaming, mid-call handovers as well as Call-through calls.
You must specify the number exactly as you have to dial it on the PBX for creating
an outbound call. If you need a leading zero there for making a PSTN call, it has
to be included.
• SIP User: Select a user to add a cellular number to. You can of course add
multiple cellular numbers per user. Those numbers can be activated in the User
Account settings or by calling the configured SIM-Switch Number to activate the
currently used SIM card / cellular number.
• Cellular Number: This is the cellular number of the handset.
It should be entered in international format, i.e. including the country code. You
may enter the number with a + or with leading zeroes (for Germany that would be
either +49 or 0049). The following characters are legal:
– Numbers 0-9
– Letters a-z and A-Z
– + # - * (these can be used for tagging purposes towards the PBX)
As mentioned above, this number is utilized without doing any mappings for static
roaming calls and must be configured exactly as they need to be dialed with the
configured SIP Endpoint.
• Use Numbering Profiles: Check this option to subject Cellular Numbers to your
Numbering Profiles. Please note that if you make use of this option, Cellular Numbers must in any case be configured in international format (with leading zeroes
or plus)!
SIM-S WITCH
If this is activated for a User Profile, or if a user has several GSM Numbers, the
SIM-Switch feature becomes available, unless the OTA setting (9.5) "Sim-SwitchActive" has been set to "False" by the system administrator.
amcc-4_ug_en_2013-06
122
6 Telephony
U NIQUE D IGITS ( TO MATCH )
Please note that Cellular Numbers must unique in the "n" digits spefied in the
Global Setting "Number of Cellular-digts to match" (explained on page 74). The
default value, i.e. the digits from the end of a Cellular Number that must be unique,
is ten digits. Please note that this requirement is part of a software update. If
Cellular Numbers do not meet this requirement, they have to be deleted manually.
M ATCHING OF C ALLER ID S
If the cellular number has 10 digits or less, it must exactly match the Caller ID in
Call-through scenarios. The Aastra AMC Controller will check at least 10 digits to
make sure that a number does not accidentally match. Please note that the 10digits requirement can be changed to the number of digits specified in the Global
Setting "Number of Cellular-digts to match" (explained on page 74).
ACTIVATION
The first number created for a user is automatically set as the active number for
the specified user.
Figure 6.14: Cellular Number association
amcc-4_ug_en_2013-06
123
7 Features
7.1
Number Conversions
This mask allows you to define source and target patterns, activate/disable, delete, edit,
move (up/down) a rule and add new ones. The rules are processed from the first to the
last. The first match will be used to apply the appropriate mapping.
The Number Conversions defined here have priority over the automatic conversions
defined in the Numbering Profiles section. This means that if you configure rules here,
these will be run through and checked. If a match is found, the configured Numbering
Profiles will be completely ignored. If no match is found, the Aastra AMC Controller will
continue to execute routing according to the Numbering Profiles.
Figure 7.1: Number Conversions
Source to target pattern mappings are defined by explicit rules. Incoming Numbers
(calls coming from the client) that match a source pattern are reformatted as defined by
the target pattern. The source pattern can be any Perl Compatible Regular Expression
(PCRE). Every expression entered will be checked for validity but not for semantical
sense, so beware! The same holds true for the target pattern. The target pattern can
only consist of the digits (0-9) and dollar signs ($). Whenever a piece of a source pattern is enclosed in brackets, it will be considered as captured subpattern that could be
inserted in the target pattern by using a $ followed by the number of the bracketed pair.
Up to 9 captured substrings can be used. For example, assuming that a leading 0 is
124
7 Features
used to dial out, then any of the following definitions shall map the incoming number
911 to the outgoing number 0911, making it possible to call 911 directly from an internal phone.
amcc-4_ug_en_2013-06
125
7 Features
Examples:
Source Pattern
(9)(1)(1)
(9)(11)
(9)(1)1
(911)
911
Target Pattern
0$1$2$3
0$1$2
0$1$21
0$1
0911
Active
Yes
Yes
Yes
Yes
Yes
Table 7.1: Number Mapping Example I
E MERGENCY N UMBERS
Please note that this 911 should only be understood as an example. Emergency
numbers (depending on country) will automatically be handled by the client and
will be forwarded through the cellular network.
M AP CAREFULLY
You should be very careful with this function because wrong rules can destroy the
called party’s number, thus rendering the whole solution useless. It can also lead
to misconnections due to wrong number mappings.
The rule in the middle in the Number Mapping Example I starts the target pattern with
a literal 0, copies the content of the first and second bracket pair ($ 1 and $ 2) and
appends a literal 1. Most likely you would use the last rule since the source pattern is
constant and this rule definition has the best readability. If an incoming number matches
several source patterns, the first matching pattern "wins", i.e. as soon as a match is
found, no further matching is tried. Copying parts of a source pattern becomes useful
when the source pattern contains wildcard characters. E.g. assuming you want all
numbers that begin with 0005 or 0006 to be mapped to 55505 or 55506, respectively,
followed by the rest of the number, you could define:
Source Pattern
000([56])(.+)
Target Pattern
5550$1$2
Active
Yes
Table 7.2: Number Mapping Example II
The first bracket pair matches one of the ciphers 5 or 6 and captures the cipher as $1.
The dot within the second bracket pair (captured as $2) matches any single character while the following plus sign specifies to repeat the last pattern one or more times.
amcc-4_ug_en_2013-06
126
7 Features
Please note that a plus is a special character so if you want to match a literal + in a
source pattern you must write it as \+. Also note that you cannot use a literal plus sign
in the target pattern.
Please see http://www.pcre.org for more information about Perl Compatible
Regular Expressions.
Priority
The priority in the Number Conversions determines the order in which these will be
matched. The number can be 0 or higher with 0 being the highest possible priority.
Source Pattern
Enter the source pattern in the above described format. Please note that you can leave
this field empty, but then your rule would never match.
Target Pattern
The match source pattern will be mapped to this. Please use the above described
format to write the patterns. This field must not remain empty.
Active Rule
This checkbox activates and deactivates a rule. It is useful both for debugging purposes
as well as for temorarily deactivating certain rules. Any defined rule will only be applied
if this option is checked.
amcc-4_ug_en_2013-06
127
7 Features
7.2
PBX Access Codes
This page allows the configuration of rewrite-rules for access codes sent by the Aastra
MC Client towards the PBX. Access codes are used by the PBX to implement platformspecific out-call features, for example "Group Pickup". These Access Codes, however,
are configurable in the PBX. The Aastra MC Client supports hiding such access codes
behind an easily selectable out-call features menu. If an Access Code for a certain
feature changes on the PBX, you would hence need to change the stored code on each
Aastra MC Client. To avoid this, you can simply define a mapping here in the web interface of the Aastra AMC Controller. The Aastra AMC Controller will then take the access
code sent by the Aastra MC Client and translate it to the correct one towards the SIP
Endpoint, namely the PBX.
Please note that these access codes are explicitly used for out-call features!
O NLY AT THE B EGINNUNG OF N UMBERS
These mappings are only applied to the beginning of numbers. Please make sure
that they do not "overlap", i.e. PBX Access Codes with identical beginnings are
not supported. Example: *23* and *23 can’t be used simultaneously.
The Aastra AMC Controller creates a standard set of PBX access codes for each
configured PBX (Endpoint). These automatically created rules contain default access codes for Endpoints. However, they can be edited here.
The following example should give a better insight into what is actually happening. If
a Aastra MC Client user has a predefined setting for a DTMF invoked feature say * on
his Aastra MC Client, but used PBX expects #9, you can configure a from-to translation
here.
7.2.1
Configuration Steps
• Endpoint: This will allow the selection of an endpoint to use. This means that the
defined mapping will be applied for all users registered to that Endpoint.
• Name: You can configure a descriptive name for the feature. This parameter has
purely informational value.
amcc-4_ug_en_2013-06
128
7 Features
Figure 7.2: Predefined Feature Codes
• FMC Feature Code: Configure the feature code to search for in every call. This
sequence will be replaced by the respective PBX Feature Code. Both should only
contain symbols that can be dialed from a standard phone, namely digits, ∗and #
• PBX Feature Code: The code to replace the matched FMC Feature Code with. It
should only contain symbols that can be dialed from a standard phone, namely
digits, ∗ and #
• Use Number Converter: For each rule configured here, you can choose to enable
or disable Number Conversion. If Use Number Converter is enabled, the Aastra AMC Controller will map the access code at the beginning and then perform
number conversion (as configured) on the rest of the number.
7.2.2
Predefined Feature Codes on the Aastra MC Client
Some features are predefined on the Aastra MC Client and cannot be altered there.
That means if one of these codes is also used for a specific, but different feature on
your PBX, the above mentioned translation has to be configured in this menu. The three
currently preconfigured codes on the Aastra MC Client are *8, *9 and #*. See below for
the details.
#* as Feature Code
The code #* is reserved for the MC solution and hence cannot be used from the Aastra
MC Client towards the PBX without mapping a PBX Access Code.
If we assume that #* is used for accessing the voice mail on your PBX, the following
has to be done:
• Configure a different code on the client for this feature, for example *5 (or another
code that has not been configured for a feature yet).
amcc-4_ug_en_2013-06
129
7 Features
• Then configure the settings for Endpoint and Name in PBX Access Codes as
described above.
• Set the value for FMC Feature Code to *5.
• As PBX Feature Code select #*
• Then Save your changes.
amcc-4_ug_en_2013-06
130
7 Features
7.3
FMC Domains
If you are using the SBC functionality of the Aastra AMC Controller, you may enter
domain names and/or IP addresses here from which the Aastra AMC Controller will
then accept requests as well. Using domain names only might make it necessary to
reconfigure Aastra MC Clients making them use domain names instead of IP addresses
as well.
Figure 7.3: FMC User Domains
7.4
User List
This menu item enables you to export as well as to import a .csv -file (Comma Separated
Values) containing all of your configured user data for a PBX.
Select the User Profile
The import and export can only be done for one User Profile at a time. Select the User
Profile by the Name that you have configured. This sets the destination if you choose
Import User List or the source for Export User List.
If you select a User Profile that has no configured users for an export, the web
interface will display an error.
Path of the User List
After having selected the destined User Profile you can import an user list with this
menu item. This list can be the product of an Export User List of any other Aastra AMC
amcc-4_ug_en_2013-06
131
7 Features
Controller of the same software version. Upon import, your Aastra AMC Controller will
setup the User Profliles for you.
If you have a user list from another source than the Export User List feature, it has to
resemble the format of a list exported by an Aastra AMC Controller. Simply export a
csv file from an Aastra AMC Controller to check the order of settings in the csv file. Its
header line will display the order of the user settings.
The import will only be done if all lines of the .csv file are formatted correctly (which is
guaranteed if you used Export User List), i.e. values have to be separated by semicolons with no semicolon at the end of each line (values for one user).
If the format is not correct, an error will occur and all configuration will be reverted to
the state prior to the import.
amcc-4_ug_en_2013-06
132
7 Features
C HANGES WITH THE LATEST VERSION (AMCC 4)
With the latest version, User Profiles were introduced, and the amount of values
to export or import decreased from 18 to 12. To ensure compatibility with lists imported from versions prior to .17, the header of the .csv-file now has to be included.
F ORMATTING I SSUES WITH E XCEL AND C O.
Please note that Excel and OpenOffice Calc may add inverted commas to the .csv
which is not supported by the Aastra AMC Controller. When (re)saving the file in
.csv format make sure that no inverted commas are added.
F ILE F ORMAT
If you have a .csv -file from a different source or if you put together an user list manually without using the function or for further manual processing. Values have to
be separated by semicolons with no semicolon at the end of each line (= values for
one user). The following data can be exported or imported with the latest version:
#Lastname;Givenname;Department;
PBX number;PBX username;
PBX password;Displayname;
Primary Cellular number;Deskphone;
Email address;Cellular number 2;
Cellular number 3
Export User List
Export all data of currently configured users with this feature.
Figure 7.4: Import Users List
amcc-4_ug_en_2013-06
133
7 Features
7.5
Additional Country Tones Configuration
Upload busy and ringback tones on this page. Depending on where the Aastra MC
Solution is used, country tones may differ. The tones can then be assigned on a perPBX basis in the PBX menu (refer to 6.8).
Figure 7.5: Upload country-specific tones
7.6
Custom Scripts
Use this page to add custom scripts to the Aastra AMC Controller. In most cases,
adding custom scripts is not necessary. If necessary, custom scripts should only be
added with assistance from our Aastra AMC Controller support.
Use the Delete button to delete default scripts. Use the Download button to download
any of the default scripts.
amcc-4_ug_en_2013-06
134
8 UC
8.1
Client Features
With this feature you have the possibility to use an HTTPS connection to send requests
from the Aastra MC Clients to the Aastra AMC Controller.
Figure 8.1: Additional Client Features: Make internal data available to your users.
There are many different usage scenarios of this HTTPS connection. One of them is
enabling users to access the complete company or branch directory, or the address
book of just one department.
General Activation
1. Enter the desired HTTPS or HTTP port into the field if you would like to use a
different port and not the default port for HTTPS (448).
2. You can also use HTTP instead of HTTPS. Simply check the box underneath
or the Port.
→The respectively needed firewall rule on the WAN Interface is configured automatically.
135
8 UC
8.2
Corporate Phonebook Settings
Older Aastra AMC Controller versions: Please note that with former versions of the
Aastra AMC Controller only one corporate phonebook was supported and only one
VCard format could be assigned. If you are still using an older version, please skip the
following section about VCards and go to section 8.2.3.
C ACHED R ESULTS
Please note that search results (of requests form a Aastra MC Client) are cached
for a duration of 4 hours. During this time, the Aastra AMC Controller does not
forward search requests for the same search pattern, but stores their results for
faster display.
8.2.1
Groups
It is possible to bundle up to five corporate phonebook profiles into a phonebook group.
A group can then be assigned to a PBX profile on the Aastra AMC Controller under
TELEPHONY/PBX (refer to 6.8).
Figure 8.2: Combine phonebooks to Groups.
8.2.2
VCard Format
All corporate phonebooks require the configuration of at least one VCard format. The
same VCard format can be assigned to several corporate phonebooks, but you also
have the possibility to use a different format per phonebook.
amcc-4_ug_en_2013-06
136
8 UC
You cannot skip this step and configure your corporate phonebook! The VCard format
settings are mandatory.
Figure 8.3: VCard Format menu.
1. Description: This value is descriptive only. It helps you identify different VCard
formats.
2. Fields and Types: All of the following fields associate a VCard field to a
LDAP/Active Directory (AD) type. Click on the "Add"-button to view the help texts.
They indicate the default values for each property type. Please note that multiple
assignments are possible, i.e. a VCard field may have several LDAP/AD type
comma-separated (with space) associations.
•First Name/Last Name: the types for the first and the last name items. Both
of these items combined make up the value for the Name field of the VCard
(and are displayed). These fields can be used to fetch more information
than just the first or last name, respectively. For example: entering "sn
(Company)" will also fetch the company name for search results if the server
provides such information.
•Homephone: The property type used for the home-phone number.
•Cellphone: The property type used for the mobile-phone number.
•Workphone: The property type used for the work-phone number.
•Email: The property type used for email addresses.
8.2.3
Phonebook LDAP
The server to which you can configure a connection here, has to reachable via Lightweight
Directory Access (LDAP). Most commonly this will be an Active Directory Server. The
amount of information made available for the Aastra MC Clients via this feature of the
Aastra AMC Controller hence depends on the information available on that server.
amcc-4_ug_en_2013-06
137
8 UC
Figure 8.4: Corp. Phonebook with LDAP
1. Description: This value is descriptive only. It helps you identify several Corporate Phonebooks.
2. Provide the IP address and specify the Port of your Active Directory server, if
another port than 389 (the default port for LDAP), is to be used. The default port
will be applied if this field is left blank.
3. Search Filter: The default Search Filter has been optimized for MS Active
Directory Servers. If you are using an MS Active Directory Servre, it is recommended to leave this setting unchanged. If you are using a different LDAP Server,
specify your Search Filter in accordance with RFC2254 . The only legal operator
for filters is the equals-character (=). The placeholder for the pattern that is then
entered in an Aastra MC Client, is the % (check the tooltip for the default search
string).
4. Search base: Specify the location of the search. This is the path that leads
to your corporate phonebook on the server. For example (see infobox for more
information about directories on LDAP/Active Directory servers):
ou=phonebook,dc=example,dc=com
5. Username and Password
Enter these values if authentication is required. The username maybe entered
like the search base (attribute=value,attribute=value,...). See screenshot on the
previous page for an example.
6. Encoding:
If your LDAP (Active directory) sever uses an encoding other than UTF-8, specify
the encoding used by it here.
7. Select the VCard format for your Corporate Phonebook.
8. When the configuration is finished, click the Save button to save your changes
and APPLY CONFIGURATION.
amcc-4_ug_en_2013-06
138
8 UC
25 R ESULTS
Please note that the maximum number of results that can be returned to the Aastra MC Clients is limited to 25 per search pattern. If this does not return the contact
that a user is looking for, the search pattern should be refined.
A BOUT S ERVER PATHS
Most Active Directories/ LDAP servers work with a very different "path" structure
if you compare them to regular hierarchical, i.e. from-top-to-bottom, paths. They
are commonly set up in OUs, so called organization units.
Example
dc=company, dc=com, ou=colleagues, ou=department
As this example suggests, the LDAP structure first states the domain, and then
the path from the lowest sublevel to the top level. Since the Domain is already
known to the Aastra AMC Controller, the path you give should start with the top
level on the server.
Before version 10684, it was not possible to enter LDAP server paths in the "OUformat". They had to be translated (manually) to hierarchical paths. Please refer
to the appropriate documentation if your Aastra AMC Controller version dates before 10684.
amcc-4_ug_en_2013-06
139
8 UC
8.3
XMPP Endpoints
XMPP is used for both Presence and Instant Messaging (IM). For those features, the
Aastra AMC Controller behaves very similarly to the SIP-telephony scenario. It will act
as an XMPP client and connect to any standard XMPP server.
XMPP is the most used Presence and Instant-Messaging protocol, used for example by
the Jabber or Openfire servers. There are both free and commercial servers available.
You can also hook up to a Hosted Presence Network as for example GoogleTalk and
bring the full functionality of your account there to the mobile phone. For a longer list of
publicly available Instant Messaging servers, take a look at the XMPP website.
In order to use the XMPP functionalities you have to configure XMPP Endpoints and
XMPP Users. As mentioned, this approach is very similar to the IP telephony approach.
The concept of XMPP Endpoints and XMPP Users is essentially identical to the concept
of SIP Endpoints and SIP User Accounts.
Please note that the Aastra AMC Controller uses TLS for XMPP connections.
Figure 8.5: XMPP Endpoints
The following explains the configuration of the required parameters in detail.
Configure an XMPP Endpoint
1. XMPP Endpoint Name
Configure a descriptive name for the XMPP Endpoint here, and it will be used in
other menus.
2. Connect Server
Enter the IP address or the host name of the XMPP Server. This could be your
your internal XMPP server or a public server like GoogleTalk or jabber.org. Note
amcc-4_ug_en_2013-06
140
8 UC
that the Aastra AMC Controller only registers user accounts - configuring XMPP
Endpoints only is not sufficient.
3. Domain
You can configure a domain name here that is used in XMPP communication.
XMPP works with addresses very similar to email addresses. It is a user part
followed by a domain name. If the domain name resolves to your XMPP-Server
IP address, it is completely save to leave this field blank, since the default setting
is always the name of the connect server. If this is not the case, it is necessary
to specify the proper domain name here.
4. Port
This field contains the port number of the XMPP server to register with. The
XMPP default port is 5222 and is used if you leave the field blank.
You have to define XMPP User accounts for any Presence or IM functionality to
work. The configuration of an XMPP Endpoint only has no effect.
amcc-4_ug_en_2013-06
141
8 UC
8.4
XMPP Users
The concept of XMPP users is that every identity on the XMPP Server is associated
with a user on the FMC system. As such, each FMC User can be assigned an XMPPuser account in order to use instant messaging and presence features. This mapping
between an XMPP user and an FMC user is created here.
Figure 8.6: XMPP Users
C REATE ACCOUNTS
Before you can register the XMPP users to your XMPP server, you have to create
the XMPP accounts on your XMPP server. Refer to your XMPP server documentation for this. Some XMPP servers allow the creation of a user account directly
via the XMPP protocol. If that is the case, you can create your XMPP account
with an external XMPP client like Miranda IM, Pidgin (Windows and Linux) etc.
PARALLEL U SAGE
With XMPP, it is possible to register multiple clients for any user. This means that
you can use the XMPP functionality of the Aastra AMC Controller and with your
standard presence client.
amcc-4_ug_en_2013-06
142
8 UC
Add XMPP Users
The following explains the configuration of the XMPP users in detail.
1. FMC User Name
Select the FMC User that should be assigned to this XMPP account. You can
only select one of the FMC Users that you have already created. Therefore to
enable a client to register with the Aastra AMC Controller an FMC User needs to
be created prior to associating it to an XMPP User.
2. XMPP Endpoint Name Select the XMPP endpoint you would like to use for this
XMPP account. A drop-down list contains the names of the XMPP Endpoints you
created.
3. XMPP User Name
Configure your XMPP Username here. If your XMPP login for example is
test123 @ jxmppserver.org you only have to enter the user part (test123)
here.
4. Password
Configure the password for the XMPP User.
5. Activate XMPP User
Check this box to activate the XMPP user. If the account is not activated the
Aastra AMC Controller will not try to connect to the XMPP server and hence the
Presence and IM functionalities for the user in question remain disabled.
6. Priority
XMPP priorities range from 0 - 255 (higher number equals higher priority). This
setting comes into play if a user is registered with the same XMPP account via a
PC-client (like PSI) and via the Presence feature of the Aastra MC Client. If the
priority set here is higher than the one set in the PSI settings, the presence state
of the Aastra MC Client will be displayed to connected contacts.
amcc-4_ug_en_2013-06
143
8 UC
8.5
SIMPLE Users
This page gives you the opportunity to assign SIMPLE (Session Initiation Protocol (SIP)
for Instant Messaging and Presence Leveraging Extensions) Users to User Accounts.
Please note that the Aastra AMC Controller only supports SIMPLE with an Aastra
BluStar-Server! Accounts for authentication have to be set up on the page "BluStarServer", refer to 8.6.
Figure 8.7: SIMPLE Users
F ORMER V ERSIONS
Presence via SIMPLE used to be activated on a per-PBX basis (with a checkbox
in the menu PBX ).
1. Select the SIP User you would like to associate to a SIMPLE account.
2. Activate the user to enable the SIMPLE service for his/her account.
3. Select the Endpoint this SIMPLE User belongs to. Please note that if the
Endpoint is an Aastra BluStar-Server, it has to be configured like other Endpoints
(refer to 6.7), and it has to be named "BSS" or "bss", or its name has to contain
"BSS" or "bss". Authentication for a BSS has to be set up on the page "BluStarServer" , refer to8.6.
4. Enter the email address that should be used for IM with SIMPLE.
amcc-4_ug_en_2013-06
144
8 UC
8.6
BluStar-Server
Figure 8.8: Integrate your BluStar Server for Presence.
8.6.1
SIMPLE BluStar Server
Select the User Profile from that is associated to your SIMPLE User accounts, and
enter Username and Password as they are configured on the BSS. Refer to the BSS
documentation.
To bring the BluStar-Server functionality to the Aastra MC Client, SIMPLE User accounts have to be added (refer to 8.5).
For successful BSS usage with the Aastra MC Clients, email addresses have to
be available on the used device and saved as "work email" in the native contacts.
To integrate other XMPP or SIMPLE infrastructure in your system with the Aastra
AMC Controller, please refer to the respective pages: for XMPP refer to 8.3 and
8.4; for SIMPLE Presence please refer to 8.5.
amcc-4_ug_en_2013-06
145
8 UC
Please note that the BluStar-Server currently only supports Presence ("see who’s
online"), but not instant messaging (IM).
8.6.2
BluStar Web URL
Enter your BluStar Web URL here. If a BluStar Web URL is configured, BluStar Web
offers additional presence states and contact lookups in a separate screen of the Aastra
MC Client. Currently only available for the Aastra MC Client for iPhone, Android and
Blackberry 10.2.1 or later (with Android Runtime).
amcc-4_ug_en_2013-06
146
8 UC
8.7
Groupware
You have the possibility to employ your Aastra MC Solution as a reverse proxy. By doing
so, it can shield a server within your LAN and make it available for Aastra MC Clients
sending requests in the WLAN area. If you choose to do so, please make sure that the
utilized port is not the port used by the Web Management of the GUI. The default port
for the Web Management is 443 unless it has been customized in the System tab under
Port Numbers in the GUI. Please check this if you are not sure.
Figure 8.9: Groupware Access (HTTPS Reverse Proxy)
amcc-4_ug_en_2013-06
147
9 Deployment
9.1
Feature/LCR Profile Upload
This menu gives you the possibility to manage (add, delete, and download) profiles for
Least Cost Routing (LCR) and Feature files.
Feature File Tool
A software tool is available to simplify the setup of feature files. Click "Get Editor"
to go to the download page.
If you have a Feature or LCR file saved locally on your computer, click the "Choose File"
button to select the file, and click Upload to add the file. The Aastra AMC Controller
detects what kind of file (Feature or LCR) is being uploaded, but note that LCR files
have to have the file extension .lcr!
LCR files with default values can also be generated and edited with the WebGUI of the
Aastra AMC Controller (refer to 9.3). Customized feature files can only be created by
using the tool mentioned above.
148
9 Deployment
9.2
Feature/LCR Profile Reader
You can view currently available Feature and LCR files on this page. Online editing is
not possible here, but the reader may be helpful when locally putting a new Feature or
LCR file together.
Please note that using the Feature File tool to generate Feature Files is absolutely
recommended. Please find the link to this tool on the previous page of the WebGUI (refer to 9.1).
Figure 9.1: Feature / LCR File Reader
9.3
LCR Profile Lists
This page lets you view and delete a list of the currently available LCR files, but you can
also add a template for a new file by clicking the "Add" button. The file with the name
you enter will then appear on the "LCR Profiles" page.
amcc-4_ug_en_2013-06
149
9 Deployment
9.4
LCR Profiles
On this page you can view and edit LCR files already uploaded to (refer to 9.1) or
generated by (refer to 9.3) the Aastra AMC Controller.
The following further explains the setup of an LCR file which determines how calls from
the Aastra MC Clients will be routed.
Example
Outline your rule with the following conditional settings:
1. Target:
Target Number Pattern is the start sequence of the phone number(s) for which
you would like to set up a rule. Whenever a matching number is dialed, and if
the other conditional parameters (Roaming) and Mobile Country Code matches
as well, the configured action (Call-Through, Cellular Callback, Direct Cellular and
HTTPS Callback) will be taken. The Target Number Pattern will in most cases be
country codes.
• Since you probably do not know whether all numbers in the users’ phone
books are configured with leading zeros or with a leading "+", you should
configure every country code twice. One pattern starting with "00" and one
with "+".
• If an asterisk (*) is set as a target pattern (see screenshot for "always_callback"),
this rule will be applied to all calls if the remaining conditional parameters
match as well. We will call this kind of rule "star rule" from now on.
2. Roaming specifies whether the desired behavior is to be done in a roaming situation or not. It enables you to set a different LCR behavior depending on the
network. The options are: "home" (no roaming, calls are done via the network
provider of the used SIM card) and "foreign" network (roaming), and "disabled" (in
any case).
amcc-4_ug_en_2013-06
150
9 Deployment
A N OTE ABOUT R OAMING
There are certain countries where a user might be roaming within that country
where a network provider does not cover the whole country. This is for example
the case in the US as well as in India.
3. Calltype
– Enterprise:
"Enterprise" (Call-Through) enables you to "leave" your mobile costs in the
home network of your used SIM card. Target Number Patterns which trigger
this feature will be routed through the Aastra AMC Controller, making use of
cheaper landline fares from there on.
– Direct:
If this is set to "1" for true, all calls matching this rule will not be routed by the
Aastra AMC Controller. They will hence stay in the mobile/cellular world.
– HTTPS Callback: Invoking Callbacks via HTTPS is faster and might hence
be a desireable alternative to Cellular Callback. If HTTPS Callback is selected, the Aastra MC Client will fall back to a Cellular Callback if HTTPS is
not available.
– Cellular Callback:
This triggers a Callback in a mere cellular network (where no GPRS is available). This feature saves corporate costs whenever outgoing calls are more
expensive than a call from the PBX to the Aastra MC Client.
4. Mobile Country Code:
Mobile Country Code (MCC) is another condition to match. Each network (provider)
has a mobile country code. In some countries (for example Germany) this mobile
country code is the same for all providers. However, this is not the case in all
countries (USA, India and more). A list of Mobile Country Codes can be found at
Wikipedia.org
Use a star rule to disable this parameter!
amcc-4_ug_en_2013-06
151
9 Deployment
9.5
OTA Profiles
Configurations can be deployed "over the air" (OTA), and this page displays all currently
available User Profiles with their respective OTA (settings) profile. Each OTA profile
consists of a set of keys (setting names) and their values. Because available values
vary by the used Aastra MC Client platform, the documentation of all key-value pairs
and their associated settings is included in the Aastra MC Client manuals.
Whenever you select a key, the default value will be loaded.
amcc-4_ug_en_2013-06
152
9 Deployment
Figure 9.2: A sample OTA Profile.
amcc-4_ug_en_2013-06
153
9 Deployment
9.6
Client Deployment
The Aastra AMC Controller implements a very simple deployment mechanism for the
Aastra MC Client’s configuration. The data is retrieved and partially automatically generated from User Profiles and Accounts. Use the deployment method Redirect Server
for an initial configration download, or select Force Configuration Download for configuration updates.
If you would like to deploy a new configuration set to several users, hold Ctrl and A to
highlight them all and then select your Deploy Type.
For more security, use the "Optional Redirect Server PIN" to activate a pop-up on the
Aastra MC Client-side in which the user has to enter that PIN to download the configuration.
There will be instant confirmation of the successful or failed deployment. For deployment details and possible error causes, refer to the Deployment Status page (10.8).
R EDIRECT S ERVER S ERVICE
The Redirect Server deployment option is a free-of-charge service offered by Aastra Technologies Ltd. Its domain name is hard-coded in the Aastra MC Clients.
When you select the "Redirect Server" option here, the users’ Cellular Numbers
and the IP of your Aastra AMC Controller will be forwarded to the Redirect Server
at the Aastra Technologies Ltd. headquaters. Since the host name of the Redirect
Server is hard coded, the only thing a user has to enter to trigger a configuration
download is his or her own mobile number. The Redirect Server will then deploy
the Download URL (of your Aastra AMC Controller) to the user(s). Once the URL
has been deployed, the Redirect Server will delete the received data.
H OW TO GET A ASTRA MC C LIENT SOFTWARE
The Aastra MC Client is available for individual downloads in all major App(lication)
Stores for all supported platforms. Just browse the respective market for "Aastra
MC Client" and download and install it like any other application for your smartphone.
amcc-4_ug_en_2013-06
154
10 Diagnostics
10.1
FMC Status
The status displays the active PBX registrations, the registered users, as well as all
active calls. You can always press Reload to refresh the displayed information. The
page will not refresh automatically while it’s open. The displayed information in detail
includes:
• FMC Numbers/Trunk Registrations: this will display the registration status of
your FMC Numbers if any of them are using Active Registration, which means
that the Aastra AMC Controller will register them as "its" phone numbers on your
PBX.
• Active Endpoint Registrations: every registration to the PBX as well as its status will be listed here. All registrations should be in the Status REGED signifying
that they are correctly registered with the SIP endpoint.
• Registered Users: this displays all users that are currently registered via IP and
via which Transport protocol (UDP or TCP). The Reg. Mode shows you how
an Aastra MC Client is registered (example: this will be "InfoReg" for signaling
only/singlemode Aastra MC Clients). The User-agent shows you which Aastra
MC Client platform is used, along with the software/client version. The IP address
and port will give you some indication as to where these users are registered from.
Note that if you see the local host’s IP address here, this indicates that the user
registered from behind a NAT network.
• Call Status: this will show all active calls; the Name represents the local user,
and the Connected User field the party the user is connected to. You will not see
who initiated the call in this screen, only that a call is ongoing.
155
10 Diagnostics
Figure 10.1: Status Page
amcc-4_ug_en_2013-06
156
10 Diagnostics
10.2
IM
This status page will list all SIP (FMC) Users currently connected to an IM account. It
displays the IM Type(XMPP or SIMPLE, refer to 8.4 and 8.5, respectively),the current
status of an IM User (online, offline, etc.), as well as the Connection Status to the IM
Host (the server is either "UP" or "DOWN" for XMPP, Reged, i.e. registered, or Failed
for SIMPLE Presence).
Figure 10.2: Overview of IM Users and IM host connections
amcc-4_ug_en_2013-06
157
10 Diagnostics
10.3
Statistic
This page will show you the overall call statistics since the implementation of the Aastra
AMC Controller or since the last reset of this part of the database (use the Reset
button for this). The collection (and reset) of the data displayed here is based on SNMP.
This page will also show the date of the last reset or the start date (if no reset has been
done) of the call data collection.
The select box will give you the option to display the collected data per user. But only
active users, i.e. users who have placed calls will be selectable here.
For all details about the display table, please go to chapter 13. It is explained there
along with some information about SNMP on this Aastra AMC Controller.
Figure 10.3: Call Statistics table after a couple of calls
amcc-4_ug_en_2013-06
158
10 Diagnostics
10.4
Call Status
This page shows the last 20 calls per SIP User sorted by Start-Time. The Call Status
page shows the Duration, the network ( Media: WLAN or cellular, incl. handover) in
which the call was established, as well as the Call Type (Static Roaming, Enterprise,
Callback etc.)
If the SIP User initiated the call the field Originator will have the value "Yes".
The Call Quality WLAN and Call Quality PBX indicate the current call quality for Voice
over WLAN calls in percent (100% being optimal call quality). It is determined respecting jitter and packet loss. Additionally, the column Call Quality Features displays
whether Noise Suppression (NS) or Acoustic Echo Cancelation (AEC) are used for a
call (still to be considered "experimental").
Hangup-Cause will display if the call was canceled or cleared normally, rejected or
failed, and the Hangup-Reason shows the event code for the termination of the call.
The last colum shows the other party’s number or extension and, if the information is
available, the platform of the other party’s Aastra MC Client(Peer ).
Figure 10.4: This is the Call Status page after one call has been placed.
amcc-4_ug_en_2013-06
159
10 Diagnostics
Call Status Settings
The option Disable Call Status logging allows you to disable the data collection. Clear
all entries deletes the already collected data.
Please note that Disable Call Status logging also deactivates the Call Statistic
page!
10.5
LDAP
If a lightweight directory access protocol (LDAP) server has been configured to grant
access to the corporate phonebook (refer to 8.2), you can check the connection status
between the Aastra AMC Controller and this LDAP server by clicking on the title bar or
the menu. At first, nothing visual will happen; the Aastra AMC Controller will check the
connection which might take from a couple of seconds to up to a minute or two.
It will then display that the verification of the connection has been successful or unsuccessful. If there are problems and the Aastra AMC Controller cannot connect to the
LDAP server, it will try to give you some information in the error message indicating
where the error might originate.
amcc-4_ug_en_2013-06
160
10 Diagnostics
10.6
System
This page shows if the basic services (like NTP and DNS) are running.
It will also show if the Redirect Server for configuration deployments towards the Aastra
MC Clients is available (PING).
Figure 10.5: System Status page with running services.
amcc-4_ug_en_2013-06
161
10 Diagnostics
10.7
Remote Control
If activated, remote control via dial-in becomes available for the Aastra AMC Controller
customer support.
Figure 10.6: Remote Control and Trusted remote control caller numbers
Trusted remote control caller numbers
Adding trusted remote control caller numbers may not be necessary, depending on
how remote control calls should be initiated. There are generally two ways to initiate
successful remote control calls:
1. Enable the call type "Remote Control" by configuring a Remote Control Number
as a Service Access Number (refer to 6.10); or by
2. Calling the Callthrough number from a configured trusted remote control caller
number.
If trusted remote control caller numbers are configured, remote control calls will only be
allowed from those numbers no matter which call type (Remote Control or Callthrough)
is used! If a Remote Control number is configured as a Service Access Number, remote
control calls, even from trusted caller numbers, are prohibited.
For maximum security, combine a Remote Control Service Access Number with trusted
remote control caller numbers!
amcc-4_ug_en_2013-06
162
10 Diagnostics
10.8
Deployment Status
This page shows you whether configuration deployments have failed or succeeded by
date, as well as the overall outcome of your configuration deployments. The available
data will look similar to this:
Figure 10.7: Recently deployed configurations
amcc-4_ug_en_2013-06
163
10 Diagnostics
10.9
Syslog-File
This page displays the last lines of the Syslog output the Aastra AMC Controller produces.
Figure 10.8: Syslog File
The output also depends on the Syslog settings and the mode that is configured there
(see 10.10 for a more detailed description of the possible settings). If Debug is used
there, a lot of information will be displayed.The output can be refreshed by pressing the
Reload button. It is also possible to adapt the number of lines displayed, by entering
the desired number into the Number of Lines field.
L OGS LOST WITH R EBOOT
By default, the Syslog file is stored in a RAM disk on the device. This means that
the information is lost after a reboot. In order to implement a persistent storage,
an external Syslog Server is recommended.
AUTOMATIC L OG R OTATION
The Aastra AMC Controller performs log rotation on a regular basis to avoid filling
up the storage space. This log rotation will compress the current syslog file. All
files are stored in the /var/log/ directory and can be accessed e.g. via WinSCP.
amcc-4_ug_en_2013-06
164
10 Diagnostics
10.10
Logging
Specify an external syslog server here, on which all important messages of the Aastra
AMC Controller are logged.
Syslog is a standard for logging system messages under Unix and Linux and meanwhile
also many other platforms including Windows. It supports both local and remote (i.e.
over the network) logging.
The configuration of a Syslog server and appropriate log level are especially recommended if the Aastra AMC Controller is operated as a firewall!
Figure 10.9: Logging
How to configure Syslog
1. Specify the IP address of your Syslog server
2. then choose one of the following log levels from the drop-down box:
•Debug: All messages are logged.
•Info: All messages, but real debugging messages are logged.
•Notice: All messages important for the user are logged.
•Warning: All messages describing failures are logged.
•Error: All error messages are logged.
•Critical: All critical failure messages are logged.
•Alert: All messages preventing a service from functioning properly are logged
•Emergency: All messages preventing a service from functioning are logged
amcc-4_ug_en_2013-06
165
10 Diagnostics
This log level determines which messages shall be logged.
3. Check the box "Local logfile" if you wish to save logs on your Aastra AMC
Controller (additionally to or instead of an remote Syslog server).
If there is no local computer available as a Syslog Server for saving the selected messages, you can either install a free syslog server (available in the Internet), or you can
use the local logging on the Aastra AMC Controller. This logging is, however, limited to
the space available there. In order to enable the local logging, simply enable the Local
Logfile checkbox.
amcc-4_ug_en_2013-06
166
10 Diagnostics
10.11
Tools
The debugging tools allow you to easily track down the reasons for network connectivity
problems over the web interface.
Figure 10.10: Debugging tools
The following tools are available:
10.11.1
Ping
Ping sends network packets to a computer and waits for the response while measuring
the elapsed time until a response arrives.
This program is able to examine if a computer is reachable or not. For this reason it
is applicable for instance to check whether the connection to a certain host is working.
You can easily trace down the reason for connectivity problems by trying to ping the first
gateway on the way, then the second and so forth. Once that fails, you will know exactly
which link is the problem.
10.11.2
Traceroute
Usually, traceroute is used after you have detected a specific network problem with the
ping tool to further narrow down the reason.
This program traces the path packets take from the Aastra AMC Controller to a certain host. It can complement and expedite certain debugging approaches taken with
ping. The output is shown in real time, line after line. This means: if ping does not respond for several seconds, the probability that the address is not reachable is very high.
amcc-4_ug_en_2013-06
167
10 Diagnostics
T RACEROUTE MAY BE BLOCKED
Please note that when trying to trace routes over the internet, some routers will
block this attempt. You will then be unable to get the desired information for a
traceroute although the network connection is working properly.
IP A DDRESS INSTEAD OF H OST N AME
If you assume that an internet connection is inoperable, you have to define the IP
address of your Aastra AMC Controller instead of your system name, because in
this case the DNS service is likely to be unable to resolve system names.
amcc-4_ug_en_2013-06
168
10 Diagnostics
10.12
SNMP
This menu item contains configuration of the SNMP Daemon.
The SNMP Daemon offers basic system information and a service to monitor the Aastra
AMC Controller system status. If you would like to manage the Aastra AMC Controller
remotely via SNMP, a read-write access has to be configured accordingly. This includes
the surveillance of running processes, disk-space usage and the CPU’s load average.
The following parameters can be set up (compare figure 10.11):
SNMP Basic Settings
In this menu section you can switch the SNMP service on-/ off and configure the basic
setup.
• SNMP read community string
Specify a SNMPv1 or SNMPv2c community that will be allowed read-only access.
• SNMP read/write community string
Specify a SNMPv1 or SNMPv2c community that will be allowed read-write access.
• Enable SNMP trap sending
This checkbox enables active monitoring. The SNMP Daemon will send traps if a
process is not running or if disk space is running low. Additionally a trap is sent
when the SNMPD Daemon is started and stopped.
• SNMP trap community name
Specify the community name which will be used in traps.
Trap destination
You can specify one or more ip-addresses here as a destination for SNMP traps.
Proxy
This option enables the SNMP Daemon to act as a proxy, passing certain requests to
a SNMP service running on another machine. The following configuration settings are
available:
• IP address
The IP-address of the machine to which the proxy should forward.
amcc-4_ug_en_2013-06
169
10 Diagnostics
• Port
Optional: The port on which the target machine is listening for SNMP. Default is
port 161.
• Password
The SNMP community string on the target machine.
• SNMP Version
Choose between SNMP version 1 or 2c.
• Object-ID (OID)
Optional: Part of the OID tree which should be passed through to the target machine. Default is the whole OID tree 1.3.
Setting up the SNMP daemon
1. Check Active to enable SNMP daemon.
2. Provide configuration details for the basic setup as described above. Click
Save to save your changes. Your changes will be applied after selecting Apply
configuration.
3. In addition to the Basic settings you can specify one or more Trap destinations
and Proxies to be used by the SNMP daemon.
4. Use Add to add an entry and fill out the form. Use
delete an existing entry.
amcc-4_ug_en_2013-06
to edit, or
to
170
10 Diagnostics
Figure 10.11: SNMP Configuration
amcc-4_ug_en_2013-06
171
10 Diagnostics
10.13
Firewall Report
This section shows the over-all number and size of dropped packets and additional
information about the matched rule (protocol, input/output interface, source and destination). Depending on the direction of packets, rules are joined in three chains INPUT,
OUTPUT, and FORWARD. Information about dropped packets may be helpful for testing
connections or improving your firewall rules.
The information shown on this page is a summary of packets dropped by the firewall
and will be refreshed every time you choose this menu item or click Refresh . You can
also reset firewall packet counters by clicking Reset .
Figure 10.12: Firewall report
amcc-4_ug_en_2013-06
172
10 Diagnostics
10.14
Net. Trace
The Network Trace enables you to collect network information for error analysis and
solution. This graphical interface for tracing uses tcpdump in the background.
U SE S UPPORT T RACE FOR S UPPORT R EQUESTS
To improve data exchange between customers and our support team, the menu
Support Trace has been added. Please refer to page 176 if you are looking for
this option.
Recording a new trace
1. From the drop-down box select a network interface to listen on. In order to
gather information from all interfaces, choose ANY.
2. Additionally, you can input certain other options for tcpdump via the Command
Line.
You can specify port numbers, protocols, the number of packets to be traced and
many other options. A trace file created by tcpdump can then be viewed by a
network packet analyzer such as Ethereal.
An introduction to the network monitoring using these tools would be far beyond
the scope of this manual, but there is a lot of documentation available on the web.
Some briefly explained parameters:
•-s0
Usually only the first 64 bytes of a packet will be traced. This reduces especially the size of long running traces. Please note that traces especially
on the LAN interface can get very large rather quickly if no filters are specified. The -s0 parameter will remove the 64 Byte limitation. The entire packet
including the payload will be visible in the trace file.
•port 5060
This will introduce a filter into the trace only for the packets with source or
destination
•src host 10.10.10.10
This will restrict the tracing to all packets coming from the specified host.
The IP 10.10.10.10 is of course just an example.
amcc-4_ug_en_2013-06
173
10 Diagnostics
•dst host 10.10.10.10
This will restrict the tracing to all packets going to the specified host.
•proto tcp
You could also use protocols ip, icmp, udp here. This will trace only the
specified packets.
An example combining several of the above parameters would be for example -s0 port 5060. This would trace only SIP traffic, or to be more
accurate all traffic on Port 5060.
3. Click on Start to start the trace. In order to stop and download the trace file,
simply click on Stop and confirm saving the file to your disk. If you just want to
check, whether the trace is already completed (e.g. in case you have specified
a maximum size for files or a number of packets to be traced) click on Status .
Your trace will not be interrupted, if it is still running.
amcc-4_ug_en_2013-06
174
10 Diagnostics
Figure 10.13: Starting trace
Figure 10.14: Downloading trace file
amcc-4_ug_en_2013-06
175
10 Diagnostics
10.15
Sup. Trace
If there is a reoccurring error on your system and you need support, please record
a Support Trace and let it run until the error has occurred again. This functionality will
collect overall runtime information about your system and is very helpful in finding errors
fast and reliably.
After starting the Support Trace, please wait approx. 15 seconds before making the first
text call.
As soon as you click on stop , there will be an option to download the collected information.
If the memory is about to run out the information gathering will be stopped automatically.
So if the error has not occurred and the memory is full,i.e. the support trace recording
has stopped, please download the support trace (to eliminate it on the Aastra AMC
Controller) and conduct another support trace to capture the crucial information.
Figure 10.15: This is where the Support Trace is started and stopped
R ESTART OF THE SIP-P ROXY C OMPONENT
If the SIP Proxy (Dual-Mode Server component on the status page) is active, it
will be restarted when a support trace is recorded. This can be checked on the
Status page. The SIP Proxy is usually active unless your Aastra AMC Controller
runs in slave mode.
As a result of this restart you might have to make your phones re-register. Most
IP-phones, however, register by themselves in periodic intervals.
amcc-4_ug_en_2013-06
176
11 Initial Setup via the Console
If you log in via the (RS232) console, a login menu opens.
You will see the following prompt:
login:
The only available user to login is root, with the same password as the admin’s password in the browser interface, initially sesam. You should change this password via the
browser as soon as possible! There’s also a possibility to use separate passwords for
the web interface and the console. Activate the setting "Separate CLI and GUI admin
password" on the page "Change Password"; refer to 3.2. If this setting is deactivated,
the option "W" (see below) will not be available.
The menu pages do the same as the analog Web-GUI pages, but with reduced
functionality:
=======================[ Main menu ]========================
1:
2:
3:
4:
5:
Configure
Configure
Configure
Configure
Configure
first LAN interface
second LAN interface
WAN interface
SSH and HTTPS ports
Routing
6: Firewall/NAT
P:
D:
T:
L:
W:
Physical Network Settings
Set domain name server
Set timezone
Change language
CLI Password Separate
A: Apply configuration
H: Shutdown
R: Reboot
177
11 Initial Setup via the Console
E: Exit
-----------------------------------------------------------Please enter your choice:
The setup of the follow-menus is self-explanatory. For example, by pressing 1 and
RETURN, you will see the following:
=============[ Configure first LAN interface ]==============
Current values:
IP address: 192.168.140.1
IP netmask: 255.255.255.0
-----------------------------------------------------------1: Enable DHCP
2: Change IP address
3: Change IP netmask
S: Save and back to previous menu
B: Back to previous menu
-----------------------------------------------------------Please enter your choice:
amcc-4_ug_en_2013-06
178
12 Factory and Password Reset (via
console)
The Aastra AMC Controller supports both a factory reset and a password reset. The
latter just resets the password while the factory reset restores the complete configuration to factory default. If you forgot your password, you must have physical access to
the device in order to do the reset.
N O S OFTWARE R ESET
Note that the factory reset has no influence on the installed software. The factory
reset will only restore the complete configuration of the device (all contained in the
/etc directory) to safe factory defaults for the currently installed software version.
In order to change the software version, you need to upgrade or downgrade the
software of the device.
12.1
Password Reset via RS232
After connecting a serial console or a keyboard and monitor you need to power up or
reboot your box (press Ctrl-Alt-Delete). Then wait until you see the following prompt:
SYSLINUX 1.62 0x3e713b13 Copyright (C) 1994-2001 H. Peter Anvin
boot:
Enter passwordreset and press enter. Your Aastra AMC Controller will boot normally
but with the password reset to the default password.
12.2
Factory reset via RS232
After connecting a serial console or a keyboard and monitor you need to power up or
reboot you box (press Ctrl-Alt-Delete). Then wait until you see the following prompt:
179
12 Factory and Password Reset (via console)
SYSLINUX 1.62 0x3e713b13 Copyright (C) 1994-2001 H. Peter Anvin
boot:
Enter factoryreset and press enter. Your Aastra AMC Controller box will boot, perform
a factory reset and the reboot again. After that your box will boot up normally, but of
course needs to be reconfigured as all settings are reset to the factory defaults.
Note that you have to be quick enough here, otherwise your box will reboot normally. Once you entered the first letter, you can wait as long as you like.
amcc-4_ug_en_2013-06
180
13 Accounting Table via SNMP
The Aastra AMC Controller collects accounting information on a per user basis in one
of its database tables. This information can be fetched and reset via Simple Network
Management Protocol (SNMP).
Get the accounting table
Please contact our support team to get the accounting table.
The table contains (among others) the following keys:
1. sipNumber
The SIP Number shows you the user to whom all remaining information in the line
belongs.
2. gsmCalls
The value displayed here will show the total amount of cellular calls made by
this SIP User since the last reset of the database (we will describe later how this
particular accounting table can be reset).
3. wlanCalls
Just like the above mentioned cellular calls, the value given here will be the total
amount of wireless calls made by this SIP User.
4. toGsmHandover
Shows the total amount of handovers made from WLAN to cellular networks.
5. toWlanHandover
Shows the total amount of handovers made from cellular networks to WLAN.
6. abnormallyAborted
Shows the number of calls which were abnormally aborted by the PBX, i.e. call
terminated by the PBX for example with:
• 488 (not acceptable here)
• 500 ( Server error)
181
13 Accounting Table via SNMP
• BUT NOT 486 (Busy Here)
• and rejections of calls
7. droppedCalls
Shows the number of calls dropped by the Aastra AMC Controller, because of
RTP timeouts or crashed sessions.
8. shortCalls
Displays the number of calls with durations below or equal to 10 seconds.
9. minCallDuration
Shows the duration (in seconds) of the shortest call made.
10. avgCallDuration
Displays the average duration of all calls.
11. maxCallDuration
Displays the maximum duration of all calls.
12. staticRoaming
Shows the number of calls made from a Static Roaming situation.
13. callthrough
Shows how many times Callthrough was used.
14. callback
Shows how many times Callback was used.
amcc-4_ug_en_2013-06
182
Index
911, 126
Accounting, 181
Activate further SIM cards, 106
area code, 88
Area Prefix, 88
Associating SIP Trunks, 96
automatic conversions, 84
B2BUA (port settings), 82
Backup
Configuration Backup, 21
Failover Server, 31, 33
Remote Backup, 26
Slave, 31
User Data, 131
VRRP(Routers), 48
Basic Settings System, 16
Bottom Menu Bar, 14
Browser, 11
call features, 66
Call Log, 95
Call-through Early Media, 70
Call-through Number, 103
Callback, 103
Callback Number, 105
Caller ID Mapping, 95
Cellular Number (User Accounts), 119
Cellular Numbers, 122
Cellular to WLAN number, 108
Change Password, 18
Client Deployment, 154
Client Early Media, 71
Codec, 93
Codecs (PBX), 93
Common Name, 91
Configuration Backup, 21
country code, 88
country prefix, 88
Country Tones, per-PBX Sound Profiles,
134
Custom Firewall Rules, 57
deactivate users, 120
Debugging, 167
Default Password, 12
DHCP server, 38
Dial-in GSM, 104
Disable Number Converter, 72
Display names, 119
DNS (System), 17
Domain Name Server (System), 17
Dropped Packages, 172
DSCP, 53
DTMF
Detection, 71
DTMF mode, 71
DUALMODE
Port Settings, 82
SBC (Port Settings), 82
Dualmode
Feature Access, 66
FMC User Domains, 131
Global Settings, 70
RTP options, 80
Early Media
Call-through , 70
Client , 71
emergency call, 126
Endpoint, 91
183
Index
Error Diagnostics, 167
Error Logs, 165
Etherreal, 173
External IP for NAT, 78
Factory Reset, 179
features, 66
firewall report, 172
Firewall Support, 172
fixed prefix, 89
FMC Enterprise Configuration, 69
FMC Status Page, 155
FMC User Domains, 131
From Header Mapping, 95
Global Settings, 70
Groupware, 147
GUIConcepts, 14
Handover
Numbers, IMS, 107
handover, 108
Hold, 95
HTTPS port, 29
HTTPS Reverse Proxy, 147
Import/Export User List, 131
IMS, 107
In-band DTMF, 71
In-call features, 66
inactive, 95
install update, 20
Instant Messaging, 140
Interface Handling(FMC), 68
internal length, 89
internal numbers, 84
Interval
Keepalives, 79
Keepalives (TCP), 79
LAN Interface 1, 38
LDAP Status, 160
License Information, 37
link, 167
amcc-4_ug_en_2013-06
local interface, 92
Log Levels, 165
Logging Messages, 165
Main Frame, 14
Main Navigation, 14
Mass Provisioning, 131
Media Stream Trace, 174
Multiple Cellular Numbers, 106
NAT, 68
External IP, 78
Network Trace, 173
NTP (Server), 47
Number Conversion, 89
number conversion, 90
Number Conversions, 124
Number Converter, 72
number converter, 95
Number Formatting
Number Conversions, 124
Stages of Conversion, 72
Number Profile, 83
Operating Mode, 32
Outbound Proxy, 94
outgoing call prefix, 88
Page Header, 12
password, 18
Password Reset, 179
Passwords
System, 18
PBX Access Codes, 128
PBX Configuration, 91
PBX Realm, 92
Ping, 167
Port Handling (FMC), 68
Ports (General), 29
Ports FMC, 82
Presence, 140
Problems with FMC Numbers, 103
Protocol Tracing, 174
Provisioning, 131
184
Index
QoS, 53
Realm (PBX), 92
Redundancy
VRRP, 48
Refresh, 172
Remote Backup, 26
Remote Logging Server, 165
Remote Update, 19
Restart, 37
restore configuration, 21
Restore Values, 35
Revert Configuration, 24
RFC 2833, 71
RFC3168, 81
Rollback, 24
RTP, 80
SDP, 95
Security, 68, 112
Database Security Key, 63
server features, 67
Session Border Controller, 68
SIM Switch, 106
Single Number Service, 104
SIP Host Configuration, 91
SIP INFO, 71
SIP number, 118
SIP Options, 77
Sip Traces, 174
SIP Trunk, 100
SIP Trunk Configuration, 100
SIP User Account, 116
SIP User Password, 118
SNMP, 181
SNMP (Daemon), 169
source pattern, 84
Special FMC Numbers, 103
SSH port, 29
Synchronize Database, 31
Failover Operation, 33
Operating Mode, 32
Master Mode, 32
Slave Mode, 33
amcc-4_ug_en_2013-06
Standalone mode, 32
Syslog, 165
Syslog File, 164
System Log Information, 165
System Name, 17
target pattern, 84
tcpdump, 173
Time and Date, 17
time zone, 17
Timeout
Registration to PBX, 77
Users, 73
TLS Certificates, 60
Top Menu Bar, 12
Topology Hiding, 68
ToS, 53
TOS for media, 81
Trace Parameters, 173
Traceroute, 167
Traces, 167
Trunk Configuration, 100
Update, 19
User Profiles, 111
User Provisioning, 131
Virtual Interface, 44
VRRP, 48
WAN Interface, 42
WebGUI Access, 11
Wireshark, 173
WLAN
Busy Sound, 71
WLAN to Cellular number, 108
XMPP Endpoints, 140
XMPP Users, 142, 143
185
c 2013 Aastra Technologies Limited.
All rights reserved.
This document contains proprietary
information, which is protected by copyright. No part of this document may
be reproduced or transmitted in any
form or by any means, electronic or
mechanical, including photocopying,
recording, or by any information storage and retrieval system, or translated into another language, without
the prior written consent of Aastra Technologies Limited.
NOTICE
The information in this document is
subject to change without notice.
AASTRA MAKES NO WARRANTY
OF ANY KIND WITH REGARD TO
THIS MATERIAL, INCLUDING, BUT
NOT LIMITED TO, THE IMPLIED WARRANTIES OF MERCHANTABILITY AND
FITNESS FOR A PARTICULAR PURPOSE.
Aastra shall not be liable for errors
contained herein, neither for incidental nor for consequential damages in
connection with the furnishing, performance, or use of these materials.


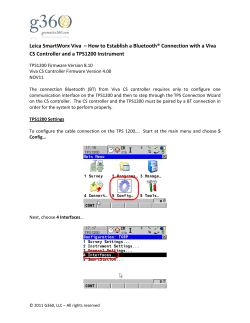

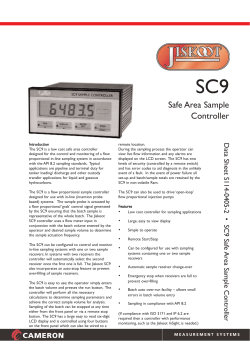
© Copyright 2026