
Clay Masonry Cleaning Manual Manual 13
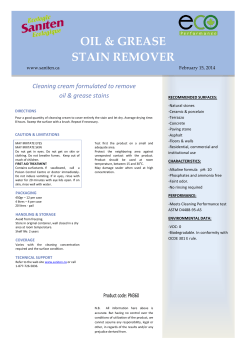
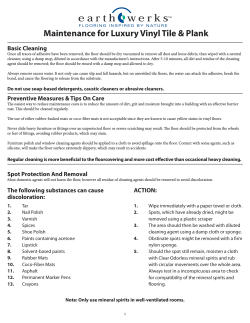
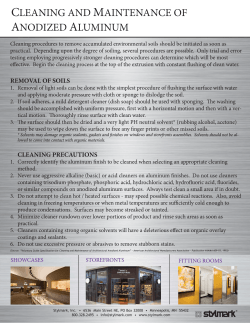
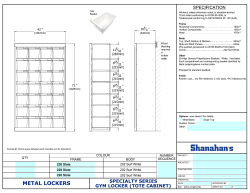
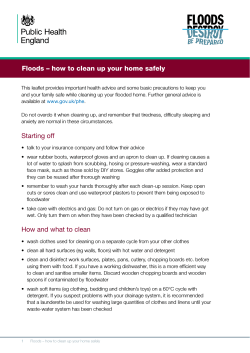
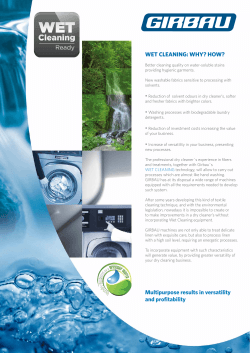
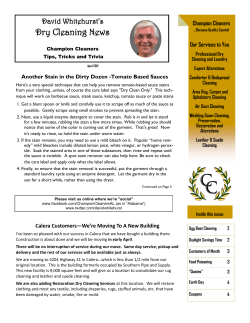
Manual 13
Clay Masonry
Cleaning
Manual
Clay Masonry Cleaning Manual
1
Contents
We represent the clay brick and
paver manufacturers of Australia.
Introduction
Our purpose is to make sure
clay brick is recognised as the
pre-eminent building material
by leading architects, developers,
builders and property owners.
We’re here to promote great home
and commercial design using clay
brick and pavers.
Revised and Republished 2014
Published 2008, revised May 2014.
Important Disclaimer
ISBN 0-947160-12-4
This may affect your legal rights:
This publication, its contents and format
are copyright of Think Brick Australia
and may not be reproduced, copied or
stored in any medium without prior
written authorisation from the Institute.
The information contained in this
manual is for general guidance only and
does not relieve any person reading the
manual from carrying out their own due
diligence to ensure that the methods
they adopt and materials/chemicals
they use for cleaning bricks and pavers
are appropriate and safe. Further, all
methods adopted and/or materials and
chemicals used, whether contained in
or referred to in this manual are required
to comply with all laws, statutes and
regulations in force from time to time.
Cover: Australia Street Infants School
Library
Architect: Matthew Gribben
Architecture
Photographer: ©Structus
Manufacturer: Boral
Product: Boral Silver Shadow, Boral
Black Beauty, Boral Leura, Boral
Limestone Hue, Boral Fossil
2
Clay Masonry Cleaning Manual
expressly or implied, that the information
contained in the manual is complete or
accurate.
The manual is not designed, nor does
it replace the service of professional
advisers. Neither Think Brick Australia,
its officers, employees, and consultants
shall be liable in any way for any loss or
damage, howsoever arising (whether
in negligence or otherwise) out of or in
connection with the use of the contents
of this manual.
2
Section 1: Design and construction
3
Section 2: Cleaning mortar residues
5
A clean start
5
Acids - the basics
5
Cleaning - the basics
7
Procedure for hand cleaning
7
High pressure water jet cleaning
8
Cleaning internal brickwork
11
Section 3: Stain removal 12
Acid burn (Iron oxide stains)
12
Calcium stains 14
Vanadium stains 16
Efflorescence 18
Graffiti and paint 20
Iron and welding spatter 20
Oil, bitumen and tar stains 21
Organic growths 21
Smoke stains 22
Soil and grime 23
Timber stains 23
Manganese stains 24
While the content of this manual is based
on information from sources which are
considered reliable, Think Brick Australia,
its officers, employees and consultants
do not represent, warrant or guarantee
Clay Masonry Cleaning Manual
1
Introduction
Section 1: Design and construction
This manual covers the cleaning of clay masonry only and
should not be applied to other masonry materials.
Consideration should be given during design and construction to the
following matters to avoid or minimise clay masonry cleaning problems.
In addition to detailing cleaning methods, guidance
is given on design and construction techniques to
minimise staining and the need for subsequent cleaning.
Bricklaying
Copings, sills, weathering
Mortar extruded from masonry joints
during laying should be cut off with a
trowel. In this way a clean cut can be made
with little smearing of the unit face.
Stormwater should be shed so as to clear
the masonry immediately below. Copings
and sills should project at least 10 mm
beyond the wall face at the underside of
the sill or coping. Sills should be angled
to properly shed water.
Simple precautions will help avoid staining and
disfigurement and are always preferable to later cleaning.
The methods detailed here are based on successful practices
implemented over many years. However tests to determine
the most effective technique should always be conducted
before undertaking any cleaning or stain removal process.
On completion of laying and joint tooling,
mortar smears on the work face should be
removed by dry brushing.
Wet sponging of the mortar joints is a
common practice with smooth face bricks.
Although this creates a smoother joint
finish, it smears a cement-rich mortar film
over the brick face that often develops
into staining.
Cleaning cavities
Cavities can be cleaned by hosing at the end
of a day’s work. Temporarily leave bricks
out at the wall base to enable mortar to be
hosed clear of the cavity.
Take care to ensure that mortar does not
set on masonry below the base of the cavity.
This is best done by thoroughly hosing the
masonry below.
Concrete droppings
Masonry supporting reinforced concrete
slabs and beams is frequently disfigured by
droppings and spattering from the concrete
pour. If these deposits are allowed to set
it is sometimes impossible to rectify the
damage. Protection is best achieved by
covering the walls with plastic sheeting.
Where this is not done, any deposits on the
wall must be thoroughly hosed off before
they set.
2
Clay Masonry Cleaning Manual
2 / The Brick Cleaning Manual
Where downpipes have not been installed
water from the guttering should be diverted
away from the brickwork.
In-built elements
In-built elements should slope away from
masonry. The soffit of major elements such
as balconies should be provided with a
drip mould. It is desirable for all roofs to be
provided with sufficient overhang to protect
the wall below.
Mortar additives
Some mortar additives if used incorrectly
may create problems during the
brick-cleaning process, examples being:
• Air-entraining agents such as Bycol or
similar used to improve the workability
of mortar. Its overuse creates a highly
porous mortar that is easily eroded
during cleaning.
• Water modifying agents such as Dynex
or similar, used to retard the absorption
of water from the mortar into the brick,
is extremely difficult to remove from the
brick if left on for more than one to
two weeks.
Clay Masonry Cleaning Manual
The Brick Cleaning Manual / 3
3
Section 2: Cleaning mortar residues
• Up to ten percent of naturally-occurring
clay in bush sand is useful in enhancing
the plasticity of the mortar. However clay
content around 15 percent is detrimental
to the mortar as excessive shrinkage will
occur, creating cracks within the mortar
and at the mortar/brick interface.
• Sugar used as a mortar retarder is not
recommended as it creates a hard mortar
surface that inhibits the absorption of
acid, thereby preventing the softening
and dissolution of the cement when
cleaning mortar residue (the use of sugar
in mortar does not comply with the
relevant Codes and Standards).
Paint overspray and splashing
Extreme care is needed to avoid paint and
timber stains being splashed onto masonry.
Dried paint is extremely difficult to remove,
therefore prevention is the best cure.
Rain interruption
When rain interrupts bricklaying – or is
expected overnight – protect the top of the
newly laid wall with plastic sheeting.
See also calcium stains in Section 3.
Retaining walls
The rear face of retaining walls should be
waterproofed by such methods as cement
rendering, coatings of Cemstick, use of
a plastic sheet membrane or bituminous
coating. This will prevent the migration
of soluble salts through the wall. Proper
drainage should also be provided
behind the wall.
A clean start
The cleaner the bricklayer leaves the wall
the easier the cleaning task will be. The
majority of mortar residues and smears
should be cleaned before they set. However,
in most cases some additional cleaning
will be required to completely remove the
mortar residue.
Scaffolding
Acids – the basics
Scaffolding planks should be laid at least
150 mm clear of the wall, allowing mortar
droppings to fall clear instead of building
up on the plank and disfiguring the wall.
At the end of each day’s work – or when
rain interrupts work – the plank nearest the
wall should be propped on edge to prevent
mortar which may have collected on it
being splattered onto the wall.
Safety requirements
All acids and proprietary cleaners are
dangerous. Users are required by law to:
• Obtain a copy of the manufacturer’s
Material Safety Data Sheet (MSDS) for
every chemical used in the conduct of
their work and to only use the product in
accordance with the instructions in the
Material Safety Data Sheet.
In particular you are reminded that
hydrochloric acid is classified as a corrosive
S6 poison. All steps should be taken to
comply with the requirements for its use
in the Material Safety Data Sheet.
To avoid personal injury users should always:
• Wear all necessary safety equipment
detailed in the Materials Safety Data
Sheet including but not limited to
goggles or face mask, gloves, and
protective clothing as advised.
Typical wall after brick laying
• If an acid or proprietary cleaner is
splashed onto the skin, it should be
immediately swabbed with clean water
or more effectively with a solution of
bicarbonate of soda and water that will
neutralise the acid. Medical attention
should be sought with respect to any
injury arising from the use of chemicals.
Chemical spills are required to be treated
in accordance with the advice contained
in the Material Safety Data Sheet.
• For transport and environmental care of
such chemicals, users should refer to their
State regulatory authorities.
• Pour acids into water – this avoids
splashes of highly concentrated acid
onto the operator.
4
Clay Masonry Cleaning Manual
4 / The Brick Cleaning Manual
Clay Masonry Cleaning Manual
The Brick Cleaning Manual / 5
5
Acid concentrations and cautions
Cleaning – the basics
The traditional masonry cleaning chemical
is hydrochloric acid, (also known as
muriatic acid or spirits of salts). Its main
function is to put portland cement into
solution, that is, dissolve the cement in
the mortar mix. It has few other uses and
in many stain situations SHOULD NOT
BE USED.
Cleaning techniques may involve
high-pressure water jet equipment or
hand methods. Both are detailed later in
this section. Whatever technique is used,
the following requirements must
be observed to ensure that additional
staining problems are avoided:
The recommended maximum strength
for light coloured clay bricks is 1 part acid
to 20 parts water, and the recommended
maximum strength for all other clay bricks
is 1 part acid to 10 parts water.
Saturate the wall
Note: This point must be strictly adhered
to particularly for bricks manufactured in
Queensland. Their raw materials naturally
contain large amounts of iron oxide,
sometimes just below the surface. The use
of acid solutions stronger than 1 part acid to
20 parts water can dissolve these particles
and create iron oxide staining. Removal of
these stains is treated in Section 3.
Proprietary masonry cleaning solutions
are available. The manufacturer’s
recommendations must be adhered
to strictly.
The brickwork must be thoroughly wetted
by hosing before any acid solution is applied
and kept wet ahead of the acid application.
The area to be cleaned must be saturated
as well as all brickwork areas below. The
hose should be trained upon the wall until
the brick suction is exhausted.
If the wall appears to be drying on the
surface, reapply water until ready to apply
the cleaning solution.
Failure to completely saturate the wall is
a major cause of cleaning stains. Cleaning
solutions containing dissolved mortar
particles will be drawn into a dry masonry
wall, causing further staining. Furthermore
saturating the wall keeps the acid solution
on the face of the masonry where the
mortar smears are present.
Recommended acid strengths are based
on application to a saturated wall and it
is a myth to consider that pre-wetting
‘weakens’ the acid.
Note: This point must be strictly adhered
to for bricks manufactured in Queensland.
Failure to saturate the wall allows acid
solutions to react with the iron oxide and
create iron oxide staining. Removal of iron
oxide stains is treated in Section 3.
6
Clay Masonry Cleaning Manual
6 / The Brick Cleaning Manual
Acid application
Apply the acid solution and leave to stand
on the wall to allow the chemical action
to take place, this could take up to 3 to 6
minutes, however for bricks manufactured
in Queensland and Western Australia a
lesser time is advised or secondary staining
can occur.
Hose off
If the acid is left on the wall too long it can
be absorbed into the brickwork and may
cause staining.
It is extremely important to thoroughly
hose off the wall as the work proceeds.
The acid solution and debris cleaned off
the wall must not be allowed to dry on the
wall. Weather conditions, location of the
masonry, and the suction of the bricks will
affect the timing of the hosing off. Generally
two to six square metres should be
treated at a time.
Procedure for
hand cleaning
Hand cleaning was the most widely used
method of cleaning clay masonry walls prior
to the advent of the high pressure water jet
equipment. This method is very appropriate
for small jobs or where the use of high
pressure water jet equipment may cause
further problems.
1. Wait for mortar to harden. It is possible
to start cleaning 24 to 36 hours after
completion of masonry work, depending
on the type of brick and the weather
(drying) conditions.
Clay Masonry Cleaning Manual
The Brick Cleaning Manual / 7
7
2. Remove all large mortar particles with
hand tools – a wooden paddle, brick
or chisel – before applying water or
cleaning solutions. This ‘pre-cleaning’
is an important part in cleaning new
masonry. Don’t expect acid and/or
water alone to remove large particles
of hardened mortar.
3. Mask and otherwise protect adjacent
materials such as metal, glass and
wood, as recommended by product
manufacturers.
High pressure
water jet cleaning
High pressure water jet cleaning can be used
on clay masonry but the following simple
precautions must be taken so that the bricks
and the mortar joints are not damaged by
the process.
Caution: Turbo or rotary head attachments
damage brickwork and are not
recommended.
4. Care should be taken to identify and
remove any vanadium staining on
the brickwork prior to applying the
solution of hydrochloric acid, as it may
turn the vanadium black and make it
more difficult to remove. For further
information regarding removal of
vanadium stains refer to Section 3.
Caution: Test clean a sample area to
determine the effectiveness of the cleaning
compound and the technique, and to check
the wall for possible damage caused by
the system.
5. Thoroughly wet the face of the wall
with clean water. All areas to be cleaned
must be saturated as well as masonry
areas below.
1. Remove all large mortar particles with
hand tools – a wooden paddle, brick
or chisel – before applying water or
cleaning solutions. This ‘pre-cleaning’
is an important part in cleaning new
masonry. Don’t expect acid and/or
water alone to remove large particles
of hardened mortar.
6. Use a brush or spray to apply the acid
solution to the saturated wall. Start
cleaning at the top of the wall. Cover
a small area.
7. Allow the solution to remain on the wall
for sufficient time for the reaction to take
place. This could take up to 3 to 6 minutes.
Then scrub vigorously with a scrubbing
brush. Scrub bricks not joints.
8. Rinse thoroughly as small areas are being
cleaned. To slow evaporation, work ahead
of sunshine. These ideal conditions allow
walls to dry soon after being washed,
permitting the operator to observe if all
stains are being removed before moving
too far ahead.
Allow mortar to harden. Cleaning with
high water pressure should not start before
mortar is at least three days old.
4. Thoroughly wet the face of the wall
with clean water. All areas to be cleaned
must be saturated as well as masonry
areas below.
5. When the suction of brick is exhausted,
apply the appropriate cleaning solution,
starting at the top of the wall working
in small areas. The solution may be
applied to the wall with a masonry
cleaning brush, soft broom or low
pressure (maximum 40 psi) sprayer.
Applying acid solutions under high
pressure is not recommended. The
practice is harmful to the operator,
to adjoining property and can drive
the cleaning solution further into
the masonry than is necessary for
surface cleaning, possibly causing
further staining.
Damage to ironed mortar joint
6. Allow the cleaning solution to remain
on the wall to allow the chemical
reaction to take place, this could
take up to 3 to 6 minutes, however for
bricks manufactured in Queensland
and Western Australia a lesser time is
advised or secondary staining can occur.
2. Mask and otherwise protect adjacent
materials such as metal, glass and
wood, as recommended by product
manufacturers.
3. Care should be taken to identify and
remove any vanadium staining on
the brickwork prior to applying the
solution of hydrochloric acid as it may
turn the vanadium black and make it
more difficult to remove. For further
information regarding removal of
vanadium stains refer to Section 3.
Damage to bricks caused by incorrect
use of high pressure water jet cleaning
8
Clay Masonry Cleaning Manual
8 / The Brick Cleaning Manual
Clay Masonry Cleaning Manual
The Brick Cleaning Manual / 9
9
7. Wash the wall with high pressure water
from top to bottom so all dissolved
mortar particles will be completely
flushed from wall surfaces.
The maximum pressure at the pump
should be kept low, around 7000 to
8000 kPa (1000 to 1200 psi), to prevent
damage to either the masonry units or
the mortar.
The concentration of power with
which the water jet strikes the wall is
a function of the flow in the hose, the
pressure, the type of nozzle and the
distance from the nozzle to the wall.
A straight or zero degree water jet should
never be used. A spray angle of 15 degrees,
called a fan jet, will allow the operator
to concentrate the pressure on the bricks
and not on the joints. The jet should
generally be 500 mm from the wall
and never closer than 300 mm for
localised patches.
Pressure cleaning should be carried out
in ‘runs’ from the top of the wall down,
to rinse down debris during cleaning.
The width of a run is usually 1 to 1.2
metres, and should only be as wide as
the operator can clean while keeping
full control of the pressure gun. The gun
must be kept moving: surface abrasion
will occur if it pauses in one spot.
Turbo head water jets are not
recommended as there is a high
potential for damaging the bricks
and/or mortar by the concentrated
force of the water.
10
Clay Masonry Cleaning Manual
10 / The Brick Cleaning Manual
8. Any lumps or smears remaining after
initial treatment will require another
scrape, followed by wetting, acid
treatment and pressure cleaning. The
patience of double cleaning on difficult
stains will be rewarded with a first
class finish. It also eliminates the risk
of eroding bricks or joints, the main
objections to the water-blast
cleaning method.
9. When all cleaning is finished, go back
and rinse loose sand and dirt from the
eaves, walls and windows. Once the
walls begin to dry, check to see if any
further cleaning is required.
Caution: If the mortar joints or the bricks
are being damaged, either the pressure
is too high or the water jet is too close
to the wall.
Caution: Before cleaning dry pressed
bricks the manufacturers advice should be
obtained as the use of high pressure water
cleaning is not recommended.
Cleaning internal
brickwork
The correct identification of stains
on brickwork is a first step in the
removal process.
Using hydrochloric acid to clean mortar
deposits on internal masonry requires
special care. The work should be done before
the building is enclosed to ensure maximum
ventilation and exhaustion of acid fumes.
Testing on one or more small areas is
the safest way to determine the correct
chemical solution and technique to remove
a particular stain. This must take place well
ahead of final cleaning as it will usually not
be possible to assess the effectiveness of
the test clean until the masonry dries.
Frequently this procedure is not followed
and the masonry is cleaned at the
completion of the building, making it
impractical to use large quantities of
water. The result can be acid fumes
flowing from the masonry for some time
after occupation, attacking metal door
furniture, light fittings, steel furniture,
exposed metal grid ceilings and other
metal components.
In addition to early cleaning, the following
procedures are recommended when
cleaning internal brickwork:
• Use a proprietary cleaner containing an
acid inhibitor that reduces fumes from
hydrochloric acid. OR
• After washing down, apply a neutralising
wash consisting of 65 grams of Sodium
Bicarbonate per litre of water. Leave this
on the wall. If acid fumes are suspected
to be coming from the wall, test using
litmus paper. Moisten a strip and apply
it to the wall. If the blue paper turns red,
acid is present and a neutralising wash
should be applied.
Quite often stains occur on brickwork
from the failure to follow correct cleaning
procedures when removing mortar residue.
Stains are aesthetic blemishes and do
not affect the structural adequacy of the
brickwork and are generally easily removed.
Clay Masonry Cleaning Manual
The Brick Cleaning Manual / 11
11
Section 3: Stain removal
Removal technique for acid burn
Acid burn
(Iron oxide stain)
Phosphoric acid
1. The application strength and duration
will vary. As a guide, use a mixture of
1 part phosphoric acid to 6 parts water.
This is a yellow, orange to brown rust-like
stain. It is most obvious on cream bricks
but can similarly occur on darker coloured
bricks. Iron oxide stains frequently result
from the incorrect use of hydrochloric
acid on clay masonry.
This stain is commonly called ‘acid-burn’
because the reaction between hydrochloric
acid and iron oxides in the brick and/or
mortar sand causes the formation of iron
oxide or rust on the face of the brick and
can also leach into the mortar joint.
2. Apply by brush or spray to the dry
wall and allow to stand until the stain
disappears, usually within 30 minutes,
but it can be up to 24 hours.
3. More than one application may
be required.
Acid burn on face brick work
The most common causes of incorrect
hydrochloric acid cleaning leading to iron
oxide staining are:
Protection should be provided to
powder-coated fixtures, painted
surfaces and concrete coloured with
oxides, such as paths and roof tiles,
to prevent discolouration by the
phosphoric acid solution.
• Failing to thoroughly pre-wet the
wall and keep it wet ahead of the
cleaning operation.
• Failing to thoroughly hose down
each four to six square metres of the
cleaned area.
• Using a hydrochloric acid solution
stronger than 1 part acid to 20 parts
water on light coloured bricks, or
stronger than 1 part acid to 10 parts
water on other bricks.
• Too often the acid solution is not given
sufficient time to act properly, usually
resulting in the operator increasing the
acid strength.
Pre-wetting and frequent washing off is
designed to prevent undue penetration of
the acid into the brick and mortar where
further reactions and staining often occur.
Window sills and corners require particular
attention with pre-wetting as the water
readily runs off instead of being absorbed.
12
Clay Masonry Cleaning Manual
12 / The Brick Cleaning Manual
Mortar containing iron oxide colouring
pigment will be lightened by this treatment.
To maintain a uniform appearance treat an
entire wall or keep the phosphoric acid
clear of the mortar.
Oxalic acid
1. Use a solution strength of 20 to 40 grams
per litre of water.
Acid burn on light coloured bricks
2. The method of application is the same
as for the phosphoric acid treatment.
3. More than one application
may be required.
4. Neutralise the oxalic acid by applying
a solution of 15 grams of Sodium
Bicarbonate per litre of water. Do
not wash off.
Clay Masonry Cleaning Manual
The Brick Cleaning Manual / 13
13
Removal techniques
techniques
for calcium stains
stains
Calcium stains
Calcium stains appear as almost a milky film
on the brickwork. These hard white deposits
are invisible when wet but insoluble in
water, unlike efflorescence which is
water soluble.
Most commonly these stains arise from
products of the setting reactions of portland
cement and bricklaying sand containing
clay. The combination of clay from the
mortar with calcium and silica residues
from the cement, form calcium silicate that
produces the insoluble white scum. Calcium
silicate is highly insoluble in most acids.
Kaolin, a clay mineral present in most
bricklaying sands, can also form a hard
deposit. It is insoluble in most acids except
hydrofluoric acid.
Typical calcium stain from wet
sponging mortar joints
Staining can occur in any of the
following ways:
• Incorrect hydrochloric acid cleaning.
When too much acid and too little water
are used, the products of the reaction
between the acid and the mortar are
absorbed into the brick faces instead of
being washed clear of the wall.
• When newly laid masonry is unprotected
and saturated by rain, lime is put into
solution either from the cement or
hydrated lime in the mortar.
The application
of Noskum
Noskumor
oran
anequivalent
equivalent
application of
product (e.g.
at fullhydrochloric
strength will
usually
acid,
referremove
to page 6
these
stains. In someand
cases,
the reaction
Acid concentrations
cautions)
at full strength
is
immediate
and should
be followed
by cases,
will
usually remove
these stains.
In some
vigorous
scrubbing.
In others,
the cleaning
the reaction
is immediate
and should
be followed
solution
should
be allowed
to stand
by vigorous
scrubbing.
In others,
the for
cleaning
some
four
to sixbe
minutes
prior
to scrubbing.
solution
should
allowed
to stand
for some four
tosmall
six minutes
prior
to scrubbing.
A
test area
should
be used to
determine the appropriate treatment
A small testMore
area should
be used
to
technique.
than one
chemical
determine the
appropriate
treatment
application
may
be required.
The wall
technique.
More than
one chemical
should
be rinsed
thoroughly
after
application
may be required. The wall
each
treatment.
should be rinsed thoroughly after
Note: The manufacturer’s instructions and
each treatment.
safety precautions must be followed when
a proprietary cleaning product such as
Note: The manufacturer’s instructions and
Noskum or its equivalent is used.
safety precautions must be followed when a
proprietary cleaning product such as Noskum or
its equivalent is used.
Calcium stains leaching from
adjacent concrete balcony
• By the interaction of lime leached by
water from concrete elements or
cement rendering.
• By the wet sponging of mortar joints that
smears a cement-rich mortar film over
the brick face.
14
Clay Masonry Cleaning Manual
14 / The Brick Cleaning Manual
Clay Masonry Cleaning Manual
Cleaning of Clay Masonry – Code of Practice / 15
15
Vanadium stains
Light-coloured clays often contain
vanadium salt that are generally colourless,
but under certain conditions may appear
as a yellow, green or reddish-brown
discolouration of the brick.
It is essential that any vanadium salts
evident prior to the removal of mortar
residue be removed, as the hydrochloric acid
may turn the salt black and become difficult
to remove.
Vanadium stains are often generated
by the use of too strong a concentration
of hydrochloric acid during the initial
cleaning process, or from excessive
water penetration.
Vanadium as a green stain on
light coloured bricks
Mix 150 grams potassium or sodium
hydroxide per litre of water and apply to
the stained bricks. Leave on the wall until
the stain disappears, then wash off. A white
residue may appear after this treatment
and this should also be hosed off. Extra
care should be taken when using highly
corrosive solutions such as these.
This is the active ingredient in household
bleach and swimming pool chlorine. It is
an inexpensive treatment for mild cases of
vanadium staining. Simply spray or brush
sodium hypochlorite onto the stain without
pre-wetting, allow it to stand until the stain
disappears, and then rinse.
Proprietary cleaners
These are general purpose cleaners
that rapidly remove the stain. The
manufacturer’s instructions and safety
precautions must be followed when
using a proprietary cleaning product.
This is probably the best known chemical
for removal of vanadium stains. However if
used it must be followed by a neutralising
wash. This action is commonly omitted
and further staining of a serious nature can
result. The correct procedure is:
1. Mix 20 to 40 grams oxalic acid per litre
of water (preferably hot).
2. Apply to the stained bricks
without pre-wetting.
Vanadium stain not removed prior to
hydrochloric acid application
16 / The Brick Cleaning Manual
A number of chemical treatments are
available to remove vanadium stains. It is
best to test the efficiency of these chemicals
on a test area to determine the most
suitable treatment to use.
Oxalic acid
After the initial removal of vanadium stains,
more water on the masonry – even that
used in the cleaning process – may induce
further efflorescing of the salts to the
surface, depending on the amount
within the brick.
Clay Masonry Cleaning Manual
Potassium hydroxide or sodium
hydroxide (caustic soda)
Sodium hypochlorite
Vanadium stains are neither permanent
nor harmful and do not indicate a defect in
the brick. Vanadium stains in exposed areas
generally wash off in time but their removal
can be hastened by chemical treatment.
16
Removal techniques
for vanadium stains
3. Neutralise the oxalic acid by applying
a solution of 15 grams of Sodium
Bicarbonate per litre of water.
Do not wash off.
Clay Masonry Cleaning Manual
The Brick Cleaning Manual / 17
17
Removal techniques
for efflorescence
Efflorescence
Efflorescence is not a stain, it is a powdery
and sometimes ‘fluffy’ deposit that
forms on the surfaces of porous building
materials such as masonry units, mortar
and concrete. The temporary appearance of
efflorescence is common on new masonry.
Most efflorescence will naturally disappear
over time, however its removal can be
accelerated by brushing with a stiff dry
brush. The use of a dust pan or vacuum
cleaner to collect the salts after brushing
is recommended as this will prevent salts
from re-entering the brickwork or any
porous paving materials below.
The formation of efflorescence requires
three conditions:
• The presence of soluble salts.
• Excessive amounts of water entering
the masonry.
• The evaporation of water as the masonry
dries out, depositing salts on the surface.
Efflorescence as seen on brick faces
The soluble salts that appear as
efflorescence can enter the wall
from various sources:
After brushing and cleaning up, an
absorbent cloth (wrung out until damp
only) can be used to pick up any residue.
Frequent rinsing of the cloth in fresh
water is advisable. Rinsing brickwork
with water will only cause the salt to
be reabsorbed into the bricks and
reappear when dry.
• Mortar components, particularly cement.
• Soil or fill in contact with the wall.
• Sea spray in coastal areas.
• Masonry units, however this is not a
common source.
Any situation that allows excessive
amounts of water to enter the wall is
likely to promote efflorescence. The
most common causes are:
Effloresence from ground salts
• Poor copings and flashings.
• The failure to protect new brickwork
when rain interrupts bricklaying.
• Poor storage of masonry units on site.
Before units are placed in the wall they
can absorb ground salts and excessive
water in the stockpiled masonry, and can
mobilise latent salts if they are present
in the masonry.
Persistent efflorescence may be a warning
that water is entering the wall through
faulty copings, flashings or pipes.
18
Clay Masonry Cleaning Manual
18 / The Brick Cleaning Manual
Clay Masonry Cleaning Manual
The Brick Cleaning Manual / 19
19
Graffiti and paint
Iron and welding spatter
These are difficult stains to remove,
particularly if they have aged. Old
paint deposits will probably require a
combination of removal techniques.
Where unprotected steel is built into
masonry, unsightly rust stains may result
on both bricks and joints. Similar stains
will occur if welding is carried on too close
to masonry.
Removal techniques
for graffiti and paint
Fresh aerosol paint
Use a commercial paint remover
in accordance with the
manufacturers’ instructions.
Oil-based paints or enamels
Burn off and follow with scraping and
wire brushing ensuring not to damage
the brickwork.
Dried paint
1. Flood the stained area for a few minutes
with a paint remover of the methylene
dichloride type.
2. Scrub to loosen the paint film.
3. Flush with water to wash away the
loosened paint.
4. Scrub with scouring powder until the
stain is removed.
Poultice method
If these methods do not remove all traces
of the paint, it will probably be necessary
to apply a poultice:
1. Mix a strong solution of sodium
hydroxide (caustic soda) in an inert
base such as diatomaceous earth.
Oil, bitumen
and tar stains
These stains generally arise from the actions
of other trades or due to a lack of care in
protecting materials in the structure.
Removal techniques
for iron and welding spatter
Removal techniques
for oil, bitumen and tar stains
Phosphoric acid
1. Treatment with a commercial
emulsifying agent (degreasing solution).
1. The application strength and duration
will vary. As a general guide, use a
mixture of 1 part phosphoric acid
to 6 parts water.
2. Apply by brush or spray to the dry wall
and allow to stand until the stain
disappears, usually within 30 minutes,
but can be up to 24 hours.
3. More than one application may
be required.
Oxalic acid
1. Use a solution strength of 20 to 40 grams
per litre of water.
2. The method of application is the same
as for the phosphoric acid treatment.
3. More than one application may
be required.
Proprietary cleaners
These are general purpose cleaners
that rapidly remove the stain. The
manufacturer’s instructions and safety
precautions must be followed when using
a proprietary cleaning product.
2. Mix an emulsifier with kerosene to move
the stain. Clean the kerosene off with the
emulsifier only mixed with water.
Hardened oil must first be scraped off
or free oil mopped up immediately with
an absorbent, such as paper towels.
Wiping should be avoided as it spreads
the stain and tends to force the oil into
the masonry.
The area affected should then be covered
with a dry absorbent material such as
diatomaceous earth, hydrated lime, or
whiting and the procedure repeated until
there is no further improvement.
(The selection of the absorbent material
will be a function of the colour of the
unit and the acceptability or otherwise
of materials being trapped within
interstices in the surface.)
Organic growths
These are common where masonry is in
contact with damp soil, such as flower
boxes, retaining walls and in sunless spots.
Some control of organic growth can be
achieved by the use of water repellents or
clear sealers. Flower boxes and the rear
of brick retaining walls should be cement
rendered with waterproof mortar or covered
with heavy duty plastic sheeting to prevent
water seepage into the wall.
It is also advisable to render the top of these
walls or provide a brick coping, ensuring
that a good cross fall is provided to
shed water rapidly.
Removal techniques
for organic growths
As much growth as possible should be
removed by vigorous brushing with a bristle
brush. For heavy growth, scraping and wire
brushing may be necessary.
After this dry cleaning, apply a proprietary
weed killer or liquid chlorine that should be
left on the surface for several days. Brush off
and clean with hot water and detergent.
3. Steam cleaning with a hot 10 percent
sodium hydroxide solution may also be
used but there is a risk of bleaching.
4. A further method is to apply a poultice
of naphtha or trichloroethylene to the
stained area.
2. Apply to a depth of about 5 mm, and
leave on the wall for at least 24 hours
before hosing off.
20
Clay Masonry Cleaning Manual
20 / The Brick Cleaning Manual
Clay Masonry Cleaning Manual
The Brick Cleaning Manual / 21
21
Smoke stains
These stains vary from minor conditions
around domestic open fireplaces to major
problems of cleaning of face masonry in
fire-damaged buildings.
The following chemical treatments may be
supplemented by high-pressure water jet
cleaning to scour the many small crevices
on the masonry surface.
Removal techniques
for smoke stains
Minor stains
Minor stains can be removed readily with
sugar soap that is a highly alkaline mixture.
Mix about 500 grams into 2 litres of hot
water and apply liberally by brush. After the
stains disappear scrub with a mixture of
detergent and a household scouring powder
containing sodium hypochlorite.
Noskum or equivalent products are also
effective in smoke stain removal.
Smoke-damaged buildings
The problems in fire-damaged buildings are
usually complex, with widespread smoke
stains and localised severe staining where
highly-combustible materials have burnt.
General cleaning with Noskum or an
equivalent product after these applications
may complete the cleaning.
Note: The manufacturer’s instructions and
safety precautions must be followed when
a proprietary cleaning product such as
Noskum or its equivalent is used.
Severely-affected areas
These may require a poultice treatment:
1. Use an inert filler material such as
diatomaceous earth, mixed with
sodium hypochlorite (bleach) to form
a thick paste.
2. Apply to the stained areas by trowel or
steel float to a depth of 5 mm.
3. Leave on the wall 24 to 48 hours before
removal by hosing and scrubbing.
Soil and grime
Timber stains
Base courses of masonry are frequently
disfigured with splashing from adjacent
soil. These deposits should be removed as
soon as possible.
These usually arise from water
spreading tannin or resin stains on the
wall, particularly from hardwoods. The
stains are usually brown or grey and are
present on both bricks and mortar.
These stains arise from long-term airborne
deposition. Grime is worst in industrial
areas with heavy pollution problems.
Special cases can arise, for example from
bird fouling or proximity to railway lines.
Horizontal surfaces such as ledges, sills
and raked masonry joints are the worst
affected areas.
Removal techniques
for soil and grime
Scrubbing with a fibre or soft bronze bristle
brush and a liquid detergent is usually
effective. Steel wire brushes should not
be used, to avoid rust staining from
broken bristles.
Large jobs are usually carried out by
specialist cleaners using high-pressure
water and dry or wet sandblasting. Test
cleaning should be carried out before the
final cleaning technique is adopted.
Removal techniques
for timber stains
Normally timber stains will be removed by
scrubbing with a solution of 20-40 grams
oxalic acid per litre of hot water. Neutralise
the wall after this treatment.
Where the stain is not removed by this
solution, two other treatments can be
used. One is to apply a bleaching solution
containing sodium hypochlorite and allow
it to dry on the wall. The other treatment
is the same as that recommended for the
removal of acid burn given in this section.
Noskum or equivalent products have also
been found to be effective in removing
these stains.
Note: The manufacturer’s instructions and
safety precautions must be followed when
a proprietary cleaning product such as
Noskum or its equivalent.
An initial treatment with sugar soap will
remove some of the deposits. This can
be followed by an application of sodium
hypochlorite. The full strength chemical
should be left on the wall for about 10
minutes before scrubbing and hosing.
22
Clay Masonry Cleaning Manual
22 / The Brick Cleaning Manual
Clay Masonry Cleaning Manual
The Brick Cleaning Manual / 23
23
Removal techniques
for manganese stains
Manganese stains
A dark-blue brown discolouration may
occur on bricks that have been coloured
grey or brown by the addition of manganese
during manufacture. The stain occurs most
characteristically along the edges of the
brick and is generally caused by excessive
water penetration. In severe cases it may
show as a stain across the face of the brick.
Phosphoric acid
1. Mix 1 part phosphoric acid to
6 parts water.
2. Apply with brush or spray to dry wall.
3. Avoid splashing any adjoining
metal surfaces.
The problem with manganese staining is
not so much the removal of the stain, as
preventing its return in a short period by:
• Minimising water penetration into
brickwork by ensuring all mortar joints
are filled.
• Using ironed joints as they form a better
weather-shield than other types.
• Ensuring copings at the top of the wall
are effective.
• Covering all brickwork under construction
during periods of wet weather.
• Insertion of effective damp proof
membranes as brickwork progresses.
24
Clay Masonry Cleaning Manual
24 / The Brick Cleaning Manual
4. Reaction can take up to 24 hours
and more than one application may
be required.
Signs of manganese staining
Acetic acid
1. Mix 1 part acetic acid (80% stronger)
with 1 part hydrogen peroxide (30 to
35% concentration) with 6 parts water.
2. Apply with brush or spray to dry wall.
3. Avoid splashing any adjoining
metal surfaces.
4. Reaction should be almost immediate
however more than one application
may be required.
Clay Masonry Cleaning Manual
The Brick Cleaning Manual / 25
25
PO Box 370, Artarmon NSW 1570 Australia
Suite 3.02, Level 3, 44 Hampden Road Artarmon NSW 2064 Australia
Telephone +61 2 8448 5500 Technical hotline 1300 667 617
ABN 30003873309
www.thinkbrick.com.au
26
Clay Masonry Cleaning Manual


© Copyright 2026