
CCH Portal 2014.2 User Manual and Getting Started
CCH Portal 2014.2 User Manual and Getting Started Checklist Legal Notice Disclaimer Wolters Kluwer has made every effort to ensure the accuracy and completeness of this document. However, Wolters Kluwer, its staff and agents will not be liable for any errors or omissions and use of the software is subject to the customer’s licence with Wolters Kluwer. This document should not be relied upon as a detailed specification of the system or the software. Wolters Kluwer may make changes to these Release Notes from time to time. Copyright This document may not be copied, altered, edited, disposed of or distributed without the prior consent of Wolters Kluwer. The content is confidential. © 2014 Wolters Kluwer (UK) Limited Trademark Rights Microsoft, Windows, Windows NT, Windows for Workgroups, Windows 98, 2000, XP, MS-DOS, Windows Vista, Windows 7, Windows 8, Windows Server, Microsoft SQL Server, and Microsoft Office, are either registered trademarks or trademarks of Microsoft Corporation. Novell and NetWare are trademarks of Novell Inc. Citrix MetaFrame is a registered trademark or trademarks of Citrix Systems, Inc., All rights reserved. Wolters Kluwer 145 London Road Kingston upon Thames KT2 6SR UNITED KINGDOM CCH PORTAL 2014.2 USER MANUAL JULY 2014 2 Using this Guide This guide is designed to provide guidance on how to prepare for the introduction of a client portal to your practice, and describes the steps you need to undertake to get up and running with CCH Portal. It assumes that you are familiar with the Microsoft Windows environment, and can perform basic tasks within CCH Central. The guide does not include installation notes which are provided separately, and it assumes CCH Portal has been successfully installed. CCH PORTAL 2014.2 USER MANUAL JULY 2014 3 Table of Contents Legal Notice .......................................................................................................................................... 2 Using this Guide.................................................................................................................................... 3 Table of Contents ................................................................................................................................. 4 Why CCH Portal? ................................................................................................................................... 7 I - FOR PRACTICE USERS .................................................................................................................... 10 1. 2. 3. 4. 5. PREPARATION FOR PORTAL....................................................................................................... 10 1.1 Update client records and associated contacts ............................................................ 10 1.2 Review client team responsibilities ................................................................................ 10 1.3 Quick reference checklist to get started (FOR PRACTICE) ......................................... 12 1.4 Quick reference checklist to get started (FOR YOUR CLIENTS) ................................. 14 ACTIVATE AND CUSTOMISE PORTAL ........................................................................................ 15 2.1 Activate portal for Practice ............................................................................................. 15 2.2 Branding and customising portal ..................................................................................... 15 2.3 Set employee (Practice user) permissions ..................................................................... 19 2.4 Activate employees (Practice user) ................................................................................ 20 2.5 Set Client teams for Portal ............................................................................................... 21 CUSTOMISE TEMPLATES ............................................................................................................. 24 3.1 Email notification templates............................................................................................ 24 3.2 Message templates ............................................................................................................. 26 3.3 Document folders ............................................................................................................... 26 3.4 Homepage controls ............................................................................................................ 28 PERMISSIONS ................................................................................................................................ 32 4.1 Password complexity ......................................................................................................... 32 4.2 Client Activation ID ............................................................................................................ 32 4.3 Activation link expiry ........................................................................................................ 33 4.4 Re-sending activation link ................................................................................................ 33 ACTIVATE CLIENTS...................................................................................................................... 35 5.1 Prepare Your Clients .......................................................................................................... 35 5.2 Activate Individuals Clients and Associated contacts .................................................. 36 5.3 Activate Organisational Clients and Associated contacts ........................................... 37 5.4 Activating Clients ............................................................................................................... 39 5.5 Client portal indicator ....................................................................................................... 40 5.6 Client activation report .................................................................................................... 40 CCH PORTAL 2014.2 USER MANUAL JULY 2014 4 5.7 Client message centre view ............................................................................................. 41 5.8 Suspend / Disable and Delete a Client Portal ............................................................... 42 6. MESSAGING .................................................................................................................................. 46 6.1 Sending a message ............................................................................................................. 46 6.2 Client user segregation ..................................................................................................... 46 6.3 Saving Messages as Draft ................................................................................................... 48 6.4 Forwarding message .......................................................................................................... 49 6.5 Deleting Messages .............................................................................................................. 50 6.6 Using message templates with mail merge fields ........................................................ 50 6.7 Sending bulk messages ...................................................................................................... 52 6.8 Print Portal message conversations for filing ............................................................... 54 6.9 Spellchecker ........................................................................................................................ 55 6.10 New message popup notification..................................................................................... 56 6.11 Out of Office rules ............................................................................................................. 56 6.12 Time Zone Compatibility .................................................................................................. 58 7. DOCUMENTS................................................................................................................................. 59 7.1 Send message with document attachment .................................................................... 59 7.2 Document housekeeping ................................................................................................... 66 8. DOCUMENT APPROVALS ............................................................................................................. 70 8.1 Send documents for approval .......................................................................................... 70 8.2 Multiple approval for documents .................................................................................... 70 9. INTERNAL REVIEW OF DOCUMENTS AND MESSAGES .............................................................. 73 10. SEND PERSONAL TAX PAYMENTS REMINDER TO PORTAL .................................................. 76 10.1 View 2014 July payment report ....................................................................................... 76 10.2 Customise the message template.................................................................................... 76 10.3 Generate payment reminder merge to Portal message .............................................. 78 10.4 Sending to a single client.................................................................................................. 81 10.5 Sending to multiple clients............................................................................................... 82 11. PORTAL REPORTS ................................................................................................................... 83 11.1 Client Activation Report ................................................................................................... 83 11.2 Document Approval Status Report .................................................................................. 83 II - FOR YOUR CLIENTS....................................................................................................................... 85 12. 12.1 CLIENT ACTIVATION ............................................................................................................... 85 Client Activation ID (client code) .................................................................................... 85 CCH PORTAL 2014.2 USER MANUAL JULY 2014 5 12.2 Password set up and password reset .............................................................................. 86 12.3 Username and Remember Me .......................................................................................... 86 12.4 Client Personalisation ........................................................................................................ 87 12.5 Multiple portal access ....................................................................................................... 88 13. CLIENT MESSAGES AND EMAIL NOTIFICATIONS .................................................................. 89 13.1 Sending messages ............................................................................................................... 89 13.2 Email Notifications ............................................................................................................. 90 14. 14.1 15. CLIENT DOCUMENTS AND FOLDERS...................................................................................... 91 Viewing Documents ............................................................................................................ 91 CLIENT APPROVING AND REJECTING DOCUMENTS ............................................................ 92 CCH PORTAL 2014.2 USER MANUAL JULY 2014 6 Why CCH Portal? CCH Portal is simply a way of sharing files with your clients over the internet. There are many public file-sharing websites but, just like email, there are concerns about security and they are not appropriate for practices that want to exchange sensitive information with their clients. In addition to that, simply sharing documents isn’t quite enough. Most of the time you are sending documents to clients you’re seeking their approval (or rejection) for the documents; and you probably want to be able to see the status of all outstanding approval requests in real-time. CCH Portal is an easy to use electronic document exchange and communication application, designed to help you to work more closely with your clients. It provides a secure facility for personalised communications, document exchange and collaboration in the Cloud with your clients, while maintaining detailed records of those transactions in CCH Central with all your other client data. CCH Portal addresses the 3 key fundamentals a practice focuses on: Client care Quality control and risk management Profitability driven from practice efficiency CCH provides these via 6 value-added benefits to your practice and your client relationships: 1. Treats your clients as individuals CCH Portal handles personalised communications. Your clients will deal with your practice in a number of roles. For example, they might be the director of several different businesses and may also be a trustee, they might be a taxpayer in their own right but also the spouse or parent of another of your clients, and so on. Your client portal should allow you to communicate with that individual in each of these contexts, keeping the roles separate but without the complication and inconvenience of multiple logons. CCH Portal provides just one logon for every contact with a simple drop down to switch relationships. If there are a number of individuals involved with the same client (such as the directors, the company bookkeeper or the payroll clerk), you can send messages and documents either to ALL of them, or only a subset of that group, by simply selecting the recipients from a drop down list. With CCH Portal, you can be assured that only the recipients selected will receive the private message, private documents, and even individual approval requests. 2. Integrates fully into your day-to-day work It’s important for your client portal to be integrated fully into your day-to-day work. CCH Portal allos you to, for example, publish a tax return to the client portal. Publishing a document to Portal is as simple as printing it, especially when you use the standard message templates. CCH PORTAL 2014.2 USER MANUAL JULY 2014 7 Once published to Portal, you can check the status of files, for example, to find out whether a document has been approved, without having to leave CCH Central that you use to do your everyday work. CCH Portal sends you a message saying that the document has been approved or rejected, without you having to look for that information. 3. Works alongside your existing processes CCH Portal respects your practice’s standards and procedures. With CCH Portal you can easily do the following: Create a new message then save it as a draft to finish later Send a message to a colleague for review Review someone else’s message inbox (an improvement on email!) and forward messages for action See all portal communications in a single location on the client file 4. Provides a single, secure environment for communication CCH Portal handles files and messages in a single, secure environment. With increasing concerns about the security of email, your communications with your clients can take place within CCH Portal’s secure environment. A record of all those “conversations” are automatically incorporated into the client’s “file” on Central, so anyone with appropriate access in the client team has full visibility of what is happening, so improving client service. CCH Portal provides clear, personalised contextual messaging for your clients. Your client always knows what message relates to which document, without having to seek out the file. Replies are linked to the original message, and from a practice perspective, you have full visibility of the conversation with the client over the portal, together with links to relevant documents, all from the client file in the software. 5. Works for you and your clients 24/7 Most of your clients lead a busy life, and handle their financial matters outside of the working day. CCH Portal works for you and your clients 24/7. Documents and messages are not automatically removed or archived to save storage space. Everything is available for your clients to view 24/7 for as long as you keep them there. 6. Helps you present a professional image CCH Portal is hosted on a generic non-branded domain called clientspace.co.uk but with a subdomain prefix of your choice to reflect your practice’s branding, for example, ABClimited.clientspace.co.uk The look and feel can also be customised using CSS (cascading style sheets) in a way that it feels like it is part of your firm’s overall online presence. This is very easy to do using your practice’s own web design resources or CCH Software can provide this for you. CCH PORTAL 2014.2 USER MANUAL JULY 2014 8 For further information, please take a look at this short video http://play.buto.tv/ngBxn which explains why we have decided to use a secure portal to work more closely with our clients. This second short video http://play.buto.tv/j4Fvz shows you some of the key areas of our client portal. CCH PORTAL 2014.2 USER MANUAL JULY 2014 9 I - FOR PRACTICE USERS 1. PREPARATION FOR PORTAL 1.1 Update client records and associated contacts Certain data on the client portal will be populated from your Central database. Consider reviewing the following in advance of launching your portal to ensure they are correctly spelled and presented: Contact details (salutation, title, first name and last name) of any individuals likely to use the portal including individual clients and other likely associated portal users (see 5.2 below) Organisation names of clients (eg names of companies, trusts, partnerships etc) and other likely associated portal users (see 5.2 below) Employee details for those likely to be communicating with your clients over portal including employee names (first name and last name) and employee photos if you plan to personalise the communications Within each client record there is an “Associated” tab in which you can record any individuals and organisations associated with that client. Any individuals included in that list who have an email address are available to be selected as “Associated Portal Users”. You may wish to discuss with your organisational clients which individuals might wish to have access to the portal. Once agreed, you should ensure the associated contact record for that client in Central includes the names and email addresses for those individuals. If an individual has multiple relationships with the practice, maybe as director of several companies, and also in connection with their personal affairs, they can be provided with a single login which enables them to access all of those client portals. 1.2 Review client team responsibilities Within the client record, there is a “Responsibility” tab which can be used to record the various members of the client team. In the Maintenance area you will be able to set, both practice-wide and at client level, which of the employees listed in this Responsibility tab have access to the client’s portal. Employees so selected will be used to populate a drop down list which your client will see when deciding to whom in the practice to send a message and/or document from their client portal. You CCH PORTAL 2014.2 USER MANUAL JULY 2014 10 may therefore wish to review the employees listed on the client Responsibility tab to check they are up to date. By default the client partner will always be included in the list which your clients will be able to select from. 1.2.1 Engagement terms Working with your clients over a portal is likely to require a review of your engagement terms to ensure there is an appropriate understanding between you over this new form of communication and document sharing. 1.2.2 Security You may wish to edit and brand the security paper to send to any clients who might be interested. 1.2.3 Review Internal Processes Consider what changes you might need to make to your current internal processes to ensure the communications and service delivery continue to meet your practice’s high standards in quality and presentation. CCH PORTAL 2014.2 USER MANUAL JULY 2014 11 1.3 Quick reference checklist to get started (FOR PRACTICE) Step 1 Review Central records Review and update your client data, contact details, associated contacts, client team / employee data (names, details, photos), responsibilities Section 1.1 Step 2 Prepare Clients Review your engagement terms with your client Ensure they have internet access Update security paper Section 1.2 Step 3 Activate Portal for Your Practice Maintenance > Portal > Activation Section 2.1 Create the practice’s Portal in the Cloud by typing your practice name. Step 4 Customise Portal Login Page Maintenance > Portal > Branding Section 2.2 A facility for you to customise the look and feel of the portal site your clients will access. You can customise your Practice Name, Logo, Banner Colour and Footer. Step 5 Step 6 Activate Practice Employee as Portal User Maintenance > Portal > Security Set Portal User Permissions Maintenance >Security > Task Permissions Section 2.4 You need to activate all employees in your Practice that you wish to give access to client portal. Until an employee has been activated for portal use, they will not have any access to the practice’s portal facilities, regardless of what permissions have been set at security group level. Section 2.3 As with all the CCH suite, there are user permissions to set for your practice portal users to meet your internal requirements Step 7 Step 8 Set Practice Level Client Team for Portal Maintenance > Portal > Client Team Defaults Review and Customise Email Templates Maintenance > Portal > Email Templates CCH PORTAL 2014.2 USER MANUAL JULY 2014 Section 2.5 This enables you to define at practice level the default client team members who will be visible to your clients when they send a message from their portal. Section 3.1 These templates will generate automated notification emails to your clients to alert them to access their portal. 12 Step 9 Step 10 Step 11 Review and Customise Message Templates Maintenance > Portal > Message Templates Review and Customise Document Folders Maintenance > Portal > Document Folders Set Password Rules and Complexity Maintenance > Portal > Security Review and customise all default templates that are available to you. These will be used in sending secure messages to your client. Step 13 Section 3.3 The document folders on the client portal are where documents and files are uploaded to for action. You may wish to add to them to meet practice need. You can decide what level of complexity client access passwords should be in order to balance security with usability Step 12 Section 3.2 Section 4.1 Provide your client with an Activation ID Activation ID This has been set by default as the client code. Your client will need this to activate their portal access. The activation ID is the same for all users within the same Client. Section 4.2 Clients and Associated Contacts Client Record > Associated tab Section 5.1 For individual clients with no email address, an associated contact with an email address can be activated on portal For organisational clients, at least 1 associated contact with an email address must be available in order to activate portal Step 14 Activate Portal for Individual Clients Client Record > Message Centre > Enable Access to Portal Section 5 Activating a client on portal will send them an automated email message with a link to activate their portal. This link will take your client to the activation page where they will be asked to enter their activation ID. To complete this process, they will also be asked to create a password. Next time your client returns to the Portal, they will be able to login using this password. Your client’s username is their email address. CCH PORTAL 2014.2 USER MANUAL JULY 2014 13 1.4 Quick reference checklist to get started (FOR YOUR CLIENTS) Step 1 Provide revised terms and conditions to the client Step 2 Check client has a valid email address This has to be the “EMAIL” field in CCH Central > Client record > Addresses tab > Email in the dropdown list Step 3 Send the client the Activation ID to use The activation ID is the same for all users within the same Client Step 4 Confirm to the client that portal username is the client user’s own email address Step 5 Inform client of the minimum password requirements This is configured in Maintenance > Portal > Security Step 6 Advise client that repeated attempts to login with incorrect password will lock the client portal for 15 mins The number of attempts can be configured in Maintenance > Portal > Security Step 7 Activate Portal in CCH Central This sends Activation email to your client with activation link Step 8 Check regularly until Resend Activation email in Client record > Message Centre tab is greyed out This means that client has activated. Step 8 Establish why client has not activated portal Step 9 Resend Activation ID is necessary Step 10 Start using Portal for communications with the client Step 11 Make staff aware that portal should be used for communications with the client CCH PORTAL 2014.2 USER MANUAL JULY 2014 This can be done in CCH Central within Client record > Message Centre tab > Resend Activation hyperlink 14 2. ACTIVATE AND CUSTOMISE PORTAL 2.1 Activate portal for Practice To activate your practice Portal, select Maintenance > Portal > Activation, and type your practice name in the box called “Portal Name” and click Activate. This process cannot be reversed. This process only needs to be undertaken once on your Central database. In the unusual event you have more than one Central database, please contact CCH for advice on how to proceed. Practice Activation creates the secure portal website which your clients and associated portal users will access. The domain name of the website will appear as follows:https://[yourpracticename].clientspace.co.uk We recommend practices use the same domain name as their main website for consistency. In keeping with domain name conventions, spaces and special characters are not permitted. To find your practice portal domain URL, you can re-visit select Maintenance > Portal > Activation and find the link to your portal. 2.2 Branding and customising portal Select Maintenance > Portal > Branding to customise the portal which your client will see. CCH PORTAL 2014.2 USER MANUAL JULY 2014 15 2.2.1 Basic Customisation Update all four fields in the basic customisation screen: Practice Name is used in a number of the email templates in notifications to your clients so you should include here your practice name as you would wish it to appear to them in such communications, as well as on the client portal itself. Portal footer might be used either for the practice’s promotional strapline or a copyright message. Banner Colour enables you to customise the colour on the banner header on the login page and portal which the client sees. You have access to the usual colour palette by clicking the . If you want to use the custom colour palette, click Define Custom Colours and select your chosen colour, clicking Add to Custom Colours when you have the required colour. For lighter shades use the hue slider. Hue slider Practice Logo enables you to upload your practice logo from a .jpg file. Click Browse and select the relevant logo file. Click OK to save changes and exit. You can return to the branding area to make amendments at any time. CCH PORTAL 2014.2 USER MANUAL JULY 2014 16 2.2.2 Advanced Customisation Full Cascading Style Sheet (“CSS”) customisation is available from the Branding screen in Maintenance > Portal > Branding by clicking on the Advanced button. The CSS is auto-populated with the data entered on the basic branding screen but can be overriden from the advanced screen. CSS can be imported via the Browse button, while Reset will enable you to revert to the basic settings. Here are a few examples on how you can edit the CSS to make changes to the appearance of your portal site: To change the font colour of the text in the top right corner of the login and message centre pages; select Insert then select “Practice name colour”: Where it says “[insert color]” type in your chosen colour replacing the entire “[insert color]” (including the square brackets): CCH PORTAL 2014.2 USER MANUAL JULY 2014 17 To activate the customised CSS, click Overwrite basic settings and OK: To review the site, select Maintenance > Portal > Activation and click on the hyperlink to your client portal. 2.2.3 “How-to” client portal video A short, unbranded video has been created to explain some basic steps on how to use the client portal. If you would like to embed this into your client portal activation and login pages to help your clients, tick the appropriate boxes in Maintenance > Portal > Branding. CCH PORTAL 2014.2 USER MANUAL JULY 2014 18 You can view and download this video and other helpful information on getting started with CCH Portal at http://www.cch.co.uk/softwaresupport/2011/product_news/PORTAL.asp 2.2.4 Auto-sending a welcome message You can edit the Welcome message template in Maintenance > Portal > Message Templates however, this template cannot be deleted as it’s a system message template. You can send a standard welcome message to all clients upon activating their portal account. This can be sent immediately as soon as the portal account has been created, without further input from someone in the practice. Alternatively, it can be created and saved as a draft, to be personalised by someone in the practice before sending. Both options are set from Maintenance > Portal > Branding The default setting above will not automatically create a welcome message on activation. To create a draft welcome message, tick the box “Prompt to send welcome message on activation”. This will use the Welcome message template to create a draft welcome message for you to personalise and send to your clients as appropriate. To send the message automatically, without creating a draft for further editing and personalisation, untick the “Save welcome message as draft” option. 2.3 Set employee (Practice user) permissions User permissions can be found in Maintenance > Security > Task Permissions CCH PORTAL 2014.2 USER MANUAL JULY 2014 19 Select Portal from the Product drop down then, for each security group you have created within the practice, review and allow permissions as appropriate by ticking the relevant box. Select OK to save changes. 2.4 Activate employees (Practice user) Once you have set up the user permissions for your practice, you will need to activate your employees as portal users to give them actual access to communicate with the client portal. This can be done either one at a time, or by batch, using the search and sort facility in the Employees area. In order to select the employee(s) you wish to activate, enter a tick in the box at the left hand end of the search list then click on the Activate Portal button on the task bar. CCH PORTAL 2014.2 USER MANUAL JULY 2014 20 2.4.1 Employee profile pictures Practice users (employees) can add profile photos in Employees > [Employee] > Person, reverseclick > Add Photo. Practice users (employees) can add a profile picture which will be visible to your Clients when they are messaging with the Practice users. This profile photo can be added before or after employee activation at any time and the changes will be reflected to the client portal pages. To upload photos of your employees into their Central record, open each individual’s employee record, select the Personal tab, and right click to Add Photo. 2.5 Set Client teams for Portal Employees can be added to the Portal Client Team on an individual basis via the Message Centre > Client Team. Alternatively, they can be added on a practice-wide basis, according to their Assignment Team Responsibility type via Maintenance > Portal > Client Team Defaults. 2.5.1 Setting client team at practice level Set responsibility types within each client team from Maintenance > Portal > Client team defaults. These settings replicate those that are set in Maintenance > Internal > Responsibility Types. It is possible to define, at practice level, the responsibility types within each client team which will be communicated with the client over their portal. If you would like an employee from a particular responsibility type to be visible to a client on the portal (for instance the Assignment Manager, where they are present on the client record), ensure CCH PORTAL 2014.2 USER MANUAL JULY 2014 21 there is a tick in the box on Maintenance > Portal > Client Team defaults against that responsibility type. If you do not want a particular responsibility type to appear, ensure that type is unticked. Click OK to save the settings. Where in the client record there is an employee listed against a responsibility type selected in Client Team defaults, then that employee’s name will appear in the drop down list available to individuals accessing the client portal when they are preparing to send a message or document to the practice. Please note the client partner is automatically included in the default client team at practice level and their name will also appear in the drop down list. At least one Central employee must be a member of the Portal client team. If a Central user attempts to remove the only member of a client's Portal client team, a warning message is shown, preventing the only member being removed - enforcing the requirement that the client has at least one contact to send a Portal message to. Employees with more than one Responsibility Type If an employee is listed under more than Responsibility Type for a client but only one of those Types had been set as active within the Client Team defaults for Portal, they will still be added to the Client Team. Employees that are members of an Assignment Team The Assignment Team is located within the client record - Assignments > [Assignment Name] > Main. Employees that are members of an Assignment Team of client's Assignments can be added to the Portal Client Team. Clients are restricted to sending Portal messages to members of the Portal Client Team only. CCH PORTAL 2014.2 USER MANUAL JULY 2014 22 2.5.2 Setting client team at client level For special client assignments, or where the client relationship is managed differently from the practice norm, it is also possible to set the client team for portal purposes at client level. Once a client has portal access enabled, a client team hyperlink is created in the client Message Centre. If you click the hyperlink, you will be presented with a client team portal user screen which is populated from the complete list of employees included in the responsibility tab on the client record. From here you can tick and untick individuals who you wish the client to be able to communicate with directly from their portal. Any such changes will impact only this client. CCH PORTAL 2014.2 USER MANUAL JULY 2014 23 3. CUSTOMISE TEMPLATES 3.1 Email notification templates For each automated email there is an email template which can be found in Maintenance > Portal > Email templates. When a message or document is placed on the client portal (“Publish to Portal”), an automated email notification is sent to any portal users linked to that client, so they know to access the portal to review the communications sent. (See section 1.1 for further explanation on associated portal users). There are currently 8 such templates as follows: Portal activation: notification to an individual asking them to complete the activation process Message notification: general notification that a new message awaits them on the portal Reset password: notification of a temporary password when a user has clicked “Forgot my password” Notification that portal access has been re-enabled: where access has been suspended by the practice Portal activation for an “associated portal user”: notification asking them to complete the activation process Notification to an existing portal user that they now have access to an additional client portal (eg a director who has portal access in respect of his personal affairs gains access to his company’s portal in addition) Notification of new access rights: When an existing user is given new access rights Disabled Portal user: When a portal user has been disabled To review any of the templates, double click anywhere on the relevant template line. This opens up a text editor which enables you to edit the Email Subject, which will appear in the subject line of the email, as well as the body of the text. In the blue area on the left, you will see a number of merge fields which are available to drop into the text to automate client names, links to the portal login area and so on. CCH PORTAL 2014.2 USER MANUAL JULY 2014 24 To add such a field, single click in the location where you wish to place the merge field, then click on the relevant merge field button – click to add the field into the main text, reverse click to add it into the Email Subject. The merge fields are defined as follows:Activation Link First Name Provides a hyperlink to the new portal user to click on to start the secure activation process Enters the first name included in the Amend Contact Last Name Name area which can be accessed by clicking the next to the contact name in their Central record Enters the last name included in the Amend Contact Organisation Name Portal Homepage Link Practice Name Salutation Temporary Password Title Name area which can be accessed by clicking the next to the contact name in their Central record Enters the name of the organisation as it is written in the “Main” field in the Amend Client Name area which can be accessed by clicking the next to the client name in their Central record Provides a hyperlink to the login page of your firm’s client portal Inserts your practice name in line with the Practice Name entered in the Branding area Enters the contents of the Salutation field from the Main tab in the contact’s Central record Including this field in a message will automatically add in a computer generated password to deliver to a portal user who has clicked the “forgotten password” option on the login page Enters the title included in the Amend Contact Name area which can be accessed by clicking the contact name in their Central record next to the You can also edit the text font, size and colour from this area to suit your Practice branding. CCH PORTAL 2014.2 USER MANUAL JULY 2014 25 3.2 Message templates Portal message templates can be created and edited in Maintenance > Portal > Message templates. Portal allows Practice to communicate with its Clients securely and the Portal messaging system is key to this communication. Some message templates have been set up to record accounting dates, indicated by square brackets. While some may be dynamically linked from the compliance software, you can add square brackets into any templates where you wish additional data to be inserted. The software will sense check for remaining square brackets and alert to you amend the message before sending it. All message templates can be customised to your Practice’s needs. “System” message templates cannot be deleted such as a Welcome Message template. There are currently 6 message templates as follows: Accounts: Accounts for the year ended [insert year] Accounts and Corporation Tax Return: Accounts and Corporation tax for the year ended [insert year] Accounts and Personal Tax Return: Accounts and tax for the year ended [insert year] Corporation Tax Return: Corporation tax for the year ended [insert year] Personal Tax Return: Personal tax return for the year ended [insert year] Welcome: Welcome to the [[Practice Name]] client portal 3.3 Document folders 3.3.1 Standard folders within CCH Portal When either you or your client uploads documents to the client portal, they can be located in a specific “Documents” area in Central which is grouped into document folders. When CCH Portal is installed and activated, the following default folders are created automatically: Accounts Correspondence Tax Shared CCH PORTAL 2014.2 USER MANUAL JULY 2014 26 The Shared folder is a temporary folder area to which you can upload files and documents you do not wish to remain on the portal long term. This is also the area where documents and files uploaded by clients and associated portal users will be saved. You can then decide whether to move that document or file to a different folder on the portal for your client to continue to access or to save it in your practice document management or other filing area and remove it from the portal. When documents are published directly from CCH Accounts Production they will automatically be saved to the relevant year in the Accounts folder. Likewise publishing to portal from CCH Personal Tax or CCH Corporation Tax will be saved in the Tax folder. Where the relevant year does not yet exist on the portal, the appropriate year will be added automatically. You will also be able to save other documents or files to any of these folders from the client record. Aside from the Shared folder, no other folders will appear on the client portal until documents are added to them. This means a tax client will not see an Accounts folder unless a document or file is expressly delivered to that folder. Folders on Portal appear in alphabetical order, irrespective of the order in which they are added. This is the same when attaching documents in Central. 3.3.2 Creating additional folders To create additional folders, or to review the existing folder structure, select Maintenance > Portal > Document folders. Document folders for Portal files can be configured in Maintenance > Portal > Document Folders Portal is shipped with “system” folders which are Accounts, Correspondence, Tax and Shared. Nonyear sub-folders can also be created under these system folders. New main folders can also be created by the practice, with further sub-folders under them if required. As a default, 4 tiers of subfolders can be created, for example, Permanent > Assets > Property > 10 High Street CCH PORTAL 2014.2 USER MANUAL JULY 2014 27 The number of tiers that can be created is configured by the Practice within Maintenance > User Defined > Configuration > Portal_DocumentFolderMaxLayers There is no limit to how many layers of subfolders that can be created this way. Folder and subfolder names can include letters, numbers, spaces, forward slash “/”, hyphen “-“ but no other special characters. Folder names can be a maximum of 100 characters. Folder names cannot begin with a forward slash or a hyphen. Folders and subfolders are Practice configured and are viewable by the client in the client Portal, when there are documents posted to those folders. Client Portal users cannot make changes to the folder structure created by the Practice. 3.4 Homepage controls 3.4.1 Setting up your home page control There is a home page control to enable you to see what messages have been sent to you by your clients over the portal. To set this up, click Home in Central then select a View screen in which you wish the home page control to reside. Select Customise homepage. CCH PORTAL 2014.2 USER MANUAL JULY 2014 28 Select Portal > Messages and drag and drop the Messages icon onto the main view area. Resize as necessary. Messages Homepage control positioning You can re-position the Messages homepage control by click-and-dragging the compass icon when in Home > Task Bar > Customise homepage mode: 3.4.2 Working with your home page control New messages sent to you will appear in your home page control in bold until you click on them. Once you have dealt with the contents of the message you can right click on the message and select “Delete”. This does not delete the message from Central or the portal, just from the home page. Should you wish to refer back to the message, go to the client message centre to select it. The home page message list can be sorted in line with Central convention by dragging any of the column headings up to the head of the page to group by that column. This enables you to sort by client, date or subject easily. Each message in the home page control will incorporate the client code which is hyperlinked to the client record in Central. Click on the blue client code field to access the client record in detail. You can reply to any messages (including adding further comment to messages you have sent) by clicking the blue reply button in the top right hand corner of the messages home page control. 3.4.3 Viewing another’s home page control With the appropriate permissions set, you can view another colleague’s portal home page control by clicking the ellipsis next to the name at the foot of the home page control and selecting the alternate employee. 3.4.4 Message Tracker Message Tracker is located via Home > Task Bar > Customise Homepage > Portal Message Diagnostics. CCH PORTAL 2014.2 USER MANUAL JULY 2014 29 Message Tracker is a portal message diagnostics homepage control, which helps you see the status of all messages sent and received via Portal. These are indicated via a traffic lights system as follows: Green: All published system messages that have been successfully received and sent to Portal Blue: Messages that are yet to receive a reply from Portal Grey: In the event that the Portal message service is not running, the message tracker records any unsent messages with a grey circle. When there are messages in the list which are grey, this is an indication that the portal message service may need to be restarted. After the portal message service has been restarted, these messages should turn to green circles. Red: An exception has occurred while sending the notification/message, either on CCh Central or client Portal and the message has not been sent. 3.4.5 Message Centre The homepage control can be added from Home > Task Bar > Customise homepage > Messages In every Client record, there is a tab called Message Centre. This is for portal activity. Before a client has been activated to use portal, the Message Centre will only display a link to activate the client portal (see section 5) Once a client is activated for Portal from Central, the Message Centre will show a holding page with a message indicating that an activation email has been sent to the client or their associated contacts. Only when these activation emails have been successfully despatched will the normal Message Centre be shown to enable the practice user to send messages. CCH PORTAL 2014.2 USER MANUAL JULY 2014 30 In the unlikely event that the activation email fails, the screen will revert back to the original activation window, so that the user can activate the client again. Please contact CCH Software Support for further assistance if the holding page remains static and only shows the activation email message. After the client’s activation, the Message Centre will display the messages in conversation style in chronological order, with the most recent at the top. Completed messages in the Message Centre can be deleted by right clicking on the message and selecting Delete Completed option. Text in the message body in the Message Centre can be copied to clipboard for use in other applications. CCH PORTAL 2014.2 USER MANUAL JULY 2014 31 4. PERMISSIONS 4.1 Password complexity The password algorithm can be set in Maintenance > Portal > Security. The default password complexity requires that portal users create password of at least 6 characters in length and with at least one number. CCH Portal enables you to decide how complex passwords should be for non-practice users accessing the client portal. This enables you to set a minimum password length (we recommend at least 6 or more characters) and the minimum number of uppercase and lowercase letters, numbers and “special characters” (listed in the right hand box). Use the up and down arrows on each selection to increase or decrease the numbers and click OK to save changes. The security settings can be altered by the practice at any time, with any such changes impacting any new passwords set. The more complex a password is in terms of length and different character types the more secure the password will be. However, you will need to balance complexity with the need for your clients to be able to remember the password. In the event that a portal user forgets their password, they can click on the Forgot Password link on the portal login page. This will send them a temporary password by email, which will have to be changed on first visit. No portal user passwords are stored within Central for security reasons. 4.2 Client Activation ID CCH PORTAL 2014.2 USER MANUAL JULY 2014 32 The portal activation ID is the client code in Central for the client portal you plan to activate. For an organisation, the client code will be that of the organisation, not the individual, where the organisational client’s portal access is enabled before enabling access to the individual’s own portal reflecting their personal affairs. We recommend this activation code is provided to clients separately from any other communication about the portal for security purposes. 4.3 Activation link expiry The configuration of the expiry time is located within Maintenance > Portal > Security. When you activate your Clients’ portal access (see section 5) your client / associated contacts will receive a Portal activation email which will include a link to activate their Portal account. You can set this activation link to expire between 1 and 50 days from when an activation email is issued. 4.4 Re-sending activation link The activation link sent to clients is designed to time out for security purposes. In the event that they fail to activate their account within this time period, you can resend the automated activation email for clients and associated contacts activated for Portal. For clients that are individuals, the option to resend the activation email is located within the client Message Centre: CCH PORTAL 2014.2 USER MANUAL JULY 2014 33 For contacts that are associated to organisations, the option to resend the activation email is located by right-clicking the relevant contact within the Associated Contacts window in the client Message Centre: Links in previous activation emails become void when one is resent. CCH PORTAL 2014.2 USER MANUAL JULY 2014 34 5. ACTIVATE CLIENTS 5.1 Prepare Your Clients 5.1.1 Check email addresses and internet access Add/edit the primary email address in the client record via Addresses > Phone and other details. As you would expect for any cloud-based software, your client will need to have internet access to work with you over a client portal. They will also need an up to date internet browser (we support Internet Explorer 8 and later, together with recent versions of Chrome, Firefox and Safari). Your client’s email address will form their username for portal, and they will be notified to that email address of any new messages or documents awaiting their attention on the portal. It is therefore most important that the primary email address you have on record in CCH Central for them is correct. Organisations can have the same email addresses as their associated contacts It is possible for Central clients (organisations only) to have the same email address as their associated contacts, since the organisation's primary email address has no bearing on Portal - unique email addresses are only required for the login credentials for individuals. When you have a non-client contact as an associated portal user, in the event their email address changes, the change will reflect in portal (and hence their portal username) when updated in the Addresses tab in CCH Central. 5.1.2 Agree with any organisational clients who might require access Where you have relationships with a number of individuals in an organisation, each of them can have personal access to the portal for that organisation. You may therefore wish to agree with them from the outset who might wish to have this access. Once agreed, you should check all the individuals are included in the organisational client record as associated contacts with valid email addresses, or update the Central record accordingly. When messages and documents are sent to a client via Portal, they are sent to one or more of the associated contacts, therefore, not all messages and documents on the portal are available to view by all associated contacts of a client. CCH PORTAL 2014.2 USER MANUAL JULY 2014 35 5.2 Activate Individuals Clients and Associated contacts To activate an individual client, go to Client record in CCH Central and navigate to the Message Centre tab. Before a client has been activated to use portal, the Message Centre will only display a link to activate the client portal (see section 5) Click on this link to activate client portal. Once a client is activated for Portal from Central, the Message Centre will show a holding page with a message indicating that an activation email has been sent to the client or their associated contacts. Only when these activation emails have been successfully despatched will the normal Message Centre be shown to enable the practice user to send messages. Individuals, supporting clients where spouses, parents, carers or professional advisers wish to collaborate with you over the portal, can activate associated contacts to collaborate with you over a client’s portal for organisations. As with organisations, you can add and remove associated contacts via the Associated Contacts hyperlink in the client’s message centre. CCH PORTAL 2014.2 USER MANUAL JULY 2014 36 It is possible to create a portal for a client where the only user is an associated contact (eg where the client is a minor and you are dealing with their parent) using the same associated contacts screen to select the appropriate individuals. 5.3 Activate Organisational Clients and Associated contacts The process of activating an organisational client is the same as that of an individual client. The only difference is for organisations, you will need not only need to activate the organisational client’s portal, but also the users who will have access to it (eg the directors); the associated contacts. The users will be enabled by way of using the functionality of the Associated tab. Before setting up an organisational portal, therefore, please ensure that any anticipated users of the organisation’s client portal are listed in the Associated tab, and that they have current valid email addresses. CCH PORTAL 2014.2 USER MANUAL JULY 2014 37 As before, click on the organisational client’s message tab, then click “Enable access to Portal”. A list of associated contacts, together with their email addresses will appear. Tick the individuals you wish to have access to the client portal (minimum 1) and click OK. You will be able to view who has been given portal access from the Associated Contacts hyperlink in the Message Centre. Portal access can be enabled and disabled for associated contacts from this screen by ticking and unticking the relevant Portal User box. Each portal requires at least one client portal user with whom the practice can communicate. CCH PORTAL 2014.2 USER MANUAL JULY 2014 38 However, all associated contacts can be deactivated on the Portal for an organisational client. Where a replacement user is to be added, activate the alternate user before removing the “retiring” user. USEFUL TIP Ensure you have provided your client with an activation ID prior to enabling the portal account. Activation ID is the same as the client code in CCH Central. However, activation ID is NOT the client’s portal username. Portal username for clients is the email address of each associated contact. 5.4 Activating Clients Select the client’s Message Centre tab. If no portal has previously been set up for this client, click the blue hyperlink to enable access. You will be asked to confirm you wish to proceed, with a reminder of the email address being used for this purpose. When you have enabled the portal access, your client will automatically receive an email message including an activation link. Your client must click on this link, reach the activation page and enter their activation ID to activate their portal account. Activation ID is the same as client code in CCH Central. Please note, for an organisation, the code will be that of the organisation, not the individual, where the organisational client’s portal access is enabled before enabling access to the individual’s own portal reflecting their personal affairs. We recommend this activation code is provided to them separately from any other communication about the portal for security purposes. At this stage, they will be asked to set a password to be able to login securely. The activation ID will NOT be needed again after this point. Your client’s username is the same as their email address in their CCH Central account. CCH PORTAL 2014.2 USER MANUAL JULY 2014 39 As soon as your client has activated their portal account, they will be greeted with your customised Welcome Message in their Messages area, assuming you have selected to send the welcome messages to new portal accounts (see section 2.2 Branding) 5.5 Client portal indicator You can identify clients with portals from the client find screen. Please note this indicator reflects portals activated by your practice; NOT where client users have activated their login. 5.6 Client activation report You can generate a report of activated portal users from within Smart Reports under Client > Portal clients. To create a new report, Click Create and drag the relevant fields onto the report as follows: Client Code Client Name PortalDisplayName (returns the name of each portal user against that client) PortalEmail (returns the email of that portal user) IsActivated (returns True or False against each user to indicate whether they have activated from the link in the activation email) Once created, click Save to name and save the report for future use. As with all Smart reports, you can edit the look of the report using the Edit and Edit in designer functions. CCH PORTAL 2014.2 USER MANUAL JULY 2014 40 5.7 Client message centre view When portal access has been enabled the Message Centre view changes to the following:- As messages are exchanged with your client, the list of messages will appear in a table on the left, which can then be previewed in the right-hand panel. This area also contains hyperlinks as follows:Create message – clicking here opens up a message box where you can prepare a message for your client, including uploading files for them. Click OK when your message is complete and the message will be sent to their portal, while an email notification is sent to their email address advising them to check their portal, incorporating a link to the login page Documents - enables you, to see what documents have been published to the client’s portal in their folder structure, to move them around between folders and to download and delete them. Client team – details the client team the client will be able to send messages to from their portal. This screen also enables you at client level who the client can send a message to from their portal. Simply tick or untick the box next to the employee name to select and deselect. Disable Portal account – enables you to suspend portal access. This will suspend access to that portal for all client users, while retaining read-only access to its contents from CCH Central. The client’s Central file is clearly marked to show the portal account has been suspended. Note that even where a portal is destroyed in the Cloud, the communications and files will remain accessible to the practice through Central. CCH PORTAL 2014.2 USER MANUAL JULY 2014 41 5.8 Suspend / Disable and Delete a Client Portal The option to disable (and then delete) a portal client's account is located within the client record via Message Centre > Disable Portal account. As a practice, you can suspend / disable a client’s portal account for any reason (for instance where fees are unpaid) which disables their access to portal. The Message Centre will be clearly marked as suspended. Suspended accounts can be re-activated at any time by your Practice, by clicking on the relevant hyperlink, where upon an email will be sent to any portal users of that account advising that the account has been reactivated CCH PORTAL 2014.2 USER MANUAL JULY 2014 42 The message which your client will see on trying to log in can be set in Maintenance > Portal > Security by changing the Client Suspension Login Message Where a portal user has access to more than one client portal, when they log in they will not be able to access or see suspended portals, but they will continue to be able to access portals which remain active. You can delete the client’s portal account which removes the portal account permanently. When portal accounts are suspended or deleted, no messages can be sent or deleted by client or practice users for that client portal. You will still be able to view the Message Centre in Central. Even after deletion, the practice retains access to the messages and documents which were previously available on the client portal. If a contact is associated with an active client Portal, this contact cannot be deleted. An error message is displayed when trying to delete such contacts, with a list of clients that are associated with the selected contact. A similar error is displayed in the case of merging a contact with another contact/client where the first contact is deleted as a result. If that contact is an active Portal user, the error message will prevent it from being merged with the second contact until the Portal connection is removed. CCH PORTAL 2014.2 USER MANUAL JULY 2014 43 5.8.1 Closing clients that have had a portal account It is possible to close a Central client if they have previously been activated for Portal. This can be done only after the client's portal account has been suspended or deleted. Before a client can be marked as closed in CCH Central, the client portal must be suspended or deleted. If you try to close a client without suspending the portal, an error message will be shown. If you suspend the portal, you can close the client without further action with the portal. The ability to close a Central client is located within the client record via Main > Task Bar > Client Status > Close client If you plan to delete the portal for that client, any documents held in the Shared folder must be deleted by the practice or moved to one of the folders other than shared if the practice wishes the tracker documents to be retained. This is to ensure the client file is preserved for Practice Assurance purposes even after the cloud-based portal is destroyed. If you try to close a client or delete a client portal when there are documents still held in the Shared folder, an error message will be shown. If a contact is associated with an active client Portal, this contact can no longer be deleted. An error message is displayed when trying to delete such contacts, with a list of clients that are associated with the selected contact. CCH PORTAL 2014.2 USER MANUAL JULY 2014 44 5.8.2 Restriction on Deleting Only Portal Associated User Each portal requires at least one client portal user “associated contact” with whom the practice can communicate. All associated contacts can be deactivated on the Portal for an organisational client. Where a replacement user is to be added, it’s recommended to activate the alternative user before “retiring” the existing user. Disabling an individual's personal Portal account does not prevent their access to their associated accounts. CCH PORTAL 2014.2 USER MANUAL JULY 2014 45 6. MESSAGING 6.1 Sending a message In order to send a message to your client, click on the Message Centre tab in their record, and click the blue “Create Message” hyperlink. A popup window will appear enabling you to enter a message title, a message copy either by typing the text yourself, or selecting a readily available message template, attach documents, select reviewers and request approvals (see further sections for details). If you click OK the message is sent to the portal, and the client will be sent an automated email notification. 6.2 Client user segregation Where a client portal has more than one portal user, having activated associated contacts, you can limit visibility of certain messages and associated documents to particular users. Such segregation might apply to documents which only the company directors should see or for operational communications where not all parties need to see all correspondence. From a practice view point, the “To” field in the new message screen has a dropdown list populated with activated associated contacts for the selected client: CCH PORTAL 2014.2 USER MANUAL JULY 2014 46 Only those selected client contacts will see the messages, and any associated documents either in the portal Message Centre or the Documents area. If you are sending documents for client approval, you will be able to select portal users from the associated contacts list for that client and only those you selected will see that message and its attachments. From your client’s viewpoint, when creating a new message they will be given the option to send a message to one practice employee and all or some of the associated contacts. If you are sending documents for client approval, you will only be able to select portal users who are in the To list to approve documents. From your client’s viewpoint, when creating a new message they will be given the option to send a message to one practice employee and all or some of the associated contacts. CCH PORTAL 2014.2 USER MANUAL JULY 2014 47 Both in Central and the portal, you can see who has been sent the message and associated documents from information in the To field. 6.3 Saving Messages as Draft You can cancel the message and save it as draft, and re-open a saved message from the Message Centre, clearly marked as Draft. a Once saved, drafts can be re-opened from the Message Centre in the Message List. They can be edited further, sent to Portal, or deleted. A draft message also appears in the Messages homepage control, where the user can double-click on the message, or right-click and select 'Edit and send draft to Portal', to edit/send the message from the Edit Message window. CCH PORTAL 2014.2 USER MANUAL JULY 2014 48 There is a task permission which restricts whether Central users (other than the original message creator) can delete draft messages from the Message Centre. Portal task permissions are located in the Product dropdown menu within Maintenance > Security > Task Permissions. 6.4 Forwarding message It is possible to forward the message to another Practice user (employee) by right clicking against messages in that home page control. CCH PORTAL 2014.2 USER MANUAL JULY 2014 49 It is also possible to forward a portal message task to an employee who has not been activated as a portal user. They will receive the task in their tasks home page control (assuming used by your practice), but cannot read or action the message. Solutions to this are to activate all employees as portal users, with access to the Portal Message Home Page control, or ensure messages are not forwarded to employees not using the portal. 6.5 Deleting Messages When messages and conversations are deleted from Portal, local copies are retained in the Central Message Centre to preserve the integrity of the client file. When the user chooses to have them shown, deleted conversations are denoted by line strikethroughs in the Message List. They appear in their original order, with each deleted constituent message or entire conversation also depicted with a yellow border. Deleted messages can be previewed by ticking 'Show Deleted Messages' at the bottom of Message Centre. 6.6 Using message templates with mail merge fields You can create, edit, and delete templates in Maintenance > Portal > Message Templates. Templates with mail merge fields can be designed, edited, and inserted into portal messages in Central. You can create, edit, and delete templates, as well as use the six pre-populated default templates. CCH PORTAL 2014.2 USER MANUAL JULY 2014 50 Practice users can double-click on existing template to edit the content in a new window. The merge fields on the left will insert data from your Central database dynamically. To add one of these fields into the body of your message template, click the location in the body of the text where you wish to insert the field, then click on the relevant merge field to insert it. In the Portal Create Message window, users can select 'Insert Template' to insert the required template, which will also draw through the mail merge fields. Users can continue to edit the message once the template has been inserted. CCH PORTAL 2014.2 USER MANUAL JULY 2014 51 A task permission is available in the Product dropdown menu within Maintenance > Security > Task Permissions to control Central users' ability to edit existing Message Templates. 6.7 Sending bulk messages If you want to send the same message to a number of clients, you can do this from the Find Clients screen. Use the check box next to the relevant clients’ names then select the Create Message option from the Portal area of the task bar. USEFUL TIP You might find this facility useful to send a welcome message to a number of clients you have set up to use the new portal service, or maybe to deliver some interesting generic information to them such as a newsletter or other technical update CCH PORTAL 2014.2 USER MANUAL JULY 2014 52 You are then presented with a new Portal message screen. When more than one client is selected in the clients search list, clicking the Portal create message link displays the Portal message window as usual, with the only difference that the “to” field is no longer visible and the message will be sent to all associated contacts that are activated on Portal. Therefore, specific recipients cannot be selected when sending bulk Portal messages. In addition, when sending a bulk Portal message, client-specific documents will not be available to attach to the message. Bulk messages can be used, for example, for sending marketing messages, newsletters, e-bulletins and so on. CCH PORTAL 2014.2 USER MANUAL JULY 2014 53 Warning for Central user attempting to send bulk message to non-Portal clients Practice users will be warned if they select non-Portal clients (as well as Portal clients) from the Find Clients screen and attempt to send a bulk Portal message. After the warning message has shown, the non-Portal clients are automatically removed from the recipient list in the 'New Message' window, where the message can be sent to the Portal clients only. 6.8 Print Portal message conversations for filing Portal message conversations between the Practice and the client can be printed out to be filed in client records. To print; click the Printer icon within the message, in the top left corner: Alternatively, go to Message Centre, right click on the message, and select Print Conversation: Messages can be printed directly from Client record, from the Message Centre tab; or from the Message Centre homepage control. CCH PORTAL 2014.2 USER MANUAL JULY 2014 54 This will open up the standard Windows print screen where the document can be printed out on paper or if there is a PDF converter available, it can be converted to PDF and saved as a file. 6.9 Spellchecker An automated spell-checking is available for Portal messages created within CCH Central. Any incorrectly spelled words will be underlined in red. To correct spelling, you can manually amend, or right click and select an appropriate word from the list offered. Alternatively you can ignore the spelling error or add the word to the dictionary for future use. CCH PORTAL 2014.2 USER MANUAL JULY 2014 55 6.10 New message popup notification Provided you are logged into Central, when a new message is sent to you, a pop-up will appear in the bottom right hand corner of your screen. If you click on the pop-up you will be taken straight to that client’s Message Centre tab so you can review and action the message. You can vary the time the pop up remains visible by altering the number of seconds from the default of 5 in Maintenance > User Defined > Configuration > Portal_TimeForDisplayingNotification Popup The system will check for new messages every 30 seconds and notify relevant users of any new messages. If you want to vary the frequency that this “polling” happens, you can change the number of seconds from the default of 30 in Maintenance > User Defined > Configuration > Portal_FrequencyOfPolling In each case click OK to exit the Configuration screen and apply the new setting. 6.11 Out of Office rules Designed to ensure your clients know when a practice employee is not available to action a portal message they are sent, this manual Out of Office functionality needs to be set by the practice user. It does not integrate to any email Out of Office functions. To activate, the relevant user should click the following in the Task Bar from the Portal homepage control: CCH PORTAL 2014.2 USER MANUAL JULY 2014 56 then enter the date of return: When activated, the task bar indicator will change to When clicked, or on logging into Central when the out of office flag is set the user will be alerted as follows: Clicking “Yes” will disable, while “No” will keep the out of office flag active. When your client creates a new message on their portal they will see the following where a practice employee is marked as “out of office”: This will let them know that they should select a different practice employee for immediate attention. It is recommended that all clients have at least two practice employees assigned for portal communications with clients. Should they decide to send the message to the out of office employee anyway, the message will show the out of office status until the relevant date has passed. CCH PORTAL 2014.2 USER MANUAL JULY 2014 57 6.12 Time Zone Compatibility Time zone compatibility measures have been put in to ensure that users located in different time zones (Practice employees as well as Practice clients) can view messages and documents according to the time zone they are located in. This is determined by each user’s own date and time settings. This affects various areas in the system, including CCH Central (message tracker, client messages and documents), messages for review, or saved as draft, forwarded or deleted; and also in Client Portal messages and documents. CCH PORTAL 2014.2 USER MANUAL JULY 2014 58 7. DOCUMENTS 7.1 Send message with document attachment 7.1.1 From local drive or client Document Centre In order to send a file or document to a client, create a new portal message, then click the paper clip icon next to the Attach area. This will open a browse screen to you to select your file or document from. Once you have identified the file you require, select it and click OK. You will be returned to the create message screen, where additional selections are now visible. From here you can select the folder in which you wish the client to see the file or document by clicking the drop down box under “Folder”. If this is also a document requiring client approval, tick the “Requires Approval” box. Since the Shared folder is a temporary folder, you will not be able to save any document requiring approval in this area. You must select another folder from the drop down box. You can select multiple documents in the same way by holding the CTRL button on your keyboard and attach documents to your message. If you click Browse DM option in the same window, you can browse and attach documents that currently exist in client’s document centre. Such documents will appear in the Document Centre with an icon that indicates that they have been published to portal. CCH PORTAL 2014.2 USER MANUAL JULY 2014 59 View the status of documents for approval You can see which files and documents have been uploaded to the portal by clicking on the “Documents” hyperlink in the client Message Centre. From here you can see the current approval status, whether it has been approved or rejected, who took that action and when. 7.1.2 From other CCH components: PT, DM, PM, CT, AP 7.1.2.1 Publishing from CCH Personal Tax In order to publish to portal from any product in the suite, the practice user must first have the appropriate task permissions. These can be found in Maintenance > Security > Task Permissions. Select Personal Tax from the Product drop down then expand the Portal area and tick #PersonalTax #Portal #Publish to allow. Click OK to save changes. CCH PORTAL 2014.2 USER MANUAL JULY 2014 60 In Personal Tax, once you have generated the IR Mark in the Online Filing area, the Publish to Portal option in the task bar becomes active. When you click this, the familiar page selection for the tax return and accompanying schedules pops up. Select the required pages you wish to publish and click Publish. You will then be presented with the usual Create Message window shown in 6.1 above. The tax return will already be listed in the attached files area, with the appropriate folder and year subfolder selected. At this point you can create your message, add other documents as in 7.1 above, and designate the return for approval as appropriate. CCH PORTAL 2014.2 USER MANUAL JULY 2014 61 A copy of the document published to portal will be added to the Document Centre with a published to portal icon . To view publication details, select the in the version area of the document’s properties; and you will see the date the document was published and by whom: In the event you want to send individual pages of the tax return or schedules to your client before the IR mark is generated, we recommend you create a pdf of the relevant pages and attach them in line with 7.1 above. 7.1.2.2 Publishing from CCH Accounts Production In order to publish to portal from any product in the suite, the practice user must first have the appropriate task permissions. These can be found in Maintenance > Security > Task Permissions. Select Portal from the Product drop down then expand the Publish area: and tick Publish accounts to allow. Click OK to save changes. CCH PORTAL 2014.2 USER MANUAL JULY 2014 62 You can publish accounts from CCH Accounts Production from the Financial Statements area in Financial Reporting. Click on Financial Statements; then select the Publish to Portal option from the Actions area of the Task Bar: The steps are then identical to those for CCH Personal Tax described in 7.1.2.1 above. 7.1.2.3 Publishing from CCH Practice Management In order to publish to portal from any product in the suite, the practice user must first have the appropriate task permissions. These can be found in Maintenance > Security > Task Permissions. Select VPM from the Product drop down then expand the Client area; CCH PORTAL 2014.2 USER MANUAL JULY 2014 63 and tick #Client#Publish To Portal to allow. Click OK to save changes. You can publish an invoice to Portal from the Bills screen of the client. Highlight the invoice you wish to publish and click Publish to Portal from the Task Bar; The steps are then identical to those for CCH Personal Tax described in 7.1.2.1 above. 7.1.2.4 Publishing from CCH Document Management In order to publish to portal from any product in the suite, the practice user must first have the appropriate task permissions. These can be found in Maintenance > Security > Task Permissions. Select Document Management from the Product drop down then expand the Portal area CCH PORTAL 2014.2 USER MANUAL JULY 2014 64 and tick #Portal#Publish to allow. Click OK to save changes. You can publish any document from CCH Document Management by clicking the check boxes next to the documents you wish to upload, and selecting Publish to Portal from the Common Tasks area of the Task Bar. The steps are then identical to those for CCH Personal Tax described in 7.1.2.1 above. 7.1.2.5 Publishing from CCH Corporation Tax In order to publish to portal from any product in the suite, the practice user must first have the appropriate task permissions. These can be found in Maintenance > Security > Task Permissions. Select Corporation Tax from the Product drop down then expand the Portal area CCH PORTAL 2014.2 USER MANUAL JULY 2014 65 and tick #Portal #Publish to allow publication of tax returns and computations from outside the eFiling area, and #Portal#Efiling#Publish to publish from the eFiling area. Click OK to save changes. It is possible to publish the tax return and computation directly from the CCH Corporation Tax module. The tax returns and computation can be published the 'Publish to Portal' option within the client record: Tax Returns > [Tax Return] > Summary > Task Bar. 7.2 Document housekeeping Practices have told us that they want to retain control over the documents and files which are uploaded to the client portal, both to keep it tidy, but also to minimise the amount of storage space used unnecessarily. To that end, we have created a “Shared” folder which is a temporary folder. Clients can only upload files into this area, while you can select to either place files in this area for later deletion, or in a folder structure of your choosing. With files uploaded by clients, you can easily either move them to different folder on the client portal or download them to a Windows structure or document management system. We recommend the Shared folders are cleared regularly as part of your housekeeping routines, particularly where large files such as client bookkeeping data are regularly uploaded to the portal. CCH PORTAL 2014.2 USER MANUAL JULY 2014 66 7.2.1 Moving Documents between folders In the Documents area, you can move and download files on the client portal. To move a file, find it in the document tree, and drag and drop it to the new folder. To download the file to local or network file storage, right click on the relevant document. You then have the option to save the file to disk (which offers the usual browse screen) or save the file to CCH Document Management (which offers the usual screen to save to DM with the option of adding descriptors as required). To delete a file, highlight the relevant line you wish to delete and press the delete key on your keyboard. 7.2.2 Documents saved / deleted from Documents Centre When messages are sent to Portal from Central, any attachments allocated to the Shared folder will not be saved into the client's Document Centre. This is designed to save local space and is consistent with the designation of Shared as the temporary exchange folder. Attachments are allocated to the Shared folder in the Portal Create Message window via the Folder dropdown, after the Attach File option is chosen. when moving a file from ‘Shared’ to a permanent folder within the ‘Documents’ window within the Central Message Centre, the ‘CCH Document Management – Send to…’ window now prompts the user to save a copy in CCH Document Management before the file is moved from the Shared folder. CCH PORTAL 2014.2 USER MANUAL JULY 2014 67 7.2.3 File size limits The default maximum limit on the file size you can upload is 200 MB. You can increase this up to 2GB in Maintenance > User Defined > Configuration > Portal_MaxMbFileUploadSize For this change to take effect, you must completely exit Central. 7.2.4 Timeout limits Document upload time is limited to 5 minutes after which the upload process will give you a timeout message. This will enable users with a slower internet connection to upload files without issues. 7.2.5 Deleting documents Your practice has full capabilities to delete messages, files and documents from the portal. CCH Central will maintain a complete audit trail of any such actions. This means that you can “unpublish” any message or document published to the portal in error. To delete a message and its associated attachments from the client portal, select the relevant message from the message summary list in the Message Centre in CCH Central, right click and select Delete. In order to delete any Document Folder, you must first ensure that all documents in that folder are deleted. Note that “system” folders, such as Accounts, Correspondence, Tax and Shared cannot be deleted. CCH PORTAL 2014.2 USER MANUAL JULY 2014 68 Deleting messages with documents attached When a message or conversation is deleted from Portal that has one or more attachments stored in the Shared folder on portal, you will be prompted to save local copies from the Shared folder into Document Management. Files in the Shared folder typically do not have a corresponding version stored in Document Management. Documents in deleted portal accounts When a client’s portal has been suspended and deleted, the contents of the portal, including the messages and documents will remain within CCH Central together with the remainder of that client’s record. Deleting documents by Practice Clients Your clients can only delete those files from the portal which they have uploaded themselves but which you have yet to move out of the shared folder. The messages they have written can only be deleted by authorised practice users. CCH PORTAL 2014.2 USER MANUAL JULY 2014 69 8. DOCUMENT APPROVALS 8.1 Send documents for approval When sending a new message with a document in the attachment, you can request approval from the client. This is done within the same new message popup window, in the document attachment area. In the new message popup window, click on the paper clip icon to go to the document attachment area; where you will be able to select or unselect the Requires Approval checkbox, as well as placing your attachment in the desired document folder; 8.2 Multiple approval for documents Documents may require approval by several contacts associated with the client. For organisational clients, some or all of the associated contacts can be selected to approve or reject documents. If an organisation has more than one associated portal user, the practice can select who is required to approve the document once the document has marked as 'Requires Approval'. To attach document(s) for approval, the following steps should be followed: Select the 'Approval' button from the New Message window in the Central Message Centre. Select 'Browse' to add further files from the Approval window that subsequently opens. Tick the files that you want approved in the 'Requires approval' column. If the document(s) in question are being sent to an organisation with more than one associated contact, there will be the options to select: o the users required to approve to approve the document(s) (via a dropdown menu) CCH PORTAL 2014.2 USER MANUAL JULY 2014 70 o whether all, or just one, of the selected users must approve the document(s) for it to be marked as approved (via adjacent radio buttons). The New Message window is also updated with the approval details once a document has been selected for approval. Where one or more contact rejects a document, the document as a whole will be marked with a rejected status. Within Central, practice users can review the detailed approval status of a document by selecting the approval status hyperlink within the Documents window in the Message Centre: CCH PORTAL 2014.2 USER MANUAL JULY 2014 71 As some of Practice clients can be slow to activate their client portal access, you won’t be able to publish a document on portal for approval until at least one client user has activated their access. Where you are sending documents to more than one user, you will be able to see which users have yet to activate their login. CCH PORTAL 2014.2 USER MANUAL JULY 2014 72 9. INTERNAL REVIEW OF DOCUMENTS AND MESSAGES Many practices have a policy of reviewing communications before sending to clients. Likewise, a practice employee can draft a portal communication, and then forward it to a colleague to review. Once the message has been drafted, click the review button from within the new message window: This will pop up a task window enabling the employee to select a reviewer, an action and make a comment; If an employee is selected as a reviewer who isn’t a portal user, the following error message will be displayed; After an appropriate reviewer is selected, the review task filled in and after clicking OK, the user will return to the new message window, and the “Send” button will have changed to read “Send for review”. CCH PORTAL 2014.2 USER MANUAL JULY 2014 73 On clicking “Send for review”, the task will pass to the reviewer’s portal home page control marked as “In Review”. It will also be visible as “In review” on the client message centre. The reviewer can see the comments made by the preparer by clicking on the red flag; CCH PORTAL 2014.2 USER MANUAL JULY 2014 74 Click on Review message to review and send the message; When the message is open, you can review, make changes, and Send. This will complete the task in the reviewer’s task list and home page control; send the message to the client; and retain a history of the review notes against the message. Alternatively, you can click on “Mark as Completed” to complete and send the message and the result will be the same. For those using Task Management in CCH Central, these tasks will also be available to view and action from there. CCH PORTAL 2014.2 USER MANUAL JULY 2014 75 10. SEND PERSONAL TAX PAYMENTS REMINDER TO PORTAL It is now possible to send 31 July personal tax payment reminders to clients via Portal. The fields to be merged into a Portal message are generated from the same report as is used to mail your clients by post. 10.1 View 2014 July payment report The 2014 July Payment Report can be found under: Reports > Personal Tax > July 2014 Payments on Account For further details on how to generate this report, please refer to the Support Page which includes the July 2014 Payments User Guide. 10.2 Customise the message template A message template has been created for this purpose and can be customised for Practice’s own use; the template can be found under: Maintenance > Portal > Message Templates Double click on “Personal Tax July 2014 Payment Reminder” to open the message template To use data fields from the July payments report, click on July 2014 Payments on Account at the bottom of the left navigation, and reveal the fields available for message merge. CCH PORTAL 2014.2 USER MANUAL JULY 2014 76 The fields in the July payment report are available as merge fields which will be populated for selected clients in the next step: Double click on the message template to modify the content In the left navigation area of the message, click on July 2014 Payments on Account to expand this option A list of merge fields available are displayed: Client Partner, Client Office, Client Name, Client Dept, Client Code, Amount due July 2014 Click on each merge field to include it in the message template Click OK to save the message template The data fields will be populated by Portal at the time of creating the Portal message: CCH PORTAL 2014.2 USER MANUAL JULY 2014 77 10.3 Generate payment reminder merge to Portal message Click on the Clients icon Select New > Search “from reports…” from the Search Type drop down list Click the Search button For further details on how to generate this report, please refer to the Support Page which includes the July 2014 Payments User Guide. Go to Category > Personal Tax and highlight the July 2014 Payment on account report, then select OK CCH PORTAL 2014.2 USER MANUAL JULY 2014 78 Where required filtering by Department, Office and / or Partner can be applied Choose which clients to include in the message merge, either all clients or a selection, by ticking the appropriate boxes. Only clients that have an activated portal account can be sent a payment reminder message. These clients are indicated with a portal icon next to them CCH PORTAL 2014.2 USER MANUAL JULY 2014 79 Select Portal > Create Message from the Task bar on the left Click Insert Template and select Personal Tax Payment Reminder template CCH PORTAL 2014.2 USER MANUAL JULY 2014 80 Make changes as required in the message body, subject line and select recipients in the “To” dropdown field 10.4 Sending to a single client When sending the July payments reminder message via Portal to a single client that has an activated Portal account, the message window will display the actual figures for the selected client when the message template is inserted. CCH PORTAL 2014.2 USER MANUAL JULY 2014 81 This message can be sent to the client straight away or saved as a draft for further review. 10.5 Sending to multiple clients When sending July payments reminder message via Portal to a multiple clients at a time, the message window will not show the actual figures. Instead, the message will display data field names in brackets. Message templates containing data field names instead of actual figures cannot be sent (as there is information still missing). This message can be saved as draft. The draft message will be available in each client record’s Message Centre, as well as all together in the Message Centre homepage control of the employee who is creating the Portal message merge. Each of these draft messages will then display the actual figures for the particular client when reviewed. This message can be sent straight away or saved as draft or sent for review as usual. CCH PORTAL 2014.2 USER MANUAL JULY 2014 82 11. PORTAL REPORTS 11.1 Client Activation Report You can generate a report of activated portal users from within Smart Reports. The report can be found under Client > Portal clients. To create a new report, Click create and drag the relevant fields onto the report as follows:Client Code Client Name PortalDisplayName (returns the name of each portal user against that client) PortalEmail (returns the email of that portal user) IsActivated (returns True or False against each user to indicate whether they have activated from the link in the activation email) Once created, click Save to name and save the report for future use. As with all Smart reports you can edit the look of the report using the Edit and Edit in designer functions. 11.2 Document Approval Status Report This report allows Practices to have an overview of files and documents sent to clients via Portal, and their current status in terms of approval or rejection. The report is available within Reports under Client category Find the report called, as “Portal document approvals” and double click on it To create the report for all clients and their document approval status, leave the Filter area blank CCH PORTAL 2014.2 USER MANUAL JULY 2014 83 To create the report for a specific client only, enter the client code in the Filter area Click OK to generate the report and the report will be displayed. The report can then be printed or exported to excel as usual. CCH PORTAL 2014.2 USER MANUAL JULY 2014 84 II - FOR YOUR CLIENTS 12. CLIENT ACTIVATION 12.1 Client Activation ID (client code) In order to get started with the client portal, the following are required: Client portal username: Client email address Activation ID: Practice client reference (or client code). Contact Practice for further information Note: The activation ID is the same for all users of the same client regardless of how many associated contacts have a portal user account for the same client When an individual client’s portal access is enabled, an automated email notification will be sent from [email protected]. Email responses to this address are not monitored. This email contains an activation link to complete the portal activation process. The activation will time out after a set length of time, configured by the Practice. Clicking the link in the activation email takes the client user to the activation screen: The activation ID is the same as client code and should be provided before the Portal activation process by the Practice. USEFUL TIP Activation ID is NOT the client’s username. It is a one off activation key. The client’s username is their email address. CCH PORTAL 2014.2 USER MANUAL JULY 2014 85 12.2 Password set up and password reset Once Client portal has been activated, a password setup will be required, according to the password complexity set by the Practice prior to activation. The number of characters and types of characters required as a minimum will be clearly identified on this screen as seen in the screenshot below. Passwords can be reset by using the Forgot Password link on the main login page on subsequent visits. This will send an email to the client’s email address with a temporary password. Both the temporary password and the original activation ID used at the time of activation (see section 12.1) will be required for this stage. Once this is done, a new password must be set and the temporary password will become void. 12.3 Username and Remember Me On subsequent visits, the main login page is displayed. The username is the same as client’s email address. CCH PORTAL 2014.2 USER MANUAL JULY 2014 86 Clicking the Remember Me option allows the username to be pre-populated on subsequent visits. 12.4 Client Personalisation Personalisation is available in the Edit Profile menu. To upload a photo, click on Edit Photo and select the picture to upload. Maximum file size for such photos is 1MB. Photos will appear in the Message Centre. Profile details can also be updated, such as name, title, or salutation. These changes will take effect in Practice’s Client records accordingly. CCH PORTAL 2014.2 USER MANUAL JULY 2014 87 12.5 Multiple portal access If a portal user has multiple relationships with the practice, maybe as director of several companies, and also in connection with their personal affairs, the same username (email address) can be used to access all client portal accounts. When an organisational client is first activated, some of the portal users for that client may have already been activated to use portal in the past for a different client. Such individuals will receive and email notification informing them that new access rights have been created on portal with regards to another client. Upon login, a new dropdown list will appear in the client portal, listing the client portals that can be accessed from this portal account: It could also be that there are several contacts accessing the same client portal, such as directors, shareholders, bookkeepers and so on. Each individual will be given their own client portal access and will only see the messages and documents sent to them. Replies to a particular portal message can only be seen by the recipients of that message. When a document is approval required, the approval will take place on the same document. See further sections for more details on this. CCH PORTAL 2014.2 USER MANUAL JULY 2014 88 13. CLIENT MESSAGES AND EMAIL NOTIFICATIONS 13.1 Sending messages Once logged in, all messages, including the first welcome message if it was sent by the Practice, can be seen in the Message Centre, in chronological order from the most recent to the oldest. To reply to a message, click Reply. To send a new message, a document or file, click on New Message. Enter subject and message and select Practice recipients to send to. Click Add Files button to add files and documents to the message. Clients can send a message to one Practice employee, and all or some of the associated contacts within the client organisation. CCH PORTAL 2014.2 USER MANUAL JULY 2014 89 13.2 Email Notifications Whenever a new message is sent to a client portal, an automated email notification is sent to the associated contacts at the clients to whom the message was sent to. This email notification is generic and will not provide a specific content due to security reasons. The email notifications are sent from [email protected] ([email protected] for Republic of Ireland) and replies to this email address are not monitored. The email notification provides a link to the client portal login page. CCH PORTAL 2014.2 USER MANUAL JULY 2014 90 14. CLIENT DOCUMENTS AND FOLDERS 14.1 Viewing Documents Documents sent via the Portal can be accessed in two places: 1) As an attachment to the messages in the Message Centre: 2) In the Documents page under the folders: Click on Documents to view documents uploaded to the portal by the Practice or by the Client; All files and documents attached to a Portal message will be saved in the Shared folder in the Documents page. This is a temporary holding place for documents which can later be moved to permanent folders by the Practice. See section 14 for further details on Documents. CCH PORTAL 2014.2 USER MANUAL JULY 2014 91 15. CLIENT APPROVING AND REJECTING DOCUMENTS Now that documents for the various government authorities such as HM Revenue & Customs and Companies House do not require original signatures, and most documents are expected to be submitted electronically; the document approval facility within the client portal will provide a secure and efficient way to obtain approval (or rejection) to documents. Documents that require approval can also be viewed in two places: 1) By clicking the hyperlink in the messages in the Message Centre: 2) In the Documents page under the relevant folders: To approve a document, tick the check box against each document and select “Approve Documents” and enter portal password. CCH PORTAL 2014.2 USER MANUAL JULY 2014 92 If document is rejected, then a reason or message must be entered. Documents will indicate the approval status by all approvers at any given time. Click on the approved/rejected links to reveal which contacts make up each figure. Once actioned, the portal document will be clearly marked to indicate the action taken, by whom, and the date and time. CCH PORTAL 2014.2 USER MANUAL JULY 2014 93 MORE FEATURES COMING SOON… CCH PORTAL 2014.2 USER MANUAL JULY 2014 94
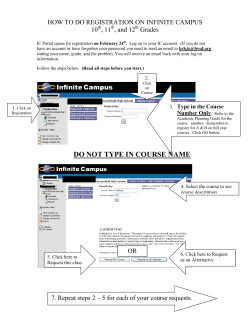
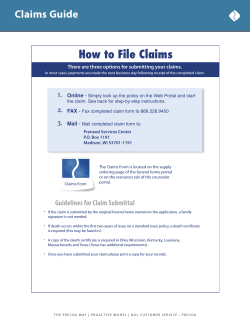
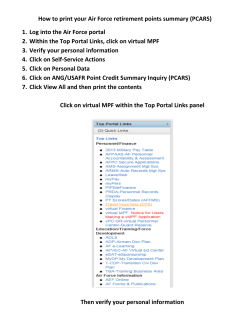


© Copyright 2026