
TimeNet Product Manual TimeNet Manual
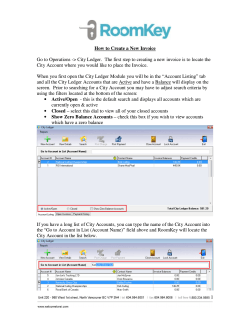
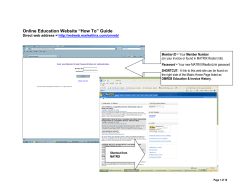
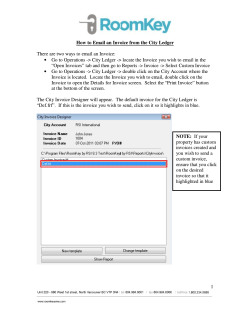
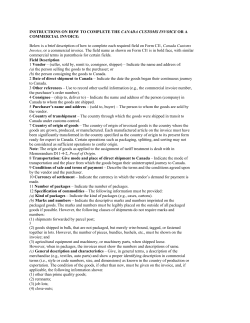
TimeNet Product Manual © 2014 - AppleSource Software TimeNet Manual Page 1 Table of Contents Features 6 The Preferences Window 7 Setting Up Your Identity 8 Options 8 Configuring Your Billing Rates 9 Employees 9 Invoices & Invoice Templates 9 Adding Clients 10 Editing Clients 11 TimeNet’s Main Window 12 Working with Projects 13 Creating Projects 13 The Project Window 13 Adding Items to a Project 14 Category Items (Hourly and Flat Fee Billing) 15 TimeNet Manual Page 2 Quick Charge (Expense) Items, Flat Fee Items and Discounts 16 Using the Timer 16 Using the Menu Bar Timer 17 Editing Items 17 Project Notes 17 Rounding Hourly Time 18 Editing Late Fees 18 Syncing Rates 18 Tracking Payments 19 Creating Invoices 20 Creating One Invoice from Multiple Projects 22 Using The Manager 23 Entering Dates in TimeNet 24 Archiving Projects and Clients 25 Customizing Invoice Templates 26 RTF (TextEdit) Invoice Templates 26 HTML Invoice Templates 26 TimeNet Manual Page 3 Invoice Template Tags 26 Getting Invoice Templates 27 Using the To Do List 28 Reports 29 Client, Category and Employee Report 30 Overdue Invoices Report 30 Mileage Report 30 Using the QuickTimer 31 Getting Notification of Overdue Invoices 32 Editing Project Late Fees 32 Networking with TimeNet 33 Resetting the Networked Data Folder 34 Using Buzz Me! to Set Reminders 35 About TimeNet Data 36 Backing Up Your TimeNet Data 36 Transferring Your TimeNet Data to Another Machine 37 Restoring From a Backed Up Data Folder 37 TimeNet Manual Page 4 Reverting to an Older Version of TimeNet 37 Changing Your TimeNet License Code 38 How To Contact AppleSource Software 39 Purchasing TimeNet 40 Appendix A. Credits 41 Appendix B. Legalities 42 TimeNet Manual Page 5 Features TimeNet is a powerful and easy to use application for keeping track of clients, projects, billing, and task management. Time is Money. Track it wisely. TimeNet's timer always makes sure you're billing for every second. Visual reports show where time is spent. See The Big Picture. Track clients, employees, hourly rates, flat fee items, expenses, taxes, discounts, partial payments, late fees, mileage, foreign currencies, and create reports based on all of it. Image is Important. Extend your brand identity to your invoices with TimeNet's gorgeous and fully customizable invoice templates. Accommodate Your Clients. Address Book import, custom tax rules & rates, foreign currency support with automatic conversion, visual client reports, and much more. Plays Well with Others. TimeNet is fully networkable. Share your data through your office network, or get the benefits of anywhere-access with Dropbox. No extra software to buy, 30 seconds to set up. Designed for Your Mac. Sync with Address Book and Calendar, use Spotlight searches, backup with Time Machine. TimeNet runs on any Mac running OS X 10.4 or later. TimeNet Manual Page 6 The Preferences Window The first thing you should do when opening TimeNet is visit the program’s Preferences. Click the Preferences button at the right of the Toolbar or select Preferences under the TimeNet Application Menu. TimeNet’s Preferences Window TimeNet Manual Page 7 The Preferences Window (Cont’d) Setting Up Your Identity Enter your business’s name and contact information here. These fields will be shown on invoices that TimeNet creates. If you want a logo to appear at the top of your invoices, drag an image file onto the grey image box or simply click on the box to choose a file. Clicking the red clear button will remove the logo. Options General Tab Here you can turn auto-update, notification sounds, and the global menu bar timer on or off. The menu bar timer lets you control the timer from any application you’re in, as long as TimeNet is open. You can also create a list of common tasks to select from when entering items into TimeNet later. TimeNet will remember new entires and add them to this list by default, but you can turn this off by unchecking the Remember Entries I Create box at the bottom. The Amount column is optional, and only applies to expense items. Hourly items will ignore this amount. Timing & Billing Tab If you do not want multiple timers to be able to run simultaneously, can turn on the Don’t Allow Simultaneous Timers option. Next, tell TimeNet how to treat idle time. If your computer goes idle (the mouse and keyboard haven’t moved), TimeNet can keep timing, pause your timer, or warn you that the computer has been idle while timing. If you’re using this option, TimeNet will offer to deduct the idle time, or let you keep it. Next, set your currency format settings, late fees and global tax rate. These settings can also be customized on a clientby-client basis when editing your clients. Groups & Stages Tab You can group clients together for organization and reporting. Create your list of groups here. When adding or editing a client, you can assign the client to a group. If you do not wish to use Client Groups, you can leave this section blank, and hide the Groups Sidebar from the main window under the View menu. TimeNet Manual Page 8 The Preferences Window (Cont’d) TimeNet lets you track projects through multiple stages. It is recommended to monitor the stage of a project, so you can be sure everything is on track. Enter the stages your projects will typically go through, and then you can set each project to one of those stages. This is entirely optional, just like Client Groups. TimeNet has five default stages, which adhere to the standard Project Management rules. For more information about these stages, refer to this page: http://en.wikipedia.org/wiki/Project_management#Processes Configuring Your Billing Rates TimeNet lets you bill in several ways. Category billing rates are typically billed by the hour. TimeNet lets you customize the rate of category tasks on the fly, but you can enter a default rate into the Preferences. TimeNet also lets you specify whether a category task is billed hourly, or billed with a flat rate. You can customize a task’s hourly rate, or set it to a flat rate, when entering tasks into TimeNet later on. Flat fee items are items that will always be charged by a flat rate, and TimeNet lets you specify the quantity of the flat fee item when entering it into a project. Employees If you have multiple employees, add them in the Employee panel. Each employee can have an hourly rate at which they are paid. You can then use the Employee Report to track employee profitability. Invoices & Invoice Templates TimeNet uses a completely customizable invoice template system. Invoice templates can be created in RTF format or HTML format. Installed invoice templates appear in this panel. Double-clicking a template opens it for editing. Holdin the Option key and double-clicking a template lets you rename it. Pressing Delete on the keyboard will remove the selected template. TimeNet can number invoices sequentially or randomly. Turning on Global Numbering automatically increments the invoice number any time an invoice is created. Otherwise, the invoice number increments individually for each client. For more information about customizing invoice templates, see the Invoice Templates section later in this manual. TimeNet Manual Page 9 Adding Clients Add a client by clicking the Client toolbar button in the Main Window, clicking the + button under the client list, or by selecting New Client from the File menu (shift-⌘N). Creating a Client TimeNet Manual Page 10 Adding Clients (Cont’d) When entering a client’s name, you’ll notice that TimeNet tries to autocomplete the entry from any contact in your Address Book/Contacts that matches. You can also see a list of Address Book contacts by clicking the blue double-arrow popup menu to the right of the field. Importing a client from Address Book A client’s code is used to prefix that client’s project numbers. Each client’s code must be unique. Invoice Numbers are unique identifying codes associated with each new project. An invoice number is either random or sequential (based on the setting you’ve chosen in the Invoice Preference panel). For example if your client’s code is “PJF”, the Next Project Number is “100,” and you’re using sequential numbering, projects created for this client will be numbered “PJF-100”, “PJF-101”, “PJF-102” and so on. Fill in your client’s contact information and currency settings in the appropriate fields. Each client has a taxable attribute (using the global tax rate from the Options panel in Preferences), and can also have a custom tax. You can use one or the other, or combine them. The optional VAT (Value Added Tax) Number field lets you assign a VAT Number to the client if you charge for VAT. The default save location (also optional) is where invoices created for this client will be automatically saved. If no default save location is selected you will be prompted at the time of invoicing to select a save location. Editing Clients Hold down the Option key while double-clicking on a Client’s name in the main window to edit it. You can also rightclick or control+click on the Client’s name and select the Edit option. TimeNet Manual Page 11 TimeNet’s Main Window TimeNet’s main window lets you quickly see all of your clients and projects. It also shows you the total and balance of your clients and projects. The toolbar lets you make new clients or projects, open the To Do drawer, open the Manager, and open the Preferences. The title of the window shows (Local) or (Networked), indicating what mode TimeNet is in. The left sidebar shows your Client Groups. This can be shown or hidden under the View Menu. Clicking the + or button at the bottom of the sidebar allows you to add or delete groups, and you can drag them up and down to re-order them. Under the client list, there is are + and - buttons to add or delete projects and clients, an action button to bring up a contextual menu based on what is selected in the client list, and a magnifying glass, which allows you to filter which projects are shown by status and stage. TimeNet Manual Page 12 Working with Projects Creating Projects Projects are filed under clients, so before adding a project you must be sure to add at least one client into TimeNet. Once you’ve done that, click the Project button (or press ⌘N) to create a new project. The Project Window When you first create a new Project, it will look like this: A Newly Created Project TimeNet Manual Page 13 Working with Projects (cont’d) You can change the project’s name, invoice number, start date, and end date at any time (the end date can only be entered once the project has been marked Finished). As items are added to the project (using the + and - buttons at the bottom-left of the project window), the amount and time shown in the upper-right corner will change in real time. Adding Items to a Project Adding items to a project is very easy. Simply click the + button in the lower-left corner of the project window or rightclick or control+click in the tasks list. There are four types of items that can be added to a project: 1. 2. 3. 4. Category item (hourly charge or flat fee) Flat Fee item Quick Charge (an expense) Discount (percentage or dollar amount) The Add Item Popup Menu TimeNet Manual Page 14 Working with Projects (cont’d) Category Items (Hourly and Flat Fee Billing) The Item Editor Task - The description of the work, as it will be shown on invoices. Date - The date that will appear next to this Item on invoices that TimeNet generates. Time Spent - This is where you can manually set the time spent on this Item. Category - Select the category. This item will be charged at the billing rate for that category. Rate - Select the standard category rate or a custom rate. You can also set the rate to hourly or flat. Type - Billable is shown on the invoice and counts towards the total. No Charge is shown on the invoice but does not count towards the total. For My Eyes Only is not shown on the invoice and does not count towards the total. TimeNet Manual Page 15 Working with Projects (cont’d) Employee - If you entered Employees in Preferences, you can set which employee is working on this Item. Notes - This is where you can keep detailed notes for an item. Notes are always available internally, and can optionally be shown below the item’s description on invoices. Linked File - A file or folder to be opened when this item’s timer starts. Use the red remove button to remove the link. Quick Charge (Expense) Items, Flat Fee Items and Discounts Flat Fee Items are items designated as “fees”, but with fixed costs. For example, copy charges per page, flat fee design packages, or any other item you charge to a client for a flat fee, rather than an hourly fee. Quick Charge Items are used to track expenses that are to be billed to the client. Discounts are for quickly marking off an amount from a project’s total earnings. You can discount a percentage of the project’s total earnings or a flat amount. Using the Timer To use the timer, click the Start Timer toolbar button, press ⌘’ (apostrophe), or hit the spacebar on your keyboard. You can also use the global Menu Bar Timer. If no category task is selected, a new one will be created and the timer will start. While the timer is running, the item currently being timed will be shown in orange, and the time and amount details will be updated in the upper-right corner of the project window. The Time and Earnings Display in the Project Window TimeNet Manual Page 16 Working with Projects (cont’d) Using the Menu Bar Timer The global menu bar timer allows for easy access to project information and the current category item while working in any application. The menu bar is even accessible when the TimeNet application is hidden. When the timer is running, the TimeNet icon will be green to indicate that the timer is running. To hide the global menu bar timer, change the Menu Bar Timer preference under the Options Preferences panel. Controlling the Timer from the Global Menubar Status Item Editing Items You may edit any Item in the project window by double-clicking it in the list, or selecting it and pressing Return. Project Notes You can keep unlimited free-form notes for each project. Click the Notes toolbar button and the Notes drawer will slide out. TimeNet Manual Page 17 Working with Projects (cont’d) Rounding Hourly Time To round the time of your category items, be sure that the project you want to round time for is open and frontmost and select the Round Project Time... option (option-⌘R) from the Project menu. Your time will be rounded up to your preference, as specified in TimeNet’s preferences. TimeNet can also automatically round time when the timer is paused. Resuming the timer will begin timing again from the actual time, not the rounded time. Editing Late Fees Editing how many Late Fees a project has is done by selecting the Edit Late Fees... option under the Project menu (⌘E). You can also specify when the last late fee was applied, and further late fees will be automatically applied based on that date. Syncing Rates If you change an hourly rate down the road, you have the option of updating existing projects to use the new hourly rate. Use the Check for Unsynced Rates... option under the Project menu (⌘U). The Project Menu TimeNet Manual Page 18 Tracking Payments TimeNet makes it easy to track payments for your projects. Open the project you’d like to add payments for and click the Payments button in the toolbar. The Payments window will open, which allows you to add a new payment, and see all existing payments logged for this project. If the amount of payments exceeds the amount of earnings for a project, the remainder is shown on the invoice as a retainer. You can add a payment at any time, and as you add time and expenses to a project, the project window will show the current balance due for the project. If a project has been marked Finished, adding payments in the amount of the project’s total will automatically mark that project as Paid. The Payments Window TimeNet Manual Page 19 Creating Invoices Invoices can be created from the Project window, the Main window, or the Manager window. Right-click or control+click a project in the Main window and select the Create Invoice option. Or, use the Invoice toolbar button in the Manager or Project window. The Invoice Creation Window First, select an invoice template from the popup menu. Next, choose whether or not you want to save this invoice to disk (if not, it will just be opened and can then be quickly reviewed, printed or emailed as a PDF to a client). You can show or hide Task Notes on the invoice. If this client uses a foreign currency, you can have TimeNet automatically convert the totals to their currency. This makes it easy to work and bill in your currency, and then invoice in their currency. Click Create to generate the invoice. TimeNet Manual Page 20 Creating Invoices (cont’d) An Invoice Created with TimeNet Using the Blocks [Blue] Template TimeNet Manual Page 21 Creating Invoices (cont’d) Creating One Invoice from Multiple Projects If you’d like to create one invoice for more than one project, open the Manager and select the projects you’d like to invoice. Then, click the Invoice Selected toolbar button. Select the Projects and click Invoice Selected TimeNet Manual Page 22 Using The Manager TimeNet’s Manager lets you quickly get a grasp of the big picture for your business. See how much has been billed, how much is owed, and use filters for status, stage, and date. From the Manager you can quickly toggle whether a project is paid or not, create invoices for single or multiple projects, archive or unarchive projects, and run a report of the shown projects. Holding down the Option key on the keyboard will change the Archive button into an Archive All button. Clicking the button while holding Option will archive all projects shown in the list. TimeNet’s Manager TimeNet Manual Page 23 Entering Dates in TimeNet Anytime there is a date field in TimeNet, you can do several things. ➡ Click the calendar button and select a date using the calendar tool: ➡ Type “today”, “yesterday” or “tomorrow” ➡ Press ⌘D to insert today’s date ➡ Use ⌘↑ and ⌘↓ (Up and Down Arrows) to go up or down by one day TimeNet Manual Page 24 Archiving Projects and Clients TimeNet makes it easy to archive projects or whole clients. This is handy to hide them from the Main window, Manager window, and Reports, but they can easily be brought back by choosing to show archived projects and clients. To archive a project, right-click or control+click it in the main window and select the Archive option. You can also open a project and select the Archive Project option from the Project menu, or use the Manager window’s Archive toolbar button (handy for archiving multiple projects at once). To unarchive a project, click the View Menu and select “Show Archived Projects”. Then you can right-click or control +click on any archived project (shown in grey) and select the Unarchive option. Alternatively, you can open the Manager, click the Include Archived/Inactive option, and then select the archived project(s) and use the Unarchive toolbar button. To archive a client, edit the client and change its status from Active to Inactive. To unarchive a client, click the View Menu and select “Show Inactive Clients”. Then edit the inactive client and change its status from Inactive to Active. TimeNet Manual Page 25 Customizing Invoice Templates RTF (TextEdit) Invoice Templates You can create or customize invoice templates in TextEdit. To fill in the information that you’d like to appear on the invoices TimeNet generates, you use <tags>. HTML Invoice Templates HTML invoice templates are exactly the same as RTF templates, but they are designed in HTML. They can look however you want and can use CSS and advanced layout techniques. When entering tags in HTML invoice templates, you cannot use the < or > symbols. Instead, use the code for the symbol: < or > (as in less than and greater than). For example, to insert your company name, you’d use the <my-company> tag. In HTML, the tag will look like this: <my-company> The best way to design a custom template is to make a copy of an existing template and begin experimenting. Invoice Template Tags Insert Tag Insert Tag The logo set in Preferences <header-image> The Client’s ATTN Field <client-attn> Your Company Name <my-company> The Client’s Address <client-address> Your Company Address <my-address> The Client’s Address 2 <client-address2> Company Address (Line 2) <my-address2> Client’s City <client-city> Your City <my-city> Client’s State <client-state> Your State <my-state> Client’s Zip <client-zip> TimeNet Manual Page 26 Insert Tag Insert Tag Your Zip <my-zip> The Client’s Phone Number <client-phone> Your Phone Number <my-phone> The Client’s Email <client-email> Your Mobile Number <my-mobile> The Client’s VAT Number <client-vat> Your Email Address <my-email> The Client’s Custom Tax <client-taxrate> The Client’s Name <client-name> The Custom Tax’s Total <client-taxtotal> The Project’s Name <project-name> The Invoice Number <invoice-num> The Project’s Start Date <project-start-date> Days Until the Invoice is Late <due-in> The Project’s End Date <project-end-date> Subtotal (without Expenses) <subtotal> Purchase Order <purchase-order> Expenses Total <ex-total> The Date of Invoice Creation <invoice-date> Total Invoice Amount (before payments, taxes or late fees) <invoice-total> The total amount of payments <payments> Total Amount Due (after payments, taxes or late fees) <invoice-balance> The Item’s Notes <insert-notes> Project Notes from the Drawer <project-notes> % to Charge for Late Fees <latefee-rate> The Number of Late Fees <latefee-qu> The Total of the Late Charges <latefee-total> The Quantity of the Item <qu> Amount Charged for the Item <amount> Total Amount of Discounts <discount-total> Getting Invoice Templates You can download our invoice templates from our online Invoice Template Library. Just visit http://applesource.biz/ software/timenet/invoice-templates.html TimeNet Manual Page 27 Using the To Do List TimeNet’s To Do List makes it easy to stay on task. Set goals and due dates with reminders. Organize by color coated priorities. Quickly see how many things you need to do this week. To-Do items can also be linked to projects. When a To Do item is linked to a project, double-clicking it will open that project. To edit a linked To Do item, select it and click the magnifying glass, or hold down the Option key and doubleclick the item. The Color Coated To Do List TimeNet Manual Adding a To-Do Item Page 28 Reports TimeNet can generate many reports to help keep you aware of everything going on with your business. They can be printed, saved as PDFs, or copied and pasted into many other applications. You can find them under the Reports menu. TimeNet’s Client Report TimeNet Manual Page 29 Reports (Continued) Client, Category and Employee Report TimeNet’s main Report window lets you specify exactly what is included in the report. Any date range. All clients, a single client, or a group of clients. All projects, a single project, or projects that match certain criteria. You can also filter by billing category or employee. The Report window is broken up into three views. Client Report, Category Report, and Employee Report. Each view gives you a spreadsheet report and a visual graph report. Overdue Invoices Report TimeNet can instantly show you any invoices that are unpaid and overdue. From there, you can quickly mark them as paid or apply a late fee. Select the Overdue Invoices Report from the Report menu (Option+⌘O). Mileage Report Every Project window in TimeNet has a mileage field for tracking mileage on that project. When you’re ready to create the Mileage Report, select the Mileage Report from the Report menu (Option+⌘M). You can then set a date range and input the number of cents per mile in your area. You can then save, email or print the report. TimeNet Manual Page 30 Using the QuickTimer If you need to quickly start a timer but don’t want to find or create the appropriate project, you can use the QuickTimer under the Window menu (⌘2) or using the global menu bar status item. QuickTimer Window After you select the category, the earnings will appear under the category popup menu. Next, select the client and the project (or create a new project). Clicking Apply It will add the time to that project. TimeNet Manual Page 31 Getting Notification of Overdue Invoices If a project is finished and unpaid, TimeNet will begin counting the days until the invoice is paid. In Preferences, you can specify how many days an invoice has until it becomes overdue. Once an invoice is overdue, TimeNet will notify you, and give you the option of marking the invoice(s) paid or applying a late fee. Your late fee can be set in TimeNet’s Preferences. TimeNet Will Notify You When a Project’s Invoice is Overdue Editing Project Late Fees If you need to manually change how many late fees a project has accrued, you may do so under the Project menu when that project is open. Use the Edit Late Fees… (⌘E) option. You can also specify when the last late fee was applied. TimeNet Manual Page 32 Networking with TimeNet TimeNet makes it very simple to share data across a wireless or wired network. Configuring your computers to allow TimeNet Law to share data requires no software other than built-in OS X components. 1. On the machine that will host the TimeNet data, open System Preferences under the Apple menu 2. Click the Sharing icon 3. In the list of sharing services on the right, be sure to enable File Sharing: Enabling File Sharing in OS X’s Sharing System Preferences Pane 4. Close System Preferences and repeat the following steps on each computer that will connect to the data: 5. Open TimeNet and choose Work on Network (⌘K) from the File menu 6. The Network Setup Assistant will be displayed. If it does not appear, then TimeNet is already trying to connect to a previously configured shared data folder. 7. Follow the instructions in the Network Setup Assistant to use TimeNet on your network. TimeNet can use your local network or Dropbox. Dropbox allows you to view, edit, and sync changes to your database from anywhere in the world as long as you have an internet connection. You’ll Know TimeNet is in Networked Mode by the Main Window’s Titlebar TimeNet Manual Page 33 Networking with TimeNet (cont’d) When TimeNet is in Networked mode, changes made to Preferences, clients, and projects will be seen by everyone connected. When a change is made on one machine it will automatically update the connected machines in real time. TimeNet will also remember to be in Networked mode and linked to that Networked Data Folder every time it is opened. Resetting the Networked Data Folder Sometimes TimeNet can’t find the Networked Data Folder that has been previously set. This can happen if the file’s path has changed, or the network is on a new machine. If for any reason when switching to Networked mode TimeNet gives you an error or simply seems stuck in Local mode, you can reset the Networked Data Folder using the following method: Hold down the Option key on the keyboard and click on the File menu. Notice the Work On Network item has changed to say “Configure Network…”. Select this to be presented with Network Setup Assistant. From here you can reconfigure TimeNet’s network settings. TimeNet Manual Page 34 Using Buzz Me! to Set Reminders TimeNet’s Buzz Me! feature lets you quickly create a reminder and get back to work with the peace of mind in knowing that you will be reminded exactly when you’re supposed to do that certain task. Buzz Me! reminders can also be set to popup on all networked machines. Set a reminder on one machine and see it popup on all networked machines when it is time. Creating a Buzz Me! Reminder The Buzz Me! feature can be found under the Window menu (⌘5) or in the global menu bar status item. If you quit TimeNet, any Buzz Me! reminders that you have set will not be shown. When quitting, TimeNet will let you review any Buzz Me! reminders that haven’t buzzed yet. TimeNet Manual Page 35 About TimeNet Data TimeNet stores all settings, clients and project details in one folder named TimeNet Data. You can find this folder at: ~/Library/Preferences/TimeNet Data The ~ Symbol (tilde) represents the home folder of the currently logged-in user in Mac OS X. You can quickly get to your home folder by using the Finder window’s sidebar or selecting Home from the Go menu in the Finder (Shift+⌘H). Information is stored locally and never sent over the internet. Data is only shared using Apple File Sharing (AFP) among authorized users. TimeNet uses invisible files to store some aspects of data. Because of this, it is extremely important that when backing up data or otherwise working with the data folder, you must copy the entire TimeNet Data folder, not just the file within it. Backing Up Your TimeNet Data TimeNet is designed to run your entire business. It is critical to maintain backups of this data. Fortunately, there are a number of easy ways to do so. 1. Use Apple’s Time Machine. Time Machine makes hourly backups of your user folder, among other things, and as such will always have a current backup of your TimeNet Data folder. 2. TimeNet’s Automatic Backup Feature makes a backup of your database every time you quit TimeNet. 3. Use the “Backup Data” Command (⌘B). In the File menu of TimeNet there is a Backup Data... function. Select this and choose a save location for the TimeNet Data Backup folder. TimeNet Manual Page 36 About TimeNet Data (cont’d) Transferring Your TimeNet Data to Another Machine To transfer your data from one machine to another: 1. Locate the ~/Library/Preferences/TimeNet Data folder and make a copy of it to the network, thumb drive, CD-R, or another storage device. 2. Transfer the folder to the new machine. 3. Move the folder to ~/Library/Preferences where ~ is the home folder of the logged in user on the new machine. 4. Open TimeNet on the new machine. You should see all data carried over from the old machine now on the new one. License Information is not copied with the data. You will have to register TimeNet on the new machine using the license code provided to you at the time of purchase. You may use the same license code for 2 different machines as long as they are owned by the same person and will not be operating simultaneously in a networked environment. Restoring From a Backed Up Data Folder It’s very easy to restore TimeNet from a backed up data folder. First, make sure all windows are closed except the Main window (the Main window can be closed as well). Next, choose Restore Data from the File menu (Shift+⌘R). Then, select a TimeNet Data folder and click Select. TimeNet will now rename the current TimeNet Data folder to have “~copy” at the end, and copy the selected folder to your ~/Library/Preferences folder and then reflect the restored data. Reverting to an Older Version of TimeNet If you see a “TimeNet Data ~old” folder in ~/Library/Preferences this means that TimeNet has converted data from an earlier version’s data structure. If you intend to revert back to the previous version of TimeNet, rename the “TimeNet Data” folder to “TimeNet Data ~new” and rename the “TimeNet Data ~old” folder to “TimeNet Data”. TimeNet Manual Page 37 Changing Your TimeNet License Code Once you’ve licensed your copy of TimeNet with a license code, TimeNet will be locked to that code on that computer. If you’ve licensed multiple machines for TimeNet with the same code, you will be unable to use them simultaneously on a network. If you purchase an additional license code down the road, you will need to reset the license in order to use the new code. To change the TimeNet License on a machine, open TimeNet on that computer. Click the TimeNet menu, and select the License Details… option. Enter your new name and license code, and click Register. TimeNet Manual Page 38 How To Contact AppleSource Software If you have an idea for a new feature, or have found a bug, or just have a question regarding TimeNet, we'd love to hear from you. Here's how to get in touch with us: Use our form online: http://www.applesource.biz/support/index.html#send Email us directly: [email protected] Visit our support site: http://www.applesource.biz/support.html For more information on TimeNet development, what’s coming in new versions and prerelease information, follow @applesource on Twitter and check out the AppleSource Developer’s blog at http://www.applesource.us TimeNet Manual Page 39 Purchasing TimeNet Order online via credit card or check: http://www.applesource.biz/order/ 1 TimeNet is provided as a digital download. We do not ship a physical product. The full version of TimeNet is always available on our website at http://www.applesource.biz/software/timenet (in demonstration form). Once you’ve downloaded the demo, you can unlock it with a license code. This is what will be emailed to you upon purchase. 1 PayPal is our authorized online payment handler. You will be making credit card payments through them. TimeNet Manual Page 40 Appendix A. Credits TimeNet is © 2014 AppleSource Software [Development] Perry Fjellman [Design and Marketing] Perry Fjellman Sarah Jones Ian Darby Kris Parker David Chapman [Testing and Quality Assurance] Sarah Jones Andy Carhart Kris Parker Ian Darby [Special Thanks] Chris Molé Linda Barnes TimeNet Manual Page 41 Appendix B. Legalities Initial Information TimeNet is distributed "as is", and offers no warranties. The author of this software (Perry Fjellman) takes no responsibility for any damage, coincidental or not, that may be caused by the use or misuse of this product. This software is designed to operate as advertised and any unintended problems will be corrected as brought to the attention of AppleSource Software. We cannot be held responsible for losses in time or money from data corruption or hard drive failure. It is the user’s responsibility to keep current backups of TimeNet Data. Distribution TimeNet is a commercial product. The demo may be freely given to a friend, coworker or the man at the bagel shop, provided that it is not modified in any way and this document is included. The TimeNet Demo can be included on a CD, provided you E-Mail us with the publication information and the above requests are met. Additional Information This software may not be modified, copied without credit to the author, or otherwise altered for any reason. You may not modify this, or any other document included with this software package. Before you may use TimeNet, you must agree to the terms herein. © 2014 AppleSource Software We Open Doors, Not Windows http://www.applesource.biz/software/timenet [email protected] -http://www.applesource.us http://www.applesource.biz TimeNet Manual Page 42


© Copyright 2026