
Chemistry 101L Laboratory Manual Fall, 2014
Chemistry 101L Laboratory Manual Fall, 2014 Table of Contents 1. 2. Symbols Used in the Lab Handout........................................................................................................ 3 Introduction to the Chemistry Lab ........................................................................................................ 4 2.1. About the Lab ............................................................................................................................... 4 2.1.1 The Question to be Tackled.................................................................................................. 4 2.1.2 Learning Objectives ............................................................................................................. 4 2.1.3 To Prepare for the Lab ......................................................................................................... 4 2.2. Background ................................................................................................................................... 4 2.2.1 Fundamental glassware and lab equipment .......................................................................... 4 2.2.2 Pipeting ................................................................................................................................ 7 2.2.3 Reading the scale on glassware ............................................................................................ 9 2.2.4 Significant figures .............................................................................................................. 10 2.2.5 Significant figures in mathematical operations .................................................................. 10 2.3. Experimental procedure .............................................................................................................. 13 2.3.1 Making the standard curve ................................................................................................. 13 2.3.2 Measuring the soft drink solutions ..................................................................................... 14 2.4. Data Analysis .............................................................................................................................. 14 2.5. Sugar Content of Soft Drinks ...................................................................................................... 15 3. Electromagnetic Radiation – Electromagnetic waves ......................................................................... 17 3.1. About the Lab ............................................................................................................................. 17 3.1.1 The Question to be Tackled................................................................................................ 17 3.1.2 Learning Objectives ........................................................................................................... 17 3.1.3 To Prepare for the Lab ....................................................................................................... 17 3.2. Background ................................................................................................................................. 17 3.3. Experimental procedure .............................................................................................................. 22 3.3.1 Emission spectrum of Hydrogen ........................................................................................ 22 3.3.2 Emission spectrum of the Mercury lamp............................................................................ 22 3.3.3 Emission spectrum of the fluorescent tube and an incandescent light source .................... 22 3.4. Data Analysis .............................................................................................................................. 23 3.5. Report - Electromagnetic Waves I. ............................................................................................. 24 4. Electromagnetic Radiation – Perception of Colors ............................................................................. 27 4.1. About the Lab ............................................................................................................................. 27 4.1.1 The Question to be tackled ................................................................................................. 27 4.1.2 Learning Objectives ........................................................................................................... 27 4.1.3 To Prepare for the Lab ....................................................................................................... 27 4.2. Background ................................................................................................................................. 27 4.3. Experimental procedure .............................................................................................................. 34 4.4. Data Analysis .............................................................................................................................. 34 4.5. Report - Electromagnetic Waves II. ............................................................................................ 35 5. Quality of Natural Waters ................................................................................................................... 37 5.1. About the Lab ............................................................................................................................. 37 5.1.1 The Question to be Tackled................................................................................................ 37 5.1.2 Learning Objectives ........................................................................................................... 37 5.1.3 To Prepare for the Lab ....................................................................................................... 37 5.2. Background ................................................................................................................................. 37 5.2.1 Dissolved Oxygen .............................................................................................................. 40 5.2.2 pH of natural waters ........................................................................................................... 41 5.2.3 Nitrate concentration .......................................................................................................... 41 5.2.4 Water hardness ................................................................................................................... 42 5.2.5 Total Dissolved Content (TDS) .......................................................................................... 42 5.2.6 Physical Properties ............................................................................................................. 42 5.3. Experimental procedure .............................................................................................................. 43 5.3.1 Drawing a water sample ..................................................................................................... 43 5.3.2 Measurements Performed On-Site ..................................................................................... 43 5.3.3 pH Testing of the Water Sample ........................................................................................ 44 1 5.3.4 Measuring the Hardness (Ca2+-ion concentration) of the Water and the Nitrate Concentration ...................................................................................................................................... 44 5.3.5 Total Dissolved Solid (TDS) content ................................................................................. 45 5.3.6 Physical properties ............................................................................................................. 45 5.4. Data Analysis .............................................................................................................................. 45 5.5. Appendix ..................................................................................................................................... 47 5.5.1 Calibration of the Oxygen probe ........................................................................................ 47 5.5.2 Storing the DO Electrode ................................................................................................... 48 5.5.3 Calibration of the ISE Electrodes (ion-selective electrodes, pH electrode)........................ 48 5.5.4 Storing the ISE Electrodes (ion-selective electrodes, pH electrode) .................................. 49 6. Nuclear Chemistry .............................................................................................................................. 50 6.1. About the Lab ............................................................................................................................. 50 6.1.1 The Question to be tackled ................................................................................................. 50 6.1.2 Learning Objectives ........................................................................................................... 50 6.1.3 To Prepare for the Lab ....................................................................................................... 50 6.2. Background ................................................................................................................................. 50 6.3. Experimental procedure .............................................................................................................. 53 6.3.1 Shielding effect of materials............................................................................................... 54 6.3.2 Effect of Distance from Source .......................................................................................... 54 6.4. Data Analysis .............................................................................................................................. 55 6.5. Report – Nuclear Chemistry ....................................................................................................... 56 2 1. Symbols Used in the Lab Handout General instruction provided for the lab that is not part of the Experimental Procedure Tasks that you need to complete before coming to a lab Warnings related to equipment, instrumentation with handling instruction Specific instructions for a chemical or experimental setup that if not handled properly can explode (or implode) Specific instructions for flammable substance(s) being used in the particular lab Specific instructions for toxic substance(s) being used in the particular lab Specific instructions for corrosive substance(s) being used in the particular lab 3 2. Introduction to the Chemistry Lab 2.1. About the Lab 2.1.1 The Question to be Tackled What glassware is used in the Chemistry lab and how to use them? What are the basic operations in Chemistry labs? How to interpret measurements and process data? 2.1.2 Learning Objectives Learning the basic glassware used in a Chemistry lab Learning how to use the basic glassware properly Learning the accuracy of different glassware and circumstances when they are used Learning how to prepare a graph and basic spreadsheet operations in Excel 2.1.3 To Prepare for the Lab Read the Background section and complete the exercises Bring some of your favored drink (if it is carbonated, allow it to go flat overnight before lab) Bring your computer for the lab 2.2. Background 2.2.1 Fundamental glassware and lab equipment This of the most commonly used glassware and equipment is listed below. 4 Glassware Lab equipment Beaker Balance Erlenmeyer flask Bunsen burner Graduated cylinder Hot plate Test tube Spatula Volumetric flask Tongs 5 Graduated pipet Pipet bulb Volumetric pipet Evaporating dish Auto pipet Test tube rack Buret Crucible 6 Funnel Buchner funnel Squeeze bottle Mortar & pestle Filter flask Disposable pipet Watch glass KimWipes© 2.2.2 Pipeting One of the most commonly used glassware is the pipet. The volumetric pipet is designed for the delivery of a single volume (up to 100 mL) very accurately. The graduated pipets offer more flexible options, however they are less accurate. For example a 25-mL pipet has the markings in every 0.1 mL between 0 and 25 mL, therefore any volume with 0.1 mL accuracy between 0 and 25.00 mL can be delivered1. Pipets can be marked TD (To deliver) or TC (to contain). The ones marked TD deliver the designated volume without blowing out the last drop that naturally remains in the pipet when the liquid is 1 There are some variations about the last mL, in case the grading is missing for the last mL 7 drained out. The ones marked TC contain the designated volumes, therefore the last drop would have to be blown out. Steps of the pipetting: 1. Hold the tri-valve bulb (see Figure 2.1) upright with left hand. 2. Twist top of pipette into bottom of bulb until it is snug. Don’t force it the pipette will only go in approximately ¼ inch. 3. With right hand, squeeze and hold “A” valve. 4. With left hand, gently squeeze bulb (no need to squeeze it completely). 5. Release the “A” valve. Bulb will stay squished, so there is no need to Figure 2.1 The three-vale pipet bulb keep squeezing. 6. Continue holding bulb with left hand, and insert pipette into liquid. Make sure that the tip is deep enough so that you wouldn’t suck air into the pipet! 7. With right hand, gently squeeze the “S” valve. This will suck liquid into the pipette. Suck liquid abut ½-1” above the 0 mark or the fill line. Again, do not suck liquid into the bulb! 8. After liquid has reached the desired level, release the “S” valve. 9. Continue holding bulb in left hand, and remove pipette from liquid. Place it over a waste beaker. 10. Raise the pipet so that the 0 mark or the fill line is at eye level to avoid the parallax error and hold the pipet in the completely upright position. 11. Squeeze gently the “E” valve and slowly allow the liquid to drain until, the bottom of the meniscus is lined up with the 0 mark or the fill line. 12. Wipe the tip of the pipet with a KimWipe© 13. Place the tip into the target glassware so that the tip touches the wall, while you still hold the pipet upright. You may have to tilt the target glassware to make a contact between the wall and the pipet tip. 14. Gently squeeze the “E” valve and allow the liquid to drain. When to stop depends on the type of pipet that you are using: a. If you use a volumetric pipet marked TD, simply allow the liquid to drain. Do not blow out the last drop! b. If you are using a volumetric pipet marked TC, when the liquid stopped draining, gently squeeze the “S” valve while you apply a gently squeeze on the bulb (to apply extra pressure inside the bulb) until the last drop is blown out. c. If you are using a graduate pipet, less than the full volume, once the liquid started to drain, raise the pipet until the designated final mark is at eye level. Close to the final mark, ease up on the valve to slow down the drain and release the valve when the bottom of the meniscus is lined up with the desired mark. 15. More experienced users remove the bulb after it is filled with the solution and 8 quickly replace it with the index finger applying pressure on the stem. The liquid can be drained out be reducing the pressure by finger which allows air in and the liquid to drain. This method needs practicing, but ultimately it is easier than using the bulb! 2.2.3 Reading the scale on glassware Typically TD marked glassware is assumed to have uncertainty in the last reported digit +/-1 unit. For example a 100-mL volumetric flask is accurate to the nearest 0.01 mL and its volume is reported as 100.00 +/- 0.01 mL, unless it says differently on the flask. When a glassware is used with scale (for example a graduated pipet), the smallest marking is the last digit considered accurate, and your estimate of the next digit (“eyeballing”) between the two smallest marks will carry +/-1 unit uncertainty. For example, the graduate pipet in has the smallest marking 0.1 mL, the volume is between 6.6 mL and 6.7 mL. You will eyeball the next digit which will not be accurate: I would say it is closer to the 6.6 mark, so let’s call it 6.63 mL. The “3” was estimated; Figure 2.2 Reading the meniscus therefore, it carries the 1 unit uncertainty, so the on a pipet volume would be reported as 6.63 +/- 0.01 mL. As a practice, read the volumes from the following glassware mL mL mL mL mL mL mL mL 9 2.2.4 Significant figures The rules are as follows: 1. All non-zero digits are significant 2. After the decimal point tailing zeros are significant 3. Zeros between non-zero digits are significant 4. Leading zeros are not significant 5. Tailing zeros before the decimal point are ambiguous 6. Exact quantities have infinite number of significant figures 0.123 3 sig.figs. 1.234 4 sig. figs. 1.234x10⁻³ 4 sig.figs. 0.12300 5 sig.figs. 0.100000 6 sig. figs. 0.100010 6 sig. figs. 100.01 5 sig. figs. 00.123 3 sig.figs 1000 can be 1.000x10³ or 1.00x10³ or 1.0x10³ or 1x10³ In 1 dozen = 12, 12 has infinite number of sig. figs. In 1 kg = 1000g, 1000 has infinite number of sig. figs. Determine the number of significant places in the following quantities: # of sig. figs. 0.0010010 g 1.0234x10⁻³ kg 0.2345 g # of sig. figs. 0.2340 g .2340 g 1.0234 g 2.2.5 Significant figures in mathematical operations 1. Multiplication/Division: the result will have the same number of significant figures as the number with the least number of significant figure: J 2 4.187 2.34 g 15K 146.9637 J 1.5 10 J gK 4.187J/gK 4 sig. figs. 2.34 g 3 sig figs. 15 K 2 sig. figs. (the fewest sig. figs.) The result should have 2 sig. figs., but the number has to be converted to scientific notation and rounded (the 6 after the 4 has to be rounded up to 5) to show only 2 sig. figs. 2. Addition/subtraction: the result will have the same number of decimal places as the number with the fewest number of decimal places. 10.12mL 3.2mL 112mL 125.32mL 125mL 10.12mL 2 decimal places 3.2 mL 1 decimal place 112 mL 0 decimal places (fewest decimal places) The result should have 0 decimal place, hence the result is 125 mL which has three significant figures. 10 Perform the following calculations and round the result to the correct number of significant figures. d m 9.98 g V 10.00mL Five measurements were made and we need to calculate the average: 9.98 g 9.97 g 9.92 g 9.90 g 9.99 g Average:_______ g Density of soft-drinks Density is a physical quantity calculated from the mass (m) and the volume (V) of a substance (see the example before). Since the volume of substances vary with the temperature (but not the mass!), the density will also change with temperature. Typically objects expand as the temperature increases. The density of water is different: at 4 oC has the highest value below and above this temperature the density is decreasing. How does the volume of water/ice change as the temperature goes up or down from 4 oC? Based on your answer, explain why concrete can disintegrate winter time if it has small cracks. Solutions made from water have higher density because of the solutes present; the more solute a solution has, the higher the density is. Density can be measured several ways. The obvious choice is to measure the mass and the volume of an object or solution, which is what we will do today. In this lab, we will test the density of 5 different drinks, including the one you brought and based on the density we will calculate their sugar content. In order to use the density for concentration calculations we need a calibration curve that relates the density to concentration. For this, we have 5 solutions with known sugar concentrations: 5.00 %, 10.0%, 15.0 %, 20.0 %, and 25.0 % sugar. So the strategy that we follow is: 1. Measure the mass of 10.00 mL of each of the five calibrating solutions. 2. From their volume and mass, we calculate their density (d). 3. Make a calibration curve d vs. % sugar 11 4. Measure the mass of 10.00 mL of the five drinks and calculate their density. 5. Using the calibration curve, and the density of the drinks look up the corresponding % sugar values. Lastly, we will check how the measured % sugar content matches the one on the label. Let’s see a sample calculation. 1. A student measured the mass of five standard solutions, 10.00 mL each and obtained the following data: % sugar 0.0 5.0 10.0 15.0 20.0 m (g) 9.95 10.14 10.34 10.53 10.73 V (mL) 10.00 10.00 10.00 10.00 10.00 d (g/mL) 0.995 1.014 1.034 1.053 1.073 2. S/he then proceeded to measure the mass of 10.00 mL Coke and he got 10.38 g 10.38 g g 1.038 The density of the Coke was d 10.00mL mL 3. S/he obtained a calibration (standard) curve using the standards in the table above (see Figure 2.3). S/he then looked up what % sugar the 1.038 g/mL corresponds to, which turned out to be 11.1 %. 4. The nutrition label suggested that a serving size (which is the whole can, 335 mL) has 40 g sugar. 5. The mass of the drink in the can is (using the density that he obtained): g m dV 1.038 335mL 348 g mL 6. There is 40 g sugar in 348 g drink: 40 g 100% 11.5% 348 g 7. The error of his measurement was: theoretical exp erimental 11.5% 11.1% %error 100% 100% 3.5% theoretical 11.5% 12 Figure 2.3 Sample standard curve 2.3. Experimental procedure You will be working in groups of 3. There will be stations set up for each group. There will be a set of the four drinks and a set of the standard solutions up front. Every student has to turn in a separate report. Put on the bench the drink that you brought. Please remember, you are not allowed to consume anything in the lab, regardless if it is food or drink you brought or we it use for the lab! 2.3.1 Making the standard curve 1. Label six 50-mL beakers and obtain about 20 mL of each of the five standard solutions. Put some water in the sixth. 2. Place a 100-mL beaker on the balance. Zero it (tare it). 3. Pipet 10.00 mL of the water into beaker on the balance. Record the mass. 4. Zero the balance and pipet 10.00 mL of the first standard into the beaker. 5. Read and record with the remaining four solutions the same way. Note: no need the empty the beaker between samples as long as you don’t forget to tare it. 13 2.3.2 Measuring the soft drink solutions 1. Label five 50-mL beakers and obtain about 20 mL of each of the four soft drinks. Put your own into the fifth. 2. Place a 100-mL beaker on the balance. Zero it (tare it). 3. Pipet 10.00 mL of the first drink into beaker on the balance. Record the mass. 4. Zero the balance and pipet 10.00 mL of the second drink into the beaker. 5. Read and record with the remaining three drinks the same way. 2.4. Data Analysis 1. Make a table in Excel for the standards as shown in the sample calculations. The table should include the calculations as well; however, you need to show your calculations with equations as shown in the example. 2. Provide a table with the results for the drinks, which includes the measured and the theoretical sugar content/serving size and % sugar content as well. Drink d(g/mL) % sugar (experimental) Sugar content from nutrition label (g/mL serving size) % sugar (calculated from nutrition label) % error 3. In the table, make sure you have the appropriate headers with units and the numbers are formatted to the correct number of sig. figs. 4. Make the standard curve in Excel. Make sure that: Axes are labelled with the correct units The gridlines are on to be able to estimate the % sugar content of the drinks. The graph is scaled properly to maximize the real estate of the chart. 5. Provide your calculations with appropriate units, sig. figs (see the sample calculation). 6. In your conclusion: Address what the possible source for errors was (Hint: study the nutrition labels before you leave!) Address how your predictions panned out for the order of sugar content among the drinks. 14 2.5. Sugar Content of Soft Drinks Name: Date: Group members: Table of data: Standard curve: 15 Calculations: Conclusions: 16 3. Electromagnetic Radiation – Electromagnetic waves 3.1. About the Lab 3.1.1 The Question to be Tackled What are the electromagnetic waves and in what form are they present in our environment? 3.1.2 Learning Objectives Gaining fundamental understanding of Electromagnetic Radiation and Waves Learning how fluorescent tubes work Understand the difference between fluorescent and incandescent sources 3.1.3 To Prepare for the Lab Download the Neon Lights and Other Discharge Lamps PhET simulation2. Make sure the application runs properly. If you need help with the Java orFlash installation, visit the Troubleshooting page of the Phet simulations3. Bring your computer for the lab 3.2. Background Electromagnetic waves are produced by the interaction of the electric and the perpendicular magnetic field and represent a form energy propagating in space, air, or materials. The energy is “packed” into individual entities, called “photons”. Electromagnetic waves have dual personality: they can behave like regular (e.g. mechanical) waves, but also they can behave as particles, depending on the circumstances. 2 3 https://phet.colorado.edu/en/simulation/discharge-lamps https://phet.colorado.edu/en/troubleshooting 17 The characteristics of waves are shown in Figure 3.1 and they are the wavelength (), and the frequency () which is related through the following simple equation: c ( 3.1) where c = 3x10⁶ m/s is the speed of light. Each photon carries the energy of E h ( 3.2) Figure 3.1 Characteristics of waves where h = 6.62x10⁻³⁴ Js is the Plank constant. The amplitude of a wave represents its intensity. The dimension of the wavelength is length, however it is customary to use prefixes to make it easier to talk about them. For example the visible range is between 4x10⁻⁷ and 7x10⁻⁷ m, but we express these waves in nm: 400-700 nm. The unit of the frequency is s1 or Hertz (Hz). In the light of ( 3.1) and ( 3.2), complete the following statement: Electromagnetic waves with longer wave length have ______________ (higher/lower) frequency, which corresponds to _______________ (higher/lower) energy. Figure 3.2 The electromagnetic spectrum 18 Figure 3.3 The visible part of the electromagnetic spectrum (numbers are the wavelengths in nm) The electromagnetic waves span across a wide spectrum (pun intended) as shown in Figure 3.2 ranging from the very high energy (high frequency and short wavelength) gamma radiation to the very low energy (low frequency and long wave length) radio waves. Electromagnetic waves interact with their environment according to their energy. For example for humans, the high energy gamma and X-rays have very damaging ionization effect (that is they destroy molecules). Waves in the ultraviolet range (UV) still have harmful effect on the human body (e.g. skin burning from the sun), although less damaging then gamma and X-rays. Waves between 400-700 nm we can see as light. In this range we perceive electromagnetic waves according to their wavelength (see Figure 3.3). The white light that arrives from the sun or an incandescent light bulb have electromagnetic waves with many wavelengths mixed together Complete the table below based on Figure 3.3. and using ( 3.1) and ( 3.2) (Note: convert nm to m first) Visible light Color Wavelength (nm) Frequency (s-1) Energy (J) Highest energy Lowest energy The waves over 700 nm (just above the visible range) we perceive as heat. During this lab we will concern ourselves with the visible range (400-700 nm), and during a later lab we will study gamma radiations on account of radioactivity. Let us set aside the electromagnetic waves for a moment and let’s consider a single hydrogen atom with its single proton and electron. The electron can be excited to higher energy levels by absorbing energy (which can be e.g. photons of an electromagnetic wave or the kinetic energy of flying electrons). Launch the Neon Lights and Other Discharge Lamps PhET simulation and configure it as shown below: 19 Set the voltage to the highest Check the Spectrometer and Run in slow motion options On the right you can see the energy levels of the single electron of the hydrogen atom, marked with numbers 1 being the ground state (most stable) and 6 the state with the highest energy. Click on the Fire electron button which will fire a single electron from the left electrode with a large kinetic energy. Observe and describe what happens with the electron on the hydrogen right after the two electrons collide.(Note: the color of the photons and electrons correspond to the energy that they have, ie. purple color high energy, red color low energy Describe what happens to the electron of the hydrogen in subsequent steps. (Note: the color of the wiggly lines represent the energy of the released photons and the direction of the lines represent the transition. For example the down pointing red wiggly line between two states represents the release of a photon with the energy of red light) Now, select the Continuous option and remove the check from the Run in slow motion, and slide the Electron Production slider to 100 % to make more electrons. The spectrometer shows the photons that are produced during transitions of the electron between the various states and the height of the lines is proportional to the number of photons with that particular wavelength. Grey lines represent photons with energy that is outside of the visible range. List the color 20 and the corresponding wavelength of the type of photons that are produced in the visible range. Click on the Multiple Atoms tab on the top and on the Reset button and run the simulation again. With this we create a situation when electrons are produced in a variety of energies from the left electrode, which means that the electrons in the hydrogen are hit by electrons with many different energies. Observe the spectrometer. List again the wavelength of the photons that are emitted. What can you conclude about the types of photons emitted by the hydrogen atom in terms of the distribution of the excitation energy? The spectrum which has only a few lines is called the line spectrum. The model that you used above is the schematic representation of a discharge tube. The commonly used fluorescent tubes work using this principle – well with some twists. We know that the fluorescent tubes contain mercury. Select Mercury from the drop down list on the right to replace the hydrogen atoms with mercury atoms, and click on the Reset button. Describe the emission spectrum of mercury. Does it look that it has many types of waves to make up the white light that we see when a fluorescent tube is turned on? Mercury has several lines at about 300nm, which is not visible as it is in the UV range, however these photons can excite the electrons in the fluorescent coating, and as much like we saw with the hydrogen, when the electrons of the coating are hit with high energy photons (from the mercury atoms), they get excited and they relax back to the ground state emitting lower energy photons, which photons are in the visible range, hence the light that we see. 21 3.3. Experimental procedure You will be working in groups of 3. There will be stations set up for each lamp. Proceed to a station that is free. If the hardware is already assembled by a group that used the setup, you need only to connect the setup to your computer. 3.3.1 Emission spectrum of Hydrogen 1. Slide the fiber optics attachment into the cell holder. 2. Connect the SpectroVis spectrophotometer to your computer and launch LoggerPro. 3. Click on the spectrophotometer icon on the top left and configure it for Intensity measurements. You will only use the detector part of the spectrophotometer. The detector will measure the light that goes through the fiber optic cable. 4. Start the data collection (click on the Start button). Now the computer monitors the entering light in real time, but no data is actually recorded. 5. Direct the end of the fiber optic cable to the Hydrogen lamp. Find a position where you get well defined spectrum, and while holding the fiber optic cable in that position, click on the Stop button. The last spectrum will be kept. Press CtrlL to save the data. 3.3.2 Emission spectrum of the Mercury lamp 1. Repeat the same process as described above with the Mercury lamp. 2. Make sure you save your data (press Ctrl-L) 3.3.3 Emission spectrum of the fluorescent tube and an incandescent light source 1. Repeat the same process as described above with the fiber optic cable pointing at a fluorescent tube on the ceiling. This make a little fiddling to get an optimal reading as the tube is rather far. 2. Make sure you save your data (press Ctrl-L). 3. Repeat the same process as described above with the fiber optic cable pointing at the original Edison source (incandescent source). 4. Make sure you save your data (press Ctrl-L). 22 3.4. Data Analysis 7. Attach a copy of the respective spectra in your report below. Make sure that the charts are properly scaled and labelled. 8. Provide a description and interpretation for each chart below in the space provided. 9. Compare the spectra of the Mercury lamp, the fluorescent tube, and the incandescent source and provide a reasoning why the coating is provided on the fluorescent tube. 23 3.5. Report - Electromagnetic Waves I. Name: Date: Group members: Spectrum Hydrogen lamp Source Mercury lamp Analysis: Analysis: 24 Incandescent source Analysis: Analysis: 25 Fluorescent tube Comparison of Mercury lamp, fluorescent tube, and incandescent source: 26 4. Electromagnetic Radiation – Perception of Colors 4.1. About the Lab 4.1.1 The Question to be tackled How do we perceive colors and how is the perception of color applicable to chemistry? 4.1.2 Learning Objectives Gaining fundamental understanding of color perception Understanding how light, as an electromagnetic radiation interact with objects and solutions, and what parameters impact the interaction Understanding how the spectrophotometer operates 4.1.3 To Prepare for the Lab Download and install the Color Vision application4. Download and install the Beer’s Law application5. Make sure the application runs properly. If you need help with the Java orFlash installation, visit the Troubleshooting page of the PhET simulations6. Bring your computer for the lab. 4.2. Background Let’s start with a question and some exercises. You are to work in groups, but everybody has to turn in a separate report. 4 https://phet.colorado.edu/en/simulation/color-vision https://phet.colorado.edu/en/simulation/beers-law-lab 6 https://phet.colorado.edu/en/troubleshooting 5 27 What color do you think the “B” has on a Red Sox Baseball cap? Launch the Color Vision application. Move the slides corresponding to the three light sources individually and record the color in each case what the observer perceives. If a source emits photons that have the energy of blue photons, what color would the observer see? Move now two slides at a time and record below in the cross section of the circles of the resulting color as the observer perceives it. The mix all three types of photons and record the perceived color in the middle. What you have just completed is called the color wheel which demonstrates the color we perceive as different types of photons are mixed. Our eyes cannot sort out the difference between the different types of photons. When all the three types of photons are present, we perceive white light. The white light as we know is composed of many more types of photons, but this simple model will help you understand the concept of colors. In reality a fraction of the objects emits any photons, yet every object seem to have a specific color. Moreover, “white light” doesn’t seem to appear on the electromagnetic spectrum, right? Click on the Single bulb tab on the top. The “filter” is an object, which absorbs photons with particular energies. The default “yellow” filter absorbs all the photons, except those with the energy corresponding to the yellow color. What color does the observer perceive? 28 Now adjust the slide bar until the observer can see red color. Photons with what energy are transmitted and which ones are absorbed (removed) by the filter? Go back to the question about the Red Sox baseball cap. Care to revise your opinion? In the light of your answers, photons with what energy are absorbed by the letter “B” and which ones are being reflected into our eyes? Just like solid objects, solutions also interact with electromagnetic waves. Solutions that have white light transmitted through them will remove the photons that they can interact with, and transmit the rest of the photons. Consider a solution which is perceived to have yellow color. Photons with what color are present in the transmitted light? Which photons were removed? Now, consider the following two factors: the concentration of the species that can absorb, and the path length that the light has to go through. Consider, furthermore a single photon. Mark the probability of the photon being absorbed as “higher,” “lower,” or the “same in the terms of these two factors. Higher concentration: Longer path: The conclusion that you came up with applies to many photons as well. The portion of the photons absorbed we will measure as absorbance (A), which is proportional to the amount/concentration of the species that can absorb the photon (c), and to the path length that the photon needs to pass (l): A A c l ( 4.1) The combination of these conclusions into one relationship is: A cl A cl ( 4.2) where is the constant called the molar absorption coefficient (unit M-1cm-1). The relationship between absorbance, concentration, and path length is called Beer’s Law. Launch the application called Beer’s Law and configure it as shown below . 29 Select the Beer’s Law tab Select Drink mix from the drop down list Set the concentration to the highest Set the wavelength to Variable What color does the solution of the drink mix have? Photons with what color are removed (i.e. absorbed) by the solution?(consider only red, green, and blue photons in your answer) The detector measures absorbance, which is proportional to the removed portion of the photons. With the slide bar on the light source, shine red, green, and blue light through the solution, and record the absorbance value for each. Red: Green: Blue: Interpret your results in terms of which photons are absorbed (do not get to the detector) or transmitted (hit the detector). Select a color on the source that exhibited significant absorbance. Record the absorbance. Move the slide bar that sets the concentration to half of the maximum concentration and record the value of the absorbance. Maximum conc: Half of the maximum conc: Interpret your findings. 30 Reset the concentration to its maximum value and record again the absorbance. Increase the path length that the light needs to pass by moving the double-headed yellow arrow (bottom right on the container) to the right. Record the absorbance again. Original path length: Longer path length: Again, interpret your findings. We will not use the quantitative relationship relating absorbance, path length, and concentration is this lab, however we will later in another lab. To study the interaction of electromagnetic waves with solution we use a device called spectrophotometer. There are many types of photometers, but they all use the same principle: they measure the change in an electromagnetic radiation as the radiation interacts with some substance. The most common is the visible spectrophotometer, which shines white light (not only light with a single wavelength) through a solution and the detector measures what portion of photons with each wavelength are removed. Figure 4.1 The schematic representation of a spectrophotometer The light from the source (which is typically a Tungsten incandescent source, which emits white light) is put through a cell or cuvette with a solution where some of the photons are absorbed and the remaining light is directed to a grating which effectively separates the photons by their color (much like a prism) making a rainbow. The range of colors then is directed to CCD sensor where each tiny pixel measures number of photons 31 with a particular color and each pixel transfers the signal to an amplifier from which the combined signal – the absorption spectrum - can be extracted. The cell is typically square shaped with 1cm edge and two opposite sides are parallel transparent, while the other two are rugged. The cell should always have to be handled by the rugged side, and never by the clear sides. The cell always has to be inserted so that the light goes through the clear and not the rugged sides. Again, the chart that shows the result, absorbance vs. the wavelength, is called the absorption spectrum. The absorption spectrum has the absorbance for photons with different energy (color), however for the following exercise, we will divide the spectrum according to the primary colors (also included is the white light, which is a combination of all three primary colors): Color Range Wavelength (nm) White 380–760 Blue 430–490 Green 510–550 Red >660 We compared three solutions: NaNO3, Cu(NO3)2, and Co(NO3)2. The following table indicates the observed colors: Solution Color Species NaNO3 Colorless Na+, NO3- Cu(NO3)2 Blue Cu2+, NO3- Co(NO3)2 Pink/purple Co2+, NO3- Since all three substances are strong electrolytes, they all dissociate completely to form ions (e.g. that is in the NaNO3 solution there is no “NaNO3”, rather Na+ and NO3- ions). As each solution has a different color, the color cannot be attributed to the anion, NO3–. Therefore, the different colors are associated with the different metal ions. Since the NaNO3 solution is colorless, we can conclude that the sodium ion does not absorb any photons in the visible spectrum. Since the Cu(NO3)2 solution is blue, we would guess that the Cu2+ ions don't absorb the blue photons and do absorb the red and green photons. There are several solutions on your bench. Complete the following table with your predictions and sketch the respective spectrum in the chart below the table. Mark the trace as shown for the CuCl2. To describe how much of a particular type of photon is absorbed use terms such as “some,” “all, “none,””most.” 32 Solutio n Ions present Co2+, Cl- CoCl2 Visible Color Purple/pin k Transmitted Primary Colors Blue and Red Absorbed Primary Colors Some blue, all green and some red Wavelength Ranges Absorbed 380–500 nm (blue), some 500–550 nm (green), all 650–750 nm (red) a some Ni2+, Cl- Green NiCl2 Fe3+, Cl- Yellow FeCl3 Cu2+, Cl- Light blue CuCl2 Na+, Cl- Clear Much green and a little blue Some of blue, all of red 380–500 nm (some blue) Some green, some red All blue, some red 380–500 nm (most blue) Much blue, some green All red, some green All None NaCl 33 650–750 nm (all red) 650–750 nm (some red) 650–750 nm (all red) 500–550 nm (some green) None 4.3. Experimental procedure You will be working in groups of 3. There will be stations set up for each group. Each student has to turn in a separate Report. 1. Connect the spectrophotometer to a computer and launch LoggerPro. 2. With no cell in the spectrophotometer, perform a calibration (refer to the Appandix for instructions) 3. Using a disposable pipet fill an empty cell 2/3rd with the first solution. 4. Wipe the cell dry and clean with a KimWipe© and place it into the spectrophotometer with the transparent sides in the light path. 5. Click on the Start button, and when the spectrum settled on the screen, click on the Stop button. 6. Press Ctrl-L to save your spectrum. Note: You can scale the graph for better visibility, since scaling won’t change your data. 7. Dispose of the solution from the cell, rinse it with DI water 8. Fill the cell the same way as before with your next solution and capture the spectrum. 9. Proceed with all the remaining solutions to collect their spectrum. 4.4. Data Analysis 1. Attach a copy of the respective spectra in your report below. Make sure that the charts are properly scaled and labelled. 2. Analyze the spectra and record the wavelength ranges where absorbance occurred. 3. Compare your predictions with your observations, and provide your reasoning for those where your prediction is not in line with your observation. 34 4.5. Report - Electromagnetic Waves II. Name: Date: Group members: The overlay spectrum of all of the solutions: 35 Solution Predicted Wavelength Ranges Absorbed Predicted Wavelength Ranges Absorbed (from the table that you previously completed) (from the spectra that you collected) 380–500 nm (blue), some CoCl2 500–550 nm (green), all 650–750 nm (red) a some 380–500 nm (some blue) NiCl2 650–750 nm (all red) 380–500 nm (most blue) FeCl3 650–750 nm (some red) 650–750 nm (all red) CuCl2 500–550 nm (some green) None NaCl Summarize briefly what you learnt during this lab: 36 If there is a difference, provide your reasoning 5. Quality of Natural Waters 5.1. About the Lab 5.1.1 The Question to be Tackled What factors affect the quality of natural waters and how can these factors can be tested/monitored? 5.1.2 Learning Objectives Understanding what factors impact the quality of natural waters Learning how to measure critical parameters of water quality Being able to interpret measured quantities and make an assessment of the water quality 5.1.3 To Prepare for the Lab Read the Background section below and complete the exercises Come to lab in an outfit that will allow you to go to a site and collect water samples Bring your computer for the lab 5.2. Background The “Quality of water” is defined in terms of its physical, chemical, and biological properties. These properties vary with the nature of the water (e.g. sea, lake, river, etc.) geographical location, weather (e.g. with seasons), human activity (e.g. agricultural activity). While there is no single standard for “good water quality” since water is present on Earth in many different types of environment and it serves a very diverse role, there are some general standards (e.g. low concentration of toxic chemicals). For each environment a specific set of standards can be applied. Because water covers 2/3rd of the surface of Earth, because water sustains the aquatic life, because good quality fresh water is essential for most living organisms on land, it is essential that government-level regulations control human activities and guard the quality of our waters. Water quality standards provide basic scientific information about water quality parameters and ecologically relevant toxicological threshold values. Some of these standards seem arbitrary, they may vary with location (e.g. by states), they change to follow the 37 accumulated scientific knowledge (e.g. heavy meatal content), but they are necessary to maintain the ecological balance on Earth. The substances present in the air have effect on water quality through rainfall as many of these substances are either soluble in water or simply “washed out” from the air by rain. These substances include dust, volcanic gases, natural gases in the air (such as carbon dioxide, oxygen, and nitrogen), substances that are results of human activity (such as sulfur dioxide, various nitrogen oxides). Especially toxic chemicals represent a grave danger as they can have a severe impact on the delicate ecological balance even in a very small concentration (e.g. hexavalent chromium or other heavy metals, chlorinated halogens, pesticides). One of the most pressing issues is providing society with the astronomical amount of water that it uses, especially drinking water. Thanks to the tight regulations in the US most places offer drinkable water, however standards vary. Often you can smell the chlorine used in municipal facility to kill bacteria in water, unless ozone (O3) is used, which is an extremely reactive (and expensive) relative of the oxygen that we breathe in, but the product of the decomposition of ozone is oxygen which is harmless. City water in households is typically treated with some passive filters, which remove some of the contaminants “Brita-type” filters). More effective devices use a process called reverse osmosis) which can also generate drinking water from seawater. The factors that in general affect the quality of water are listed in the table below. For each factor identify at least two sources (natural and/or human related) Factor Sedimentation Source Mining activity, Ore processing Runoff Mining, Urbanization Erosion Removing forests, Mining Dissolved oxygen Global warming, Waste water intake pH Industrial activity, Agricultural activity Temperature Global warming, Power plants Decayed organic materials Agricultural activity, Removing forests Pesticides Agricultural activity, Improper waste management Toxic and hazardous substances Combustion engines, Industrial activity Oils, grease, and other chemicals Road runoffs, Industrial activities Detergents Households, Carwash Litter and rubbish Improper garbage management, Irresponsible disposal 38 The most critical parameters are strictly monitored and controlled. For example in Massachusetts, the Massachusetts Water Resources Authority monitors and regulates these standards.7 In this lab we will measure the following properties: Dissolved oxygen (DO) Temperature pH Nitrate concentration Hardness (Ca2+ ion concentration) Total dissolved solid (TDS) content Physical properties (e.g. color, smell, turbidity/general appearance, density) 7 http://www.mwra.com/index.html 39 Which of the parameters listed above you think have to be measured on site and which ones can be measured in the lab using a sample of the water drawn at the site? Temperature and DO have to be measured on site as those parameters would change during sampling and subsequent transportation/storage 5.2.1 Dissolved Oxygen Molecular oxygen (O2) is a nonpolar substance and as such “technically” it is not soluble in water which is a polar substance (you will learn about polarity later this semester in both class and in lab). Therefore it is rather counterintuitive that the very small amount of oxygen that does dissolve in water makes aquatic life possible. The source of oxygen in water is mostly air; however oxygen is also produced by rooted aquatic plants and algae as a product of photosynthesis. Why do you think the major source of DO is air? Natural water typically has a large contact surface to air. Can you think of a situation when we artificially increase the DO content of water to increase the quality of water for fish? How is it being done? In an aquarium with a pump which bubbles air through water facilitating the solution of oxygen. The major factor that impacts the DO concentration is temperature (see Figure 1.). 40 Figure 1. DO concentration as a function of temperature at different atmospheric pressure How do you think higher temperature impacts the DO level? In the light of your answer, how do you think global warming affects the DO level? Higher temperature lowers the DO level, therefore global warming lowers the DO level as well. However, increased amount of organic materials lower the DO level. Can you propose an explanation why and where in real life this could be an issue (think of urban areas)? Decomposition (or oxidation) of organic substances (“rotting”) requires oxygen. Untreated sewer intake can increase the organic content of natural waters. Changing the DO level due to temperature drift yields an environment which is less favorable for the natural aquatic habitat and more favorable to new species which results in the upsetting of the ecological balance. 5.2.2 pH of natural waters pH is a measure of hydrogen ion concentration in water, which is also a measure of acidity (we will talk about it later during the semester). The scale goes between 0 (being very acidic, e.g. stomach acid has the pH about 1) to 14 (being very alkaline (like the drain cleaner liquids), 7 being in the middle, neutral, which is the pH of pure water. The pH scale is logarithmic; therefore one unit change reflects one order of magnitude of hydrogen ion concentration change. Most organisms are very sensitive the pH of their environment which is why –especially the more developed ones- devised mechanisms that maintain the pH in a desired range even if the environment changes in their entire body, which mechanisms are called buffers (again, to be discussed later). Most toxic gases from air are washed out by rain, yielding the phenomenon called acid rain, which alters the pH of natural waters as well causing severe damage to aquatic life. Which naturally occurring gas do you think also dissolves in water causing also the shift of the pH to acidic values? Carbon dioxide 5.2.3 Nitrate concentration The presence of nitrate ions in natural waters became a problem with the astronomical increase of fertilizers in the agriculture. While it is a source for the vital nitrogen for plants, the unused nitrate is washed off by rain into the natural water yielding, among 41 other things, accelerated eutrophication with uncontrollable plant growth, which has ripple effect on aquatic life, and indirectly, but perhaps most importantly: on sources of drinking water. Prolonged consumption of drinking water with high nitrate concentration can cause hypoxia, which could be lethal for infants. The problem with nitrate is that is extremely soluble in water and it is very costly to remove it. EPA recognizing the health related ramifications limits the nitrate concentration as 10mg/L or 10 ppm. 5.2.4 Water hardness Dissolved calcium and magnesium ions in natural water constitute the “hardness” of the water. Both ions, but calcium even more so are necessary for most organisms for bone formation and for metabolic processes. In humans calcium plays an even more complex role, including neural signal transmission. Typically high concentration of either ion doesn’t represent any health related problems. However, high concentration can impact soap and detergent performance which is why “softeners” are used in areas with high concentration of calcium and/or magnesium. Water hardness is the calcium concentration in terms of CaCO3 mg/L (or ppm) and the total hardness is the calcium and magnesium combined concentration in terms of CaCO3 mg/L (or ppm). Typically most of the hardness comes from the calcium ions, which is what we will measure during this lab. 5.2.5 Total Dissolved Content (TDS) TDS is a “litmus” indicator of the overall amount of dissolved substances.8 Most water soluble substances dissociate to form ions, which contribute to the conductivity of a water sample. The major ions potentially present are: H+, Na+, K+, Ca2+, Mg2+, NH4+, F-, Cl-, SO42-, NO3-, HCO3-, CO32-, PO43- . Because conductivity is not specific for any of these ions, the distribution of the ions cannot be determined with this method, however TDS is an indicator of how much substance is in dissolved which is particularly useful if monitored over a period of time as it can indicate significant changes in the concentration of dissolved substances. Describe the conductivity of pure water (Hint: remember what can be responsible for conductivity)! Since ions are responsible for conductivity and pure water has very low ion concentration, it also has very low conductivity. Conductivity is measured in Siemens (S). Actually because 1 S is a very large quantity, we typically report S/cm. In this context 2000 S/cm conductivity is equivalent with 1000 mg/L (=1000 ppm) TDS content. 5.2.6 Physical Properties 8 An alternative method is drying out a sample of water, measure the mass of the residue, and report it as mg/L This method usually yields somewhat higher TDS as it also includes the non-soluble floating substances that do not contribute to conductivity. 42 Physical properties are typically very qualitative (with the exception of density), therefore you have to be particularly detail oriented as you describe these properties.9 Visual assessment can help to identify some serious problems. For example foul odor can indicate dying aquatic life, sewer contamination, etc., floating layer on the surface can indicate oil pollution, etc. While most of these properties are recorded on site, the density will be measured in the lab. 5.3. Experimental procedure We will meet in the lab as usual. During the first week you will go a site designated by your instructor in groups of 5-6 to collect sample after the prelab discussion. Make sure you will return before the end of the lab period with your sample. Every member of the group has to return and report to the instructor. 5.3.1 Drawing a water sample The environmental conditions greatly vary on every site with sampling method, depth, sampling position of the site, weather, even the time of the day or the day of the year. Therefore each affecting parameter has to be recorded very precisely to make any measurement unambiguous, meaningful and potentially comparable to any other observed data. You will be assigned a site by your instructor to draw a sample from. Each group has to make a list of the proposed parameters to be recorded and/or measured on site, as well as a strategy as to how to draw the sample. Have your instructor approve your list and your strategy before going to collect the sample. 5.3.2 Measurements Performed On-Site 1. Once you identified a spot that is suitable for sampling AND the sampling can safely be performed, secure the accessories and devices that you brought with you. 2. Record in extreme details the conditions of the sampling. 3. Assemble the experimental setup. Attach the following probes to the LabQuest: Port 1: Temperature probe Port 2: Pressure probe Port 3: Oxygen probe . Technically the temperature is a “physical property”, however for water quality analysis purposes it is customary to report it separately 9 43 4. Turn on the LabQuest. The device will recognize the probes. The temperature and pressure probes do not require calibration; record the respective readings. 5. Calibrate the oxygen probe if you were told to do so (see Appendix for instructions). 6. Immerse the temperature probe into the water and record the temperature of the water (also the depth, position etc.) in your notebook. 7. Immerse the oxygen sensor into the water and gently swirl it around until the reading stabilizes. Record the reading into your notebook. 8. Draw and secure the water sample that you will bring back to the lab for further analysis. 9. Record your visual observations of physical properties. 10. Replace the DO electrode into the storage vial (see Appendix) 5.3.3 pH Testing of the Water Sample 1. Attach the pH probe to the LabQuest and turn it on. 2. Very carefully loosen the cap on the vial containing the electrode (do not remove the cap completely) and slowly pull out the electrode. Secure the vial in a place where it won’t get knocked over. 3. Calibrate the pH sensor (see Appendix for instructions). 4. Fill a 100-mL beaker ¾ with your sample and immerse the probe into it (about ½” deep) 5. Swirl the electrode around until the pH reading stabilizes and record your reading. 6. Rinse the probe with DI water, wipe it off with a KimWipe©, slide it into the storing vial gently until the bottom /2” of the electrode is covered with the solution inside while the electrode is held straight up. 7. Tighten the screw cap on the vial to secure the electrode. The electrode always has to be stored in the upright position so that the bottom ½” of the electrode is always in the storing solution. 5.3.4 Measuring the Hardness (Ca2+-ion concentration) of the Water and the Nitrate Concentration 1. Both of these quantities will be measured with ion-selective electrodes. Each electrode is specifically sensitive to one ion; however the process for both is identical. 2. Attach the first probe to the LabQuest and turn it on. 3. Very carefully loosen the cap on the vial containing the electrode (do not remove the cap completely) and slowly pull out the electrode. Secure the vial in a place where it won’t get knocked over. 4. Calibrate the pH sensor (see Appendix for instructions). 5. Fill a 100-mL beaker ¾ with your sample and immerse the probe into it (about ½” deep) 6. Swirl the electrode around until the pH reading stabilizes and record your reading. 44 7. Rinse the probe with DI water, wipe it off with a KimWipe©, slide it into the storing vial gently until the bottom /2” of the electrode is covered with the solution inside while the electrode is held straight up. 8. Tighten the screw cap on the vial to secure the electrode. 9. Repeat the same process with the other electrode. The electrode always has to be stored in the upright position so that the bottom ½” of the electrode is always in the storing solution 5.3.5 Total Dissolved Solid (TDS) content 1. 2. 3. 4. 5. 6. Plug the conductivity probe into the LabQuest and turn it on. There is no calibration needed, unless you are told otherwise. Rinse the electrode with DI water and wipe it off with KimWipe©. Set the switch on the control box of the probe to 2000 S/cm. Fill a 100-mL beaker ¾ full with the sample water. Immerse the electrode into the water sample. Make sure that the slot on the bottom of the electrode is fully covered with water and that there is no air bubble stuck in the slot. 7. Record the conductivity of the sample. 5.3.6 Physical properties 1. Visual observations had to be recorded on site. 2. To measure the density, tare an empty 100-mL volumetric flask on a top-loading balance 3. Fill the flask to the mark with a water sample and record the mass of the water to the nearest 0.01 g 5.4. Data Analysis Your lab report should contain: Names of your group. Date, time, location of sampling (preferably including a map and even a photo of the location). Method used for sampling and sample transportation. Measurements taken on site, calculation results. Measurements taken in the lab (time/date), calculation results. Details of calculations have to be summarized in the back of the report. For DO calculate the % saturation from your measurement and the DO content of the saturated water under pressure condition of the sampling (use the table from the Appendix). 45 Evaluate the nitrate content against the EPA mandated limit. Assessment of your findings: o Compare your results to the results with other groups. Try to interpret the differences, similarities. o Try to locate data on the Internet related to the same or similar site. Compare your data to the data available on the Internet. o If you suspect any of your data is off, provide plausible explanations for the reasons. Checkpoint: Did you include everything in your report, so that if someone would repeat your work, s/he would understand what you did, why you did, arrive to the same conclusions/interpretation? 46 5.5. Appendix 5.5.1 Calibration of the Oxygen probe 1. Configure the LabQuest as follows: a. Port 1: Temperature probe b. Port 2: Pressure probe c. Port 3: DO probe 2. Turn on the LabQuest and record the pressure and temperature readings. 3. From the table below, determine the oxygen level in the oxygen-saturated water under the measured temperature and pressure conditions (Note: you need to convert the pressure reading from the probe from kPa to Torr). This is going to be your second calibration point. Temp. 0°C 1°C 2°C 3°C 4°C 5°C 6°C 7°C 8°C 9°C 10°C 11°C 12°C 13°C 14°C 15°C 16°C 17°C 18°C 19°C 20°C 21°C 22°C 23°C 24°C 25°C 26°C 27°C 28°C 29°C 30°C 31°C 32°C 33°C 34°C 35°C 770 14.76 14.38 14.01 13.65 13.31 12.97 12.66 12.35 12.05 11.77 11.50 11.24 10.98 10.74 10.51 10.29 10.07 9.86 9.67 9.47 9.29 9.11 8.94 8.78 8.62 8.47 8.32 8.17 8.04 7.90 7.77 7.64 7.51 7.39 7.27 7.15 760 14.57 14.19 13.82 13.47 13.13 12.81 12.49 12.19 11.90 11.62 11.35 11.09 10.84 10.60 10.37 10.15 9.94 9.74 9.54 9.35 9.17 9.00 8.83 8.66 8.51 8.36 8.21 8.07 7.93 7.80 7.67 7.54 7.42 7.29 7.17 7.05 750 14.38 14.00 13.64 13.29 12.96 12.64 12.33 12.03 11.74 11.46 11.20 10.94 10.70 10.46 10.24 10.02 9.81 9.61 9.41 9.23 9.05 8.88 8.71 8.55 8.40 8.25 8.10 7.96 7.83 7.69 7.57 7.44 7.32 7.20 7.08 6.96 Atmospheric pressure (torr) 740 730 720 14.19 13.99 13.80 13.82 13.63 13.44 13.46 13.28 13.10 13.12 12.94 12.76 12.79 12.61 12.44 12.47 12.30 12.13 12.16 12.00 11.83 11.87 11.71 11.55 11.58 11.43 11.27 11.31 11.16 11.01 11.05 10.90 10.75 10.80 10.65 10.51 10.56 10.41 10.27 10.32 10.18 10.04 10.10 9.96 9.83 9.88 9.75 9.62 9.68 9.55 9.42 9.48 9.35 9.22 9.29 9.16 9.04 9.11 8.98 8.86 8.93 8.81 8.69 8.76 8.64 8.52 8.59 8.48 8.36 8.44 8.32 8.21 8.28 8.17 8.06 8.14 8.03 7.92 7.99 7.89 7.78 7.86 7.75 7.64 7.72 7.62 7.51 7.59 7.49 7.39 7.47 7.36 7.26 7.34 7.24 7.14 7.22 7.12 7.03 7.10 7.01 6.91 6.98 6.89 6.80 6.87 6.78 6.68 710 13.61 13.26 12.92 12.59 12.27 11.96 11.67 11.39 11.11 10.85 10.60 10.36 10.13 9.90 9.69 9.48 9.29 9.10 8.91 8.74 8.57 8.40 8.25 8.09 7.95 7.81 7.67 7.54 7.41 7.28 7.16 7.04 6.93 6.81 6.70 6.59 700 13.42 13.07 12.73 12.41 12.10 11.80 11.51 11.23 10.96 10.70 10.45 10.21 9.99 9.77 9.55 9.35 9.15 8.97 8.79 8.61 8.45 8.28 8.13 7.98 7.84 7.70 7.56 7.43 7.30 7.18 7.06 6.94 6.83 6.72 6.61 6.50 Note: the sections represent the likely range where you should be looking for your data 4. 5. 6. 7. Remove the screw cap with the electrode from the storage vial. Remove the blue protective sleeve from the electrode. Remove the screw cap from the electrode body. Unscrew the membrane from the electrode (about an inch of the bottom of the electrode) 47 8. With a plastic pipet fill the removed cap with the “Filling solution” up to the bottom of the thread inside the cap. 9. Replace the cap over a large beaker. As you tighten the cap, some liquid should come out through the thread. Rinse and wipe the electrode. 10. Tap anywhere on the LabQuest screen and select Calibrate. 11. On the next screen tap Calibrate now. 12. Place the tip of the electrode into the Sodium Sulfite standard (Note: only the very tip of the electrode has to be in the liquid) and keep swirling it around slowly. 13. Wait until the voltage reading stabilizes on the screen. The voltage reading on the screen should go down to between 0.20-0.40 V (if not, let your instructor know). 14. Enter 0 for the first calibrating solution and while swirling the probe, click on the corresponding Keep button. 15. Rinse and wipe the electrode. 16. Remove the screw cap from the empty plastic vial which is in the kit (looks like the vial in which the electrode is being stored. 17. Fill the empty vial about ¼ full with DI water. 18. Slide the electrode into the opening on the screw cap, screw the cap on the vial. 19. Position the electrode so, that when it is held upright, there is about ½” between the bottom of the electrode and the water surface. 20. Gently swirl the electrode around and observe the voltage on the screen which should settle somewhere in the 1.90-2.10 V range (if not, let your instructor know). 21. Swirling around saturates the air with moisture around the electrode. Enter the second calibration point for the saturated conditions (the value that you looked up from the table). Click the corresponding Keep button. Click OK twice. You should be back on the main screen and the value of the oxygen level should be close to the saturated value. 22. Loosen the screw cap and gently pull out the electrode. Now you are ready to measure DO content. 5.5.2 Storing the DO Electrode 1. 2. 3. 4. 5. 6. 7. Unscrew the cap from the bottom of the electrode. Dispose of the filling solution. Rinse the cap and shake out the residue water. Rinse the exposed electrode inside the electrode body and wipe it gently. Replace the cap, but do not tighten it. Slide the electrode back into the screw cap of the storing vial. Replace the blue sleeve onto the electrode (the bottom of the sleeve has to be flushed with the bottom of the electrode). 8. Replace the screw cap with the electrode to the vial. Push down gently the electrode to the bottom of the vial and tighten the screw cap. 9. Store the electrode in upright position. 5.5.3 Calibration of the ISE Electrodes (ion-selective electrodes, pH electrode) 48 1. 2. 3. 4. 5. 6. 7. 8. Plug the probe into the Labquest, Port 1. Turn on the LabQuest. Remove the screw cap with the electrode from the storage vial. Remove the blue protective sleeve from the electrode (if there is one). Rinse and wipe the electrode. Tap anywhere on the LabQuest screen and select Calibrate. On the next screen tap Calibrate now. Place the bottom ½” of the electrode into the standard with the lower concentration or for the pH electrode, into the buffer with the lower pH. 9. Wait until the voltage reading stabilizes on the screen. The voltage reading on the screen should go down to between 0.20-0.40 V (if not, let your instructor know). 10. Enter the concentration of the solution (or the pH of the calibrating solution for the pH probe0) first calibrating solution and while swirling the probe, click on the corresponding Keep button. 11. Rinse and wipe the electrode. 12. Place the electrode into the solution with the lower concentration (or higher pH for the pH probe). 13. Gently swirl the electrode around and observe the voltage on the screen which should settle. 14. Enter the concentration of the solution with the lower concentration (or the pH of the calibrating solution with the higher pH for the pH electrode) and while swirling the probe, click on the corresponding Keep button. 15. Click OK twice. Now you are ready to measure pH. 5.5.4 Storing the ISE Electrodes (ion-selective electrodes, pH electrode) 10. Rinse and wipe the electrode. 11. Slide it back into the screw cap of the storing vial. 12. Replace the blue sleeve onto the electrode (the bottom of the sleeve has to be flushed with the bottom of the electrode). The pH electrode has to be positioned so, that in upright position the bottom ½”of the electrode should be covered with the storing solution. 13. Replace the screw cap with the electrode to the vial. Push down gently the electrode to the bottom of the vial and tighten the screw cap. 14. Store the electrode in upright position. 49 6. Nuclear Chemistry 6.1. About the Lab 6.1.1 The Question to be tackled What kind of nuclear radiations are there, and what are their fundamental characteristics? 6.1.2 Learning Objectives Understanding the types of radioactive radiations Understanding the difference between the different types of radioactive radiations Being able to assess the potential danger represented by a radioactive radiation 6.1.3 To Prepare for the Lab Read the Background section below and complete the exercises Download the movie Radioactivity.mp410. Bring your computer for the lab 6.2. Background Radioactivity is one of the greatest discoveries of modern ages. With its great potentials to improve the quality of our lives (e.g. source of energy, medical benefits) comes a great responsibility to make sure that it is used in a safe and controlled manner. Despite the beneficial applications, the use of nuclear reactions continues to be controversial because all nuclear reactions produce by-products, including radiation and nuclear waste (unstable nuclei). While these issues represent a real problem, very often they are misinterpreted (especially by the media) and presented in ways that are out of context and intended to stir concerns for those who have little or no understanding of radioactivity. In this lab, some of the fundamental properties of nuclear radiation will be studied to help you acquire a better understanding of the safety issues surrounding nuclear reactivity. Any process in which the nucleus itself undergoes change and the identity of the element is altered is called a nuclear reaction. All unstable nuclei are said to be radioactive, 10 http://physics4.me/data/Radioactivity.mp4 50 meaning that they spontaneously disintegrate, or decay, into other nuclei. In this process, they typically emit electrons (beta particles, β), positrons (positive “electrons”, β+), or helium nuclei (alpha particles, α). Nuclear decay is sometimes accompanied by the emission of a photon of energy (electromagnetic radiation known as a gamma rays, γ). γray emission does not affect the nuclear composition (number of protons and neutrons), but, rather, affects the energy of the nucleus. Alpha and beta particles and gamma rays are all ionizing radiation. As they pass through matter, they expand their energy by interacting with electrons on the molecules they encounter. In the process, electrons are ejected and reactive free radicals are formed. These free radicals can initiate chain reactions that disrupt previously stable systems. The properties of the three types of nuclear radiation that will be investigated are described below: 1. Alpha particles (α) are helium nuclei, 24 He or 24 emitted by nuclei of high atomic number. An example is the radioactive decay of radium-226: 226 88 4 Ra 222 86 Rn 2 He The product nucleus has an atomic number that is two less, and a mass number that is four less, than that of the original nucleus. Alpha particles are ejected with high energy. They efficiently ionize atoms in their path. They do not travel far but produce intense ionization within a short path. They travel at 5% to 7% of the speed of light. 2. Beta particles (β) are high speed electrons. β-emission is equivalent to the conversion of a neutron to a proton: 1 0 n 11 p 10 e An example of β-emission is the radioactive decay of carbon-14: C 147 N 10 e 14 6 The product nucleus has an atomic number that is one more than that of the original nucleus. The mass number remains the same. With their high speed, up to 90% of the speed of light, single negative charge, and extremely small size and mass, the high energy β particles pass through matter much more easily than do particles. 3. Gamma rays (γ) are a form of high energy electromagnetic radiation and travel at the speed of light. Because of their high energies and their ability to penetrate deeply into matter, they can do considerable biological damage. They have neither mass nor charge. γ-emission often accompanies α- or β-emissions, since these forms of radioactive decay frequently leave the product nucleus in an 51 excited state. This unstable state can go to a lower energy state with the emission of electromagnetic radiation, which, for the nucleus, is in the γ-ray region of the spectrum. Complete the decay processes for the three isotopes that we will be using in this lab: -decay: 210 84 -decay: 60 27 -decay: 137 55 Po ....... 82 Pb ........ Co ........ 28 Ni ........ Cs ......... 56 Ba .......... Radiation (α and β particles and γ-rays) is detected using a radiation monitor. The most familiar type of radiation monitor is a Geiger-Müller (GM) counter. The simpler GMcounters give a beeping sound for each count, so higher radiation generates more beeps. The more sophisticated ones display the number of decayed nuclei within a period of time, typically per minutes, which is called counts-per-minute (or CPM). Note: The Geiger counter measures "counts." These counts include both radiation from our sample of interest and some unavoidable background signal from other sources. We only care about the signal that comes from our sample, which we will call "activity": activity = counts – background Activity is a measure of radiation intensity, so activity and intensity can be used interchangeably. Interestingly enough, the radioactive decay is a random process, that is if you repeat the measurement several times counting the number of decayed nuclei, likely you will have different counts. This is not an experimental error, rather arises from the randomness of the radioactive process. However, if the experiment is repeated many times, there will be a prevailing “average.” Watch the movie Radioactivity.mp4. The experiment was conducted with a Cesium-137 sample over 10 hours and recorded every minute. The movie plays back the experiment in a “fast-forward” manner (you can see how fast the minute counter goes in the yellow area). For each minute the number of decayed nuclei is counted. Then the plot is updated with the number occurred decays per minutes on the horizontal, the times the particular number of decay occurred on the vertical axis. First, you will test different materials as to how they shield the effect of the different types of radiation in comparison with air. You will use paper, aluminum foil, and lead. You will also determine whether or not physical separation (distance from a radiation source) is an effective way of protecting yourself from radiation. You will determine the relationship between intensity and distance for a γ-ray source. You will place a Geiger52 Müller counter at different distances from a γ-emitter and measure counts at each distance. It is postulated that the intensity (I) of many physical properties, such as light or radioactivity, decreases as the distance (d) of the source (of light or radioactivity) from the detector increases. The proposed relationship is: I k d2 ( 6.1) where I is the intensity of the radiation (CPM), d is the distance between the source and the counter, and k is a constant. What type of chart do you expect when you plot I as a function of d? Can you think of a mathematical operation on both sides of eqn. ( 6.1) so that the plot would be linear? What would be resulting equation? What would be the dependent and what would be the independent variable? If plotted, what would be the value of the slope and intercept symbolically? Equation: = Independent variable: Dependent variable: Slope: Intercept: 6.3. Experimental procedure You will perform these labs in groups of 3. There will be stations setup for both parts of the lab. Proceed to a station that is free. While the radioactive samples have low intensity radiation and they do not represent any danger, the samples cannot be moved from the bench or relocated. The sources are embedded in a plastic case which cannot be removed. If a sample appears to be damaged or the label doesn’t clearly indicate the type of isotope it contains, immediately notify your instructor! 53 6.3.1 Shielding effect of materials 1. Connect a computer to the LabQuest interface. Make sure that the GM-counter is connected to the LabQuest. 2. Launch LoggerPro and configure it as described in the Appendix. 3. Measure the CPM for background intensity 5 times for a minute. 4. Place the Cesium-137 sample under the detector, and repeat the 5 measurements. 5. Place a piece of paper between the source and the counter and repeat the 5 measurements. 6. Place a piece of aluminum foil between the source and the counter and repeat the 5 measurements. 7. Summarize your data in the table below: Measurement 1 2 3 4 5 Average: Corrected average: Background Air Paper Aluminum foil Note: Corrected average is the Average – Background 6.3.2 Effect of Distance from Source 1. Connect a computer to the LabQuest interface. Make sure that the GM-counter is connected to the LabQuest. 2. Launch LoggerPro and load the provided configuration file. 3. Place the source about 2cm from the GM counter and measure the distance with a ruler. 4. Click on the Start button. The program will collect the counts for 30s. When the 30s is up, click on the Keep button, and enter the measured distance into the appearing window (only the number, not the unit!) 5. Move the source to about 4cm and measure the exact distance with a ruler. 6. Click on Continue. 7. Again, when the 30s is up, click on the Keep button, enter the distance. 8. Continue to move the source with about 2cm steps up to about 20cm distance. 9. When done, click on the Stop button, press Ctrl-L, and save your data. 54 6.4. Data Analysis Your lab report should contain: Your measurements from the table above Conclusion as to which substance has the best and which one the worst shielding capability using your results Chart (properly scaled) of the I vs. d measurement Chart of the transformed data to a straight line Your conclusion whether the assumed mathematical relationship holds or not. Possible source for errors in the I vs. d measurements. 55 6.5. Report – Nuclear Chemistry Name: Date: Group members: Shielding efficiency of substances: Measurement 1 2 3 4 5 Average: Corrected average: Background Air Conclusions: 56 Paper Aluminum foil I vs. d chart: Calculated chart: Conclusions: 57 58

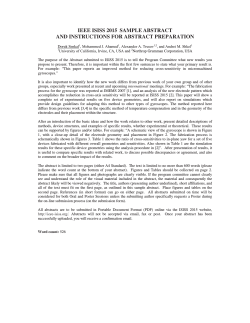


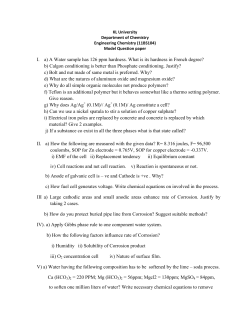


© Copyright 2026