
Mind Express manual
Mind Express
manual
Mind Express
Table of Contents
Introduction ..........................................................................................3
Installation ...........................................................................................5
I. Using the Application ................................................. 7
Chapter 1 - Getting started with Mind Express
1.1 Starting Mind Express............................................................................. 9
1.2 How to use the sample files.................................................................. 10
1.3 Using Mind Express 3 files in Mind Express 4 ....................................... 11
1.4 Using the Media library ......................................................................... 11
1.5 Entering document properties............................................................... 13
1.6 Importing and exporting files ................................................................ 14
1.6.1 Exporting documents................................................................................ 14
1.6.2 Importing documents................................................................................ 15
1.6.3 Exporting stylesets ................................................................................... 16
1.6.4 Importing stylesets ................................................................................... 16
1.7 Closing Mind Express ........................................................................... 17
1.8 Printing pages and messages ............................................................... 17
Chapter 2 - User Settings
2.1 Selecting a user....................................................................................
2.2 Creating a login file...............................................................................
2.3 User modes ..........................................................................................
2.4 Speech preferences..............................................................................
2.5 Options.................................................................................................
19
20
21
22
23
Chapter 4 - Scanning and Mouse Selection
4.1 Mouse mode......................................................................................... 29
4.2 Scanning mode..................................................................................... 35
4.2.1 The Method tab........................................................................................
4.2.2 The Preferences tab.................................................................................
4.2.3 The Timing tab.........................................................................................
4.2.4 The General tab .......................................................................................
36
38
40
41
4.3 Joystick ................................................................................................ 46
II. Editing the Application ............................................ 51
Chapter 1 - Editing a cell
1.1 Symbol - Label ..................................................................................... 53
1.1.1 Symbol .................................................................................................... 53
1.1.2 Label ....................................................................................................... 54
1.2 Fast Input .............................................................................................
1.3 Using the edit toolbar............................................................................
1.4 Using the Edit menu..............................................................................
1.5 Using the editor ....................................................................................
54
56
57
58
1.5.1 Basic Workflow ........................................................................................
1.5.2 The layout of the Edit window ..................................................................
1.5.3 Symbols and Label...................................................................................
1.5.4 Actions ....................................................................................................
1.5.5 Advanced features and cell types.............................................................
58
59
60
67
68
1.6 Using the right-click menu.................................................................... 69
Chapter 3 - Writing Messages
Chapter 2 - Layout, Document and Page settings
3.1 Writing a message................................................................................ 25
3.2 Saving messages.................................................................................. 27
2.1 Page settings........................................................................................ 74
2.2 Style settings........................................................................................ 75
2.3 Document preferences.......................................................................... 76
Mind Express
Chapter 3 - Working with Messages
3.1 Message options ..................................................................................
3.2 Message box cell..................................................................................
3.3 Message style settings .........................................................................
3.4 Using Message functions......................................................................
Chapter 1 - Word Prediction
79
80
81
81
Chapter 4 - Working with Actions
4.1 <Text>.................................................................................................
4.2 Address book........................................................................................
4.3 Agenda.................................................................................................
4.4 Battery .................................................................................................
4.5 Calculator .............................................................................................
4.6 Camera ................................................................................................
4.7 Date/time .............................................................................................
4.8 Dynamic list..........................................................................................
4.9 E-mail ..................................................................................................
4.10 GEWA .................................................................................................
4.11 Go to level ..........................................................................................
4.12 Go to page..........................................................................................
4.13 Grammar ............................................................................................
4.14 Message box ......................................................................................
4.15 Music And Video.................................................................................
4.16 Open document ..................................................................................
4.17 Phone functions..................................................................................
4.18 Phonetic .............................................................................................
4.19 Run application...................................................................................
4.20 Slideshow...........................................................................................
4.21 Sound.................................................................................................
4.22 User ...................................................................................................
4.23 Volume ...............................................................................................
4.24 Windows Control ................................................................................
83
84
85
85
85
85
85
85
85
85
86
86
86
86
86
86
87
87
87
87
87
89
90
90
III. Special Features..................................................... 91
1.1 Setting the word prediction options....................................................... 93
1.2 Editing the word prediction list.............................................................. 94
1.2.1 Editing words........................................................................................... 94
1.2.2 Startwords ............................................................................................... 95
1.2.3 Abbreviations........................................................................................... 95
Chapter 2 - Sentence Prediction
2.1 Editing the sentence prediction list ....................................................... 97
Chapter 3 - Music and Video
3.1 Using the music sample file .................................................................. 99
3.2 Making a music file ............................................................................ 100
3.2.1 Creating music cells...............................................................................
3.2.2 Creating music action cells ....................................................................
3.2.3 Creating music playlist cells...................................................................
3.2.4 Creating music playlist action cells ........................................................
100
100
101
101
3.3 Using the video sample file ................................................................. 101
3.4 Making a video file.............................................................................. 102
3.4.1 Creating a video cell ..............................................................................
3.4.2 Creating video action cells .....................................................................
3.4.3 Creating a video playlist .........................................................................
3.4.4 Creating video preview cells...................................................................
3.4.5 Creating video list action cells................................................................
102
103
103
104
104
Chapter 4 - Address book
4.1 Using the address book ...................................................................... 105
4.1.1 Adding a contact person ........................................................................ 105
4.1.2 Editing a contact person......................................................................... 106
4.1.3 Deleting a contact person ...................................................................... 106
4.2 Creating an address book cell............................................................. 106
4.3 Creating address book action cells...................................................... 107
Chapter 5 - Phone functions
5.1 Settings .............................................................................................. 109
Mind Express
5.1.1 On the computer..................................................................................... 109
5.1.2 In Mind Express...................................................................................... 109
5.2 Using the Phone module ..................................................................... 110
5.3 Making a phone file ............................................................................ 112
5.3.1 Calling.................................................................................................... 112
5.3.2 Creating cells for answering a call .......................................................... 113
5.3.3 Creating a cell for hanging up the phone................................................. 113
5.4 Using the sms sample file................................................................... 113
5.4.1 Opening the sms sample file................................................................... 113
5.4.2 Writing a message.................................................................................. 116
5.5 Making an sms file ............................................................................. 117
5.5.1 Creating a cell for sending messages ..................................................... 117
5.5.2 Creating cells for reading messages ....................................................... 118
5.5.3 Creating a cell for deleting a message .................................................... 118
5.5.4 Creating a cell for answering messages.................................................. 118
5.5.5 Creating a cell for checking for new messages ....................................... 118
5.5.6 Creating phone inbox cells...................................................................... 119
5.5.7 Creating a phone message content cell .................................................. 119
5.5.8 Creating a phone message sender cell ................................................... 119
5.5.9 Creating a phone message date cell ....................................................... 119
5.5.10 Creating a number of phone messages cell .......................................... 120
6.4.6 Creating a number of (new) e-mails cell................................................. 131
6.4.7 Creating a cell for sending e-mails......................................................... 131
Chapter 7 - Camera
7.1 Working with the Camera module ....................................................... 133
7.2 Making a camera file .......................................................................... 136
7.2.1 The camera viewing cell ........................................................................
7.2.2 The snapshot cell...................................................................................
7.2.3 Previous and next picture.......................................................................
7.2.4 Cell for deleting a picture .......................................................................
7.2.5 Cell to stop the camera ..........................................................................
7.2.6 The camera preview cell ........................................................................
136
136
136
136
137
137
Chapter 8 - Clock
Chapter 9 - Calculator
9.1 Using the calculator sample file .......................................................... 141
9.2 Making a calculator ............................................................................ 141
Chapter 10 - Battery level
Chapter 6 - E-mail in Mind Express
10.1 Battery level message....................................................................... 143
10.2 Creating a battery cell....................................................................... 143
6.1 E-mail settings ................................................................................... 121
Chapter 11 - GEWA
6.1.1 Server Settings....................................................................................... 121
6.1.2 Advanced ............................................................................................... 122
6.1.3 Sounds ................................................................................................... 124
6.2 Using the E-mail sample file ............................................................... 125
6.2.1 Writing and sending an e-mail ................................................................ 127
6.2.2 Address book ......................................................................................... 128
6.3 The Inbox ........................................................................................... 129
6.4 Making an e-mail file.......................................................................... 130
6.4.1 Creating an e-mail content cell ............................................................... 130
6.4.2 Creating an e-mail inbox cell .................................................................. 130
6.4.3 Creating an e-mail sender cell ................................................................ 130
6.4.4 Creating an e-mail date cell.................................................................... 130
6.4.5 Creating an e-mail subject cell ............................................................... 131
11.1 Programming infrared codes............................................................. 145
11.2 Transmitting IR codes ....................................................................... 145
11.3 Making a backup file of the GEWA commands .................................. 146
Chapter 12 - Slideshow
12.1 Using the slideshow module ............................................................. 147
12.2 Making a slideshow file .................................................................... 148
12.2.1 Creating a slideshow viewing cell ........................................................ 148
12.2.2 Creating slideshow action cells ............................................................ 149
Mind Express
Chapter 13 - Dynamic lists
13.1 Using the dynamic lists sample file ................................................... 151
13.2 Making a dynamic list....................................................................... 151
13.2.1 Dynamic lists........................................................................................ 151
13.2.2 Dynamic list cells ................................................................................. 153
13.2.3 Dynamic list action cells ....................................................................... 154
Chapter 14 - Dynamic pages
Chapter 15 - Agenda
15.1 Using the agenda.............................................................................. 159
15.1.1 Consulting today’s appointments .......................................................... 159
15.1.2 Consulting the monthly overview .......................................................... 159
15.1.3 Consulting the weekplanner ................................................................. 160
15.1.4 Consulting the dayplanner .................................................................... 161
15.1.5 Adding an appointment to the agenda................................................... 161
15.2 Editing the agenda............................................................................ 163
15.2.1 Adding new appointments to your agenda ............................................ 163
15.2.2 Adding an alarm to your agenda ........................................................... 164
15.3 Making an agenda file ...................................................................... 165
15.3.1 Creating time indicator cell ................................................................... 165
15.3.2 Creating an Agenda cell........................................................................ 165
Chapter 16 - Windows Control
Chapter 17 - Bliss Editor
17.1 Starting Bliss Editor ..........................................................................
17.2 Mind Express and Bliss Editor ...........................................................
17.3 A few ground rules ...........................................................................
17.4 Creating a new Bliss symbol .............................................................
17.5 The menu bar: File............................................................................
17.6 The menu bar: Edit ...........................................................................
17.7 The menu bar: Insert ........................................................................
17.8 The menu bar: Symbol......................................................................
Chapter 18 - Phonetic Script
169
169
170
171
172
172
173
173
License agreement
Please read the following license agreement carefully before you install Mind Express. If you object to this license agreement, please return the
complete Mind Express package to Jabbla.
Jabbla grants you the right to use this copy of Mind Express on a single computer. You are allowed to make one copy of this software for backup
purposes only. The Mind Express software is the property of Jabbla, and is protected according to the author’s law and international copyright
agreement.
Copyright
© Copyright Jabbla
All rights reserved. No part of this publication may be reproduced, stored in a retrieval system, translated to any language or transmitted in any
form or by any means, be it electronic, mechanical, magnetic, optical, chemical, manual, recording, or otherwise, without prior written
permission by Jabbla.
Trademarks
Bliss-symbols used in this program are derived from the symbols described in the work "Semantography", original copyright C.K.Bliss 1949.
Checked and approved 1996 by BCI monitors.
SymbolStix TM © N2Y, Inc.
The Library of Character/Logo Symbols in the SymbolStix symbol set contained in this software is included free of charge, may be used solely for
communication purposes and may not be sold, copied or otherwise exploited for any type of profit.
The Picture Communication Symbols ©1991-1998 Mayer-Johnson Co., USA. All rights reserved worldwide.
The Widgit Symbols ©Widgit Software Ltd 1993-1999.
Beta prenten © Beta VZW.
Picto/Visitaal pictograms ©Visitaal pictogrammen.
Picture This © Silver Lining Multimedia, Inc.
The Mulberry Symbols
©2004-2012 by The OATS Project Consortium
Mind ExpressTM is a trademark of Jabbla.
Mind Express
Introduction
Mind Express is an easy to use computer program that has everything a speech
therapist or teacher needs to create new communication grids and exercises. A
huge variety of symbols, pictures, speech, music and sounds can be used to
make interesting and stimulating methods of communication.
Mind Express allows people to form words and sentences by selecting pictures
and symbols, which can be spoken out loud using a clear, high quality speech
engine. Mind Express also has among other things, a built in grammar module,
which provides automatic conjugations of verbs.
An extensive range of symbols and icons are available for use in Mind Express.
They can be used to create communication grids and games and can also be
extended with your own drawings, photos or new symbols.
Mind Express can be accessed via touch screen, mouse, trackball, head mouse,
eye tracking system and 1 or 2 switch scanning. The appropriate access method
enables the user to work independently, often increasing self-esteem and
providing stimulation for creativity and development.
This manual consists of three main parts:
• The first part is intended for the end user, the persons with a
communication disability in their daily living. This part of the manual
explains how the user can work with the Mind Express software. Refer to
“Using the Application” on page 7.
• The second part of the manual explains how the therapist, teacher or
parent of the user can edit the application and adapt it to the individual
needs of the user. In this part of the manual, you can find instructions to
create a communication grid and to change the layout of the application.
Refer to “Editing the Application” on page 51.
• The third part of the manual contains all add-ons of Mind Express. It is
explained in detail how they can be used by the user and how they should
be edited by the therapist, parent or teacher. Refer to “Special Features”
on page 91.
3
Mind Express
Installation
System requirements
In order to be able to use Mind Express efficiently, you should make sure that
your system meets a number of minimum system requirements.
The minimum system requirements for Mind Express are the following:
• Windows XP or higher
• 256 MB RAM or more
• 1 GB of free disk space
• DVD-drive
Security
Mind Express is protected by either hardware or software protection.
• If your version contains a hardware key (HASP dongle), you should insert it
into your PC’s USB port.
• Follow the instructions on the registration card.
Installing Mind Express
To install Mind Express, you should insert the Mind Express dvd-rom into the
dvd-rom drive. If the installation does not start automatically, click Start > Run
and start the program Setup from the dvd-rom. You are guided through the
installation procedure by the Mind Express installation wizard. Follow the onscreen instructions to install the program correctly.
5
I. Using the Application
Mind Express
9
Chapter 1 - Getting started with Mind Express
This chapter describes the basic menu options that you need to master in order
to be able to work with Mind Express in a correct and efficient way.
• Starting Mind Express
• How to use the sample files
• Using Mind Express 3 files in Mind Express 4
• Using the Media library
• Entering document properties
• Importing and exporting files
• Closing Mind Express
1.1 Starting Mind Express
To start Mind Express
1. In the Windows Start menu, go to Programs > Mind Express 4 > Mind
Express.
Alternatively, start Mind Express directly by double-clicking the Mind
Express icon on your desktop.
The start-up screen appears while Mind Express is loading.
When finished loading, the me4_eng start file opens.
Mind Express
1.2 How to use the sample files
If you have installed the Mind Express 4 application, you will automatically have installed a couple of sample files. You can access these sample files via the Mind
Express 4 start window.
10
Mind Express
11
You can now choose one of the 8 categories to go to the corresponding demo
files.
Table 1: ME4 Demo files
Category
Description
communication
Select communication to get a list of preconfigured
keyboards
Even though the Mind Express 4 files are in .xml or .jmm format, the old Mind
Express 3 .bls files can easily be imported and used in Mind Express 4.
Importing Mind Express 4 files into Mind Express 3 is not possible
communication grids that can be used to express your feelings
For more information, refer to “Importing documents” on page 15.
or thoughts.
1.4 Using the Media library
Select keyboard to open a keyboard. You can choose a
keyboard with word prediction, with symbol prediction, etc.
words
1.3 Using Mind Express 3 files in Mind Express 4
Go to File > Media library to open the Media library. You have to use the library
to add your own pictures, sounds and photographs to the program.
Select words to open communication grids based on common
words.
computer
Select computer to get a list of computer tools you can use, e.g.
the calculator, e-mail, Windows control, etc.
games
Select games to get access to a couple of educational games,
e.g. to learn new words and practise counting.
calendar
multimedia
Select calendar to check your calendar or day planner.
Select multimedia to watch a movie, listen to music, to get an
example of a slideshow of photographs, etc
quick start
Select quick start to get some tips and tricks on how to quickly
perform a couple of basic actions in Mind Express.
To return to the main page, click the Mind Express icon.
In the top left corner you can filter your media to only documents, templates,
images, sounds or music and video.
You can select different folders or items at the same time by using the Shift or
Ctrl key on your keyboard.
Mind Express
12
In the Tasks pane, you can find tasks that can be performed. If you click an item
in the right window, more tasks are added to the list.
The Open window appears.
Table 2: All media types
Task
Description
Create new folder
To create a new folder in your Media library.
Add/import item(s)
To add/import an item to your library.
Delete item
To delete an item from your library.
Rename item
To change the name of a media item. You can also click the
name of the folder or item twice and type a new name for it.
Move item
To move an item to another place in the library.
Export item
To export an item from your library.
To import items into the library
1. Go to File > Media library.
The Media library opens.
2. In the top left corner, select the type of file you want to import.
3. Click Add/Import item(s).
4. Browse to the file you want to import and click Open.
In case of images, it is recommended to enable the Resize images
after import option, for large images are not necessary to fill in cells.
Moreover, large images will slow down the import notably. If you
select the check box, the images will be automatically resized. Only
in case of a background image it might be better to let this option
unselected.
Images should be saved in one of the following formats: WMF
(Windows Metafile), BMP (Bitmap), GIF (Graphics Interchange
Format), PNG (Portable Network Graphics) or JPG (Joint Photographic
Experts Group).
If their file format is supported, you can also add sounds or
pictures to the library by dragging them from another window into
the media library window. A copy of the sounds/pictures will be
made.
Mind Express
13
Table 4: Media library - Right-click menu
Table 3: Sounds and Music & Video only
Task
Description
Play sound
To listen to a sound.
Stop sound
To stop playing a sound from your library.
You can also right-click a folder or item in the list to change it.
Option
Description
Move
To move an item to another place in the library.
When browsing through the media library, you can use the bread
crumbs at the top of the screen to go back to the top folder.
1.5 Entering document properties
You can enter document properties to a document. This is particularly useful
when you want to export the document later on.
To enter properties to the current document
1. Click File > Properties.
Table 4: Media library - Right-click menu
Option
Description
Create new folder
To create a new folder in your media library.
Cut
To cut a specific item or folder to paste it on another place.
Copy
To make a copy of a specific item or folder.
Paste
To paste the item you copied before.
Delete
To delete an item from your library.
Rename
To change the name of a media item. You can also click the name
of the folder or item twice and type a new name for it.
The Document properties window opens.
2. Enter the author, contact and description and click OK.
The document properties are saved.
Mind Express
1.6 Importing and exporting files
Mind Express enables you to easily exchange files with colleagues and friends.
You can also download demo files from the Jabbla website (www.jabbla.com)
without much effort. Whereas in Mind Express 3 you had to pass on pictures,
sounds and photographs separately, in Mind express 4 files are exported with
pictures and sounds automatically included.
1.6.1 Exporting documents
14
5. Indicate if you want to export the images, sounds and/or linked documents
as well.
Images
exported along with the file.
If you disable this option, the images will not be exported.
Sounds
If you disable this option, the sounds will not be exported.
Linked documents
1. Go to File > Export > Current document.
If you enable this option, all documents linked to the exported
document will also be exported. This means that if cells in the
exported document open other documents, these other
The Save As window opens.
documents will also be exported. If you enable the Images and
2. Enter a name and select a directory for the export file.
Sounds options too, the images and sounds of these other
3. Click OK.
The Export window opens.
If you enable this option, all media library sounds will be
exported along with the file.
Mind Express 4 documents are exported as .jmm files.
To export a document
If you enable this option, all media library images will be
documents will also be exported.
Music
To export the music files that are used in the documents. The
export files may be very large if you check this option.
Video
To export the movie files that are used in the documents. The
export files may be very large if you check this option.
6. Click OK.
4. If desired, fill in the Author, Contact and Description fields.
Mind Express
The Export window opens.
15
The Import window opens.
7. Click OK.
The file is exported as .jmm file and can be found in the chosen
directory. Another Mind Express user can now import the file if
needed.
1.6.2 Importing documents
In Mind Express 4 you can import .bls files (Mind Express 3 files), .jmm files
(export files from Mind Express 4, Grid 2 Bundle files and Zingui files from the
Zingui device.
To import a document
1. Go to File > Import > Document (*.bls, *.jmm) or Grid 2 bundle (*.bdl) or
From Zingui...
The Open window appears.
2. Browse to the file you want to import and click Open.
3. Click Change folders if you want to modify the destination folder of the
documents, images and sounds. When you import a document into Mind
Express 4, the images and sounds used in the document will also be
imported. You can choose where those files will be stored. For each type of
file you can choose a specific folder.
• Original location: Original location is the default folder where the files will
be stored. This means it will be saved in the same folder as the folder it
was saved in before the import. If the folder doesn’t exist in the Media
Library, it will be created.
• Root folder: The files will be saved in the Root folder. The imported sounds
will be stored in the folder Sounds in the Media Library. The images in the
folder Images. The documents in the folder Documents.
• Select an existing folder in the media library
Mind Express
• Click New to create a new folder. The window New folder appears.
16
The Open window appears.
2. Select the imported document in the list and click Open.
The imported document opens.
1.6.3 Exporting stylesets
You can export all styles used in a specific document to be able to reuse these
styles in another document later on.
To export a styleset
Select Root folder if you want to create a new folder under the Root
folder or another folder if you want to create a new folder under the
selected folder.
4. Click OK to confirm.
5. Click OK to start the import.
The Import window opens showing the import progress.
1. Go to File > Export > Current stylesets.
The Save As window opens.
2. Browse to the place on your computer where you want to save the stylesets
and enter an appropriate name.
3. Click Save.
The styles are exported and the stylesets file has the extension .sty.
1.6.4 Importing stylesets
You can import stylesets into Mind Express. This way, there is no need to repeat
the time consuming style creation process.
To import a styleset
1. Go to File > Import > Styleset.
The Open window appears.
2. Browse to the .sty file you want to import and click Open.
6. When the importing procedure is finished, click OK.
The document has been imported into Mind Express.
To open the imported file
1. Go to File > Open.
Mind Express
The following window appears.
17
1.8 Printing pages and messages
If necessary communication grids and messages can be printed.
To print pages:
1. Go to File > Print and select Print pages.
3. Click Yes.
The new styles are now available in the style list.
1.7 Closing Mind Express
When closing the application, if changes were made, you will be asked whether
you want to exit Mind Express with or without saving the current grid.
To exit Mind Express
1. Click File > Exit.
The following message appears.
2. The pages can be printed as full pages, the aspect ratio will be kept. This
option means that the pages will be printed on A4 paper and that the
proportion between the rows and columns will be held.
3. Select Custom size if you want to print the grid on a custom size. You can
enter the width and the height in mm. Check Center on page if you want to
have the grids centered on the page.
4. Check Print labels if you want the lables to be printed. If this option is
disabled, only the symbols will be printed.
To print messages:
2. Indicate whether you want to save the changes made to the current
communication grid before closing Mind Express or not.
Mind Express closes.
1. Go to File > Print and select Print Message. Select the printer and click OK.
Mind Express
19
Chapter 2 - User Settings
To set or change preferences and options on user level, you should use the
Tools menu.
This chapter covers the following topics:
• Selecting a user
• Creating a login file
• User modes
• Speech preferences
• Options
The Select user window opens.
2.1 Selecting a user
You can configure Mind Express for optimal use by more than one user. For
every user, you can set different preference settings, dictionary files, letter
settings, etc.
When opening a document, the system will first look for
specific selection preferences and if found, these settings will
be used. If no selection preferences are specified, the user
selection settings will be used.
To set up user profiles
Table 5: Select user
Option
Description
To add a new user.
1. Go to Tools > Select user.
To edit the profile of the selected user.
To delete the selected user.
Password
If the user profile is secured, enter the password to log in or to
change the specific user settings.
Mind Express
20
Table 5: Select user
3. Set or change the preferences of the user and click OK.
Option
Description
2.2 Creating a login file
Show log on window
If you activate this option, the Select User window will appear
To make a login file
at start-up
when starting Mind Express.
1. Go to Tools > Select User.
2. Double-click User 1 to change the profile of the user.
Alternatively, click User 1 and then click the edit button.
2. Select a specific user and click the edit button.
The User window opens.
The User window opens.
3. Fill in the password of the selected user, for example “tea”.
When you open Mind Express, you have to select the cells tree (t) elephant (e) - apple (a).
Table 6: User profile
Option
Select Image
Description
You can add an image or a photograph to the user profile. Click
the button and select an image from the catalog.
Name
Password (optional)
To add or change the name of the user.
You can enter a password to secure Mind Express. No password
is set when Mind Express is installed.
Start document
If you enable this option, you can select a document that will
always be opened as soon as this user opens the Mind Express
application.
Mind Express
4. To make a cell containing the letters of a password, open the Edit window of
a cell and choose the action User > Append to password and for example
fill in the ‘a’ of ‘apple’. The Edit window of apple looks like this:
21
6. To make a cell for checking the password, open the Edit window of a cell
and choose the action User > Check password.
You can select a specific file that will open automatically
when you enter the correct password.
7. Make a cell to reset the entered password and start again. Open the Edit
window of a cell and choose the action User > Reset password.
2.3 User modes
5. Use the same procedure to complete the other cells.
You can use Mind Express with the following input devices:
• mouse
• trackball
• touch screen
• scanning with 1 or 2 switches
• head tracking
• eye tracking
• joystick
Mind Express offers you two different user modes that allow you to configure
your communication grids to best suit the needs and skills of the users:
Mind Express
22
1. Mouse mode: Using the mouse, you can click the cells in the
communication grid. A single click can trigger a sound, produce a word or
a sentence, or execute an action.
The settings that are relevant for the mouse also apply to the
trackball and the touch screen.
Table 7: Speech window
Option
Description
Speed
To change the speed of speech.
Enter a sentence or words and click the
speaker button to check the results of your
2. Scanning mode: Mind Express can also be used with a 1- or 2-switch
scanning system.
3. Joystick.
For more detailed information on the preferences of these two user modes, refer
to Chapter 5 Scanning and Mouse Selection.
2.4 Speech preferences
settings.
You can also link a personal dictionary file to the speech output engine. In this
dictionary, you include words that are not pronounced properly by the text to
speech synthesis engine.
To compose a pronunciation dictionary
1. Go to Tools > Speech dictionary.
The speech output speaks out the messages that you assign to the cells in the
communication grid.
You can even determine the characteristics of the speech output, such as voice,
volume and speed of speech.
To modify the speech output settings in the Speech window, go to
Tools > Speech... .
Table 7: Speech window
Option
Description
Language
To select the language you prefer to hear.
Voice
To select the voice you want to hear.
Voice volume
To change the volume of the voice.
General Volume
To change the general volume of the
computer.
The Speech dictionary window opens.
2. Do one of the following:
Table 8: Speech dictionary
Option
Description
Select the word list you want to use/edit.
Click the add button to create a new dictionary and enter a
name for it in the New list window.
To delete the selected word list.
To copy the selected dictionary and enter a name for it in
the New list window.
Mind Express
23
3. To enter a new item in the word list, click the add button at the bottom of
the window.
4. In the Word field, enter the word that is pronounced incorrectly and add its
correct pronunciation in the New pronunciation field.
5. To check the new pronunciation, click the speaker button.
6. To delete an item from the word list, click the delete button at the bottom of
the window.
7. To confirm your changes, click OK.
Select the Phonetic option if you want to enter a phonetic transcription of a word
in the New pronunciation field. The phonetic script used in Mind Express has
been listed in tables for your reference. Refer to the Appendix “Phonetic Script”
on page 175.
2.5 Options
In the Options window, you can set a couple of user specific settings.
To open the Options window, go to Tools > Options.
Table 9: Options window
Option
Startup in
Description
Indicate in which mode you want Mind Express 4 to start
up.
Startup with
To indicate if caption and menu bar should be shown on
startup of Mind Express or not. Possibilities are:
• Caption and menu
• Caption only
• No caption/No menu
Mind Express
24
Table 9: Options window
Table 9: Options window
Option
Description
Option
Description
Menu password
If you select this option, you can enter a password that
Allow typing in Message box
To enable you to type directly into the message box with
will be needed to make the menu bar reappear.
Start document
If you enable this option, you can select which document
should be opened each time you start the Mind Express
application.
Edit mode indicator
If you enable this option, you can choose the color of the
bar that will blink intermittently at the bottom of the
screen when being in edit mode.
Open editor by right-clicking
If you enable this option, you can also open the Edit
in mouse mode
window by right-clicking in mouse mode.
Quick recording
If you select this option, you can start recording in mouse
mode by clicking the cell for the indicated number of
seconds.
AGC
Automatic Gain Control: Select this option to make sure
all recordings will have about the same volume.
Noise Reduction
To remove noise from your recordings. Because of this,
hissing sounds may also get lost.
your keyboard.
Program language
To select the language of your menus.
Time notation
To change the time notation method.
Save changes every ...
If you enable this option, you can set the time interval
minutes
after which changes will automatically be saved.
Mind Express
Chapter 3 - Writing Messages
Mind Express allows you to create messages. A message can consist of a series
of symbols, of text, or both. Thanks to the speech synthesis engine, the
message can be read out loud.
In this chapter you will learn how to write a message in Mind Express.
This chapter contains the following sections:
• Writing a message
• Saving messages
3.1 Writing a message
Follow the procedure below to learn how to write a message in Mind Express.
The step by step instructions provide you with the ideal basis for further
experiments.
To write a message
1. Choose File > Open.
The Open file window appears.
2. To open the Mind Express 4 start window, click me4_eng.
3. Click communication.
4. Select an existing communication grid in which you want to compose a
message.
The chosen file opens.
25
Mind Express
5. To activate the message box, click write.
6. In the communication grid, select the cells you want to use in the message
by clicking them.
Depending on the message box settings (in the advanced part of the
Edit window), the text (1), the symbols (2), or both the text and the
symbols (3) will appear in the message box.
26
Mind Express
27
4. Click the cell to which you want to assign the message.
1
The message is stored in the cell. If the option Put symbols when
storing Message in cell is activated, the first symbols of the message
are also shown in the cell. For more information, refer to “Document
preferences” on page 76.
5. To open the message, click the cell under which the message is stored.
2
To save a message with the “Save message as” action cell
1. Write a message.
For more information on writing a message, see also “Writing a
message” on page 25.
3
2. Select the action cell Save message as.
3. Click a cell, for example the cell apple.
The message is now saved.
4. To open the message, click the action cell Open message and select the cell
under which the message is stored.
You can use the message box functions included in the communication grid (in
the form of action cells). For more information on using message box functions,
see “Using Message functions” on page 81.
To save a message with the “Save message as x” action cell
3.2 Saving messages
1. Write a message.
With the action Store in cell you can save the letter or a sentence. With the
action cell Save message as, you can save the message as a file linked to a cell.
With the action Save message as ‘x’ you can save the message under a specific
name.
To save a message with a “Store in cell” action cell
1. Write a message.
For more information on writing a message, see also “Writing a
message” on page 25.
2. Select the action cell Store in cell.
3. If desired, select a level.
For more information on writing a message, see also “Writing a
message” on page 25.
2. Select the action cell Save message as x.
The message is now saved.
3. To open the message, click the action cell Open message ‘x’.
Mind Express
29
Chapter 4 - Scanning and Mouse Selection
In this chapter, you will find detailed descriptions of the options available for
each of the two user modes, enabling you to select the most suitable
combination of options for the specific user.
• Mouse mode
• Scanning mode
• Joystick mode
When opening a document, the system will first look for
specific selection preferences and if found, these settings will
be used. If no selection preferences are specified, the user
selection settings will be used.
4.1 Mouse mode
Using the mouse, you can click the cells in the communication grid. A single
click can trigger a sound, produce a word or a sentence, or execute an action.
The settings that are relevant for the mouse also apply to the
trackball and the touch screen.
Go to Tools > Mouse selection to set the preferences of the mouse mode.
Mind Express
30
The table below gives an overview of the different mouse preference settings and their functions:
Setting
Description
Selection indicator
You can indicate a cell is selected, by
None
a border
Border large
the inverse
a circle at the bottom
Mind Express
Setting
31
Description
a circle at the top
Enlarge cell
When you select a cell, the cell is magnified. You can set how many times the cell should be enlarged when selecting
the cell (up to 10 times).
Show indicator during mouse movement
To show the selection indicator when you move the pointer over a cell.
If both the Enlarge cell option and this option are selected, the cell is magnified when you move the pointer over the cell.
Also show mouse Cursor
The mouse cursor stays visible, even though there is already an indicator shown during mouse movement.
Select on press/on release
The cell is selected as soon as the left mouse button is pressed or the cell is selected on release of the left mouse
button.
Dwell selection
If you enable this option, the cell over which the pointer has been positioned is automatically selected after a set period
of time. In the Timing section of the mouse selection window, you can set the dwell time. For example, if you enter 2
sec. and you hold the pointer over a cell for longer than 2 seconds, that cell is automatically selected.
Mind Express
Setting
Repeat dwell
32
Description
If you enable this option, dwell selection is repeated every time the selected period passes. For example, when a dwell
selection time of 2 seconds has been set, the cell over which you hold the pointer will be automatically selected every
two seconds, until you move the pointer to a different cell.
Dwell Indicator
If this option is enabled, the time that has passed in the dwell selection interval is indicated by:
a bar on bottom
a bar at the top
Mind Express
Setting
33
Description
a full circle clock
a hollow clock
External dwell jitter margin
Defines how big the area is in which a dwell-user can move the mouse pointer without breaking the current dwell.
Handy for users which tend to shake while moving the mouse.
Start on press, stop on release
Dwelling starts on press and stops on release of your pointer / finger of the screen. If dwell time has passed, the cell will
be selected.
Sound on selection
A default sound can be heard to indicate a cell is selected.
Mind Express
34
Setting
Description
Auditory feedback on mouse movement
The scanword of each cell, row or column is pronounced whenever you move your pointer over it. If no scanword has
been set, the <Text> action of each cell will be pronounced. If you enable the option Use label if no scanword is specified
the label of the cell will be pronounced instead of the <Text> action.
For more information on scanwords see “Auditory scanning” on page 44.
To set up the Voice settings click Voice. The window Speech appears on your screen. Choose the Voice settings and
click OK.
Timing
Click Post selection time to change the time interval that should pass before you can select another cell.
Click Acceptance time to change how long you should click and hold a cell before your selection is accepted.
Click Dwell time to change how long you should position the pointer over a cell before it is automatically selected.
Mind Express
4.2 Scanning mode
Mind Express can also be used with a 1- or 2-switch scanning system,
depending on the user’s skills and your scanning preferences.
Go to Tools > Scanning selection to set the preferences of the scanning mode.
Mind Express offers you a number of scanning methods, preferences and
options that allow you to configure grid scanning to best suit the needs and skills
of the user.
35
Mind Express
36
4.2.1 The Method tab
You can select one of the following advance, selection and scanning methods:
Table 10: Scanning selection - method tab
Setting
Options
Description
Advance
Automatic
Scanning advances automatically.
Tap switch
Scanning advances each time you press switch 1.
Hold switch
Scanning advances when you keep the switch pressed down.
Tap switch
The current cell, column or line is selected as soon as you press the switch.
Tap switch 2
The current cell, column or line is selected as soon as you press switch 2.
Automatic (after timeout)
When a set time interval has elapsed during which you do not press or hold the switch, the current cell, row or
Select
column is selected.
Hold same switch
Hold the switch you also use for scanning. When a set time interval has elapsed, the cell is selected.
Release same switch
Scanning stops when you release the switch, at which point the cell, line or column that was scanned when you
released the switch, is selected.
Accept tap
Tap same switch
Selection is made when you click the same switch you also use for scanning.
on press
A cell, row or column is selected when pressing down the switch.
on release
A cell, row or column is selected when releasing the switch.
Mind Express
37
Table 10: Scanning selection - method tab
Setting
Options
Description
Method
Linear
All the cells are scanned in a linear fashion, from left to right, starting at the top line.
Linear (column)
All the cells are scanned in a linear fashion, from top to bottom, starting at the top left.
Snake
The first row of the grid is scanned from left to right, the second from right to left, and so on.
Snake (column)
The first column of the grid is scanned from top to bottom, the second from bottom to top, and so on.
Row-column
Mind Express first scans all the rows in the grid and then the cells in the selected row.
Column-row
Mind Express first scans all the columns in the grid and then the cells in the selected column.
Back track
The first time you select, scanning continues in reverse order (from right to left or from bottom to top).
Step 1 - Step 2 -
Only with Column - Row
Scanning starts with switch 1, selection is made with switch 2. Scanning restarts with switch 2 and selection is
Selection
and Row - column
made with switch 1. Scanning restarts with switch 1 and selection is made with switch 2. Scanning continues
while alternating the function of the switches that way.
Prescan in blocks
The communication grid is scanned in blocks. If you enable this option, you can set the size of the blocks used.
Mind Express
4.2.2 The Preferences tab
Depending on your choices on the Method tab page, the Preferences tab will
have a different appearance and different options.
Depending on whether you are using 1- or 2-switch scanning, you can set a number of scanning preferences.
38
Mind Express
39
The following table gives an overview of the scanning preferences.
Table 11: Scanning selection - Preferences tab
Section
Option
Description
Restart scanning
After selection of a cell
If you enable this option, scanning resumes from the top left cell (or the first
row/column, depending on the current scanning method) in the grid after you
have made a selection.
With switch 2
If you enable this option, the user can use switch 2 (for example, the right
mouse button) to return to the first cell in the grid. If this option is disabled,
and the user scans beyond the cell of his choice, he/she needs to scan the
entire grid once more before being able to return to the cell of his/her choice.
Return from wrong group
Select on entire group highlight
selection
When activated, the entire group will highlight when the scanning has run
through all the cells of that group. Press the switch to jump to the next group.
After number of rounds
The cells of a row or column that is selected will be scanned for a specific
number of rounds. After that number of rounds, scanning jumps to the next
row, column or group.
Pause scanning
After selection of a cell
If you enable this option, scanning is temporarily interrupted when the user
has made a selection. To resume scanning, press a switch.
With switch 2
If you enable this option, scanning is temporarily interrupted when the user
presses switch 2. This option can only be used in 1 switch scanning mode. To
resume scanning, press switch 1.
After number of rounds
If you enable this option, scanning stops automatically when no selection has
been made within a set number of rounds through the grid.
Mind Express
40
4.2.3 The Timing tab
Table 12: Scanning selection - Timing tab
Which items appear on the Timing tab, depends on the choices you made on the
Method tab.
Option
Description
Backward step time
When the back track option is enabled on the Method
tab, you can change the backward step time, the time
interval elapsing between scanning of one cell/row/
column and the following cell/row/column.
Wait after group selection
You can change the time interval elapsing before
continuing scanning after having selected a row, column
or group.
Post selection time
After a selection, all switch input will be ignored for this
time interval.
Hold time
You can change the time you need to hold the switch
before selection is made. The hold time can only be set
when Hold same switch is the active selection method
(on the Method tab).
Auto select time
When Automatic (after timeout) is set as the selection
method, you can change the auto select time, the
Depending on the set scanning and selection methods, the Timing tab can have
one or more of the following 6 options.
Table 12: Scanning selection - Timing tab
Option
Advance time
Description
When scanning is set to advance automatically, you can
change the time interval elapsing between scanning of
one cell/row/column and the following cell/row/column.
timeout interval before automatic selection.
Mind Express
4.2.4 The General tab
On the General tab, some extra scanning options can be set.
The table below clarifies these extra options by means of an example.
41
Mind Express
42
Table 13: Scanning selection - General tab
Option
Description
Scanning indicator
The scanned cell/row/column can be indicated by
a border
the inverse
a circle at the bottom
Mind Express
43
Table 13: Scanning selection - General tab
Option
Description
a circle at the top
Enlarge cell
The indicated cell is magnified. In case of a full row or column, only the first cell is magnified. You can
set how many times the cell should be enlarged (up to 10 times).
Sound on advance
Each time a new cell/row/column is scanned, a sound can be heard.
Sound on select
When a cell/row/column is selected, you can hear a sound.
Skip cells with no action
If you enable this option, empty cells in the grid are automatically skipped.
Mind Express
44
Table 13: Scanning selection - General tab
Option
Description
Allow mouse during
You can move the mouse and use it to select cells in scanning mode.
scanning
If you enable this option, you can no longer use the mouse buttons as switches to select a cell,
column or row while scanning.
Auditory scanning
If you enable this option, the text for every cell is read out when the cells are scanned.
Table 14: Speech window
Auditory scanning
You can have Mind Express read out the text assigned to the cells when they are
scanned. If you select the Auditory scanning option on the General tab, the
following options appear on the tab page.
Option
Description
Voice volume
To change the volume of the voice.
Speed
To change the speed of speech.
Enter a sentence or words and click the
speaker button to check the results of your
You can select the channel of the scanning (Left channel - Right channel - Both
channels (stereo)). If for example you select left channel, you will hear the
scanwords through the left speaker and all other voice through the right
speaker.
If you want to modify the voice of the auditory scanning, click the Voice button.
In the Speech window, the language, voice and speed can be edited.
Table 14: Speech window
Option
Description
Language
To select the language you prefer to hear.
Voice
To choose the voice you want to hear.
settings.
Mind Express offers you the option of assigning short keywords (‘scanwords’) to
the cells in a communication grid. You could, for example, assign the scanword
“monkey” to the cell with the message “the monkey likes to eat bananas”.
When using auditory scanning, you will only hear the scanword “monkey”,
allowing you to scan the grid more quickly and efficiently.
If you enable the option ‘Use label if no scanword is specified’, you will hear the
label of a cell if no scanword has been assigned to that cell instead of the
<Text> action. The auditory scanning will first look for a scanword. If no
scanword is specified it will look for a <Text> action, unless this option is
enabled, then the label will be used as scanword.
For more information on labels see “Symbol - Label” on page 53.
Mind Express
To assign a keyword for auditory scanning to a cell
1. In edit mode, right-click the cell in the communication grid to which you
want to assign a scanword.
2. In the right-click menu, go to Scanword > Current cell, Current row or
Current column depending on the item you want to assign a scanword to.
The Scanword window opens.
3. Enter a keyword for auditory scanning in the text box.
4. Click OK.
45
Mind Express
46
4.3 Joystick
For more information on connecting a joystick, see your Windows manual and the manual of your joystick.
Select Tools > Joystick selection in the menu. The window Joystickselection appears on the screen.
Setting
Description
Selection indicator
You can indicate a cell is selected, by
a border
the inverse
a circle at the bottom
Mind Express
47
a circle at the top
Enlarge cell
When you select a cell, the cell is magnified. You can set how many times the cell should be
enlarged when selecting the cell (up to 10 times).
Auto wrap
If you enable the Joystick auto wrap option, the joystick indicator will jump back to the
first cell of a row when you have reached the end of the row; when you have reached the
end of a column, it will jump back to the first cell of that column. On the other hand, when
you have reached the beginning of a row or column, the joystick indicator will jump to the
last cell of that row or column.
If you disable this option, the joystick indicator will remain on the last cell of a row, even if
you keep moving the joystick to the right. The same goes for all other directions.
Select on press/on release
The cell is selected as soon as the selection button is pressed or the cell is selected on
release of the selection button.
Mind Express
Dwell selection
48
If you enable this option, the cell over which the pointer has been positioned is automatically
selected after a set period of time. In the Timing section of the mouse selection window, you
can set the dwell time. For example, if you enter 2 sec. and you hold the pointer over a cell
for longer than 2 seconds, that cell is automatically selected.
Repeat dwell
If you enable this option, dwell selection is repeated every time the selected period passes.
For example, when a dwell selection time of 2 seconds has been set, the cell over which you
hold the pointer will be automatically selected every two seconds, until you move the pointer
to a different cell.
Dwell Indicator
If this option is enabled, the time that has passed in the dwell selection interval is indicated
by:
a bar on bottom
a bar at the top
Mind Express
49
a full circle clock
a hollow clock
Sound on selection
A default sound can be heard to indicate a cell is selected.
Step repeat
If the jostick is moved in a certain direction, the indicator will automatically continue moving
in this direction as long as the joystick is pointing into this direction.
Timing
Click Post selection time to change the time interval that should pass before you can select
another cell.
Click Acceptance time to change how long you should click and hold a cell before your
selection is accepted.
Click Dwell time to change how long you should position the pointer over a cell before it is
automatically selected.
Click Step repeat time to set up the step time between successive steps with the option Step
repeat.
II. Editing the Application
Mind Express
53
Chapter 1 - Editing a cell
Before you can edit or complete cells in Mind Express, you need to open an
existing document or create a new one.
To create a new file in Mind Express
1. Click File > New.
The New file window opens.
2. Indicate if you want to create an empty document using a default or specific
style set or if you want to use an existing template.
You can save the first page of a document as a template. This way,
you can create a new document starting from an existing template
(in which some settings are already defined) instead of starting from
an empty document. This can save you a lot of work and allows you
to create different documents with common features.
3. Click OK.
If you chose to create an empty document, the Page settings window
opens.
4. Select the page type you want to use: a grid or freestyle.
If you use a communication grid, you should start from a fixed
number of cells. In freestyle you can draw your own cells.
5. Enter all other page settings and click OK.
For more information on the other page settings, refer to “Page
settings” on page 74.
A new file is created.
6. Define the layout of the grid.
In Mind Express, there are different tools to complete and edit the cells of your
communication grid. In any case, you need to be in edit mode.
To activate the edit mode, go to Edit > Edit mode or press F2 on your keyboard.
To exit edit mode, go to Edit > Mouse, Edit > Scanning or Edit > Joystick
depending on your preferred working method or press F2 again.
For more information on mouse mode, refer to “Mouse mode” on page 29. For
more information on scanning mode, refer to “Scanning mode” on page 35.
For more information on joystick mode, refert to “Joystick” on page 46.
This chapter covers the following topics:
• Symbol - Label
• Fast Input
• Using the edit toolbar
• Using the Edit menu
• Using the editor
• Using the right-click menu
1.1 Symbol - Label
1.1.1 Symbol
The symbols you use to complete your communication grid are selected from a
number of symbol sets that contain true symbols as well as images and
drawings. Apart from the symbols included in these sets, you can also create
your own symbols for use in Mind Express.
For more information, refer to “Symbol Catalog” on page 60 and “Using other
symbols” on page 61.
Mind Express
54
1.1.2 Label
1.2 Fast Input
If you select a symbol from one of the symbol sets, the text associated with it
automatically appears in the label field, as shown below:
The easiest way to complete the cells of a communication grid is to click the cell
you want to fill and type directly in it. The word you type is automatically entered
in the symbol field, the label field and the speech field. Refer to the image
below.
If you want to display another text caption for the symbol than the one offered by
default, simply enter the new one in the field next to the label icon. For example,
if you want to display the text “flower” with the rose symbol, instead of the
default text “rose”, enter “flower” in the label field.
Repeat this action for each cell to complete the whole communication grid.
You can edit or complete several cells at the same time. Use the
Shift and/or Control keys to select a number of cells and start
typing.
A lot of shortcuts can be used to complete the communication grid more quickly.
You can find an overview in the table below.
Table 15: Keyboard shortcuts
For more information, refer to “Setting a Label” on page 62.
Shortcut
Description
Arrow keys
To move through the communication grid.
Tab
To go through the communication grid forwards (from the top
left to the bottom right).
Mind Express
55
Table 15: Keyboard shortcuts
Shortcut
Shift-tab
Table 15: Keyboard shortcuts
Description
Shortcut
Description
To go through the communication grid backwards (from the
Backspace
To delete the label of the selected cell. The symbol and action(s)
bottom right corner to the top left corner)
Insert
To add a new page. The new page will have the same page
are not deleted. You can now type a new label directly in it.
Ctrl + m (*)
settings as the current one.
Shift + Insert
To add a new page and add a “Go to page” action to the
selected cell(s).
F2
To switch between edit mode and mouse mode.
F4
To open the Choose symbols window. This function enables you
to select a couple of symbols very quickly. For more
information, refer to “Using the Choose symbols window (F4)”
on page 55.
F5
To open the Edit window of the selected cell.
F6
To open the symbol window to choose from all symbols related
to the one you entered at first.
F7
To open the actions window, to see which actions are listed for
a specific cell or to edit the actions list for that cell.
F8
To open the Page settings window.
Ctrl + x
To cut a cell. The content of the cell is moved to the clipboard.
Ctrl + v
To paste what you have cut or copied before to the selected
cell.
Ctrl + c
To copy the selected cell.
Del
To clear the selected cell. The content of the cell is lost, except
if you undo the action of deleting.
To change the (spoken) message of the selected cell. You can
type the new message directly in it.
Ctrl + i (*)
Ctrl + l (*)
To directly change the image (symbol) of the selected cell.
To change the label of the selected cell. You can type the new
label directly in it.
Ctrl + arrow up/down
To scroll through the symbols list.
Ctrl + arrow left/right
To scroll through the different cell styles.
Ctrl + a
To select all cells of the communication grid. Now you can edit
all cells at the same time, e.g. change the style of the cells by
using the Ctrl + arrow left/right combination.
Ctrl + z
To undo your latest action.
Ctrl + y
To redo the action undone before.
(*): Shift + backspace clears the content of the cell.
Using the Choose symbols window (F4)
You can use the Choose symbols window to add various symbols to your
communication grid very quickly.
1. Select one or more cells in the communication grid and press F4 on your
keyboard.
Mind Express
56
The Choose symbols window opens.
The symbols are added to the cells in your comminication grid.
If you selected more symbols than the number of cells available,
only the first symbols from the list will be inserted.
1.3 Using the edit toolbar
The procedure below shows how you can complete a communication grid by
using the edit toolbar. By executing this procedure, you take your first steps in
designing your own communication grid.
To complete the cells in a communication grid by using the edit toolbar
1. After having created or opened a communication grid, click Edit > Edit
mode to activate the edit mode.
Alternatively, use the shortcut key F2 on your keyboard.
At the top of the communication grid, the edit toolbar appears.
1
2. Use the search tools to get the symbols you might want to use to appear
below.
3. If desired, click Add all to add all symbols in the results list to the
communication grid.
4
2 3
Table 16: Edit toolbar
No.
Description
1
To choose a symbol for the selected cell.
Otherwise, click the symbols you want to use.
2
To open the symbol window.
The symbols you selected are listed in the top right corner of the
window.
3
To enter the label for the selected cell.
4
To show the first action for the selected cell.
4. Click OK.
5 6
Mind Express
57
Table 16: Edit toolbar
No.
Description
5
To open the action window and add, edit or delete actions for the selected
cell.
6
To set the color and style for the selected cell.
2. In the communication grid, click the cell you want to fill.
3. In the edit toolbar, type the name of a symbol, enter a label and/or a speech
action.
In freestyle, the edit toolbar contains an extra button which should be activated
to draw your own cells on the page.
When the button has been activated, it turns green. Now you can start drawing
your own cells on the page.
In freestyle, cells can have different sizes and they may even overlap.
You can use the Ctrl and Shift keys on your keyboard to select some or all cells
at the same time. This way, you can change the style or position of the selected
cells at once.
For more information, refer to “Right-click menu - freestyle” on page 70.
The cell is filled accordingly.
You can resize cells by clicking the cell (in edit mode) and then
clicking one of the black squares that appear. Hold your mouse
and drag to the desired size.
1.4 Using the Edit menu
The table below gives an overview of the functions in the Edit menu in order of
their appearance in the menu.
Table 17: Edit menu
You can click the arrow next to the symbol field to choose another
picture that corresponds to the label.
4. Click the color and style icon at the right of the edit toolbar to select a
specific cell style from the list or create a new style by clicking New style in
the list.
Refer to “Style settings” on page 75 for more information on creating
a new cell style.
Menu item
Description
Mouse
To activate the mouse mode.
Scanning
To activate the scanning mode. For more information on
scanning, refer to “Scanning mode” on page 35.
Edit mode
To activate the edit mode.
Undo
To undo your latest action.
Mind Express
58
Table 17: Edit menu
Menu item
Description
Redo
To redo the action undone before.
Cut
To clear (the symbol, label and action(s) of) the selected cell.
The content of the cell is moved to the clipboard.
Copy
Paste
To copy the selected cell.
To paste what you have cut or copied before to the selected
cell.
Delete
To clear the selected cell. The content of the cell is lost, except
if you undo the action of deleting.
Select All
To select all cells in the communication grid. This can help you
to copy a full page.
You can use the Shift and/or Control keys to select several cells at
the same time and perform one of the standard Windows
commands mentioned above on all selected cells at the same
time.
1.5 Using the editor
The Mind Express editor allows for more advanced functions, compared to the
edit toolbar.
1.5.1 Basic Workflow
You can use the editor to edit the image, label (style) and actions of a cell.
To use the editor to complete or change a cell
1. In edit mode, right-click a specific cell.
2. In the menu that appears, select Go to editor.
Alternatively, press F5 on your keyboard or double-click a cell.
The Edit window opens.
3. Select one of the symbol sets next to the symbol icon.
4. Optionally, select a category and search for the symbol you want to add to
the cell.
5. Click the chosen symbol in the list.
Symbol, label and action are filled in automatically.
6. If needed, next to the label icon, enter the word(s) you want to appear in
your cell and select the style you want to use.
7. Verify or change the action assigned to the cell and click OK.
The cell is completed or modified.
Mind Express
59
1.5.2 The layout of the Edit window
There are 2 different layouts of the Edit window: the simple and the advanced. You can switch between these two layouts by clicking the corresponding button at the
bottom of the Edit window. The simple version contains the basic functions that are most often used. The advanced version is a bit more extensive, containing some
extra functions. In the simple version, click Advanced to get access to the advanced options.
A
A
B
B
C
A. Symbols and Label
B. Actions
C. Advanced features and cell types
You can use the Clear button at the bottom of the Edit window to reset the settings of the selected cell. A message will appear asking you to confirm you want to reset
the currently selected cell(s).
Mind Express
60
1.5.3 Symbols and Label
Mind Express contains a number of symbol sets including true symbols as well
as images and drawings.
Symbol Catalog
You select the symbols you want to use to complete your communication grid
from a number of lists. You can choose a list of symbols (a symbol set) by
selecting the set of your choice from the list next to the symbol icon in the Edit
window.
All symbols of the selected symbol set are shown in the list.
The symbol sets described above have been divided into different thematic
categories, as for example location, medical, nature,.... This allows you to filter
the main symbol list so that you can find the symbol of your choice more
quickly.
You can also search for items by one of the following search criteria: begins
with, contains and ends with. Automatically all symbols with its name beginning
with, ending with or containing the letters you entered, are shown.
You can add more than one symbol to a cell. In the advanced Edit window, click
the add button underneath Current images and select an image in the symbol
catalog.
Creating a new symbol based on an existing one
You can create a new symbol starting from an existing symbol from the catalog.
In the Edit window, right-click the symbol preview box and click Edit symbol. In
the advanced Edit window, you can also click the edit button underneath Current
images. The ImageEditor window opens containing the symbol you want to edit.
If you selected a Bliss symbol from the catalog, Mind Express automatically
opens Bliss Editor.
You can now make changes to the symbol using the available tools, listed in the
table below.
Table 18: ImageEditor
Tool
The second image will be added to the cell at the right.
To activate or deactivate symbol sets go to Tools > Symbolsets.
This can be useful when you do not want to use or to update a
specific symbol set.
Description
To start drawing on the symbol.
Mind Express
61
Table 18: ImageEditor
Tool
Table 18: ImageEditor
Description
Tool
Description
To erase parts from the symbol.
Zoom level
To zoom in or out on the symbol.
Brush size
To set the brush size.
Symbol Name
To give the symbol a name. The default name is the originally
To draw lines on the symbol.
name of the symbol with ‘ edited’ appended to it, e.g. Cat
(Edited).
To color specific parts of the symbol.
To copy the color of a specific area of the symbol to paste it to
another area.
To select the color you want to use.You can also select
transprarent.
To rotate the symbol horizontally for 180 °.
To rotate the symbol vertically for 180°.
To undo a change you made.
To redo a change undone before.
Click the close button and confirm you want to save the changes you made to
the symbol.
Using other symbols
Mind Express allows you to use symbols other than those included in the default
symbol sets. For example, you can use photographs or your own drawings and
illustrations. Remember to save the images you want to use in Mind Express in
one of the following formats:
• WMF (Windows Metafile)
• BMP (Bitmap)
• GIF (Graphics Interchange Format)
• JPG (Joint Photographic Experts Group).
• EMF (Enhanced Metafile Format)
• PNG (Portable Network Graphics)
Import your images into Mind Express by using the Media library.
For more information, refer to “Using the Media library” on page 11.
Mind Express
62
Setting a Label
If you select a symbol from one of the symbol sets, the text associated with it
automatically appears in the field next to the label icon, as shown in the
illustration below.
If you want to display another label for the symbol than the one offered by
default, simply enter the new label in the field next to the label icon. For
example, if you want to display the label “cat” with the kitten symbol, instead of
the default label “kitten”, enter “cat” in the label field.
You can right-click the symbol name in the list and click the Fill in
Label and Action option to reset the default label and action to the
image.
If you enter an on-screen text that is too long to fit in the grid cell,
the text is split over two lines as soon as there is a space in the
text. You can also add ’enters’ yourself. Add “##” in the label field
at the position where you want to place an enter.
When you click OK, all changes are saved.
Modifying Styles
Every time you create a new communication grid, Mind Express automatically
uses the default styles.
You can modify the style of your cells by changing for example the text font and
position, the image position and scale and the cell color.
To modify the cell style
1. In the Edit window, select the style you want to use from the drop down list
next to the style icon.
2. To view or change the specific style characteristics, click the
button.
Mind Express
The Style settings window opens.
63
Mind Express
64
The table below explains all functions that can be found and changed in the Style settings window.
Table 19: Style settings
Style setting
Description
Name
To enter a new name for the specific style.
Color
You can select the background color of the cell from a standard Windows color palette
and choose between a solid or gradient fill.
Transparent
You can make a cell more or less transparent. This might be useful if you are using a
background image in the grid. To get more information on setting a background image,
refer to “Page settings” on page 74.
Example
Mind Express
65
Table 19: Style settings
Style setting
Description
Text
You can change the position of the text in the cell:
•
•
•
•
•
•
•
•
•
Font
Top left
Top middle (as in the example)
Top right
Middle left
Center
Middle right
Bottom left
Bottom middle
Bottom right
In the Font window you can change the font, size and color of the text. You can also
indicate you want the text to be in italic, bold, underlined or strikethrough.
Image
You can change the position of the image in a cell or change its scale. The image can
be centred horizontally in the cell, or can be aligned with the left or right edge of the
cell.
The image can be centred vertically, or can be aligned with the top or bottom edge of
the cell.
The percentage of the cell that is covered by the image can be set. At 100%, the entire
cell is covered by the image, while at 50% only half the surface of the cell is covered.
Example
Mind Express
66
Table 19: Style settings
Style setting
Description
Border
You can adapt the border width and color around the images.
Page indicator
If a cell contains the action Go to page, you can use page indicators. In the top right
corner an arrow appears to indicate the link to another page.
Shape
You can select the shape of the cell: rectangle, rounded rectangle or circle.
3. Edit the style characteristics as desired and click OK to save your changes.
Example
Mind Express
Applying a style to multiple cells
You can select several cells at the same time, by using the Shift and/or Control
keys. You can use this option to apply a style to a number of cells in a single
action.
• To select a number of non-adjacent cells: Press the Ctrl key and select the
cells with one left click.
• To select a block of cells, press the Shift key and select the first and the
last cell with a left click. All the cells in between will be selected.
Right-click one of the selected cells in the grid and choose Styles to apply a
new/another style to the selected cells.
For more information on the right-click menu, refer to “Using the right-click
menu” on page 69.
67
1.5.4 Actions
To each cell in a communication grid, you can assign three information levels.
Each level can contain one or more actions.
These actions can be message box options, grammatical options or other
commands. Most of these actions contain a number of subactions.
If you assign an action to a cell, you can use that cell in the grid as a navigation
tool, or for other functions. You can use it to go to a different page in the grid, or
to activate a different level.
For more information on working with actions, see also “Working with Actions”
on page 83.
Switching levels
You can attach information to the cells in a grid on three different levels. To
switch between levels, it suffices to create a new cell in your grid to which you
attach the action Go to level 2 or Go to level 3. In fact, you are creating “action
cells” in your grid, that help you activate the different information levels.
Mind Express
68
Multiple actions per level
To copy an action in the action list: click the action to select it and
You can define an unlimited number of actions per level. One level may contain,
for example, four actions.
press Ctrl and click
.
1.5.5 Advanced features and cell types
A third part of the Edit window contains the advanced functions that can be
assigned to cells.
Table 21: Cell types
Table 20: Multiple actions per level
Button
Description
Option
Description
Selectable
The user can or cannot select a certain cell.
Draggable
If selected, the user can move the cell in mouse mode. The
option should be selected if you want the user to solve a sliding
Add a new action.
Move selected action up.
Move selected action down.
Delete the selected action.
puzzle.
Visible
To determine whether the cell is visible to the user or not.
Do not add to
If this option is selected, the cell will not be added to the
Message box
message box when it is selected. The actions of the cells will be
executed, but the message box will remain unchanged.
Mind Express
69
Table 21: Cell types
Option
Type
Table 22: Right-click menu
Description
Option
To indicate the specific type of the cell. The following types are
Edit style ‘Style 1’
available:
•
•
•
•
•
•
•
•
•
•
•
•
•
•
•
Default
Address book
Agenda
Battery
Calculator
Camera
Clock
Dynamic list
E-mail
Message box
Music And Video
Phone functions
Prediction
Slideshow
Time indicator
Description
Click to open the Style settings window. You can now modify
the current style of the selected cell(s). For more information on
editing styles, refer to “Modifying Styles” on page 62.
Styles
Shows the list of available styles. You can select one or click
New style to create a new style in the Style settings window. A
new style is automatically created. You should define its
settings and click OK to save the new style.
Go to <New page>
To add a new page and add a “Go to page” action to the
selected cell(s).
Go to <new page>
To add a new page and add a “Go to page” action to the
selected cell(s). You will be prompt to give a name to the new
page.
For more information, refer to part IV “Special Features” on
page 91.
1.6 Using the right-click menu
Most of the editing functions can also be accessed by right-clicking a cell in the
communication grid.
Fill cells
a couple of symbols very quickly. For more information, see
“Dynamic lists” on page 151.
Table 22: Right-click menu
Option
Description
Go to Editor
Click to open the Edit window. For more information, refer to
“Using the editor” on page 58.
To open the Symbol window. This function enables you to select
Cut
To clear (the symbol, label and action(s) of) the selected cell.
The content of the cell is moved to the clipboard.
Copy
To copy the selected cell.
Mind Express
70
Table 22: Right-click menu
Option
Paste
Table 23: Right-click menu - freestyle
Description
To paste what you have cut or copied before to the selected
cell.
Paste image
In freestyle, the right-click menu looks somewhat differently.
To past an image iimmediately in a cell. The image will
Option
Description
Go to Editor
Click to open the Edit window. For more information, refer to
“Using the editor” on page 58.
automatically be added to the Media library.
Clear
To delete the selected cell. The content of the cell (symbol, label
Edit style ‘Style 1’
the current style of the selected cell(s). For more information on
and actions) is lost, except if you undo the action of deleting.
Copy to pages
To copy the selected field(s) to all or to the selected pages.
Click to open the Style settings window. You can now modify
editing styles, refer to “Modifying Styles” on page 62.
Styles
Shows the list of available styles. You can select one or click
New style to create a new style in the Style settings window. A
new style is automatically created. You should define its
settings and click OK to save the new style.
Go to <New page>
To add a new page and add a Go to page action to the selected
cell(s).
Fill cells
To open the Symbol window. This function enables you to select
a couple of symbols very quickly. Refer to “Using the Choose
symbols window (F4)” on page 55.
Cut
To clear (the symbol, label and action(s) of) the selected cell.
The content of the cell is moved to the clipboard.
Delete
You can delete the current row or the current column.
Insert
You can insert a row or column before or after the current one.
Scanword
You can enter a scanword for the current cell/row/column.
Refer to “To assign a keyword for auditory scanning to a cell”
on page 45.
Copy
Paste
To copy the selected cell.
To paste what you have cut or copied before to the selected
cell.
Paste image
To past an image iimmediately in a cell. The image will
automatically be added to the Media library.
Delete
You can delete the current cell(s).
Mind Express
71
Table 23: Right-click menu - freestyle
Option
Order
Description
To put the selected cell in front or in back of the others, click
Bring to front or Send to back.
Format
If you select two or more cells, you can change the format and
alignment of the selected cells. The cell with the black markers
(the cell you selected last) is used as reference.
•
•
•
•
•
•
•
Align top
Align bottom
Align left
Align right
Make same size
Make same width
Make same height
Mind Express
73
Chapter 2 - Layout, Document and Page settings
Table 24: Document menu
To change characteristics and options on the document level, you should use
the Document menu.
Menu item
Table 24: Document menu
Menu item
Description
Page settings
Click to open the Page settings window. For more
Add new page
Duplicate page
document. A confirmation message will appear.
Delete page
Click to delete the current page.
Click to open the Style settings window. For more
Preferences
To open the Document preferences window. For more
page 75.
First page
To navigate to the first page of the document.
Previous page
To navigate to the previous page in the document.
Next page
To navigate to the next page in the document.
Last page
To navigate to the last page in the document.
Page...
Click to add a copy of the current page at the end of the
page 74.
information on style settings, refer to “Style settings” on
Go to
Click to add a new page to the document. The new page is
automatically opened and can now be edited.
information on page settings, refer to “Page settings” on
Style settings
Description
Click to go to a certain page in the document. You can
select the desired page in the list.
information on the document preferences, refer to
“Document preferences” on page 76.
This chapter covers the following topics:
• Page settings
• Style settings
• Document preferences
Mind Express
2.1 Page settings
74
settings window. Go to Document > Page settings. Alternatively, click F8 on
your keyboard.
The table below gives you an overview and description of all the options you can
change on the Page settings window.
Table 25: Page settings
Option
Description
Window that shows an overview of the pages in the
document.
To add a new page. Each page can have a different
number of cells.
To delete an existing page from the document.
In the Page settings window, you can determine the overall structure of your
communication grid. This window opens automatically when you start creating a
new communication grid (File > New). When creating a new communication
grid, you need to decide in advance:
• Whether you want to use a fixed number of cells or draw your own cells
(“freestyle”).
• In case of a fixed number of cells: of how many cells the grid will consist
(down and across) and how much space should be left between the cells.
• What the background of the page should look like.
While working in Mind Express, when you need to change the page settings or
when you want to add a new page to your document, you can also use the Page
To sort the order of the pages alphabetically.
To select all the pages of the document.
To move selected pages up or down in the list.
Mind Express
75
Table 25: Page settings
Table 25: Page settings
Option
Description
Option
Description
Name
To give a specific name for the selected page. You
Always go back
After a selection, always return to the previous
can assign a different name to every page in a file.
Page type
You can choose to use a fixed number of cells (a
page.
Popup window
grid) or to draw your own cells (freestyle).
Select the check box to indicate the page you
created should be used as a popup window. If
needed, change the size and place of appearance
You can indicate how many cells, rows and
of the popup window.
columns, both horizontally and vertically, you want
to include in your communication grid.
Page 1 can never be a popup window.
To determine the spacing between the cells.
Background color
By default, the background color of the
communication grid is white. Click the white box to
choose another background color. A color palette
appears from which you can select the color you
prefer.
The background color can be solid or gradient
(horizontally or vertically).This way you can make
one color flow over in another color.
Image button
To select the image you want to use as a
background image. You can change the position of
the image in the drop down list next to the Image
button.
Scale
Maintain aspect ratio
To change the scale of the background image.
Select this option to keep the original aspect ratio
of the image.
2.2 Style settings
Mind Express comes with different style sets. A specific style set contains a
couple of defined properties regarding text font, text position, background color,
image scale, image position, cell shape, etc. You can redefine these styles.
To modify styles, go to Document > Style settings.
Mind Express
76
2.3 Document preferences
The Style settings window opens.
You can set a couple of preferences for the current document. To open the
Document preferences window, go to Document > Preferences.
In the top part of the window, you can add a new style
, delete a style
,
sort the styles alphabetically or by number
or select all styles at once
.
Refer to Table 19, “Style settings” on page 64 to get more information on the
other functions that can be found and changed in the Style settings window.
You can use the Shift and/or Control keys to select several styles
at the same time and edit these selected styles simultaneously.
You can also import existing stylesets into Mind Express via the File menu. For
more information, refer to “Importing stylesets” on page 16.
Mind Express
77
Table 26: Document preferences
Table 26: Document preferences
Setting
Description
Always return to first page
If this option is enabled, and you are using a grid with
several pages, Mind Express automatically returns to
the first page after you have selected a cell on one of
the other pages.
Always return to level 1
If this option is enabled, and you are using several
information levels, Mind Express automatically returns
Setting
Second set
Use template for new pages
If this option is enabled, the selected template will be
No speech when adding to
If this option is enabled, the words you select in the
Message box
communication grid while writing a message are not
pronounced via speech synthesis.
Start with active Message box
If this option is enabled, the user will hear a sound
when dragging.
If this option is enabled, you can start writing your
message as soon as this document is opened.
Put symbols when storing
When storing a message in a cell, also show the first
Message in cell
symbols. Enter a maximum number of symbols to be
shown in the cell.
used for each new page you create.
Sound when dragging
Indicate which symbol set should be used when no
symbol could be found in the preferred set.
to level 1 after you have selected one cell at level 2 or
3.
Description
Save window position
To save the current position and size of the window.
Use specific selection
When this option is enabled, the current document uses
settings
specific selection settings, regardless of your user
Wait for speech before page
Another page will only be opened when speech of the
change
current page has ended.
Word prediction
Word prediction can occur on text and/or on symbol
selection window or Scanning selection window. For
level:
more information on the mouse selection settings, refer
• Text only: word prediction on text level
• Text (with symbols): prediction cells with text and,
if available, symbols.
• Symbols only: prediction on symbol level if
symbols are available.
• Symbols (with text): prediction cells with symbols
and text if symbols are available.
Preferred set
Indicate which symbol set should preferably be used
during symbol prediction.
settings. Choose between mouse and scanning
selection and click Settings to open the Mouse
to “Mouse mode” on page 29. For more information on
the scanning selection settings, refer to “Scanning
mode” on page 35.
Mind Express
79
Chapter 3 - Working with Messages
Mind Express allows you to create messages. A message can consist of a series
of symbols, of text, or both. Thanks to the speech synthesis engine, the
message can be read out loud.
Messages are written in a message box you should add to your communication
grid. Double-click the cell you want to use as message box and in the advanced
part of the edit window, select the cell type Message box. Indicate the number of
lines and whether the message box should display only text, only symbols or
both.
You can resize the message box to your needs, depending on how much space
you wish to reserve for viewing the message.
You can resize your message box by clicking the cell (in edit
mode) and then clicking one of the black squares that appear.
Hold your mouse and drag to the desired size.
You can find all the message-related actions in the Mind Express Edit window.
In this chapter, you will find a detailed overview of each of the message box
actions.
This chapter contains the following sections:
• Message options
• Message style settings
• Using Message functions
3.1 Message options
Before you start writing a message, you should first determine the specific
message options.
Your preference settings are saved along with the file.
To change the message options
1. Go to Document > Preferences.
The Document Preferences window appears. This window contains,
amongst others, the preference settings for the message, as shown
below.
Mind Express
2. Enable the settings of your choice by selecting the corresponding check
boxes.
80
The table below lists the preference settings for the message box and their
effects:
Setting
Description
No speech when adding
If this option is enabled, words added to the Message box
to Message box
are not pronounced at once.
Start with active
If this option is enabled, you can start writing your message
Message box
as soon as the document is opened.
Put symbols when
The cell will display the first symbols of the message. Enter
storing Message in cell
a maximum number of symbols to be shown in the cell.
3.2 Message box cell
The selected message items can be visualised in the Message box type cell.
To create a Message box cell
1. Open the content window of the cell.
2. Select Message Box next to Type.
3. Click OK.
The preference settings you selected are applied to the current
communication grid.
3. Define the lay-out of the Message box: number of line, Text and/or Images,
Line distance and symbol distance.
Mind Express
81
3.3 Message style settings
In Mind Express you can configure the writing process to meet your personal
needs.
You can change the look of the text in your messages. This means that you can
change the style, containing the font, size, color, etc., to suit your preferences.
Table 27: Message box functions
Function
Description
Add to sentence
Add the sentences of the message box to the sentence
prediction
prediction list.
For more information, refer to “Sentence Prediction” on
To set the style of your message
1. Double-click the message box cell and in the Edit window, select the style
you want to use for your message.
You can also select New style to create a new style for your
message.
For more information on style settings, refer to “Style settings” on
page 75.
3.4 Using Message functions
The table below gives an overview of all the message box functions that can be
attributed to a cell.
Table 27: Message box functions
Function
Description
Activate: off
The writing of the message is stopped, and the message
box is disabled.
You can use this option to temporarily stop
composing the message, to use the communication grid
without including the selected cells in the message.
Activate: on
Start writing.
Activate: on/off
Toggle/switch between start writing (active) and stop
writing (not active).
page 97.
Add: Exclamation mark (!)
Add an exclamation mark to your message.
Add: Full stop (.)
To add a full stop to your message.
Add: Question mark (?)
To add a question mark to your message.
Add: Space
To add a space to your message.
Backspace
To delete the word/symbol added last to the message box.
Clear
The entire message is cleared.
Cursor: Down
To set the cursor in the next line of the message.
Cursor: End
Set the cursor at the end of the message.
Cursor: Home
Set the cursor at the beginning of the letter.
Cursor: Left
Move the cursor one position to the left.
Cursor: Right
Move the cursor one position to the right.
Cursor: Up
To set the cursor in the previous line of the letter.
Delete character
To delete the character/letter before the cursor position.
Delete sentence
To delete the sentence before the cursor position.
Delete word
To delete the word before the cursor position.
Mind Express
82
Table 27: Message box functions
Table 27: Message box functions
Function
Description
Function
Description
Echo off
To stop pronouncing each word/item when you add it to the
Switch items
To switch the two last entered items in the message box.
Undo
To undo the last message box actions (10 actions).
message.
Echo on
To activate the echo function to pronounce each word/item
you add to the message immediately.
New line
To set the cursor at the beginning of a new line in the
message.
Open message
To open an existing message, only in combination with the
Save message as option. Refer to “Saving messages” on
page 27.
Open Message x
To open an existing message stored under a specific given
name (for example Message 1). This name is defined in the
action ‘Save message as ‘x’.
Print message
To print the content of the Message box.
Read all
The content of the message is read.
Read sentence
The sentence on the cursor is read.
Read word
The word on the cursor is read.
Save message as
Save a message as a separate file. Refer to “Saving
messages” on page 27.
Save message as ‘x’
To save a message under a specific name. When selecting
the action in the action list you will be prompted to fill in a
name.
Store in cell
Place the whole message in a cell. For more information,
refer to “Saving messages” on page 27.
You can enable the Mind Express user to save his messages. To allow the user
to do this, you need to include action cells with the Message box subactions
Store in cell or Save message as in the communication grid.
Enter in message box with regular keyboard = read last sentence.
Mind Express
83
Chapter 4 - Working with Actions
Apart from a symbol and a label, you can assign actions to cells in your
communication grid.
To assign an action to a cell
1. In the bottom part of the Edit window, click the add button.
2. In the Actions field, click the action you want to add.
A list of subactions appears.
3. If present, click the desired subactions and click OK.
•
•
•
•
•
•
Run application
Slideshow
Sound
User
Volume
Windows Control
Via Tools > Add-ons, you can turn off some of the add-ons to
make working in Mind Express easier.
The selected subaction is assigned to the cell.
In the following paragraphs you will find an overview of the main actions and
their subactions, in the order in which they are presented in the Actions field of
the Edit window.
• <Text>
• Address book
• Agenda
• Battery
• Calculator
• Camera
• Date/time
• Dynamic list
• E-mail
• GEWA
• Go to level
• Go to page
• Grammar
• Message box
• Music And Video
• Open document
• Phone functions
• Phonetic
4.1 <Text>
This is the message that is pronounced when you click a specific cell. This text
message can be anything you like, because you can modify the default text that
comes with the selected symbol. For example, you can assign an entire
sentence to a certain cell.
In the Actions part of the Edit window, indicate you want to add spoken text to a
cell.
Mind Express
84
You can choose from a number of word classes when entering text in Mind
Express. This allows you to conjugate verbs, define plural forms, and use
personal pronouns. The table below gives you an overview of the word classes
available in Mind Express and of the windows you use to enter their details. You
can open these windows by clicking Data in the Edit window.
Table 28: Word classes
Word class and options
Window
Personal pronoun:
The pronouns “I, you, he/she, we,
Table 28: Word classes
you, they” are all personal
pronouns.
Word class and options
Window
Verb:
Select Verb if the word you entered
in the text box is a verb and you
wish to use its conjugation. If
available, Mind Express will
automatically enter the correct
conjugation in the Verb window. If
not available, Mind Express will ask
you to add the conjugation yourself.
Other:
not applicable
No grammatical information will be
used.
4.2 Address book
In Mind Express, you can collect all addresses of your friends and contacts in a
directory (address book). Via the Edit window, you can add the following address
book subactions to your communication grid.
Table 29: Address book - subactions
Noun:
Select Noun if you entered a noun in
the text box and you wish to use the
plural form of the noun.
Subaction
Description
Scroll next
To scroll through the items in your address book.
Scroll previous
To scroll backward through the items in your address book.
Scroll to beginning
To scroll to the first item in your address book.
Clear list of recipients
To clear all contact persons from the List of recipients cell.
Refer to ’Address book cell” on page 106.
Mind Express
For more information on using the address book, refer to ’Address book” on
page 128.
4.3 Agenda
Mind Express contains an agenda function, so you can order your appointments
and activities.
For more information on making or using an agenda, refer to Chapter 15
“Agenda” on page 159.
4.4 Battery
In Mind Express you can create battery level indicator to show the current level
of the battery at any time.
For more information on making or using a battery level indicator, refer to
Chapter 10 “Battery level” on page 143.
4.5 Calculator
In Mind express you can make a calculator or use the standard calculator
already available in the software.
For more information on making or using a calculator, refer to Chapter 9
“Calculator” on page 141.
4.6 Camera
The camera module in Mind Express enables you to take your own pictures.
For more information on making or using a camera, refer to Chapter 7 “Camera”
on page 133.
85
4.7 Date/time
You can make a cell to hear the current day/date/time spoken out loud when you
click it.
Table 30: Date/time subactions
Subaction
Description
Say date
Click this cell to hear the current date.
Say day
Click this cell to hear the current day.
Say time
Click the cell to hear the current time.
4.8 Dynamic list
In Mind Express, dynamic lists can be created and used.
For more information on making or using a dynamic list, refer to Chapter 13
“Dynamic lists” on page 151.
4.9 E-mail
In Mind Express you can send each message or letter you created to any e-mail
address.
For more information on using the e-mail functions, refer to Chapter 6 “E-mail in
Mind Express” on page 121.
4.10 GEWA
Mind Express can be optionally equipped with a programmable infrared remote
control unit.
For more information on using GEWA, refer to Chapter 11 “GEWA” on page 145.
Mind Express
4.11 Go to level
By assigning the action Go to level 1, 2, or 3 to a certain cell in a grid, you can
use the contents of the different cell levels.
If you have enabled the Always return to level 1 option in the Document
preferences window, the new level will only be enabled for the next cell you
select. For more information on the document preferences, refer to ’Document
preferences” on page 76.
86
• 1st/2nd/3rd pers. plural: Choose one of these functions to use a verb in
either the first, second or third person plural.
4.14 Message box
If you select the Message box action, a list of subactions for use in messages
appears.
For more information on messages, refer also to ’Using Message functions” on
page 81.
4.12 Go to page
4.15 Music And Video
By assigning the action Go to page to a specific cell in a grid, you can jump to
another page in your communication grid.
In Mind Express, you can create music and video files to listen to your favourite
music and watch your videos.
For more information on music and video, refer to Chapter 3 “Music and Video”
on page 99.
4.16 Open document
If you enabled the option Always return to first page in the Document
preferences window, you will return to the first page after performing an action
on the other page. If not, you need to create a cell to go back to the first page (or
page of your choice). For more information on the document preferences, refer
to ’Document preferences” on page 76.
You can use this action to open a file in Mind Express. Select a specific directory
from the list. A list of available documents is displayed.
4.13 Grammar
You can assign the following grammar functions to a cell in a communication
grid:
• Past participle/Infinitive/Present tense/Present participle/Past tense/Future
tense: Choose one of these functions to conjugate the selected verb in the
corresponding tense.
• Plural/Singular: Choose one of these options to put the next noun you
select in the corresponding number.
• 1st/2nd/3rd pers. sing.: Choose one of these functions to use a verb in
either the first, second or third person singular.
Set a specific page if you want the document to be opened on a specific page.
If you select the option Don’t save current document, you will open the desired
document without saving changes made to the current file.
Mind Express
87
4.17 Phone functions
4.19 Run application
In Mind Express, you can make and receive phone calls and send messages via
the phone module.
For more information on using the phone module, refer to Chapter 5 “Phone
functions” on page 109.
With the Run application command, you can start other applications. Apart from
that, you can also open files when that type of file is linked to an application. You
can for example immediately play MP3 files with your default MP3 application.
4.18 Phonetic
You can make letters and diphthong be pronounced through recordings (WAVE
files of phonetic sounds).
4.20 Slideshow
If you select the Slideshow action, a list of subactions for use in a slideshow
appears
Table 31: Slideshow - subactions
To make a phonetic action cell
1. Double-click a cell.
Subaction
Description
2. In the Actions part of the Edit window, select Phonetic and select the
language you are working in.
Next
To go to the next series of slides.
Next (jump 1)
Jump to the next slide.
Previous
To go to the previous series of slides.
Previous (jump 1)
Jump to the previous slide.
Go to begin
Go to the first slide.
Start Autoscroll
To start scrolling the slideshow automatically.
Stop Autoscroll
To stop the automatic scroll.
3. From the drop down list, select a specific phonetic sound.
The letters shown in the Add to Message box field will appear in the
message box.
4. Enter an appropriate label and/or symbol.
5. To confirm, click OK.
You can now click the cell to add the chosen letter/diphthong to the
message box.
For more information on creating a slideshow, refer also to Chapter 12
“Slideshow” on page 147.
4.21 Sound
You can also link the cells in your communication grid to a sound. That sound
may be an existing *.wav file, or a sound file that you record in Mind Express. To
record sounds, you will need a microphone.
Mind Express
88
You can select a sound from the list or record your own sound by clicking the
record button at the right. To stop recording, click the stop button. The recorded
sound is added to the list. To listen to the take, select the sound in the list and
click play. To change the name of a sound, click the name twice and type the
new name. Right-click a sound in the list and click Delete file to the delete the
selected sound.
Table 32: Sound
Button
Description
To listen to the selected sound.
To stop the sound playing.
To record a new sound.
Mind Express
89
4.22 User
The User actions can be used when logging in to Mind express as a specific user.
Table 33: User - subactions
Subaction
Subaction
Description
Selection
Go to mouse mode
To switch to mouse mode.
Go to scanning mode
To switch to scanning mode.
Go to Joystick mode
To switch to Joystick mode.
Pause mouse selection
To pause the mouse selection.
Toggle external dwelling
To toggle the external dwelling.
External dwelling on
To activate the dwelling.
External dwelling off
To deactivate the dwelling.
External dwell right click
To make a right click with the external dwell.
External dwell double
To make a double click with the external dwell.
click
External dwell drag and
To drag and drop with the external dwell.
drop
Change voice
Increase dwell time
To increase the dwell time.
Decrease dwell time
To decrease the dwell time.
Increase scan time
To increase the scan time.
Decrease scan time
To decrease the scan time.
-
To change the voice. Click Select voice to select the voice
you want.
Mind Express
90
Table 33: User - subactions
Subaction
Subaction
Description
Append to password
-
To add a character to the password.
Reset password
-
To reset your password.
Check password
-
To check your password.
Change user
-
To switch to another user.
Pause mouse selection
-
To disable mouse selection until you click this cell again.
4.23 Volume
4.24 Windows Control
The volume action allows you to adjust the volume to your preference.
In Mind Express you can send commands to other applications.
For more information on Windows Control, refer to Chapter 16 “Windows Control” on page 167.
To create volume action cells
1. Double-click a cell.
2. In the Actions part of the window, select Volume and choose one of the
subactions (see table below).
Table 34: Volume - subactions
Subaction
Description
Stop all sound
To stop speech/sound.
Volume down
To lower the volume of the sound.
Volume up
To raise the volume of the sound.
3. Add an appropriate label and/or symbol to the cell.
4. Click OK.
III. Special Features
Mind Express
93
Chapter 1 - Word Prediction
When the user is able to use text, offering word prediction can increase the
communication speed significantly.
You can have these predictions appear in the Mind Express cells. This enables
the Mind Express user to select these predictions in order to type words or
sentences much faster. As soon as the user selects a letter or word in the
communication grid, the predictions appear in the Mind Express prediction cells.
The Options window opens.
Table 35: Prediction - Options window
Option
Description
Case-sensitive
Enable this option when you want the prediction
To use a cell as word prediction cell
1. Double-click a cell.
engine to be case sensitive.
Minimal length
written word.
3. Click OK.
4. If desired, enable sentence prediction by selecting the Sentence prediction
check box.
For more information on sentence prediction, refer to “Sentence
Prediction” on page 97.
1.1 Setting the word prediction options
A couple of options can be set to determine how word prediction should be
used.
To set the word prediction options
1. Go to Tools > Word prediction.
The Prediction window opens.
2. Click the Options button.
To define the minimal number of characters the
word predictions will be longer than the current
2. In the advanced part of the Edit window, select the cell type Prediction.
Maximum repetitions
To define how many times a word prediction will
be suggested. If it hasn’t been chosen by then,
the prediction will no longer be shown but will be
replaced by another prediction.
Recency priority
You can choose between None - Low - Normal High. To define whether recently used words will
obtain higher probabilities.
Auto-learn
This parameter defines whether new words and/
or word pairs will be added to the prediction list
or not. This will also affect the probability of the
words in the list.
Mind Express
94
1.2 Editing the word prediction list
You can edit the word prediction list, add and delete words, change frequencies.
Table 36: Prediction window
Option
Description
To edit word prediction lists
To set the word prediction options. Refer to
1. Go to Tools > Word prediction.
“Setting the word prediction options” on
page 93.
The Prediction window opens.
Table 36: Prediction window
Option
Description
You can select the prediction list you want to use
or edit in the list.
New
To make a new word prediction list. You can add
words manually, but you can also use the auto
learn function. The word prediction will
automatically learn words while using it.
Copy
1.2.1 Editing words
You can edit the words of the prediction list.
To edit words
1. In the Prediction window, click Edit.
The Edit window opens.
2. In the search field, enter (part of) the word you are looking for and click the
button next to it.
A list of words and their corresponding frequency will appear.
To make a copy of an existing prediction list and
Table 37: Edit words
save it with a new name.
Option
Description
Delete
To delete the current word prediction list.
Edit
To edit the current word prediction list. Refer to
Click this button to add a word to the list. In the Add new window you
“Editing words” on page 94.
can enter the new word and its frequency. To set a frequency, compare
Abbreviations
To add new abbreviations to the list.
Start words
Words that will be shown in the prediction cells
at the beginning of a new sentence. You can add
start words to this list by typing them directly in
with existing frequencies of similar words.
Select a word and click this button to change the frequency of the word.
Select a word and click this button to delete the word from the list.
the field with the list of start words.
3. Select a word from the list.
Mind Express
At the right, the word pair icon appears.Word pairs are word that
often appear together.
95
Go to Tools > Word prediction and in the Prediction window, click Start words.
In the Startwords window you can add, change or delete words.
1.2.3 Abbreviations
4. Click the word pair button.
The following window opens.
You can add abbreviations to the word prediction list.
To add abbreviations to the word prediction list
1. In the Prediction window, click Abbreviations.
The Abbreviations window opens.
Words that have already been used next to the selected word are
listed. They will appear in word prediction.
1.2.2 Startwords
You can edit the list of words that will be shown at the beginning of a new
sentence.
Mind Express
2. Do one of the following:
Table 38: Abbreviations window
Option
Description
Select an abbreviation from the list and click this button to change its
expansion.
Select an abbreviation and click this button to delete the abbreviation
from the list.
Click this button to add an abbreviation and its expansion to the list.
3. Click OK.
96
Mind Express
97
Chapter 2 - Sentence Prediction
When the user is able to use text, offering sentence prediction can increase the
communication speed significantly.
You can have these predictions appear in the Mind Express cells. This enables
the Mind Express user to select these predictions in order to type words or
sentences much faster. As soon as the user selects a letter or word in the
communication grid, the predictions appear in the Mind Express prediction cells.
Sentence prediction searches for sentences that include the word(s) or word
part(s) you are typing. If you enter the word ‘tea’, sentence prediction will for
example come up with the sentence ‘I like a cup of tea’.
When first using Mind Express, sentence prediction is empty.
2.1 Editing the sentence prediction list
You can edit the sentence prediction list, add and delete sentences, change
frequencies.
To edit sentence prediction lists
1. Go to Tools > Sentence prediction.
The Sentence Prediction window opens.
2. Do one of the following:
Table 39: Sentence Prediction window
To add sentences to sentence prediction
1. Double-click a cell.
Option
2. In the Actions part of the Edit window, click the action Message box and the
subaction Add to sentence prediction.
Description
You can search for items in the sentence
prediction list.
3. Click OK.
To add a new sentence and its frequency (Count)
If this option is enabled, sentences will automatically be added to the
sentence prediction list.
to the prediction list.
To change the frequency of the selected
You can also add sentences to the prediction list manually by using the add
button in the Sentence Prediction window. Refer to table 41 “Sentence
Prediction window”.
sentence.
To delete the current sentence from the
To use a cell as sentence prediction cell
prediction list.
1. Double-click a cell.
2. In the advanced part of the Edit window, select the cell type Prediction and
select the sentence prediction check box.
Add sentences when Message box is
When this option is selected, the prediction
read
sentences are also learnt when the Read all
action is selected.
3. Click OK.
3. Click OK.
Mind Express
99
Chapter 3 - Music and Video
This chapter covers the following topics:
• Using the music sample file
• Making a music file
• Using the video sample file
• Making a video file
1. Music action cells. Refer to 3.2.2 Creating music action cells.
2. Music playlist cells. Refer to 3.2.3 Creating music playlist cells.
3. Music playlist action cell. Refer to 3.2.4 Creating music playlist action
cells.
4. Click one of the following icons.
3.1 Using the music sample file
Table 40: Music template
Mind Express contains a music sample file that can be used to listen to your
favorite music without having to create a music module from scratch.
Icon
Description
To select the song you want to hear.
To use the music template in Mind Express
1. Go to File > Open.
The Open file window appears.
2. To open the Mind Express 4 start window, select me4_eng.
To start playing the selected song.
3. Click multimedia and then click music.
The music sample file opens.
To stop playing the selected song.
To pause the selected song.
1
To move backward in the selected song.
2
3
Mind Express
100
Table 40: Music template
Icon
Description
To move forward in the selected song.
3. Indicate the place where the music file is stored (Media library or directory).
4. Click
and select the music file you want to be opened.
5. Click OK.
Repeat this procedure until you created all the music cells you need.
3.2.2 Creating music action cells
To go to the previous music items.
Music action cells are used to control the selected song.
To make music action cells
1. In edit mode, double-click the cell you want to use as music action cell.
To go to the next music items.
2. In the Actions part of the window, select Music and Video and choose the
desired subaction.
3.2 Making a music file
Making a music file is very similar to making a simple communication grid.
Refer to “To create a new file in Mind Express” on page 53.
Table 41: Music actions
Music actions
Description
Play
To start playing the selected music file.
To make a music cell
Pause
To pause the song currently playing.
1. In edit mode, double-click the cell you want to use as music cell.
Stop
To stop the music file currently playing.
2. In the Actions part of the window, select Music and Video and choose the
subaction Open file.
Forward
To move forward in the currently playing song.
Backward
To move backward in the currently playing song.
3.2.1 Creating music cells
Create a cell in which a specific song will appear.
3. Add an appropriate label and/or symbol to the cell.
4. Click OK.
Repeat this procedure until you created all the music action buttons you need.
Mind Express
3.2.3 Creating music playlist cells
You can also make a list of songs you can browse through.
A music playlist cell displays an arbitrary song from the list.
To make a music playlist
1. In edit mode, double-click the cell you want to use as music playlist cell.
2. In the advanced part of the Edit window, select the cell type Music and
Video.
101
2. In the Actions part of the window, select Music and Video and choose the
desired subaction.
Table 42: Music actions (part 2)
Music commands
Play stream
Description
To play MP3 or radio players from the internet. Enter the link
in the field.
Start Playlist
Start track one of the playlist.
Scroll forward
To scroll forward in the list of music files.
Scroll backward
To scroll backward in the list of music files.
Scroll to beginning
To scroll to the first music file in the list.
3. Indicate the place where the music files are stored.
4. Add an appropriate label and/or symbol to the cell.
3. Select the option Browse through folder or Browse through media library
folder depending on the place where the music files are stored.
Only if the songs are not imported into the media library, you should
use the Browse through folder option.
4. Browse through the correct (media library) folder.
5. Click OK.
3.2.4 Creating music playlist action cells
Music list action cells are used to control the playlist.
To make a music list action
1. In edit mode, double-click the cell you want to use as music action cell.
5. Click OK.
Repeat this procedure until you created all the music list action buttons you
need.
3.3 Using the video sample file
Mind Express contains a video template that can be used to watch your favorite
movies without having to create a video module from scratch.
To use the video template in Mind Express
1. Go to File > Open.
The Open file window appears.
2. Select me4_eng to open the Mind Express 4 start window.
3. Click multimedia and then click movies.
Mind Express
102
Table 43: Video template
The video template opens.
Icon
Description
To pause the video.
To move backward in the selected video.
1
To move forward in the selected video.
2
3
4
1. Video cell. Refer to 3.4.1 Creating a video cell.
2. Video action cells. Refer to 3.4.2 Creating video action cells.
3. Video playlist cells. Refer to 3.4.3 Creating a video playlist.
4. Video list action cells. Refer to 3.4.5 Creating video list action cells.
4. Click one of the following icons.
To go to the previous video.
To go to the next video.
Table 43: Video template
Icon
Description
To select a specific video you want to watch.
3.4 Making a video file
Making a video file is very similar to making a simple communication grid.
For more information, refer to “To create a new file in Mind Express” on
page 53.
To start playing the selected video.
3.4.1 Creating a video cell
First of all, you should decide which cell you are going to use as viewing screen.
In the video cell, the video you selected will be displayed.
Mind Express
103
Table 44: Video actions
To make a video cell
1. In edit mode, double-click the cell you want to use as video cell.
Video actions
Description
2. In the advanced part of the Edit window, select the cell type Music and
Video.
Forward
To move forward in the currently playing video.
3. Select the option Video cell.
Backward
To move backward in the currently playing video.
4. Click OK.
3. Add an appropriate label and/or symbol to the cell.
You can resize your video cell by clicking the cell (in edit mode)
and then clicking one of the black squares that appear. Hold your
mouse and drag to the desired size.
4. Click OK.
Repeat this procedure until you created all the video action buttons you need.
3.4.3 Creating a video playlist
3.4.2 Creating video action cells
You can also make a list of videos you can browse through.
A video playlist cell displays an arbitrary video from the list.
Video action cells are used to control the selected video.
To make a video playlist
To make video action cells
1. In edit mode, double-click a cell you want to use as video playlist cell.
1. In edit mode, double-click the cell you want to use as video action cell.
2. In the advanced features part of the Edit window, select the cell type Music
and Video.
2. In the Actions part of the window, select Music and Video and choose the
desired subaction.
Table 44: Video actions
Video actions
Description
Play
To restart playing the selected video after it was paused.
Pause
To pause the video currently playing.
Stop
To stop the video playing.
3. Select the option Browse through folder or Browse through media library
folder depending on the place where the video files are stored.
Mind Express
104
Table 45: Video actions
Only if the video files are not imported into the media library, you
should use the Browse through folder option.
Video actions
Description
5. Add an appropriate label and/or symbol to the cell.
Scroll backward
To scroll backward in the video playlist.
6. Click OK.
Scroll to beginning
To scroll to the first video in the list.
4. Browse to the correct (media library) folder.
3.4.4 Creating video preview cells
Create a cell in which (the name of and/or a picture from) a specific video will
appear.
To make a separate video preview cell
1. In edit mode, double-click the cell you want to use as video preview cell.
2. In the Actions part of the window, select Music and Video and choose Open
file.
3. Browse to the specific (media library) file.
4. Add an appropriate label and/or symbol to the cell.
5. Click OK.
3.4.5 Creating video list action cells
Video list action cells are used to control the video playlist.
To make a video list action cell
1. In edit mode, double-click the cell you want to use as video list action cell.
2. In the Actions part of the window, select Music and Video and choose the
desired subaction.
Table 45: Video actions
Video actions
Description
Scroll forward
To scroll forward in the video playlist.
3. Indicate the place where the video files are stored.
4. Add an appropriate label and/or symbol to the cell.
5. Click OK.
Repeat this procedure until you created all the video list action buttons you need.
Mind Express
105
Chapter 4 - Address book
This chapter covers the following topics:
• Using the address book
• Creating an address book cell
• Creating address book action cells
The Details window appears:
4.1 Using the address book
You can specify in the Address book whether you prefer to send an e-mail with
or without a JPEG as attachment. You can also join a photograph of the contact
person.
4.1.1 Adding a contact person
To add a contact person
1. Go to Tools > Address book.
The Address book window appears.
3. To add a picture or image click
.
The Symbol window opens.
4. Select a symbol or picture from the list and click OK.
5. Fill in the details of the person.
Depending on the setups of your contacts you can:
• Send an e-mail with only text.
• Send an e-mail as JPEG. The text will be sent to the inbox of the receiver,
the message with symbols will be received in attachment.
2. Click the add button.
6. Click OK.
Mind Express
106
4.1.2 Editing a contact person
3. Click OK.
To edit a contact person
4.2 Creating an address book cell
1. Go to Tools > Address book.
The Address book window appears.
2. Select a contact person and click the edit button.
The Details window appears:
To create an address book cell
1. Double-click the cell you want to use as address book cell.
The Edit window appears:
2. In the advanced part of the Edit window, select the cell type Address book.
3. Below the cell type, you can choose between:
Table 46: Address book cell
Option
3. If needed, change the data.
Specific Person
4. Click OK to save the settings and to close the window.
4.1.3 Deleting a contact person
The Address book window appears.
2. Select a contact person and click the delete button.
The contact person is deleted from your address book.
If you select this option, indicate the specific contact person
that should be shown in the cell.
Dynamic
The cell will show one of the contact persons from your address
book.
To delete a contact person
1. Go to Tools > Address book.
Description
List of recipients
This cell will display the contact persons you select.
If you select a specific contact person a second time, it will be
deleted from the list of recipients.
Mind Express
107
4.3 Creating address book action cells
If you created dynamic address book cells, to move through the items in your
address book, you need to create action cells.
Via the Edit window, you can add the following address book subactions to your
communication grid.
Table 47: Address book - subactions
Subaction
Description
Scroll next
To scroll through the items in your address book.
Scroll previous
To scroll backward through the items in your address book.
Scroll to beginning
To scroll to the first item in your address book.
Clear list of recipients
To clear all contact persons from the List of recipients cell.
Mind Express
109
Chapter 5 - Phone functions
Thanks to the Phone module, you can send sms messages and call from your
communication grid. Messages are constructed and sent using symbol pages
and received text messages are read out via the speakers in the Tellus or
computer. You can also make calls, receive calls and hang-up the phone when
finished.
This chapter explains how such a communication grid works and is made.
• Settings
• Using the Phone module
• Making a phone file
• Using the sms sample file
• Making an sms file
The Phone Settings window opens.
5.1 Settings
5.1.1 On the computer
Before using the Phone module you should connect your mobile phone to the
computer. You can do this with a cable or wireless (Bluetooth).
5.1.2 In Mind Express
Once the phone is connected to Mind Express you can start working with the
phone and sms module.
There are also some phone settings in Mind Express.
1. Go to Tools > Phone functions > Settings.
Table 48: Phone settings
Option
Pin
Description
You only need to enter a pin code when you are working
with a built-in phone or SIM card. If you are working with
a Bluetooth connection you don’t need to fill in a PIN
code.
Model
In case of a Nokia, choose “Nokia Suite” (even if the
model appears in the list). In case of a Mobi, choose
“Mobi”. If you are working with a Sierra Wireless Aircard,
select “Sierra Wireless Aircard”.
Port
Nokia PC Suite (optional)
Enter the COM Port. In case of a Mobi, choose “COM 1”.
Enter the COM Port. This option does not exist for Mobi
devices and PCMCIA cards.
Mind Express
110
Table 48: Phone settings
Option
Connect at Startup
Description
Select this option if you want to start connecting to the
phone automatically when opening Mind Express.
Show additional info when
Select this check box to see all information on for
executing phone functions
example connecting the phone, etc.
2. Fill in the settings of the Phone Settings window and click OK.
3. Go to Tools > Phone functions > Initialize/Reset.
If there is no connection with a phone set, the following message
appears instead.
4. Click Ok.
5.2 Using the Phone module
To open the Phone sample file
1. Go to File > Open.
The Open file window opens.
2. Select me4_eng.
The Mind Express start window opens.
3. Click computer and then phone.
Mind Express
The Phone module opens.
111
Mind Express
112
5.3.1 Calling
You can now:
Table 49: Phone functions
Option
Description
Click to answer the phone.
Contact persons
For frequently called persons, or if the user is not able to remember or to
compose a phone number, make a cell with a contact person. The person will be
called automatically when selecting this cell.
In the Actions part of the Edit window, select Phone functions and choose the
subcommands Call, Call number and Telephone number.
Click to hang up the phone.
Call fixed numbers
Click a cell to call a specific number.
Call numbers from
Calls a specific contact person from your address book.
address book
Choose number from
Browse through your address book and select the contact
address book
person you want to call. A dynamic list of contact persons is
shown.
Type your number
Dial the number of a contact person and click the call button.
Refer to “Phone numbers” on page 112.
5.3 Making a phone file
Making a phone file is very similar to making a simple communication grid.
For more information, refer to “To create a new file in Mind Express” on
page 53.
From now on you only need to click the cell to call the specific contact person.
Phone numbers
To call a number immediately, you can also make a numeric keypad. The
composed number will be displayed in the message box. To call the number,
click the Call button.
To make a cell for calling
1. Double-click a cell.
Mind Express
2. In the Actions part of the window, select Phone functions and choose the
subactions Call, Call number and From message box.
113
5.4.1 Opening the sms sample file
To open the sms sample file
1. Go to File > Open.
The Open file window opens.
2. Select me4_eng.
3. Add an appropriate label and/or symbol to the cell.
4. Click OK.
5.3.2 Creating cells for answering a call
To make a cell for answering a call
1. Double-click a cell.
2. In the Actions part of the window, select Phone functions and choose the
subactions Call and Answer.
3. Add an appropriate label and/or symbol to the cell.
4. Click OK.
5.3.3 Creating a cell for hanging up the phone
To make a cell for hanging up the phone
1. Double-click a cell.
2. In the Actions part of the window, select Phone functions and choose the
subactions Call and Hang up.
3. Add an appropriate label and/or symbol to the cell.
4. Click OK.
5.4 Using the sms sample file
The sms template allows you to send and receive phone text messages.
The Mind Express start window opens.
3. Click computer and then text message.
Mind Express
The sms sample file opens.
114
Mind Express
115
Table 50: Sms functions
You can now:
Table 50: Sms functions
Button
Description
To check for new messages received.
To consult previous messages.
To consult next messages.
To start writing a new message.
To read a message aloud.
To stop reading a message.
To answer the last read message.
Button
Description
To delete the last read message.
Mind Express
5.4.2 Writing a message
To write a new message
1. In the sms sample file, click the New message button.
The following screen appears.
116
Mind Express
117
Table 51: Writing phone message
2. Write a message using the keyboard with word prediction.
3. You can now:
Button
Table 51: Writing phone message
Button
Description
To clear the message box.
Description
To add a contact person from your address book to the list
of recipients.
To send the composed message to the list of recipients.
If you select a specific contact person a second time, it
will be deleted from the list of recipients.
To clear the list of recipients.
5.5 Making an sms file
To return to the inbox.
Making an sms file is very similar to making a simple communication grid.
For more information, refer to “To create a new file in Mind Express” on
page 53.
5.5.1 Creating a cell for sending messages
To read the composed phone message.
To make a cell for sending messages
1. Open the Edit window of a cell.
To stop reading the composed phone message.
To delete the last entered item.
2. In the Actions part of the window, select Phone functions and choose the
subactions Message and Send message.
Mind Express
118
3. From the third drop down list, select one of the following options.
Table 52: Send message
Option
Description
Telephone number
If you select this option, enter a telephone number in the field
Address book
5.5.3 Creating a cell for deleting a message
To make a cell for deleting the last read message
1. Double-click a cell.
that appears below.
2. In the Actions part of the window, select Phone functions and choose the
subactions Message and Delete message.
If you select this option, a list of all address book recipients will
3. Add an appropriate label and/or symbol to the cell.
appear below. Choose the contact person you want to send a
message to.
List of recipients
4. Click OK.
If you select this option, the message will be sent to the contact
person(s) you added to the list of recipients.
4. Click OK.
5.5.4 Creating a cell for answering messages
To make a cell for answering a message
1. Double-click a cell.
4. Add an appropriate label and/or symbol to the cell.
5. Click OK.
2. In the Actions part of the window, select Phone functions and choose the
subactions Message and Reply to message.
5.5.2 Creating cells for reading messages
3. Add an appropriate label and/or symbol to the cell.
To make a cell for reading a message from the list
4. Click OK.
1. Double-click a cell.
5.5.5 Creating a cell for checking for new messages
2. In the Actions part of the window, select Phone functions and choose the
subactions Message and Read selected message.
To make a cell for checking for new messages
3. Add an appropriate label and/or symbol to the cell.
4. Click OK.
2. In the Actions part of the window, select Phone functions and choose the
subactions Message and Download messages.
To make a cell to show the previous or next messages in the list
3. Click the add button to add another action to the cell.
1. Double-click a cell.
2. In the Actions part of the window, select Phone functions and choose the
subactions Message and Show previous or Show next.
3. Add an appropriate label and/or symbol to the cell.
1. Double-click a cell.
Mind Express
4. In the Actions part of the window, select Phone functions and choose the
subactions Message and Show newest message.
119
5. Click OK.
5.5.7 Creating a phone message content cell
This cell displays the content of the selected phone message.
To create a phone message content cell
1. Double-click a cell.
2. In the advanced part of the Edit window, select the cell type Phone
functions.
3. In the drop-down list underneath, select Show message content.
5. Add an appropriate label and/or symbol to the cell.
4. Indicate whether or not you want the content of the message to be spoken
aloud when clicking the cell.
6. Click OK.
5. Click OK.
5.5.6 Creating phone inbox cells
5.5.8 Creating a phone message sender cell
These cells display the title or first lines of received messages.
This cell displays the sender of the selected phone message.
To create a phone inbox cell
To create a phone message sender cell
1. Double-click a cell.
1. Double-click a cell.
2. In the advanced part of the Edit window, select the cell type Phone
functions.
2. In the advanced part of the Edit window, select the cell type Phone
functions.
3. In the drop-down list underneath, select Inbox cell.
3. In the drop-down list underneath, select Show message sender.
4. Indicate whether or not you want the name of the sender to be spoken aloud
when clicking the cell.
5. Click OK.
5.5.9 Creating a phone message date cell
This cell displays the date the selected phone message was sent.
4. Indicate whether or not you want the message to be spoken aloud when
clicking the cell.
To create a phone message date cell
1. Double-click a cell.
Mind Express
2. In the advanced part of the Edit window, select the cell type Phone
functions.
3. In the drop-down list underneath, select Show message date.
4. Indicate whether or not you want the date to be spoken aloud when clicking
the cell.
5. Click OK.
5.5.10 Creating a number of phone messages cell
This cell displays the number of phone messages in your inbox.
To create a number of phone message cell
1. Double-click a cell.
2. In the advanced part of the Edit window, select the cell type Phone
functions.
3. In the drop-down list underneath, select Number of messages.
4. Indicate whether or not you want the number of messages to be spoken
aloud when clicking the cell.
5. Click OK.
120
Mind Express
121
Chapter 6 - E-mail in Mind Express
Mind Express offers a simple and efficient e-mail solution. You can send any
message or letter created in Mind Express to any e-mail address, as text or text
and symbols. Received messages can be opened and displayed or read aloud.
This chapter covers the following topics:
• E-mail settings
• Using the E-mail sample file
• The Inbox
• Making an e-mail file
6.1 E-mail settings
Before using the e-mail module you have to configure the e-mail settings.
To open the E-mail window, go to Tools > E-mail > Settings.
6.1.1 Server Settings
On the Server Settings tab, enter your server settings. These settings depend on
the specific provider.
Setting
Description
Servertype
Mind Express only works with POP-3 accounts.
Incoming e-mail
Enter the correct incoming server depending on the user’s
provider.
Outgoing
Enter the correct outgoing server depending on the user’s
provider.
Accountname
Enter the e-mail address of the user.
Password
Enter the password of the e-mail account.
Setting
Description
Authentication required for
The password required for incoming e-mails is also
outgoing e-mails
required for outgoing e-mails. Depends on the provider.
When using Gmail, the following server settings should be used.
Mind Express
When using Hotmail, the following server settings should be used.
122
6.1.2 Advanced
On the Advanced tab page, enter the required advanced settings.
Setting
Description
Portnumber for outgoing
Enter the portnumber for outgoing e-mail depending on
e-mail server
your Internet provider.
This server requires a
Indicate whether the server requires a secure connection
secure connection (SSL)
or not.
Portnumber for incoming
Enter the portnumber for incoming e-mail depending on
e-mail server
your Internet provider.
This server requires a
Indicate whether the server requires a secure connection
secure connection (SSL)
or not.
Only receive e-mails from
When you enable this option, you will only receive e-mails
people from address book
from your contact persons of your Mind Express Address
book. E-mails from unknown senders will be blocked, but
they will be available in the inbox. Go to Tools > E-mail >
Inbox.
After entering these settings, the e-mail module is ready for use.
Mind Express
When using Gmail, the following advanced settings should be used.
123
When using Hotmail, the following advanced settings should be used.
Mind Express
124
6.1.3 Sounds
On the Sounds tab, click
to choose a sound for the confirmation of E-
mail sent, Error while sending e-mail, New e-mails received.
Mind Express
6.2 Using the E-mail sample file
You can access the e-mail sample file via the Mind Express 4 start window. Click computer and then select e-mail.
The e-mail sample file opens.
To create your own e-mail file, see “Making an e-mail file” on page 130.
125
Mind Express
126
You can now:
To delete the currently selected e-mail.
To download the e-mails in Mind Express.
To show the next e-mails.
To show the previous e-mails.
To start writing a new message.
To hear the content of the currently selected email.
E-mails are read automatically when opening.
Select Read to hear the e-mail once again or to
hear the content of the message box.
To stop reading the content of the e-mail.
To send a reply to the currently selected e-mail.
To go back to the Mind Express 4 start window.
Mind Express
6.2.1 Writing and sending an e-mail
To send an e-mail
1. In the E-mail sample file, click the New message button.
The following screen appears.
127
Mind Express
128
Table 53: Writing an e-mail
2. Write your message in the message box, using the keypad with word
prediction.
Button
3. You can now:
To delete the last entered item from your e-mail.
Table 53: Writing an e-mail
Button
Description
Description
To clear your e-mail message.
To send the composed e-mail to the indicated
recipient(s).
To add a contact person from your address book to the
list of recipients. These contact persons will appear in
the To field.
If you select the same contact person a second time, it
will be deleted from the list of recipients.
To clear the list of recipients for this e-mail.
6.2.2 Address book
In the Address book, you can specify whether you prefer to send an e-mail with
or without a JPEG as attachment.
1. Go to Tools > Address book.
The Address book window appears.
To return to the e-mail inbox.
To read the e-mail out loud, to check it.
To stop reading the e-mail.
2. Select a contact person and click the edit button.
Mind Express
129
The Details window appears:
The Inbox window appears:
Here you can indicate whether you want to:
The attachments appear in the right corner below.
• Send an e-mail with only text.
For more information on using the address book, refer to “Address book” on
page 105.
6.3 The Inbox
2. Select Inbox or Deleted e-mails.
3. To select a certain message, click it.
Choose one of the following options:
The Inbox and the Deleted e-mails can also be consulted.
Option
Description
1. Go to Tools > E-mail > Inbox.
Check for new e-mails
To see newly received e-mails.
Read
To read the selected e-mail message.
Save
To save a message.
Undelete
To undelete a deleted message.
Delete
To delete an e-mail from the inbox or to delete an
already deleted e-mail permanently.
Mind Express
6.4 Making an e-mail file
Making an e-mail file is very similar to making a communication grid.
For more information, refer to “To create a new file in Mind Express” on
page 53.
130
The Edit window appears:
2. In the advanced part of the Edit window, select the cell type E-mail.
3. Below the cell type, select the option Inbox cell.
6.4.1 Creating an e-mail content cell
4. Indicate whether or not you want the inbox cell content to be read aloud
when clicking the cell.
This cell will show the content of the e-mail message.
5. Click OK.
To create an e-mail content cell
6.4.3 Creating an e-mail sender cell
1. Double-click the cell you want to use as e-mail content cell.
This cell will show the name of the sender of the selected e-mail.
The Edit window appears:
2. In the advanced part of the Edit window, select the cell type E-mail.
To create an e-mail sender cell
1. Double-click the cell you want to use as e-mail sender cell.
The Edit window appears:
2. In the advanced part of the Edit window, select the cell type E-mail.
3. Below the cell type, select the option Show e-mail sender.
4. Indicate whether or not you want the name of the sender to be read aloud
when clicking the cell.
5. Click OK.
3. Below the cell type, select the option Show e-mail content.
6.4.4 Creating an e-mail date cell
4. Indicate whether or not you want the e-mail content to be read aloud when
clicking the cell.
This cell will show the date on which the selected e-mail was sent.
5. Click OK.
6.4.2 Creating an e-mail inbox cell
This cell will show the sender and the subject the e-mails you received in your
inbox.
To create an e-mail inbox cell
1. Double-click the cell you want to use as e-mail inbox cell.
To create an e-mail date cell
1. Double-click the cell you want to use as e-mail date cell.
The Edit window appears:
2. In the advanced part of the Edit window, select the cell type E-mail.
3. Below the cell type, select the option Show e-mail date.
4. Indicate whether or not you want the date on which the selected e-mail was
sent to be read aloud when clicking the cell.
Mind Express
5. Click OK.
6.4.5 Creating an e-mail subject cell
131
2. In the Actions part of the window, select E-mail and choose the subaction
Send e-mail.
This cell will show the subject of the selected e-mail as indicated by the sender.
To create an e-mail subject cell
1. Double-click the cell you want to use as e-mail subject cell.
The Edit window appears:
2. In the advanced part of the Edit window, select the cell type E-mail.
3. Below the cell type, select the option Show e-mail subject.
4. Indicate whether or not you want the subject of the selected e-mail to be
read aloud when clicking the cell.
5. Click OK.
3. From the second drop-down list, select one of the following options:
6.4.6 Creating a number of (new) e-mails cell
Table 54: Send e-mail
This cell will display the number of (new) e-mails in your inbox.
To create a number of (new) e-mails cell
1. Double-click the cell you want to use as number of (new) e-mails cell.
Option
E-mail address
Address book
If you select this option, a list of all address book recipients will
appear below. Choose the contact person you want to send an
3. Below the cell type, select the option Number of (new) e-mails.
4. Indicate whether or not you want the number of (new) e-mails to be read
aloud when clicking the cell.
If you select this option, enter an e-mail address in the field that
appears below.
The Edit window appears:
2. In the advanced part of the Edit window, select the cell type E-mail.
Description
e-mail to.
Address book
If you select this option, the e-mail will be sent to the contact
recipients
person(s) you added to the list of recipients.
5. Click OK.
6.4.7 Creating a cell for sending e-mails
4. If desired, enter an appropriate label and/or image.
To make a Send e-mail action cell
5. Click OK.
1. In edit mode, double-click the cell you want to give the Send e-mail action.
Mind Express
132
To make e-mail action buttons
1. Double-click a cell and in the Edit window, select the action E-mail.
2. Select a subaction from the drop-down list.
Send e-mail
To send an e-mail to:
• E-mail address: To send an e-mail to a specific e-mail address.
• Address book: To send an e-mail to a contact person from your Mind Express
Address book.
• Address book recipients: To send an e-mail to the contact person(s) added to the
list of recipients.
Show previous
To show the previous list of headings of e-mails.
Show next
To show the next list of headings of e-mails.
Show newest e-mail
To show the headings of the last received e-mails.
Download inbox
To download the content of the inbox in the Mind Express grid.
Delete e-mail
To delete the last read e-mail. You can find deleted e-mails by selecting Deleted e-mails in the menu
Tools > E-mail > Inbox.
Read selected e-mail
To read the selected e-mail out loud.
Select previous e-mail
To select the previous e-mail.
Select next e-mail
To select the next e-mail.
Reply to e-mail
To reply to the selected e-mail.
Add content to message
To add the content of the e-mail to the message box.
Mind Express
Chapter 7 - Camera
With the Camera module you can take your own pictures.
First of all you need to connect a web cam to your computer.
7.1 Working with the Camera module
To open the Camera sample file
1. Go to File > Open.
The Open file window appears.
2. Select me4_eng and click Open.
The Mind Express 4 start window opens.
3. Click multimedia and then camera.
133
Mind Express
The Camera module opens.
4. Click the camera cell to activate the camera.
134
Mind Express
135
5. Do one of the following:
The next page of the camera sample file opens.
Table 55: Camera options
Button
Description
To take a picture.
To take a multi-shot (automatically taking three pictures,
one immediately after the other). When done, the next page
automatically opens.
7. You can now:
To go to the next page of the camera sample file where you
Table 56: Camera - Look at pictures
can look at the pictures already taken.
Button
Description
To scroll to the previous photograph.
6. To look at the pictures you have taken, click the Look at pictures button.
To delete the selected photograph.
Mind Express
136
Table 56: Camera - Look at pictures
Button
Description
To scroll to the next photograph.
You can resize your camera cell by clicking the cell (in edit mode)
and then clicking one of the black squares that appear. Hold your
mouse and drag to the desired size.
A grid can only contain 1 camera cell per page.
To return to the first page of the camera sample file
where you can take pictures.
7.2.2 The snapshot cell
To create a cell to take pictures
7.2 Making a camera file
Making a camera file is not complicated and is very similar to making a simple
communication grid.
For more information about making communication grids see “To create a new
file in Mind Express” on page 53.
1. Double-click a cell.
2. In the Actions part of the window, select Camera and choose the subaction
Take snapshot.
3. Add an appropriate label and/or symbol to the cell.
4. Click OK.
7.2.1 The camera viewing cell
7.2.3 Previous and next picture
This cell will display the pictures you have taken.
To create cells to move from one picture to another
To create a camera viewing cell
1. Double-click a cell.
1. Select the cell you want to use as camera viewing cell and open the Edit
window.
2. In the Actions part of the window, select Camera and choose the subaction
Previous picture or Next picture.
2. In the advanced part of the Edit window, choose the cell type Camera.
3. Add an appropriate label and/or symbol to the cell.
3. Click OK.
4. Click OK.
You now have made a cell in which the pictures taken by the web
cam will appear.
7.2.4 Cell for deleting a picture
To make a cell to delete pictures
1. Double-click a cell.
Mind Express
2. In the Actions part of the window, select Camera and choose the subaction
Delete picture.
3. Add an appropriate label and/or symbol to the cell.
4. Click OK.
7.2.5 Cell to stop the camera
By clicking this cell you will switch off the camera and the camera viewing cell
will appear, so you can have a look at the pictures you have taken.
To create a cell to stop the camera
1. Double-click a cell.
2. In the Actions part of the window, select Camera and choose the subaction
Stop.
3. Add an appropriate label and/or symbol to the cell.
4. Click OK.
7.2.6 The camera preview cell
Make a camera preview cell to activate the camera again.
To create a camera preview cell
1. Double-click a cell.
2. In the Actions part of the window, select Camera and choose the subaction
Preview.
3. Add an appropriate label and/or symbol to the cell.
4. Click OK.
137
Mind Express
139
Chapter 8 - Clock
In Mind Express you can add a clock to your communication grid to see the
current time whenever you want. You can choose between different layouts
when creating the clock.
It is possible to hear the current day/date/time spoken out loud when you click
the clock.
1. Double-click the cell.
2. In the Actions part of the Edit window, click Date/time and then select one of
the following subactions.
Table 57: Date/time subactions
To make a clock in Mind Express
1. Double-click the cell you want to use as a clock.
2. In the advanced part of the Edit window, select the cell type Clock.
3. Choose between an analog and digital view.
4. Indicate whether you want the seconds to be shown or not.
5. Click OK.
The clock is created.
Subaction
Description
Say date
Click this cell to hear the current date.
Say day
Click this cell to hear the current day pronounced out loud.
Say time
Click the cell to hear the current time.
3. Click OK.
Mind Express
Chapter 9 - Calculator
Mind Express 4 contains a calculator sample file. You can insert the calculator in
an existing file or create a new one.
This chapter covers the following topics:
• Using the calculator sample file
• Making a calculator
9.1 Using the calculator sample file
To use the calculator sample file
141
9.2 Making a calculator
To make a calculator
1. Create a new file.
For more information, refer to “To create a new file in Mind Express”
on page 53.
2. To make cells for the numbers:
• Open the Edit window.
• Choose the Calculator action and for each cell enter a number from 0-9 in
the operations field. In the end, you have 10 cells with numbers.
1. Go to File > Open.
The Open file window opens.
2. Select me4_eng to open the Mind Express 4 start window.
3. Click computer and then click calculator.
The calculator opens.
3. To make cells for the operations:
• Open the Edit window.
• Choose the Calculator action and for each cell enter an operation symbol in
the operations field.
Table 58: Calculator - operation symbols
Operation
You can now use the calculator.
Symbol
difference
-
sum
+
quotient
/
Mind Express
142
Table 58: Calculator - operation symbols
Operation
Symbol
Table 59: Calculator - type
Option
Description
product
*
Read out operations
The operations made are read out loud.
to the power of
^
Reset at Pageload
The calculator is reset when loading the page.
cell root
@
Write result in the
The result of the operation will be written in the
message box
message box after selecting the result cell.
fraction 1/x
R
equal to
=
+/-
i
Note that it can be useful to make the cell for the results larger than
the other cells.
6. Click OK.
If you often need to do the same calculation, you can make a cell
with a fixed operation, for example “15%”.
7. Make cells to delete signs and to delete the content of the display.
• Open the Edit window.
• Choose the Calculator action and for each cell enter an operation symbol in
the operations field
Table 60: Calculator - operation symbols 2
4. Click OK.
Operation
5. Make a cell that will function as result cell for the calculator.
• Double-click the cell.
• In the advanced part of the Edit window, select the cell type Calculator.
Delete a sign or a number
B
Clear the display
C
You can select the following options.
Table 59: Calculator - type
Option
Description
Show Result Only
Only the result of the operation is shown.
If this option is not selected, the complete operation
appears in the result cell.
Symbol
• Click OK.
You can now start using the calculator.
Mind Express
143
Chapter 10 - Battery level
There are two ways to get informed about the status of the battery of your
computer: a spoken message or visual information in a cell.
In edit mode, in the top left corner of the cell, a battery symbol
appears indicating the cell type.
10.1 Battery level message
The label of the cell mentions the percentage of the battery load.
1. In edit mode, double-click a cell to open the Edit window.
2. In the Actions part of the window, select Battery.
3. Select a symbol if necessary.
4. Click OK.
From now on the level of the battery will be spoken out loud when
you select this cell.
You can use this cell in combination with a battery cell.
10.2 Creating a battery cell
It is possible to make a battery cell.This means that you will create a cell that
displays the level of the battery.
1. In edit mode, double-click a cell.
2. In the advanced part of the Edit window, select the cell type Battery.
3. Add an appropriate symbol to the cell.
4. Click OK.
Mind Express
145
Chapter 11 - GEWA
If you are using a Tellus or a Mobi, Mind Express can be optionally equipped with
a programmable infrared remote control unit. With this module you can learn
and transmit infrared codes and control for instance your television, CD player
and other machines.
11.1 Programming infrared codes
Mind Express has a specific user interface to easily program the infrared
module.
To program infrared codes
1. Select Tools > GEWA > Record.
The Gewa window opens:
Choose one of the codes gw1 till gw150 to link with a specific IR
code. You can enter a more appropriate name in the Name box, for
instance “television volume up”.
2. Put your remote control (in this example it will be the remote control of your
television) in front of the IR window of the device (Tellus or Mobi). The
distance between your remote control and the IR window should be about
two inches.
3. Click Record to start the procedure.
4. The status line in the Gewa window will display in dark blue: Press remote
control. At the same time a red light in the IR window will turn on. The IR
module now waits for the IR code that has to be learned.
5. Press the button of your remote control of the code you want the IR module
to learn (in this case the IR code for television volume up).
6. Keep the button pressed until the red light in the IR window goes out or the
status line in the Gewa window will display in light blue Release.
This procedure will be repeated in order to learn the code for a
second time: The red light in the IR window will turn on again and the
status line will ask to press the (same) remote control button again.
The unit is now waiting for you to send the IR code for a second time.
Press the same button on your remote control again.
7. Keep the button pressed until the red light in the IR window goes out again
and the status line displays in light blue Release. The IR module now has
recorded the code a second time.
The red light will blink shortly to confirm that the record procedure
has been finished successfully. In the status line displays OK and will
turn green.
If an error occured, then the status line displays in red Error.
You can click Test to check if the new code works properly.
Repeat this procedure for all IR codes you want the computer to
learn.
11.2 Transmitting IR codes
To send IR codes with Mind express you have to link the Send Gewa action to a
cell in the grid.
1. To open the Mind Express editor, go to Edit > Edit mode and double-click
the cell you want to link.
2. In the editor, click Actions and from the actions list, choose GEWA.
3. From the drop-down list, select a specific code and fill in its Repeat
frequency underneath. This can be useful, for instance in the case of
volume control.
The chosen command will now appear in the list.
Mind Express
4. Click OK or add another command to build a macro. This can be useful to
make TV channel selections like for instance TV channel 39. The Pause
window allows you to add a pause between consecutive IR codes.
If you are familiar with the Gewa command structure you can also type the gewa
commands directly in the Type command window. For example !S 01 S01.
11.3 Making a backup file of the GEWA commands
This option is meant as a backup function of the GEWA commands. If any
problem occurs, you can restore the GEWA commands with your backup file.
This can also be useful in case you want to use different GEWA command sets
for different locations. You can program the GEWA with the commands for
location A and make a backup file once it is programmed for location A. You can
do the same for location B. Using backup and restore, this allows you to switch
the GEWA command set based on your location.
To make a backup of the GEWA commands
1. Go to Tools > GEWA > Back up.
The following window, asking to give the backup file a name,
appears.
2. Enter a name for this backup file, for example gewa_home.
3. Click OK.
The following message appears:
4. Click Yes.
A sandglass appears while the files are being saved.
To restore the GEWA backup
1. Go to Tools > GEWA and select Restore Backup.
The Restore window appears on the screen.
2. Select the backup you want to restore and click OK.
146
A sandglass will be displayed on the screen. When restoring is
finished, the window disappears.
Mind Express
147
Chapter 12 - Slideshow
In Mind Express you can make a slideshow to view images or photographs
stored in a (library) folder.
This chapter gives more information on:
• Using the slideshow module
• Making a slideshow file
4. Click one of the following icons.
Table 61: Slideshow template
Icon
Description
12.1 Using the slideshow module
Click to start the slideshow. All pictures stored in the given folder are
To use the slideshow template
again.
shown. After the last picture, the slideshow automatically starts
1. Go to File > Open
The Open file window opens.
To stop the slideshow.
2. Select me4_eng to open the Mind Express 4 start window.
3. Click multimedia and then click pictures.
The slideshow template opens.
To view the previous picture.
To view the next picture. Alternatively, click the picture itself.
Mind Express
148
12.2 Making a slideshow file
Making a slideshow file is very similar to making a simple communication grid.
For more information, refer to “To create a new file in Mind Express” on
page 53.
12.2.1 Creating a slideshow viewing cell
Slideshow viewing cells display the images from the selected folder arbitrarily.
To make a slideshow viewing cell
1. Select the cell you want to use as slideshow cell and open the Edit window.
2. In the advanced part of the Edit window, choose the cell type Slideshow.
3. Indicate whether you want to scroll through images stored in a media library
folder or in a folder on your computer.
4. Browse to the specific folder or to a media library folder.
5. If you want to view the next picture when clicking the slideshow window,
add the action Slideshow and the subaction Next to the slideshow cell.
6. Browse to the specific folder again.
7. Click OK.
You can resize your slideshow cell by clicking the cell (in edit
mode) and then clicking one of the black squares that appear.
Hold your mouse and drag to the desired size.
Mind Express
149
12.2.2 Creating slideshow action cells
Slideshow action cells allow you to scroll through the pictures in the folder.
To make a slideshow action cell
1. Double-click the cell you want to use.
2. In the Actions part of the window, select Slideshow and choose the
subaction you want to add to your grid.
Table 62: Slideshow subactions
Subaction
Description
Next
In case of more than one slideshow cell, use this
subaction to view the next x pictures of the folder.
Next (jump 1)
To view the next picture of the folder.
Previous
In case of more than one slideshow cell, use this
subaction to view the previous x pictures of the folder.
Previous (jump 1)
To view the previous picture of the folder.
Go to begin
To jump to the beginning of the slideshow.
Start autoscroll
To start the slideshow. It automatically scrolls through all
items in the specified folder. In case of more than one
slideshow cell, each time, x new pictures will appear at
once.
Start autoscroll (jump 1)
To start the slideshow. It automatically scrolls through all
items in the specified folder.
Table 62: Slideshow subactions
Subaction
Description
Stop autoscroll
To stop the slideshow.
3. Add an appropriate label and/or symbol to the cell.
4. Click OK.
Mind Express
151
Chapter 13 - Dynamic lists
In Mind Express you can create and use dynamic lists. This chapter covers the
following main topics:
• Using the dynamic lists sample file
• Making a dynamic list
13.2.1 Dynamic lists
13.1 Using the dynamic lists sample file
1. Go to Tools > Dynamic list.
You can access the dynamic lists template via the Mind Express 4 start window.
Click communication and then select dynamic lists.
The sample file contains 6 dynamic lists: persons, verbs, feelings, colors, fruit
and vegetables. Click the plus icon to see the three (in case of colors, fruit and
vegetables) or four (in case of persons, verbs and feelings) next items of the list
appear.
First of all, you should enter the data of the dynamic lists you want to create.
To enter the data of a dynamic list
The Dynamic list editor window opens.
Table 63: Dynamic list editor
Button
Description
To add a new dynamic list.
13.2 Making a dynamic list
Making a dynamic list file is very similar to making a simple communication
grid.
Refer to “To create a new file in Mind Express” on page 53.
To edit the selected dynamic list.
Mind Express
152
Table 63: Dynamic list editor
Button
Table 64: New dynamic list
Description
To delete the selected dynamic list.
Button
Description
Click this button to open the Edit window to add a new item to the
2. To add a new dynamic list, click the add button.
The New dynamic list window opens.
3. Enter the name of the dynamic list you want to add (e.g. clothes) and select
where you want to store the dynamic list: in the Current document or in
Mind Express. If you select Current document, the dynamic list will only be
disponible in the current document, if you select Mind Express, the
dynamic list can be used in any file in Mind Express.
dynamic list.
To create multiple items and add them to the list at once.
To edit the selected item from the list. (*)
To go to the previous item in the list. (*)
4. Click OK.
The following window opens.
To go to the next item in the list. (*)
To delete the selected item from the list. (*)
To sort the order of the dynamic lists alphabetically.
(*): You can use the Shift and Ctrl keys to select and edit several items at the
same time..
5. To add new items to the list, do one of the following:
• Click the add button and in the Edit window, create a new item.
• Click the create multiple items button.
If you chose the second option, the Choose symbols window opens.
Mind Express
6. Use the search tools and select all useful items from the results list.
153
All selected items are added to the dynamic list.
8. To save the (changes made to the) dynamic list, click OK.
The data of your dynamic list are saved.
13.2.2 Dynamic list cells
You can make as much dynamic list cells as you want.
7. Click OK.
To create a dynamic list cell
1. Double-click a cell.
2. In the advanced part of the Edit window, select the cell type Dynamic list.
3. Select the list you want to be displayed.
4. Indicate whether you want the list items to appear in random order or not.
5. Click OK.
A dynamic list cell is created. Repeat this procedure as many times
as needed.
Mind Express
154
13.2.3 Dynamic list action cells
To create dynamic list action cells
1. Double-click a cell.
2. In the Actions part of the Edit window, select Dynamic list and choose the
subaction you want to use.
Table 65: Dynamic list - Subactions
Subactions
Start Autoscroll
Description
To start the dynamic list cells to move automatically
through all items of a specific list. Enter the number of
seconds that should go by before the next x items of the
list are shown.
Table 65: Dynamic list - Subactions
Indicate which list this subaction should apply to.
Subactions
Description
Next
To show the next x items of the dynamic list.
Start Autoscroll (jump 1)
seconds that should go by before each dynamic list cell
Indicate which list this subaction should apply to.
Next (jump 1)
Previous
Previous (jump 1)
Go to begin
shows the next item of the list.
Each dynamic list cell will show the next item of the list.
Indicate which list this subaction should apply to.
To start the dynamic list cells to move automatically
through all items of a specific list. Enter the number of
Indicate which list this subaction should apply to.
Stop Autoscroll
To stop the dynamic list cells to move automatically
To show the previous x items of the dynamic list.
through all items of a specific list.
Indicate which list this subaction should apply to.
Indicate which list this subaction should apply to.
Each dynamic list cell will show the previous item of the
Add message box to list
To add the content of the message box to the dynamic
list.
list.
Indicate which list this subaction should apply to.
Indicate which list this subaction should apply to.
To go to the beginning of the dynamic list. The first
This option can only be active if the Put symbols when
dynamic list cell will show the first item of the list, the
storing Message in cell option is enabled. Refer to
second dynamic list cell will show the second item, etc.
page 77.
Indicate which list this subaction should apply to.
3. Add an appropriate label and/or symbol to the cell.
4. Click OK.
A dynamic list action cell is created.
Mind Express
In case of the clothes example, the dynamic list can look as follows.
155
Mind Express
157
Chapter 14 - Dynamic pages
The cell type Dynamic pages allows you to load a page (grid) into a field of a
page. One of the advantages of this fieldtype is that you can make a static and a
dynamic part in your grid.
Dynamic page cells can not be used in Freestyle documents.
2. In the Action part of the Edit window, select the action Go to page and select
the page you want to load in the dynamic page cell.
3. Select the name of the dynamic page cell next to In.
How to make a dynamic page cell:
1. Double-click a cell.
2. In the Type part of the Edit window, select the cell type Dynamic page and
enter the name of the dynamic page cell.
You can insert serveral dynamic page cells on the same page. This is
why you have to give each cell a specific name.
4. Click OK to confirm.
The page will now be displayed in the dynamic page cell after selecting this cell.
The number of cells of the dynamic page cell must be equal to the number
of cells of the page that will be displayed in the dynamic page cell.
3. Select the page that first will be displayed in the dynamic page cell in Start
page.
How to make dynamic page action cells:
To display a page in a dynamic page cell instead of opening the new page.
1. Double-click a cell.
Mind Express
159
Chapter 15 - Agenda
In Mind Express you can organize your appointments by using the agenda. You
can also use it to remind birthdays of your friends and family.
This chapter consists of two main parts:
• Using the agenda
• Editing the agenda
• Making an agenda file
15.1 Using the agenda
15.1.1 Consulting today’s appointments
To look at your appointments and planning of the current day
1. Go to File > Open.
The Open file window appears.
A clock indicates the current time.
The check mark (Time indicator cell) indicates the time next to it has
passed.
15.1.2 Consulting the monthly overview
To open the agenda template
1. Go to File > Open.
The Open file window appears.
2. Select me4_eng to open the Mind Express 4 start window.
3. Click calendar and then click calendar again.
The agenda template opens, showing the overview of the current
month.
2. Select me4_eng to open the Mind Express 4 start window.
3. Click calendar and then click today.
An overview of the current day opens.
The current day is indicated by three stars (***).
Mind Express
160
4. You can now:
Table 66: Month overview
Click
The weekplanner template opens, showing the overview of the
current week.
To
go to the overview of the previous month.
go to the overview of the next month.
open the dayplanner for this specific day.
4. You can now:
5. To return to the ME4 start window, click the ME icon.
15.1.3 Consulting the weekplanner
To open the weekplanner
1. Go to File > Open.
Table 67: Week overview
Click
To
go to the previous week overview.
The Open file window appears.
2. Select me4_eng to open the Mind Express 4 start window.
3. Click calendar and then click week planner.
go to the next week overview.
5. To return to the ME4 start window, click the ME icon.
Mind Express
161
15.1.4 Consulting the dayplanner
To open the dayplanner
Table 68: Dayplanner
Click
1. Go to File > Open.
To
go to the next day.
The Open file window appears.
2. Select me4_eng to open the Mind Express 4 start window.
open the overview of the full month.
3. Click calendar and then click dayplanner.
The dayplanner opens with the current day displayed.
5. To return to the Mind Express 4 start window, click the ME icon.
15.1.5 Adding an appointment to the agenda
To add an appointment to the agenda
1. Go to File > Open
The Open file window opens.
2. Select me4_eng to open the Mind Express 4 start window.
3. Click calendar and then click add to agenda.
4. You can now:
Table 68: Dayplanner
Click
To
go to the previous day.
Mind Express
The following screen appears.
4. Click the Choose activity button to select an activity from the list.
5. To indicate the date on which the activity will take place, click Change date.
By default, the current day is entered.
6. Change the begin and end time using the buttons at the right.
7. To add the appointment to your agenda, click Add to agenda.
The activity is added to your agenda and the dayplanner is opened on
the day for which you added a new activity.
162
Mind Express
15.2 Editing the agenda
163
The Editor window opens.
15.2.1 Adding new appointments to your agenda
To add a new appointment to the agenda
1. Go to Tools > Agenda > Edit agenda.
The Agenda window opens with the current date indicated in the top
right of the screen.
3. Add the appointment specifications.
Table 69: Agenda - Editor window
Item
Description
Activity
Add a name for the activity or appointment.
Picture
You can add a picture to the activity.
When
Indicate what day the activity will take place and if the activity
occurs once or will repeat in time.
Duration
Indicate whether it is a full day event (for example birthday,
Easter, etc.) or not. If not, indicate the time interval during
2. Click the New appointment button.
which the activity takes place.
Alarm
You can set an alarm to remind you of the specific activity.
Indicate when you want the alarm to go off.
4. Click Save.
Mind Express
The appointment is added to your agenda.
Full day events are shown in the month overview. Appointments
are shown on the week overview and on the dayplanner.
15.2.2 Adding an alarm to your agenda
164
3. Click Save.
To add a background image to the month overview
1. Go to Tools > Agenda > Custom background.
The Custom background window opens.
To add an alarm
1. Go to Tools > Agenda > Add alarm.
The Alarm Editor window opens.
2. Enter the alarm specifications.
2. Click
next to the name of a montt and select a symbol for the month.
The Symbol window opens.
Table 70: Alarm Editor window
Item
When
Description
Indicate when the alarm should go off: what day, what time and
if repetition is required.
Message
Enter the message you want to be displayed or spoken.
Sound
Browse to the sound you want to hear.
3. From now on, the symbol selected for this specific month will automatically
appear on the pages were a cell Agenda > Show Title > Month (specific
month) is programmed.
Mind Express
4. Search for a symbol and click OK.
165
2. In the advanced part of the Edit window, select the cell type Time indicator.
3. Below the cell type, indicate what time should be shown.
4. If desired, choose an image that will be shown before the indicated time has
passed.
The symbol is used as background of the specific month.
15.3 Making an agenda file
To create an agenda file, you should start in the same way as making a simple
communication grid.
Refer to “To create a new file in Mind Express” on page 53.
In this section, you will find out how you can make a time indicator cell and an
agenda cell.
15.3.1 Creating time indicator cell
To create a cell with cell type Time indicator
1. Double-click the cell you want to use as time indicator cell.
For more information on cell indicator cells see
The Edit window appears:
5. If desired, choose an image that will be shown after the indicated time has
passed.
6. Click OK.
Repeat this procedure until you created all the time indicator cells
you need.
15.3.2 Creating an Agenda cell
To create a cell with cell type Agenda
1. Double-click the cell you want to use as agenda cell.
The Edit window appears:
Mind Express
166
Table 71: Agenda Actions
2. In the advanced part of the Edit window, select the cell type Agenda.
3. Below the cell type, indicate if you want the cell to show the activity, the title
or the timing of the agenda item.
• If you selected Show activity, indicate the day of which the activities should
be shown and, if desired, select Only show full day events. Enter the start
and end time of the time interval that is represented by the agenda cell.
• If you selected Show title, indicate the day of which the title should be
shown and choose the date format to be used.
• If you selected Timing, indicate whether you want the Begin hour or End
hour to be shown.
Item
Description
Next week
To go to the next week.
Previous week
To go to the previous week.
Go to this week
To go to the actual week.
Next month
To go to the next month.
Previous month
To go to the previous month.
Go to this month
To go to the actual month.
Next year
To go to the next year.
Previous year
To go to the previous year.
Go to this year
To go to this year.
Go to specific month
To go to a specific month.
Change begin hour
To change the beginning hour of an appointment. You
can increase or decrease the hour for minutes or
hours.
4. Click OK.
Change end hour
To change the end hour of an appointment. You can
increase or decrease the hour for minutes or hours.
Table 71: Agenda Actions
Store in agenda cell
To store the content of the message in an agenda cell.
Item
Description
Add to agenda
To add the activity to the agenda.
Next day
To go to the next day.
read cell
To read the cell.
Previous day
To go to the previous day.
Go to today
To go to the actual day.
Mind Express
167
Chapter 16 - Windows Control
Table 72: Windows control - subactions
This module makes it possible to control other applications from Mind Express,
e.g. Word.
Table 72: Windows control - subactions
Subactions
Send key
Option
Subactions
Option
Toggle sending
Start sending
Description
Stop sending
To send a macro to another
Toggle sending
To send a sentence/message to
To switch between Send and Don’t
send to the other application
To insert a pause between two
Start sending (other
To start sending commands to
commands (for example to give the
computer)
another computer.
other application the time needed to
open properly).
Sticky key
To deactivate the sending of
commands to another application.
another application, e.g. Word.
Pause
To send commands to another
application.
application.
Send message
Description
Click once to activate the key until
another Windows control key is
Active window
Move
Size
Dock
To dock up/down/ left/right the ME
window to the active window.
continuously.
Click three times to deactivate the
To reduce or increase the height or
width of the active window.
pressed.
Click twice to keep the key activated
To move the active window up/
down/to the left/to the right.
Tile
To tile up/down/left/right the active
window to the ME window.
key.
Select next window
To switch between windows/running
programs.
You can choose to enter (a part of)
the name of the program(s)/
window(s) you want to select,
e.g.notepad.
Mind Express
168
Table 72: Windows control - subactions
Subactions
Option
Description
Mind Express
Move
To move the Mind Express window
window
up/down/to the right/to the left.
Size
To reduce or increase the height or
width of the Mind Express window.
Mouse control
Move
This option is intended for scanners
of Mind Express to move the mouse
up/down, to the left/right.
Click
This option is intended for scanners
of Mind Express to click the mouse.
Double click
This option is intended for scannes
of Mind Express to double click the
mouse.
Right click
This option is intended for scanners
of Mind Express to right click the
mouse.
Drag on/off
This option is intended for scanners
of Mind Express to drag on/off items.
Exit
Always on top
Mind Express
To exit Mind Express.
Windows
To exit Windows.
To switch between the setting
always on top on/off for the Mind
Express window .
Mind Express
169
Chapter 17 - Bliss Editor
Bliss Editor is an accessory to Mind Express that allows you to create your own
Bliss symbols. Bliss Editor is based on the standard Bliss rules. You can use the
basic shapes to create new Bliss symbols or you can combine existing Bliss
symbols.
In this chapter you can find more information on:
• Starting Bliss Editor
• Mind Express and Bliss Editor
• A few ground rules
• Creating a new Bliss symbol
• The menu bar: File
• The menu bar: Edit
• The menu bar: Insert
• The menu bar: Symbol
The Bliss Editor application opens.
17.1 Starting Bliss Editor
To start Bliss Editor
1. In Windows, go to Start > Programs > Mind Express 4 > Bliss Editor.
Alternatively, in the Edit window, select a Bliss symbol, right-click the
symbol preview box and click Edit symbol.
Read this chapter to learn how you can create a new Bliss symbol. In this
chapter, you can also find all relevant information on the Bliss Editor functions.
17.2 Mind Express and Bliss Editor
The symbols you create using Bliss Editor automatically appear in the Bliss
symbol list at the top of the Edit window in Mind Express.
For more information on the Edit window, see also “The layout of the Edit
window” on page 59.
You can use your own Bliss symbols to create a communication grid in the same
way as you would do with the other symbol sets (Beta, PCS, ...) in Mind Express.
Mind Express
170
17.3 A few ground rules
Take the following ground rules into account when you create your own Bliss symbols:
• The standard Bliss area contains a top line and a bottom line. These are the two thick lines in the grid. The distance between these two lines is the standard
distance. This means that the Bliss symbols are always placed between these two lines, except in a few cases.
• Indicators are placed at 1/4 of the standard distance from the top line. This can also be at a quarter above the top part of the Bliss symbol if that Bliss symbol itself
exceeds the top line. Indicators give a grammatical meaning to a Bliss symbol.
• Pointers are placed at 1/8 of the standard distance from the symbol. Pointers are used to “point at” a part of the symbol.
• For composite symbols, the distance between the different parts is 1/4 of the standard distance.
Mind Express
17.4 Creating a new Bliss symbol
You can use Bliss Editor to create your own Bliss symbols, so you can use them
in your communication grids afterwards.
171
• Choose Insert > Basic symbol and choose a symbol from the list by
clicking it.
To create a new Bliss symbol
1. Start Bliss Editor.
The Bliss Editor window appears together with the Basic Symbol
window.
• Choose Insert > Bliss symbol. Choose a symbol from the list or type the
name of the symbol in the Symbol field. Click Insert.
2. Click the new symbol button or press Ctrl + N and enter a name.
The symbol of your choice appears in the Bliss Editor window.
3. Select the appropriate word class by clicking one of the radio buttons.
The grid takes on a different color for every word class. For example,
when you select Substantive, the grid turns orange.
4. To save the Bliss symbol, choose File > Save or click the save button in the
toolbar.
Mind Express
172
Table 74: Edit menu
The thickness of the Bliss symbols can be modified in the
window Symbol sets under Tools > Symbolsets
Menu option
Paste
Description
Allows you to select a symbol (or parts of a symbol) and to
paste it (them).
17.5 The menu bar: File
Clear
disappear. The work area of the Bliss Editor window is made
Below you find a chronological overview of the commands on the File menu.
empty.
Table 73: File menu
Menu option
Description
Save
To save the current symbol.
Exit
To close Bliss Editor.
To clear an entire symbol. The color and all parts of the symbol
When you clear a symbol, it does not disappear from
the symbol list. Only the symbol contents are removed.
If you want to completely delete a symbol from the list,
choose Symbol > Remove.
Delete
To delete only the selected parts of a symbol. You can select
certain parts of a symbol by clicking them with the mouse. The
selected parts then turn blue. You can also select several parts
17.6 The menu bar: Edit
Below you find an overview of the functions in the Edit menu, in order of their
appearance in the menu. Use these functions to edit symbols. The changes are,
however, only applied to the current symbol in the Bliss Editor window.
of a symbol at once by holding down the Shift key.
Select all
Show grid
Table 74: Edit menu
Menu option
Description
Restore
To undo a change you have made to a symbol.
Cut
Allows you to select a symbol (or parts of a symbol) and to cut it
(them).
Copy
Allows you to select a symbol (or parts of a symbol) and to copy
it (them).
To select all parts of the current symbol. You can also press Ctrl
A for this purpose.
To make the grid visible or to make it disappear.
Mind Express
173
17.7 The menu bar: Insert
Below you find an overview, in order of appearance, of the commands on the
Insert menu.
Table 76: Symbol menu
Menu option
Previous
Description
Basic symbol
To make the dialog box with basic symbols appear. Click one of
the basic symbols to make it appear in the work area of the
First
To make the Bliss symbol window appear. Select a symbol from
Last
Find
completely match the name of the symbol you are looking for,
select the option Match whole word only. If you want to see all
the Bliss Editor window.
Table 76: Symbol menu
To open the Find window. Insert the name of the symbol you
are looking for in the Find what field. If you want the result to
the Symbol field. Then click Insert to make the symbol appear in
Below you find an overview, in order of appearance, of the commands on the
Symbol menu. This menu contains all the commands that you can apply to the
symbol lists.
To view the last symbol in the list. Alternatively, use the End
key on your keyboard.
the list or immediately type the name of the symbol you want in
17.8 The menu bar: Symbol
To view the first symbol in the list. Alternatively, use the Home
key on your keyboard.
Bliss Editor window immediately.
BLISS symbol
To view the previous symbol in the list. Alternatively, use the
Left Arrow key on your keyboard.
Table 75: Insert menu
Menu option
Description
the symbols in which the word occurs, do not select this option.
Find next
To find the next symbol that corresponds to your look-up
criteria. For this purpose, you can also use the F3 key on your
keyboard.
Ungroup
To undo the Group operation. Alternatively, press Ctrl U on your
keyboard.
Group
To group the component parts of a symbol. As soon as a
symbol is grouped, you can no longer select the separate parts:
Menu option
Description
New
To insert a new symbol. You can also press Ctrl N on your
symbol.
keyboard.
Alternatively, press Ctrl G on your keyboard.
Remove
Next
To remove a symbol from the list.
To view the next symbol in the list. Alternatively, use the Right
Arrow key on your keyboard.
clicking any of the parts of the symbol selects the entire
Mind Express
175
Appendix - Phonetic Script
Table 77: Vowels and diphthongs (UK English)
The phonetic script used in Mind Express has been listed in the tables below for
your reference.
Table 77: Vowels and diphthongs (UK English)
Symbol
Transcription
As in:
o&U
‘So&U
show
Symbol
Transcription
As in:
I&$
‘hI&$
here
i
‘bit
beat
E&$
‘DE&$
there
I
‘bIt
bit
U&$
‘pU&$
poor
E
‘bEd
bed
@
‘m@p
map
A
‘kA
car
A+
‘pA+t
pot
Symbol
Transcription
As in:
^
‘b^t
but
j
‘ju
you
O
‘bOt
bought
w
‘wIt
wit
U
‘bUk
book
R+
‘R+a&Id
ride
u
‘but
boot
l
‘lEt
let
$
$.’ba&Ut
about
p
‘p@n
pan
E0
‘tE0n
turn
t
‘t@n
tan
e&I
‘be&It
bait
k
‘k@n
can
O&I
‘bO&I
boy
b
‘bO&I
boy
a&I
‘ba&I
buy
d
‘de&I
day
a&U
‘da&Un
down
g
‘gA+t
got
Table 78: Consonants (UK English)
Mind Express
176
Table 78: Consonants (UK English)
Symbol
Transcription
As in:
? (glottal stop)
?it
eat
f
‘fa&In
fine
T
‘TIn
thin
s
‘sIn
sin
S
‘Sa&In
shine
v
‘va&In
vine
D
‘D@t
that
z
‘zo&Un
zone
Z
‘vI.Z$n
vision
h
‘hEd
head
t&S
‘t&SE0+t&S
church
d&Z
‘d&Z^nK.g$l
jungle
m
‘ma&I
my
n
‘no&U
no
nK
‘sA+nK
song
Table 79: Vowels and diphthongs (US English)
Symbol
Transcription
As in:
i
‘fil
feel
I
‘fIl
fill
E
‘fEl
fell
@
‘k@t
cat
A
‘gAt
got
^
‘k^t
cut
O
‘fOl
fall
U
‘fUl
full
u
‘ful
fool
$
$.’la&U
allow
E0
‘kE0R+t
curt
O
‘dOr
door
e&I
‘fe&Il
fail
O&I
‘fO&Il
foil
a&I
‘fa&Il
file
a&U
‘fa&Ul
foul
o&U
‘go&Ul
goal
Mind Express
177
Table 80: Consonants (US English)
Table 80: Consonants (US English)
Symbol
Transcription
As in:
j
‘jEs
yes
w
‘wa&I
why
R+
‘R+Ip
rip
l
‘lIp
lip
p
‘pIt
pit
t
‘tAp
top
k
‘k@t
cat
b
‘bIt
bit
d
‘dIg
dig
g
‘gAt
got
? (glottal stop)
‘?it
eat
f
‘f@t
fat
T
‘Tin
thin
s
‘sil
seal
S
‘Sip
ship
v
‘v@t
vat
D
‘Den
then
z
‘zil
zeal
Z
‘li.Z$R+
leisure
Symbol
Transcription
As in:
h
‘h@t
hat
t&S
‘k@t&S
catch
d&Z
‘d&ZE0R+.ni
journey
m
‘m@n
man
n
‘n^t
nut
nK
‘R+InK
ring
A
Address book 84
Using 105
Advanced features 68
Agenda 85
Dayplanner 161
Making 165
Today 159
Using 159
Weekplanner 160
Appointment
Adding 161
Auditory scanning 44
B
Battery 85
Battery level message 143
Battery level visual 143
Bliss Editor 169
Ground rules 170
Installation 5
Bliss symbols
Creating new 171
C
Calculator 85
Making 141
Using 141
Camera file
Making 136
Using 133
Clock
Making 139
Commands
Working with 83
Communication grids
Lay-out 19, 29, 73, 93, 99
Contact person
Adding 105
Deleting 106
Editing 106
Creating
login file 20
New Bliss symbol 171
New file 53
D
Document preferences 76
Document properties 13
Dynamic lists 85
E
Edit menu 57
Edit toolbar 56
Edit window 59
Editor 58
E-mail 85
Settings 121
E-mail file
Creating 130
Using 125
Exporting documents 14
Exporting stylesets 16
F
Fast input 54
G
General tab 41
Getting started with Mind Express 53
GEWA 85
Restoring the GEWA backup 146
Go to level 86
Go to page 86
Grammar 86
Grammar functions 86
Grid settings 74
Ground rules for Bliss Editor 170
I
Importing documents 15
Importing stylesets 16
Inbox 129
Insert menu 173
Installation
Bliss Editor 5
Mind Express 5
installation 5
Installing 5
K
Keyboard shortcuts 54
L
Label 54
Lay-out of communication grids 19, 29, 73, 93, 99
Letter functions 86
Letters
Functions 86
Login file 20
M
Media library 11
Menu bar
Edit 172
File 172
Insert 173
Symbol 173
Message 79
Functions 81
Options 79
Style settings 81
Writing 25
Message box 86
Message options 79
Messages
Saving 27
Working with 79
Writing 25
Method tab 36
Mind Express
Closing 17
Exiting 17
Getting started with 53
Installation 5
Starting 9
Mind Express and Bliss Editor
installation 5
Modify styles 62
Modifying
Styles 22, 75
Mouse
Mode 29
Mouse mode 29
Music and Video 86
Music file
Creating 100
Music sample file
Using 99
N
New file 53
O
Open file command 86
Options window 23
P
Page
Go to 86
Go to, command 86
Page settings 74
Phone
Settings 109
Phone functions 87
Phone module
Making 112
Using 110
Phonetic 87
Preferences tab 38
R
Reference 9
Restore the GEWA backup 146
Right-click menu 69
Run application 87
S
Sample files 10
Saving
Letters 27
Messages 27
Scanning 35
Scanning mode 35
Scanword 44
Security 5
Select user 19
Sentence prediction
Add sentences 97
Edit 97
Sentence window
Preferences 79
Shortcuts 54
Slideshow 87
SMS sample
Using 113
SMS sample file
Making 117
Some ground rules for Bliss Editor 170
Sound 87
Speech dictionary 22
Speech preferences 22
Start words 95
Style settings 64, 75
Styles
modify 62
Modifying 22, 75
Switching levels 67
Symbol 53
Symbol catalog 60
System requirements 5
T
Timing tab 40
U
User 89
Select 19
Settings 81
User mode
Mouse 29
Scanning 35
User modes 21
V
Video file
Creating 102
Video sample file
Using 101
Volume 90
W
Windows Control 90
Word prediction
Editing 94
Options 93
Working with actions 83
Working with commands 83
Working with messages 79
Writing 25
Writing messages 25


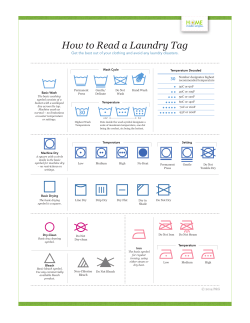
© Copyright 2026