
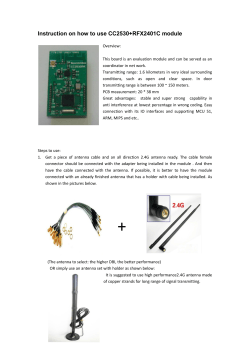
Tactical Dipole (CHA TD) Operator’s Manual California - USA
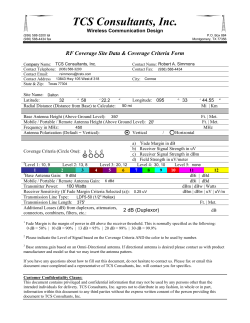
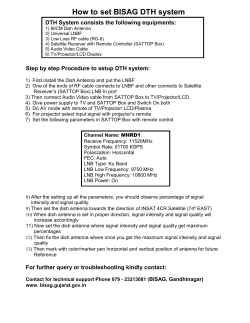
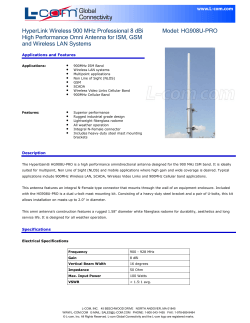
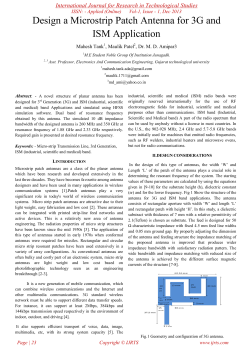
Tactical Dipole (CHA TD) Operator’s Manual California - USA WWW.CHAMELEONANTENNA.COM VERSATILE – DEPENDABLE – STEALTH – BUILT TO LAST Table of Contents Introduction .............................................................................................................................................. 3 HF Propagation ......................................................................................................................................... 3 Parts of the Antenna ................................................................................................................................. 4 Antenna Configurations ............................................................................................................................ 8 Sloping “V” ............................................................................................................................................ 9 Horizontal Dipole ................................................................................................................................ 11 Sloping Wire ........................................................................................................................................ 12 Inverted “L” ......................................................................................................................................... 14 Horizontal NVIS ................................................................................................................................... 15 Half Rhombic ....................................................................................................................................... 16 Recovery Procedure ................................................................................................................................ 19 Packing Procedure .................................................................................................................................. 19 Troubleshooting ...................................................................................................................................... 19 Specifications .......................................................................................................................................... 20 Accessories .............................................................................................................................................. 20 Chameleon AntennaTM Products ............................................................................................................ 21 References .............................................................................................................................................. 22 Be aware of overhead power lines when you are deploying the CHA TD. You could be electrocuted if the antenna gets near or contacts overhead power lines. All information on this product and the product itself is the property of and is proprietary to TM Chameleon Antenna . Specifications are subject to change without prior notice. CHA TD Page 2 Introduction TM Thank you for purchasing and using the Chameleon Antenna Tactical Dipole (CHA TD) antenna. The CHA TD is a broadband High Frequency (HF) antenna specially designed for short to long range portable and man-pack HF communication. The CHA TD is ideal for military, government agencies, non-governmental organizations (NGOs), Military Affiliate Radio System (MARS), Civil Air Patrol (CAP), Amateur Radio Emergency Service (ARES) / Radio Amateur Civil Emergency Service (RACES), Salvation Army Team Emergency Radio Network (SATERN), and amateur radio operators (hams) involved in field communication and disaster preparedness. The CHA TD is configurable to facilitate Near-Vertical Incident Sky wave (NVIS) communication and its broadband design supports Automatic Link Establishment (ALE), frequency-hopping, and spread-spectrum modes without a tuner or coupler. The CHA TD can be deployed by the operator in the field in less than 15 minutes, using almost any available support, with no masts TM or guying required. Antennas built by Chameleon Antenna are versatile, dependable, stealthy, and built to last. Please read this operator’s manual so that you may maximize the utility you obtain from your CHA TD. HF Propagation HF radio provides relatively inexpensive and reliable local, regional, national, and international voice and data communication capability. It is especially suitable for undeveloped areas where normal telecommunications are not available, too costly or scarce, or where the commercial telecommunications infrastructure has been damaged by a natural disaster or military conflict. Although HF radio is a reasonably reliable method of communication, HF radio waves propagate through a complex and constantly changing environment and are affected by weather, terrain, latitude, time of day, season, and the 11-year solar cycle. A detailed explanation of the theory of HF radio wave propagation is beyond the scope of this operator’s manual, but an understanding of the basic principles will help the operator decide what frequency and which of the CHA TD’s configurations will support their communication requirements. HF radio waves propagate from the transmitting antenna to the receiving antenna using two methods: ground waves and sky waves. Ground waves are composed of direct waves and surface waves. Direct waves travel directly from the transmitting antenna to the receiving antenna when they are within the radio line-of-sight. Typically, this distance is 8 to 14 miles for field stations. Surface waves follow the curvature of the Earth beyond the radio horizon. They are usable, during the day and under optimal conditions, up to around 90 miles, see table (1). Low power, horizontal antenna polarization, rugged or urban terrain, dense foliage, or dry soil conditions can reduce the range very significantly. The U.S. Army found that in the dense jungles of Vietnam, the range for ground waves was sometimes less than one mile. Frequency Distance Frequency Distance 2 MHz 88 miles 14 MHz 33 miles 4 MHz 62 miles 18MHz 29 miles 7 MHz 47 miles 24 MHz 25 miles 10 MHz 39 miles 30 MHz 23 miles Table 1. Maximum Surface Wave Range by Frequency. Sky waves are the primary method of HF radio wave propagation. HF radio waves on a frequency below the critical frequency (found by an ionosonde) are reflected off one of the layers of the ionosphere and back to Earth between 300 and 2,500 miles, depending upon the frequency and ionospheric conditions. HF radio waves can then be reflected from the Earth to the ionosphere again during multihop propagation for longer range communication. The most important thing for the operator to understand about HF radio wave propagation is the concept of Maximum Usable Frequency (MUF), Lowest Usable Frequency (LUF), and Optimal Working Frequency (OWF). The CHA TD Page 3 MUF is the frequency for which successful communications between two points is predicted on 50% of the days of in a month. The LUF is the frequency below which successful communications are lost due to ionospheric loses. The OWF, which is somewhere between the LUF and around 80% of the MUF, is the range of frequencies which can be used for reliable communication. If the LUF is above the MUF, HF sky wave propagation is unlikely to occur. The HF part of the Radio Frequency (RF) spectrum is usually filled with communications activity and an experienced operator can often determine where the MUF is, and with less certainty, the LUF by listening to where activity ends. The operator can then pick a frequency in the OWF and attempt to establish contact. Another method is using HF propagation prediction software, such as the Voice of America Coverage Analysis Program (VOACAP), which is available at no cost to download or use online at www.voacap.com. The operator enters the location of the two stations and the program show a wheel with the predicted percentage of success based on frequency and time. ALE, which is the standard for interoperable HF communications, is an automated method of finding a frequency in the OWF and establishing and maintaining a communications link. Even under optimal conditions, there is a gap between where ground waves end (around 40 to 90 miles) and the sky wave returns to Earth on the first hop (around 300 miles). NVIS propagation can be used to fill this gap. The frequency selected must be below the critical frequency, so NVIS is can normally only be used on frequencies from around 2 to 10 MHz. Frequencies of 2 – 4 MHz are typical at night and 4 – 8 MHz during the day. Parts of the Antenna The CHA TD is comprised of the following components: a. Matching Transformer, EMCOMM II The EMCOMM II Matching Transformer, see plate (1), provides impedance matching for the CHA TD. b. Antenna Wire The Antenna Wires, see plate (2), are two 60 foot lengths of black insulated wire, wrapped around Line Winders (f). c. Counterpoise Wire The Counterpoise Wires, see plate (3), are two 25 foot lengths of black insulated wire, wrapped around Line Winders (f). d. Isolation loop Two Isolation loops, one at each end, are permanently attached to the Antenna Wires (b) and Counterpoise Wires (c), see plates (2) and (3). e. Carabiner The Carabiners, see plates (2) and (3) are removable pear-shaped stainless steel hooks with a spring-loaded gate. CHA TD Page 4 Plate 1. Matching Transformer, Side View (top), Bottom View (left) and Top View (right). f. Line Winder The Line Winders are used to store the Antenna Wires (b), Counterpoise Wires (c), and Paracord (h), see plates (2) and (3). They enable rapid deployment and recovery of the CHA TD. Plate 2. Antenna Wire. g. Termination Resistor, CHA R-300 The Termination Resistors, see plate (4), are non-inductive 300 Ohm resistors. They enable the CHA TD to be broad-banded without use of a tuner or coupler. CHA TD Page 5 Plate 3. Counterpoise Wire. h. Paracord, 550 Paracord (not pictured) is used to suspend components of the CHA at the proper height or anchor them to the ground, depending upon the antenna configuration. Additional 50 foot lengths of Paracord on a Line Winder are available for purchase from Chameleon TM Antenna . At least one additional assembly is highly recommended for deployment of some antenna configurations. i. Stakes The four stainless steel stakes (not pictured) are used to anchor various ends of the CHA TD to the ground, depending upon the antenna configuration. j. Coaxial Cable The Coaxial Cable assembly, see plate (5), is a 50 foot length of RG-58 coaxial cable with built-in RF current isolation, terminated at each end with a UHF Plug, PL-259 (o). The cable length may be extended using a Double UHF Socket (SO-239 Barrel), and another Coaxial Cable TM assembly, which is available for purchase from Chameleon Antenna . k. UHF Socket The UHF Socket, SO-239, is located on the bottom of the Matching Transformer (a), see plate (1). l. Top Transformer Connection The Top Transformer Connection is located on the top of the Matching Transformer (a), see plate (1). CHA TD Page 6 Plate 4. Termination Resistor. m. Bottom Transformer Connection The Bottom Transformer Connection is located on the bottom of the Matching Transformer (a), see plate (1). n. Transformer Eyebolt The Transformer Eyebolt is located on the top of the Matching Transformer (a), see plate (1). Plate 5. Coaxial Cable. CHA TD Page 7 o. UHF Plug UHF Plugs, PL-259, are attached to both ends of the Coaxial Cable (j) assembly. p. Resistor Connection The Resistor Connection, see plate (4), are located at both ends of the Termination Resistor (g). q. Resistor Eyebolt The Resistor Eyebolts, see plate (4), are located at both ends of the Termination Resistor (g). r. Wire Connector The Wire Connectors are located at both ends of the Antenna Wires (b) and one end of the Counterpoise Wires (c). s. Backpack The Backpack, see plate (6), stores and organizes the components of the CHA TD, enabling rapid deployment and recovery, and making the antenna portable and man-packable. Plate 6. Backpack. Antenna Configurations Using the supplied components, the CHA TD can be deployed into a number of configurations. Six configurations are described in this manual, each with unique performance characteristics. Table (2) shows the antenna configurations described in this manual. The table can assist the operator to quickly select the most appropriate antenna configuration to meet their operational requirements. Configuration Ground Short Sloping “V” Medium Long ↕ Horizontal Dipole ↓ Directionality Deployment Unidirectional Deliberate ↕ ↑ Bidirectional Deliberate Sloping Wire ↓ ↕ ↑ Omnidirectional Hasty Inverted “L” ↓ ↕ ↑ Omnidirectional Hasty ↑ Omnidirectional Hasty ↓ Unidirectional Hasty Horizontal NVIS Half Rhombic ↓ ↓ Table 2. Antenna Configuration Selection. To use the table, decide which distance column (Ground = 0 to 90 miles, Short = 0 - 300 miles, Medium = 300 – 1500 miles, Long > 1500 miles) best matches the distance to the station with whom you need to communicate. CHA TD Page 8 Then, determine if the OWF is in the lower (↓ = 1.8 – 10 MHz) or upper (↑ = 10 – 30 MHz) frequency range. Finally, select the CHA TD configuration with the corresponding symbol in the appropriate distance column. All CHA TD configurations provide some capability in each distance category, so depending upon the complexity of your communications network, you may need to select the best overall configuration. The directionality column indicates the directionality characteristic of the antenna configuration. When using NVIS, all the configurations are omnidirectional. “Hasty” and “Deliberate” in the deployment column indicate the relative complexity of site selection and setup for each antenna configuration. Sloping “V” The CHA TD Sloping “V” configuration, see figure (1), is a broadband medium range HF antenna. This configuration exhibits directionality towards the opening of the “V” at medium to higher frequencies, while on lower frequencies it is bidirectional to the sides of the “V”. It requires only a single support and can be mounted at heights from 3 to 40 feet, with around 25 feet providing good overall results. An opening angle of 90° will provide good overall performance, but angles from 180° to 60° can be used to fit the antenna to the site or to improve performance. Larger opening angles increase performance on lower frequencies and smaller angles on higher frequencies. At 180°, the antenna becomes an Inverted “V” antenna. The antenna may also be mounted horizontally using three 10 foot tall supports. Figure 1. Sloping V Antenna Configuration. Site Selection and Preparation. 1. Select a site to deploy the CHA TD Sloping V configuration, see figure (1). The best site should have a tree or other support that would enable the Matching Transformer to be at a height of around 25 to 40 feet. If a tall support is unavailable, any convenient object, such as a CHA TD 3. fence post or the top of a vehicle, may be used as a field expedient support with reduced performance. Remove the Matching Transformer (a), Paracord (h), Antenna Wires (b), Coaxial Cable (j), and two Stakes (i) from the Backpack (s). Page 9 4. If not already attached, connect a Carabiner to each end of both Antenna Wires. Connect the Matching Transformer. Refer to figure (2) for steps (5) – (10). Figure 2. Matching Transformer Electrical and Mechanical Connections. 5. Connect the Carabiner from one end of an Antenna Wire to the Transformer Eyebolt (n). 6. Connect the Wire Connector (r) from the Antenna Wire to the Bottom Transformer Connection (m). Tighten the wing nut finger tight. 7. Connect the Carabiner from the end of the other Antenna Wire to the Carabiner from step (5). 8. Connect the Wire Connector from the Antenna Wire to the Top Transformer Connection (l). Tighten the wing nut finger tight. 9. Using a Bowline or similar knot, tie one end of Paracord to the Carabiner from step (5). 10. Connect the UHF Plug (o) from the Coaxial Cable to the UHF Socket (k) on the Matching Transformer. Raise the antenna. 11. Using a throw weight or some other method, loop the Paracord over the support. 12. Raise the antenna to the desired height and secure the free end of the Paracord to the support with a Round Turn and two Half Hitches or similar knot. Extend the Antenna Wires into a “V”. CHA TD 13. Using a Bowline of similar knot, tie a short length of Paracord (around 4 feet) to the Carabiners at the unconnected end of both Antenna Wires. 14. Extend one Antenna Wire to its full length. 15. Drive a Stake in the ground around two feet beyond the end of the Antenna Wire. 16. Using two Half Hitches or similar knot, tie the short length of Paracord from the Antenna Wire to the Stake, such that the Antenna Wire is not quite taut. 17. Extend the other Antenna Wire to its full length along the approximate opening angle chosen to form the antenna into a “V” (60 feet between the ends of the “V” for 90°). 18. Drive a Stake into the ground around two feet beyond the end of the Antenna Wire. 19. Using two Half Hitches, tie the short length of Paracord from the Antenna Wire to the Stake, such that the Antenna Wire is not quite taut. 20. Remove the Counterpoise Wires (c), and Termination Resistors (g) from the Backpack. Attach the Termination Resistors. Refer to figure (3) for steps (21) – (25). Figure 3. Termination Resistor Electrical and Mechanical Connections. 21. Connect the Carabiners at the ends of both Antenna Wires to the Resistor Eyebolts (q) of both Termination Resistors. Page 10 22. Connect the Wire Connectors from both Antenna Wires to the Resistor Connection (p). Tighten the wing nuts finger tight. Attach the Counterpoise Wires. 23. If not already attached, connect a Carabiner to the Wire Connector end of both the Counterpoise Wires. 24. Connect the Carabiners to the unconnected Resistor Eyebolts of the Termination Resistors. 25. Connect the Wire Connectors to the Resistor Connections of the Termination Resistors. Tighten the wing nuts finger tight. 26. Extend both Counterpoise Wires along the ground to their full lengths. The counterpoise works best if extended in a straight line along the path of the Antenna Wires, but they can be bent or ran in different directions, if needed. 27. Perform operational test. 28. This completes deployment of the CHA TD Sloping “V” configuration. Horizontal Dipole The CHA TD Horizontal Dipole configuration, see figure (4), is a broadband short to long range HF antenna. The Horizontal Dipole is the standard for wire HF antennas and will provide good sky wave (including NVIS) propagation. It requires at least two supports (one at each end). A center support is also recommended. The CHA TD Horizontal Dipole should be mounted at a height of around 25 feet for good overall results. When mounted at this height, the antenna is mostly omnidirectional at lower frequencies. At higher frequencies the pattern is predominately bidirectional broadside to the antenna. If the center of the antenna is supported and the ends are sloped down to the ground, the antenna becomes an Inverted “V” (see Sloping “V” configuration). If the Termination Resistors are not installed, the antenna becomes a Horizontal Dipole resonant around 3.9 MHz. If the Termination Resistors are not installed and a Counterpoise Wire is substituted for one of the Antenna Wires, the antenna becomes a 5.4 MHz Off-Center-Fed (OCF) Dipole. Figure 4. Horizontal Dipole Configuration. Site Selection and Preparation. 1. Select a site to deploy the CHA TD Horizontal Dipole configuration, see figure (4). A good site should have two trees or other supports that are 120 feet apart and are tall enough that the Termination Resistors at each end of the Horizontal Dipole will be at a height of around 25 feet. The best site will have an additional tree or other support for the center of the antenna. If tall supports the right distance apart are unavailable, any convenient objects, such as fence posts or the tops of vehicles, may be used as a field expedient supports with reduced performance. CHA TD Page 11 2. Remove the Matching Transformer (a), Paracord (h), Antenna Wires (b), and Coaxial Cable (j) from the Backpack (s). 3. If not already attached, connect a Carabiner to each end of both Antenna Wires. Connect the Matching Transformer. Refer to figure (2) for steps (4) – (8). 4. Connect the Carabiner from one end of the Antenna Wire to the Transformer Eyebolt (n). 5. Connect the Wire Connector (r) from the Antenna Wire to the Bottom Transformer Connection (m). Tighten the wing nut finger tight. 6. Connect the Carabiner from the other end of the other Antenna Wire to the Carabiner from step (4). 7. Connect the Wire Connector of the Antenna Wire to the Top Transformer Connection (l). Tighten the wing nut finger tight. 8. Connect the UHF Plug (o) from the Coaxial Cable to the UHF Socket (k) on the Matching Transformer. Extend the Antenna Wires. 9. Fully extend both Antenna Wires in a straight line in opposite directions along the ground. 10. Using a throw weight or some other method, loop the Paracord over the end supports. 11. Using a Bowline or similar knot, tie Paracord to the Carabiners at the ends of the Antenna Wires. 12. If a center support is available, use a Bowline or similar knot, tie one end of the Paracord to the Carabiner from step (4). Attach the Termination Resistors. Refer to figure (3) for steps (15) – (19). 13. Remove the Counterpoise Wires (c), and Termination Resistors (g) from the Backpack. 14. Connect the Carabiners at the ends of both Antenna Wires to the Resistor Eyebolts (q) of both Termination Resistors. 15. Connect the Wire Connectors from both Antenna Wires to the Resistor Connection (p). Tighten the wing nuts finger tight. Attach the Counterpoise Wires. 16. If not already attached, connect a Carabiner to the Wire Connector end of both the Counterpoise Wires. 17. Connect the Carabiners to the Resistor Eyebolts of the Termination Resistors. 18. Connect the Wire Connectors to the Resistor Connections of the Termination Resistors. Tighten the wing nuts finger tight. Raise the antenna. 19. Raise the antenna to the desired height and secure the free ends of the Paracord to the supports with a Round Turn and two Half Hitches or similar knot. 20. Perform operational test. 21. This completes deployment of the CHA TD Horizontal Dipole configuration. Sloping Wire The CHA TD Sloping Wire configuration, see figure (5), is a broadband short to long range HF antenna. It should provide acceptable ground wave and sky wave propagation. This configuration is predominately omnidirectional, slightly favoring the direction of the high end of the antenna as the frequency increases. The Sloping Wire requires one support and is excellent for hasty deployment. It should be mounted at a height of 25 to 40 feet for best performance. Site Selection and Preparation. 1. Select a site to deploy the CHA TD Sloping Wire configuration, see figure (5). The best site should have a tree or other support that would enable the Termination Resistor to be at a height of around 25 to 40 feet. If a tall support is unavailable, any convenient object, such as a fence post or the top of a vehicle, may be used as a field expedient support with reduced performance. CHA TD Page 12 Figure 5. Sloping Wire Configuration. 2. Remove the Matching Transformer (a), Paracord (h), one Antenna Wire (b), Coaxial Cable (j), two Stakes (i), both Counterpoise Wires (c), and one Termination Resistor (g) from the Backpack (s). 3. If not already attached, connect a Carabiner to each end of the Antenna Wire. 4. If not already attached, connect a Carabiner to the Wire Connector end of both the Counterpoise Wires. Connect the Matching Transformer. Refer to figure (2) for steps (5) – (10). 5. Connect the Carabiner from the Counterpoise Wire to the Transformer Eyebolt (n). 6. Connect the Wire Connector (r) from the Counterpoise Wire to the Bottom Transformer Connection (m). Tighten the wing nut finger tight. 7. Connect the Carabiner from one end of the Antenna Wire to the Carabiner from step (5). 8. Connect the Wire Connector from the Antenna Wire to the Top Transformer Connection (l). Tighten the wing nut finger tight. 9. Using a Bowline of similar knot, tie one end of short length (around four feet) of Paracord to the Carabiner connected in step (5). 10. Connect the UHF Plug (o) from one end of the Coaxial Cable to the UHF Socket (k) on the Matching Transformer. CHA TD Connect the Terminating Resistor. Refer to figure (3) for steps (11) – (15). 11. Connect the Carabiner from the unconnected end of the Antenna Wire to the Resistor Eyebolt (q) of the Termination Resistor (g). 12. Connect the Wire Connector from the Antenna Wire to the Resistor Connection (p) of the Termination Resistor. Tighten the wing nut finger tight. 13. Connect the Carabiner from the Counterpoise Wire to the other end of the Termination Resistor. 14. Connect the Wire Connector from the Counterpoise Wire to the Resistor Connection of the Termination Resistor. Tighten the wing nut finger tight. 15. Using a Bowline or similar knot, tie one end of the Paracord to the Carabiner from step (11). Raise the Antenna. 16. Using a throw weight or some other method loop the Paracord over the support. 17. Raise the end of Sloping Wire antenna to the desired height and secure the Paracord to the support using a Round Turn and two Half Hitches or similar knot. Extend the Antenna Wire and Counterpoise Wire. 18. Fully extend the Antenna Wire. Page 13 19. Drive a Stake around two feet beyond the end of the Antenna Wire. 20. Using two Half Hitches, tie the short length of Paracord from the Matching Transformer to the Stake, such that the Antenna Wire is not quite taut. 21. Extend the Counterpoise Wire that is attached to the Matching Transformer along the ground in any convenient direction away from the rest of the antenna. 22. Perform operational test. 23. This completes deployment of the CHA TD Sloping Wire configuration. Inverted “L” The CHA TD Inverted “L” configuration, see figure (6), is a broadband short to long range HF antenna. This configuration is mostly omnidirectional, slightly favoring the Terminating Resistor end of the antenna as the frequency increases. It is also provides effective ground waves communication during the day time on frequencies between 1.8 – 4.0 MHz without using sky wave propagation. The Inverted “L” requires two supports and is suitable for hasty deployment. It should be mounted at a height of 25 feet for best performance, but will provide good performance at a height of 10 to 20 feet and is usable when mounted as low as 3 feet. Figure 6. Inverted L Configuration. Site Selection and Preparation. 1. Select a site to deploy the CHA TD Inverted “L” Wire configuration, see figure (6). The site should have two trees or other support that would enable the Termination Resistor and the corner of the “L” in the Antenna Wire to be at a height of around 25 feet. If a tall supports are unavailable, any convenient object, such as a fence post or the top of a vehicle, may be used as a field expedient support with reduced performance. 2. Remove the Matching Transformer (a), Paracord (h), one Antenna Wire (b), Coaxial Cable (j), two CHA TD Stakes (i), both Counterpoise Wires (c), and one Termination Resistor (g) from the Backpack (s). 3. If not already attached, connect a Carabiner to each end of the Antenna Wire and to the Wire Connector end of both Counterpoise Wires. Connect the Matching Transformer. Refer to figure (2) for steps (4) – (9). 4. Connect the Carabiner from the Counterpoise Wire to the Transformer Eyebolt (n). 5. Connect the Wire Connector (r) from the Counterpoise Wire to the Bottom Transformer Page 14 Connection (m). Tighten the wing nut finger tight. 6. Connect the Carabiner from one end of the Antenna Wire to the Carabiner from step (4). 7. Connect the Wire Connector from the Antenna Wire to the Top Transformer Connection (l). Tighten the wing nut finger tight. 8. Connect the UHF Plug (o) from one end of the Coaxial Cable to the UHF Socket (k) on the Matching Transformer. 9. Using a Bowline of similar knot, tie one end of short length (around four feet) of Paracord to the Carabiner connected in step (4). 10. Drive a Stake in the ground below the support closest to the location of the radio set. 11. Using two Half Hitches, tie the short length of Paracord from the Matching Transformer to the Stake. Connect the Terminating Resistor. Refer to figure (3) for steps (12) – (15). 12. Connect the Carabiner from the end of the Antenna Wire to the Resistor Eyebolt (q) of the Termination Resistor. 13. Connect the Wire Connector from the Antenna Wire to the Resistor Connection (p) of the Termination Resistor. Tighten the wing nut finger tight. 14. Connect the Carabiner from the Counterpoise Wire to the Resistor Eyebolt at the other end of the Termination Resistor. 15. Connect the Wire Connector from the Counterpoise Wire to the Resistor Connection of the Termination Resistor. Tighten the wing nut finger tight. Raise the Antenna. 16. Using a Bowline or similar knot, tie the end of the Paracord to the Carabiner from step (12). 17. Using a throw weight or other method, loop the Paracord over the support that is closest to where the radio set will be located. 18. Pull the Counterpoise Wire, Termination Resistor, and Antenna Wire over the support. 19. Using a throw weight or some other method, loop the Paracord over the other support. 20. Raise the Inverted “L” antenna so that the vertical and horizontal sections are not quite taut. 21. Secure the Paracord to the support using a Round Turn and two Half Hitches or similar knot. Extend the Counterpoise. 22. Extend the Counterpoise Wire, attached to the Matching Transformer, along the ground under the horizontal section of the antenna. 23. Perform operational test. 24. This completes deployment of the CHA TD Inverted “L” configuration. Horizontal NVIS The CHA TD Horizontal NVIS configuration, see figure (7), is a special configuration designed to provide good NVIS propagation on lower frequencies. It is predominately omnidirectional and also provides medium range sky wave propagation on frequencies above 10 MHz. It is suitable for hasty deployment and requires two supports that will enable the antenna to be raised to a height of 10 – 12 feet. This configuration will require an antenna tuner or coupler. Site Selection and Preparation. 1. Select a site to deploy the CHA TD Horizontal NVIS configuration, see figure (7). The site must have two trees or other supports that will position the Matching Transformer and the end of the Antenna Wire to be at a height of between 10 and 12 feet and 60 feet apart. Higher or lower heights may be used, but may reduce NVIS performance. CHA TD Page 15 Figure 7. Horizontal NVIS Configuration. 2. Remove the Matching Transformer (a), Paracord, Antenna Wires (b), and Coaxial Cable (j) from the Backpack (s). 3. If not already attached, connect a Carabiner (e) to each end of the Antenna Wires. Connect the Matching Transformer. Refer to figure (2) for steps (4) – (8). 4. Connect the Carabiner from one the Antenna Wires to the Transformer Eyebolt (n). 5. Connect the Wire Connector (r) from the Antenna Wire to the Bottom Transformer Connection (m). Tighten the wing nut finger tight. 6. Connect the Carabiner from the other Antenna Wire to the Transformer Eyebolt. 7. Connect the Wire Connector from the Antenna Wire to the Top Transformer Connection (l). Tighten the wing nut finger tight. 8. Connect the UHF Plug (o) from one end of the Coaxial Cable to the UHF Socket (k) on the Matching Transformer. Raise the Antenna. 9. Using a Bowline or similar knot, tie the end of the Paracord to the Carabiner from step (6). 10. Using a throw weight or other method, loop the Paracord over the support that is closest to where the radio set will be located. 11. Raise the Matching Transformer end of the antenna to a height of 10 to 12 feet and secure it to the support using a Round Turn and two Half Hitches or similar knot. 12. Using a Bowline or similar knot, tie another length of Paracord to the Carabiner at the end of the Antenna Wire. 13. Using a throw weight or some other method, loop the Paracord over the other support. 14. Raise the end of the Antenna Wire to a height of 10 to 12 feet, such that the Antenna Wire is not quite taut, and secure it to the support using a Round Turn and two Half Hitches or similar knot. Extend the Counterpoise. 15. Position the dangling Antenna Wire so that it drops vertically from the Matching Transformer and then horizontally under (parallel) to the raised Antenna Wire. This is the counterpoise for this antenna configuration. 16. Perform operational test. 17. This completes deployment of the Horizontal NVIS configuration. Half Rhombic The CHA TD Half Rhombic configuration, see figure (8), is a low noise broadband medium range HF antenna. This configuration is vertically polarized and unidirectional in the direction of the Termination Resistor. It is designed to produce good lower to middle frequency range ground and sky waves. It requires one support at least 18 feet high and is excellent for hasty deployment. CHA TD Page 16 Figure 8. Half Rhombic Configuration. Site Selection and Preparation. 1. Select a site to deploy the CHA TD Half Rhombic configuration, see figure (8). A good site should have a support that is tall enough to suspend the apex, at the center of the antenna, to a height of around 18 feet. 2. Remove the Matching Transformer (a), Paracord (h), Antenna Wires (b), one Termination Resistor (g), two Stakes (i), and Coaxial Cable (j) from the Backpack (s). 3. If not already attached, connect a Carabiner to each end of both Antenna Wires. Connect the Matching Transformer. Refer to figure (2) for steps (4) – (9). 4. Connect the Carabiner from one end of the Antenna Wire to the Matching Transformer Eyebolt (n). 5. Connect the Wire Connector to the Bottom Transformer Connection (m). Tighten the wing nut finger tight. 6. Connect the Carabiner from the other end of the other Antenna Wire to the Carabiner from step (4). 7. Connect the Wire Connector to the Top Transformer Connection (l). Tighten the wing nut finger tight. 8. Attach a short length (4 feet) of Paracord to the Carabiner from step (4). CHA TD 9. Connect the UHF Plug (o) from the Coaxial Cable to the UHF Socket (k) on the Matching Transformer. Extend the Antenna Wires. 10. Extend both Antenna Wires on the ground to their full lengths alongside each other with the center of the Antenna Wires close to the support. Attach the Termination Resistor. Refer to figure (3) for steps (11) - (13). 11. Connect the Carabiners at the end of both Antenna Wires to the Resistor Eyebolts (q) of the Termination Resistor. 12. Connect the Wire Connectors to the Resistor Connections (p). Tighten the wing nuts finger tight. 13. Attach a short length (4 feet) of Paracord to the Carabiner from step (11). Raise the Antenna. 14. Using a throw weight or some other method, loop the Paracord over the support. 15. Using a Fisherman’s or similar knot, tie the Paracord to the center of one of the Antenna Wires. 16. Raise the apex at the center of the Antenna Wire to a height of 18 feet and secure the Paracord to the support using a Round Turn and two Half Hitches or similar knot. Page 17 17. Drive a Stake around two feet beyond the Termination Resistor. 18. Secure the Paracord from the Termination Resistor to the Stake using two Half Hitches or similar knot. 19. Drive a Stake around two feet beyond the Matching Transformer. 20. Pull the Paracord attached to the Matching Transformer so that the elevated Antenna Wire CHA TD is not quite taut and secure the Paracord to the Stake using two Half Hitches or similar knot. 21. Position the other Antenna Wire so that it is on the ground mostly under the elevated Antenna Wire. This Antenna Wire is the counterpoise for this configuration. 22. Perform operational test. 23. This completes deployment of the CHA TD Half Rhombic configuration. Page 18 Recovery Procedure To recover the CHA TD, perform the following steps: 1. Disconnect the Coaxial Cable (j) from the radio set. 2. Lower the antenna to the ground. 3. Disconnect the Coaxial Cable from the Matching Transformer (a). 4. Carefully roll (do not twist) the Coaxial Cable. 5. Untie the Paracord (h) from the Antenna Wire (b). 6. Disconnect the Antenna Wires from the Matching Transformer (a). 7. Disconnect the Antenna Wires from the Termination Resistors (g) or Matching Transformer, depending upon the configuration. 8. Wind the Antenna Wires onto their Line Winders (f) and secure with attached shock cord. 9. Pull the Stakes (i) from the ground. 10. Disconnect the Counterpoise Wires (c) from the Terminating Resistors or Matching Transformer, depending upon the antenna configuration. 11. Wind the Counterpoise Wires onto their Line Winders and secure with attached shock cord. 12. Remove dirt from antenna components and inspect them for signs of wear. Packing Procedure Note: If you have just received your CHA TD, you may want to go through this procedure to pack your new antenna in its backpack. Note: This suggested packing procedure will make deployment easier and help to ensure you don’t lose any CHA TD components during recovery. To pack the CHA TD in the Backpack (s), perform the following steps: 1. Place the Matching Transformer (a) into the lower front pouch. 2. Place the Paracord (h) into the lower front pouch and zip up the pouch. 3. If not already connected, attach a Carabiner (e) to the Isolation Loops (d) at each end of both Antenna Wires (b), see plate (2). 4. Place both Antenna Wire assemblies into the middle pouch. 5. Place Coaxial Cable (j) assembly into the middle pouch. 6. Place the Stakes (i) into the middle pouch and zip up the pouch. 7. If not already connected, attach a Carabiner to the Isolation Loop at the Wire Connector end of the Counterpoise Wires (c), see plate (3). 8. Place the Counterpoise Wire assemblies into the rear pouch. 9. Place the Termination Resistors (g) into the rear pouch and zip up the pouch. 10. The front top pouch can be used to store small items or tools. 11. Store the Operator’s Manual in the rear pouch. Troubleshooting 1. 2. 3. Ensure Wire Connectors (r) are securely connected. Inspect Antenna Wires (b) and Counterpoise Wires (c) for breakage or signs of strain. Ensure UHF Plugs (o) are securely tightened. CHA TD Page 19 4. 5. 6. 7. 8. 9. Inspect Coaxial Cable (j) assembly for cuts in insulation or exposed shielding. If still not operational, replace Coaxial Cable assembly. Most problems with antenna systems are caused by the coaxial cables and connectors. If still not operational, connect a Standing Wave Ratio (SWR) Power Meter and check SWR. If SWR is greater than 3:1, connect a Multi-Meter to Termination Resistors (g). Termination Resistor should measure 300 Ohms. Replace if they measures less than 285 Ohms or greater than 315 Ohms. If still not operational, connect a Multi-Meter to the Antenna Wires to check continuity. Replace assemblies that do not pass a continuity check. If still not operational, replace Matching Transformer (a). Specifications Frequency: 1.8 MHz through 30.0 MHz continuous (including all Amateur Radio Service bands 160m to 10m) Power: 100 W continuous duty cycle (CW, AM, FM, RTTY), 300 W intermittent duty cycle (SSB and SSBbased digital modes) RF Connection: UHF Plug (PL-259) SWR: Subject to frequency and configuration, but typically less than 2.5:1 (2.75:1 below 2 MHz) Length: 120 ft (maximum), 112 ft (typical), 35 ft (minimum) Footprint: 1,800 sq ft (maximum) Weight: Less than 10 lbs Personnel Requirements and Setup Time: one trained operator, less than 15 minutes Accessories TM The following accessories are available for purchase from Chameleon Antenna . Please contact us at [email protected] for current prices and availability. 50’ Paracord and Line Winder Assembly (h). This is highly recommended to enable installation of the CHA TD in certain configurations or situations where available supports are higher or further apart. Coaxial Cable Assembly (j). Used to extend the Coaxial Cable length. Recommended non-supplied accessories: Flashlight. Multi-tool. Throwing weight and string. Tape measure. Mallet. SWR Power Meter Multi-Meter Double Female UHF Connector (Barrel). Used to extend the Coaxial Cable length. #10x24 stainless steel wing nut. Recommend one for use as a spare. CHA TD Page 20 Chameleon AntennaTM Products TM The following products are available for purchase at Chameleon Antenna . Go to http://chameleonantenna.com for ordering and more information. CHA Zepp - The CHA Zepp Antenna has been specially designed for apartments, condominiums, homeowners associations, deed restrictions and CCRs (Covenants, Conditions & Restrictions), ARES, RACES, MARS, EMCOMM, NVIS, First Responders, Emergency Preparedness and attic antenna installation. It’s a true base station or portable stealth antenna. CHA EMCOMM II - The CHA EMCOMM II Antenna has been specially designed for backup emergency HF system or permanent installation. The integral broadband impedance matching network allows broadband antenna tuning. CHA SKYLOOP - The CHA SKYLOOP is a 250' full wave loop antenna cut for 80M. With the help of an antenna tuner, the CHA SKYLOOP will cover all the bands between 80M and 6M. CHA HYBRID Vehicular Base - The CHA HYBRID Vehicular Base is designed to enhance the capabilities of the common HF radio application by allowing faster tuning operation across the HF bands including MARS/CAP frequencies. This antenna base has an integral broadband impedance matching network allowing broadband antenna tuning. The CHA HYBRID can be used mobile with the CHA V1L and V2L mobile antennas or stationary with the provided 30' wire. CHA V1 Mobile Antenna - The CHA V1 antenna is our first and classic broadband HF mobile antenna that we designed. It has been updated from fiberglass to 7075 alloy and stainless steel. CHA V1L Mobile Antenna - The CHA V1L antenna is a rugged multiband HF mobile antenna that can be erected in a minimum of time and space. CHA V2L Mobile Antenna - The CHA V2L is a rugged multiband HF antenna designed for smaller vehicles. CHA TD CHA VHF/UHF Magnetic Mount Mobile Antenna The CHA VHF/UHF is a simple but great dual band antenna for 2M and 70CM. CHA HYBRID-MINI Base - The CHA HYBRID-MINI Base is the portable version of the regular HYBRID. The unit can be differentiated by the color of the lid and the base connector, which is black instead of gray. The HYBRID-MINI is also smaller and about 50% lighter than the regular HYBRID. The CHA HYBRIDMINI Base and a CHA MIL Whip perfectly complements the capability of the CHA TD. CHA HYBRID-MICRO Antenna - The CHA HYBRIDMICRO is a lightweight highly portable broadband HF antenna system designed to offer maximum portability and performance. The antenna weights about 1 lb. The antenna will operate at all frequencies in the 1.8-54 MHz band without any adjustment with most modern external antenna tuners. No masts or guying are required. The CHA HYBRID-MICRO is a great quick deployment backup for the CHA TD and will fit in the same backpack. The CHA HYBRID-MICRO and a CHA MIL Whip perfectly complements the capability of the CHA TD. CHA MIL Whip - The CHA MIL whip is a broadband (28 to 54 MHz) monopole antenna designed for portable or man-pack radios requiring compact but rugged antenna systems. Its design has been borrowed from similar antennas utilized by many armies all over the world. The CHA MIL is very hardy, sturdy and portable (being collapsible). Un-mounted the entire antenna length is less than 29”. The 5 aluminum sections are hold together by a piece of 1/8th inch US GI MIL SPEC shock cord. The CHA MIL Whip and a CHA HYBRID-MINI Base perfectly complements the capability of the CHA TD. CHA MIL EXT Whip Extension - The CHA MIL EXT whip has been designed to offer maximum portability and performance for those already using Page 21 the portable CHA MIL whip for man-pack antenna system. This collapsible antenna extension needs to be used with the CHA MIL to create a 17’4” long portable antenna. When combined with any HYBRID series antenna bases the CHA MIL EXT will operate at all frequencies in the 1.8-54 MHz band without any adjustment with most modern external antenna tuners. References 1. 2. 3. st Silver, H. Ward (editor), 2013, 2014 ARRL Handbook for Radio Communications, 91 Edition, American Radio Relay League, Newington, CT. 1987, Tactical Single-Channel Radio Communications Techniques (FM 24-18), Department of the Army, Washington, DC. Turkes, Gurkan, 1990, Tactical HF Field Expedient Antenna Performance Volume I Thesis, U.S. Naval Post Graduate School, Monterey, CA. CHA TD Page 22


© Copyright 2026