
4D-Nucleofector™ System Manual For Research Use Only BioResearch
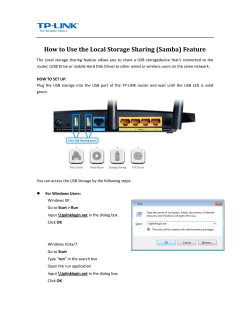
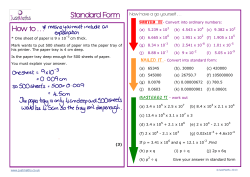
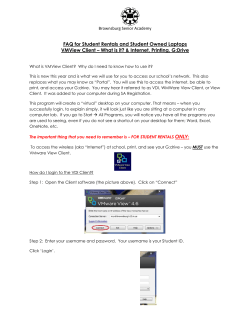
BioResearch 4D-Nucleofector™ System Manual For Research Use Only The purchase of the 4D-Nucleofector™ System conveys to the buyer the non-transferable right to use the system as well as Lonza’s proprietary Nucleofector™ Technology for research conducted by the buyer (whether the buyer is an academic or for-profit entity). For further details about the license please refer to chapter 5. Content 1 The Nucleofector™ Technology 4 2 Operating Instructions 6 2.1Restrictions 2.2Maintenance 2.3Safety Instructions – Please Read Carefully 2.4Waste Disposal 2.54D-Nucleofector™ System Components 2.6Set-up Instructions 2.7Instructions for Using the 4D-Nucleofector™ System 2.7.1 Turn on the 4D-Nucleofector™ System 2.7.2 Adjusting Position of the Graphical User Interface (Touch Screen) 2.7.3 Operating Software 2.7.4 Using a Predefined Experiment 2.7.5 Defining an Experiment 2.7.6 Loading of Samples 2.7.7. Turn off the 4D-Nucleofector™ System 2.8Additional Settings and Options 2.9Cleaning the Nucleofection™ Vessel Tray 2.10 Firmware Update 2.11 PC Editor Software 2.12 96-well Shuttle™ Mode 3Troubleshooting 6 6 7 7 8 9 10 10 10 11 12 13 14 15 15 17 17 18 19 20 3.1Suboptimal Transfection Results 3.2Rescue of Samples 20 20 4 Error Codes of the 4D-Nucleofector™ System 21 4.1Arc Discharge Correction 21 5 Purchaser Notification 23 6Appendix 23 BioResearch 4D-Nucleofector™ Manual 1 The Nucleofector™ Technology Moving Transfection into the Forth Dimension Since its introduction in 2001, Nucleofector™ Technology has transformed transfection. Nucleofection™ has proven to be a reliable and reproducible easy-to-use technology, suited to a wide variety of applications. An ever increasing number of publications in a wide range of research areas reflect how Nucleofector™ Technology is driving research in numerous cell types and applications. Nucleofector™ Technology provides an answer to almost every transfection challenge. At Lonza, we believe that listening to our customers is the best way to develop innovative products that meet your needs. In line with this customer-oriented spirit, the 4D-Nucleofector™ System was developed to offer advanced performance, flexibility and convenience. The system is controlled by intuitive software on an up-to-date touch screen user interface. Its modular architecture allows seamless expansion of the system for new applications. How it Works Nucleofector™ Technology is based on two unique components, the Nucleofector™ System that delivers the specifically optimized electrical parameters and Nucleofector™ Kits, which contain specific Nucleofector™ Solutions. As part of Nucleofector™ Technology, Lonza provides cell-type specific optimized protocols for many different cell lines and primary cells. Experience the 4D-Nucleofection™ with: –– A novel conductive polymer based cuvette system completely free of toxic metal ions –– Transfection of different cell numbers using the same conditions –– Transfection of adherent cells in using multiple methods Transfection of Any Cell With over 160 protocols optimized by Lonza’s R&D Team for cell lines and primary cells and more than 680 entries in the online Cell Transfection Database, Nucleofector™ Technology is the transfection method of choice for difficult-to-transfect cell types. Moreover, Nucleofection™ is the only electroporation based technology allowing reliable transfection of adherent cells and cells in suspension. www.lonza.com/cell-database Transfection of Any Substrate Nucleofector™ Technology offers high flexibility within applications, since the same transfection parameters apply for almost all substrates. DNA vectors, RNA duplexes, and peptides can be transfected using our sophisticated transfection protocols. This makes Nucleofection™ an ideal tool for providing answers to scientific questions in over-expression studies, gene silencing approaches, protein expression, generation of stable clones and many more applications besides. 4 1 The 4D-Nucleofector™ System Support Teams Europe Scientific Support: +32 87 321 611 [email protected] North America Scientific Support: 800 521 0390 (toll free) [email protected] 5 BioResearch 4D-Nucleofector™ Manual 2 Operating Instructions 2.1 Restrictions 2.2 Maintenance Medical use restrictions Nucleofector™ Technology is intended for research and investigational use by professionals only. Please note that Lonza’s Nucleofector™ Technology is not intended to be used for diagnostic purposes, for testing or treatment in humans. The 4D-Nucleofector™ System requires minimal maintenance for reliable operation. Unplug the power supply before cleaning and disinfecting the case. Use a damp cloth to wipe down the outer case with water or 70–80% ethanol. Avoid wetting the cuvette holder within the cuvette tray and the connectors located on the rear of the system. License statement Lonza is holder of various patents, patent applications, copyrights and technical and scientific experience with respect to Nucleofector™ Technology. Use of Lonza’s Nucleofector™ Technology and /or related software requires a license from Lonza. The 4D-Nucleofector™ System is designed for use under a sterile hood either with or without a UV radiation source. Prolonged exposure of the outer casing to UV light may lead to discoloration but not functional impairment of the Nucleofector™ System. However, the system should be removed from the hood during extended UV irradiation. Purchasers are granted a non-exclusive, non-transferable license for a limited use of Lonza’s Nucleofector™ Technology and related software for research and development purposes, the terms of which are disclosed in detail in chapter 5. Certain commercial application is allowed under Lonza’s license for for-profit-entities, as set forth in the license. The 4D-Nucleofector™ System is protected by two main fuses. Both are inside a receptacle incorporated in the power socket of the Core Unit (see figure 2.0). Blown fuses can easily be replaced. Disconnect the 4D-Nucleofector™ System from the power supply and insert a small flat screwdriver into the slot on top of the power plug housing to lever it open. The fuse receptacles (each marked with an arrow) are then also levered open using the screwdriver. For license information contact Lonza Cologne GmbH: Phone + 49 221 99199 0 E-mail [email protected] Figure 2.0: Opened fuse receptacles The 4D-Nucleofector™ System will not function unless both the left and right receptacle contain intact fuses. Blown fuses can usually be identified by molten broken wires inside the glass tube. Only use T2.5A, L fuses to replace blown fuses. 6 2.3 Safety Instructions – Please Read Carefully –– Never unplug high voltage cable while system is running. –– Unpack the Nucleofection™ Vessels or 24-well Dipping Electrode Arrays immediately before the experiment. Make sure that the outer contact areas are dry. –– Safety may be compromised if any fluid has been spilled in the close vicinity of the 4D-Nucleofector™ System. Ensure that no fluid is in contact with or has entered the system. –– System safety may be compromised if any fluid enters the system. To ensure that the system is safe to use, contact Lonza Scientific Support for advice on actions or precautions that should be taken. –– Do not insert or place foreign objects in the electrical drawers of the 4D-Nucleofector™ System. –– Safety may be compromised if any foreign object has entered the 4D-Nucleofector™ System. To ensure that the system is safe to use, contact Lonza Scientific Support for advice on actions or precautions that should be taken. –– If the 4D-Nucleofector™ System has been damaged, ensure that the system can not be used by any personnel and contact Lonza Scientific Support for assistance. –– All service shall be performed by Lonza authorized personnel only. –– Handling of system parts that may be contaminated with sample should always be performed using protective gloves and any disposal of such parts must be according to federal, state or local procedures for clinical waste handling and disposal. Use secure leakproof containers and avoid unprotected handling of such parts. This symbol means that there is a risk of electric shock. An electric shock could cause death or personal injury. The 4D-Nucleofector™ System has been certified by international safety standards and is safe to use when operated in accordance with this manual. This system is designed to deliver variable high voltage electrical impulses for the purpose of introducing substrates into eukaryotic cells. These electrical impulses can be deadly! Therefore, use this system with care and take the following precautions: –– Only use the system once you have read the 4D-Nucleofector™ Manual. The manual should be accessible for all users. Make sure that each potential user reads it. –– Do not open the system. The system does not contain user-serviceable parts. Under no circumstances should circuit components be interfered with, as they can deliver an electric shock even when system is not in operation. –– Do not alter the system in any manner. –– Do not obstruct the movement of the drawer holding the Nucleofection™ Vessels or culture plates. –– Do not plug any non-Lonza-certified connectors into the external high voltage electrode sockets at the rear side of the 4D-Nucleofector™ System. They are designed to connect certified add-on systems to the 4D-Nucleofector™ System, e.g., the 96-well Shuttle™. –– Only use the system when it is set on top of a safe, leveled and stable table or bench. –– Set up the system in such a way that easy removal of the power cord is possible at any time. –– Do not expose the system to a humid environment. –– The system must not be exposed to direct sunlight nor be placed in a hot environment. –– The system is not approved for use in fire- or explosion-endangered areas, nor for use with inflammable or explosive media. –– Take precautions against severe impacts and vibration while moving and transporting the 4D-Nucleofector™ System. –– Only use the system with Lonza-certified Nucleofector™ Solutions and Lonza-certified Nucleofection™ Vessels or 24-well Dipping Electrode Arrays. Using consumables from any other source than Lonza will preclude all warranty and liability claims. –– Standard Nucleofector™ Solutions are not compatible with the 4D-Nucleofector™ System. Lonza disclaims all warranties and shall in no event be liable for any kind of damages caused by or arising out of any operation or use in violation with the above safety and handling instructions. 2.4 Waste Disposal Disposal of used consumables from Nucleofector™ Kits (cuvettes, pipettes and Nucleofector™ Solutions) Dispose of cuvettes, pipettes and Nucleofector™ Solutions in a biohazard container. Refer to your local waste management organization and to the relevant laboratory safety instructions for proper disposal practices. 7 2 BioResearch 4D-Nucleofector™ Manual 2.5 4D-Nucleofector™ System Components Figure 2.1: 4D-Nucleofector™ System before assembly By definition the 4D-Nucleofector™ System is a modular system offering maximum flexibility. Therefore, a complete system may vary in the number and type of components it contains. Furthermore, a system may consist of minor model variants of the units. These variants can be discriminated by their part codes and serial numbers (see table below). Table: Overview of model variants Model Variant A Variant B Part codes Core Unit: AAF-1001B X Unit: AAF-1001X Y Unit: AAF-1001Y Core Unit: AAF-1002B X Unit: AAF-1002X Y Unit: AAF-1002Y Serial numbers Core Unit: 5**B**** X Unit: 5**X**** Y Unit: 5**Y**** Core Unit: 8**B**** X Unit: 8**X**** Y Unit: 8**Y**** Unit arrangement (also see 2.6) horizontal or vertical (via demountable side panels) vertical only (fixed side panels) Core Unit – display frame silver blue X/Y Unit – sample rescue using wheel accessible after removal of side panel (also see 3.2) 1 3 2 4 5. T ray holding retainers for two 100 μl Nucleocuvette™ Vessel and 6. one 16-well Nucleocuvette™ Strip (X Unit) 7. Tray holding 24-well Dipping Electrode Array for adherent transfection (Y Unit) 8. Touch screen (graphical user interface of the system) 9. USB port (for USB stick) 10.Operation LED via screw behind termination plug A typical 4D-Nucleofector™ System includes: 1. One 4D-Nucleofector™ Core Unit 2. At least one functional unit –X Unit: comprising two retainers for 100 µl Nucleocuvette™ Vessels and one retainer for 16-well Nucleocuvette™ Strips –Y Unit: enabling transfection of cells in adherence using a 24-well Dipping Electrode Array 3. Power cord 4. Interface cable for high voltage and data connection (plus termination plug cap, not shown) Figure 2.2: 4D-Nucleofector™ System comprising Core, X and Y Unit (front view) 7 9 8 5 6 8 2.6 11.Power cord socket with main power switch and fuses 12. USB port (for PC connection) 13. Serial port for shuttle connection 14.Lonza interface outlet port to connect functional units 15.Lonza interface inlet port to connect functional units 16.Lock and release slider for attachment of the side panels (only for model variant A, see table on page 8) 17. HV outlets for the 96-well Shuttle™ 1. Unpack the components of the 4D-Nucleofector™ System and check for completeness. 2. Stack the units with the Core Unit (containing the touch screen) on top (figure 2.4) 3. Connect the units (figure 2.5) by using the interface cables: –– Connect the interface outlet port of the Core Unit (A) with the interface inlet port of the first functional unit (X or Y Unit; B). Make sure that the cable is securely attached and that the retaining screws on the cable housing are screwed tightly into the port. –– Further functional units are added by connecting the outlet (C) and the inlet port (D) of adjacent units as described above. –– Important: Plug in the interface terminator cap into the outlet of the last unit (C or F). 4. Attach the power cord to the power cord socket at the rear side of the Core Unit and plug it into an appropriate power outlet. 5. Check all connections before turning on the system for the first time. Figure 2.3: 4D-Nucleofector™ System comprising Core, X and Y Unit (rear view) 10 13 12 11 14 15 Set-up Instructions 16 Figure 2.4: Stacked units The 4D-Nucleofector™ System comes with default programs and includes a USB port at the front for software updates. Figure 2.5: Inlets and outlets on rear side of Core, X or Y Unit A 9 B C D E 2 BioResearch 4D-Nucleofector™ Manual 2.7 Instructions for Using the 4D-Nucleofector™ System 2.7.2 The touch screen of the 4D-Nucleofector™ System can be set at four angles (0°, 30°, 45°, and 60°), providing convenient access for the user. Press the label on top of the display frame to unlock the display from its home position. From this starting position, the user can adjust it to the most convenient angle by simply pulling it into a more upright position. The screen can be returned to its home position by moving it to the 60° position and then pulling it gently forward towards the front of the Core Unit. A switch will be activated, and the screen will drop automatically back into the starting position. Press down the screen to lock it in its home position. This section gives an overview of the 4D-Nucleofector™ System operating software. Details of the Nucleofection™ Process can be found in the cell-type specific Optimized Protocols (see www.lonza.com/optimizedprotocols). 2.7.1 Adjusting position of the graphical user interface (touch screen) Turn on the 4D-Nucleofector™ System NOTE:All screenshots shown in this section refer to software version 2.16. Older versions may slightly differ but can be upgraded to 2.16 (download available at www.lonza.com/4d-nucleofector). NOTE:Do not try to close the display when the system is switched off. If there is a need to close it during OFF status or in case the display gets stuck, use the release knob shown in figure 2.7 (red circle). Turn on the system using the main power switch at the rear of the Core Unit. The system will boot up — this process may take a few moments — and the blue LED at the front of the Core Unit will be lit. Once the start-up procedure is complete, the 4D-Nucleofector™ graphical user interface (touch screen) will display the software main screen. The main screen (figure 2.6) displays the current configuration of the 4D-Nucleofector™ System (Core Unit and functional units). Figure 2.7: Releasing the touch screen 1 2 3 4 5 6 Figure 2.6: Main Screen Emergency release 10 2.7.3 Operating software Figure 2.8: Software screen elements The 4D-Nucleofector™ System is operated via a 5.7 inch touch screen display and controlled by intuitive software. This chapter will familiarize you with the functions of the touch fields and the basic features of the operating software. You will learn how to use a predefined experiment, how to start a Nucleofection™ Procedure and how to create a new experiment from scratch. 1 Return to the main menu Top bar (2) Return to the “Choose a vessel” screen Wrench icon (3) –– T ransport Mode – activates transport lock of the 4D-Nucleofector™ System (see chapter 2.7.7 for further details) –– Device Cleaning – allows convenient cleaning of the vessel tray (see chapter 2.9 for details) –– Help –– Settings – opens the settings menu (see chapter 2.8 for details) –– Status* – shows device status –– Open* – opens the tray of the units –– Close* – close the tray of the units * Only available when X or Y Unit are selected Lock icon (4) Activates transport lock (software version 2.16 or later) BACK Return to previous screen CLR Reset settings for an experiment or a Nucleofection™ Vessel SAVE Save experiment or results file LOAD Load predefined experiments OK/START Confirm selection or execute a program A-Z, Z-A, Top 10, Last 10 Sort a list alphabetically, display the most frequent 10 items or the most recent 10 items Magnifier symbol Activate search functions i Display additional information (text) <, > Arrow keys to switch between experimental setup screens 3 4 2 Table: Main menu and general commands or icons Home icon (1) 2 11 BioResearch 4D-Nucleofector™ Manual 2.7.4 Using a predefined experiment Figure 2.9: Using a predefined experiment 1 2 This chapter summarizes the steps required to load and perform a predefined experiment. More detailed information for defining experiments is given in chapter 2.7.5. –– Select the functional unit you wish to work with by pressing the appropriate icon (1). –– A screen appears displaying the Nucleofection™ Vessels available for the selected functional unit (2). –– Press the icon displaying the vessel you wish to use. –– A screen appears with the message “Choose Experiment or Position” (3). –– Press on the touch field labeled “Choose Experiment” –– A list of predefined experiments will appear (4). –– Choose the experiment you wish to use and confirm your selection by pressing “OK”. –– By pressing on the icons displaying the Nucleofection™ Vessels you can check the settings (“Cell Type Program,” “Pulse Code,” etc.) for the selected well (5). –– To accept all settings, press “OK”. –– A summary of the experimental settings will appear (6) and the drawer of the selected functional unit will open, giving access to the vessel retainers. –– If the experimental setup is as desired, load the samples and press “START” to run the experiment (7). –– Depending on the number of samples you wish to process the drawer will be opened several times and a message “Please change cuvette(s). Proceed?” will be displayed (7). –– Load samples and press “YES” to continue or press “NO” to interrupt the experiment (7). –– When the experiment is complete, a result file summarizing the Nucleofection™ Process will be displayed. The result file will be saved automatically by the system and could be reopened as described in chapter 2.8 –– By pressing “START” again a message will appear asking “Do you want to pulse the same experiment again?” (8). –– Press “OK” to start the experiment, “NEW” to return to the “Experiment” screen or “CANCEL” to return to the “Results” screen. 12 3 4 5 6 7 8 2.7.5 Defining an experiment Figure 2.10: Defining and saving an experiment 1 2 This chapter explains how to define and save a new experiment. By definition, an experiment is a set of Nucleocuvette™ Vessels (or 24-well Dipping Electrode Array) with defined Nucleofection™ Parameters (“Cell Type or Custom Program”, “Pulse Code”, “Solution” and “Control Options”) for each vessel. –– Select the functional unit you wish to work with by pressing the appropriate icon (1). –– A screen appears displaying the Nucleofection™ Vessels available for the selected functional unit (2). –– Press the icon displaying the vessel you wish to use. –– A screen appears with the message “Choose Experiment or Position” (3). –– Press one of the Nucleofection™ Vessel positions (e.g. A1). –– The fields “CELL TYPE PROGRAM”, “CUSTOM PROGRAM”, “PULSE CODE”, and “CONTROL OPTIONS” will be activated (4). –Press the field “CELL TYPE PROGRAM” to choose predefined Nucleofection™ Conditions from a cell type list (5). Use the search (magnifying glass symbol) or the sort list functions (A-Z) to find conditions more quickly. –Select the desired cell type by tapping on the appropriate line of the cell list. The cell type selected will be highlighted. For additional information about the cell type selected press “i”. To confirm your selection press “OK”. –If required, modify pulse code by pressing the letter or number code fields. A keyboard will appear, enabling you to change settings. –Define control options for the selected vessel by choosing(6): – Sample: Nucleofection™ Program applied to vessel containing cells and substrate – No DNA: Negative control. Nucleofection™ Protocol applied to vessel with cells but without substrate – No program: Negative control. No Nucleofection™ Program applied to a vessel containing cells and substrate –– Save your experiment by pressing the “SAVE” button (7). A keyboard will appear allowing you to define a name (max. length: 26 characters). You may enter further information about your experiment by touching the “Info” field and typing in your text (8). –– Confirm and save the experiment parameters by pressing “OK” or “SAVE”. –– Load samples and start your experiment by pressing “START”. 2 13 3 4 5 6 7 8 BioResearch 4D-Nucleofector™ Manual 2.7.6 Loading of samples This chapter describes how to load the 16-well Nucleocuvette™ Strips or 100 µl Nucleocuvette™ Vessels into the sample tray of the X Unit as well as loading the 24-well Dipping Electrode Array into the sample tray of the Y Unit. The steps required to prepare Nucleofection™ Samples are described in the dedicated optimized protocols. Loading 16-well Nucleocuvette™ Strips –– Pick up the 16-well Nucleocuvette™ Strip containing your Nucleofection™ Samples from the module rack* (1) –– Load the 16-well Nucleocuvette™ Strip into the sample tray such that the hole is showing to the back (2) –– Make sure that the 16-well Nucleocuvette™ Strip is oriented properly (3a). The yellow pin at the rear end of the 16-well Nucleocuvette™ Position must be visible. If the 16-well Nucleocuvette™ Strip is mounted in the wrong orientation its rear end will stay above the cuvette holder (3b). Loading 100 µl Nucleocuvette™ Vessels –– Pick up the 100 µl Nucleocuvette™ Vessels containing your Nucleofection™ Samples from the cuvette rack* (4) –– Load the 100 µl Nucleocuvette™ Vessel into the sample tray such that the label LONZA on the lid is readable. The opening clip should be at the front (5, 6a) –– Make sure, that the 100 µl Nucleocuvette™ Vessels are mounted correctly (6b) Loading 24-well Dipping Electrode Array –– Insert the dipping electrode array into 24-well culture plate containing your Nucleofection™ Samples. Make sure that the dipping electrode array is inserted in the right orientation. –– Place 24-well plate with inserted dipping electrode array into the retainer of the 4D-Nucleofector™ Y Unit. Well “A1” must be in upper left position. If the array-plate sandwich was entered in the wrong orientation an error message will appear after pressing “START”. –– It is not recommended to re-use dipping electrodes as this may lead to suboptimal transfection efficiencies. The RFID chip contained in the dipping electrode lid logs usages and after pressing “START” the software will check for used wells and offer you different options how to continue. When all samples are loaded, press “START” to begin the Nucleofection™ Process. *4D-Nucleofector™ Module Rack (AAK-2001) or Cuvette Rack (AAK-2002) can be purchased as separate items. 14 Figure 2.11: Loading of samples 1 2 3a Right orientation 3b Wrong orientation 4 5 6a 6b 2.7.7 2.8 Turn off the 4D-Nucleofector™ System This chapter explains how to turn off the 4D-Nucleofector™ System properly. Following this procedure will guarantee a save shut down of the system and protection against damage of interior fragile parts. This is mandatory for transporting the system. –– Press the “Lock” icon (1). Alternatively you can press the “Wrench” icon and select “Transport Mode”. –– This will initiate the transport lock. –– Wait until the successfully execution of the transport lock is confirmed by a message (2). Additional Settings and Options This chapter explains how to change settings like date and time and how to organize and manage your stored experiments, results and custom programs. –– Activate the “Settings” menu by either pressing the “Core Unit” icon or the “Wrench” icon submenu “Settings” (figure 2.13, 1). –– A screen appears displaying a list of setting options (figure 2.13, 2): –– Experiments – display user-defined experiments (see page 16 for more information) –– Custom programs – create and manage custom Nucleofection™ Programs (see page 16 for more information) –– Results – reopen or load result files onto a USB stick plugged into the USB port in front of the Core Unit (see page 16 for more information) –– Lonza programs – version information about the cell type list –– Display and audio – adjust brightness of the touch screen display, time to activate standby and deactivate the touch tone –– Date and time – set and format date and time –– Language and keyboard – change language settings for display functions and keyboard –– hier sollte schon “...more” stehen bleiben, aber in fett, also –– ... more – to switch between pages of the settings list –– Firmware update – update the system software (see chapter 2.10 for details) –– Device cleaning – opens the tray of the functional modules to remove it for cleaning (see chapter 2.9 for details) –– System restart – restart system –– Transport mode – activates the transportation lock of the system (also see 2.7.7) –– Synchronize – supports synchronization of the actual firmware with the PC Editor (see page 16 and chapter 2.11 for more information) –– Version – displays firmware version and serial number of all modules NOTE:By pressing “BACK” you would release the transport lock again. –– Finally, switch off the device via the main power switch located at the rear of the Core Unit. Figure 2.12: Activating the transport lock 1 2 To open one of the setting menus touch the appropriate field. Depending on the menu, several parameter settings will appear. Most of the menus are intuitive. The menus requiring additional information are described on the next page. 15 2 BioResearch 4D-Nucleofector™ Manual Experiments This menu displays a list of experiments and allows you to view additional information by pressing the “i” field. Erase existing experiments by pressing “CLR”. To load a predefined experiment from a USB stick, insert the stick into the USB port on the front of the Core Unit, press “LOAD” and follow the instructions displayed on the screen (figure 2.13, 3). Synchronize This menu is used to synchronize the firmware of your 4D-Nucleofector™ System with the PC Editor software (see chapter 2.11). It is necessary to perform synchronization with each firmware update. To start synchronization: –– Insert a USB stick into the USB port on the front of the Core Unit. –– Press “Synchronize” (figure 2.13, 7) –– The 4D-Nucleofector™ System is now creating a synchronization file and saves it to the USB stick (figure 2.13, 8) –– Remove the USB stick and connect it to the PC your PC Editor software is installed. –– Open the PC Editor software as described in chapter 2.11 –– Select the menu Settings and press “Synchronize” –– A window will open enabling you to select the USB stick –– Select the USB stick as storage device and press “OK” –– Confirm that you like to update the PC Editor by pressing “YES” or cancel by pressing “NO” Results This menu will display a list of result files and allows you to manage them. To open existing result files just select the file you like to open and press “VIEW”. To erase result files that are no longer required, select the file from the list and press “CLR”. To store result files on a USB stick, insert the USB device into the USB port on the front of the Core Unit and press “SAVE”. Pressing “i” displays further information related to the result file (figure 2.13, 4). Custom Programs This menu is used to create and manage custom Nucleofection™ Programs, i.e. an optimal combination of pulse and solution that has been defined by the customer. You can create new custom programs by pressing the “NEW” field. Edit existing programs by pressing “EDIT” or save your programs onto a USB stick by pressing “SAVE” (figure 2.13, 5). To create a new custom program or to edit an existing program: –– Press “NEW” or select an existing program and press “EDIT”. –– A screen will open comprising a keyboard, “PULSE CODE” setting, a “SOLUTION” field and a “VOLUME” selection (figure 2.13, 6). –– Define a name for your custom program by typing, e.g., the cell name. –– Select the volume appropriate for the Nucleofection™ Vessel you wish to use (20 µl for the 16-well Nucleocuvette™ Strip or 100 µl for single Nucleocuvette™ Vessel). –– Press “SOLUTION” to display a list of available solutions. –– Select the solution most suited for your cell from the list and confirm your selection with “OK”. –– Define the Nucleofection™ Program by typing in the “PULSE CODE” — you can determine the best program by using one of our optimization kits or simply use the code from an existing optimized protocol. –– Confirm the setting for your custom program by pressing “OK”. –– The custom program can now be selected for an experiment by pressing the “CUSTOM PROGRAM” field (see chapter 2.7.5 for further details). 16 2.9 Figure 2.13: Additional settings and options for organizing stored experiments 1 3 Activate Settings Menu “Experiments” 2 Cleaning the Nucleofection™ Vessel Tray To allow convenient cleaning, the Nucleofection™ Vessel tray can be removed from the X and the Y Unit. To dismount the tray please follow the instructions below: –– Open the “Settings” menu as described in chapter 2.8. –– Press “Device Cleaning”. –– The drawer will open, giving access to the Nucleofection™ Vessel tray. –– Remove the tray from its support by pressing the two plastic noses on the left and right side of the tray. –– Wash the tray with a cloth damped in water and rinse it with tap water until all leftovers are washed off. –– Dry the tray carefully. –– Remount the dried tray to the support. –– Press “DONE” –– The drawer will close and the tray will be moved to its home position. 4 Menu “Results” 2.10 Firmware Update 5 Menu “Custom Programs” 6 Menu “Custom Programs” 7 Menu “ Synchronization” 8 Menu “ Synchronization” Due to new optimized protocols added to the Lonza program list or technical improvement of the operation software, the 4D-Nucleofector™ System may require an update of its firmware. To update the firmware proceed as follows: –– Download the software from the Lonza web site and store the file(s) on a USB stick into a folder called “LONZA”. –– Start the 4D-Nucleofector™ System. –– The “Choose a Device” main screen will appear. –– Click on the Core Unit icon. –– Select “Firmware Update” within the “Settings” menu –– A dialog box will appear asking to plug in the USB stick. –– Plug in the USB stick and press “OK”. –– Follow the instructions on the screen to update the firmware. 17 2 BioResearch 4D-Nucleofector™ Manual 2.11 PC Editor Software Transfer of Experiments from the PC Editor –– Open PC Editor by double clicking on the file 4D-Nucleofector_Editor.exe –– Define and save your experiment with the PC Editor –– Plug USB stick into a USB port of your PC –– Open the “Settings” menu by pressing the “Wrench” icon and select the menu “Experiments” (figure 2.13, 1 and 2) –– Select your new experiment by clicking the appropriate field (figure 2.15, 1) –– This will activate the “CLR” and the “SAVE” keys of the PC Editor –– Press “SAVE” –– A Windows® Explorer® screen will open allowing to save the experiment to the appropriate location (figure 2.15, 2) –– Select the USB stick and press “SAVE” –– Unplug the USB stick from your PC as soon as the experiment file has been saved The PC Editor is a PC-compatible version of the 4D-Nucleofector™ User Interface. It can be used to define experiments on the PC and then transfer them to the 4D-Nucleofector™ System via USB stick. This chapter describes the installation of the 4D-Nucleofector™ PC Editor as well as the transfer of experiment files from your PC to the 4D-Nucleofector™ System. It is not required to run an installation routine to install the 4D-Nucleofector™ PC Editor on your PC. Just follow the steps below to copy the software onto your hard disk drive: –– Insert 4D-Nucleofector™ user information CD into the CD drive of your PC –– Copy all files from the 4D-Nucleofector™ PC Editor software folder to your hard disk – preferably into a folder called 4D-Nucleofector™ PC Editor –– Open the folder, search the file called “4D-Nucleofector_Editor” and double click on it to start the software (highlighted in figure 2.14) –– A window will appear displaying the graphical user interface of the 4D-Nucleofector™ PC Editor. Functionality of the PC Editor matches with the operation of the 4D-Nucleofector™ Software –– Use the PC Editor to set-up experiments as described in the 4D-Nucleofector™ Manual –– To transfer experiments edited with the PC Editor please follow instruction given in the next paragraph NOTE:Do not unplug the stick while saving! –– Turn on the 4D-Nucleofector™ System –– Plug USB stick with new experiment into the USB port at the front of the Core Unit (figure 2.15, 3) –– Press the Core icon to open the “Settings” menu (figure 2.15, 4) –– Press “EXPERIMENTS” to open the experiment menu –– Press “LOAD” –– A screen appears displaying “Load experiment from” (figure 2.15, 5) –– Select the USB stick by double clicking on “USB” –– Select your experiment and press “OK” to load it –– Press “OK” to leave the experiment menu –– Your new experiment is now saved onto the 4D-Nucleofector™ System and can be used directly. Figure 2.14: Files comprising the 4D-Nucleofector™ PC Editor Figure 2.15: Transferring experiments from the PC Editor (continues on page 19) 1 18 2.12 96-well Shuttle™ Mode 2 To operate the 96-well Shuttle™ Device a 4D-Nucleofector™ System comprising Core and X Unit is required (for details about operating the “Nucleofector™ 96-well Shuttle™ System” please refer to the respective 96-well Shuttle™ Manual). Three connections have to be established: –– High voltage cable between 96-well Shuttle™ Device and X Unit (1) –– USB data cable between laptop and Core Unit (2) –– Serial data cable between 96-well Shuttle™ Device and Core Unit (3) As soon as the Nucleofector™ 96-well Shuttle™ Software controlling the system is started, the 4D-Nucleofector™ Device switches into “96-well mode” (shown on the display) and the graphical user interface of the 4D-Nucleofector™ Device is locked. It is then controlled by the PC-based Nucleofector™ 96-well Shuttle™ Software. To exit the “96-well mode” press “Cancel”. 3 Figure 2.16: Shuttle connectivity on the 4D-Nucleofector™ System 3 2 1 4 5 19 2 BioResearch 4D-Nucleofector™ Manual 3 Troubleshooting 3.1 Suboptimal Transfection Results The following troubleshooting guidelines may be helpful if experiments using the 4D-Nucleofector™ System do not provide the expected results. The comments are intended to help optimize experimental conditions. If you require further help, please contact our Scientific Support Team. Issue Possible Error Solution Low survival rate Cells were kept in Nucleofector™ Solution too long Transfer cells immediately into pre-warmed medium as recommended in the optimized protocol. Cells were damaged by harvesting procedure or through handling Avoid harsh conditions during cell harvesting, especially centrifugation at higher speed or overexposure to trypsin. Pipette cells smoothly as they are quite stressed already. Use a plastic pipette as recommended in the optimized protocols. Cells culture conditions were suboptimal Cells should be viable and in culture for several passages. Avoid excessive cell densities or cell confluencies since this may decrease cell viability post Nucleofection™. For further details please refer to the dedicated optimized protocol. Multiple use of cuvettes We strongly recommend using the Nucleofection™ Vessels only once, because the high voltage pulses that are applied drastically affect their physical integrity. Poor DNA quality DNA used for Nucleofection™ should be of high purity. We strongly recommend endotoxin-free preparation of the DNA. Do not use procedures involving phenol /chloroform treatment. DNA amount is too low We recommend a certain DNA amount per sample (depending on cell type and Nucleofection™ Vessel; for details please refer to respective optimized protocol). If both transfer efficiency and cell mortality are low, the DNA amount could be increased. Increasing DNA amount may lead to higher transfection efficiency, but at the same time result in higher cell mortality. Cell number in Nucleofection™ Sample too high or too low Please use the cell numbers recommended in the dedicated optimized protocol. Poor DNA quality DNA used for Nucleofection™ should be of high purity. We strongly recommend endotoxin-free preparation of the DNA. Do not use procedures involving phenol /chloroform treatment. Low efficiency 3.2 Rescue of Samples Figure 3.1: Rescue of samples 1 This chapter describes how to rescue your samples from the X or Y Unit in case of system malfunction or break down of electricity, . Depending on the model variant (see table on page 8) the process differs slightly (figure 3.1). –– Unplug system from main power Model variant A: –– Remove side panel from the X or Y Unit (1) –– Turn wheel into direction of the red arrow as far as it will go (2) Model variant B: –– Remove the terminator cap or cable connection to next unit (3) –– Insert screw driver supplied with the 4D-Nucleofector™ System in the lower hole of the plug receptacle (4) –– Turn the screw manually counter-clockwise until the screw blocks (may require > 60 turns). Turn back clockwise one full turn. Further steps for both model variants –– Open the front flap manually (5) –– Pull the tray cautiously towards you (6) –– Remove the Nucleocuvette™ Vessels and rescue your cells –– Contact your Lonza representative to solve potential technical issue 2 3 5 6 Unlocked 4 20 4 Error Codes of the 4D-Nucleofector™ System 4.1 The color of a well indicates the completion status of each well (figure 4.1). In case of an error, the respective error code can be displayed by clicking on the well in the result file. This section describes Nucleofector™ Error Codes and provides suggestions for solving the problem. Arc Discharge Correction Arcing is a complete or partial discharge circumventing the sample and is often accompanied by a flash and a noise. This problem is usually caused by imperfect cuvettes or cuvette filling. The 4D-Nucleofector™ System is equipped with a hardware safety feature that immediately detects arc formation and protects the cells from damage. After the arc interruption the 4D-Nucleofector™ System resumes program execution. Normally, the program can be completed successfully (“arc discharge correction 1 or 2”) and only minor differences in transfection efficiency are observed. When repeated arc discharges occur within one program, it may be impossible for the 4D-Nucleofector™ System to complete execution of the program. In this case (“Err8 – Arc discharge”), significant impact on transfection efficiency may be observed. Discard the cuvette (which is possibly damaged) and its content, reset the device by pressing any button and repeat the experiment with a new cuvette. It is not necessary to switch off the 4D-Nucleofector™ System. If the problem cannot be resolved, please call Lonza’s Scientific Support Team Europe Scientific Support: +32 87 321 611 [email protected] North America Scientific Support: 800 521 0390 (toll free) [email protected] 3 4 Figure 4.1: Color code of wells Parameter File Result File, OK Result File, Warning Undefined Sample No Program No DNA 21 Result File, Error Skipped Well BioResearch 4D-Nucleofector™ Manual Error Code What Happened? Possible Error Procedure Err1A No pulse generated Internal communication failure, internal error or device possibly defective. Clear the error message by pressing any button and try to apply program a second time. If Err1A re-occurs, switch off the device, check the interface cable, wait for 2 seconds and switch on again. If error persists, contact our Scientific Support. Err2 No pulse generated No or inappropriate cuvette loaded. Inappropriate Nucleofector™ Solution or volume. Check cuvette. Check type and volume of Nucleofector™ Solution. Cuvette can be reloaded. Err3 No pulse generated Improper interconnection or system defective. Switch off the device. Check proper connection of the interface cable as well as the terminator cap on the last interface outlet. Switch on the device and repeat the experiment with the same sample. Err 4 WEAK A weak pulse occurred. Efficiency may be sub-optimal. e-used cuvette or inappropriate R Nucleofector™ Solution. Clear the error message by pressing any button. Use the sample if maximum efficiency is not essential. Otherwise, use a new sample. Err 5 & Err 6 Device possibly generated an arc discharge. Program could be resumed and successfully completed. A limited impairment on performance has to be presumed. Inappropriate solution or well volume, occasional arcing. Utilize sample if maximum performance is not essential. Check solution and volume. Err7 No pulse generated No lid detected on the cuvette. Clear the error message by pressing any button. Check proper placement of the lid and rerun experiment with the same cuvette. Err8 Device possibly generated an arc discharge Inappropriate cuvette, Nucleofector™ leading to incomplete program execution. Solution or volume in the cuvette. A substantial reduction in efficiency and viability must be assumed. Clear the error message by pressing any button. Check the volume of Nucleofector™ Solution. Try again with a new cuvette. Err11 No pulse generated. The device case is open. Switch the device off, check the correct mounting of all side panels and the interlock between all modules. Try again with the same samples. Can only occur with model variants A (see 2.5). Err12 Pulse possibly omitted. Internal device temperature too high for pulsing. Switch off the device, wait for 2 minutes and run experiment with a new cuvette. Err13 No pulse generated. The device front flap is open. Check proper closing of front flap after the tray is closed and rerun the experiment. Err 21 Used well: Multiple use of well. Nucleofection™ may be suboptimal. Dipping electrode for that well position was used twice. Utilize sample if maximum performance is not essential. Avoid re-use of dipping electrodes that had been used before. Err 22 Used well: A weak pulse occurred. Efficiency may be sub-optimal. Re-used dipping electrode or inappropriate Nucleofector™ Solution. Clear the error message by pressing any button. Use the sample if maximum efficiency is not essential. Otherwise, use a new sample. Err 23 & Err24 Used well: Device possibly generated an arc discharge. Program could be resumed and successfully completed. A limited impairment on performance has to be presumed. Inappropriate solution or well volume, occasional arcing. Utilize sample if maximum performance is not essential. Check solution and volume. Err 25 Used well: Device possibly generated an arc discharge leading to incomplete program execution. A substantial reduction in efficiency and viability must be assumed. Inappropriate dipping electrode, Nucleofector™ Solution or volume in the dipping electrode. Device possibly defective. Clear the error message by pressing any button. Check the volume of Nucleofector™ Solution. Try again with a new dipping electrode. Err 26 Used well: Multiple use of well Nucleofection™ suboptimal Dipping electrode for that well position was used multiple times. Utilize sample if maximum performance is not essential. Avoid reuse of dipping electrodes that had been used before. Res 27 Used well: Well was skipped User confirmed to skip the well as it had been used before – 22 5 Purchaser Notification Purchaser Notification NOTWITHSTANDING ANYTHING TO THE CONTRARY SET FORTH HEREIN, IN NO EVENT WILL LONZA BE LIABLE FOR LOST PROFITS, DAMAGE TO REPUTATION, OR LOSS OF DATA, OR FOR ANY SPECIAL, INDIRECT, INCIDENTAL, PUNITIVE, OR CONSEQUENTIAL DAMAGES, HOWEVER CAUSED, ON ANY THEORY OF LIABILITY AND WHETHER OR NOT LONZA HAS BEEN ADVISED OF THE POSSIBILITY OF SUCH DAMAGES, ARISING UNDER ANY CAUSE OF ACTION AND ARISING IN ANY WAY OUT OF BUYER’S USE OF THE PURCHASED DEVICE OR THE LICENSED PROCESS. BUYER HEREBY AGREES THAT TO THE FULLEST EXTENT PERMITTED BY LAW, LONZA’S LIABILITY TO BUYER FOR ANY AND ALL INJURIES, CLAIMS, LOSSES, EXPENSES, OR DAMAGES WHATSOEVER, ARISING UNDER ANY CAUSE OF ACTION AND ARISING IN ANY WAY OUT OF BUYER’S PURCHASE OR USE OF THE PURCHASED DEVICE OR LICENSED PROCESS SHALL BE LIMITED IN THE AGGREGATE, IN LONZA’S SOLE AND ABSOLUTE DISCRETION, TO REPAIR, REPLACEMENT, OR REFUND OF THE EQUIPMENT OR EQUIPMENT PART, AS APPLICABLE, OR THAT PORTION OF THE PURCHASE PRICE APPLICABLE TO THE EQUIPMENT OR THE EQUIPMENT PART, AS APPLICABLE, WHICH VIOLATES AN EXPRESS WARRANTY PROVIDED HEREUNDER. NOTWITHSTANDING ANYTHING HEREIN TO THE CONTRARY, THE LIABILITY OF LONZA WITH RESPECT TO A CLAIM OF ANY KIND WHATSOEVER, SHALL NOT EXCEED THE INVOICE PRICE OF THE PARTS, REPLACEMENT PARTS OR SERVICE AS TO WHICH THE CLAIM IS MADE. The purchase of the 4D-Nucleofector™ System (the “Purchased Device”) conveys to the buyer a limited non-transferable, non-exclusive license (the “License”) for the use of the Purchased Device and Lonza’s proprietary Nucleofector™ process and methods (the “Licensed Process”) without the right to sublicense. The License is limited to research use only. The License does not include the right to use the Purchased Device, its components or materials, or the Licensed Process for any Commercial Purpose, as defined below. Notwithstanding the foregoing, the License permits the buyer to use the Purchased Device in combination with the Licensed Process to perform services internally for affiliates, subsidiaries, sections, departments or scientific collaborators, provided that such services are not for any Commercial Purpose. Under no circumstances shall the Purchased Device or the Licensed Process be used for testing or treatment in humans. The buyer, through the purchase of the Purchased Device, acknowledges that the Purchased Device and Licensed Process are not diagnostic or therapeutic tools and shall not be used as an accessory or complement to such tools. “Commercial Purposes”, as used herein, means the sale, license, lease, export, transfer or other distribution of the Purchased Device, its components or materials, or the Licensed Process to a person or entity other than the buyer for financial gain or other commercial purposes and/or the use of the Purchased Device, its components or materials, or the Licensed Process: (1) in manufacturing or producing a product for general sale or products for use in the manufacture of products ultimately intended for general sale; (2) to provide a service, information, or data to a person or entity other than the buyer for financial gain; or (3) for therapeutic, diagnostic or prophylactic purposes. Buyer assumes all responsibility and liability for injury or damages resulting from its hand ling, possession, use or sale of the Purchased Device or Licensed Process including, but not limited to any injury or damage resulting from the use of the Purchased Device or Licensed Process in Buyer’s operations or in combination with other substances, materials or products. Buyer agrees to defend, indemnify and hold Lonza and its affiliates and their respective directors, officers, employees, agents harmless from and against all claims, losses, damages, liabilities and expenses (including attorneys’ fees and other litigation or settlement costs) arising out of (a) Buyer’s handling, possession, use or sale of the Purchased Device or Licensed Process, (b) any material breach of any Agreement between Lonza and Buyer or other terms and conditions relating to the use of the Purchased Device or Licensed Process provided to Buyer by Lonza, or (c) the gross negligence or willful misconduct of Buyer or any of its affiliates in performing any activity relating to the subject matter hereof. Lonza does not assume any liability that the Licensed Process, the Purchased Device or any product resulting from the use of the Licensed Process or use of the Purchased Device shall be approved by governmental authorities or any other institution or supervisory board or similar agencies. The License does not permit the buyer to manufacture, copy, reproduce, transmit, distribute, sell, lease, transfer or sublicense the Licensed Process and/or the Purchased Device. For information on obtaining a license to the Purchased Device or the Licensed Process for purposes other than research, contact our Licensing Department, at +49 221 99199 0 or e-mail: [email protected] Representations and Warranties 4 5 Lonza represents and warrants that, it is the holder of intellectual property, including patents, patent applications, copyrights, trademarks and technical and scientific knowledge with respect to the Purchased Device and the Licensed Process and that, to its knowledge, it has the right to grant the License provided herein. Lonza further represents and warrants that it has no knowledge of any rights of third parties which supersede its intellectual property rights to the Purchased Device and the Licensed Process and that Lonza has full corporate power and authority to grant the License provided hereunder. 6 Appendix Technical Data Lonza does not warrant that the information and data pertaining to the Licensed Process and/or the Purchased Device is correct and without defects, that the use of such information or data is adequate for the use of the Licensed Process and/or the Purchased Device or that the technical information or data for the Licensed Process and/or the Purchased Device is complete. Lonza does not warrant either that the use of the License does not infringe third parties’ rights or does not cause damages to third parties. Any liability for later invalidation or lapse of Lonza’s intellectual property is excluded. THE EXPRESS WARRANTY PROVIDED ABOVE IS LONZA’S ONLY WARRANTY RELATING TO THE PURCHASED DEVICE OR THE LICENSED PROCESS AND IS IN PLACE OF ALL OTHER WARRANTIES, EXPRESSED OR IMPLIED, STATUTORY OR OTHERWISE, INCLUDING WARRANTIES AS TO MERCHANTABILITY OR FITNESS FOR A PARTICULAR PURPOSE, ALL OF WHICH ARE EXPRESSLY EXCLUDED. BUYER AGREES THAT LONZA HAS MADE NO UNDERTAKINGS, AGREEMENTS OR REPRESENTATIONS, EXPRESSED OR IMPLIED WITH RESPECT TO THE PURCHASED DEVICE OR THE LICENSED PROCESS, OTHER THAN THOSE EXPRESSLY SET FORTH HEREIN. Power supply 100–240 VAC 50–60 Hz self-regulating Power consumption 140 VA Fuse protection Fuse T2.5A, L Temperature range +15°C to +40°C, non-condensing Altitude < 2000 m above sea level Safety class EN 61010-1 UL 61010-1 IP 20 Weight Core Unit: 4,4 kg (9.7 lb) X Unit: 4,7 kg (10.4 lb) Y Unit: 5,0 kg (11.0 lb) 23 Unit dimensions (w x h x d) 24,5 x 10.5 x 28 cm (9,7 x 4.1 x 11.0 in) Manufacturing date The manufacturing year is encoded by the second and third digit of the serial number, e.g., serial number x13xxxxx was manufactured in 2013. 6 www.lonza.com www.lonza.com /research Contact Information North America Customer Service: 800 638 8174 (toll free) [email protected] Scientific Support: 800 521 0390 (toll free) [email protected] Europe Customer Service: +32 87 321 611 [email protected] Scientific Support: +32 87 321 611 [email protected] International Contact your local Lonza distributor Customer Service: +1 301 898 7025 Fax: +1 301 845 8291 [email protected] International Offices Australia +61 3 9550 0883 Austria 0800 201 538 (toll free) Belgium +32 87 321 611 Brazil +55 11 2069 8800 Denmark 808 83 159 (toll free) France 0800 91 19 81 (toll free) Germany 0800 182 52 87 (toll free) India +91 40 4123 4000 Ireland 1 800 654 253 (toll free) Italy 800 789 888 (toll free) Japan +81 3 6264 0660 Luxemburg +32 87 321 611 Norway 800 16 557 (toll free) Poland +48 781 120 300 Singapore +65 6521 4379 Spain 900 963 298 (toll free) Sweden 020 790 220 (toll free) Switzerland 0800 83 86 20 (toll free) The Netherlands 0800 022 4525 (toll free) United Kingdom 0808 234 97 88 (toll free) Lonza Cologne GmbH – 50829 Cologne, Germany For research use only. Not for use in diagnostic procedures. Manufacturer and distributor information: The 4D-Nucleofector™ System is manufactured by Lonza Cologne GmbH, Nattermannallee 1, 50829 Cologne, Germany and distributed in the US by Lonza Walkersville, Inc. (8830 Biggs Ford Road, Walkersville, MD 21793). The use of this product, alone or in combination with materials and/or methods of others, may require a license from a third party. User shall be fully responsible for determining whether and from whom it requires such license and for obtaining such license. The Nucleofector™ Technology is covered by patent and/or patent pending rights owned by the Lonza Group Ltd or its affiliates. Unless otherwise noted, all trademarks herein are marks of the Lonza Group or its affiliates. Nucleofector™ Kits contain a proprietary nucleic acid coding for a proprietary copepod protein fluorescent protein intended to be used as a positive control with Lonza products only. Any use of the proprietary nucleic acid or protein other than as a positive control with a Lonza product is strictly prohibited. Use in any other application requires a license from Evrogen. To obtain such a license, please contact Evrogen at [email protected]. The information contained herein is believed to be correct and corresponds to the latest state of scientific and technical knowledge. However, no warranty is made, either expressed or implied, regarding its accuracy or the results to be obtained from the use of such information and no warranty is expressed or implied concerning the use of these products. The buyer assumes all risks of use and/or handling. Any user must make his own determination and satisfy himself that the products supplied by Lonza Group Ltd or its affiliates and the information and recommendations given by Lonza Group Ltd or its affiliates are (i) suitable for intended process or purpose, (ii) in compliance with environmental, health and safety regulations, and (iii) will not infringe any third party’s intellectual property rights. © Copyright 2013, Lonza Cologne GmbH. All rights reserved. MN-4DNucleo-2 04/13 CD-MN025


© Copyright 2026