
CLIQ.connect Installation Sheet
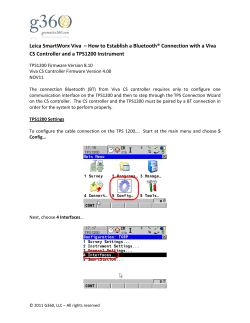
CLIQ.connect Installation Sheet
To attach the CLIQ.connect to the CLIQ controller:
Description
Place the CLIQ controller on a level surface.
2.
Using a small screwdriver, carefully remove the cloudshaped dust cover from the top of the CLIQ controller to
expose the female ClareBus. Next remove the ClareBus
cover from the bottom of the CLIQ.connect.
3.
Align the CLIQ.connect over the top of the CLIQ controller
so that the male ClareBus on the bottom of the
CLIQ.connect is touching the female ClareBus on the top
of the CLIQ controller. See Figure 1.
4.
Push down on the CLIQ.connect until it is properly seated
on the CLIQ controller.
To attach additional CLIQ.connects:
The Clare Controls CLIQ.connect is an add-on module for the
CLIQ controller (CLIQ.host and CLIQ.lite) that doubles the
number of available I/O ports. The CLIQ.connect uses autodiscovery technology that makes the units seamlessly
interoperable and lets you scale your project with near-zero
configuration. You can stack up to three CLIQ.connect
modules onto one CLIQ controller. This, coupled with the
modules’ built-in ease of interconnection, makes the CLIQ
controller an ideal controller for a wide range of projects.
1.
Remove the dust cover from the top of the attached
CLIQ.connect, and then remove the ClareBus cover from
the bottom of the next CLIQ.connect.
2.
Align the next CLIQ.connect over the CLIQ.connect that
you just added, and push down until the unit is seated.
3.
Repeat steps 1 and 2 for each additional CLIQ.connect.
Note: When attaching additional CLIQ.connects, be sure
that each CLIQ.connect is receiving power before adding
the next CLIQ.connect. The CLIQ controller autodiscovers each CLIQ.connect in the order in which you
add them.
Unpacking the CLIQ.connect
Remove all contents from the CLIQ.connect packaging and
ensure you have the following items.
•
•
•
•
•
•
1.
Figure 1: Attaching CLIQ devices
1 CLIQ.connect device
3 terminal connectors
1 terminal block jig
2 RJ12 to DB-9 cables
6 IR emitters
4 rubber foot covers
Installation
Attaching the CLIQ.connect to a CLIQ controller
The CLIQ.connect attaches to a CLIQ controller without any
screws, external jumpers, or wires. Magnets hold the
CLIQ.connect securely to the CLIQ controller. You can connect
up to three CLIQ.connect devices to a single CLIQ controller.
© 15OCT14 Clare Controls, Inc.
1/2
Doc ID 2014-10-706 • REV 03
Adding the rubber foot covers
Figure 3: CLIQ.connect rear connections
#2
1
2
3
4
5
6
To add the rubber foot covers:
•
RS232
IR Outputs
(1)
(2)
#1
#2
NC
NO
C
NC
NO
C
#1
#1
12vdc
Gnd
#2
#3
12vdc
Gnd
#4
If you are placing a CLIQ.connect on the bottom of a stack, use
the four rubber foot covers included to prevent it from sliding.
I/O
Relay
(4)
(5)
Peel each foot cover from the paper backing and place
one on each foot on the bottom of the CLIQ.connect.
Connecting devices to the CLIQ.connect
Begin making connections to your other devices. Figures 2
and 3 identify the LED and ports on the front and rear of the
CLIQ.connect. Refer to the documentation that came with each
of your other devices for detailed information about connecting
them to the CLIQ.connect.
To connect the CLIQ.connect:
1.
Connect your serial devices to either of the two RS-232
ports using a standard RJ12 cable, or an RJ12 to DB9
cable (included). See Figure 3, item 1 and Figure 4.
2.
Connect your IR devices (optional) to the 12-pin terminal
connector (included), and then insert the connector into
the port labeled “IR Outputs.” See Figure 3, item 2.
(1)
(2)
(3)
(3)
RS-232 (2 ports)
IR Outputs
ClareBus
(4)
(5)
I/O
Relay
RS-232 port pinouts
If you are using your own RJ12 cable (rather than the one
supplied), ensure your RJ12 cable connector pinouts match
the pinouts on the RS-232 ports shown in Figure 4.
Figure 4: RS-232 ports with pinouts
#1
#2
Note: When connecting an IR emitter (included), attach
the striped wire to positive (+) and the black wire to
negative (-).
3.
Connect your digital I/O devices (optional) to the 8-pin
terminal connector (included), and then insert the
connector into the port labeled “I/O.” See Figure 3, item 4.
When connecting devices, wire it such that ports 1 and 2
share the same12 VDC power and ground and ports 3 and
4 share the same power and ground.
4.
Connect relay contacts (e.g., garage door contacts) to the
6-pin terminal connector (included), and then insert the
connector into the port labeled “Relay.” See Figure 3,
item 5.
Figure 2: CLIQ.connect front
RS232
Configure, test, and deploy a project
Refer to the Fusion Configuration Tool Administrator Guide
(Doc ID 069) for instructions on creating, testing, and deploying
a project.
Specifications
Power
5 mA at 12 VDC
Operating temperature
41 to 113°F (5 to 45°C)
Relative humidity
10 to 90%, non-condensing
Dimensions (W × H × D)
1.3 × 8 × 6 in. (3.3 × 20.32 × 15.24 cm)
Contact information
(1)
2/2
LED – Illuminates blue when unit is powered on
Clare Controls, Inc.
7519 Pennsylvania Ave, Suite 104
Sarasota, FL 34243
Support: 941.404.1072
Fax: 941.870.9646
http://support.clarecontrols.com
www.clarecontrols.com
Doc ID 2014-10-706 • REV 03


© Copyright 2026