
Document 368366
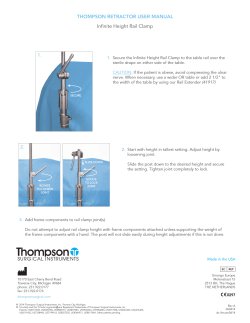
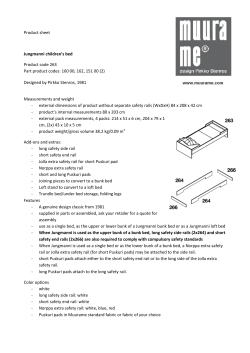
Portable Rail Profilometer - modernized, PRP-1M Contents 1. 2. 3. 4. 2 Safety precautions and measurement conditions ...................................................... 4 Electromagnetic compatibility .................................................................................... 4 Laser safety ............................................................................................................... 4 General information ................................................................................................... 4 4.1. Controlled parameters ........................................................................................ 5 5. Basic data and performance characteristics .............................................................. 5 6. Complete set to be supplied ...................................................................................... 5 7. Structure and operation principle............................................................................... 6 7.1. Basic components of the device and their functions........................................... 6 7.1.1. Laser scanning module ............................................................................... 6 7.1.2. Power supply............................................................................................... 7 7.1.3. PDA ............................................................................................................. 8 7.2. Operation principle ............................................................................................. 9 8. Measurement procedure ........................................................................................... 9 8.1. Activation ............................................................................................................ 9 8.2. Measurement ..................................................................................................... 9 9. Rail parameters under control. Terms and definitions ............................................. 10 9.1. L-parameters .................................................................................................... 10 9.2. Geometric parameters of the rail under control ................................................ 11 10. PDA program setting ............................................................................................... 11 10.1. Selection of measurement units ....................................................................... 11 10.2. Data and Time settings .................................................................................... 12 10.3. L-parameters and tolerances settings .............................................................. 12 10.4. Reference profile selection and installation ...................................................... 13 10.4.1. Reference profile selection ........................................................................ 13 10.5. Database selection ........................................................................................... 14 10.6. New laser module connection .......................................................................... 14 10.7. Selection and changing of language and terminology ...................................... 15 10.8. Browsing and updating PDA software .............................................................. 15 11. Operations with rail profilometer .............................................................................. 16 11.1. Activation .......................................................................................................... 16 11.2. On-line measurements ..................................................................................... 16 11.3. Measurements with database maintenance ..................................................... 16 11.4. Browsing the database ..................................................................................... 17 11.5. Deactivation ..................................................................................................... 18 12. Installation of software on PC and startup ............................................................... 19 12.1. Installation of database support software ......................................................... 19 12.2. Installation of Microsoft Activesync.................................................................. 19 12.3. Preparation and installation of language support file ........................................ 19 12.4. Program starting ............................................................................................... 20 13. User settings of the program ................................................................................... 20 13.1. Registration of user organization ...................................................................... 20 13.2. Registration of operators .................................................................................. 21 13.3. Registration of reference profiles...................................................................... 22 13.3.1. Request and registration of the reference profile file ................................. 23 13.4. Selection of software language ........................................................................ 23 14. Data exchange between PDA and PC..................................................................... 23 14.1.1. Transfer of database file to PC.................................................................. 24 14.1.2. Transfer of language file from PC to PDA ................................................. 24 ПРП-1M [Версия 1.0] 30 Мая 2012 Portable Rail Profilometer - modernized, PRP-1M 3 14.1.3. Transfer of reference profile files from PC to PDA .................................... 25 14.1.4. Transfer of reference profile files from PC to PDA .................................... 26 14.1.5. Updating of PDA software ......................................................................... 27 14.2. Data transfer by means of flash memory card .................................................. 27 15. Taking measurements under PC control (without PDA) .......................................... 28 15.1. Preparation for taking measurements .............................................................. 28 15.2. Measurement and saving of data ..................................................................... 29 16. Working with profilograms and wear calculations .................................................... 31 16.1. Profiles lookup .................................................................................................. 31 16.2. Browsing/recalculation of parameters .............................................................. 32 16.3. Comparing profiles ........................................................................................... 32 16.3.1. Selection of reference profile..................................................................... 32 16.3.2. Change image scale ................................................................................. 33 17. Scanning and editing of data ................................................................................... 33 17.1. Scanning and filtering of data ........................................................................... 33 17.2. Editing data ...................................................................................................... 36 17.3. Creation of empty database ............................................................................. 37 17.4. Import of database ........................................................................................... 37 18. Report preparation .................................................................................................. 38 18.1. Exel-format report............................................................................................. 38 19. Procedure of installation of Bluetooth connection between PRP and PC ................ 39 20. Charging of built-in accumulator battery .................................................................. 43 21. Warranty policy ........................................................................................................ 43 22. Distributors .............................................................................................................. 43 23. Annex 1. RIFTEK measurement instruments for railway transport .......................... 46 ПРП-1M [Версия 1.0] 30 Мая 2012 Portable Rail Profilometer - modernized, PRP-1M 1. Safety precautions and measurement conditions • Prior to mounting the profilometer onto the rail, areas of contact and laser scanning of the rail surface should be thoroughly cleaned from dirt. • When mounting the module on the rail, do not allow heavy shocks of its support against the rail. • The output windows of the laser sensor must be carefully inspected and cleaned • Do not use laser module in locations close to powerful light sources. 4 2. Electromagnetic compatibility The profilometer have been developed for use in industry and meet the requirements of the following standards: • EN 55022:2006 Information Technology Equipment. Radio disturbance characteristics. Limits and methods of measurement. • EN 61000-6-2:2005 Electromagnetic compatibility (EMC). Generic standards. Immunity for industrial environments. • EN 61326-1:2006 Electrical Equipment for Measurement, Control, and Laboratory Use. EMC Requirements. General requirements. 3. Laser safety The profilometer make use of an c.w. 660 nm wavelength semiconductor laser. Maximum output power is 1 mW. The device belongs to the 2 laser safety class. The following warning label is placed on the profilometer body: The following safety measures should be taken while operating the profilometer: • Do not target laser beam to humans; • Do not disassemble the sensor; • Avoid staring into the laser beam. 4. General information Portable laser rail profilometer (PRP) is designed for non-contact registration of cross-section of the railhead acting face. The main functions of PRP are: • obtaining the information on the cross-section profile of the working railhead surface; • full profile scanning and analyze of the railhead acting face; • visualization of the combined graphical images of actual and new crosssection railhead profiles on the display of system unit; ПРП-1M [Версия 1.0] 30 Мая 2012 Portable Rail Profilometer - modernized, PRP-1M 4.1. Controlled parameters • • • 5 5. railhead vertical wear ( Hv ); side wear ( Hh ), that is measured 13 mm lower the top of railhead or side wear( HhR45 ), that is measured at 45 degrees relative to the rail symmetry axes at the point that passes through the center of lateral working fillet; redused head wear, that is determined as vertical one + the half of lateral wear, namely :Hr = Hv + 0,5Hh or Hr = Hv + 0,5Hh∟R45 . Basic data and performance characteristics Name of parameter Railhead vertical wear, mm Lateral railhead wear, mm Redused railhead wear, mm Scanning angle inside the rail track, degrees Scanning angle outside the rail track, degrees Inaccuracy, not more than, mm Scanning time, sec Digital readout device dimensions, mm Dimensions of laser scanning, mm Power supply, laser module Power supply, PDA The number of measurements that can be taken before battery recharge is not less than PDA memory capacity, no less Interface to PC 6. Value -15,0 …+20,0 -15,0…+20,0 Up to 20,0 108 108 ±0.1 3 see Fig.5 see Fig.3 Lead-Acid battery 12V, 7200мАч Lithium-polymer batteries, 3,7V, 3300mAh 1000 100 000 measurements Bluetooth Complete set to be supplied Designation RF303 RF570 РФ 570.10 RF570.40 RF570.41 RF570.42 RF570.43 RF570.30 PRP_DB RF570UM Name PDA Laser scanning module Power supply, laser module Charging device 5V 3.0A for PDA Charging device 9V 3.0A for laser module Universal cable (USB-port) Bluetooth/USB - adapter Packing case Database management system (CD) User's manual ПРП-1M [Версия 1.0] 30 Мая 2012 Quantity Weight kg 1 1 1 1 1 1 1 1 1 1 0,4 3,5 4,0 0,2 0,5 1,5 Portable Rail Profilometer - modernized, PRP-1M 7. Structure and operation principle 7.1. Basic components of the device and their functions Fig. 1 shows basic components of the device. 6 Figure 1 (1) PDA. (2) Laser scanning module. (3) Box for battery. 7.1.1. Laser scanning module The module is intended for laser scanning of rail surface. Figure 2 The module is intended for laser scanning of rail surface. (1) Indicator of Bluetooth connection (blue LED) (2) Indicator of turn ON (red LED) (3) Support for mounting of the device on the rail ПРП-1M [Версия 1.0] 30 Мая 2012 Portable Rail Profilometer - modernized, PRP-1M (4) Input window of laser sensor (5) Output window of laser sensor Overall dimensions of scanning module are shown in figure 3. 7 Figure 3 7.1.2. Power supply The power supply is stored in a battery box. Figure 4 Fig.4: indicates: (1) Carrying handle (2) ON/OFF button (3) Cable connector for the connection to the laser module (4) Connector to the charging device (5) Connector to the battery box ПРП-1M [Версия 1.0] 30 Мая 2012 Portable Rail Profilometer - modernized, PRP-1M 7.1.3. PDA PDA is designed for control of the laser scanning module, data reception from the scanning module, indication of measurement results, parameter input and data storage. 8 Figure 5 Fig. 5 indicates: (1) Turn-on button (2) Charge indicator (red/green LED) (3) Connector to PC USB-port or charging device. (4) Connector of flash memory card (5) Stylus (6) Bluetooth antenna Overall dimensions of PDA are shown in figure 6 ПРП-1M [Версия 1.0] 30 Мая 2012 Portable Rail Profilometer - modernized, PRP-1M Figure 6 7.2. Operation principle Operator mounts the laser scanning module onto the railhead to be measured. Having received a command from PDA or PC, the laser module performs non-contact scanning of rail surface. Measurement results (geometric parameters and profile of the surface) are displayed on PDA, can be saved in the PDA memory, and transferred to the PC database. Simultaneously, additional parameters can be saved: date, operator number, permanent way division, track number, rail type, etc. 9 8. Measurement procedure 8.1. Activation • Connect the battery box (cable connector (3) at Fig.4) to the laser module (connector (5) at Fig.4) • Switch the laser module on by pressing ON/OFF button on battery box: button (2), Fig. 4 – red LED is lit (2). • Turn the PDA on by pressing the button (1), Fig. 5. • After the laser module is switched on, some time will pass until automatic wireless communication is set between the profilometer and the PDA, which is accompanied by blinking of a blue LED on the laser module. The LED goes out when the link is established. • The PDA screen will show the main program window containing: main menu; indicators of PDA and laser module charging degree; indicator of Bluetooth connection showing serial number of the laser module with which connection is established and the Measurement button: Меню Заряд КПК Кнопка “Измерение” 8.2. Measurement To perform measurement, it is necessary to: • Fix the laser module on the rail, • Set Carriage to zero position! • Press Measurement button on the PDA display; ПРП-1M [Версия 1.0] 30 Мая 2012 Bluetooth соединение с лазерным модулем №00212 Portable Rail Profilometer - modernized, PRP-1M • With the Measurement button pressed, the laser module will scan the rail surface. During scanning time of about 10 seconds red LED (2) is lit. • When scanning is competed, the PDA will show values of measured parameters selected for presentation (см. п.10.3): 10 • To look at rail profile, press the Profile button, and the PDA will display scanned rail profile as well as measured parameters: 9. Rail parameters under control. Terms and definitions 9.1. L-parameters Geometric parameters of the rail are calculated automatically after laser scanning of the rail is completed. To calculate geometric parameters, use is made of reference points on the railhead. Location of the reference points is shown in Fig. 7 and is defined by L-parameters (parameters L1). Values of L-parameters preset in PDA are given in Table 1 and can be changed by user (see par.10.3.). ПРП-1M [Версия 1.0] 30 Мая 2012 Portable Rail Profilometer - modernized, PRP-1M 11 Figure 7 Table 1. L-parameter Default value L1 13 mm 9.2. Purpose Used for calculation of railhead wear, mm Geometric parameters of the rail under control The parameters under control and respective calculation methods are given in Table 2. Table 2. Parameter Design Calculation method ation Hv is calculated as a difference between the measured value and Railhead vertical nominal value of new rail in direction of rail axis of symmetry. wear Hh Lateral railhead is measured at the height of L1 = 13 mm from the rolling wear Lateral railhead wear at angle 45 degrees redused head wear redused head wear at 45 degrees H45 Hr R45 surface of rail head (Hh∟R45), is measured at 45 degrees relative to the rail symmetry axis at the point that passes through the center of lateral working fillet that is determined as vertical one + the half of lateral wear, namely :Hr = Hh + 0,5Hh or Hr = Hv + 0,5Hh∟R45 is determined as vertical one + the half of lateral wear, namely : Hv = Hh + 0,5Hh∟R45 10. PDA program setting Prior to starting work with the rail profilometer, PDA program setting must be performed. 10.1. Selection of measurement units • All parameters as well as measurement results can be presented in the metric system (millimeters) or in the English system of units (inches). To set ПРП-1M [Версия 1.0] 30 Мая 2012 Portable Rail Profilometer - modernized, PRP-1M measurement units, it is necessary to select PRP > Units of measuring >[mm/inch] 12 • select mm or inch options 10.2. Data and Time settings To set data and time: • select Service > Data/Time in main window of the program. View on the PDA screen: • write data and time • press Save. 10.3. L-parameters and tolerances settings To change L-parameters: • select Service > L Parameters ПРП-1M [Версия 1.0] 30 Мая 2012 Portable Rail Profilometer - modernized, PRP-1M 13 • write parameter's value • select parameters, that values must be displayed. • press Save 10.4. Reference profile selection and installation The program lets compare scanned profile of the rail with reference profile. Reference profiles are /stored in the PDA database as profile description files with extension .ref. PDA is supplied with several pre-installed profiles. If there is no required reference profile in the database, user can form profile description himself or request the lacking profile from RIFTEK (free service). 10.4.1. Reference profile selection To select reference profile press Service > Reference profiles: • Activate the required profile and press the Set key; • To delete profile from the database, activate the line with selected profile and press the Delete key; • To exit from the window, press the Exit key. ПРП-1M [Версия 1.0] 30 Мая 2012 Portable Rail Profilometer - modernized, PRP-1M 10.5. Database selection If necessary, measurement results are saved in the PDA database. The program makes it possible to simultaneously create and store several database files connected with a concrete date of taking measurements. To select a database file, choose Service > DB files in the main window menu. The screen will show: 14 • To create a new database, press New DB. File with the name wp_yy_mm_dd.prp will be formed automatically, where yy_mm_dd is the current date; • to select the available database, activate the line with the file name and press Select DB; • to delete the selected file press Delete; • to delete all files press Delete all; • to exit from the window press Exit 10.6. New laser module connection Bluetooth-connection of PDA is adjusted for work with the laser scanning module supplied with PDA complete package. To connect other scanning module it is necessary to: • Select Service > New PRP ПРП-1M [Версия 1.0] 30 Мая 2012 Portable Rail Profilometer - modernized, PRP-1M 15 • press Start and wait for new devices (with serial numbers) will appear on the screen • select device and press Save to save new device address 10.7. Selection and changing of language and terminology It is possible for the user to change the program language, form his own language support files as well as change/edit the terminology used. To choose language in the main window menu, select PRP > Language. Select the required language support file. 10.8. Browsing and updating PDA software To look at the software version in the main window menu, select About Program tab. The screen will show: ПРП-1M [Версия 1.0] 30 Мая 2012 Portable Rail Profilometer - modernized, PRP-1M 16 11. Operations with rail profilometer 11.1. Activation Switch on the PDA and scanning module as shown in par. 8.1. 11.2. On-line measurements Procedure of on-line measurements is described in par. 8.2. 11.3. Measurements with database maintenance A fully functional work with the rail profilometer involves maintenance of the measurements database. • To take measurements Select in the main menu PRP > Measurement, the window of parameters input will appear • If necessary, fill in/edit the required fields • to save parameters, press the Save button • measure the rail • after the scanning surface is laser-scanned, the PDA will show the value of selected geometrical rail parameters. ПРП-1M [Версия 1.0] 30 Мая 2012 Portable Rail Profilometer - modernized, PRP-1M 17 : • to look at the profile press Profile button: 11.4. Browsing the database To browse the database: • select Service > Profiles in the main window. View on the screen: ПРП-1M [Версия 1.0] 30 Мая 2012 Portable Rail Profilometer - modernized, PRP-1M 18 Buttons: – delete selected profile; • when in this mode, it is possible to save the selected profile as a reference profile by pressing Save button: – create reference profile (profile_name.ref). • write profile name and press Save. 11.5. Deactivation To turn off the PDA, press power supply button and hold it down until the screen is blank. To turn off the laser module, press button (2), Fig. 4 . ПРП-1M [Версия 1.0] 30 Мая 2012 Portable Rail Profilometer - modernized, PRP-1M 12. Installation of software on PC and startup 12.1. Installation of database support software 19 The PRP_DB software is intended for maintaining rail wear database on a personal computer (the updated version of the program can be downloaded from www.riftek.com). To install the software, insert compact disk to PC CD drive, select and start Install_PRP.exe file in the Software folder. Follow instructions of the installation wizard. The program is installed in C:\Program Files\RIFTEK\ folder by default. 12.2. Installation of Microsoft Activesync For combined work PDA and PC, it is necessary to install Microsoft Activesync. Proceed as follows: • Start ActiveSync42.exe file from the Software folder on CD. • Follow program installation instructions. • Check for correctness of the installation by activating PDA and connecting it PC USB port using cable which is part of supply package. In case of successful connection the screen will show the following message: NOTE: For PC with Microsoft Windows Vista or Microsoft Windows 7 installed, use Windows Mobile Device Center synchronization program instead of Microsoft Activesync. 12.3. Preparation and installation of language support file By default, working language of the program is English. User can change the language, form his own language support files as well as change/edit the terminology used. Language support files are located in the directory used in the process of installation. By default the following directory is used: C:\Program Files\RIFTEK\Prp_db\Language\. The directory contains two files, RUS.lng and ENG.lng, to support Russian and English languages respectively. To create support file for any other language, it is necessary to • copy one of the existing files. For example, ENG.lng under the other name, for example, GER.lng • edit the renamed files by using any text processor, namely, change all terms and phrases to analogous ones from the required language • save the edited *.lng file in the Language folder • To change and edit terminology, it is necessary to: • edit the corresponding language file by using any text processor; ПРП-1M [Версия 1.0] 30 Мая 2012 Portable Rail Profilometer - modernized, PRP-1M • save the edited *.lng file in the Language folder • 12.4. Program starting To start the program click Start > All programs > IKP5 > IKP5_DB. View of the main program window is shown in the figure. 20 13. User settings of the program 13.1. Registration of user organization For registration user organization select Registration > Organization. Fill out the required fields in the opening window. Subsequently, the filled out information will be used in automatic generation of reports. ПРП-1M [Версия 1.0] 30 Мая 2012 Portable Rail Profilometer - modernized, PRP-1M 21 Buttons: - add new body; - edit selected body; - delete selected body; - exit. 13.2. Registration of operators Steps to follow: menu Registration > Operator. Fill out the required fields in the opening window by assigning a unique digital identification cod (up to 4 digits) to each operator. Functions of buttons are similar to those in par. 13.1. . ПРП-1M [Версия 1.0] 30 Мая 2012 Portable Rail Profilometer - modernized, PRP-1M 13.3. Registration of reference profiles Reference profiles are stored in the database as profile description files with extension .ref. The program is supplied with several pre-set profiles. In addition, user can form a description of required profile himself or request it from RIFTEK (free service). To browse available profiles, select menu Registration > Profiles: 22 Buttons: - import of reference profile from *.ref file; - export of reference profile into *.ref file; delete reference profile; For profile viewing make double click on selected profile or click right mouse button and press Image. ПРП-1M [Версия 1.0] 30 Мая 2012 Portable Rail Profilometer - modernized, PRP-1M 23 13.3.1. Request and registration of the reference profile file To get .ref-file of reference profile send the drawing of profile to RIFTEK ([email protected]). Register received .ref-file: • press button Import • in the window appeared indicate the way to the .ref-file • press button Open 13.4. Selection of software language To choose software language, select File > Language in the main window menu and set the required language support file. 14. Data exchange between PDA and PC Data exchanged is done by direct cable connection of PDA to PC USB-port (special RF505.42 cable is supplied) • activate PDA • connect cable between PDA and PC (note: Microsoft Activesync must be installed on PC as shown in par. 12.2) • select data exchange device by executing File > Device selection > select either RF303M. ПРП-1M [Версия 1.0] 30 Мая 2012 Portable Rail Profilometer - modernized, PRP-1M 24 14.1.1. Transfer of database file to PC To transfer database file from PDA to PC, it is necessary to: • select File > Data > Data transfer • check the required files in the emerging window and click OK. 14.1.2. Transfer of language file from PC to PDA To transfer language file from, PC to PDA, it is necessary to: • select File > Data > Resource file > Transfer resource file ПРП-1M [Версия 1.0] 30 Мая 2012 Portable Rail Profilometer - modernized, PRP-1M 25 • select required file • if transfer is successful, the screen will show: 14.1.3. Transfer of reference profile files from PC to PDA To transfer reference profile file from PC to PDA, it is necessary: • select File > Data > Transfer reference file • check required files with extension .ref ПРП-1M [Версия 1.0] 30 Мая 2012 Portable Rail Profilometer - modernized, PRP-1M 26 • if transfer is successful, the screen will show: 14.1.4. Transfer of reference profile files from PC to PDA To transfer reference profile file from PC to PDA, it is necessary: • select File > Data > Transfer reference file • • select required file with extension .ref if transfer is successful, the screen will show the following message: ПРП-1M [Версия 1.0] 30 Мая 2012 Portable Rail Profilometer - modernized, PRP-1M 14.1.5. Updating of PDA software The updated software version can be downloaded from ther site www.riftek.com. To transfer the update file to PDA, it is necessary to: • select File > Update > RF303 27 • • select file for transfer if transfer is successful, the screen will show: 14.2. Data transfer by means of flash memory card To transfer database files from PDA to PC by using flash memory card, it is necessary: • insert flash card to PC USB-port • select File > Device selection > SD Card\Disk • • select database files folder check files and click OK for transfer ПРП-1M [Версия 1.0] 30 Мая 2012 Portable Rail Profilometer - modernized, PRP-1M 28 15. Taking measurements under PC control (without PDA) The laser scanning module can work under direct control of PC without PDA. 15.1. Preparation for taking measurements To work under direct control of PC, it is necessary to: • install Bluetooth-connection between the scanning module and PC. The procedure is described in par. 19. • select File > Device selection > Profilometer in the main window menu. • select required port ( see par. 19) ПРП-1M [Версия 1.0] 30 Мая 2012 Portable Rail Profilometer - modernized, PRP-1M • 29 click ОК for connection • If the connection is successful, the Measurement button in the main program window becomes active • Press the Measurement button or select File > Measurement in the menu. After the scanning module parameters are read, the program is ready for work: 15.2. Measurement and saving of data To measure the wheel profile, press the . button. Measurement being completed, the screen will show graphic image of the rail profile and calculated profile parameters. ПРП-1M [Версия 1.0] 30 Мая 2012 Portable Rail Profilometer - modernized, PRP-1M 30 • • to save the results in the database, go to the Save tab. fill in the required parameter fields in the emerging window • • button after filling the fields press the the profile measured will be saved in the database: ПРП-1M [Версия 1.0] 30 Мая 2012 Portable Rail Profilometer - modernized, PRP-1M 31 16. Working with profilograms and wear calculations 16.1. Profiles lookup To look at rolling surface profiles select Results > Profiles, or press button Profiles Select the required wheel pair from the table offered. ПРП-1M [Версия 1.0] 30 Мая 2012 Portable Rail Profilometer - modernized, PRP-1M To print picture press button To save picture in separate file (.bmp file ) press button To look at the points coordinates use Values bookmark 32 16.2. Browsing/recalculation of parameters In this tab shows calculated profile parameters and the corresponding values of L-parameter. To recalculate values of flange parameters for other L-parameter, it is necessary to change values of L-parameter and press the Calculate button - . 16.3. Comparing profiles 16.3.1. Selection of reference profile To compare measured profile with the reference profile, select Parameters tab and tick the Compare with field. Select required reference profile in the pullout list. ПРП-1M [Версия 1.0] 30 Мая 2012 Portable Rail Profilometer - modernized, PRP-1M . 33 16.3.2. Change image scale To change image scale, mark part of the image with the left mouse key, move the image by holding it with the right mouse key pressed or with buttons Increase , Decrease - and Show all - . 17. Scanning and editing of data 17.1. Scanning and filtering of data To scan data, select Results > Rails in the menu or press the Results button. The form showing results will be as follows: ПРП-1M [Версия 1.0] 30 Мая 2012 Portable Rail Profilometer - modernized, PRP-1M 34 To navigate between the base entries, use “up/down” arrows or buttons of the navigation panel: - to the beginning of the database; - to the previous page of the database; - to the previous entry of the database; - to the next entry of the database; - to the next page of the database; - to the end of the database. • Sorting of data To sort data for any of the fields, click left mouse key on the header of the field column: To cancel data sorting, press Ctrl and click left mouse key on the header of the field column. • Filtering of data In order to filter data in any of the fields, click left mouse key on the header of the field grouping, and select required value in the emerging pullout list: ПРП-1M [Версия 1.0] 30 Мая 2012 Portable Rail Profilometer - modernized, PRP-1M 35 To cancel filtering, all steps should be taken in the reverse order. • Data grouping To group data for any of the fields, click left mouse key on the header of the field column, and, with the mouse key pressed, drag it onto the table header To filter data for a grouping field, click left mouse key on the header of the grouping field and select required value in the pullout list • Hide/show field To hide field, it is necessary to click left mouse key on the header of the field column, and, with the mouse key pressed, drag it outside of the with the mouse key pressed, drag it outside the table header: The second method: to hide/show the field, click left mouse key on the utmost left header ( ), and remove mark from /mark required field in the table ПРП-1M [Версия 1.0] 30 Мая 2012 Portable Rail Profilometer - modernized, PRP-1M • Changing of the field position order To change the field position, click left mouse key on the header of the field column and, with the mouse key pressed, drag it to required position: 17.2. Editing data You can edit, add and remove data in/from the database. • Editing data 36 To edit the current entry, press the button and input/change required parameter values, after the editing is complete press the Save button. • Adding data To add a new data entry, press the button and type required parameter values, after the editing is complete press the Save button. • Deleting data; To delete a current entry, press the ПРП-1M [Версия 1.0] 30 Мая 2012 button and confirm the deletion. Portable Rail Profilometer - modernized, PRP-1M • Deleting all selected data 37 If it is necessary to delete not only one entry but several entries combined by some condition, filter the data according to the corresponding attribute, press the button and confirm the deletion. 17.3. Creation of empty database To create empty database, select File > New DB in the main menu. All data except for reference files will be deleted from the database. At the same time, catalog DB(dd.mm.yy) will be created in the installation directory whereto all deleted data (dd.mm.yy – current date) will be copied. Subsequently, these data can be restored (see par. 17.4). 17.4. Import of database To import data to data base, • select File > Data import in the menu. • select folder with DB files in the left-hand window. All files will appear in the right-hand window: ПРП-1M [Версия 1.0] 30 Мая 2012 Portable Rail Profilometer - modernized, PRP-1M 38 • press OK to import data. 18. Report preparation When staying in the scanning and editing of date mode according to par. 17, user can prepare reports in Excel, RTF, TXT formats or print out reports. In the formation of report sorting used at the moment is taken into account. To generate a report, press the following options: button, and the program will to select the 18.1. Exel-format report To prepare a report in Excel format, select Report in Excel and press ОК. The required data will be transferred to Excel-table: ПРП-1M [Версия 1.0] 30 Мая 2012 Portable Rail Profilometer - modernized, PRP-1M 39 19. Procedure of installation of Bluetooth connection between PRP and PC To install Bluetooth-connection between the PRP and PC, it is necessary to: • insert USB/Bluetooth-module to PC USB-port. • continue installation of the equipment following instructions of the wizard by selecting successively: ПРП-1M [Версия 1.0] 30 Мая 2012 Portable Rail Profilometer - modernized, PRP-1M 40 • when drivers are installed, the corresponding message and Bluetooth icon will appear in the screen: • activate PRP. • click right mouse key on the Bluetooth icon and select Add Bluetooth device ПРП-1M [Версия 1.0] 30 Мая 2012 Portable Rail Profilometer - modernized, PRP-1M 41 • Then Bluetooth installation wizard will start working: • tick the Device is installed and ready for connection • select Next for search • when the search is competed, the wizard will show the devices found: ПРП-1M [Версия 1.0] 30 Мая 2012 Portable Rail Profilometer - modernized, PRP-1M 42 • select the required device (PRP), press Next and type access key (Pin). The key for each device consists of 4 symbols and is set based on the PRP serial number. For example, if the PRP number is 02010, then Pin=0200; 01309 Pin=0139, etc. • press Next and continue installation process. • when required drivers are installed, the Bluetooth device will give a message with COM-port (outgoing) which should be opened for connection with PRP during measuring. In this case, the port is COM3: ПРП-1M [Версия 1.0] 30 Мая 2012 Portable Rail Profilometer - modernized, PRP-1M 43 20. Charging of built-in accumulator battery To charge of built-in accumulator battery it is necessary to: • Switch off PDA (laser module). • Connect charging device and PDA (laser module) • Connect charging device and 220V. • Time of charging of DRD–5 hours (until red LED is OFF), laser module – 12hours (until green LED is OFF). • Disconnect charging device and 220V • Disconnect charging device and PDA (laser module) ATTENTION: please follow the sequence of this points. 21. Warranty policy Warranty assurance for the portable rail profilometer - 24 months from the date of putting in operation; warranty shelf-life - 12 months. 22. Distributors AUSTRALIA BENELUX BULGARIA, HUNGARY XN Innovation Altheris B.V. RMT Ltd. LG Centre, Suite 1, Level M, 55 Parramatta Rd, NSW, 2141, Lidcombe, Australia Tel: +61 (0)2 8091 2426 Fax: +61 (0)2 9648 6597 [email protected] Scheveningseweg 15 2517 KS The Hague, The Netherlands Tel: +31 (70) 3924421 Fax: +31 (70) 3644249 [email protected] www.altheris.com R Zahradni 224 739 21 Paskov, Czech Republic Tel: +420 558640211 Fax: +420 558640218 [email protected] [email protected] www.rmt.cz ПРП-1M [Версия 1.0] 30 Мая 2012 Portable Rail Profilometer - modernized, PRP-1M CHINA Zhenshangyou Technologies Co.,Ltd. Rm 1806, Block B, Jinhaian Building Chuangye Road, Nanshan District Shenzhen,518054, China Tel: 86)755-26528100/8011/8012 Fax: (86)755-26528210/26435640 [email protected] www.51sensors.com 44 GERMANY CZECH REPUBLIC GERMANY RMT Ltd. Disynet GmbH Zahradni 224 739 21 Paskov, Czech Republic Tel: +420 558640211 Fax: +420 558640218 [email protected] [email protected] www.rmt.cz Westwall 12 D-41379 Brueggen, Germany Tel: +49 (2157) 8799-0 Fax: +49 (2157) 8799-22 [email protected] www.sensoren.de INDIA INDONESIA PT. DHAYA BASWARA SANIYASA BIP-Industrietechnik GmbH Pragathi Solutions RAILWAY INSTRUMENTS ONLY Am Elisabethhof 22, D-14772 Brandenburg D-41379 Brueggen, Germany Tel: +49 (0) 33 81 75 90 0 Fax: +49 (0) 33 81 75 90 11 [email protected] www.bip-industrietechnik.de #698, 5th Main, 8th Cross, HAL 3rd Stage, New Tippasandra Road, Bangalore, 560075, India Tel: +91 80 32973388 Tel/fax: +91 80 25293985 Mobile: +91 9448030426/ +919448492380 [email protected] [email protected] www.pragathisolutions.in ITALY FINLAND Sentra Niaga Puri Indah Blok T6 No. 41 Kembangan Jakarta,11610, Indonesia Tel: 021 5830 4517 Fax: 021 5830 4518 [email protected] LITHUANIA FAE s.r.l. TERÄSPYÖRÄ-STEELWHEEL OY JSC "Comexim" Via Tertulliano, 41 20137 Milano, Italy Tel: +39-02-55187133 Fax: +39-02-55187399 [email protected] www.fae.it RAILWAY INSTRUMENTS ONLY Juvan teollisuuskatu 28 FI-02920 ESPOO, Finland Tel: +358 400 422 900 Fax: +358 9 2511 5510 [email protected] www.teraspyora.fi Serbentu, 222, LT-5419 Siauliai, Lithuania Tel/Fax:+370 41553487 [email protected] www.komeksimas.lt MALAYSIA POLAND POLAND OptoCom Equiptech (M) Sdn Bhd P.U.T. GRAW Sp. z o.o. MTL ASCO Sp. z o.o. H-49-2, Jalan 5, Cosmoplex Industrial Park. Bandar Baru Salak Tinggi, Sepang, Malaysia Tel: 603 8706 6806 Fax: 603 8706 6809 ul. Karola Miarki 12, skr.6. 44-100 Gliwice, Poland Tel/fax: +48 (32) 231 70 91 [email protected] www.graw.com RAILWAY INSTRUMENTS ONLY ul. Wielowiejska 53 44-120 PYSKOWICE (k/ GLIWIC), Poland Tel: +48 32 233 33 33 Fax: +48 32 233 21 34 [email protected] www.ascorail.pl PORTUGAL RUSSIA [email protected] www.optocom.com.my POLAND RMT Ltd. UltraSens Sensorika-M LLC Zahradni 224 739 21 Paskov, Czech Republic Tel: +420 558640211 Fax: +420 558640218 [email protected] [email protected] www.rmt.cz Qt. da Portela, Lt. 22.1, Ap. 152 3030 - 502 Coimbra, Portugal Phone +351 239 796 277 Fax: +351 239 918 267 [email protected] www.ultrasens.com Dmitrovskoye shosse 64-4 127474, Moscow, Russia Tel: 487-0363 Fax: 487-7460 [email protected] www.sensorika.com ПРП-1M [Версия 1.0] 30 Мая 2012 Portable Rail Profilometer - modernized, PRP-1M RUSSIA 45 SERBIA, SLOVAKIA SOUTH KOREA Intellect-Optic RMT Ltd. PROSEN. CO., LTD Ekaterinburg Mira str 32 – 120 Tel/fax: 343 2227565 Tel/fax: 343 2227370 [email protected] www.d-test.ru Zahradni 224 739 21 Paskov, Czech Republic Tel: +420 558640211 Fax: +420 558640218 [email protected] [email protected] www.rmt.cz 211/ Jung-woo Venture 2, 1228-1 Singil-dong, Danwon-gu, Ansan-si, Gyeonggi-do, 425-839 Republic of Korea Tel: +82-(0)31-508-3456~7 Fax: +82-(0)31-624-3458 [email protected] www.prosen.kr SOUTH KOREA SPAIN DAESHIN T&S CO., LTD Iberfluid Instruments S.A. SWEDEN, NORWAY, DENMARK 1702 Ace High-End Tower 5 Gasan-dong, Geumcheon-Gu Seoul, Korea Tel: +82-2-2279-8800 Fax: +82-2-2277-6667 [email protected] www.railstar.co.kr Cardenal Reig, 12 08028 Barcelona, Spain Tel: +34 93 447 10 65 Fax: +34 93 334 05 24 [email protected] www.iberfluid.com SWITZERLAND TURKEY BLConsult Rävbergsvägen 31 SE 713 30, Nora, Sweden Tel: +46 (0) 587 153 20 Mobile: +46 (0) 70 663 19 25 [email protected] www.blconsult.se UKRAINE ID&T Gmbh MATES A.S. KODA Gewerbestrasse 12/a 8132 Egg (Zurich), Switzerland Tel: +41 (0)44 994 92 32 Fax: +41 (0)44 994 92 34 RAILWAY INSTRUMENTS ONLY Gezegen Sok. N: 10 GOP ANKARA, TURKEY Tel: +90 312 447 2192 Fax: +90 312 447 2193 [email protected] www.mates.com.tr Frunze st 22 61002, Harkov, Ukraine Tel/fax: +38 057 714 26 54 [email protected] www.koda.com.ua USA, CANADA, MEXICO USA, CANADA, MEXICO International Electronic Machines Corporation Acuity Products of Schmitt Industries, Inc. RAILWAY INSTRUMENTS ONLY R 60 Fourth Avenue, Albany, New York, USA Tel: +1 (518) 449-5504 Fax: +1 (518) 449-5567 [email protected] www.iem.net 2765 NW Nicolai Street Portland, OR, 97210, USA Tel: +1-503-227-7908 [email protected] [email protected] www.idtlaser.com UNITED KINGDOM, IRELAND Ixthus Instrumentation Ltd The Stables, Williams' Barns Tiffield road, Towcester, Northents Tel: 01327 353437 Fax: 01327 353564 www.ixthus.co.uk [email protected] ПРП-1M [Версия 1.0] 30 Мая 2012 Portable Rail Profilometer - modernized, PRP-1M 23. Annex 1. RIFTEK measurement instruments for railway transport Laser wheel profilometer. IKP Series A laser profilometer is designed for the measuring of: wheel flange height; wheel flange thickness; wheel flange slope; full profile scanning and analyze of wheel rolling surface; maintaining of electronic wear data base; control of tolerances and sorting in the course of checkup, examination, repair and formation of railway wheel sets; Measurements are made directly on rolling stock without wheel set roll-out. 46 Wheel diameter measuring gauge. IDK Series Electronic gauge is designed for measuring wheel rolling circle diameter of railway, metro and tram wheel sets. Measurements are made directly on rolling stock without wheel set roll-out. Back-to-back distance measuring gauge. IMR Series The device is designed for: measuring back-to-back distance of railway, metro and tram wheels in the course of checkup, examination, repair and formation of wheel sets; Measurements are made directly on rolling stock without wheel set roll-out. Disc brakes profile gauge, IKD Series Laser disc brakes profilometer IKD Series is designed for disc brakes profile measuring. The main functions of IKD are: obtaining the information on the profile parameters of the working disc brakes surface; full profile scanning and analyze of the disc brakes acting face; visualization of the combined graphical images of actual and new disc brakes profiles on the display of system unit. ПРП-1M [Версия 1.0] 30 Мая 2012


© Copyright 2026