
Windows Live Movie Maker is the fast, easy way to turn
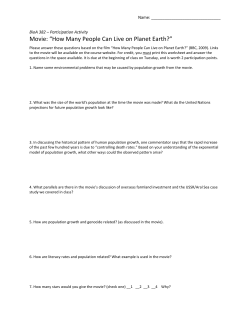
Windows Live Movie Maker
is the fast, easy way to turn
photos and videos into
great-looking movies and
slide shows you can share
with.
With Windows Live Movie Maker, you can make movies from
your photos and videos, whether they're already on your computer or still
on your camera.
Use Movie Maker special effects and themes to make your movies
stand out. Editing movies is now as easy as dragging and dropping the
scenes, still photos, and transitions where you want them. You can even
use Auto Movie to let Movie Maker create a film for you.
In just a few clicks, share your movies on your favorite social
networking sites such as YouTube and Facebook, or upload them to
Windows Live Skydrive. Watch your movie with friends while chatting in
Windows Live Messenger.
1
To make a movie with Windows Live Movie Maker, you'll need some
photos and videos on your computer. You can import photos and videos from
your digital camera, a flash memory card, DVDs, or your mobile phone.
To import your photos and videos into Movie Maker, connect the
camera to your computer by using a USB cable, and then turn on the
camera. Click the Movie Maker button, and then click IMPORT FROM
DEVICE. If the PHOTOS AND VIDEOS WILL BE IMPORTED
INTO WINDOWS LIVE PHOTO GALLERY message appears, click OK.
Click the device you want to import photos and videos from, and
then click IMPORT. On the NEW PHOTOS AND VIDEOS WERE FOUND page,
click IMPORT ALL NEW ITEMS NOW, type a name for all the photos and
videos, and then click IMPORT.
In Windows Live Photo Gallery, select the check box in the upper-left
corner for each photo or video you want to use in your movie. On
the CREATE tab, in the SHARE group, click MOVIE. When the photos and
videos appear in Movie Maker, you’re ready to start making your movie.
2
Using the video editing features
in Windows Live Movie Maker, you can make your movie
look the way you want it to.
Get started with making a movie and editing it by
first adding any videos that you want to use into Movie
Maker.
On the HOME tab, in the ADD group, click ADD
VIDEOS AND PHOTOS. Hold down the Ctrl key and click
the videos you want to use, and then click OPEN.
2.1
To trim the beginning or end of a video clip so only the part of the
video you want appears in your final movie, click the video you want to
trim, and then drag the playback indicator on the storyboard to the point
where you want the video to start or stop playing in your movie. Do one of
the following:
To set a new start point, under VIDEO TOOLS, on the EDIT tab, in
the EDITING group, click SET START POINT.
To set a new end point, under VIDEO TOOLS, on the EDIT tab, in
the EDITING group, click SET END POINT.
You can split a video into two smaller items and then continue
editing. For example, after splitting a video, you can move one video in front
of the other to change the order in which the videos play in your movie.
To split a video into two items, click the video, and then drag the
playback indicator to the point where you want to split the video.
Under VIDEO TOOLS, on the EDIT tab, in the EDITING group, click SPLIT.
2.2
There are shortcut keyboard commands to
accomplish trimming and splitting clip.
2.3
You can change the speed of your video in
Movie Maker to make the video play faster or
slower in your movie.
To change the speed of a video, click the
video. Next, under VIDEO TOOLS, on
the EDIT tab, in the ADJUST GROUP, click
the SPEED list, and then click a speed (depending
on how much you want to speed the video up or
slow it down).
Adjust the video speed in your movie.
3
Use AutoMovie themes to make a greatlooking movie in just a few clicks
in Windows Live Movie Maker. Just pick your
photos, videos, and a theme, and then the
transitions and effects are added for you.
Choose from several different AutoMovie themes to get the look you want for your movie.
3.1
On the HOME tab, in the ADD group,
click ADD VIDEOS AND PHOTOS. Hold down the
Ctrl key and click the photos and videos you want
to use, and then click OPEN.
3.2
On the HOME tab, in the ADD group,
click ADD MUSIC. Click the music file you want to
use, and then clickOPEN.
On the HOME tab, in the AUTOMOVIE
THEMES group, click the theme you want to use. Movie
Maker automatically adds titles, credits, transitions, effects,
and more for you.
You can continue editing as you normally would, or
just save your movie.
4
Get great sound in your movie by using the audio
editing tools in Movie Maker. Make your finished movie
feel polished and professional by adding a soundtrack
and using the editing features to adjust the volume,
fade music in or out, and more.
You can add music that plays during your movie.
After you add music, you can edit it so it plays how you
want in your movie.
On the HOME tab, in the ADD group, click ADD
MUSIC. Click the music file you want to use, and then
click OPEN.
4.1
Make the audio fade in nicely at the beginning
and fade out smoothly at the end to make a movie
that looks and sounds professional.
To make the music fade in or out, click the
music. Then, under MUSIC TOOLS, on
the OPTIONS tab, in the Audio group, do one or both
of the following:
To make the music fade in, click the FADE
IN list, and then click the speed for the music to fade
in.
To make the music fade out, click the FADE
OUT list, and then click the speed for the music to
fade out.
4.2
Trim the beginning or end of the music, so only the
part of the song that you want plays in your final movie.
To trim the beginning or end of the music, click the
music, and then drag the playback indicator on the
storyboard to the point in the music where you want it to
start or stop playing in your movie. Do one of the following:
To set a new start point for the music to start playing
at the current point, under MUSIC TOOLS, on the
Options tab, in the EDITING group, click SET START POINT.
To set a new end point so the music stops playing at
the current point, under MUSIC TOOLS, on THE
OPTIONS tab, in the EDITING group, click SET END POINT.
4.3
You can change the volume of a music item or
the audio in a video. This way, regardless of the audio
or music that's playing, it sounds just right in your
movie.
To change the volume of a music item, click the
music. Under MUSIC TOOLS, on the OPTIONS tab, in
the Audio group, click MUSIC VOLUME, and then move
the slider left to lower the volume or right to increase it.
To change the volume of the audio in a video,
click the video. Under VIDEO TOOLS, on the EDIT tab,
in the Audio group, click VIDEO VOLUME, and then
move the slider left to lower the volume or right to
increase it.
Change the volume in your movie to make it sound just right.
5
On the HOME tab, in the SHARING group,
click the website where you want to publish your
movie. Enter your user name and password, and
then follow the steps to publish your movie.
After your movie is published on the web,
click WATCH ONLINE to watch your movie on the
website. You can then send a link to your movie in an
email message to friends and family, so they can watch
your movie online.
Publish your movies on popular
video sharing and social networking
websites, right from Movie Maker.
A
If you want to add transitions to your content, click
the Animations tab on the ribbon to display options for
transitioning from one photo or video to the next.
AutoMovie automatically adds a crossfade transition to
each piece of content, but changing the transition is as
simple as selecting the photo or video, navigating to the
Animations tab, and clicking another transition to apply it
to your content.
You can mouse-over the options to see a live preview
of how one photo or video will transition into another in the
preview window. To see more options, click the down arrow
in the lower-right corner.
B
Click the ANIMATIONS tab on the ribbon to display
options for panning and zooming individual photos when
they are displayed. To see more options, click the down
arrow in the lower-right corner. AutoMovie automatically
adds various pan-and-zoom effects to your photos. If you
want to change the pan-and-zoom effect, simply navigate
to the ANIMATIONS tab, and with your photo(s) selected
click any one of the pan-and-zoom effects to add it to your
photos.
B.1
Click the VISUAL EFFECTS tab on the ribbon to
display effects that can be applied to photos and
videos. Mouse-over each effect to see what it would
look like before adding it to your photo or video. When
you find one you like, click it, and it is automatically
added. To remove that effect so that it is not applied to
your content, click NO EFFECT on the visual effects
menu (the first one on the left), and it’s gone.
1. INTERFACE
Windows Movie Maker: The layout consists of a
storyboard view and a timeline view, collections
for organizing imported video, and a preview
pane. When in Storyboard view, the video
project appears as a film strip showing each
scene in clips. The storyboard/timeline consists
of one 'Video' (with accompanying 'Audio' bar),
one 'Music/Audio' bar, and one 'Titles/Credits'
bar.
Windows Live Movie Maker: In addition to a lighter
color scheme, Windows Live Movie Maker works
differently through and through. You won't find
previous functionality such as a Storyboard, drop
down menus, and a time lines. Windows Movie
Maker used a Task based approached to creating
a movie, Windows Live Movie Maker introduces a
clean design with most tools and functionality
revealed through the innovative Scenic Ribbon
which displays common functionality once buried
under drop down menus and wizards in a gallery of
easy to identify icons.
2. VIDEO INPUT
Window Movie Maker: When importing footage
into the program, a user can either choose to
Capture Video (from camera, scanner or other
device) or Import into Collections to import existing
video files into the user's collections. The accepted
formats for import are .WMV/.ASF, .MPG (MPEG-1),
.AVI (DV-AVI), .WMA, .WAV, and .MP3. Additionally,
the Windows Vista Home Premium and Ultimate
editions of Movie Maker support importing MPEG2 Program streams and DVR-MS formats.
Windows Live Movie Maker: With this totally new
Windows Live Movie Maker, you can add video files,
photo files and audio files. There are much more video
formats will be supported with Window Live Movie
Maker. The supported types are WMV, ASF, WM, M2TS,
M2T, WTV, MP4, MOV, M4V, MPEG, MOG, MPE, M1V,
MP2, MPV2, MOD, VOB, AVI.
Note: If your videos are not supported by Windows Movie
Maker or Windows Live Movie Maker, you will need to
convert the videos before importing with a Video
Converter.
3. VIDEO EDITING
Window Movie Maker: After capture, any clip can
be dragged and dropped anywhere on the
timeline. Once on the timeline, clips can be
duplicated or split and any of the split sections
deleted or copied using the standard Windows
keyboard shortcuts or clicked and dragged to
another position. Right-clicking any clip brings up
the range of editing options. An AutoMovie feature
offers predefined editing styles (titles, effects and
transitions) for quickly creating movies.
Windows Live Movie Maker: Previously, in Windows
Movie Maker, your videos would require that you drag
and drop into the Story board and edit in the Time line.
Windows Live Movie Maker does the opposite. Task like
re-arranging or cropping a video clip are more visual and
interactive. In fact, one of the lovely highlights is the
actual display of multiple frames in a clip. You can use
the video cursor bar to scan through a video clip and
see additional sequences within the video itself. The
cursor bar itself is an important element of the software
and allows you to accomplish many of the common
tasks you would do in the previous Movie Maker time
line.
4. OUTPUT VIDEO
Window Movie Maker: Windows Movie Maker can
only export video in Windows Media formats or DV
AVI. Earlier versions of Windows Movie Maker did
not support direct burning of DVDs. The project
had to be first saved as an AVI file, and a separate
authoring program used to produce and burn the
DVD. The Windows Vista version of Windows Movie
Maker passes the video project to Windows DVD
Maker to burn DVD-Video discs. Movie Maker also
allows users to publish a finished video on video
hosting websites.
Windows Live Movie Maker: As to output, there is an absolute
plethora of choices for you to make concerning your completed
movie, you can just save it as a normal standard definition file, or a
HD 720 or even a full HD 1080p file! Videos are for sharing, so Live
Movie Maker makes it easy to share online with a few clicks. Post
your video to YouTube right from the main menu, or add a quick plugin and easily publish to Facebook. We will be adding more plug-ins to
popular sharing sites in the future. You can also burn your creation to
a DVD or save it in high definition to play on your TV. Save it down to a
smaller format and transfer it to a mobile device or send it via e-mail.
In conclusion, we highly recommend Windows Live Movie Maker, here
are a few reasons I think you will enjoy the new-and-improved
Windows Live Movie Maker for it's easier to create beautiful videos
wit more customization features and convenient to share your movies
with the world.


© Copyright 2026