
Document 416175
INTEGRATED PRODUCTION & PERFORMANCE SUITE
Production Management
Batch
INSTALLATION GUIDE
P UBLICATION BATCH-IN011C-EN-P–November 2014
Supersedes Publication BATCH-IN011B-EN-E
Contact Rockwell
Customer Support Telephone — 1.440.646.3434
Online Support — http://www.rockwellautomation.com/support/
Copyright Notice
© 2014 Rockwell Automation, Inc. All rights reserved. Printed in USA.
This document and any accompanying Rockwell Software products are copyrighted by Rockwell
Automation, Inc. Any reproduction and/or distribution without prior written consent from Rockwell
Automation, Inc. is strictly prohibited. Please refer to the license agreement for details.
Trademark Notices
Allen-Bradley, ControlLogix, eProcedure, FactoryTalk, Rockwell Automation, Rockwell Software,
RSBizWare, RSBizWare BatchHistorian, RSBizWare Historian, RSBizWare MaterialTrack, and RSLinx
are trademarks of Rockwell Automation, Inc.
Any Rockwell Automation software or hardware not mentioned here is also a trademark, registered or
otherwise, of Rockwell Automation, Inc.
Other Trademarks
Warranty
ActiveX, Microsoft, Microsoft Access, SQL Server, Visual Basic, Visual C++, Visual SourceSafe,
Windows, Windows Server-, Windows XP and Windows 7 are either registered trademarks or
trademarks of Microsoft Corporation in the United States and/or other countries.
Adobe, Acrobat, and Reader are either registered trademarks or trademarks of Adobe Systems
Incorporated in the United States and/or other countries.
All other trademarks are the property of their respective holders and are hereby acknowledged.
This product is warranted in accordance with the product license. The product’s performance may be
affected by system configuration, the application being performed, operator control, maintenance, and
other related factors. Rockwell Automation is not responsible for these intervening factors. The
instructions in this document do not cover all the details or variations in the equipment, procedure, or
process described, nor do they provide directions for meeting every possible contingency during
installation, operation, or maintenance. This product’s implementation may vary among users.
This document is current as of the time of release of the product; however, the accompanying software
may have changed since the release. Rockwell Automation, Inc. reserves the right to change any
information contained in this document or the software at anytime without prior notice. It is your
responsibility to obtain the most current information available from Rockwell when installing or using
this product.
Table of Contents
Chapter 1
How to Use this Guide
Getting started ........................................................................................................ 9
Select a chapter for each computer ...................................................................... 9
Examples............................................................................................................ 9
Chapter 2
What’s new in this release
New system requirements ................................................................................... 11
FactoryTalk Batch product enhancements ...................................................... 12
FactoryTalk Batch Equipment Editor ....................................................... 12
FactoryTalk Batch Recipe Editor ............................................................... 13
FactoryTalk Batch Server ............................................................................. 14
FactoryTalk Event Archiver ........................................................................ 15
Chapter 3
System requirements
System Requirements ........................................................................................... 17
Configuration requirements for Windows Server 2008 ........................ 19
Tested third-party software ......................................................................... 21
Chapter 4
Setting Up a FactoryTalk
Batch System
FactoryTalk Batch component integration ..................................................... 23
Server placement guidelines ................................................................................ 24
FactoryTalk Activation ....................................................................................... 24
Cumulative unit licensing ............................................................................ 26
Chapter 5
Install FactoryTalk Batch
Server/Client
Before you install the FactoryTalk Batch Server/Client ............................... 28
Configure the operating system .................................................................. 28
Install Microsoft Visual Basic (optional) .................................................. 30
Install SQL Server (optional) ...................................................................... 30
Set up security ................................................................................................ 31
Identify FactoryTalk Batch Server names ................................................. 31
Log on to Windows....................................................................................... 31
Enable the Windows Firewall ..................................................................... 31
Configure Batch Server to run in a Workgroup ...................................... 33
Install the FactoryTalk Batch Server/Client ................................................... 35
Rockwell Automation Publication BATCH-IN011C-EN-P November 2014
5
Table of Contents
Install the FactoryTalk Services Platform ................................................. 35
Installing FactoryTalk Activation Manager ............................................. 37
Install the FactoryTalk Batch products ..................................................... 38
After you install the FactoryTalk Batch Server/Client.................................. 41
Set system date and time............................................................................... 41
Modify event log settings ............................................................................. 41
Create a shared directory .............................................................................. 41
Set security on the Logs and Journals folders ........................................... 42
Configure the Server options ...................................................................... 42
Define redundant servers ............................................................................. 42
Configure the Windows Firewall (optional) ............................................ 43
Create an area model..................................................................................... 43
Create recipes ................................................................................................. 43
Install a loopback adapter (optional) ......................................................... 43
Chapter 6
Install FactoryTalk Batch
Clients
Before you install the FactoryTalk Batch Client ............................................ 46
Install operating system ................................................................................ 46
Install Microsoft Visual Basic (optional) .................................................. 46
Set up security ................................................................................................ 47
Identify server names .................................................................................... 47
Log on to Windows....................................................................................... 47
Enable the Windows Firewall ..................................................................... 47
Install the FactoryTalk Batch Clients ............................................................... 48
Install the FactoryTalk Services Platform ................................................. 48
Install the FactoryTalk Batch Client ......................................................... 50
After you install the FactoryTalk Batch Client ............................................... 52
Set system date and time............................................................................... 52
Modify event log settings ............................................................................. 52
Modify local security policy settings........................................................... 52
Create a shared directory .............................................................................. 53
Configure the Windows Firewall (optional) ............................................ 53
Install a loopback adapter (optional) ......................................................... 53
Appendix A
Uninstalling the FactoryTalk
Batch applications
Backing up your files ............................................................................................ 55
Uninstalling Batch components ........................................................................ 56
Allow the Message Queue to clear .............................................................. 57
Disable the Material Server .......................................................................... 57
Disable COM+ Security and shut down the COM+ application ....... 57
6
Rockwell Automation Publication BATCH-IN011C-EN-P November 2014
Table of Contents
Run the Uninstall program.......................................................................... 58
Delete the COM+ application ................................................................... 59
Delete the account profile running Material Manager ........................... 59
Delete the default directories ...................................................................... 60
Remove Registry subkeys.............................................................................. 60
Appendix B
Troubleshooting your
installation
Running the FactoryTalk Directory Configuration Wizard........................ 61
Communications with Batch Server timing out ............................................. 63
Windows XP Clients cannot communicate with Batch Server ................... 64
Batch Server service user account change .................................................. 64
Appendix C
Installing a loopback adapter
Windows Server 2008 & Windows 7 ............................................................... 65
Windows XP ......................................................................................................... 65
Index
Rockwell Automation Publication BATCH-IN011C-EN-P November 2014
7
Chapter 1
How to Use this Guide
This guide provides the information and procedures you need for installing
FactoryTalk® Batch.
Getting started
Before installing your FactoryTalk Batch system, read the first four chapters of
this guide to become familiar with the new features and system requirements for
FactoryTalk Batch version 12.
Chapter 2 contains highlights of the new features, including any new operating
system requirements, and a description of each new feature and new user interface
element.
Review the system requirements in Chapter 3 for important hardware, software,
and operating system requirements in version 12.
Finally, review Chapter 4 which outlines server placement guidelines and
information about implementing your FactoryTalk Batch system.
Select a chapter for each
computer
Refer to Chapters 5 and 6 for specific installation procedures. For each computer
in your FactoryTalk Batch system, select the chapter that most closely describes
the FactoryTalk Batch products you are installing on that computer. Depending
on your FactoryTalk Batch system configuration, you may follow a different
chapter for each computer in your system, or you may find that you will repeat the
instructions in one chapter for several computers.
Begin your installation with the computers where you will install your
FactoryTalk Batch servers. After the servers are installed, install the FactoryTalk
Batch Client components on your client computers.
Examples
If, for example, your FactoryTalk Batch system will include a FactoryTalk Batch
Server and FactoryTalk Batch Client on one computer, and the FactoryTalk
Batch Client on several other computers, decide in advance on which computer
you will install each component. Next, read the corresponding chapters most
closely resembling the FactoryTalk Batch product configuration of each computer
in your FactoryTalk Batch system.
Rockwell Automation Publication BATCH-IN011C-EN-P November 2014
9
Chapter 1
How to Use this Guide
The following table shows a FactoryTalk Batch system with the corresponding
chapter for each computer:
10
Computer
Components
Reference
1
FactoryTalk Batch Server
FactoryTalk Batch Client
Chapter 5 "Install FactoryTalk
Batch Server/Client (on page 27)”
2 and 3
FactoryTalk Batch Client
Chapter 6 "Install FactoryTalk
Batch Clients (on page 45)”
Rockwell Automation Publication BATCH-IN011C-EN-P November 2014
Chapter 2
What’s new in this release
The following sections describe new features that have been added to the
FactoryTalk Batch products, including FactoryTalk eProcedure and FactoryTalk
Material Manager:
New system requirements
•
New system requirements
•
FactoryTalk Batch product enhancements (on page 12)
•
FactoryTalk Batch Equipment Editor (on page 12)
•
FactoryTalk Batch Recipe Editor (on page 13)
•
FactoryTalk Event Archiver (on page 15)
Windows® Server 2008 is required to run the FactoryTalk Batch, FactoryTalk
eProcedure and FactoryTalk Batch Material Manager Servers.
•
If you are using a 32-bit computer, use Windows Server 2008 SP2
•
If you are using a 64-bit computer, use Windows Server 2008 R2 SP1 or
later
•
The FactoryTalk Batch, FactoryTalk eProcedure and FactoryTalk Batch
Material Manager clients can be installed and run on English only versions
of Windows Server 2008, Windows 7 (64-bit), and Windows XP
Professional SP3 (32-bit)
If you choose to use SQL Server, the supported versions are as follows:
•
SQL Server 2012 (32- or 64-bit, English version only)
•
SQL Server 2008 R2 Standard Edition (32- or 64-bit, English version only)
FactoryTalk Batch version 12 components require:
•
FactoryTalk Services Platform version 2.60.00.12 (CPR 9 SR6)
•
FactoryTalk Activation version 3.60
Rockwell Automation Publication BATCH-IN011C-EN-P November 2014
11
Chapter 2
What’s new in this release
FactoryTalk Batch product
enhancements
FactoryTalk Batch includes these new features:
•
Recipe Approvals is a process to validate the development and
maintenance of batch recipes. Using signature certification, the recipe
approvals process safeguards the design workflow in a formalized manner.
•
Recipe Version Control provides a recipe file naming and numbering
convention that enforces orderly check in, check out, import, export, and
obsolescence of recipe versions.
•
Security Authority secures intellectual property in area models and recipes
to the FactoryTalk Network Directory security authority identifier (SAI).
Once secured, area models and recipes can only be opened, edited, and used
under that particular SAI.
•
FactoryTalk Event Archiver with Reporting Services provides the
existing functionality of the former FactoryTalk Batch Archiver and
includes reports and presentation of historical data. This release features
enhancements to error detection, recovery, and robustness to ensure that
electronic batch records are properly archived.
FactoryTalk Batch Equipment Editor
The following enhancements and features have been added to the FactoryTalk
Batch Equipment Editor:
12
•
A process engineer can now configure a Recipe Approval process based on
a user-defined approval model, and save it as part of the area model. The
approval steps and their associated approval signatures are entered using the
Recipe Approvals Configuration dialog box. Selecting the Enable Recipe
Approvals check box in this dialog enables the configured recipe approval
process for all recipes built based on that area model.
•
Recipe versioning enhances management of recipes. A versioned recipe is a
saved, read-only snapshot of the recipe taken at a particular point in time.
Versioning is enabled or disabled for recipes associated with a particular area
model in the Server Options dialog box.
•
Security Authority secures area models to the FactoryTalk Network
Directory security authority identifier (SAI). Once secured, area models can
only be opened, edited, and used under that particular SAI.
Rockwell Automation Publication BATCH-IN011C-EN-P November 2014
What’s new in this release
Chapter 2
FactoryTalk Batch Recipe Editor
The following enhancements have been added to the FactoryTalk Batch Recipe
Editor:
•
Recipe Version control
Check In, Check Out, and Version history toolbar icons and menu
commands allow recipe authors to take recipe snapshots and mark them as
read-only (Check In), or create an editable copy of a checked in recipe
(Check Out), called a work-in-progress recipe (WIP). Recipe versioning:
•
•
Appends version information to the recipe basename to show version
number and status (read-only or editable).
•
Enforces assignment of unique recipe identifiers or basenames when a
new recipe or procedure is created.
•
Prompts the user to resolve version conflicts when importing and
exporting recipes.
Recipe Approval Process control
Recipe authors configure a Recipe Approval Process through the Primary
Approval and Expedited Approval dialog boxes:
•
The Primary Approval process comprises six approval steps, with
signoffs to either approve or revert approval.
•
The Expedited Approval process comprises only two steps: Release
Recipe to Step to quickly approve a recipe for inclusion in other
recipes; and Release Recipe to Production to approve it for inclusion
in the production recipe list in FactoryTalk Batch View, FactoryTalk
eProcedure, or FactoryTalk Batch ActiveX controls.
•
All approval steps can be reverted to allow both forward and reverse
progress through the approval process.
When Recipe Approval is enabled in the area model, recipes migrated from
a previous version of FactoryTalk Batch begin by default in the Expedited
Approval process. Recipe Editor assigns a new Release Recipe to Step
approval step to the recipe, and signs it automatically to provide
compatibility with previous versions of FactoryTalk Batch. If a migrated
recipe previously had its Release to Production property set to true, that
property is retained as a Release Recipe to Production approval step. In
both cases, these steps are shown as approved by the $System signer.
Rockwell Automation Publication BATCH-IN011C-EN-P November 2014
13
Chapter 2
What’s new in this release
•
Security Authority
Security Authority secures recipes to the FactoryTalk Network Directory
security authority identifier (SAI). Once secured, recipes can only be
opened, edited, and used under that particular SAI.
•
Expanded recipe filtering
Previously a recipe author could apply recipe type (operation, unit
procedure, and procedure) and recipe style (class or instance based) filters to
narrow a list of returned recipes when opening, importing, exporting,
removing, and printing recipes.
These new filters have been added:
•
•
Recipe Approval process type (Primary Approval or Expedited
Approval), step names, and their approval status (Not Started, In
Progress, Reverting, or Completed).
•
Recipe Version type (versioned, work in progress (WIP), or obsoleted)
and base name.
Expanded report generation
The Generate Reports command now appends the following data to recipe
reports:
•
Recipe Approval Process information
•
Current and previous recipe version information
•
Recipe Security Authority information
FactoryTalk Batch Server
With Security Authority enabled, when the FactoryTalk Batch Server starts, it
checks the security authority identifier in the area model against the security
authority identifier in the FactoryTalk Network Directory. If these identifiers do
not match, the Batch Server does not start.
If the security authority identifier in a recipe does not match the one in the
FactoryTalk Network Directory, that recipe cannot be added to the Recipe List
for production use.
14
Rockwell Automation Publication BATCH-IN011C-EN-P November 2014
What’s new in this release
Chapter 2
FactoryTalk Event Archiver
The FactoryTalk Batch Archiver is now called the FactoryTalk Event Archiver.
The FactoryTalk Event Archiver provides the existing archiving functionality of
the FactoryTalk Batch Archiver and also incorporates the option formerly called
Enhanced Reporting. The FactoryTalk Event Archiver has the following
configuration options:
•
FactoryTalk Event Archiver without Reporting Services – this
configuration option replaces the SQL script that was used to create the
BatchHistory SQL database.
•
FactoryTalk Event Archiver with Reporting Services – this configuration
option creates the BHBatchHistory SQL database, and populates that
database with the required tables, views, and stored procedures. It also
configures the SQL Reporting Services and provides basic reports that can
be used or customized to give basic or advanced reporting capabilities on
batch data.
The Event Archiver with or without Reporting Services options detect existing
BatchHistory or BatchHistoryEx databases and provides the option to migrate,
overwrite, or ignore those databases (depending on what is detected and which
setup option was selected).
The FactoryTalk Event Archiver transfers data from Batch Event journals into the
BATCHHIS SQL table. The Event Archiver distributes copies of the
BATCHHIS data into additional tables to provide the batch reporting capability
via the SQL Server Reporting Services (SSRS).
The Event Archiver with Reporting Services archives events from the Batch Server
into SQL database tables.
Rockwell Automation Publication BATCH-IN011C-EN-P November 2014
15
Chapter 3
System requirements
Review the following information before setting up your FactoryTalk Batch
system.
System Requirements
This section presents the minimum and recommended system requirements to
successfully install and run FactoryTalk Batch components.
•
These requirements assume that no other applications will be running on
the computer, unless listed in the Tested third-party software section.
•
A DVD-ROM drive is required for software installation.
•
Ensure that all selected hardware is on the compatibility list for any one of
the following:
•
Microsoft® Windows™ Server 2008 Service Pack 2 (32-bit)
•
Microsoft Windows Server 2008 R2 Service Pack 1 (64-bit)
•
Windows XP™ Professional Service Pack 3 (32-bit)
•
Windows 7 Service Pack 1 (32- and 64-bit)
Systems that do not meet the minimum requirements for the version of
software being used are not covered under warranty.
Important:
•
FactoryTalk Batch components version 12.0 are supported in U.S. English only. You must
install the English language version of Windows Server 2008, SQL Server (if used),
Windows XP Professional, or Windows 7 to ensure proper operation of FactoryTalk Batch,
FactoryTalk eProcedure, or FactoryTalk Batch Material Manager.
The FactoryTalk Batch Server computer cannot be configured as a:
•
Domain Controller
•
DHCP Server
•
WINS Server
•
RAS Server
•
DNS Server
•
Master Browser
Rockwell Automation Publication BATCH-IN011C-EN-P November 2014
17
Chapter 3
System requirements
•
Replication cannot be enabled on the FactoryTalk Batch Server computer.
•
Install FactoryTalk Batch software on an NTFS formatted hard drive, as
Windows security features are available only for drives formatted to use
NTFS.
Important:
Systems with modified DCOM configuration settings are not covered under warranty. Configuring
settings using DCOMCNFG may stop the FactoryTalk Batch Server and prevent the FactoryTalk
Batch Service Manager from functioning correctly.
Important:
Windows security mandates that the domain name and server name must contain only
alphanumeric characters (including "-" or "."). Internet Explorer blocks cookies from a server if the
server name contains other characters, such as an underscore character ("_"). If a server or domain
name does contain illegal characters, the eProcedure Client will not retain the logged on user's
name.
The following is a list of the hardware and software required to install and use
FactoryTalk Batch. The requirements listed are the minimum tested (and
therefore supported) requirements.
Server
Client
Operating System
Windows Server 2008 R2 SP1, Windows XP SP3
64-bit; English only
32-bit; English only
or
Windows Server 2008 SP2,
32-bit; English only
Windows 7 SP1 32- and 64bit; English only
Computer
2.8 GHz processor or greater,
including hyper-threading
models
1.8 GHz processor or greater
2.6 GHz processor or greater )
Memory
4 GB RAM
(minimum)
1 GB RAM (2 GB RAM
recommended)
2 GB RAM (minimum)
Available Hard
Disk Space
30 GB
(60 GB recommended)
12 GB
(24 GB recommended)
15 GB
(30 GB recommended)
Hard Disk Format
Disk Drive(s)
18
NTFS
DVD-ROM drive and a hard disk (SCSI or faster)
Monitor
SVGA TrueColor with 2 MB of video RAM and 1024 x 768 resolution
Mouse
Microsoft Mouse, Microsoft IntelliMouse® or compatible pointing device
Browser
Internet Explorer 8, 9 (U.S. English)
Rockwell Automation Publication BATCH-IN011C-EN-P November 2014
System requirements
Server
Operating System
SQL Server Options
Chapter 3
Client
Windows Server 2008 R2 SP1, Windows XP SP3
64-bit; English only
32-bit; English only
or
Windows Server 2008 SP2,
32-bit; English only
Windows 7 SP1 32- and 64bit; English only
SQL Server 2012, 32-bit or 64-bit, English only
SQL Server 2008 R2 Standard Edition, 32-bit, English only
SQL Server 2008 R2 Standard Edition, 64-bit, English only
Network
Network Protocol
Backup
Other Software
10 Megabit or faster Ethernet card, network cable
TCP/IP
Removable media device such as a DVD-RW drive
FactoryTalk Batch, FactoryTalk Batch Material Manager, and FactoryTalk eProcedure are not
warranted to run with any other third-party software installed on the same PC, unless otherwise
stated in writing by Rockwell Automation. (See “Tested third-party software” for more
information.)
Configuration requirements for Windows Server 2008
FactoryTalk Batch version 12.0 requires a specific configuration of the Microsoft
Windows Server 2008 (English) operating system, as well as Microsoft SQL Server
2008 or 2012 for use with the Material Manager. SQL Server can reside on the
same computer as the Batch Server but this is neither required nor recommended.
Important:
FactoryTalk Batch components version 12.0 are supported in U.S. English only. You must install the
English language version of Windows Server 2008, Windows XP Professional, or Windows 7 to
ensure proper operation of FactoryTalk Batch, FactoryTalk eProcedure, or FactoryTalk Batch Material
Manager. Modifying regional settings is not supported.
Rockwell Automation Publication BATCH-IN011C-EN-P November 2014
19
Chapter 3
System requirements
The only configurations that are tested, and therefore warrantied, by Rockwell
Automation are as follows:
Component
Version and Requirements
Operating System Servers
• English only: Microsoft Windows Server 2008 R2 Service Pack 1 (64-bit) and Windows Server
2008 Service Pack 2 (32-bit)
• Internet Explorer 8, 9
• Install the operating system using the default selections with the following exception:
− Add the Application Server role and Internet IIS 7.0 role (32-bit) or IIS 7.5 role (64-bit).
− For eProcedure Server installations, enable both ASP and IIS6 Metabase Compatibility role
services.
− Add Microsoft Message Queuing Service (if FactoryTalk Batch Material Manager is being
installed anywhere in the Batch system).
Clients
• English only: Windows XP Professional SP3 (32-bit) and Windows 7 SP1 (32- and 64-bit)
• Internet Explorer 8, 9
• Install the operating system using the default selections
Important:
20
It is highly recommended that you use the default installation directories for all components. The
application, test suite, and associated documentation assume default directories are used. Extensive
unit and system testing by Rockwell Automation ensures that all components function as one
solution after the application is configured.
Rockwell Automation Publication BATCH-IN011C-EN-P November 2014
System requirements
Chapter 3
Tested third-party software
The following software has been tested with the current version of FactoryTalk
Batch components.
Microsoft
•
Internet Explorer 8 or 9
•
Microsoft Office 2010
•
Visual Basic 6.0, Service Pack 6
•
SQL Server 2008 R2, Standard Edition, (English version only), or SQL
Server 2012 (English version only)
Adobe
•
Acrobat Reader XI (11)
Rockwell Software
•
Logix Designer (formerly RSLogix 5000) version 21
•
RSLinx Classic version 3.60
•
RSLinx Enterprise version 5.60
•
FactoryTalk Activation version 3.60
•
FactoryTalk Services Platform version 2.60.00.12 (CPR 9 SR6)
•
FactoryTalk View SE version 6.0 or 7.0
Anti-virus software
All Rockwell Software products in this release have been tested using the latest
anti-virus software. For more detailed information, refer to Rockwell Automation
Knowledgebase technical note ID 35330
https://rockwellautomation.custhelp.com/app/answers/detail/a_id/35330. You
may be required to log into the Rockwell Automation Knowledgebase before you
can view the information.
Rockwell Automation Publication BATCH-IN011C-EN-P November 2014
21
Chapter 4
Setting Up a FactoryTalk Batch System
Please review the following information before setting up your FactoryTalk Batch
system.
FactoryTalk Batch
component integration
FactoryTalk Batch components are completely open, configurable products that
help you define, manage, monitor and control manufacturing at local or remote
sites. A typical FactoryTalk Batch architecture consists of one or more computers
on a single network. The following diagram gives an example of a possible
FactoryTalk Batch network:
Rockwell Automation Publication BATCH-IN011C-EN-P November 2014
23
Chapter 4
Setting Up a FactoryTalk Batch System
Server placement
guidelines
There are a few guidelines to consider when deciding where to place your servers
on the network.
•
Install the FactoryTalk eProcedure Server on the same computer as the
FactoryTalk Batch Server.
•
Install the FactoryTalk Batch Material Server on a computer with SQL
Server. Do not install the Material Server on the same computer as the
FactoryTalk Batch Server.
•
Up to ten FactoryTalk Batch Servers can exist in a FactoryTalk Batch
network.
The following table indicates the FactoryTalk Batch components that can reside
on the same computer. S represents the Server component and C represents the
Client component.
Important:
FactoryTalk Activation
Because of memory utilization, do not install the FactoryTalk eProcedure Client on
the same computer as the eProcedure and FactoryTalk Batch Servers.
FactoryTalk Activation is used to license FactoryTalk Batch, FactoryTalk
eProcedure and FactoryTalk Batch Material Manager.
Before you install the FactoryTalk Batch products you must install the
FactoryTalk Activation Server. The FactoryTalk Activation Server stores the
activation files needed to run FactoryTalk Batch, FactoryTalk eProcedure and
FactoryTalk Batch Material Manager. You can install the FactoryTalk Activation
Server on the same computer as the FactoryTalk Batch Server. The FactoryTalk
24
Rockwell Automation Publication BATCH-IN011C-EN-P November 2014
Setting Up a FactoryTalk Batch System
Chapter 4
Activation Manager installation includes the FactoryTalk Activation Server and
Client.
The FactoryTalk Batch Server computer requires the FactoryTalk Activation
Client to enable communication with the FactoryTalk Activation Server. If your
FactoryTalk Activation Server is not on the same computer as the FactoryTalk
Batch Server then you must install the FactoryTalk Activation Client on the
FactoryTalk Batch Server computer.
Rockwell Automation Publication BATCH-IN011C-EN-P November 2014
25
Chapter 4
Setting Up a FactoryTalk Batch System
Activation files are obtained in one of the following ways:
•
Go to the Rockwell Software licensing website
(https://licensing.software.rockwell.com)
•
Use the FactoryTalk Activation Tool on a computer that has internet
access.
•
No internet access: Call Rockwell Automation Technical Support to obtain
an activation file via e-mail or fax.
Cumulative unit licensing
Software licenses are split into a product license and a number of unit licenses. For
example, if you purchased a 30-unit FactoryTalk Batch product, you actually get
the 30-unit Batch Server license that is currently shipped and 30 new unit licenses.
When the Batch Server is started, it performs a license check. As a result of the
license check, the Batch Server determines which applications have a license. It
then attempts to check out individual unit licenses up to the number of units
specified in the area model. The Batch Server will then set the maximum number
of allowable units to the total number of successful individual unit license
checkouts. It also checks for FactoryTalk eProcedure, and FactoryTalk Batch
Material Manager licenses, as necessary.
For example: A plant needs two Batch Servers; one requires automation phases
and seven units while the other needs manual and automation phases with 33
units. Using cumulative unit licensing, you can purchase one 30-unit combined
Batch and eProcedure (you get a 30-unit combined Batch Server/eProcedure
license and 30 individual unit licenses) and a 10-unit Batch (you get a Batch Server
license and 10 individual unit licenses). This results in a total of 40 unit licenses.
The first Batch Server checks its area model upon startup calculating the number
of units to check out (seven). The Batch Server also determines if it needs a Batch
Server license (for automation phases), an eProcedure license (for manual phases)
or both. Finding no manual phases, the first Batch Server checks out a Batch
Server license and seven unit licenses.
The second Batch Server checks its area model upon startup calculating the
number of units to check out (33). The Batch Server also determines if it needs a
Batch Server license (for automation phases), an eProcedure license (for manual
phases) or both. Since both manual phases and automation phases are used in this
example, the second Batch Server checks out a combined Batch Server
license/eProcedure license and 33 individual unit licenses.
26
Rockwell Automation Publication BATCH-IN011C-EN-P November 2014
Chapter 5
Install FactoryTalk Batch Server/Client
This chapter instructs you in installing the FactoryTalk Batch Server and Client
software on the same computer. If you have already installed and configured a
FactoryTalk Batch Server computer and just want to install Client components on
a different computer, see “Install FactoryTalk Batch Clients (on page 45).”
There are setup procedures that must be completed before and after you install the
FactoryTalk Batch Server. The Server installation process is divided into three
categories:
•
Pre-Installation Procedures
•
Installation Procedures
•
Configure the FactoryTalk Batch Server/Client
Use the following checklist when installing the Server and Client:
Pre-Installation Procedures for
FactoryTalk Batch Server/Client
Install Operating System
Install Windows Server 2008, SP2
(32-bit) or Windows Server 2008, R2, SP1 (64-bit).
Install Microsoft Visual Basic
Install if you plan to develop with the ActiveX Controls
Library on the Batch Server Computer.
Install Microsoft SQL Server 2008
Install if recipes are stored in RDB format.
Set Up Security
Configure security for your FactoryTalk Batch System.
Identify Server Names
Identify the name of the computer where the FactoryTalk
Batch Server is installed.
Log on to Windows
Log on with Administrator privileges.
Enable Windows Firewall
Enable the firewall if you want the setup program to
populate the firewall exceptions.
Rockwell Automation Publication BATCH-IN011C-EN-P November 2014
27
Chapter 5
Install FactoryTalk Batch Server/Client
Install FactoryTalk Batch Server/Client
Install FactoryTalk Services Platform
Required for the FactoryTalk Batch components.
Install FactoryTalk Activation on the Batch Server
FactoryTalk Activation is used for licensing and must be
installed prior to installing the FactoryTalk Batch Server.
Install the FactoryTalk Batch Server/Client
Install the FactoryTalk Batch Server with the FactoryTalk
Batch Client Components.
Update Factory Talk Batch product policies
Required to ensure product policies are updated and all
patches are current.
Configure the FactoryTalk Batch Server/Client
Before you install the
FactoryTalk Batch
Server/Client
Set System Date and Time
Each computer in the FactoryTalk Batch System must be
set to the same date and time.
Modify Event Log Settings
Configure the Windows Application and System logs.
Create a Shared Directory
Skip this step if you installed your project files in the
default directory, BATCHCTL.
Set Security on Logs and Journal Folders
The system administrator determines who needs to
access these files and assign the appropriate permissions.
Configure the Server Options
Server Options are configured in the Equipment Editor.
Define Redundant Servers
Redundant Servers are defined in the Equipment Editor.
Create an Area Model
Complete this step on the FactoryTalk Batch Server
computer if you performed a full install.
Create Recipes
Complete this step on the FactoryTalk Batch Server
computer if you performed a full install.
Before you install the FactoryTalk Batch Server and Client you must install and
configure the Windows operating system, and install other third-party software
that will be used with your FactoryTalk Batch system.
Configure the operating system
For a FactoryTalk Batch Server or eProcedure Server installation, the Windows
Server 2008 (32-bit or 64-bit) operating system must be configured as an
Application Server to support FactoryTalk Batch communications. This setup
process is accomplished using the Windows Server Manager.
Important:
If you plan on installing eProcedure, you must select Webserver (IIS) and ASP.
1. After you log on to Windows, select Start > Administrative Tools >
Server Manager. The Server Manager opens.
28
Rockwell Automation Publication BATCH-IN011C-EN-P November 2014
Install FactoryTalk Batch Server/Client
Chapter 5
2. Select Roles in the left pane.
3. Select Add Roles in the right pane. The Add Roles Wizard opens.
4. On the Add Roles Wizard - Select Server Roles window, select
Application Server and Web Server (IIS) (required if eProcedure will be
installed on the server), and then click Next.
Tip:
You may be prompted about required features that must also be installed to support the application server.
If so, click the Add Required Features button to continue.
5. On the Add Roles Wizard - Application Server window, click Next.
6. On the Add Roles Wizard - Select Role Services window, select
Application Server Foundation and Web Server (IIS) Support (required
if eProcedure will be installed on the server), and then click Next.
Rockwell Automation Publication BATCH-IN011C-EN-P November 2014
29
Chapter 5
Install FactoryTalk Batch Server/Client
Tip:
You may be prompted about required features that must also be installed to support IIS. If so, click the Add
Required Features button to continue.
7. On the Add Roles Wizard - Web Server (IIS) window, click Next.
If you did not select Web Server (IIS) in step 6, skip to step 8.
8. On the Add Roles Wizard - Select Role Services window, select ASP near
the top of the list of services, scroll down through the list, select IIS 6
Metabase Compatibility, and then click Next. (Selecting ASP is required
if you are installing eProcedure on the server.)
9. On the On the Add Roles Wizard - Confirm Selections window, click
Install.
10. When prompted click Finish. Close the Administrative Tools dialog box.
11. When the roles and role features have been installed, click Close to exit the
wizard.
Install Microsoft Visual Basic (optional)
If you plan to develop with the ActiveX Controls Library, install Microsoft Visual
Basic.
Tip:
If you are using VB.NET with PC Based Phase Programming or ActiveX Controls, be aware that Report, Request,
and Parameter properties appear as Methods in the .NET environment. If you require further assistance,
contact Rockwell Support.
Install SQL Server (optional)
To store recipes in RDB format, install any one of the accepted versions of SQL
Server listed under “New system requirements (on page 11).” SQL Server services
must be running during the installation process. Restart the computer after the
SQL Server installation is complete.
30
Rockwell Automation Publication BATCH-IN011C-EN-P November 2014
Install FactoryTalk Batch Server/Client
Important:
Chapter 5
If you intend to store recipes in RDB format, you must create a SQL server database login for the
person performing the installation.
If you intend to store recipes (from the FactoryTalk Batch Recipe Editor), on a remote SQL Server, you
must add TCP Port 1433 as an exception in the Windows Firewall.
Set up security
If you are installing the FactoryTalk Batch Server on a domain, create a domain
user account for the Server to use. If the Server is using a local account, you must
create Windows accounts with the same name and password on all computers in
the workgroup.
FactoryTalk Security is used to support the FactoryTalk Batch Clients. If you
want to enable security refer to FactoryTalk Batch Security in the FactoryTalk
Batch Administrator’s Guide.
Identify FactoryTalk Batch Server names
The setup program prompts you for the Domain or Workgroup name and the
FactoryTalk Batch Server user account name and password.
Log on to Windows
Log on to Windows Server with administrator privileges. Close any open
applications.
Important:
You must have administrative privileges on the target computer to install or upgrade
FactoryTalk Batch.
Enable the Windows Firewall
If you want the installation program to populate the firewall exceptions
automatically, you must first enable Windows Firewall Service prior to running
the installation. This allows the Firewall Configuration Utility to add the
necessary exceptions.
Tip:
You must enable the service on both the Server and Client computers.
Rockwell Automation Publication BATCH-IN011C-EN-P November 2014
31
Chapter 5
Install FactoryTalk Batch Server/Client
On Windows Server 2008 and Windows 7:
1. From the Start menu, select Control Panel > Windows Firewall. The
Windows Firewall dialog box opens.
2. If the Firewall is off, select Turn Windows Firewall On or Off. The
Windows Firewall Settings dialog box opens.
3. Click OK, and then close the dialog box.
Tip:
If the Windows Firewall was not enabled before installing your Batch applications, run the FactoryTalk
Windows Firewall Configuration Utility on each computer in your Batch system to add the required
exceptions.
On Windows XP:
1. From the Start menu, select Control Panel > Windows Firewall. The
Windows Firewall Settings dialog box opens.
2. Click OK.
Tip:
If the Windows Firewall was not enabled before installing your Batch applications, run the FactoryTalk
Windows Firewall Configuration Utility on each computer in your Batch system to add the required
exceptions.
For a complete list of the exceptions added to Windows Firewall during
FactoryTalk Batch component installation, see the FactoryTalk Batch
Administrator’s Guide.
32
Rockwell Automation Publication BATCH-IN011C-EN-P November 2014
Install FactoryTalk Batch Server/Client
Chapter 5
Configure Batch Server to run in a Workgroup
If you are upgrading FactoryTalk Batch, eProcedure, or Material Manager Servers
running on a Windows Workgroup, there are two additional items you must
configure:
•
Add an incoming firewall rule
•
Disable Administrative Approval Mode
Add an incoming firewall rule
If you are running on a Workgroup, you must add an Incoming Firewall Rule to
allow the Batch Service Manager to connect to the server in a timely manner.
On the computer where the Batch Server has been installed:
1. From the Start menu, select All Programs > Administrative Tools >
Windows Firewall with Advanced Security.
2. Select Inbound Rules, right-click Inbound Rules, and then select New
Rule. The New Inbound Rule Wizard opens.
3. On Rule Type window, select Port and click Next.
4. If not already selected, select TCP and type 49157 in the Specific local
ports box. Click Next.
Rockwell Automation Publication BATCH-IN011C-EN-P November 2014
33
Chapter 5
Install FactoryTalk Batch Server/Client
5. Select Allow the connection and click Next.
6. Select all profiles (Domain, Private, Public) and click Next.
7. Type Port 49157 TCP in the Name box, and then click Finish.
8. Verify that the Port 49157 TCP rule was added to the Inbound Rules list:
9. Close the Windows Firewall with Advanced Security window.
Disable Administrative Approval Mode
You must also disable Administrative Approval Mode for all Administrators on
the Server computer when running in a Workgroup configuration. On the
computer where the Batch Server has been installed:
1. From the Start menu, select All Programs > Administrative Tools >
Local Security Policy.
34
Rockwell Automation Publication BATCH-IN011C-EN-P November 2014
Install FactoryTalk Batch Server/Client
Chapter 5
2. Expand Local Polices and click Security Options.
3. Scroll down to User Access Control: Run All Administrators in Admin
Approval Mode and double-click it.
4. On the Local Security Setting tab, select Disabled and click OK.
5. Verify that User Access Control: Run All Administrators in Admin
Approval Mode is now set to Disabled.
6. Close the Local Security Policy window.
Install the FactoryTalk
Batch Server/Client
These instructions assume that you are installing the FactoryTalk Batch Server
computer on a network with other FactoryTalk Batch Client computers. Before
you begin the installation, complete all the pre-installation procedures. You can
exit installation at any time by clicking the Cancel button.
Install the FactoryTalk Services Platform
You must install the FactoryTalk Services Platform before installing FactoryTalk
Batch, FactoryTalk eProcedure or FactoryTalk Batch Material Manager.
1. Insert the FactoryTalk Batch product installation CD into the CD-ROM
drive. The installation process starts automatically.
Tip:
To start installation manually, click the Start button, and then select Run. In the Run dialog box, type
d:\setup (where d is the drive letter for the CD-ROM drive), and then click OK.
Rockwell Automation Publication BATCH-IN011C-EN-P November 2014
35
Chapter 5
Install FactoryTalk Batch Server/Client
2. In the Welcome dialog box, click Install FactoryTalk Components. The
FactoryTalk Component Installation dialog box opens.
3. Click Install FactoryTalk Services Platform. The FactoryTalk Services
Platform dialog box opens.
Tip:
If FactoryTalk Diagnostics is not installed, you are prompted to install it.
4. Click Next.
5. In the License Agreement dialog box, read the license agreement, and then
select I accept the terms in the license agreement. Click Next.
6. In the Setup Type dialog box, select Standard (if it is not already selected),
and then click Next.
7. Click Install.
After a few moments, the Configuring FactoryTalk Directory progress
box opens. It shows you that any existing FactoryTalk Directories have been
backed up, the backup file name(s), and the path to the backup files.
Tip:
36
The FactoryTalk Directory is configured during the installation process. It can be run manually, however, if
you need to define or reset a disabled Administrator account. (See “Running the FactoryTalk Directory
Configuration Wizard (on page 61)” for more information.)
Rockwell Automation Publication BATCH-IN011C-EN-P November 2014
Install FactoryTalk Batch Server/Client
Chapter 5
8. Click Finish, and then click Yes to restart your computer (if prompted to
do so).
Tip:
For more detailed information on FactoryTalk Directory installation and configuration, you can view the
FactoryTalk Administration Console help file (FTAdminEN.chm) located in C:\Program Files\Common
Files\Rockwell\Help.
Installing FactoryTalk Activation Manager
You can install FactoryTalk Activation Manager on any computer in your domain
(or workgroup). Downloaded licenses will reside on that computer.
1. In the Welcome to FactoryTalk Batch dialog box, click Install
FactoryTalk Components. The FactoryTalk Components Installation
dialog box opens.
Tip:
If you restarted your computer after installing the FactoryTalk Services Platform, click the Start button and
select Run. In the Run dialog box, type d:\setup (where d is the drive letter for the CD-ROM drive), and
then click OK. Click Install FactoryTalk Components.
2. Click Install FactoryTalk Activation Manager. The InstallShield wizard
opens.
3. Click Install. The FactoryTalk Activation Manager dialog box for installing
the HASP (dongle) driver opens. Depending on your machine's
configuration, you may also be prompted to install other prerequisites.
4. Click Yes to install additional components as desired, or click No to
continue.
5. In the FactoryTalk Activation Manager InstallShield Wizard, click
Next. The End User License Agreement dialog box opens.
6. Read the license agreement and select I accept the terms in the license
agreement. Click Next.
7. Click Install. After the installation is finished, the FactoryTalk Activation
Manager InstallShield Wizard Completed dialog box opens.
8. If prompted, follow the instructions in the dialog box to activate your
products.
9. Click Finish.
Important:
Use the FactoryTalk Activation tool to obtain activations from the Rockwell Software
Activation website. Please refer to the Activate Rockwell Software Products brochure provided
in your product package for more information.
Rockwell Automation Publication BATCH-IN011C-EN-P November 2014
37
Chapter 5
Install FactoryTalk Batch Server/Client
Install the FactoryTalk Batch products
1. On the Welcome to FactoryTalk Batch dialog box, click Install
FactoryTalk Batch (click Back to return to the Welcome dialog box, if
necessary). The FactoryTalk Batch Installation dialog box opens.
Important:
If the installation program detects an existing FactoryTalk Batch installation, it gives you the
option to remove the current installation. You must remove the existing version of the software
before installing the upgrade. See “Uninstalling the FactoryTalk Batch Applications (on page 55)”
for instructions on removing the current installed version.
2. Click Install FactoryTalk Batch to start the installation process. The
FactoryTalk Batch InstallShield Wizard opens. Click Next.
3. In the License Agreement dialog box, read the license agreement, and then
select I accept the terms in the license agreement. Click Next.
4. The FactoryTalk Directory Selection dialog box opens.
5. Select the desired FactoryTalk Directory (typically Network Directory, the
default). Click Next.
38
Rockwell Automation Publication BATCH-IN011C-EN-P November 2014
Install FactoryTalk Batch Server/Client
Chapter 5
6. In the Customer Information dialog box, enter your name and
organization, and click Next.
7. In the Custom Setup dialog box, if you do not want to install the editors on
the Batch Server, disable Client Components.
Important:
Tip:
We recommend installing the Client on the Batch Server computer because you must configure
the Server Options, which are located in the FactoryTalk Batch Equipment Editor Client.
The default installation directory is C:\Program Files (x86)\Rockwell Software\Batch. To set a different
directory, click the Change button, select the desired directory, and click OK.
8. Click Space (near the bottom of the dialog box) to see if there is enough
disk space to install the selected options. The Disk Space Requirements
dialog box opens. If there is not enough disk space, the drive is highlighted.
9. Click OK. If there was not enough disk space, click Change to select a
different drive (or move or delete files from the selected drive), and
continue with the installation.
10. Click Next.
11. The System Setup dialog box opens.
•
If you are installing this as part of an existing FactoryTalk Batch system,
select Yes, I am adding this computer to an existing FactoryTalk
Batch System. Click Next. The Existing Server Details dialog box
opens. Enter the Server Node Name. Click Next.
•
If you are installing the FactoryTalk Batch module software for the first
time, select No, this will be the first computer in a FactoryTalk
Batch System. Click Next.
12. The Domain/Workgroup Details dialog box opens. Select Domain or
Workgroup to indicate how you are installing the Batch Server.
Rockwell Automation Publication BATCH-IN011C-EN-P November 2014
39
Chapter 5
Install FactoryTalk Batch Server/Client
Tip:
The FactoryTalk Batch Server user account is added to the batchsvr_group, the Administrators group, the
FactoryTalk Event Archiver Service, and to the FactoryTalk Batch Server Service on the local computer.
13. If the FactoryTalk Batch Server runs under a domain account:
•
Enter the Domain name in the Domain/Workgroup Name box.
•
Complete the User Name and Password boxes for the Batch Server’s
domain account.
If the Server runs under a workgroup account:
•
Enter the Workgroup name in the Domain/Workgroup Name box.
•
Complete the User Name and Password boxes for the Batch Server’s
workgroup account.
Tip:
If you are in a Workgroup, please see “Configure Batch Server to run in a Workgroup” after the Batch Server
and Clients have been installed for instructions on configuring the Batch Server to operate properly in a
Workgroup setting.
14. Click Next. The Microsoft SQL Server Recipe Storage dialog box opens.
15. In the Microsoft SQL Server Recipe Storage dialog box, indicate how you
want to store recipe files:
•
To store recipes in SQL Server, select Yes, I want to store recipes in
SQL Server. You must have SQL Server installed before selecting this
option. If SQL Server is not installed, click Cancel, install a supported
SQL Server, restart the computer, and then install FactoryTalk Batch.
•
If you do not want to use SQL Server to store recipes, select No, I do
not want to store recipes in SQL Server. Click Next. Your recipes are
stored as binary files.
•
If you want to have the SQL Server on a different computer than the
Batch Server, select No, I do not want to store recipes in SQL Server.
16. Click Next.
40
Rockwell Automation Publication BATCH-IN011C-EN-P November 2014
Install FactoryTalk Batch Server/Client
Chapter 5
17. In the Ready to Install the Program dialog box, verify your selections. If
anything is incorrect, click Back and make the appropriate corrections.
When you are ready to proceed, click Install.
18. The wizard notifies you when it has completed. Click Finish to close the
dialog box.
19. Click Home to install additional FactoryTalk Batch products, or Exit to
close the Install FactoryTalk Batch installer.
After you install the
FactoryTalk Batch
Server/Client
You are now ready to configure the Batch Server computer. The following
instructions are provided to assist you in this process.
Set system date and time
Each computer on the network must be set to the same date and time.
Modify event log settings
Configure the Windows Application and System logs to overwrite events as
needed. (See “Modifying event log settings” in the FactoryTalk Batch
Administrator’s Guide.)
Create a shared directory
If FactoryTalk Batch is installed in a networked environment, and you have
installed the project files to a directory that is not located in the BATCHCTL
share, you must create a share for that project directory. (See “Creating a shared
directory” in the FactoryTalk Batch Administrator’s Guide for information.)
Rockwell Automation Publication BATCH-IN011C-EN-P November 2014
41
Chapter 5
Install FactoryTalk Batch Server/Client
Set security on the Logs and Journals folders
The data in the log files and the event journals (.evt) files may be lost if security is
not administered correctly on these folders. Setting security permissions on the
folder is recommended. The system administrator determines who needs access to
these files and assigns the appropriate permissions. The account(s) under which
the FactoryTalk Batch Server and Archiver are running must be given full access to
these folders. (See “Setting security on folders or files” in the FactoryTalk Batch
Administrator’s Guide for more information.)
Configure the Server options
Prior to configuring the FactoryTalk Batch Server, ensure that all project
directories are shared. Configure the FactoryTalk Batch Server using the
FactoryTalk Batch Equipment Editor’s Server Options dialog box.
Tip:
Check the Server Options. If you copied over your backed-up batchsvr.ini file, all the information
you need is there. Check that it is correct for the operating system you are running.
Configure the FactoryTalk Batch Server to allow each network computer to read
from and write to the appropriate project directories, as well as the FactoryTalk
Batch Server and Archiver initialization files. (See “Working with the FactoryTalk
Batch Server” in the FactoryTalk Batch Administrator's Guide for information on
the Server Options dialog box.)
Define redundant servers
FactoryTalk Batch can be configured to store batch journals and batch restart
information in two separate locations. Using a secondary server allows you to
perform a manual failover if there is a hardware failure on the primary FactoryTalk
Batch Server computer. The second computer must be capable of running the
Server. Redundant servers are defined by specifying the primary and secondary
restart paths. These paths indicate where system files are written if the system
experiences a failure. If a secondary path is not specified, FactoryTalk Batch does
not write any secondary files. (See “Defining redundant servers” in the FactoryTalk
Batch Administrator’s Guide for information.)
Tip:
42
You must install area model and all recipe files on both the primary server and the secondary server. You also
must move activation files to the redundant server.
Rockwell Automation Publication BATCH-IN011C-EN-P November 2014
Install FactoryTalk Batch Server/Client
Chapter 5
Configure the Windows Firewall (optional)
On Windows Server 2008 with the Windows Firewall enabled: If you want to use
the firewall after the FactoryTalk Batch or FactoryTalk eProcedure Server has
been installed, you must run the FactoryTalk Windows Firewall Configuration
Utility.
1. From the Start menu, select All Programs > Rockwell Software >
FactoryTalk Tools, and then click Windows Firewall Configuration
Utility.
The configuration utility starts. If the firewall has not been enabled, the
following dialog box may open. Click Yes to enable the firewall and
continue.
2. The utility configures the Windows Firewall, and the firewall is set to the
new state (if different).
Tip:
For a complete list of the exceptions made by the Windows Firewall Configuration Utility, refer to the
section “FactoryTalk Batch Windows firewall exceptions” in the FactoryTalk Batch Administrator’s Guide.
Create an area model
Open the FactoryTalk Batch Equipment Editor and then create your area model.
(See the FactoryTalk Batch Equipment Editor User’s Guide for more information.)
Create recipes
Open the FactoryTalk Batch Recipe Editor and then create your recipes. (See the
FactoryTalk Batch Recipe Editor User’s Guide for more information.)
Install a loopback adapter (optional)
You must install a loopback adapter if you are in a workgroup or if you may be
disconnected from the network on occasion (such as a laptop). See “Installing a
loopback adapter (on page 65)” for more information.
Rockwell Automation Publication BATCH-IN011C-EN-P November 2014
43
Chapter 6
Install FactoryTalk Batch Clients
This chapter instructs you in installing the FactoryTalk Batch Client software on
a computer other than the one on which the FactoryTalk Batch Server is installed.
If you have not yet installed and configured a FactoryTalk Batch Server computer,
refer to Chapter 5 (see "Install FactoryTalk Batch Server/Client" (on page 27).”
There are setup procedures that must be completed before and after you install the
FactoryTalk Batch Client Components. The Client installation process is divided
into the following three categories:
•
Pre-Installation Procedures
•
Installation Procedures
•
Configure the FactoryTalk Batch Clients
Use the following checklist when installing the FactoryTalk Batch Clients.
Pre-Installation Procedures for a FactoryTalk Batch Clients
Install Operating System
Install one of the following:
• Either Windows Server 2008, Service Pack 2 (32-bit);
Windows Server 2008 R2, Service Pack 1 (64-bit)
or
• Windows XP SP3 (32-bit)
Windows 7 SP (64-bit)
Install Microsoft Visual Basic
If you plan to develop with the ActiveX Controls Library
on the client machine
Set Up Security
If the FactoryTalk Batch Server is using a local account,
add this account to all computers in the workgroup
Identify Server Names
Specify the name of the computer where the FactoryTalk
Batch Server is installed
Log on to Windows
Log on with administrator privileges
Enable Windows Firewall (optional)
Enable the firewall if you want the setup program to
populate the firewall exceptions
Rockwell Automation Publication BATCH-IN011C-EN-P November 2014
45
Chapter 6
Install FactoryTalk Batch Clients
Install FactoryTalk Batch Client
Installing the FactoryTalk Services Platform
Install the FactoryTalk Services Platform.
Install a FactoryTalk Batch Client
Install the FactoryTalk Batch Client components.
Update Factory Talk Batch product policies
Required to ensure product policies are updated and all
patches are current.
Configure the FactoryTalk Batch Clients
Before you install the
FactoryTalk Batch Client
Set System Date and Time
Each computer in the FactoryTalk Batch system must be
set the same.
Modify Event Log Settings
Configure the Windows Application and System logs.
Modify Local Policy Security Settings
Installing on a workgroup, setup users on the FactoryTalk
Batch Client computer.
Create a Shared Directory
Skip this step if you installed your project files in the
default directory, BATCHCTL.
Before you install the FactoryTalk Batch Clients you must install and configure
the Windows operating system, and install other third-party software that will be
used with your FactoryTalk Batch system.
Install operating system
For a FactoryTalk Batch Client only installation, install Microsoft Windows
Server 2008, Windows XP Professional, or Windows 7 (see “System Requirements
(on page 17)”).
Install Microsoft Visual Basic (optional)
If you plan to develop with the ActiveX Controls Library, install Microsoft Visual
Basic.
Tip:
46
If you are using VB.NET with PC Based Phase Programming or ActiveX Controls, be aware that Report, Request,
and Parameter properties appear as Methods in the .NET environment. If you require further assistance,
contact Rockwell Support.
Rockwell Automation Publication BATCH-IN011C-EN-P November 2014
Install FactoryTalk Batch Clients
Chapter 6
Set up security
If you are installing the FactoryTalk Batch Server on a domain, create a domain
user account for the Server to use. If the Server is using a local account, you must
create Windows accounts with the same name and password on all computers in
the workgroup.
FactoryTalk Security is used to support the FactoryTalk Batch Clients. If you
want to enable security refer to FactoryTalk Batch Security in the FactoryTalk
Batch Administrator’s Guide.
Identify server names
If you are installing just the FactoryTalk Batch Client components, the setup
program prompts you for the name of the computer where the FactoryTalk Batch
Server is installed.
Log on to Windows
Log on to Windows Server with administrator privileges. Close any open
applications.
Important:
You must have administrative privileges on the target computer to install or upgrade FactoryTalk
Batch.
Enable the Windows Firewall
If you want the installation program to populate the firewall exceptions
automatically, you must first enable Windows Firewall Service prior to running
the installation. This allows the Firewall Configuration Utility to add the
necessary exceptions.
Tip:
You must enable the service on both the Server and Client computers.
On Windows Server 2008 and Windows 7:
1. From the Start menu, select Control Panel > Windows Firewall. The
Windows Firewall dialog box opens.
2. If the Firewall is off, select Turn Windows Firewall On or Off. The
Windows Firewall Settings dialog box opens.
Rockwell Automation Publication BATCH-IN011C-EN-P November 2014
47
Chapter 6
Install FactoryTalk Batch Clients
3. Click OK, and then close the dialog box.
Tip:
If the Windows Firewall was not enabled before installing your Batch applications, run the FactoryTalk
Windows Firewall Configuration Utility on each computer in your Batch system to add the required
exceptions.
On Windows XP:
1. From the Start menu, select Control Panel > Windows Firewall. The
Windows Firewall Settings dialog box opens.
2. Click OK.
Tip:
If the Windows Firewall was not enabled before installing your Batch applications, run the FactoryTalk
Windows Firewall Configuration Utility on each computer in your Batch system to add the required
exceptions.
For a complete list of the exceptions added to Windows Firewall during
FactoryTalk Batch component installation, see the FactoryTalk Batch
Administrator’s Guide.
Install the FactoryTalk
Batch Clients
These instructions assume that you are installing the FactoryTalk Batch Clients
on a computer networked with other FactoryTalk Batch system computers.
Before you begin the installation, complete the pre-installation procedures. You
can exit installation at any time by clicking the Cancel button.
Install the FactoryTalk Services Platform
You must install the FactoryTalk Services Platform before installing
FactoryTalk Batch, FactoryTalk eProcedure, or FactoryTalk Batch Material
Manager.
1. Insert the FactoryTalk Batch product installation CD into the CD-ROM
drive. The installation process starts automatically.
Tip:
48
To start the installation manually, click the Start button, and then select Run. In the Run dialog box, type
d:\setup (where d is the drive letter for the CD-ROM drive), and then click OK.
Rockwell Automation Publication BATCH-IN011C-EN-P November 2014
Install FactoryTalk Batch Clients
Chapter 6
2. In the Welcome dialog box, click Install FactoryTalk Components. The
FactoryTalk Component Installation dialog box opens.
3. Click Install FactoryTalk Services Platform. The FactoryTalk Services
Platform dialog box opens.
Tip:
If the Microsoft .NET Framework is not already installed, you are prompted to install it. After it is installed,
the FactoryTalk Services Platform dialog box opens.
4. Click Next.
5. In the License Agreement dialog box, read the license agreement, and select
I accept the terms in the license agreement. Click Next.
6. In the Setup Type dialog box, select Standard (if it is not already selected),
and click Next.
7. Click Install.
After a few moments, the Configuring FactoryTalk Directory progress
box opens. It shows you that any existing FactoryTalk directories have been
backed up, the backup file name(s), and the path to the backup files.
Tip:
The FactoryTalk Directory is configured during the installation process. The FactoryTalk Directory Wizard
can be run manually, however, if you need to define or reset a disabled Administrator account. (See
“Running the FactoryTalk Directory Configuration Wizard (on page 61)” for more information.)
Rockwell Automation Publication BATCH-IN011C-EN-P November 2014
49
Chapter 6
Install FactoryTalk Batch Clients
8. Click Finish, and then click Yes to restart your computer (if prompted to
do so).
Tip:
For more detailed information on FactoryTalk Directory installation and configuration, you can view the
FactoryTalk Administration Console help file (FTAdminEN.chm) located in C:\Program Files
(x86)\Common Files\Rockwell\Help.
Install the FactoryTalk Batch Client
Tip:
Before installing the FactoryTalk Batch Client, you must install the FactoryTalk Services Platform on the
FactoryTalk Batch Client computer. The FactoryTalk Batch Server must be installed on the same computer as the
FactoryTalk Batch Client components or the FactoryTalk Batch Server must be installed on the FactoryTalk Batch
network before installing the FactoryTalk Batch Client components.
1. In the Welcome dialog box, click Install FactoryTalk Batch (click Back to
return to the Welcome dialog box, if necessary). The FactoryTalk Batch
Install Disk dialog box opens.
2. Click Install FactoryTalk Batch to start the installation process. The
FactoryTalk Batch InstallShield Wizard opens. Click Next.
If prompted to install the .NET 2.0 framework, please do so.
3. In the License Agreement dialog box, select I accept the terms in the
license agreement. Click Next.
4. The FactoryTalk Directory Selection dialog box opens.
5. Select the desired FactoryTalk directory (the default is Network), and click
Next.
6. In the Customer Information dialog box, enter your name and
organization, and click Next.
50
Rockwell Automation Publication BATCH-IN011C-EN-P November 2014
Install FactoryTalk Batch Clients
Chapter 6
7. In the Custom Setup dialog box, disable Server Components.
Tip:
The default installation directory is C:\Program Files (x86)\Rockwell Software\Batch. To set a different
directory, click Change, select the desired directory, and then click OK.
8. Click Space (near the bottom of the dialog box) and confirm there is
enough disk space for installing the selected options. The Disk Space
Requirements dialog box opens. If there is not enough disk space, the drive
is highlighted.
9. Click OK. If there was not enough disk space, click Change to select a
different drive (or move or delete files from the selected drive), and
continue with the installation.
10. Click Next.
11. In the Existing Server Details dialog box, enter the computer name of any
existing FactoryTalk Batch Server in the system. Click Next.
Tip:
Do not use a double back slash (\\) or any characters other than those in the actual server name. For
example, if the server name is \\DomainName\SERVER2, just enter SERVER2.
12. In the Batch User Name dialog box, enter the domain or workgroup name
where the FactoryTalk Batch Server is running, enter the FactoryTalk Batch
Server account name, and then click Next.
Rockwell Automation Publication BATCH-IN011C-EN-P November 2014
51
Chapter 6
Install FactoryTalk Batch Clients
13. In the Ready to Install the Program dialog box, verify your selections. If
anything is incorrect, click Back and make the appropriate corrections.
14. Click Install.
15. When prompted, click Finish, and then click Yes to restart your computer.
After you install the
FactoryTalk Batch Client
You are now ready to configure the FactoryTalk Batch Client computer. The
following instructions are provided to assist you in this process.
Set system date and time
Each computer on the network must be set to the same date and time.
Modify event log settings
Configure the Windows Application and System logs to overwrite events as
needed. (See “Modifying Event Log Settings” in the FactoryTalk Batch
Administrator’s Guide.)
Modify local security policy settings
If your FactoryTalk Batch Client is installed on a workgroup and the operating
system is Windows 7 or Windows Server 2008, you must configure the Local
Security Policy Settings. (See “FactoryTalk Batch Security” in the FactoryTalk
Batch Administrator’s Guide.)
52
Rockwell Automation Publication BATCH-IN011C-EN-P November 2014
Install FactoryTalk Batch Clients
Chapter 6
Create a shared directory
If FactoryTalk Batch is installed in a networked environment, and you have
installed the project files to a directory that is not located in the BATCHCTL
share, you must create a share for that project directory. (See “Creating a shared
directory” in the FactoryTalk Batch Administrator’s Guide for information.)
Configure the Windows Firewall (optional)
On Windows Server 2008 with the Windows Firewall enabled: If you want to use
the firewall after the FactoryTalk Batch or FactoryTalk eProcedure Server has
been installed, you must run the FactoryTalk Windows Firewall Configuration
Utility.
1. From the Start menu, select All Programs > Rockwell Software >
FactoryTalk Tools, and then click Windows Firewall Configuration
Utility.
The configuration utility starts. If the firewall has not been enabled, the
following dialog box may open. Click Yes to enable the firewall and
continue.
2. The utility configures the Windows Firewall, and the firewall is set to the
new state (if different).
Tip:
For a complete list of the exceptions made by the Windows Firewall Configuration Utility, refer to the
section FactoryTalk Batch Windows firewall exceptions in the FactoryTalk Batch Administrator’s Guide.
Install a loopback adapter (optional)
You must install a loopback adapter if you are in a workgroup or if you may be
disconnected from the network on occasion (such as a laptop). See “Installing a
loopback adapter (on page 65)” for more information.
Rockwell Automation Publication BATCH-IN011C-EN-P November 2014
53
Appendix A
Uninstalling the FactoryTalk Batch applications
This section explains how to uninstall earlier versions of the FactoryTalk Batch
components: FactoryTalk Batch, FactoryTalk eProcedure and FactoryTalk Batch
Material Manager. If you do not have eProcedure or Material Manager installed,
skip those sections in the following procedures.
Tip:
Backing up your files
You must have administrative privileges on the target computer in order to uninstall
the software.
Before uninstalling previous versions of FactoryTalk Batch, you may want to back
up the following files (if you have not already backed them up). Close all
applications, and stop all Batch services (including the eProcedure Server).
Batch Server files
•
Batcharc.ini file (Batch\bin folder)
•
Batcharc.log file (Batch\bin folder)
•
Batchsvr.ini file (Batch\bin folder)
•
BatchIDCreation.dll (Batch\bin folder) (only if it has been customized)
•
BatchID Custom folder
•
Simulator configuration files (.sim files in any Recipes folder)
•
DSDF files (only if customized)
Batch Client files
•
Tip:
•
Tip:
Area models (Recipes folder) (back up if stored on server node)
If your area model has members of the PHASE_FAILURES enumeration set with ordinals greater
than 32767 or less than 0 (zero), you must edit the ordinals before migrating the area model
to a newer version of FactoryTalk Batch.
Recipes folders and contents (back up if stored on server node)
If you plan to use Security Authority to secure area models and recipes, back up the FactoryTalk
Network Directory Security Authority Identifier (SAI). If an SAI is ever lost, you are prevented
from opening any area models or recipes that are linked to it. Backing up a SAI provides a
means of recovery.
Rockwell Automation Publication BATCH-IN011C-EN-P November 2014
55
Appendix A
Uninstalling the FactoryTalk Batch applications
•
Journal folders and contents (back up if stored on server node)
•
Log folders and contents (back up if stored on server node)
•
Custom bitmaps stored in the bmp folder
•
Batcheqp.ini file (Batch\bin folder)
•
Batchrcp.ini file (Batch\bin folder)
•
Batchvew.ini (Batch\bin folder)
eProcedure files
Before uninstalling the previous version of FactoryTalk eProcedure, back up all
instruction files associated with eProcedure, close all applications, and stop all
Batch services.
•
Instruction files
•
User.asp files (if customized)
•
eProcedure databases
•
Any customized files that support the User.asp
Material Manager files
Before uninstalling the previous version of FactoryTalk Batch Material Manager,
back up all instruction files associated with Material Manager, close all
applications, and stop all Batch services.
Uninstalling Batch
components
•
Materialserver.log file (Batch\bin folder)
•
MaterialBasedRecipe database
•
MaterialBasedRecipe_MAJ database
•
Sample2_Materials database (if used)
•
Any other material-based recipe databases unique to your facility
The steps required to uninstall Batch, eProcedure, and Material Manager are
discussed in the following section. You must complete all steps in this section that
apply to the products you are using to successfully uninstall Batch, eProcedure,
and/or Material Manager.
Important:
56
Be sure you have backed up any customized Batch, eProcedure or Material Manager
Server/Client files, such as area models, databases, etc. Refer to the instructions given in
the chapter specific to your Batch system.
Rockwell Automation Publication BATCH-IN011C-EN-P November 2014
Uninstalling the FactoryTalk Batch applications
Appendix A
Allow the Message Queue to clear
(Material Manager users only) Allow the message queue that handles
communication between the Material Server and the Material Activity Journal to
clear before proceeding.
1. Click the Start button, point to Programs > Administrative Tools, and
then select Computer Management. The Computer Management window
opens.
2. Expand Services and Applications, expand Message Queuing, and then
select the Private Queues folder. The list of queues displays in the right
pane.
3. Wait until the number of messages in the Material, Material_0, and
material_track0-4 queues reaches 0 (zero).
Disable the Material Server
(Material Manager users only) Before running the uninstall program, you must
disable the Material Server.
1. On the Master Node computer in your FactoryTalk Batch system, open the
Network Editor.
To identify the Master Node, open the Network Editor on any computer.
In the left pane select Network Model. In the right pane, the name of the
Master Node displays after User Name (ignore \username if present).
2. In the left pane, right-click the Material Server, and then select Remove
Server.
3. Click the Synchronize button.
4. From the File menu, select Exit, and then click Yes to exit the Network
Editor.
Disable COM+ Security and shut down the COM+ application
(Material Manager users only) Before you can shut down the COM+
application, you need to disable security.
1. Click the Start button, point to All Programs > Administrative Tools,
and then select Component Services. The Component Services window
opens.
Rockwell Automation Publication BATCH-IN011C-EN-P November 2014
57
Appendix A
Uninstalling the FactoryTalk Batch applications
2. Expand Components Services, expand the Computers folder, expand My
Computer, and then select the COM+ Applications folder. The COM+
applications display in the right pane.
3. Right-click Material, and then select Properties. The Material Properties
dialog box opens.
4. Select the Advanced tab, and then clear the Disable deletion and Disable
changes options.
5. Click OK.
6. Right-click Material, and then select Properties. The Material Properties
dialog box opens.
7. Select the Security tab, clear Enforce access checks for this application,
and select Perform access checks only at the process level. Security
property will not be included in the object context. COM+ security call
context will not be available.
8. Click OK.
9. Right-click Material and select Shut down.
10. Close the Component Services window.
Run the Uninstall program
Before uninstalling Batch, eProcedure, or Material Manager, back up all files and
database(s) associated with these applications, then close all applications, and stop
all Batch Services.
Important:
The installation programs for FactoryTalk Batch, eProcedure and Material Manager have a Remove
option that is evoked if a previous version of the software is detected. If that does not completely
remove the software, use the following procedures.
1. Click the Start button, point to Control Panel, and the select
Add/Remove Programs. The Add/Remove Programs dialog box opens.
2. To uninstall the FactoryTalk Batch Client or Server, select FactoryTalk
Batch, and then click Remove. A message box opens prompting you to
confirm the removal.
3. Click Yes. The uninstall program runs and removes Batch.
Tip:
58
If it appears that the uninstall program has stopped operating, check if any modal dialog boxes are hidden
behind the uninstall dialog box. Click OK to acknowledge any notifications to allow the uninstall to finish.
Rockwell Automation Publication BATCH-IN011C-EN-P November 2014
Uninstalling the FactoryTalk Batch applications
Appendix A
4. To uninstall FactoryTalk eProcedure, select FactoryTalk eProcedure, and
then click Remove. A message box opens prompting you to confirm the
removal.
5. Click Yes. The uninstall program runs and removes eProcedure. You may
be prompted to restart the computer.
6. To uninstall the FactoryTalk Batch Material Client or Server, select
FactoryTalk Batch Material Manager, and then click Remove. A message
box opens prompting you to confirm the removal.
7. Click Yes. The uninstall program runs and removes Material Manager.
8. Restart the computer.
Delete the COM+ application
(Material Manager users only)
1. Click the Start button, point to Programs > Administrative Tools, and
then select Component Services. The Component Services window opens.
2. Expand Components Services, expand the Computers folder, expand My
Computer, and then select the COM+ Applications folder. The COM+
applications display in the right pane.
3. Right-click Material and select Delete. A message box opens prompting
you to confirm the deletion.
4. Click Yes.
5. Close the Component Services window.
Delete the account profile running Material Manager
(Material Manager users only)
1. Open Windows Explorer.
2. On the local drive, right-click the rpmServer (default) folder or the account
folder under which FactoryTalk Batch Material Manager is running, and
then select Delete.
Rockwell Automation Publication BATCH-IN011C-EN-P November 2014
59
Appendix A
Uninstalling the FactoryTalk Batch applications
Delete the default directories
Important:
Make sure you have backed up files that are affected by the uninstall process before deleting the
default directories. (See “Backing up your files (on page 55)” for instructions.)
1. Open Windows Explorer.
2. Expand the Program Files folder, and then select the Rockwell Software
folder. The Batch folder displays in the right pane.
3. Right-click the Batch folder, and then select Sharing and Security. The
Batch Properties dialog box opens to the Sharing tab.
4. Select Do not share this folder, and then click OK.
5. Right-click the Batch folder, and then select Delete. A message box opens
prompting you to confirm the deletion.
6. Click Yes.
7. Close Windows Explorer.
Remove Registry subkeys
Important:
Back up the registry security settings before removing registry subkeys.
1. Click the Start button, and then select Run. The Run dialog box opens.
2. In the Open box, type regedt32, and then click OK. The Registry Editor
opens.
3. Expand HKEY_LOCAL_MACHINE on Local Machine.
4. Expand the SOFTWARE subkey.
5. If you are using a 64-bit operating system, expand Wow6432node.
6. Select the BATCHCTL subkey, and then press the DELETE key. A dialog
box opens prompting you to confirm the deletion.
7. Click Yes.
8. Close the Registry Editor.
This removes FactoryTalk Batch components from the computer.
60
Rockwell Automation Publication BATCH-IN011C-EN-P November 2014
Troubleshooting your installation
Appendix B
Appendix B
Troubleshooting your installation
Running the FactoryTalk
Directory Configuration
Wizard
The FactoryTalk® Directory Configuration Wizard runs silently during the
FactoryTalk Service Platform installation or upgrade. It can be run manually,
however, if you need to define or reset a disabled Administrator account.
1. From the Windows Start menu, select All Programs > Rockwell Software
> FactoryTalk Tools, and then select FactoryTalk Directory
Configuration Wizard. The FactoryTalk Directory Configuration
Wizard opens.
FactoryTalk Batch and eProcedure® store client configuration settings in the
Local and Network Directory, therefore the following steps apply to both
directories.
2. Select FactoryTalk Network Directory and FactoryTalk Local Directory
and then click Next.
Rockwell Automation Publication BATCH-IN011C-EN-P November 2014
61
Appendix B
Troubleshooting your installation
3. The Reconfigure FactoryTalk Network Directory dialog box opens.
4. Enter the User name and Password for an existing Network administrator
account. Re-enter the password in the Confirm password box.
5. Click Next. The Reconfigure FactoryTalk Local Directory dialog box
opens.
6. Enter the User name and Password for an existing Local administrator
account. Re-enter the password in the Confirm password box, and then
click Next.
62
Rockwell Automation Publication BATCH-IN011C-EN-P November 2014
Troubleshooting your installation
Appendix B
7. The Summary displays.
Tip:
If All Users is selected, the Windows group, Authenticated Users, is added to the Local Directory during
installation.
8. Click Close to exit the wizard.
9. Click Finish, then click Yes to restart your computer (if prompted to do
so).
Tip:
Communications with Batch
Server timing out
For more detailed information on FactoryTalk Directory installation and configuration, you can click the
Help button on the wizard dialog box, or view the FactoryTalk Administration Console help file
(FTAdminEN.chm) located in C:\Program Files (x86)\Common Files\Rockwell/Help.
If you are running FactoryTalk Batch and eProcedure Servers on a workgroup,
you must you must add an Incoming Firewall Rule to allow the Batch Service
Manager to connect to the server in a timely manner. (See “Add an incoming
firewall rule (on page 33)” for more information.)
You must also disable Administrative Approval Mode for all administrators on the
Batch Server computer when running on a workgroup. (See “Disable
Administrative Approval Mode (on page 34)” for more information.)
Rockwell Automation Publication BATCH-IN011C-EN-P November 2014
63
Appendix B
Troubleshooting your installation
Windows XP Clients cannot
communicate with Batch
Server
This problem may occur for Windows XP (SP3) Clients running as part of a
Windows Server 2008 R2 domain controller. The Windows XP Clients (Batch
View and Active X Controls) cannot communicate with the Batch Server. You
may see a communication status of "Lost" or a message indicating that the system
cannot communicate with the Batch Server.
To resolve this issue, the domain administrator must register the Batch Server user
and service as a service name provider on the domain. Follow the steps below.
1. Register the Batch Server SPN from any machine on the domain by running
the following two commands from the command prompt:
SetSPN -s batchsvr/BatchServerComputerName
DomainName\BatchServerUserName
SetSPN -s
batchsvr/BatchServerComputerName.FullyQualifiedDomainName\Batch
ServerUserName
2. Verify the SPN using the following command:
SetSPN -l BatchServerUserName
This should list two SPNs for the Batch Server user:
•
batchsvr/computername
•
batchsvr/computer.domain
Batch Server service user account change
If the Batch Server service user account is changed to another name, remove the
SPNs using the SetSPN and recreate them under the new user name. For help on
SetSPN, at the command prompt, type:
SetSPN /?
64
Rockwell Automation Publication BATCH-IN011C-EN-P November 2014
Appendix C
Installing a loopback adapter
You must install a loopback adapter if you are in a workgroup or if you may be
disconnected from the network on occasion (such as a laptop). The following
instructions step you through the process.
Windows Server 2008 &
Windows 7
Follow this procedure for Windows Server 2008 and Windows 7.
1. Click the Start button, point to Settings, and then select Control Panel.
The Control Panel window opens.
2. Open the Device Manager, select Network adapters. Select Action > Add
legacy hardware. The Add Hardware wizard opens.
3. Click Next.
4. Select Install the hardware that I manually select from a list (Advanced).
Click Next.
5. Select Network adapters from the list of Common hardware types. Click
Next.
6. Select Microsoft from the list of Manufacturers, then select Microsoft
Loopback Adapter. Click Next.
7. Click Next to install the loopback adapter.
8. Click Finish to close the Add Hardware Wizard.
Windows XP
Follow this procedure for Windows XP.
1. Restart the computer and log on with administrator privileges.
2. Click the Start button, point to Settings, and then select Control Panel.
The Control Panel window opens.
3. Double-click Add Hardware. The Add Hardware Wizard opens.
4. Click Next.
Rockwell Automation Publication BATCH-IN011C-EN-P November 2014
65
Appendix C
Installing a loopback adapter
5. Click Yes, I have already connected the hardware and click Next.
6. Select Add a new hardware device from the list of installed hardware, and
then click Next.
7. Select Install the hardware that I manually select from a list (Advanced),
and then click Next. A list of common hardware types is displayed.
8. Select Network adapters, and then click Next. The Select Network
Adapter dialog box opens.
9. Select Microsoft from the Manufacturers list.
10. Select Microsoft Loopback Adapter from the Network Adapter list, and
then click Next. The Start Hardware Installation dialog box opens.
11. Click Next. The software for the loopback adapter is installed.
12. Click Finish.
66
Rockwell Automation Publication BATCH-IN011C-EN-P November 2014
Index
C
W
configuration requirements
for Windows Server 2008 19
configure
Windows Firewall 43
cumulative unit licensing 26
Windows Firewall
configuration utility 43
configure 43
configuring after installing Batch 43
configuring after installing eProcedure 43
exceptions 31
service, enable 31
D
DCOM configuration 17
dongles 37
E
enhancements
Equipment Editor 12
Event Archiver 15
Recipe Editor 13
Server 14
EVRSI activation 37
L
language support 17, 19
loopback adapter 65
N
new features
in FactoryTalk Batch 11
in FactoryTalk Batch components 11
NTFS drives 17
P
pre-installation procedures
Batch Server
install the operating system
28
U
unit licenses
cumulative 26
Rockwell Automation Publication BATCH-IN011C-EN-P November 2014
67
Rockwell Automation support
Rockwell Automation provides technical information on the web to assist you in using its products. At
http://www.rockwellautomation.com/support you can find technical and application notes, sample code, and links to
software service packs. You can also visit our Support Center at https://rockwellautomation.custhelp.com for software
updates, support chats and forums, technical information, FAQs, and to sign up for product notification updates.
In addition, we offer multiple support programs for installation, configuration, and troubleshooting. For more
information, contact your local distributor or Rockwell Automation representative, or visit
http://www.rockwellautomation.com/services/online-phone.
Installation assistance
If you experience a problem within the first 24 hours of installation, review the information that is contained in this
manual. You can contact Customer Support for initial help in getting your product up and running.
United States or Canada
1.440.646.3434
Outside United States or Canada
Use the Worldwide Locator available at http://www.rockwellautomation.com/locations, or contact your local Rockwell
Automation representative.
New product satisfaction return
Rockwell Automation tests all of its products to ensure that they are fully operational when shipped from the
manufacturing facility. However, if your product is not functioning and needs to be returned, follow these procedures.
United States
Contact your distributor. You must provide a Customer Support case number (call the phone number above to obtain one) to
your distributor to complete the return process.
Outside United States
Please contact your local Rockwell Automation representative for the return procedure.
Documentation feedback
Your comments will help us serve your documentation needs better. If you have any suggestions on how to improve this
document, complete the feedback form, publication RA-DU002
(http://literature.rockwellautomation.com/idc/groups/literature/documents/du/ra-du002_-en-e.pdf).
Rockwell Automation Publication BATCH-IN011C-EN-P November 2014
Supersedes Publication BATCH-IN011B-EN-P
Copyright © 2014 Rockwell Automation, Inc. All rights reserved. Printed in the U.S.A.


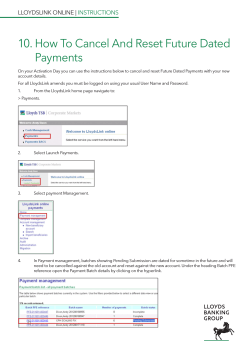


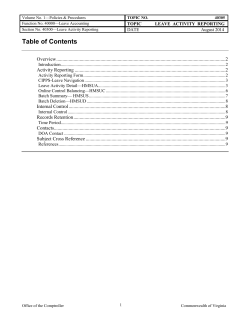
© Copyright 2026