
FEZ Tinker Kit – Connect Components, Run the Program.
FEZ Tinker Kit
BETA DRAFT 0.2
November 17, 2014
Getting Started
FEZ Tinker Kit
–
Connect Components,
Run the Program.
–
Have Fun
G H I
E l e c t r o n i c s
GHI Electronics,LLC
FEZ Tinker Kit
By GHI Electronics LLC. The world's leading vendor of .NET Gadgeteer
and .NET Micro Framework hardware and software.
“Where hardware meets software”
BETA DRAFT 0.2
Page 2 of 54
www.GHIElectronics.com
GHI Electronics,LLC
FEZ Tinker Kit
Table of Contents
Table of Contents
1.Introduction...................................................................................................................................................................................................4
2.Helpful Notes for Your Gadgets...................................................................................................................................................................7
3.Everybody's First Project: Hello World.........................................................................................................................................................8
4.The Second Program: Input.......................................................................................................................................................................16
5. Graphics....................................................................................................................................................................................................20
5.First Responder Traffic Control..................................................................................................................................................................24
5.1.The Project.......................................................................................................................................................................................24
5.2.Technicalities. The .NET Gadgeteer Framework..............................................................................................................................28
6.A Sensor Logger........................................................................................................................................................................................31
6.1.The Project.......................................................................................................................................................................................31
6.2.Missing Declarations.........................................................................................................................................................................34
6.3.Collecting Data.................................................................................................................................................................................36
IntelliSense.......................................................................................................................................................................................37
Watch What You Are Stepping Into..................................................................................................................................................39
Keeping it Tidy While it Grows..........................................................................................................................................................40
7.Solutions to Resource Challenges.............................................................................................................................................................42
8.Epilogue.....................................................................................................................................................................................................44
9.Resources In The Cloud............................................................................................................................................................................45
10.Updating Flash Software..........................................................................................................................................................................47
10.1.Check Firmware Compatibility with SDK .......................................................................................................................................47
10.2.Updating TinyBooter.......................................................................................................................................................................49
10.3.Updating TinyCLR...........................................................................................................................................................................52
11.Revision History and Acknowledgments..................................................................................................................................................53
12.Legal Notice.............................................................................................................................................................................................54
Disclaimer...............................................................................................................................................................................................54
Do Not Use Info 2
Page 3 of 54
www.ghielectronics.com
GHI Electronics,LLC
FEZ Tinker Kit
Introduction
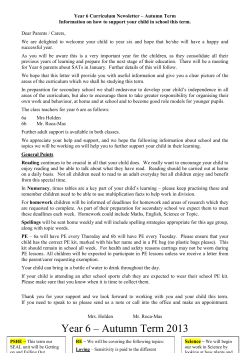
1. Introduction
Your Tinker Kit uses .NET Gadgeteer as its programming framework.
What is .NET Gadgeteer?
•
A software and hardware standard developed by Microsoft and released as open
source.
•
A method of creating projects consisting of a processor board, the “Mainboard,” and
one or more modules (devices for sensing, controlling, and communicating).
•
A point and click development environment that uses a visual designer -- pictures of
the Mainboard and modules are selected and connected. Application source code is
automatically generated from the final diagram.
A Gadgeteer module on the left, a Gadgeteer Mainboard on the right. A cable connects sockets between the
module and the mainboard.
BETA DRAFT 0.2
Page 4 of 54
www.GHIElectronics.com
GHI Electronics,LLC
FEZ Tinker Kit
Introduction
.NET Gadgeteer simplifies embedded development, projects are up and running in minutes
instead of days. You will enjoy:
•
No soldering, no breadboards (until you want to).
•
A state of the art programming environment with built-in help, easy and fast debugging.
•
Software libraries that contain all the necessary interfaces to work with hardware
devices; independent of underlying, often complicated, circuits and communications.
•
An application loading procedure that takes one click of the mouse.
The projects in this book are easy, fun and quick! That doesn't mean your Tinker Kit
applications are limited to these examples – .NET Gadgeteer uses a powerful underlying
system, “.NET Micro Framework,” (NETMF). Gadgeteer was designed to make using
NETMF easier. All Gadgeteer modules and mainboards use C# drivers which utilize NETMF
to perform the actual work.
NETMF has a huge number of libraries.
The libraries support embedded hardware controls and interfaces, such as:
•
GPIO,
•
Analog In/Out
•
Serial (UART)
•
One-wire
•
SPI
•
I2C
•
CAN
When you are ready for advanced feaures, your applications can use:
•
Networking (TCP/IP), DHCP, HTML, Wireless
•
SQLite Database
•
USB Host: input from joysticks, keyboards, mice, printers and more
•
USB Client: simulate a USB keyboard , mouse, etc.
•
In-Field update
Even though designed for education and hobbyists, .NET Gadgeteer is powerful enough that
it has been adopted worldwide by engineers for Rapid Prototyping of commercial and
scientific devices. NETMF based designs are found in many mass produced products.
BETA DRAFT 0.2
Page 5 of 54
www.GHIElectronics.com
GHI Electronics,LLC
FEZ Tinker Kit
Introduction
The availability of advanced features may vary between mainboards due to hardware constraints.
Project source code for examples in this book are found at
https://www.ghielectronics.com/downloads/src/Tinker_Kit_Examples.zip
BETA DRAFT 0.2
Page 6 of 54
www.GHIElectronics.com
GHI Electronics,LLC
FEZ Tinker Kit
Helpful Notes for Your Gadgets
2. Helpful Notes For Your Gadgets
Make it the Latest and Greatest
The required Software Development Kits (SDKs) for .NET Gadgeteer projects are:
•
Microsoft Visual Studio (VS), supporting C# and/or Visual Basic
•
Microsoft .NET Gadgeteer and .NET Micro Framework for VS
•
GHI Electronics' .NET Gadgeteer package.
We are constantly improving and adding features! Make sure you are using the best! Current
versions and installation instructions are on GHI's “Support for .NET Gadgeteer“ website.
Feeling Lost?
This manual contains active hyperlinks. If you are reading a printed copy, the URLs are listed
in the Resources In The Cloud chapter.
Mix-n-Match the Hardware
For the example projects, we use the FEZ Cerberus Tinker Kit. The projects will work on any
FEZ Gadgeteer Mainboard with minor, or no, changes.
Good news! – if you use the Gadgeteer Visual Designer (discussed below) many changes are
automatic!
Perfection is not the Goal
•
To keep examples small and to the point, efficiency, robustness, and good
programming style are sacrificed.
•
Sometimes, in topics beyond the scope of this book” we may over simplify.
BETA DRAFT 0.2
Page 7 of 54
www.GHIElectronics.com
GHI Electronics,LLC
FEZ Tinker Kit
Everybody's First Project: Hello World
3. Everybody's First Project: Hello World
Whenever you are using a new programming language, a new hardware system, or change
development environments, task one is to develop and run a small application. For the .NET
Gadgeteer tinker kit we'll blink the LED that is found on every mainboard and print a string to
Visual Studio's Output window.
An important part of embedded programming is the requirement that the versions of “firmware” on the processor match the
development SDKs. If you know your processor matches the requirements of the SDK; just keep reading; otherwise, please see
the Updating Flash Software chapter.
Launch Visual Studio, Design the Gadget's Hardware
Run Visual Studio (VS).
On the left click New Project... , select the Gadgeteer template,
in the Name field be sure to type “HelloLED” , exactly (letters are case sensitive)!
This is important so that you can copy the sample code below and paste it into visual studio without having to make any
modifications. The name HelloLED is used by VS as the namespace for your program.
BETA DRAFT 0.2
Page 8 of 54
www.GHIElectronics.com
GHI Electronics,LLC
FEZ Tinker Kit
Everybody's First Project: Hello World
When you click OK Visual Studio you select your mainboard. Make sure the project will be
created for the correct version of the SDK; in this case, 4.3, see below:
Select and Create your mainboard (we are using the FEZ Cerberus).
BETA DRAFT 0.2
Page 9 of 54
www.GHIElectronics.com
GHI Electronics,LLC
FEZ Tinker Kit
Everybody's First Project: Hello World
The Gadgeteer Visual Designer's window appears. Find the Toolbox tab (top left side of
designer window). From the Toolbox choose an USB Client Sp module (either left-click and
drag it to designer window or double click it).
BETA DRAFT 0.2
Page 10 of 54
www.GHIElectronics.com
GHI Electronics,LLC
FEZ Tinker Kit
Everybody's First Project: Hello World
Right-click anywhere on the Visual Designer surface/window, and select Connect all modules
Based on the Diagram of the Connections, Build the Physical Hardware
Attach a connector from the USB Client Sp module to the mainboard's socket number shown
by the designer; for the FEZ Cerberus this is socket “8”.
Connect the USB Client Sp to the PC using a standard USB Cable. The Red light present on
every Gadgeteer Mainboard turns-on, indicating the board has power.
BETA DRAFT 0.2
Page 11 of 54
www.GHIElectronics.com
GHI Electronics,LLC
FEZ Tinker Kit
Everybody's First Project: Hello World
Note: when you are connecting modules to mainboards, you find the letter labeling the socket on the module; and then, connect
it to any socket on the mainboard with the same letter. For the USB Client Sp the socket letter on the module is “D.” The
module is then attached to any socket on the mainboard with type “D” (for the FEZ Cerberus, socket “8”). If the mainboard
has more than one socket with the type you are looking for, you can choose any of them.
Write the Software
Your hardware is done! Time for the programming. As you can see in the Solution Explorer*
window, the Visual Designer has already created two pieces of your application:
1. in the file Program.generated.cs are all the declarations and initializations to
create the classes as drawn.
2. in the file Program.cs is a fully runnable application shell. This is where your project
code goes.
*If the Solution Explorer window is not visible, click on the VIEW menu and select Solution Explorer
Open an edit window by Double-clicking on Program.cs.
For this project we're going to change the code to blink an LED. You could type the following
into the editor, but it's easier to just select the code, copy it, and then replace the default
program with paste.
using
using
using
using
using
using
using
using
using
using
System;
System;
System.Collections;
System.Threading;
Microsoft.SPOT;
Microsoft.SPOT.Presentation;
Microsoft.SPOT.Presentation.Controls;
Microsoft.SPOT.Presentation.Media;
Microsoft.SPOT.Presentation.Shapes;
Microsoft.SPOT.Touch;
using Gadgeteer.Networking;
using GT = Gadgeteer;
using GTM = Gadgeteer.Modules;
namespace HelloLED
{
public partial class Program
{
void ProgramStarted()
{
Debug.Print("Hello PC");
while (true) // careful!!, must sleep/yield for event loop
BETA DRAFT 0.2
Page 12 of 54
www.GHIElectronics.com
GHI Electronics,LLC
FEZ Tinker Kit
Everybody's First Project: Hello World
{
Mainboard.SetDebugLED(true);
Thread.Sleep(1000); // leave it on for 1 second
Mainboard.SetDebugLED(false);
Thread.Sleep(500); // turn it of for 500 milliseconds
}
}
}
}
As an aside, every Gadgeteer program has a class named Mainboard. Every Mainboard has a static method
SetDebugLED; so the above program will work with any .NET Gadgeteer mainboard.
The program is written, your gadget is built; time to compile, load, and ...
Run It!
An important step before running any application is to tell Visual Studio where you want to run
the program.
Under the PROJECT menu, select HelloLED Properties...
BETA DRAFT 0.2
Page 13 of 54
www.GHIElectronics.com
GHI Electronics,LLC
FEZ Tinker Kit
Everybody's First Project: Hello World
Click on .NET Micro Framework. Make sure the Transport is USB
Everything is set-up. Press the Start button or press the F5 Key.
Visual Studio does all the work; displaying its progress in the Output* window. The program is
built; sent, “deployed,” to the mainboard.
*If the Output window is not visible, click on the VIEW menu and select Output.
The board's LED starts flashing!
BETA DRAFT 0.2
Page 14 of 54
www.GHIElectronics.com
GHI Electronics,LLC
FEZ Tinker Kit
Everybody's First Project: Hello World
The Debug.Print statements write their output to the Visual Studio Output window.
When you deploy and run your application from Video Studio, a connection is open to the running process on your board (for
debugging). If you want to make changes to your program/project the connection cannot be active. Just click on the red stop
square in the toolbar (you can also type Shift+F5):
Project source code for examples in this book are found at
https://www.ghielectronics.com/downloads/src/Tinker_Kit_Examples.zip
BETA DRAFT 0.2
Page 15 of 54
www.GHIElectronics.com
GHI Electronics,LLC
FEZ Tinker Kit
The Second Program: Input
4. The Second Program: Input
In the first project, we established a way for our gadgets to use hardware signaling (useful for
in field debugging). Here we provide an input method for program control.
Start Visual Studio, in this case name your project FlashBulb (remember to copy this name
exactly).
Here's our design of the hardware, set yours up the same way.
BETA DRAFT 0.2
Page 16 of 54
www.GHIElectronics.com
GHI Electronics,LLC
FEZ Tinker Kit
The Second Program: Input
Often when working on a project, you will want to consult a reference on the C# class used to
interact with a module or Mainboard. Try this:
In the designer, select the Button module and press F1.
Visual Studio presents the full class description of the module.
Let us explore another useful feature of the designer: rename a variable. Click on the label
button and change it to controller.
BETA DRAFT 0.2
Page 17 of 54
www.GHIElectronics.com
GHI Electronics,LLC
FEZ Tinker Kit
The Second Program: Input
Below is the program code. If you examine it, you'll see we have purposely used BlinkLed
in the namespace. This does not match our project name (FlashBulb). Leave the
namespace wrong for a minute.
using
using
using
using
using
using
using
using
using
System;
System.Collections;
System.Threading;
Microsoft.SPOT;
Microsoft.SPOT.Presentation;
Microsoft.SPOT.Presentation.Controls;
Microsoft.SPOT.Presentation.Media;
Microsoft.SPOT.Presentation.Shapes;
Microsoft.SPOT.Touch;
using
using
using
using
Gadgeteer.Networking;
GT = Gadgeteer;
GTM = Gadgeteer.Modules;
Gadgeteer.Modules.GHIElectronics;
namespace BlinkLed // FlashBulb
{
public partial class Program
{
void ProgramStarted()
{
while (true) // careful!!, must sleep for event loop
{
while (controller.Pressed)
{
controller.TurnLedOn();
Thread.Sleep(100);
}
controller.TurnLedOff();
Thread.Sleep(200);
}
}
}
}
BETA DRAFT 0.2
Page 18 of 54
www.GHIElectronics.com
GHI Electronics,LLC
FEZ Tinker Kit
The Second Program: Input
Try to compile it (press F5).
In the error window (VIEW > Error List) you read that VS could not find a definition for
Mainboard; and, even though ProgramStarted is present, the compiler error states that it
is missing. Remember this pattern of errors – it will save you time when you have wrong
and/or missing namespace statements.
Fix fhe program by changing the namespace to use FlashBulb.
Now compile and deploy.
Push the button down, its LED turns on; release the button, the LED turns off.
BETA DRAFT 0.2
Page 19 of 54
www.GHIElectronics.com
GHI Electronics,LLC
FEZ Tinker Kit
5. Graphics
5. Graphics
Included in the Tinker Kit is a little graphics display. In this section we build a small drawing
program that uses the joystick to draw on the screen. This example also shows a way to do
graphics that requires very little memory. Your Tinker Kit may have a processor with more
memory than FEZ Cerberus; the processor may have built-in support for displays. In these
cases there are other methods you can use for graphics and user-interfaces we'll go over
them later.
Here's the hardware for this project:
BETA DRAFT 0.2
Page 20 of 54
www.GHIElectronics.com
GHI Electronics,LLC
FEZ Tinker Kit
5. Graphics
And here's the program:
using
using
using
using
using
using
using
using
using
System;
System.Collections;
System.Threading;
Microsoft.SPOT;
Microsoft.SPOT.Presentation;
Microsoft.SPOT.Presentation.Controls;
Microsoft.SPOT.Presentation.Media;
Microsoft.SPOT.Presentation.Shapes;
Microsoft.SPOT.Touch;
using
using
using
using
Gadgeteer.Networking;
GT = Gadgeteer;
GTM = Gadgeteer.Modules;
Gadgeteer.Modules.GHIElectronics;
namespace Graphics
{
public partial class Program
{
private const int Y_MAX = 160;
private const int X_MAX = 128;
// In our example FEZ Cerberus, has 12 bit precision
private const double DELTA = 2*(1.0/1024.0);
void ProgramStarted()
{
Thread drawingThread = new Thread(Sketch);
drawingThread.Start();
joystick.Calibrate();
joystick.JoystickReleased += joystick_JoystickReleased;
}
private bool doErase = false;
void joystick_JoystickReleased(Joystick sender, Joystick.ButtonState state)
{
if (!doErase) doErase = true;
}
Bitmap eraser = new Bitmap(1, Y_MAX + 1);
void ScreenErase()
{
eraser.DrawLine(GT.Color.Black, 1, 0,0, 0, Y_MAX);
for (int xp = 0; xp <= X_MAX; xp++ )
{
displayN18.Draw(eraser, xp, 0); // line by line erase
Thread.Sleep(10); // slow it down so it visibly crosses the display
}
BETA DRAFT 0.2
Page 21 of 54
www.GHIElectronics.com
GHI Electronics,LLC
FEZ Tinker Kit
5. Graphics
doErase = false;
}
void Sketch()
{
double xc=0.0;
double yc=0.0;
int x_center = (X_MAX)/2;
int y_center = (Y_MAX) / 2;
int x_current = x_center;
int y_current = y_center;
Bitmap dot = new Bitmap(1, 1);
dot.SetPixel (0,0,GT.Color.Red);
doErase = true;
while(true) {
if (doErase){
ScreenErase();
x_current = x_center;
y_current = y_center;
}
displayN18.Draw(dot, x_current, y_current);
// average to reduce noise and add some delay
for (int ax = 1; ax <= 4; ax = ax +1 )
{
xc = joystick.GetPosition().X; // -1.0 ... 0 .... 1.0
yc = joystick.GetPosition().Y;
Thread.Sleep(3);
}
if (xc/4.0d > 0.0d + DELTA)
{
// ignore magnitude, just use value as direction
x_current = x_current + 1;
if (x_current > X_MAX) x_current = 0; // wrap around
} else if (xc < 0.0 - DELTA){
x_current = x_current - 1;
if (x_current < 0) x_current = X_MAX; // wrap around
} // do nothing it's considered 0
yc = yc * (-1.0d); // map to screen coordinate system
if (yc/4.0d > 0.0d + DELTA)
{
y_current = y_current + 1; // overlap movement for smoother lines
if (y_current > Y_MAX) y_current = 0; // wrap around
}
else if (yc < 0.0d - DELTA)
{
y_current = y_current-1;
BETA DRAFT 0.2
Page 22 of 54
www.GHIElectronics.com
GHI Electronics,LLC
FEZ Tinker Kit
5. Graphics
if (y_current < 0) y_current = Y_MAX;
}
}
// wrap around
}
}
}
When working with displays and devices like a joystick you need to decide on the orientation
of the device and the coordinate system. In this example, as you face the components, Use
the joystick with the GHI Electronics as its bottom and the screen layed-out so the ribbon
cable is on the left side.
In the case of small embedded processors, if there isn't enough memory to represent the
entire graphics screen. The program draws on small bitmaps and then calls methods that
draw the bitmap on the screen.
If your mainboard has enough memory you can work on the whole display as one big bitmap
and then use common graphics primitives, such as drawing lines, ellipses, etc.
To have a modern look to the display you can create windows, buttons, check boxes and
similar objects using GHI's Glide Library.
BETA DRAFT 0.2
Page 23 of 54
www.GHIElectronics.com
GHI Electronics,LLC
FEZ Tinker Kit
First Responder Traffic Control
5. First Responder Traffic Control
5.1. The Project
In the previous chapters have seen how easy it is to use the hardware and get started on the
software.
This project may seem more challenging than the previous; it is not – just a few more
modules and the software to control them.
Here is the scenario: You are a traffic-light engineer; tasked to add a control to a traffic signal.
The control will allow firemen to turn the light red and sound the fire alarm.
We will model one face of the traffic symbol: using an LED Strip; the Tunes module for the
alarm, and a Button module as the controller.
The LED Strip Module conveniently has green, yellow, and red LEDs; in the order of a traffic
signal.
Characteristics of the system:
•
Traffic lights are periodic: the program must measure time.
•
Each time a specific interval of time passes, the light (LED Strip) needs to switch
colors.
•
When a fireman needs to stop traffic he obviously needs a control device (Button
module), the event must turn the signal red and sound the alarm (the Tunes module).
•
If the alarm is sounding, and the button is pushed again, the traffic signal resumes
normal operation.
Building a Traffic Light
In previous examples, we let the designer connect the modules' sockets to the sockets on the
mainboard. There are times when you will want to use a particular socket for a module. This
time, we will start off by manually choosing and connecting sockets for the Button module:
1. Start a new project project TrafficLight. Target the current version of NETMF.
2. Cick on the Button Module's socket (type X and Y), hold the mouse button down
3. Drag the mouse over the mainboard socket you wish to use. The socket must have the
correct type, in this case X or Y; we choose Socket #3 which supports the necessary Y
type (it also supports A, O and P).
4. Release the mouse button.
BETA DRAFT 0.2
Page 24 of 54
www.GHIElectronics.com
GHI Electronics,LLC
FEZ Tinker Kit
First Responder Traffic Control
The designer highlights mainboard sockets that support the module. The designer will not connect mismatching sockets.
Finish the design by adding the LED Strip module, the Tunes module and the power module.
Connect your gadget to the PC.
1...2...3...Stop and 4...5...6...Go
The duration each light stays lit is important. Conveniently, NETMF contains a Timer class
that does most of what we want; the class waits for a time period (specified in milliseconds)
and then invokes a method. The program also takes advantage of the Button class'
ButtonPressed event.
BETA DRAFT 0.2
Page 25 of 54
www.GHIElectronics.com
GHI Electronics,LLC
FEZ Tinker Kit
First Responder Traffic Control
Open Program.cs in an Edit window, replace its contents with:
using
using
using
using
using
using
using
using
using
System;
System.Collections;
System.Threading;
Microsoft.SPOT;
Microsoft.SPOT.Presentation;
Microsoft.SPOT.Presentation.Controls;
Microsoft.SPOT.Presentation.Media;
Microsoft.SPOT.Presentation.Shapes;
Microsoft.SPOT.Touch;
using
using
using
using
Gadgeteer.Networking;
GT = Gadgeteer;
GTM = Gadgeteer.Modules;
Gadgeteer.Modules.GHIElectronics;
namespace TrafficLight
{
public partial class Program
{
private enum LightState : uint
{
// RR YYY GG
0 == ON, 1 == OFF
GREEN = 1 + 2, // 00 000 11
YELLOW = 4 + 8 + 16, // 00 111 00
RED = 32 + 64 // 11 000 00
}
private static int AlarmFrequency;
private static LightState CurrentColor;
private static bool fire = false;
private static int seconds = 0;
private static LEDStrip TrafficSymbol;
private static Tunes Alarm;
void ProgramStarted()
{
Alarm = tunes;
TrafficSymbol = ledStrip;
TrafficSymbol.SetBitmask((uint)LightState.RED);
CurrentColor = LightState.RED;
GT.Timer timer = new GT.Timer(1000);
timer.Tick += timer_Tick;
button.ButtonPressed += fire_alarm;
timer.Start();
}
static void fire_alarm(Button sender, Button.ButtonState state)
BETA DRAFT 0.2
Page 26 of 54
www.GHIElectronics.com
GHI Electronics,LLC
FEZ Tinker Kit
First Responder Traffic Control
{
if (fire == false)
{
fire = true;
AlarmFrequency = 8000;
Alarm.Play(AlarmFrequency);
}else {
fire = false;
AlarmFrequency = 0;
Alarm.Play(AlarmFrequency);
}
}
private void timer_Tick(GT.Timer timer)
{
if (fire)
{
if (CurrentColor == LightState.RED)
return;
else if (CurrentColor == LightState.GREEN)
seconds = 4; // --> Yellow, then Red
}
seconds += 1;
if (seconds == 3) // Red-> Green
{
TrafficSymbol.SetBitmask((uint)LightState.GREEN);
CurrentColor = LightState.GREEN;
}
else if (seconds == 5) // Green-> Yellow
{
TrafficSymbol.SetBitmask((uint)LightState.YELLOW);
CurrentColor = LightState.YELLOW;
}
else if (seconds == 8) // Yellow->Red
{
TrafficSymbol.SetBitmask((uint)LightState.RED);
CurrentColor = LightState.RED;
seconds = 0;
}
}
}
}
BETA DRAFT 0.2
Page 27 of 54
www.GHIElectronics.com
GHI Electronics,LLC
FEZ Tinker Kit
First Responder Traffic Control
Compile it. Run it
The Signal light cycles through Red, Green, then Yellow.... A FIRE call comes-in!! Press the
button, the alarm sounds, the light changes to red, the water truck zooms away. You press
the button again to allow regular traffic.
•
The program will continue to run until you remove the power (disconnect the USB).
•
Using the Reset button on the mainboard, just re-starts the program; it does not stop it!
•
If you power-up the board, the program automatically starts. In a traffic light, that's what you want – if there is a
power failure, the light should re-start as soon as power is restored!!
5.2. Technicalities. The .NET Gadgeteer Framework
Yes, this is the boring part of getting started!! But you should take the time to read it! We
describe important concepts related to every .NET Gadgeteer application.
To explain the details we use the TrafficLight project.
Boilerplate
Gadgeteer programs use an event based programming style: the program is broken into
methods which only execute when specific actions occur.
Nuts and Bolts
The traffic light program has three methods, each corresponding to an event:
EVENT
METHOD
Initialization
ProgramStarted. Invoked (executes/runs)
once and only once when the Gadgeteer
application is started.
A second has gone by
timer_Tick. It is invoked every time 1000
milliseconds passes.
A button is pressed
fire_alarm. Asynchronously invoked
when/if the Button module is pressed
BETA DRAFT 0.2
Page 28 of 54
www.GHIElectronics.com
GHI Electronics,LLC
FEZ Tinker Kit
First Responder Traffic Control
The Invisible Event – Idle-Time
What happens in-between ticks of the clock (seconds in TrafficLight) and no button
presses??? It appears that the program does nothing!! – In an event based program there is
another method, the “event loop;” it is built-in to .NET Gadgeteer. The loop is running
whenever one of event based methods is not running (we will call this “Idle-time”).
The event loop is a decision maker – it watches for things that need to happen and calls
methods when they do. In TrafficLight, the event loop calls ProgramStarted,
timer_Tick, or fire_alarm when appropriate. When the called method returns, the loop
continues.
The method ProgramStarted is in every Gadgeteer program.; it only runs once -- when the
application is launched. ProgramStarted initializes variables needed by the other methods;
this includes establishing a list of event handlers (methods) that may be invoked by the loop.
Very important:
1. During idle-time (i.e., in the event loop), the event loop occasionally runs the “Garbage Collector” (it manages the
memory used by the program).
2. Additionally, the event loop checks for a mainboard linked to a computer's USB; if found , a .NET Gadgeteer internal
event handler is set-up for communicating with the PC.
With a few exceptions, if any method called by the event loop does not return,
✗
==>
the event loop no longer runs;
✗
==>
if events do occur, they are ignored (the event loop manages internal events)
✗
==>
the application may run-out of memory (no Garbage Collection)
✗
==>
communication between the mainboard and the computer will never occur... No deployments, no debugging,
nothing! (USB detection is performed by the event loop)
In the above case, .NET Gadgeteer programs do not stop, they are “stuck”! There are extenuating circumstances, such as
threads and sleep (discussed in the SensorData project).
To fix a stuck program you will need to Erase the memory containing the program (FEZ Config is used for this.
Deployment (Advanced) > Erase Application).
BETA DRAFT 0.2
Page 29 of 54
www.GHIElectronics.com
GHI Electronics,LLC
FEZ Tinker Kit
First Responder Traffic Control
An expanded table of events and methods for TrafficLight is:
EVENT
METHOD
Idle-time
The event loop (calls all other methods)
PC to USB Link set-up (by the event loop!!)
The communications routine; periodically
called from the event loop. Sends and
receives data to/from the PC.
Application launched.
ProgramStarted. Invoked (executes/runs)
once and only once when the Gadgeteer
application is started.
A preset interval of time has passed.
timer_Tick. Invoked every time 1000
milliseconds passes.
A button is pressed.
fire_alarm. Asynchronously invoked when
ever the button is pressed
BETA DRAFT 0.2
Page 30 of 54
www.GHIElectronics.com
GHI Electronics,LLC
FEZ Tinker Kit
A Sensor Logger
6. A Sensor Logger
One or more sensors are often used in embedded projects. The sensor's data needs to be
analyzed and/or saved for future use.
6.1. The Project
This example uses a LightSense module, and an SD Card module.
The structure of this program can be used for other sensors, such as: gas sensors, current
monitors, blood oxygen detectors, water flow, barometric pressure,.....
Breaking the program into parts, it does two things:
1. It periodically collects the current value of the light sensor (sampleProcessor)
2. If a button is pressed, the sensor data is written to a file on the SD card (SaveData
and LogData)
Name this project SensorData. Use the Designer to put together the mainboard, Display,
LightSensor, Button, and SD Card. We chose the Display N18.
Go ahead and put an SD Card into the module.
BETA DRAFT 0.2
Page 31 of 54
www.GHIElectronics.com
GHI Electronics,LLC
FEZ Tinker Kit
A Sensor Logger
In this example, the Display N18 module has its top left corner when the display ribbon cable
is on the bottom
Here is the contents for Program.cs
using
using
using
using
System;
System.Collections;
System.Threading;
System.Text;
using
using
using
using
using
using
Microsoft.SPOT;
Microsoft.SPOT.Presentation;
Microsoft.SPOT.Presentation.Controls;
Microsoft.SPOT.Presentation.Media;
Microsoft.SPOT.Presentation.Shapes;
Microsoft.SPOT.Touch;
using
using
using
using
Gadgeteer.Networking;
GT = Gadgeteer;
GTM = Gadgeteer.Modules;
Gadgeteer.Modules.GHIElectronics;
using
using
using
using
System.IO;
GHI.IO;
GHI.IO.Storage;
Microsoft.SPOT.IO;
namespace SensorData
{
public partial class Program
{
// sample values will be from 1 to this number, limited to 255
private const double SCALE = 100.0;
private const int SAMPLE_BUFFER_LENGTH = 100;
private const int TIME_FOR_BUFFER_FILL = 5000;
private const int FULL_BUFFER_INDICATOR_DURATION = 2000;
void ProgramStarted()
{
Thread dataHandler = new Thread(sampleProcessor);
dataHandler.Start();
button.ButtonPressed += SaveData;
// when the button is pressed run SaveData()
}
private bool Dump = false;
private void SaveData(Button sender, Button.ButtonState state)
{
BETA DRAFT 0.2
Page 32 of 54
www.GHIElectronics.com
GHI Electronics,LLC
FEZ Tinker Kit
A Sensor Logger
if (!Dump)
{
Dump = true;
button.TurnLedOn();
}
}
private void sampleProcessor()
{
byte[] readings = new byte[SAMPLE_BUFFER_LENGTH];
int buffer_index = 0;
Mainboard.SetDebugLED(true); // sampling started
while (true)
{
if (buffer_index >= SAMPLE_BUFFER_LENGTH)
{
button.TurnLedOn();
Thread.Sleep(FULL_BUFFER_INDICATOR_DURATION);
if (Dump) LogData(readings, SAMPLE_BUFFER_LENGTH);
button.TurnLedOff();
buffer_index = 0;
}
else if (Dump)
{
LogData(readings, buffer_index);
button.TurnLedOff();
buffer_index = 0; // restart sensor sampling (at top of loop)
}
readings[buffer_index] = (byte)(SCALE * lightSense.ReadProportion());
Thread.Sleep(TIME_FOR_BUFFER_FILL/SAMPLE_BUFFER_LENGTH);
buffer_index += 1;
}
}
private int FileCounter = 0; // used to create unique filenames for storing data.
private void LogData(byte[] buff, int dumpCount)
{
if (sdCard.IsCardMounted && dumpCount != 0)
{
FileCounter++;
string Line;
byte[] data;
string rootDirectory = VolumeInfo.GetVolumes()[0].RootDirectory;
FileStream FileHandle = new FileStream(rootDirectory +
@"\Data" + FileCounter + ".csv",
FileMode.Create);
// output values in ASCII for editors, spreadsheets, databases...
for (int bx = 0; bx < dumpCount; bx += 1 )
{
BETA DRAFT 0.2
Page 33 of 54
www.GHIElectronics.com
GHI Electronics,LLC
FEZ Tinker Kit
A Sensor Logger
Line = (bx + 1).ToString("g") + "," + buff[bx].ToString("g") + "\r\n";
data = Encoding.UTF8.GetBytes(Line);
FileHandle.Write(data, 0, data.Length);
}
FileHandle.Close();
VolumeInfo.GetVolumes()[0].FlushAll();
}
}
Dump = false;
}
}
6.2. Missing Declarations
Compile the program. We get errors:
What's wrong? It's not the project namespace, they match. The compiler tells us that a
number of Classes and/or Namespaces can not be found. We need to find the declarations
and get them added to the code.
The first place to start looking is with the NETMF library documentation, comprised of:
•
Core NETMF API
GHI Electronics' NETMF extensions
These links may change or point to stale information. The current links are maintained on GHI's NETMF Support page.
•
BETA DRAFT 0.2
Page 34 of 54
www.GHIElectronics.com
GHI Electronics,LLC
FEZ Tinker Kit
A Sensor Logger
Going to the core API and searching for VolumeInfo yields:
First we check the list of assemblies (libraries) by expanding References in the Solutions
Explorer window (VIEW>Solution Explorer):
BETA DRAFT 0.2
Page 35 of 54
www.GHIElectronics.com
GHI Electronics,LLC
FEZ Tinker Kit
A Sensor Logger
There is no Microsoft.SPOT.IO. We need to add a reference to the missing assembly.
Right click on References, click Add Reference... and select Microsoft.SPOT.IO. Add
the using statement to the code:
using Microsoft.SPOT.IO;
Following the same method for FileStream, we add a using statement for the
namespace System.IO (the assembly was already part of the project). Finally for
Encoding; the System.Text namespace is added:
using Microsoft.SPOT.Touch;
using Microsoft.SPOT.IO;
using System.IO;
using System.Text;
using Gadgeteer.Networking;
6.3. Collecting Data
When compiled and deployed (F5), the mainboard's LED turns on to indicate that data is
being collected. When ever the buffer holding the sample data fills-up, the red LED on the
button lights up for a few seconds. If during this time, the button is pressed, the entire set of
data is written to the SD Card (which can be plugged-in to a PC and examined. During the
sampling time, point the sensor in different directions to get varying values. When you've
logged some data (by pressing the button). You can take out the SD Card and read the files
on a PC.
The important piece of code is the method LogData. It shows you how easy it is to work with
files and SD Cards. If the SD Card is removed from the module without warning, the SD Card
may not have all the data written to it. This examples flushes the filesystem immediately after
writing the file to make sure the SD Card is ready for removal at any time.
As far as example projects go, this tutorial is finished. However, we use the project to learn a
few time savers; so, keep on reading...
BETA DRAFT 0.2
Page 36 of 54
www.GHIElectronics.com
GHI Electronics,LLC
FEZ Tinker Kit
A Sensor Logger
IntelliSense
“Intellisense” is an extremely useful part Microsoft's Visual Studio! Remember how you can
select a module in the Gadgeteeer Designer and press F1 to get help on the module's driver
class? Well, IntelliSense is better than that, it automatically gives you a reference guide to
what you are typing. It also performs auto-completion and auto-code-generation.
If your program is still connected to VS, turn off the debugging link (shift+F5)
Example IntelliSense usage:
•
From left to right, slowly move the edit cursor over the various names in the
GraphView statement:
GraphView.SimpleGraphics.Clear();
BETA DRAFT 0.2
Page 37 of 54
www.GHIElectronics.com
GHI Electronics,LLC
FEZ Tinker Kit
A Sensor Logger
Just for demonstration purposes, type the following statement anywhere in the body of
a method: GraphView.SimpleGraphics... As you type, IntelliSense displays the
possible completions of the class members being referenced. You can use Tab or
double click on the chosen member.
BETA DRAFT 0.2
Page 38 of 54
www.GHIElectronics.com
GHI Electronics,LLC
FEZ Tinker Kit
A Sensor Logger
Watch What You Are Stepping Into
Instead of building and deploying with F5, press F11 (DEBUG>Step Into). When the program
deploys, the VS debugger starts execution by stepping into the the program and stopping at
the first line. While stopped, we will set a breakpoint in the event handler SaveData. View
Program.cs in an edit window. Scroll down to SaveData; in the far left margin, on the line:
if (!Dump)
click with the mouse. A red stop icon appears:
Click Continue
The program begins graphing data. Press the button to invoke the event handler the program
will stop at the breakpoint. Want to see the value of Dump? Hover the mouse over the
variable name.
The debugger has many features you will want to explore.
BETA DRAFT 0.2
Page 39 of 54
www.GHIElectronics.com
GHI Electronics,LLC
FEZ Tinker Kit
A Sensor Logger
Keeping it Tidy While it Grows
Spaghetti
As your projects grow more complex, keeping the modules and cables organized can be a
problem. Here is a picture of a project; with just five modules, things are looking twisted and
tangled:
BETA DRAFT 0.2
Page 40 of 54
www.GHIElectronics.com
GHI Electronics,LLC
FEZ Tinker Kit
A Sensor Logger
GHI has a solution:
As you can see we put a Light Sensor on a long cable to allow us greater mobility. The
modules are mounted on a Holey board using standoffs, screws and nuts. The button is
conveniently located between the display and the SD Card module. We recommend browsing
our catalog for similar hardware accessories.
Just Can't Get Enough
What do you do when you have used up all the sockets on your mainboard.?
You have many choices, a couple are:
1. Move to a mainboard with more sockets. The FEZ Cerberus used in our examples has
8 sockets. At the time of this writing, GHI offered one mainboard with 14 sockets and
another with 18.
2. Add more sockets to your board with specialized extender modules. Here is an
example: (as our product line-up changes over time, check the catalog for current
offerings)
Hub AP5 Module – adds eight Y-type sockets (GPIO), which are also five P-type
sockets (PWM) and two A-type sockets.
BETA DRAFT 0.2
Page 41 of 54
www.GHIElectronics.com
GHI Electronics,LLC
FEZ Tinker Kit
Solutions to Resource Challenges
7. Solutions To Resource Challenges
Memory
One of the bigger challenges when programming for embedded devices is the trade-offs
made to keep the hardware as cheap as possible. This is especially true of the RAM. The
more RAM, the more the microcontroller costs. On a PC, you usually have at least a few
Gigabytes. Contrast that with the FEZ Cerberus which has roughly 100 Kilobytes.
What can you do? The easiest solution is to buy a mainboard with more RAM.
There are many programming practices which reduce the memory demands of a program.
We present a few here.
Avoid dynamic data that is allocated over-and-over when it is only used for one purpose.
Especially when that allocation is within loops; allocate the item outside the loop body.
Re-use data structures by making them static and carefully use them in more than one
method, a common example of this would be an array used as a buffer.
Invoke the garbage collector Debug.GC. Garbage collection manages memory to conserve it
and make it more efficient, it does run occasionally, but at unpredictable times. Your program
may want to invoke it directly after using and then releasing big pieces of memory and/or
many small items.
BETA DRAFT 0.2
Page 42 of 54
www.GHIElectronics.com
GHI Electronics,LLC
FEZ Tinker Kit
Solutions to Resource Challenges
Power
Adding any electrical module to a project increases the demand on power. For instance, when
you are using USB to power your project; you may only have 500 mA . Some modules require
large amounts of power, for instance WiFi. You can get a rough estimate of the power needs
of your project in the Gadgeteer Designer. Right-click anywhere on the window and select
“Power Estimate.”
If any of the numbers approaches 500 mA you may exceed the amount of power supplied by
the USB cable. Solutions to this can be found on GHI's website, search the Catalog for
“power.”
BETA DRAFT 0.2
Page 43 of 54
www.GHIElectronics.com
GHI Electronics,LLC
FEZ Tinker Kit
Epilogue
8. Epilogue
We want emphasize this tutorial really is just a cursory introduction; it is only the tip of the
iceberg. The power of Gadgeteer and .NET Micro Framework (NETMF) gives you most of the
facilities of full blown desktop Apps.
Gadgeteer is just a friendly veneer over the surface of NETMF. It makes it extremely fast to
design your project from hardware to application code. But, you don't have to use it; and, for
a variety of reasons, often developers do not. A few cases where using pure NETMF is a
good idea:
•
Manufacturing – Project designs where the hardware will be built on a production line.
•
Hardware size -- (no connectors, peripheral devices and mainboards without sockets,
etc.)
•
Environmental concerns -- for instance if the project is embedded in a machine with
large vibrations (jackhammer, washing machine, suspension of a car)
•
Size of deployed code – The deployed applications are smaller when you bypass the
drivers and support code used by Gadgeteer
Early development is usually faster with Gadgeteer. Transforming the code to pure NETMF is
relatively easy.
In general, GHI's mainboards are built around small boards called “System on Modules.”
They are designed for easy incorporation into commercial products and a way to reduce the
physical size of any project.
BETA DRAFT 0.2
Page 44 of 54
www.GHIElectronics.com
GHI Electronics,LLC
FEZ Tinker Kit
Resources In The Cloud
9. Resources In The Cloud
At the time this book was written important webpages were:
Project source code for examples in this book are found at
https://www.ghielectronics.com/downloads/src/Tinker_Kit_Examples.zip
•
GHI Electronics' homepage:
https://www.ghielectronics.com
•
GHI's Support Page. Contains installation instructions, links to API reference libraries, etc.:
https://www.ghielectronics.com/support
•
The list of GHI's documentation:
https://www.ghielectronics.com/docs
•
Discussions, often in real-time, on all manner of subjects, with a focus on .NET Gadgeteer. This a
tremendous source of help and information:
https://www.ghielectronics.com/community/forum
•
All source code (open and free) for GHI Electronics' mainboards and modules:
https://bitbucket.org/ghi_elect/gadgeteer
•
Page with links to the most current version of this guide and to the guide's projects:
https://www.ghielectronics.com/support/gadgeteer
•
If you would rather program in Visual Basic, you may want to look at the book “Learn to program with
Visual Basic & .NET Gadgeteer”
http://blogs.msdn.com/b/net_gadgeteer/archive/2013/12/05/new-gadgeteer-book-learnto-program-with-visual-basic-amp-net-gadgeteer.aspx
BETA DRAFT 0.2
Page 45 of 54
www.GHIElectronics.com
GHI Electronics,LLC
FEZ Tinker Kit
Resources In The Cloud
•
GHI Electronics graphics framework “Glide”:
https://www.ghielectronics.com/glide
BETA DRAFT 0.2
Page 46 of 54
www.GHIElectronics.com
GHI Electronics,LLC
FEZ Tinker Kit
Updating Flash Software
10. Updating Flash Software
In all processors running NETMF there are a number of software components. Two of the
components (“TinyBooter” and “TinyCLR”) may need to be updated to be compatible with
your SDK.
Any time you receive a new SDK or a mainboard, you should follow the Compatibility test
shown below.
10.1. Check Firmware Compatibility with SDK
Step one is the same for all mainboards: use FEZ Config to check whether your mainboard
needs updating!!
FEZ Config is installed with the GHI SDK.
Connect the power supply to the mainboard. For most people this will be either the “USB
Client SP Module” or “USB Client DP Module” (the cable from the socket on the USB Client
board must be plugged into a socket on the mainboard labeled with a “D”).
Add an USB cable from the Client Module to the computer. This often results in Windows
having to load a device driver. If it does, do not proceed until the driver is fully loaded.
BETA DRAFT 0.2
Page 47 of 54
www.GHIElectronics.com
GHI Electronics,LLC
FEZ Tinker Kit
Updating Flash Software
Launch FEZ Config. Click on the Check device for update button.
The next few sections describe the steps needed to change TinyBooter and/or TinyCLR
IMPORTANT: if you need to update both TinyBooter and TinyCLR, always update TinyBooter first.
BETA DRAFT 0.2
Page 48 of 54
www.GHIElectronics.com
GHI Electronics,LLC
FEZ Tinker Kit
Updating Flash Software
10.2. Updating TinyBooter
At the time this book was written TinyBooter updating varied between processors. Plans were
underway to eliminate all differences. FEZ Config will always reflect the current instructions.
Directions for boards are found in the Advanced>Loader (TinyBooter)Update menu:
If the mainboard you are using is supported, just select it from the menu and carefully follow
the directions. As a convenience, if FEZ Config updates TinyBooter, it also updates
TinyCLR.
The example used below was written for a Tinker Kit using the FEZ Cerberus.
FEZ Cerberus TinyBooter Update
The loader on the Cerb Family is updated using ST Microelectronics's STDFU Tester
program. This program is installed by default with our SDK.
Under STMicroelectronics in the Start menu, run the STDFU Tester program.
The Cereberus main board must be put in a special mode for the STDFU tool to recognize it.
To do so, hold the LDR button on your board, power the board or press Reset, then release
LDR.
If your board lacks an LDR button, short the two pads labeled either LDR or BOOT (depending on your board)
together and then power/reset your board.
If you have a FEZ Cerb40 II, hold the LODR pin high and then power/reset the board.
You will see STM Device in DFU Mode appear under Device in the STDFU tool. Click the
BETA DRAFT 0.2
Page 49 of 54
www.GHIElectronics.com
GHI Electronics,LLC
FEZ Tinker Kit
Updating Flash Software
Protocol tab.
BETA DRAFT 0.2
Page 50 of 54
www.GHIElectronics.com
GHI Electronics,LLC
FEZ Tinker Kit
Updating Flash Software
Click the Create from Map button, select the Erase radio button, and then click Go. The program
will take a few moments to finish erasing.
Once you see that it has finished, click the Load DFU File button and select the C:\Program
Files (x86)\GHI Electronics\GHI NETMF v4.3 SDK\Firmwares\Cerb
Family\Loader.dfu file (substitute your SDK version for v4.3). Click the Download radio
button and then click Go.
The program will quickly load TinyBooter onto your board. Reboot your board after the DFU
outputs “Success.”
BETA DRAFT 0.2
Page 51 of 54
www.GHIElectronics.com
GHI Electronics,LLC
FEZ Tinker Kit
Updating Flash Software
10.3. Updating TinyCLR
FEZ Config is used to update TinyCLR. FEZ Config is designed to take you through the
steps, just click on Firmware Updater and click your way through the Next and Okay buttons, sit
back and watch the progress.
BETA DRAFT 0.2
Page 52 of 54
www.GHIElectronics.com
GHI Electronics,LLC
FEZ Tinker Kit
Revision History and Acknowledgments
11. Revision History And Acknowledgments
This book uses some content from the copyrighted publication(s) listed below:
•
Learn to program with Visual Basic & .NET Gadgeteer
Rev No.
Date
Modification
Beta Draft
0.3
11/14/2014
Split some examples. More memory tips
BETA
DRAFT 0.2
BETA DRAFT 0.2
Preliminary
Page 53 of 54
www.GHIElectronics.com
GHI Electronics,LLC
FEZ Tinker Kit
Legal Notice
12. Legal Notice
Disclaimer
IN NO EVENT SHALL GHI ELECTRONICS, LLC. OR ITS PARTNEERS BE LIABLE FOR
ANY DIRECT, INDIRECT, INCIDENTAL, SPECIAL, EXEMPLARY, OR CONSEQUENTIAL
DAMAGES (INCLUDING, BUT NOT LIMITED TO, PROCUREMENT OF SUBSTITUTE
GOODS OR SERVICES; LOSS OF USE, DATA, OR PROFITS; OR BUSINESS
INTERRUPTION) HOWEVER CAUSED AND ON ANY THEORY OF LIABILITY, WHETHER
IN CONTRACT, STRICT LIABILITY, OR TORT (INCLUDING NEGLIGENCE OR
OTHERWISE) ARISING IN ANY WAY OUT OF THE USE OF THIS PRODUCT, EVEN IF
ADVISED OF THE POSSIBILITY OF SUCH DAMAGE. SPECIFICATIONS ARE SUBJECT
TO CHANGE WITHOUT ANY NOTICE. GHI ELECTRONICS, LLC LINE OF PRODUCTS
ARE NOT DESIGNED FOR LIFE SUPPORT APPLICATIONS.
.NET Micro Framework, Visual Studio, IntelliSense and Windows are registered or
unregistered trademarks of Microsoft Corporation.
Other Trademarks and Registered Trademarks are Owned by their Respective Companies.
BETA DRAFT 0.2
Page 54 of 54
www.GHIElectronics.com


© Copyright 2026