
Instruction manual
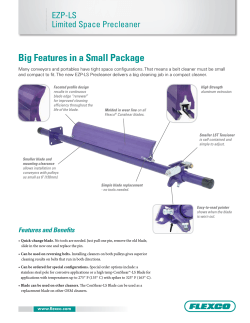
403021.qxp_Layout 1 28/10/2014 09:29 Page 1
FP403021 MUK Rev 1
YEAR
2
GUARANTEE
Please read and keep these instructions for future use
For competitions, product hints and tips
and more join us at
www.morphyrichards.co.uk/blog
www.facebook.com/morphyrichardsuk
@loveyourmorphy
* Register online for your 2 year guarantee. See the back of this instruction book for details (UK and Ireland customers only).
403021.qxp_Layout 1 28/10/2014 09:29 Page 2
Health And Safety
The use of any electrical appliance requires the following common sense safety rules.
Please read these instructions carefully before using the product.
• This appliance shall not be used by children. Keep the appliance
and its cord out of the reach of children.
• Appliances can be used by persons with reduced physical,
sensory or mental capabilities or of experience and knowledge if
they have been given supervision or instruction concerning use of
the appliance in a safe way and if they understand the hazards
involved.
• Children shall not play with the appliance.
• Unplug from the outlet when not in use, or when left
unattended, and before assembling, disassembling or cleaning.
• Only use for the maximum time specified in the manual before
allowing to cool.
• If the supply cord is damaged, it must be replaced by the
manufacturer, its service agent or similarly qualified
persons in order to avoid a hazard.
Location
• This appliance is intended to be used in household and
similar applications.
• Do not use outdoors or in a bathroom.
Personal safety
• Avoid touching moving parts. Keep hands, hair and
clothing, and utensils away from the blender
attachment blades during operation, to prevent personal
injury and/or damage to the appliance.
Other safety considerations
• The use of attachments or tools not recommended or
sold by Morphy Richards may cause fire, electric shock
or injury.
• Do not use the appliance for anything other than its
intended purpose.
Product specific safety
• WARNING: The blender blades are very sharp. Handle
with care when using, emptying and cleaning.
• WARNING: To protect against fire, electric shock and
personal injury, do not immerse the cord, plug or blender
in water or other liquid.
2
• Do not clean the attachments under running water while
they are in position.
• Do not use the appliance if the Juice Filter is damaged.
• Make sure the blender is switched off before connecting
to or disconnecting from the mains supply and when left
unattended.
• Switch off the appliance and disconnect from the supply
before changing accessories or approaching parts that
move in use.
• Do not use hot liquids in the blender as it can be ejected
out of the appliance due to sudden steaming.
Electrical requirements
• Check that the voltage on the rating plate of your
appliance corresponds with your house electricity supply
which must be A.C. (Alternating Current).
• Should the fuse in the mains plug require changing, a 3
amp BS1362 fuse must be fitted.
403021.qxp_Layout 1 28/10/2014 09:29 Page 3
Introduction
Thank you for purchasing your new Morphy Richards Easy Blend Deluxe.
Your Easy Blend Deluxe will allow you to create an extensive selection of
sauces, dips, rubs and drinks.
Please read the instructions thoroughly before use.
Remember to visit www.morphyrichards.co.uk to register your
products two year guarantee.
Contents
Health And Safety ........................................................
2
Introduction ..................................................................
3
Features .......................................................................
4
Before First Use ..........................................................
5
Using The Easy Blend Beakers ...................................
5
Safety Seal ..................................................................
6
Usage ...........................................................................
6
Crushing Ice .................................................................
6
Grinding Spices ...........................................................
6
Using The Easy Blend Juicer ......................................
8
Suitable Foods ............................................................. 10
Beakers, Lids And Jug ................................................. 10
Blending In The Jug ....................................................
10
Blades ......................................................................... 10
Hints And Tips For Juicing .......................................... 10
General Hints And Tips ............................................... 11
Care And Cleaning ....................................................... 11
Contact Us ................................................................... 11
Guarantee ..................................................................... 12
3
403021.qxp_Layout 1 28/10/2014 09:29 Page 4
Product Overview
2
4
5
1
8
2
3
4
12
6
9
5
7
10
17
13
11
14
15
16
18
Features
4
(1)
Pusher
(10) Flat Lid
(2)
Juicer Lid
(11) 300ml Beaker
(3)
Filter
(12) Straw Lid (x2)
(4)
Spout
(13) 500ml Beaker (x2)
(5)
Jug
(14) Quad Blade Lid
(6)
Main Unit
(15) Dual Blade Lid
(7)
Speed Control
(16) Safety Seal
(8)
Sports Lid (x2)
(17) 30ml Measuring Cap
(9)
750ml Beaker (x2)
(18) Straw (x2)
403021.qxp_Layout 1 28/10/2014 09:30 Page 5
Before First Use
WARNING: Sharp blades, handle with care.
1.
Before using for the first time or if un-used for a
long period, wash your Easy Blend Deluxe
thoroughly before use.
Remove the Safety Seals (16) from the Blade Lids
(14), (15).
2.
Wash all parts except the Main Unit (6) in hot
soapy water and dry thoroughly. Do not allow the
Blade Lids to stand in water.
Using Your Easy Blend Beakers
1
WARNING: Ensure your Easy Blend is
unplugged from the mains before use.
2
Add the ingredients to the desired Beaker (9),
(11) or (13). Do not exceed the maximum level
for the chosen beaker.
3
Ensure the Safety Seal (16) is fitted correctly
in the Quad Blade Lid (14). Attach to the
Beaker, screw to fix into place securely.
5
Plug into the mains. Turn the Speed Control
(7) to the desired speed High (II), Low (I), or
Pulse (P). Your Easy Blend will begin to blend.
4
Attach the Blade Lid to the Main Unit (6). Align
the open padlock and arrow and twist to lock
into place.
6
When finished, turn the Speed Control to the
Off (O) position and unplug from the mains.
5
403021.qxp_Layout 1 28/10/2014 09:30 Page 6
7
Hold the Blade Lid and twist to unlock from
the Main Unit. DO NOT hold the Beaker.
8
Unscrew the Blade Lid from the Beaker. For
drinks on the go, attach a Lid (8), (10), (12) to
the Beaker.
• Always ensure the Safety Seal is in place before
use. Failure to do so could cause damage to the
appliance.
Safety Seal
• The Safety Seal only needs to be removed for
cleaning. After cleaning ensure the seal is
reinserted as directed before using the Easy
Blend.
Usage
After 40 seconds of continuous use, you will need
to switch off your Easy Blend and leave to cool
for 5 minutes to prevent overheating.
• There is a Safety Seal (16) in place on both the
Blade Lids (14), (15). This is to prevent leakage
from your Easy Blend when in use and for when
the Beaker (9), (11), (13) is upside down.
• When inserting the Safety Seal, ensure that it is
pressed tightly into the channel in the Blade Lid.
Ensure the Safety Seal is correctly located before
the Beaker or Jug (5) is screwed onto the Blade
Lid.
• After screwing the Blade Lid onto the Beaker or
Jug, look inside to check the Safety Seal is
securely fitted before attaching to the Main Unit.
For Juicing, after 60 seconds of continuous use,
switch off and leave to cool for 30 seconds.
Crushing Ice
• If using ice in a recipe (i.e. blending it with other
liquids). Do not use more than 6 ice cubes.
• Only crush ice as part of the recipe - do not crush
ice on its own.
Grinding Spices
1
WARNING: Ensure your Easy Blend is
unplugged from the mains before use.
6
2
Add the ingredients to the 300ml Beaker (11).
Do not exceed the maximum level.
403021.qxp_Layout 1 28/10/2014 09:30 Page 7
3
4
Ensure the Safety Seal (16) is fitted correctly
in the Quad or Dual Blade Lid (14), (15).
Attach the selected Blade Lid to the Beaker.
Screw to fix into place securely.
Attach the Lid to the Main Unit (6). Align the
open padlock and arrow and twist to lock into
place.
5
6
Plug into the mains. Turn the Speed Control
(7) to the desired speed High (II), Low (I), or
Pulse (P). Your Easy Blend will begin to grind.
7
It may be necessary to shake your Easy Blend
to loosen the spices when grinding.
When finished, turn the Speed Control to the
Off (O) position and unplug from the mains.
8
Hold the Blade Lid and twist to unlock from the
Main Unit. DO NOT hold the Beaker.
7
403021.qxp_Layout 1 28/10/2014 09:30 Page 8
Using Your Easy Blend Juicer
1
WARNING: Ensure your Easy Blend is
unplugged from the mains before use.
Ensure the Safety Seal (16) is fitted correctly
to the Quad Blade Lid (14). Attach the Quad
Blade Lid to the Jug (5). Screw to fix into
place securely.
3
Attach the Quad Blade Lid to the Main Unit
(6). Align the open padlock and arrow and
twist to lock into place.
4
Insert the Filter (3) into the Jug. Align the black
frame with the lines in the Jug. The four lines
on the inside of the Jug will line up with the
four cut-outs on the base of the Filter.
5
Attach the Juicer Lid (2). Twist clockwise to
lock, aligning the grate with the spout of the
Jug. The Juicer Lid will not fit the Jug
correctly if the Filter is not properly inserted.
8
2
6
Plug into the mains. Turn the Speed Control (7)
to High (II).
403021.qxp_Layout 1 28/10/2014 09:30 Page 9
7
Add a small amount of fruit or vegetables to
the Jug, do not over fill.
If required, gently press down with the Pusher
(1) pushing the fruit or vegetables into the
blades.
9
Do not run for more than 60 seconds, switch
off your Easy Blend and wait 30 seconds
before continuing.
11
If the Jug becomes full, switch off, unscrew from
the Main Unit (see step 13) and decant before
continuing. Mix the juices together before
drinking for a better flavour.
13
Hold the Blade Lid and twist to unlock from
the Main Unit. DO NOT hold the Jug.
8
10
When adding fruit for juicing, do not look into
the Lid while your Easy Blend is running as
‘spitting’ may occur. Switch off before looking
into the top of the Jug.
12
When finished, turn the Speed Control to the
Off (O) position and unplug from the mains.
14
Pour the juice from the Jug and dismantle for
cleaning. Clean the Filter immediately after use.
9
403021.qxp_Layout 1 28/10/2014 09:30 Page 10
Suitable Foods
Blending In The Jug
Blending
1.
Your Easy Blend Deluxe is ideal for blending a
wide range of foods, including fruit and dairy.
However it is NOT suitable for the following uses:
Follow steps 1-3 of ‘Using your Easy Blend
Juicer.’
2.
Add your ingredients to the Jug (5), Do not over
fill. The Jug has a maximum capacity of 750ml.
14
• Grinding or mashing heavy foods (e.g. potatoes
or meat).
• Stirring thick mixtures (eg dough).
Grinding
The spice mixes produced are best made with
the Dual Blade (15). When grinding garlic or
ginger however, the Quad Blade (14) should be
used.
Juicing
3.
• A wide range of fruits can be juiced, however it
should be prepared correctly before juicing. Your
Easy Blend Deluxe is unable to separate citrus
peel or pith from fruit so it should be removed
and flesh cut into segments prior to juicing.
Ensure the Measuring Cap and Lid are fixed
in place securely.
• DO NOT juice hard vegetables (turnip, carrot
potatoes, uncooked beetroot etc).
4.
Blend as normal (Steps 5-6 of ‘Using your Easy
Blend Beakers’ on page 5).
• Cut all fruit and vegetables into segments or thin
sticks before juicing.
5.
Before pouring your drink from the Jug, detach
from the Main Unit (6).
Beakers, Lids And Jug
Your Easy Blend comes with 5 beakers of varying
capacity.
Blending beakers (9), (11), (13)
There are 3 sizes of blending beakers supplied.
300ml (11), 500ml (13) and 750ml (9). Do not
overfill. The Beakers have 3 separate Lids, all are
interchangeable between the different sizes. We
recommend grinding spices or coffee in the
300ml capacity beaker.
Lids (8), (10), (12)
There are three types of beaker lids supplied. All
the lids are compatible with all the beakers. Use
the Sports (8) and Straw Lids (12) for drinks on
the go. Use the Flat Lid (10) to store rubs,
marinades and sauces.
Jug (5)
The Jug supplied is for use with the Juicing
process, as depicted on page 8-9. It has a
maximum capacity of 750ml. You can also use the
Jug to blend smoothies and milkshakes by
following the steps detailed to the right.
10
Insert the Measuring Cap (17) into the Juicer Lid
(2) twist to lock into place. Attach the Lid to the
Jug ensuring the blank side of the Lid is aligned
with the spout (not the grate). See above.
Blades
Your Easy Blend comes with 2 separate Blade
Lids.
Quad Blade (14)
The Quad Blade is designed for blending and
mixing wet ingredients such as fruit or
vegetables. This blade should be used for making
smoothies or juicing.
Dual Blade (15)
The Dual Blade is designed for use with dry
ingredients like coffee beans or herbs and spices.
Note: neither blade is suitable for blending bone,
potatoes, dough or heavy foods.
Hints And Tips For Juicing
• Prepare all the ingredients first and have them
conveniently placed near the appliance, this will
ensure you keep the juicing time short. Do not
exceed 550g of prepared fruit for juicing.
• The recipe cards supplied should give you 1 glass
(approximately 200ml) of fresh juice depending
on the condition of the fruits used.
403021.qxp_Layout 1 28/10/2014 09:30 Page 11
• If you should need to juice for more than 1
minute, switch off, allow to rest for 30 seconds,
continue for a further 30 seconds if required. Do
not exceed this 1 minute run time as permanent
damage could be caused to the motor and blade
bearing.
• When removing the Jug from the Main Unit (6),
ensure you do not unscrew the jar from the Blade
Lid. Support the Blade Lid if you see it turning,
leakage will occur if you allow this to happen.
Care And Cleaning
It is important to clean your Easy Blend Deluxe
immediately after use.
1.
Switch your Easy Blend Deluxe off and unplug
from the mains outlet.
2.
Remove the Safety Seal (16) from the Blade Lids
(14), (15).
WARNING: Extreme care must be taken when
washing the metal blades as they are sharp.
• When pouring juice out keep the pusher in place
to retain the pulp.
• After pouring the juice out into a glass allow the
pulp to stand in the jug for 2 minutes, this will
allow more juice to flow through the Filter mesh
(3).
3.
Wash all parts except the Main Unit (6) in hot
soapy water, dry thoroughly. Do not allow the
Blade Lid to stand in water.
A small brush can be used to remove food from
under the blade on the Blade Lids and the
Filter (3).
General Hints And Tips
4.
• Use the Pulse speed setting (P) for short periods
of up to 10 seconds. For longer periods of time
blending, use Speed II.
Replace the Safety Seal into the Blade Lids
before use. Ensure the Safety Seal is correctly
located before the Beaker is screwed onto the
Blade Lid.
5.
Clean the Main Unit with a damp cloth. Do not
immerse in water.
• When removing the Beaker from the Main Unit (6)
hold the edge of the Blade Lid and twist. DO NOT
hold the Beaker.
• The Beakers (9),(11),(13), and Lids (8),(10),(12),
are dishwasher safe, place on the top shelf on a
cool wash only.
• To reduce the thickness of a smoothie, use the
Pulse setting.
• If using seeded berries, you may wish to sieve the
drink before serving for a smoother consistency.
WARNING: Always unplug the appliance before
cleaning.
• Ripe bananas give a much better, sweeter flavour
than green ones.
Contact Us
• Pineapple should be fresh, with all skin removed.
• Mango should be ripe, peeled and de-stoned.
• Remove the peel and pith from citrus fruit to
avoid a bitter tasting juice and damaging the Easy
Blend Deluxe.
• Soak fresh ginger in cold water for a few minutes
before use for a milder flavour.
• Ingredients at room temperature will give a higher
juice yield than those used straight from the
refrigerator.
• Tomatoes produce a thick juice, adding a few
grapes will dilute the drink and add sweetness.
• Use seasonal ingredients to add variety to your
fruit juices.
• Add a few herbs to vary the flavour or add a
handful of kale for a healthier option.
• Remove the skin from cucumber to alleviate the
bitterness.
Helpline
If you are having a problem with your appliance,
please call our Helpline, as we are more likely to
be able to help than the store you purchased the
item from.
Please have the product name, model number
and serial number to hand when you call to help
us deal with your enquiry more quickly.
UK Helpline: 0344 871 0944
IRE Helpline: 1800 409 119
Spares:
0344 873 0710
Talk To Us
If you have any questions or comments, or want
some great tips or recipe ideas to help you get
the most out of your products, join us online:
Blog:
www.morphyrichards.co.uk/blog
Facebook: www.facebook.com/morphyrichardsuk
Twitter:
@loveyourmorphy
Website:
www.morphyrichards.com
11
403021.qxp_Layout 1 28/10/2014 09:30 Page 12
FP403021 MUK Rev 1 10/14
Registering your 2 year
guarantee
Exclusions
Your standard one year guarantee is extended for an
additional 12 months when you register the product within
28 days of purchase with Morphy Richards. If you do not
register the product with Morphy Richards within 28 days,
your product is guaranteed for 1 year. To validate your
2 year guarantee register with us online at
www.morphyrichards.co.uk
Or call our customer registration line
1 The fault has been caused or is attributable to accidental
use, misuse, negligent use or used contrary to the
manufacturer’s recommendations or where the fault has
been caused by power surges or damage caused in
transit.
2 The appliance has been used on a voltage supply other
0344 871 0242
1800 409 119
UK
IRE
Morphy Richards shall not be liable to replace or repair the
goods under the terms of the guarantee where:
than that stamped on the products.
3 Repairs have been attempted by persons other than our
N.B. Each qualifying product needs to be registered with
Morphy Richards individually.
Please note that the 2 year guarantee is only available in
the UK and Ireland. Please refer to the one year guarantee
for more information.
service staff (or authorised dealer).
4 The appliance has been used for hire purposes or non
domestic use.
5 The appliance is second hand.
6 Morphy Richards reserves the right not to carry out any
Your 1 year guarantee
type of servicing under the guarantee at its discretion
7 Batteries and damage from leakage are not covered by
It is important to retain the retailer’s receipt as proof of
purchase. Staple your receipt to this back cover for future
reference.
the guarantee.
• This guarantee does not confer any rights other than those
Serial no.
expressly set out above and does not cover any claims for
consequential loss or damage. This guarantee is offered
as an additional benefit and does not affect your statutory
rights as a consumer. Morphy Richards products are
intended for household use only. See usage limitations
within the location safety instructions.
All Morphy Richards products are individually tested before
leaving the factory. In the unlikely event of any appliance
proving to be faulty within 28 days of purchase, it should
be returned to the place of purchase for it to be replaced.
Disclaimer
Please quote the following information if the product
develops a fault. These numbers can be found on the base
of the product.
Model no.
If the fault develops after 28 days and within 12 months of
original purchase, you should contact the Helpline number
quoting Model number and Serial number on the product,
or write to Morphy Richards at the address shown.
You may be asked to return a copy of proof of purchase.
Subject to the exclusions set out below (see Exclusions),
the faulty appliance will then be repaired or replaced as
appropriate and dispatched usually within 7 working days
of receipt.
If, for any reason, this item is replaced or repaired during
the 1 year guarantee period, the guarantee on the new
item will be calculated from original purchase date.
Therefore it is vital to retain your original till receipt or
invoice to indicate the date of initial purchase.
Morphy Richards has a policy of continuous improvement
in product quality and design. The company, therefore
reserves the right to change the specification of
its models at any time.
For electrical products sold within the
European Community. At the end of the
electrical products useful life, it should not be
disposed of with household waste.
Please recycle where facilities exist. Check with
your Local Authority or retailer for
recycling advice in your country.
To qualify for the 1 year guarantee, the appliance must
have been used according to the instructions supplied.
IF YOU ARE HAVING A PROBLEM
WITH ONE OF OUR PRODUCTS, CALL
OUR HELPLINE:
The After Sales Division
Morphy Richards Ltd
Mexborough, South Yorkshire,
England, S64 8AJ
UK:
EIRE:
SPARES:
Helplines (office hours)
UK 0344 871 0944
Spare Parts 0344 873 0710
Republic of Ireland 1800 409 119
www.morphyrichards.com
0344 871 0944
1800 409 119
0344 873 0710


© Copyright 2026